|
|
|
Porsche, and the Porsche crest are registered trademarks of Dr. Ing. h.c. F. Porsche AG.
This site is not affiliated with Porsche in any way. Its only purpose is to provide an online forum for car enthusiasts. All other trademarks are property of their respective owners. |
|
|

  |

| tornik550 |
 Jun 29 2010, 06:02 AM Jun 29 2010, 06:02 AM
Post
#41
|
|
Senior Member  Group: Members Posts: 1,248 Joined: 29-January 07 From: Ohio Member No.: 7,486 Region Association: None |
Mine do say Made in Italy (is that good or bad). The butterfly issue does make perfect sense. I'm going to tear into them tonight and find out. I do remember that when I rebuilt them I had issues getting the butterflies in correctly.
Does anybody know if the screws that hold the butterflies in place are something I can get at a local hardware or is it a special order type thing? I am so great full for everyones help (especially JMill). I am not sure what I can do to help everybody else but if I can please let me know. |
   |

 
|
| jmill |
Jun 29 2010, 06:17 AM
Post
#42
|
|
Green Hornet Group: Members Posts: 2,449 Joined: 9-May 08 From: Racine, Wisconsin Member No.: 9,038 Region Association: Upper MidWest |
Made in Italy is a good thing. Chances are that it's an assembly error on your part rather than poor machining on theirs.
I'd get the screws from Weber. They are metric brass machine screws. Unless you have a fantastic hardware store I doubt they will have what you need. |
|
|
|
| jmill |
Jun 29 2010, 09:00 AM
Post
#43
|
|
Green Hornet Group: Members Posts: 2,449 Joined: 9-May 08 From: Racine, Wisconsin Member No.: 9,038 Region Association: Upper MidWest |
One more thought. IIRC the butterfly plates are machined with a slight angle on them already so they fit the bore tight. I have triple webers at the house and don't have IDFs anymore so I can't check for sure. Check to see on yours. If they are indeed machined with a slight angle you might have the plates 180 out. This would cause them to hang up high and leave a port open below the butterfly.
|
|
|
|
| rhodyguy |
Jun 29 2010, 10:31 AM
Post
#44
|
|
Chimp Sanctuary NW. Check it out. Group: Members Posts: 22,063 Joined: 2-March 03 From: Orion's Bell. The BELL! Member No.: 378 Region Association: Galt's Gulch |
i just checked a set of 40s that i have. there is a bevel and the throttle plates(butterflies) are installed the orientation as pictured in the diagram. there is also a stamping of 76* on the bottom side of the throttle plates. interesting that the bevels are cut in the opossite taper on either side of the shaft. installed wrong and it the thin edge of the plates would make for the sealing line instead of the broader edge the taper would provide and the plates seem like they would ride higher when closed.
|
|
|
|
| jmill |
Jun 29 2010, 10:53 AM
Post
#45
|
|
Green Hornet Group: Members Posts: 2,449 Joined: 9-May 08 From: Racine, Wisconsin Member No.: 9,038 Region Association: Upper MidWest |
Thanks for checking that out. (IMG:style_emoticons/default/beerchug.gif) Whats really important is what direction the 76 faces. You can flip them upside down all day and the same bevel angle will meet the carb bore. If you hold the plate flat and rotate it to have the 76 face the other way you will reverse the bevel angle that meets the carb bore. Just remember that the hole drilled in the plate will be on the side opposite of the mixture screw.
|
|
|
|
| rhodyguy |
Jun 29 2010, 11:01 AM
Post
#46
|
|
Chimp Sanctuary NW. Check it out. Group: Members Posts: 22,063 Joined: 2-March 03 From: Orion's Bell. The BELL! Member No.: 378 Region Association: Galt's Gulch |
no hole in the plates on these italians but the 76* is on the side of the carb opposite the idle air mixture screws. that would be the inside of the shaft if the carb was installed.
|
|
|
|
| tornik550 |
Jun 29 2010, 07:42 PM
Post
#47
|
|
Senior Member Group: Members Posts: 1,248 Joined: 29-January 07 From: Ohio Member No.: 7,486 Region Association: None |
I just got back inside from examining my butterflies. I believe that I have a combo of issues. It appears that 3 of the 4 butterflies were very slightly misaligned. I was able to realign all of them and they seem to close and cover all progression holes. Now I am having another issue however I am pretty sure I know what the problem is this time.
After re-aligning the butterflies, I set the idle mixture screws at 1/2 turn and the idle speed screws at 1/2 turn after light contact with the lever- wouldn't start. I tried different scenarios of backing out the idle mixture screws and turning the idle speed screws in. Basically once I advanced the idle speed screws to about 1 3/4 - 2 turns, the car would start without difficulty however I was shooting black smoke out. I turned the idle mixture screws in all the way and the engine would not run (unless I turned up the idle speed screws- opening up the progression ports). I opened the idle mixture screws about 1/10 of a turn and the car ran great, no smoke. SO am I correct in assuming that this means that my idle jets are to big? If so, I am in luck because I have smaller jets on order. Also, does turning the idle speed screws to about 1 3/4 - 2 turns sound reasonable (I get an idle of about 1000 with this)? I am absolutely amazed with the wonderful help that has been provided here. THank you!!! (IMG:style_emoticons/default/beerchug.gif) |
|
|
|
| jmill |
Jul 1 2010, 06:47 PM
Post
#48
|
|
Green Hornet Group: Members Posts: 2,449 Joined: 9-May 08 From: Racine, Wisconsin Member No.: 9,038 Region Association: Upper MidWest |
You really want to keep the butterflies as close to closed as you can. My goal was to get it idling nice when the screws just touched. It's not usually possible but it's nice to shoot for. As you open the butterflies you move off the idles and onto the progression ports. 1000 RPM is too high. You should be able to get it down to 800.
1/10 of a turn is very little. Those idle jets you have now would have to be bored out pretty big. I have my fingers crossed that the new jets will fix you up. What size did you order? |
|
|
|
| tornik550 |
Jul 1 2010, 06:49 PM
Post
#49
|
|
Senior Member Group: Members Posts: 1,248 Joined: 29-January 07 From: Ohio Member No.: 7,486 Region Association: None |
I ordered 40s. I figured that I can bore them out if needed. I just found my problem. JMill get the trophy. I will post pics to explain shortly.
|
|
|
|
| tornik550 |
Jul 1 2010, 07:01 PM
Post
#50
|
|
Senior Member Group: Members Posts: 1,248 Joined: 29-January 07 From: Ohio Member No.: 7,486 Region Association: None |
Heres the answer. JMill had told my to check to make sure the idle air jets were patent. They were patent but-
|
|
|
|
| tornik550 |
Jul 1 2010, 07:02 PM
Post
#51
|
|
Senior Member Group: Members Posts: 1,248 Joined: 29-January 07 From: Ohio Member No.: 7,486 Region Association: None |
The problem
Attached image(s) 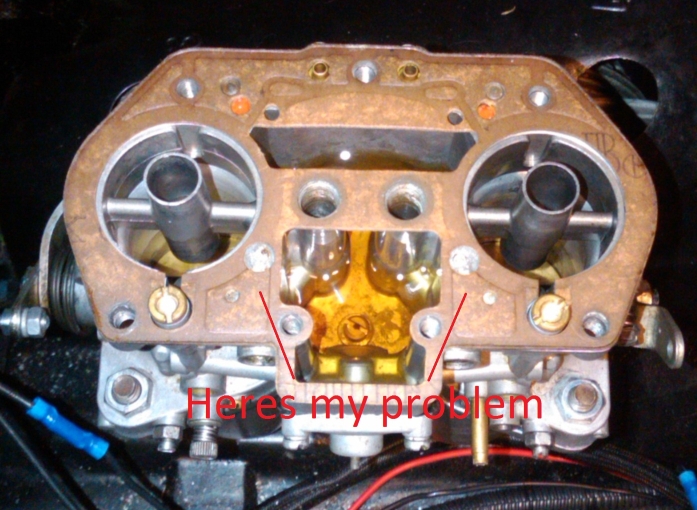
|
|
|
|
| tornik550 |
Jul 1 2010, 07:03 PM
Post
#52
|
|
Senior Member Group: Members Posts: 1,248 Joined: 29-January 07 From: Ohio Member No.: 7,486 Region Association: None |
The Solution
Attached image(s) 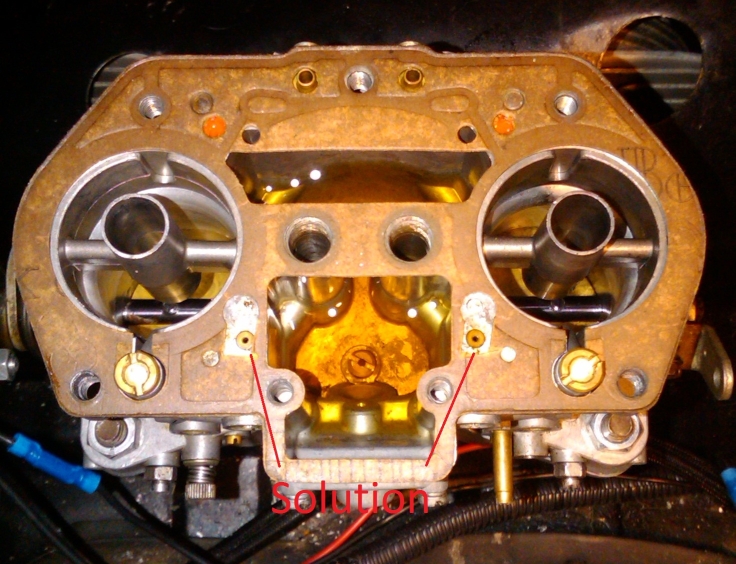
|
|
|
|
| tornik550 |
Jul 1 2010, 07:04 PM
Post
#53
|
|
Senior Member Group: Members Posts: 1,248 Joined: 29-January 07 From: Ohio Member No.: 7,486 Region Association: None |
I am really kicking myself for not seeing this. Anyways, that you to everyone for their help. I think that I am probably get things tuned ok from here.
|
|
|
|
| FourBlades |
Jul 1 2010, 08:16 PM
Post
#54
|
|
From Wreck to Rockin Group: Members Posts: 2,054 Joined: 3-December 07 From: Brevard, FL Member No.: 8,414 Region Association: South East States |
No wonder you were not getting enough air into the mix... You should be in better shape now. John |
|
|
|
| jmill |
Jul 1 2010, 09:34 PM
Post
#55
|
|
Green Hornet Group: Members Posts: 2,449 Joined: 9-May 08 From: Racine, Wisconsin Member No.: 9,038 Region Association: Upper MidWest |
I bet it'll run great now. (IMG:style_emoticons/default/cheer.gif)
|
|
|
|
| 7275914911 |
May 22 2012, 05:10 PM
Post
#56
|
|
Hummmm!!! Group: Members Posts: 756 Joined: 7-May 08 From: Mid-South Member No.: 9,028 Region Association: South East States |
Man this place just continues to amaze me!! I have had a rich running condition in my 40idfs since I have had them. No matter the jetting. This thread got me to thinking hummmmm.....
Well look what I found!!  Found these in a rebuild kit but are the floats going to work properly and they don't fit the throats that well?? 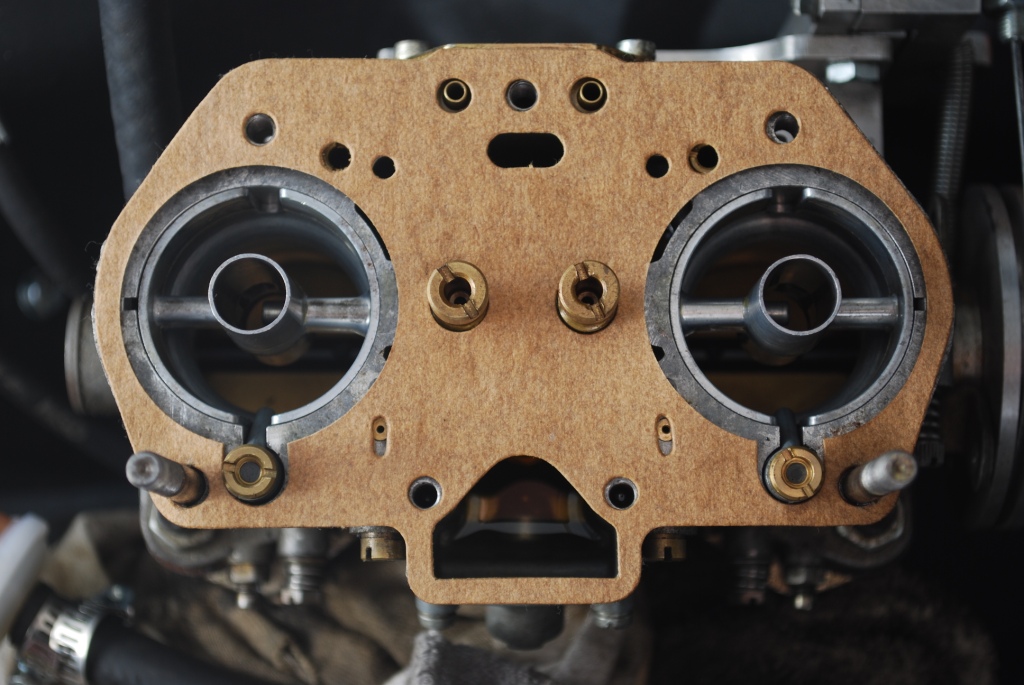 Or should I just modify the old gasket as tornik has?? Damn it just amazes me at the answers that can be found at the World. I finally found a rich running LJet problem after practically replacing everything. I found the answer from a post just like this. My LJet did not like a relay in the FP spot on relay board eventho it should not have mattered in the least. It did, Go figure... (IMG:style_emoticons/default/aktion035.gif) THX John....I actually had two other gaskets that are correct for the 40s. The one in pic did not have slot/hole for enrichment tubes and like you said 44 throat size... |
|
|
|
| VaccaRabite |
May 22 2012, 07:13 PM
Post
#57
|
|
En Garde! Group: Admin Posts: 13,426 Joined: 15-December 03 From: Dallastown, PA Member No.: 1,435 Region Association: MidAtlantic Region |
Well... shit.
I bet this was the root of the super rich idle i had with IDF 40s, and the reason I gave up on them to start the EFI conversion.... Learn something new every day... Zach |
|
|
|
| jmill |
May 22 2012, 09:22 PM
Post
#58
|
|
Green Hornet Group: Members Posts: 2,449 Joined: 9-May 08 From: Racine, Wisconsin Member No.: 9,038 Region Association: Upper MidWest |
QUOTE(7275914911 @ May 22 2012, 06:10 PM)  Found these in a rebuild kit but are the floats going to work properly and they don't fit the throats that well?? Or should I just modify the old gasket as tornik has?? I'd modify the old ones. A hole punch works. The new gaskets you have look like they are for 44's which is unusual. Usually the kits come with 40 size gaskets and you have to cut them larger to fit 44's. |
|
|
|
| rhodyguy |
May 23 2012, 08:36 AM
Post
#59
|
|
Chimp Sanctuary NW. Check it out. Group: Members Posts: 22,063 Joined: 2-March 03 From: Orion's Bell. The BELL! Member No.: 378 Region Association: Galt's Gulch |
HUGE deal with the o-rings. they rest in the recess in the opening. don't put them on the screws and then run the screws in. there should also be curved washers with a hole for the idle air mixture screws to pass thru that cover the o-rings. are the springs for the iams in place? inspect the needle end of the screws looking for rings/wear on the tapered end that result from the screws being run in to tightly. i think if you have adj the air by-pass screws w/o the o-rings you'll need to baseline those again and repeat the 'fine tune' procedure.
k |
|
|
|
| aharder |
May 23 2012, 08:45 AM
Post
#60
|
|
Advanced Member Group: Members Posts: 4,374 Joined: 6-September 11 From: Dallas Texas Member No.: 13,524 Region Association: Southwest Region |
QUOTE(Vacca Rabite @ May 22 2012, 08:13 PM) Well... shit. I bet this was the root of the super rich idle i had with IDF 40s, and the reason I gave up on them to start the EFI conversion.... Learn something new every day... Zach I think I will open them up and take a look (IMG:style_emoticons/default/screwy.gif) |
 |
|
|
1 User(s) are reading this topic (1 Guests and 0 Anonymous Users)
0 Members:

|
Lo-Fi Version | Time is now: 28th April 2024 - 07:43 AM |
Invision Power Board
v9.1.4 © 2024 IPS, Inc.