|
|
|
Porsche, and the Porsche crest are registered trademarks of Dr. Ing. h.c. F. Porsche AG.
This site is not affiliated with Porsche in any way. Its only purpose is to provide an online forum for car enthusiasts. All other trademarks are property of their respective owners. |
|
|

  |

| nsr-jamie |
 Jun 19 2010, 10:41 PM Jun 19 2010, 10:41 PM
Post
#1
|
|
914 guy in Japan  Group: Members Posts: 1,182 Joined: 7-November 07 From: Nagoya, Japan Member No.: 8,305 Region Association: None |
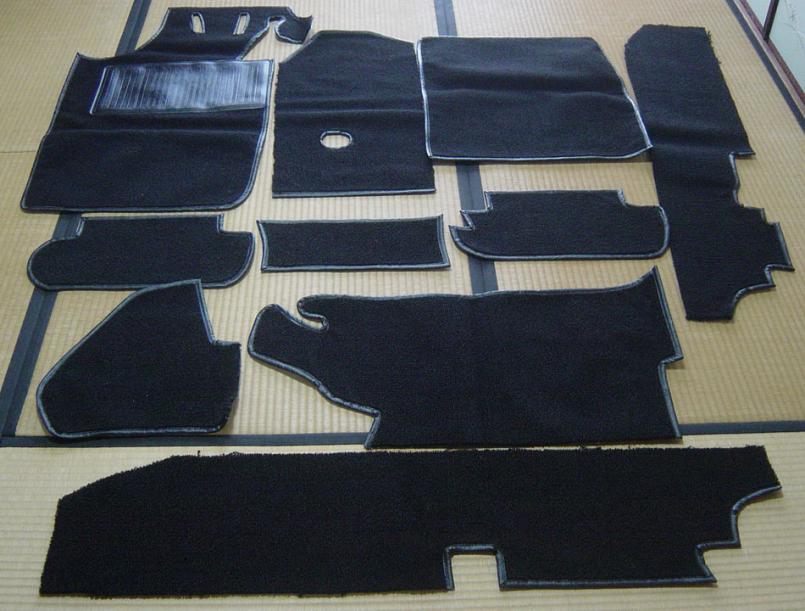 Hello, I recently bought a new loop carpet kit in black from our friends at A and P. They look quite nice and for the price you can't complain. How hard is it to install carpet kits in the 914? I have read in some of the catalogs that professional installation is recommended. I have absolutely no experience at all when it comes to carpets, but I thought I would at least give it a try. Any tips or advice or pointers before I start. Also I don't have the stock carpets in the car so I am not sure how and where they fit it. My car had a huge single carpet installed a few years ago and its awful and I want to go back to a semi stock look. Here is a picture of the carpets since people like pictures so much. What kind of glue should I use? Any help would be appreciated, thank you Jamie |
   |

 
|
| nsr-jamie |
Jun 19 2010, 10:44 PM
Post
#2
|
|
914 guy in Japan Group: Members Posts: 1,182 Joined: 7-November 07 From: Nagoya, Japan Member No.: 8,305 Region Association: None |
Another problem I am having cause I don't have the original carpets to pull out is finding out which way they fit in....so I took the same picture and added some numbers so hopefully some owners can give me some advice.
#1, #2 and #3 are pretty obvious, but not sure which direction if front or back on #3 (round corners to the front of car or square corners to the front?) #4 and #10 look to run down the sides....which side gpes on the ebrake side? The rest of them I am not really sure off so I thought I would ask here before attempting anything. Thanks for any help Cheers (IMG:style_emoticons/default/beerchug.gif) Attached thumbnail(s) 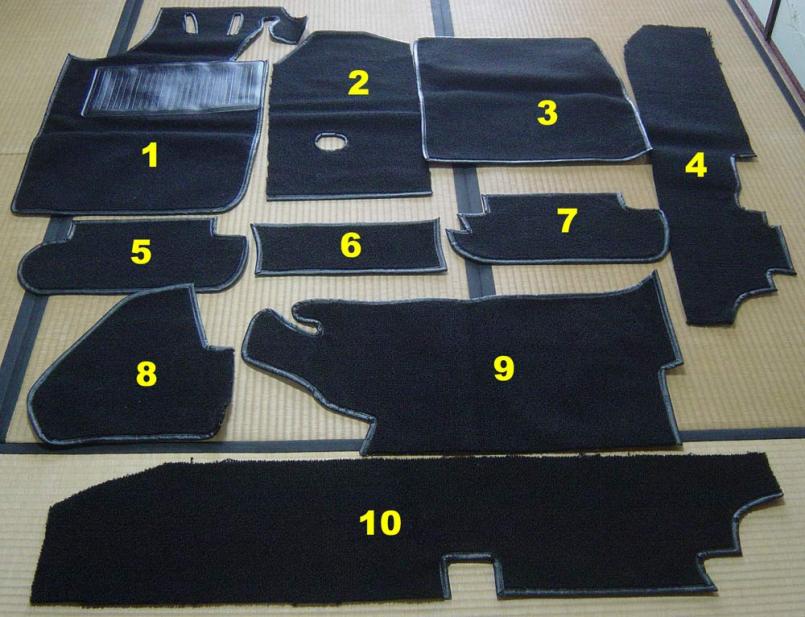
|
|
|
|
| montoya 73 2.0 |
Jun 19 2010, 11:04 PM
Post
#3
|
|
Lack of consideration to others, and Selfish! Group: Members Posts: 1,791 Joined: 27-October 04 From: Paso Robles, Ca. Member No.: 3,016 Region Association: Central California |
QUOTE(nsr-jamie @ Jun 19 2010, 09:44 PM)  Another problem I am having cause I don't have the original carpets to pull out is finding out which way they fit in....so I took the same picture and added some numbers so hopefully some owners can give me some advice. #1, #2 and #3 are pretty obvious, but not sure which direction if front or back on #3 (round corners to the front of car or square corners to the front?) #4 and #10 look to run down the sides....which side gpes on the ebrake side? The rest of them I am not really sure off so I thought I would ask here before attempting anything. Thanks for any help Cheers (IMG:style_emoticons/default/beerchug.gif) #4 - Drivers side #5 - behind #6 - center seat cushion area #7 - behind drivers seat #8 - drivers side footwell behind speaker (Up and to the left of #1) #9 - Passenger side footwell (above #3) the upper left notch is for the steering shaft. The rough ends get tucked under the mating carpet pieces. Unless I'm wrong someone will say. Edit: Check the pieces for pre-made slits (#2, #8 & #9). It's been awhile but If I recall correctly some pieces did have them I think. I also put mine in the clothes dryer for a little while to make them a bit easier to fit. |
|
|
|
| jonferns |
Jun 19 2010, 11:05 PM
Post
#4
|
|
Advanced Member Group: Members Posts: 2,081 Joined: 29-March 07 From: New Jersey Member No.: 7,631 Region Association: North East States |
IIRC, 5 and 7 go behind the seats. Im also curious where the rest go.
I do quite a few carpet kit installations on bugs at work. Start by first figuring out where everything goes, and laying it out inside the car. Make sure you're happy with how everything fits together before you glue anything. I would only glue down the pieces that run over the longitudinals, everything else could stay loose for periodic removal for cleaning. Once the carpet is glued down, lifting it may cause the carpet fibers to pull, tearing lines in the carpeting. Use a spray adhesive, but dont use much, in case you do have to remove it. Good luck and please post pics of the final result! (IMG:style_emoticons/default/bye1.gif) |
|
|
|
| Elliot Cannon |
Jun 19 2010, 11:18 PM
Post
#5
|
|
914 Guru Group: Retired Members Posts: 8,487 Joined: 29-December 06 From: Paso Robles Ca. (Central coast) Member No.: 7,407 Region Association: None |
Go slowly. Don't be in a hurry. Take your time. Make sure if fits how you want it, befor glueing it down.
|
|
|
|
| montoya 73 2.0 |
Jun 19 2010, 11:20 PM
Post
#6
|
|
Lack of consideration to others, and Selfish! Group: Members Posts: 1,791 Joined: 27-October 04 From: Paso Robles, Ca. Member No.: 3,016 Region Association: Central California |
I didn't use any glue. I did use some heavy duty velcro in the e-brake area and the passenger longs for future cleaning.
|
|
|
|
| Elliot Cannon |
Jun 19 2010, 11:24 PM
Post
#7
|
|
914 Guru Group: Retired Members Posts: 8,487 Joined: 29-December 06 From: Paso Robles Ca. (Central coast) Member No.: 7,407 Region Association: None |
Velcro works good. Here's mine. I did it my own self. Which means you can also. (IMG:style_emoticons/default/lol-2.gif)
Attached thumbnail(s) 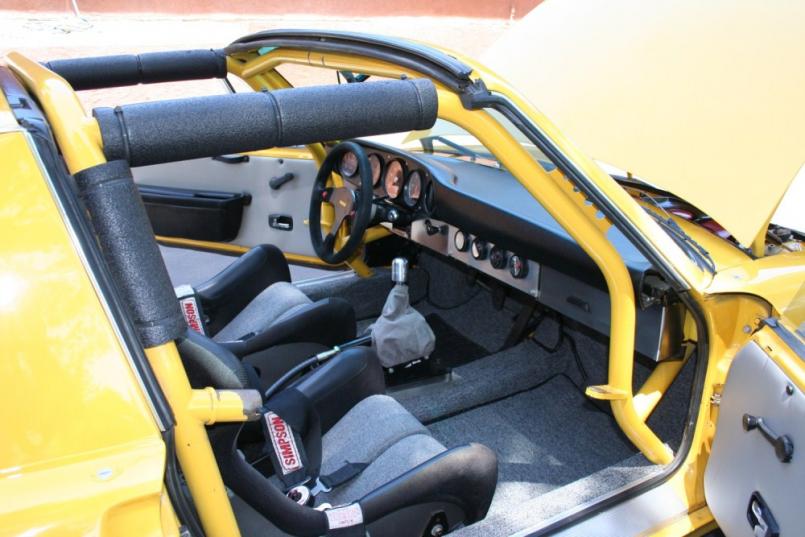
|
|
|
|
| VaccaRabite |
Jun 19 2010, 11:36 PM
Post
#8
|
|
En Garde! Group: Admin Posts: 13,444 Joined: 15-December 03 From: Dallastown, PA Member No.: 1,435 Region Association: MidAtlantic Region |
Yep - no glue!
Since I laid down new carpet, I have twice had to get at wires in the tunnel. I am also just using velcro. Works like a charmer, but I have found it helpful to stich the velcro on to the carpet backing. The glue on the vlcro is not very strong. Zach |
 |
|
| dangrouche |
Jun 20 2010, 12:30 AM
Post
#9
|
|
dangrouche Group: Members Posts: 550 Joined: 1-May 04 From: San Francisco Bay Area Member No.: 2,012 Region Association: None |
leave them to bake in the sun a few hours and then start positioning them, it helps to drape better on the longs. The one where the steering shaft is where you make a strategic razor cut to go around the shaft, otherwise you have to R&R the steering shaft, which I did not want to do. make the cut so that if the carpet droops, the carpet will not fall straight down
|
|
|
|
| dem |
Jun 20 2010, 07:44 AM
Post
#10
|
|
Rusty Member Group: Members Posts: 147 Joined: 7-February 10 From: Cupertino, CA Member No.: 11,334 Region Association: Northern California |
QUOTE(dangrouche @ Jun 19 2010, 11:30 PM) The one where the steering shaft is where you make a strategic razor cut to go around the shaft, otherwise you have to R&R the steering shaft, which I did not want to do. Morph's kit (and many after-market) you don't need to do this (#9 in the set at the top of the thread.) Similarly the e-brake area (#4) is "carved around" rather than molded with holes and requiring the ebrake removal. The latter means some unexposed areas of the car are exposed if you had factory carpet.. so if it ain't pretty, you might wanna put some additional floor vinyl there before laying down the carpet. |
|
|
|
| dem |
Jun 20 2010, 07:51 AM
Post
#11
|
|
Rusty Member Group: Members Posts: 147 Joined: 7-February 10 From: Cupertino, CA Member No.: 11,334 Region Association: Northern California |
QUOTE(montoya 73 2.0 @ Jun 19 2010, 10:04 PM) #6 - center seat cushion area This one goes above the pedal floor board, sandwiched under it at the bottom, and a bit of glue up top. |
|
|
|
| Drums66 |
Jun 20 2010, 12:19 PM
Post
#12
|
|
914 Rudiments Group: Members Posts: 5,321 Joined: 15-January 03 From: Coronado,Cali Member No.: 151 Region Association: Southwest Region |
Like puttting on your pants....forget the belt! (IMG:style_emoticons/default/yellowsleep[1].gif)
(IMG:style_emoticons/default/clown.gif) (you can do it blindfolded..if you want to!) |
|
|
|
| montoya 73 2.0 |
Jun 20 2010, 12:47 PM
Post
#13
|
|
Lack of consideration to others, and Selfish! Group: Members Posts: 1,791 Joined: 27-October 04 From: Paso Robles, Ca. Member No.: 3,016 Region Association: Central California |
QUOTE(dem @ Jun 20 2010, 06:51 AM) QUOTE(montoya 73 2.0 @ Jun 19 2010, 10:04 PM) #6 - center seat cushion area This one goes above the pedal floor board, sandwiched under it at the bottom, and a bit of glue up top. I guess I better move mine! (IMG:style_emoticons/default/chair.gif) (IMG:style_emoticons/default/headbang.gif) |
|
|
|
| Tom_T |
Jun 20 2010, 07:05 PM
Post
#14
|
|
TMI.... Group: Members Posts: 8,318 Joined: 19-March 09 From: Orange, CA Member No.: 10,181 Region Association: Southern California |
QUOTE(nsr-jamie @ Jun 19 2010, 09:44 PM) Another problem I am having cause I don't have the original carpets to pull out is finding out which way they fit in....so I took the same picture and added some numbers so hopefully some owners can give me some advice. #1, #2 and #3 are pretty obvious, but not sure which direction if front or back on #3 (round corners to the front of car or square corners to the front?) #4 and #10 look to run down the sides....which side gpes on the ebrake side? The rest of them I am not really sure off so I thought I would ask here before attempting anything. Thanks for any help Cheers (IMG:style_emoticons/default/beerchug.gif) Reverse 5 & 7 Move 6 above 1 & 8 to the left of 6 Move 4 to Left of 1 & put 10 in its place on right - the unfinished edges on 4 & 10 go under the carpet strips at the threshold plates (aluminum 70-73.5 MY & 73.5-76 black plastic), with the edged side down on the sides of the inner longs Move 9 in front of 2 & 3 (above them in the car) then you'll have them all in proper place. Download the free 914 PET parts manual pdf at the Porsche website in the Classics section & you'll see the diagram of them there too. PS - agree on not gluing it down, except perhaps lightly at the front firewall as the factory did - velcro works better everywhere else. Let the sun or a hairdrier or heat gun low take those folds out, & if it has a spray-on or sheet plastic backer, then you can heat it up to press form fit it into place around the tunnel, inner longs, floor boards, firewall, etc. |
|
|
|
| nsr-jamie |
Jun 21 2010, 06:17 AM
Post
#15
|
|
914 guy in Japan Group: Members Posts: 1,182 Joined: 7-November 07 From: Nagoya, Japan Member No.: 8,305 Region Association: None |
Hi, thank you for all the help everyone! That is great news!!
First a couple of more questions.... #5 and #7 are upside down in the picture? If #6 goes above the foot pedal area what piece of carpet do I use to cover the center tunnel area near the seat back pad? My car is missing the original tray and I have no center cushion....do I need to now have a custom piece made up? I wish I would have known that first from the A and P site. Tom T, thank you for your help and excellent directions....I am checking out the Porsche site right now and for some reason can not find the link you mentioned...I am looking in the classics section and I also checked the classics section of this forum too and can not find those diagrams you mentioned...if you could post the link would be most excellent. I was going to install them this weekend but the weather was so bad...I got some mild glue for carpet and will probably try some velcro too. Thank you to everyone for their help and advice Now, can I ask to others to post pictures of their freshly installed carpet sets?? Cheers (IMG:style_emoticons/default/beerchug.gif) |
|
|
|
| nsr-jamie |
Jun 21 2010, 06:25 AM
Post
#16
|
|
914 guy in Japan Group: Members Posts: 1,182 Joined: 7-November 07 From: Nagoya, Japan Member No.: 8,305 Region Association: None |
I found this.....it would be nice if A and P had a picture of the carpets on their site in the correct position and setting so its a little easier to understand for people who don't have their old stock carpets.....
Attached thumbnail(s) 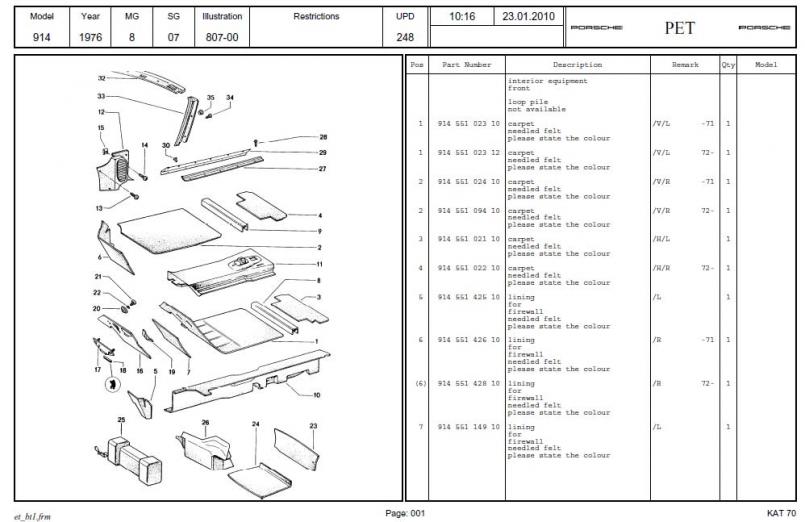
|
|
|
|
| dem |
Jun 21 2010, 07:33 AM
Post
#17
|
|
Rusty Member Group: Members Posts: 147 Joined: 7-February 10 From: Cupertino, CA Member No.: 11,334 Region Association: Northern California |
QUOTE(nsr-jamie @ Jun 21 2010, 05:17 AM) #5 and #7 are upside down in the picture? If #6 goes above the foot pedal area what piece of carpet do I use to cover the center tunnel area near the seat back pad? My car is missing the original tray and I have no center cushion....do I need to now have a custom piece made up? I wish I would have known that first from the A and P site. I was going to install them this weekend but the weather was so bad...I got some mild glue for carpet and will probably try some velcro too. Thank you to everyone for their help and advice Now, can I ask to others to post pictures of their freshly installed carpet sets?? Cheers (IMG:style_emoticons/default/beerchug.gif) #5/#7 will make sense when you put them in.. the "jagged" edged mushroom goes on the driver side, because it fits around the ebrake mechanisms. There is no center tunnel piece included, so yes, you would need some extra carpet.. or if that "above the pedal board" piece covers.. just use it - you can barely see the original piece once it is installed. My glue philosophy (after doing it once 10 years ago, and then again recently) Clean the e-brake depression on the driver's long (#4) REALLY well. Pre-mold and pre-fit this area. Hair dryer or heat gun (on the back of the carpet only) until the fit is good. I carved a piece of wood and used clamps to hold it overnight before gluing. Use 3M Super90 and follow the high strength application for this area (basically apply glue to both surfaces thoroughly, let dry, then join.) The rest of the long area just needs a bit of glue, no need to go crazy, but if you want it nice and tight you need some glue. The piece that goes on the drivers fender (#8, by your left foot) also requires some glue, because it is rounded and the carpet is flat, but it is a lot easier than that damn ebrake depression. This one also should have a slot cut into it for the speednut bracket that holds on your speaker to help orient it. Passenger long (#10) - a bit of glue. Piece above the pedal board (#6) - velcro would probably work (at the top only, bottom is sandwiched under the pedal board.) Center tunnel piece (#2) - no glue, it will be held down by the other pieces. Passenger footrest area (#9) - no glue needed, also has a slot for the speaker bracket. 4 mats (1, 3, 5, 7) - no glue I'll see if I can take some pictures to round this out. (IMG:style_emoticons/default/smile.gif) |
|
|
|
| dem |
Jun 22 2010, 08:58 PM
Post
#18
|
|
Rusty Member Group: Members Posts: 147 Joined: 7-February 10 From: Cupertino, CA Member No.: 11,334 Region Association: Northern California |
Polishing this thread off for Jamie, hopefully this helps, continuing the number coding from above:
(IMG:http://www.914world.com/bbs2/uploads_offsite/www.haphazard.com-11334-1277261878.1.jpg) (IMG:http://www.914world.com/bbs2/uploads_offsite/www.haphazard.com-11334-1277261878.2.jpg) (IMG:http://www.914world.com/bbs2/uploads_offsite/www.haphazard.com-11334-1277261879.3.jpg) (IMG:http://www.914world.com/bbs2/uploads_offsite/www.haphazard.com-11334-1277261880.4.jpg) (IMG:http://www.914world.com/bbs2/uploads_offsite/www.haphazard.com-11334-1277261880.5.jpg) |
|
|
|
| montoya 73 2.0 |
Jun 22 2010, 09:06 PM
Post
#19
|
|
Lack of consideration to others, and Selfish! Group: Members Posts: 1,791 Joined: 27-October 04 From: Paso Robles, Ca. Member No.: 3,016 Region Association: Central California |
|
|
|
|
| nsr-jamie |
Jun 23 2010, 06:01 AM
Post
#20
|
|
914 guy in Japan Group: Members Posts: 1,182 Joined: 7-November 07 From: Nagoya, Japan Member No.: 8,305 Region Association: None |
Whoa!! Wow!! What can I say? THANK YOU !!!!!!!! (IMG:style_emoticons/default/beerchug.gif) (IMG:style_emoticons/default/beerchug.gif) (IMG:style_emoticons/default/beerchug.gif)
That is perfect and EXACTLY what I needed, that helps me out so much! Thank you very much for your excellent pictures Mr. Dem. By the way, that is one nice looking interior you have there. Thank you so much !! This thread will also be helpful to many others too I think who order the A and P kits.. Thank you Jamie ------- |
|
|
|
|
1 User(s) are reading this topic (1 Guests and 0 Anonymous Users)
0 Members:

|
Lo-Fi Version | Time is now: 16th May 2024 - 07:08 PM |
Invision Power Board
v9.1.4 © 2024 IPS, Inc.