|
|
|
Porsche, and the Porsche crest are registered trademarks of Dr. Ing. h.c. F. Porsche AG.
This site is not affiliated with Porsche in any way. Its only purpose is to provide an online forum for car enthusiasts. All other trademarks are property of their respective owners. |
|
|


| tomeric914 |
 Aug 1 2010, 04:28 PM Aug 1 2010, 04:28 PM
Post
#1
|
|
One Lap of America in a 914!  Group: Members Posts: 1,321 Joined: 25-May 08 From: Syracuse, NY Member No.: 9,101 Region Association: North East States |
Back in February of '08, Cupomeat and Tomeric914 picked up this lovely 916 replica and a boatload of spare parts:
(IMG:http://www.914world.com/bbs2/uploads_offsite/farm5.static.flickr.com-9101-1280701715.1.jpg) Clean, one owner, Florida car, runs great, blah, blah, blah... When we picked it up, one carb was seized and the PO was "working on it". "Does the engine turn over?", I ask. "Last I knew it did", he says. Yea, maybe not: (IMG:http://www.914world.com/bbs2/uploads_offsite/farm5.static.flickr.com-9101-1280701715.2.jpg) (IMG:http://www.914world.com/bbs2/uploads_offsite/farm5.static.flickr.com-9101-1280701716.3.jpg) Our first clue was when we pulled the oil drain plug and nothing came out. It was about 20 degrees in the garage so the water on the bottom of the engine was frozen. After using a torch to melt the water, the oil came out. http://www.youtube.com/watch?v=VuK9Z7fpgic The video above shows a nice ice cube stuck to the float of the one Weber that was still in the car. The PO said the car ran hot so they remove the rain tray to get more air in the engine compartment. The filters didn't have rain hats on and there were 1/4" to 1/2" gaps around the bottoms of the filters. The PO had made up some cheesedick plate for the bottom of the filter on but didn't understand the concept of flatness. (IMG:http://www.914world.com/bbs2/uploads_offsite/farm5.static.flickr.com-9101-1280701717.4.jpg) That was only the beginning of the fun. I've already forgotten about all the other half-assed fixes the PO did. My goal was to get the car on the road by April and on the track by the end of the summer. The PO had relocated the battery to the trunk which I wasn't crazy about. They also did some hellhole repair that looked to be ok. I finished their repair and but the battery tray back where it should be. At the same time, I rebuilt the 2.0 engine using A LOT of the spare parts we had (heads were one of those spare parts). What amazed me was the amount of parts that were in their original shipping boxes dated from the mid 1980's with 2nd day air! They sat for 20+ years! Here is the engine in the car around the middle of April all set to go. (IMG:http://www.914world.com/bbs2/uploads_offsite/farm5.static.flickr.com-9101-1280701717.5.jpg) So now it has 96mm KB pistons and AA cylinders (which, BTW suck. AA used to have decent cylinders). It is now a 2056 with 40IDFs and what appears to be an old S&S exhaust setup. I put the lowest profile tires I could find on the crappy set of cookie cutters we had. (IMG:http://www.914world.com/bbs2/uploads_offsite/farm5.static.flickr.com-9101-1280708541.1.jpg) For the next few months I drive it and sort out the various issues, rebuild all the brake calipers, remove the brake line tee that the DAPO put in and get a nice reconditioned brake pressure regulator from PMB. Sign up for my first track event at Watkins Glen and before going there, install an oil cooler. (IMG:http://www.914world.com/bbs2/uploads_offsite/farm5.static.flickr.com-9101-1280708542.2.jpg) Then I found some rust in the long that needed attention. Luckily, not too bad... yet. Cut it out and repair it. (IMG:http://www.914world.com/bbs2/uploads_offsite/farm5.static.flickr.com-9101-1280708542.3.jpg) Then off to the Glen! |
   |

 
|
  |
Replies(1 - 19)
| tomeric914 |
Aug 1 2010, 07:00 PM
Post
#2
|
|
One Lap of America in a 914! Group: Members Posts: 1,321 Joined: 25-May 08 From: Syracuse, NY Member No.: 9,101 Region Association: North East States |
At the Glen, the car feels a little loose in the rear but I keep driving figuring its because I'm pushing the car harder. Get home, jack it up and find one of the rear bushings decided to go. I picked up a set of Weltmeister bushings (first mistake) to replace the stock ones.
While I'm in there, I decided to change to 911 rear brakes and toss the 914 setup. I score a new pair of vented 911 rear rotors and a 911 parking brake setup and engineer the whole setup. (IMG:http://www.914world.com/bbs2/uploads_offsite/farm5.static.flickr.com-9101-1280710809.1.jpg) While I'm in there I discover more loveliness in the form of rust on both sides of the car. Here's the before on one side: (IMG:http://www.914world.com/bbs2/uploads_offsite/farm5.static.flickr.com-9101-1280710810.2.jpg) ...and the after on the other. It was all smoothed out and painted before everything went back together. (IMG:http://www.914world.com/bbs2/uploads_offsite/farm5.static.flickr.com-9101-1280710811.3.jpg) ...and installed: (IMG:http://www.914world.com/bbs2/uploads_offsite/farm5.static.flickr.com-9101-1280710812.4.jpg) When we bought the car, it had already been converted to 5-bolt so the rear was a no-brainer. The front had early an early 5-bolt arrangement with solid discs on it. The struts were shot. Luckily, the parts stash had a pair of vented discs and hubs with newer Bilstein monotube struts. Those went in so we had vented discs all the way around. Moving forward to June of 2009, I made a trip down to Tangerine Racing in my '58 VW Single Cab to pick up on of their weld in roll cages. After getting it home and mocking it up, it put the passenger seat just too far forward. Since I knew I was going to have instructors with me, I returned the main hoop for a double bump hoop. There is no doubt, Chris's stuff is first rate! (IMG:http://www.914world.com/bbs2/uploads_offsite/farm5.static.flickr.com-9101-1280710814.5.jpg) That was followed up with Second Skin's Damplifier Pro: (IMG:http://www.914world.com/bbs2/uploads_offsite/farm5.static.flickr.com-9101-1280710814.6.jpg) ...and Luxury Liner: (IMG:http://www.914world.com/bbs2/uploads_offsite/farm5.static.flickr.com-9101-1280710815.7.jpg) Then back to Watkin's Glen again! (IMG:http://www.914world.com/bbs2/uploads_offsite/farm5.static.flickr.com-9101-1280710816.8.jpg) |
|
|
|
| Ericv1 |
Aug 1 2010, 07:31 PM
Post
#3
|
|
Member Group: Members Posts: 259 Joined: 30-December 07 From: Cincinnati, Ohio Member No.: 8,518 Region Association: Upper MidWest |
Nice, I'm liking the 916 front and rear. If properly done it looks awesome.
|
|
|
|
| tomeric914 |
Aug 1 2010, 08:01 PM
Post
#4
|
|
One Lap of America in a 914! Group: Members Posts: 1,321 Joined: 25-May 08 From: Syracuse, NY Member No.: 9,101 Region Association: North East States |
Oops, I can't forget the garage floor rebuild that happened in the middle of this. I had long suspected that the floor was hollow underneath. I decided to undertake this "small" task with the aid of a masonry contractor. SO I rented a jackhammer, punched a hole in the floor and stuck a light and my digital camera underneath.
(IMG:http://www.914world.com/bbs2/uploads_offsite/farm5.static.flickr.com-9101-1280714464.1.jpg) Yes, you are looking at the underside of the garage floor above and the settled gravel fill about 16" below. Gotta love these low budget home builders. Here we are after pulling out 14 ton of concrete, replacing with flowable fill and pouring in the new concrete. Funny how none of my neighbors stopped by while I was removing the old floor, but they all showed up when the concrete truck was there! (IMG:http://www.914world.com/bbs2/uploads_offsite/farm5.static.flickr.com-9101-1280714465.2.jpg) Next on the list was seating and 5-point harnesses. Since I'm over 6 foot tall and my head hits the roof with a helmet on unless I removed the stock seat bottom cushion, I purchased a pair of Kirkey Intermediates and welded up some frames that would sit as close to the floor as possible. I fabricated the driver's side: (IMG:http://www.914world.com/bbs2/uploads_offsite/farm5.static.flickr.com-9101-1280714465.3.jpg) Then moved on to the passenger side to find that the cross support was rotted along with the floor underneath it. (IMG:http://www.914world.com/bbs2/uploads_offsite/farm5.static.flickr.com-9101-1280714466.4.jpg) So I repaired the floor and rebuilt the cross rail. (IMG:http://www.914world.com/bbs2/uploads_offsite/farm5.static.flickr.com-9101-1280714467.5.jpg) and completed the installation: (IMG:http://www.914world.com/bbs2/uploads_offsite/farm5.static.flickr.com-9101-1280714467.6.jpg) Next was time for a facelift. The car came with hideous looking 916 bumpers (IMHO) that needed to go. Cupomeat brought up stock 914 front and rear bumpers and I got at it. First was removing the front bumper only to discover what little had been holding it on. (IMG:http://www.914world.com/bbs2/uploads_offsite/farm5.static.flickr.com-9101-1280714469.7.jpg) The inner front fender in this location gives very little room to manipulate any tool much less an angle die grinder or MIG gun but somehow I managed it. (IMG:http://www.914world.com/bbs2/uploads_offsite/farm5.static.flickr.com-9101-1280714470.8.jpg) Thanks to the 914World classifieds, I scored a stock fiberglass front bumper to go along with the LE front spoiler we had in the stash. (IMG:http://www.914world.com/bbs2/uploads_offsite/farm5.static.flickr.com-9101-1280714470.9.jpg) We had a stock 914 rear bumper in pretty darn good shape that I painted up gloss black and stuck on the rear. What a difference that made over the 916 look! So here we are in March of 2010 with a DE around the corner at Limerock. My money was in for the Mepstein GT flare and rocker group buy as well. There was one spot of rust on the passenger fender that bothered me. This was where the dealer had installed an antenna and created a nice pocket for water to sit and rust in. Sometime in the past, the PO removed the antenna and slathered Bondo in its place creating an even bigger problem. I started at it with my pick only to watch it basically disintegrate. (IMG:http://www.914world.com/bbs2/uploads_offsite/farm5.static.flickr.com-9101-1280714471.10.jpg) Yuck... (IMG:http://www.914world.com/bbs2/uploads_offsite/farm5.static.flickr.com-9101-1280714472.11.jpg) Cut out the old... (IMG:http://www.914world.com/bbs2/uploads_offsite/farm5.static.flickr.com-9101-1280714473.12.jpg) Hand form a repair piece out of 14 gauge... (IMG:http://www.914world.com/bbs2/uploads_offsite/farm5.static.flickr.com-9101-1280714473.13.jpg) Weld it in... (IMG:http://www.914world.com/bbs2/uploads_offsite/farm5.static.flickr.com-9101-1280714474.14.jpg) ...and finish it off. Not shown is all the steps to remove the underlying surface rust, prep it and painting underneath. (IMG:http://www.914world.com/bbs2/uploads_offsite/farm5.static.flickr.com-9101-1280714475.15.jpg) Off to the track! (IMG:http://www.914world.com/bbs2/uploads_offsite/farm5.static.flickr.com-9101-1280714799.1.jpg) ...more later! (This was through end of April 2010) |
|
|
|
| Cupomeat |
Aug 2 2010, 09:13 AM
Post
#5
|
|
missing my NY 914 in VA Group: Members Posts: 1,349 Joined: 26-November 07 From: Oakton VA Member No.: 8,376 Region Association: MidAtlantic Region |
Having seen pix throughout this process, it is amazing work Tom!
Thanks for stopping by on Saturday to show off the car, it looks GREAT! Ready for WG again! |
|
|
|
| Nürburg Nomad |
May 13 2011, 01:39 AM
Post
#6
|
|
914Rubber.com! Group: Members Posts: 296 Joined: 30-March 10 From: Buckeye State Member No.: 11,536 Region Association: Upper MidWest |
Have any updates and particularly current side profile photos to share? I'm considering buying the same 245/60/16 rear tire size you mentioned in another thread but it would be nice to see it first! (IMG:style_emoticons/default/smile.gif)
|
|
|
|
| Cairo94507 |
May 13 2011, 06:58 AM
Post
#7
|
|
Michael Group: Members Posts: 10,609 Joined: 1-November 08 From: Auburn, CA Member No.: 9,712 Region Association: Northern California |
Wow! Very nice work and I too like the stock (early) bumpers over the 916 bumpers. Happy motoring.
|
|
|
|
| rick 918-S |
May 13 2011, 07:06 AM
Post
#8
|
|
Hey nice rack! -Celette Group: Members Posts: 21,239 Joined: 30-December 02 From: Now in Superior WI Member No.: 43 Region Association: Northstar Region |
Drive it like ya stole it! (IMG:style_emoticons/default/aktion035.gif)
|
|
|
|
| PanelBilly |
May 13 2011, 08:36 AM
Post
#9
|
|
914 Guru Group: Members Posts: 5,950 Joined: 23-July 06 From: Kent, Wa Member No.: 6,488 Region Association: Pacific Northwest |
I need to component you on the nice balance of restoration vs. function. At least that's the wY it looks like from the thread.
|
|
|
|
| tomeric914 |
May 13 2011, 09:32 AM
Post
#10
|
|
One Lap of America in a 914! Group: Members Posts: 1,321 Joined: 25-May 08 From: Syracuse, NY Member No.: 9,101 Region Association: North East States |
Thanks PB. That means a lot to me considering the level of perfection that I've seen from your threads!
I think I've got a few good shots of the 245's on the rear with flares. I will try in earnest to update this thread over the weekend. I flared and painted it last year then dropped a six in it over the winter. |
|
|
|
| PeeGreen 914 |
May 13 2011, 09:40 AM
Post
#11
|
|
Just when you think you're done...wait, there is more..lol Group: Members Posts: 10,219 Joined: 21-September 06 From: Seattle, WA... actually Everett Member No.: 6,884 Region Association: Pacific Northwest |
I like the progression (IMG:style_emoticons/default/beerchug.gif) . Looking good (IMG:style_emoticons/default/aktion035.gif)
|
|
|
|
| Cupomeat |
May 13 2011, 09:41 AM
Post
#12
|
|
missing my NY 914 in VA Group: Members Posts: 1,349 Joined: 26-November 07 From: Oakton VA Member No.: 8,376 Region Association: MidAtlantic Region |
No doubt that you have made HUGE changes on this car since the last posting!
Let me know if you want me to post pix for you! |
|
|
|
| abnrdo |
May 14 2011, 04:00 AM
Post
#13
|
|
Member Group: Members Posts: 399 Joined: 24-September 04 From: Panama City, FL Member No.: 2,820 Region Association: South East States |
(IMG:style_emoticons/default/beerchug.gif) Nice work!! Inspiration for me when I get home!
|
|
|
|
| tomeric914 |
May 15 2011, 10:02 AM
Post
#14
|
|
One Lap of America in a 914! Group: Members Posts: 1,321 Joined: 25-May 08 From: Syracuse, NY Member No.: 9,101 Region Association: North East States |
Getting back to it, I'll start back at May 2010...
Remember I said I replaced the rear swing arm bushings with Weltmeister bushings? What a waste! They quickly wore enough to have noticeable play in the rear suspension that I had to replace them again. I should have bought the Elephant polybronze setup from the start. Oh well, lesson learned. The Elephant setup went in very easily and works great! Next was the fender flare install (with thanks to mepstein for setting up the group buy!) I won't bore you with the how-to of flare installs. There are other threads for that, but basically... Carefully cut out the old measuring 12 times and cutting once 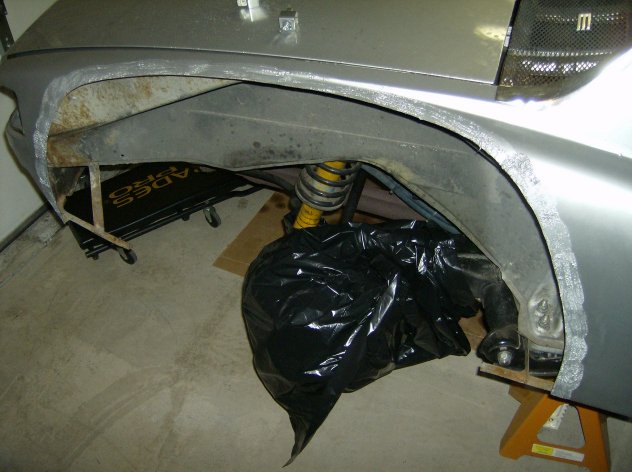 ...and butt weld in the new 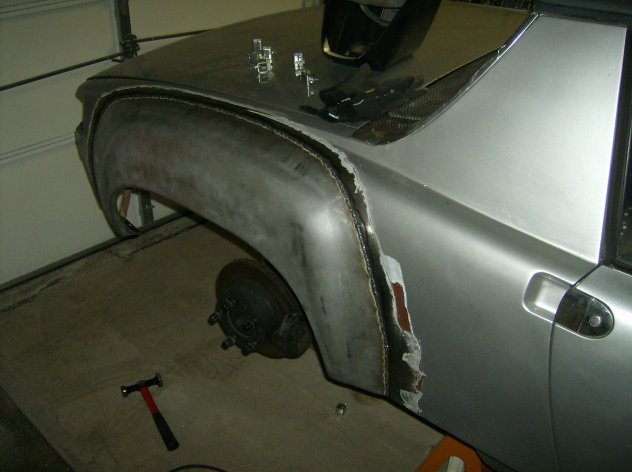 So while I'm at it, I decided to replace the non-existent jack point that the DAPO had removed and replaced with a flat plate. Little did I know that there was a whole 'nuther cluster waiting for me underneath. 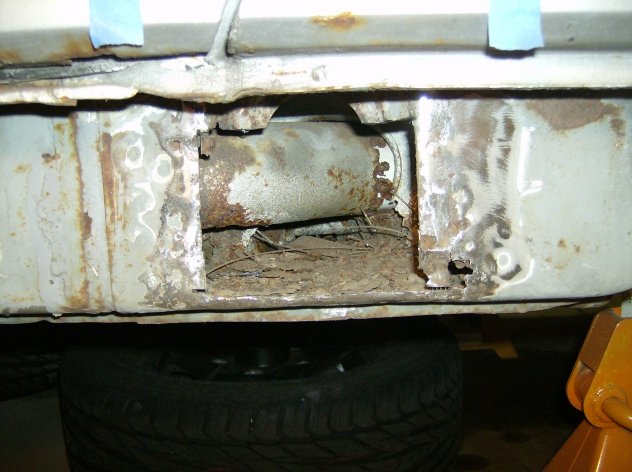 This also extended to the inside where I found the driver's side seat belt mounting point dangerously loose. So I cut and cut and cut some more to get rid of the rust and rebuilt this portion of the long and floor pan. 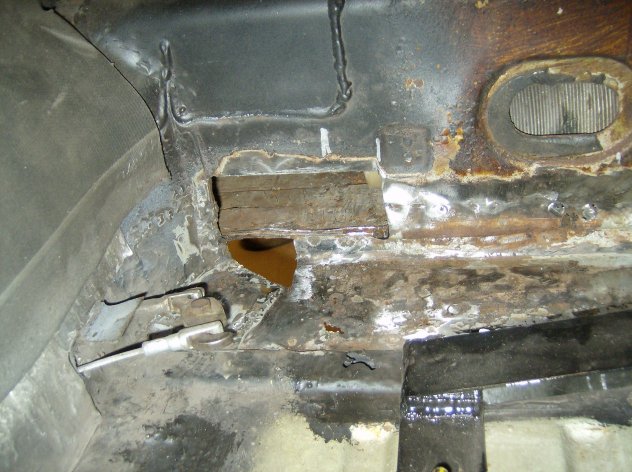 That work easily added a month to the whole flare install but resulted in a much stronger long and a functional jack point. 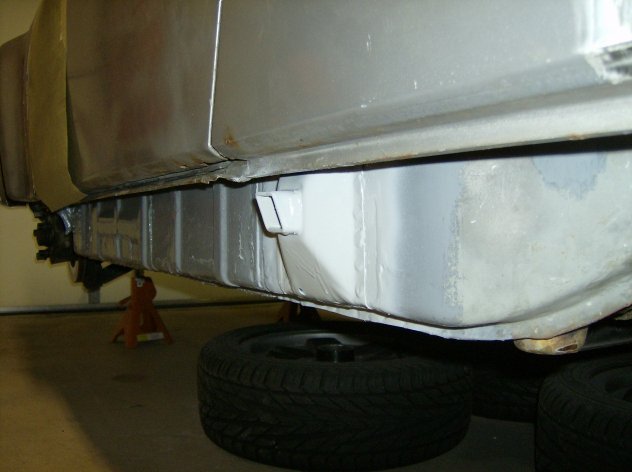 Then came fitting the 245/50-16 tire inside the flare, which in the pic below, it isn't. 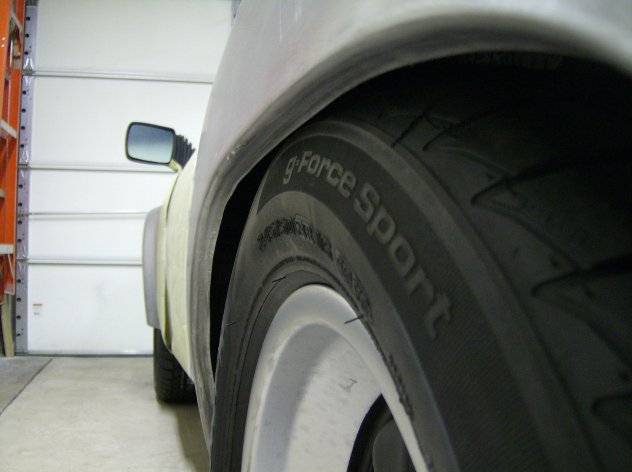 Lots of opinions on this one, cut versus roll, etc. My factory rear fenders had the lips trimmed so I did the same. I attempted to roll the lip but all that did was to start and deform them fender. Just not worth it. Here is a pic of the fender well painted showing the lip trimmed. 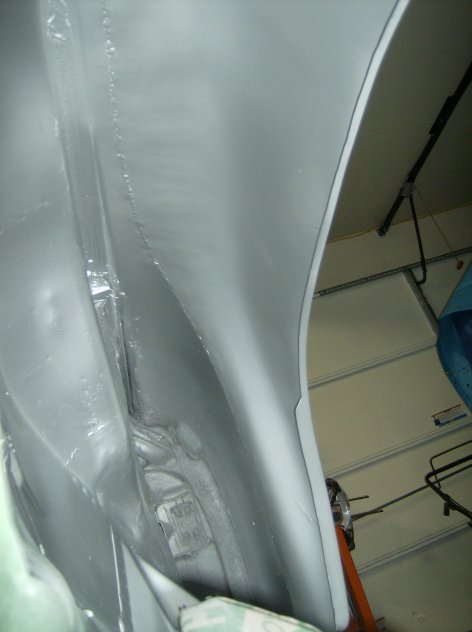 After that, I stripped the doors and the rest of the paint from the fenders and put them in epoxy.  Then hammered and shaped and added filler only where necessary followed by more epoxy, urethane primer, wet sanding, basecoat and finally clearcoat. (IMG:style_emoticons/default/w00t.gif) 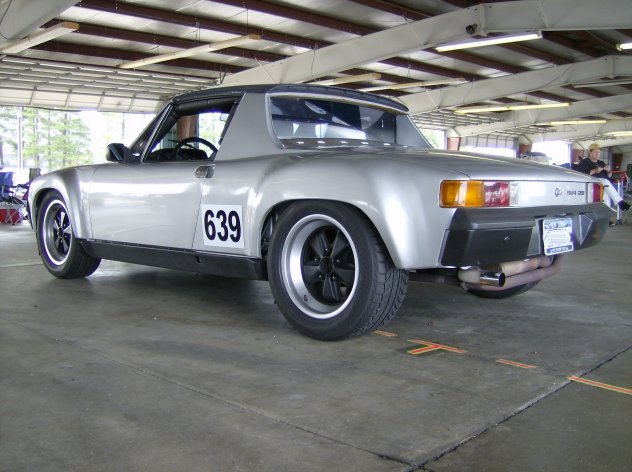 ...still more to come (this is through August 2010) |
|
|
|
| FourBlades |
May 15 2011, 10:39 AM
Post
#15
|
|
From Wreck to Rockin Group: Members Posts: 2,056 Joined: 3-December 07 From: Brevard, FL Member No.: 8,414 Region Association: South East States |
Great work man, keep the pictures coming. I also like how you have kept it on the road most of the restoration. John |
|
|
|
| tomeric914 |
May 15 2011, 10:51 AM
Post
#16
|
|
One Lap of America in a 914! Group: Members Posts: 1,321 Joined: 25-May 08 From: Syracuse, NY Member No.: 9,101 Region Association: North East States |
QUOTE(FourBlades @ May 15 2011, 12:39 PM)  I also like how you have kept it on the road most of the restoration. Well, I don't drive it when there is snow on the ground so that gives me 6 months to work on it! I'll get more pics up later so this thread is up to date. |
|
|
|
| markb |
May 15 2011, 10:58 AM
Post
#17
|
|
914less :( Group: Members Posts: 5,450 Joined: 22-January 03 From: Nipomo, CA Member No.: 180 Region Association: Central California |
|
|
|
|
| tomeric914 |
May 15 2011, 06:11 PM
Post
#18
|
|
One Lap of America in a 914! Group: Members Posts: 1,321 Joined: 25-May 08 From: Syracuse, NY Member No.: 9,101 Region Association: North East States |
From the start of this build, the priorities were:
1. Get it running 2. Upgrade the brakes to vented all the way around 3. Get a full cage in for stiffness and safety 4. Better seats 5. 5 point harnesses 6. Flares and wider tires 7. More horsepower Step 7 started about a year ago when I picked up a Rich Johnson engine mount and started hunting for a 911 engine. We wanted a 3.0 because it seemed to be the best built and most reliable of all, not to mention that it was less likely to get me in as much trouble as a 3.6 would. So I found a 3.0 on the bird board with CIS and a bunch of parts. Basically an engine in unknown condition with a bunch of parts, but not enough parts to get it running. (IMG:http://www.914world.com/bbs2/uploads_offsite/forums.pelicanparts.com-9101-1305504690.1.jpg) I thought about getting the CIS going on it, but after adding up all the parts to even think about getting it running and the great possibility that even then it wouldn't work I went the Weber route. Looked around a bit for the right set of carbs when I just happened to stumble across a set that Eric Shea had for sale. Unfortunately, the intake manifolds weren't ideal for a CIS setup and the beautifully restored air cleaner would have been too restrictive for my needs so I opted for PMO manifolds and rain hats. (This shot is for you Mr. Shea (IMG:style_emoticons/default/wub.gif))  On the underside, I modified the 914-4 linkage with a straight section of 3/4" tubing, rebuilt the CVs in hopes that they at least last the summer, ran new cables. 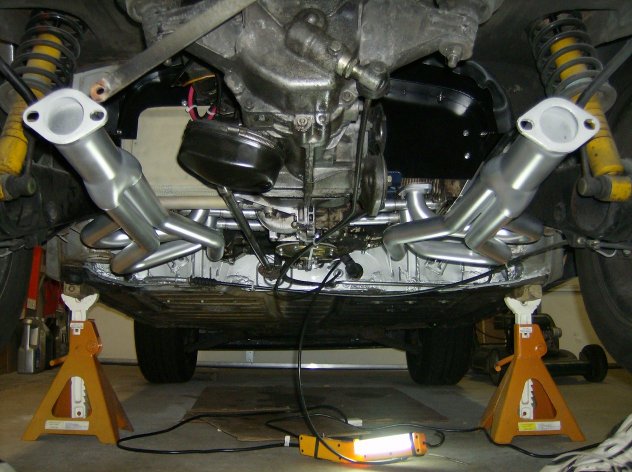 Throttle is always a challenge on 6 conversions. I wasn't a fan of the bell crank linkage so I had a custom throttle cable built and designed my own bracket. If there's interest, I may build more (just drop me a PM). While running the lines, I departed from the typical 6 path and ran the scavenge line towards the back and into a small Earl's oil cooler. Initial trial shows at least a 25 degree drop between the cooler fan on and off so it should be perfect for track days. 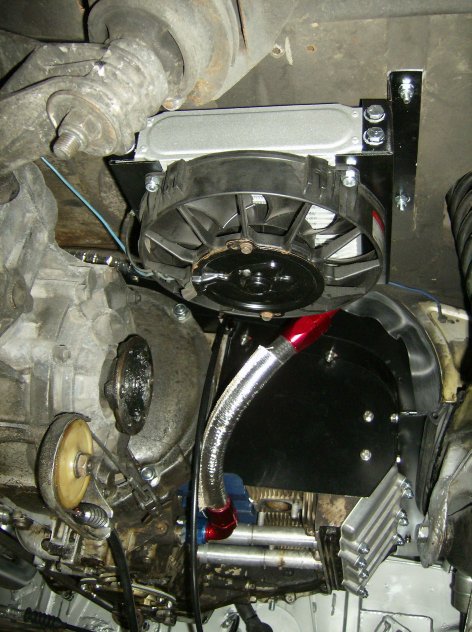 I've yet to do the final tune on the carbs and permanently hook up the breather but the initial drive shows that this little car just got a lot more fun to drive! I'm also working on a custom dual exhaust setup so stay tuned! Many of the parts not needed were sold which subsidized the parts for purchase which kept my wife happy and this conversion's cost reasonable. Thanks to a few of our member vendors here on 914World; Jonathan @ GPR for the 914-6 tin and oil tank group buy and Maltese Falcon at MSDS for getting me in on the 914-6 header group buy, Rich Johnson for the engine mount and 914-6 oil cooler mod, Chris Foley at CFR for the roll cage and rear suspension heim braces. |
|
|
|
| Cupomeat |
May 15 2011, 09:33 PM
Post
#19
|
|
missing my NY 914 in VA Group: Members Posts: 1,349 Joined: 26-November 07 From: Oakton VA Member No.: 8,376 Region Association: MidAtlantic Region |
|
|
|
|
| jaxdream |
May 16 2011, 08:52 AM
Post
#20
|
|
Senior Member Group: Members Posts: 974 Joined: 8-July 08 From: North Central Tennessee Member No.: 9,270 Region Association: South East States |
I could be wrong , but looks like you are missing that big "cup " washer on top of the trans ear mounts . You have done a lot of work to this car , keep it going , looks great !!! (IMG:style_emoticons/default/piratenanner.gif)
Jack / Jaxdream |
|
|
|
|
2 User(s) are reading this topic (2 Guests and 0 Anonymous Users)
0 Members:

|
Lo-Fi Version | Time is now: 2nd April 2026 - 01:52 PM |
Invision Power Board
v9.1.4 © 2026 IPS, Inc.