|
|

|
Porsche, and the Porsche crest are registered trademarks of Dr. Ing. h.c. F. Porsche AG.
This site is not affiliated with Porsche in any way. Its only purpose is to provide an online forum for car enthusiasts. All other trademarks are property of their respective owners. |
|
|
  |
| Gudhjem |
 Aug 28 2010, 04:59 PM Aug 28 2010, 04:59 PM
Post
#1
|
|
Member   Group: Members Posts: 133 Joined: 29-March 07 From: Castro Valley, CA Member No.: 7,629 Region Association: Northern California |
I've had bubbling showing through on both sides of the fender-cowl seem, which was welded together by the PO. So I knew I had some problems, and finally started digging in. Here are a few pics of what I found:
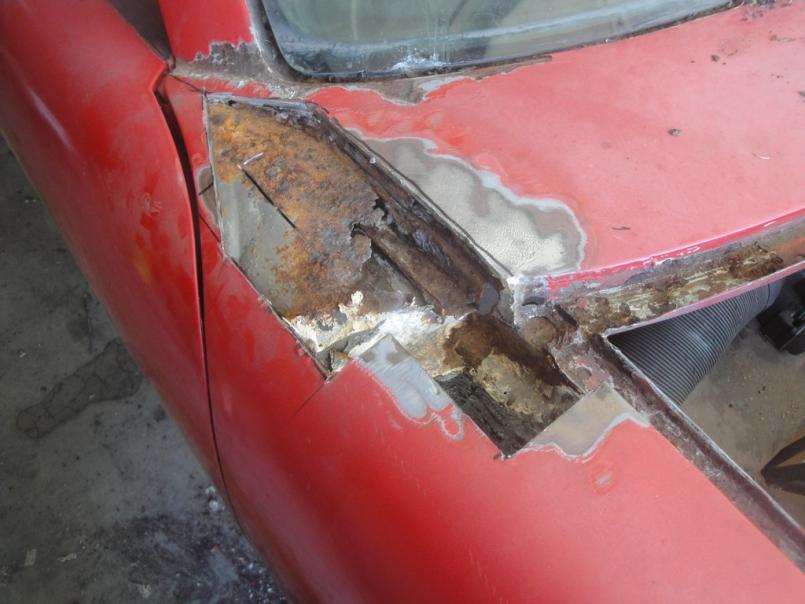 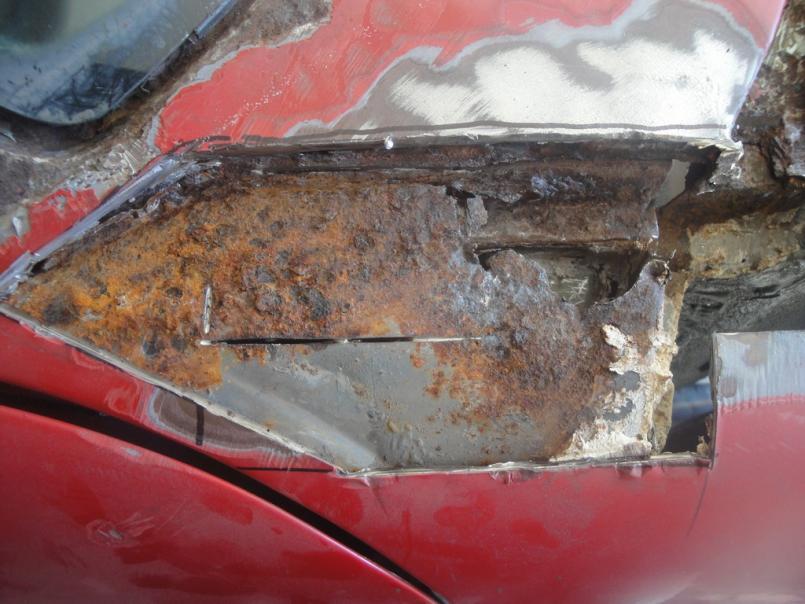 I know. (IMG:style_emoticons/default/barf.gif) It's not quite as bad as those pics make it look (I hope) since the rust seems to be localized to the area right at the former cowl seems, which look like they were welded shut without treating existing rust underneath. Other than right in the corners, the hood channels, etc. look pretty good. I've been working out how to go about rebuilding this area all week. I'd like to reconstruct the channel, not reweld it closed, and I'd like to do it right, not just cover the problem. Several pieces come together here, and it's not clear to me how it's even possible to weld all of these together, even with the fender removed. How, for example, does one fully-weld the drain channel so that it doesn't invite water seeping in the seams that are left? I've scoured the sites for rebuild threads that include this area, and found several good ones with helpful pics of the area (Michelko's Digging into Hell, Bringing out the Dead, among others). I haven't been able to figure out exactly how all these restoration heroes went about this fix. I'm wondering if anyone has pics of this area that clearly show the construction. I think I have it deciphered, but not 100% sure since mine was already repaired and welded shut. Maybe someone can share some wisdom on how to go about the reconstruction? Specifically what to weld to what, etc. (IMG:style_emoticons/default/welder.gif) --Steve |
| Jeff Hail |
 Aug 28 2010, 05:26 PM Aug 28 2010, 05:26 PM
Post
#2
|
|
Senior Member    Group: Members Posts: 1,141 Joined: 3-May 07 From: LA/ CA Member No.: 7,712 |
|
| tomeric914 |
 Aug 28 2010, 06:00 PM Aug 28 2010, 06:00 PM
Post
#3
|
|
One Lap of America in a 914!    Group: Members Posts: 1,268 Joined: 25-May 08 From: Syracuse, NY Member No.: 9,101 Region Association: North East States 
|
|
| dlee6204 |
 Aug 28 2010, 06:17 PM Aug 28 2010, 06:17 PM
Post
#4
|
|
Howdy     Group: Members Posts: 2,162 Joined: 30-April 06 From: Burnsville, NC Member No.: 5,956 |
Me three... HERE
|
| strawman |
 Aug 28 2010, 09:57 PM Aug 28 2010, 09:57 PM
Post
#5
|
|
Senior Member    Group: Members Posts: 891 Joined: 25-January 08 From: Los Osos, CA Member No.: 8,624 Region Association: Central California 
|
|
| Gudhjem |
 Aug 29 2010, 12:14 AM Aug 29 2010, 12:14 AM
Post
#6
|
|
Member   Group: Members Posts: 133 Joined: 29-March 07 From: Castro Valley, CA Member No.: 7,629 Region Association: Northern California |
Great stuff, thanks for the replies. Some of the pics show pretty clearly how the metal fits together from the factory.
I still can't tell though exactly how the actual channel between the fender and cowl gets reconstructed. Obviously you can't weld on the inside of that channel once it's fully-formed, since there's no way to reach it. You can weld the cowl side, which it looks like you all did, but what about the fender side? Did you guys weld the fender only at the top of the channel and leave the bottom of the channel un-welded? Or maybe there is no "channel" at all below the fender, only the wall on the cowl side, with the fender side below the cowl seal left open? hmmm (IMG:style_emoticons/default/blink.gif) (IMG:style_emoticons/default/blink.gif) Is that it? That would make more sense, and would definitely make this repair seem possible. I'm wondering if I'm finally understanding this. In other words, is there no vertical piece at the cowl seem underneath the fender patch in this pic: 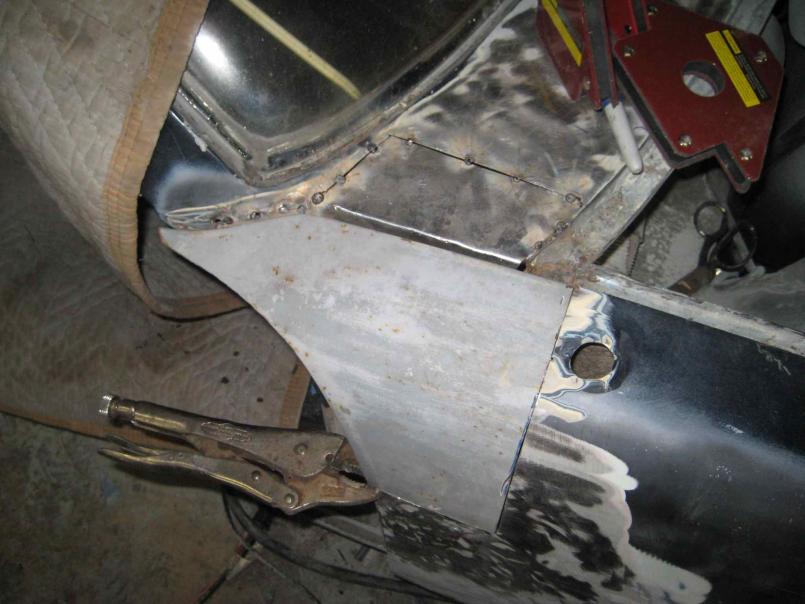 or in this pic: 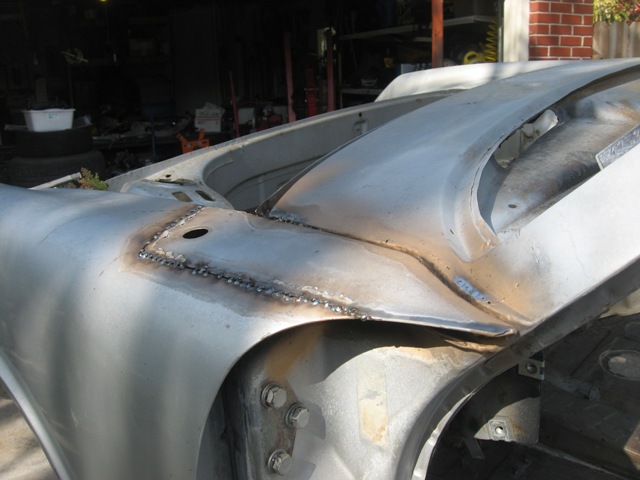 EDIT: oh man, the more I think about this, the more I am becoming convinced that there is no channel at all, other than what is created by the thickness of the fender and cowl extension metal, which holds the seal in place. I've been wracking my mind trying to figure out how to rebuild something that was never there... hopefully someone can confirm. |
| dlee6204 |
 Aug 29 2010, 08:13 AM Aug 29 2010, 08:13 AM
Post
#7
|
|
Howdy     Group: Members Posts: 2,162 Joined: 30-April 06 From: Burnsville, NC Member No.: 5,956 |
(IMG:style_emoticons/default/huh.gif) (IMG:style_emoticons/default/blink.gif) (IMG:style_emoticons/default/wacko.gif)
Hopefully i understand your problem enough to help... The fender has a vertical 'lip' which is spot welded to the vertical piece of the cowl from inside the door jamb. Here are two pictures of the 'lip' I am talking about. I apologize if the angle isn't the greatest. 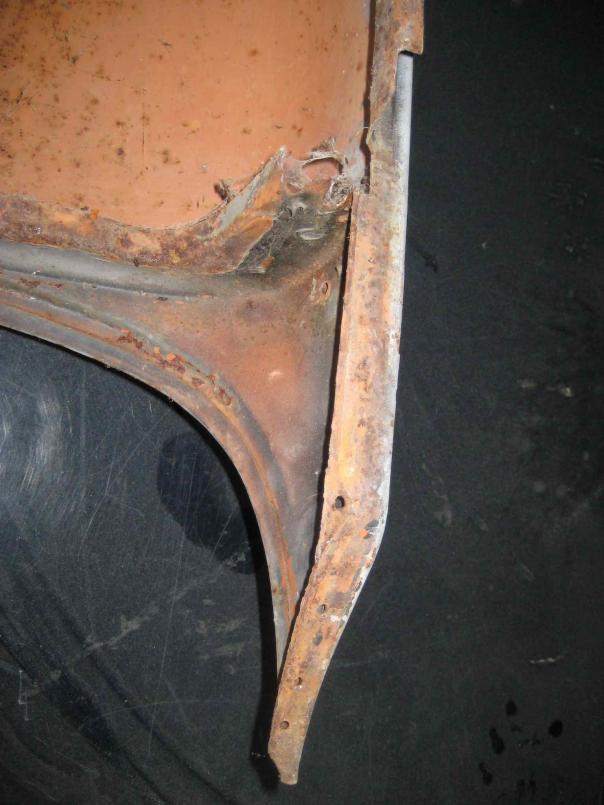 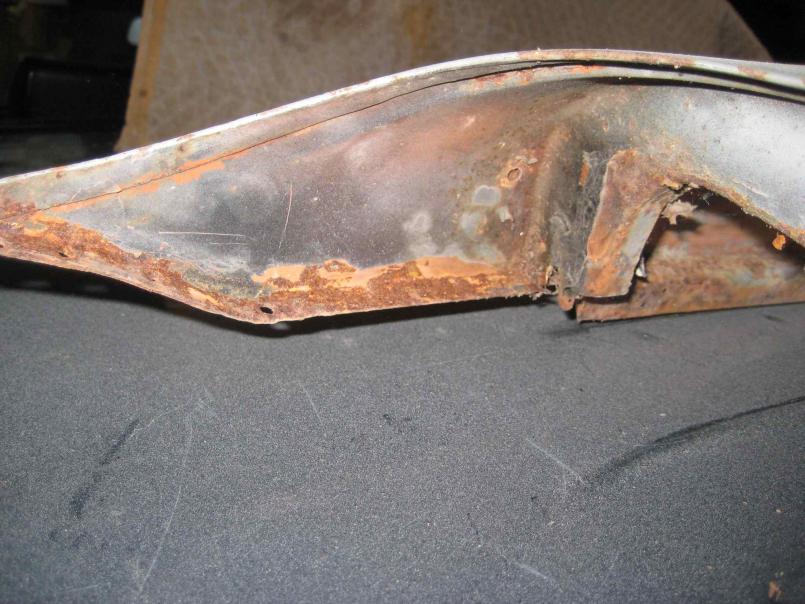 Better yet here is a diagram of how the area is constructed... 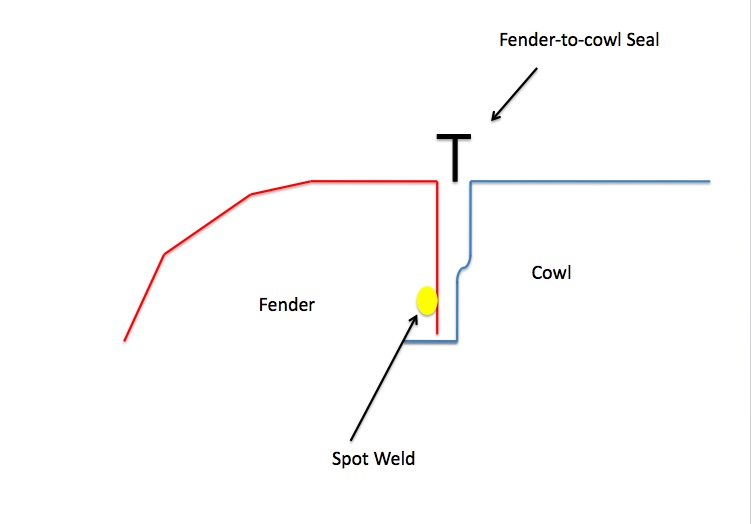 Hope this helps! |
| patssle |
 Aug 29 2010, 09:47 AM Aug 29 2010, 09:47 AM
Post
#8
|
|
Senior Member    Group: Members Posts: 981 Joined: 28-August 09 From: Houston, TX Member No.: 10,741 Region Association: None |
Nice drawing, helps since the fender removal is impossible to see how the area is constructed.
My fender/cowls have the same issues, with minor corner cowl rust on drivers side, and 2 small pen-sized holes punched through the fender on the passenger side (painted it to slow down the rust). Need to get them fixed...unfortunately I have zero metal experience or any equipment, so I need to find somebody that can do it. |
| sean_v8_914 |
 Aug 29 2010, 09:58 AM Aug 29 2010, 09:58 AM
Post
#9
|
|
Chingon 601     Group: Members Posts: 4,011 Joined: 1-February 05 From: San Diego Member No.: 3,541 |
this is the difinitive cowl rebuild reference. the last one I did is not even worthy of this thread
|
| Gudhjem |
 Aug 29 2010, 10:52 AM Aug 29 2010, 10:52 AM
Post
#10
|
|
Member   Group: Members Posts: 133 Joined: 29-March 07 From: Castro Valley, CA Member No.: 7,629 Region Association: Northern California |
Thanks Doug.
Your diagram shows that the gap below the fender-to-cowl seal DOES get closed off to form a channel. The factory did it with spot welds. How have those of you that have repaired this done it? It would be almost impossible to get at to seam weld, and even if you could, I suppose this would collect water above the seam weld (below the fender-to-cowl seal, the spot the arrow points to in Doug's diagram below: 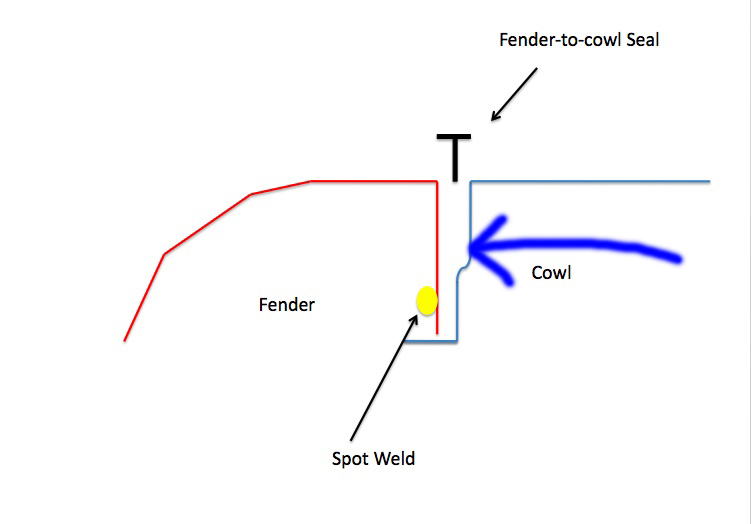 Rosette welding where the factory spot welded would make this an even worse place for water to pool. Is Rosette welding and then hoping the seal keeps out water the usual method? --Steve |
| strawman |
 Aug 29 2010, 11:29 AM Aug 29 2010, 11:29 AM
Post
#11
|
|
Senior Member    Group: Members Posts: 891 Joined: 25-January 08 From: Los Osos, CA Member No.: 8,624 Region Association: Central California 
|
If memory serves, it was a factory goober/snot weld that tied those two pieces together... not a traditional pinch/spot weld.
After welding everything back together, I treated the entire area with Marine Clean, Metal Ready, and then PPG two-part epoxy primer. I will use 3M seam sealer to seal everything up prior to putting the rubber seal in/on. But I'm interested in the opinions of the 914World luminaries on the optimal solution. (IMG:style_emoticons/default/popcorn[1].gif) Geoff |
| davesprinkle |
 Aug 29 2010, 11:48 AM Aug 29 2010, 11:48 AM
Post
#12
|
|
Senior Member    Group: Members Posts: 720 Joined: 13-October 04 From: Berkeley, CA Member No.: 2,943 Region Association: None 
|
That channel is a real problem, on two levels -- it rusts badly, and it's difficult to repair. Yet another bad factory design decision.
At the risk of offending Pat and his CW followers, here's what I did: I sandblasted the rust out of the channel. Bent a piece of 1/8" welding rod to lay into the channel. Mig'ed over the top of the welding rod to stitch everything together. Ground down the weld and painted. It's been 12 years now with no problems. No cracks, no rust. If you're concerned that this approach deviates from the factory design, you should be aware that the factory 914 prototypes had no cowl channel. |
| MLedesma |
 Aug 29 2010, 09:24 PM Aug 29 2010, 09:24 PM
Post
#13
|
|
Member   Group: Members Posts: 52 Joined: 13-October 06 From: Elizabeth, CO Member No.: 7,036 Region Association: Rocky Mountains |
I too am working this area on my car. Let this be a warning not to use body filler in this area! The car was painted a while back and they used filler which cracked and allowed moisture in, and the resulting rust.
Please be careful and use proper protective eauipment when grinding, welding, or sanding here. I don't know if it is because I have an early car (71) or not, but I have lead filler in the cowl area. From what I have read most people melt and wire brush it to remove. I thought my metal was in good shape till I removed some of the lead. In my pictures the blue circle is where I have found lead, and the red circle is the step down to the area in which some of it has been removed. Picture of the passenger side. 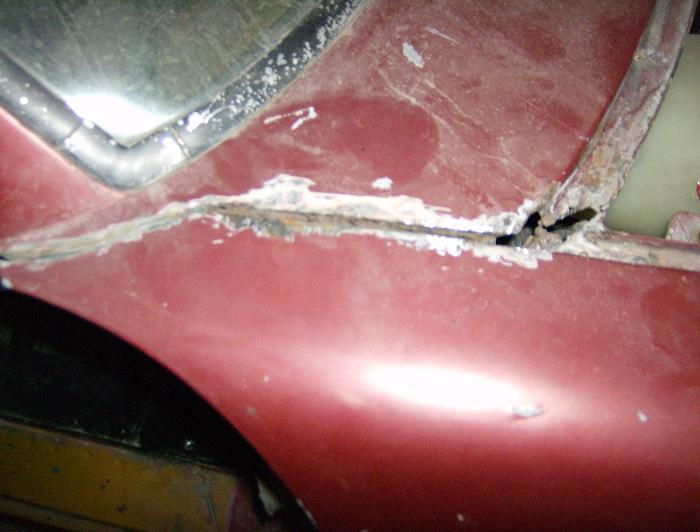 Where I am at now. 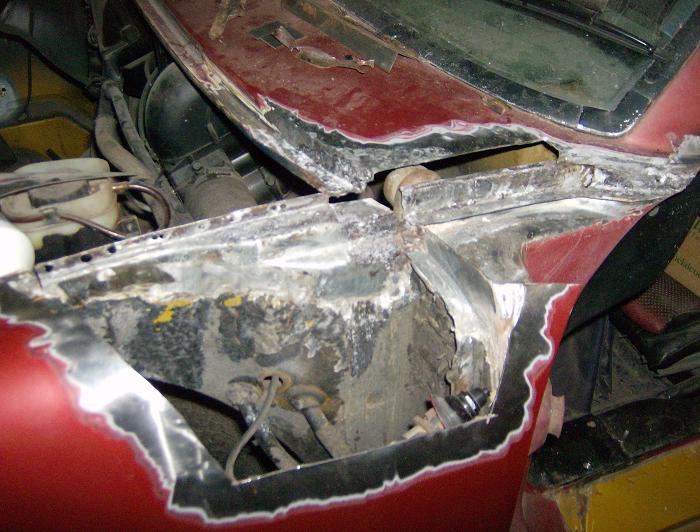 Little detail on the leaded area. 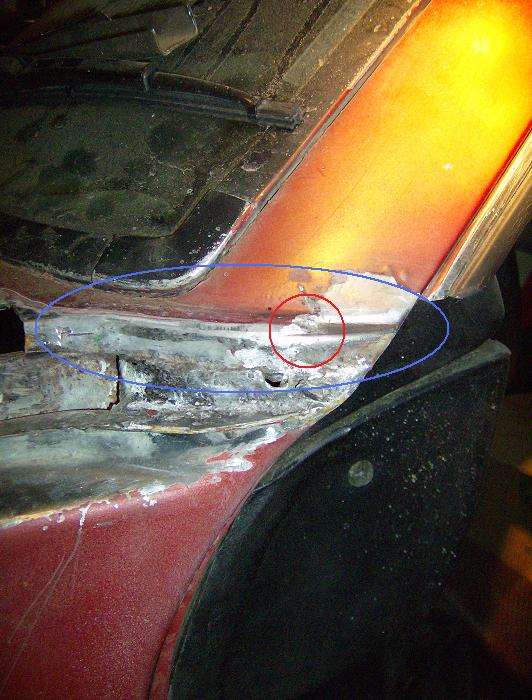 |
| MLedesma |
 Aug 29 2010, 09:45 PM Aug 29 2010, 09:45 PM
Post
#14
|
|
Member   Group: Members Posts: 52 Joined: 13-October 06 From: Elizabeth, CO Member No.: 7,036 Region Association: Rocky Mountains |
Sorry Gudhjem, I didn't mean to partially hijack. I have had a little bit of a tough time (time consuming) recreating the different bends and pieces that I plan on welding back in. In your case it might be easier to remove the rust, replace it and to plan on welding the seam back over again.
Matt |
| charliew |
 Aug 30 2010, 04:21 PM Aug 30 2010, 04:21 PM
Post
#15
|
|
Advanced Member     Group: Members Posts: 2,363 Joined: 31-July 07 From: Crawford, TX. Member No.: 7,958 |
I agree in that if the area has rusted I would take enough of the top off and fix the underlying area, and add a cross brace to the inside of the cowl down to the inner part of the fender to support the door hinge post area, even if it is just round rod, treat the surrounding area, paint it with epoxy primer, then weld the entire area up with a one piece cover. My idea is to stop the flex. Also I would add a shield in the front up to the underside of the fender to stop water and dirt from getting up in the area. Just my idea and it may be bogus. It does seem though that the factory went to a lot of trouble to have a seam there so they must have thought it needed to be flexible.
|
| Gudhjem |
 Aug 31 2010, 10:27 AM Aug 31 2010, 10:27 AM
Post
#16
|
|
Member   Group: Members Posts: 133 Joined: 29-March 07 From: Castro Valley, CA Member No.: 7,629 Region Association: Northern California |
My plan was to do as Geoff did - replace the metal underneath, Metal Ready and epoxy primer everything, and restore the channel. Problem is I can't see how the channel can really be welded closed, other than from underneath it. That would still be a tough weld to get at, and it seems to me it would invite water to pool in the channel above the weld.
That makes the weld-the-channel-shut approach seem like a better, and definitely easier, solution. I would prefer have a channel because I think it looks better, and because I don't understand why Porsche went to the trouble to have one, which makes me leery of removing it (water drainage from the hood channel? crumple zone?). Did those of you that have kept the channel actually weld inside the channel when installing the fender? Look at Doug's diagram. How would you weld down where that spot weld is to close the channel? (IMG:style_emoticons/default/confused24.gif) Any additional insights are appreciated. --Steve |
  |
1 User(s) are reading this topic (1 Guests and 0 Anonymous Users)
0 Members:

|
Lo-Fi Version | Time is now: 4th July 2025 - 09:21 AM |
Invision Power Board
v9.1.4 © 2025 IPS, Inc.


