|
|
|
Porsche, and the Porsche crest are registered trademarks of Dr. Ing. h.c. F. Porsche AG.
This site is not affiliated with Porsche in any way. Its only purpose is to provide an online forum for car enthusiasts. All other trademarks are property of their respective owners. |
|
|

  |

| Cheapsnake |
 Sep 11 2010, 05:47 PM Sep 11 2010, 05:47 PM
Post
#1
|
|
Member  Group: Members Posts: 419 Joined: 15-November 07 From: Door County, WI Member No.: 8,341 |
Got busted studs on your bumper pads? If you're like me you can't stand tossing stuff that has useful life left in it. If so, here's a quick, easy and effective fix.
If your pad's reinforcement steel is rusted and crunchy (like this one) you're in luck because it makes the job that much easier. First thing you do is pop out the plastic spacer that surrounds the stud. Under that you'll find what's left of the stud attached to a piece of the reinforcement steel. Dig it out and you'll have some solid rubber behind it to work with. Once the old stud is out, drill a 3/8" hole about 3/4" into the rubber, careful that you don't drill all the way through. 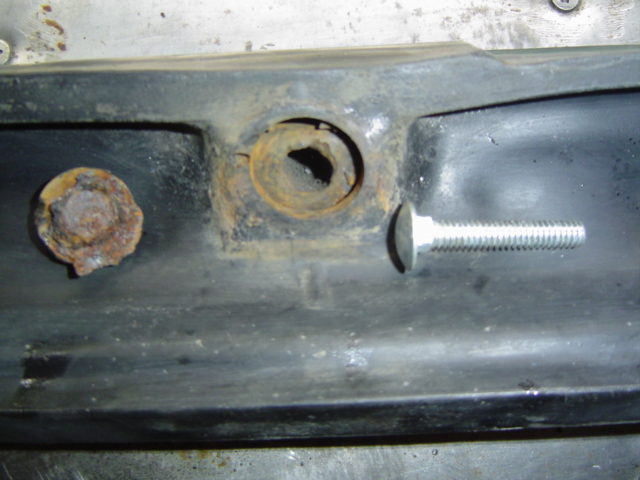 To replace the stud, I used a 1/4" x 1 1/2" carraige bolt. Jam the bolt into the hole as far as it will go and adjust it to be centered. 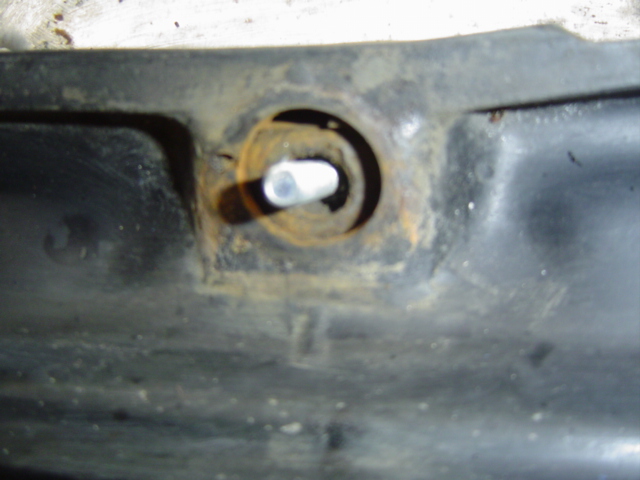 Next, you need something to bed the bolt into the hole. I used heavy duty construction adhesive just cuz it retains a bit of flexibility and that's what I had handy. I'm guessing most any other heavy bodied adhesive would work here. Once the adhesive is in place, jam a 7/16" washer into the recess. There's a lip over the recess so you'll have to work a bit to get the washer seated under the lip. This will provide most of the holding power so do don't laze out and just lay the washer on top. 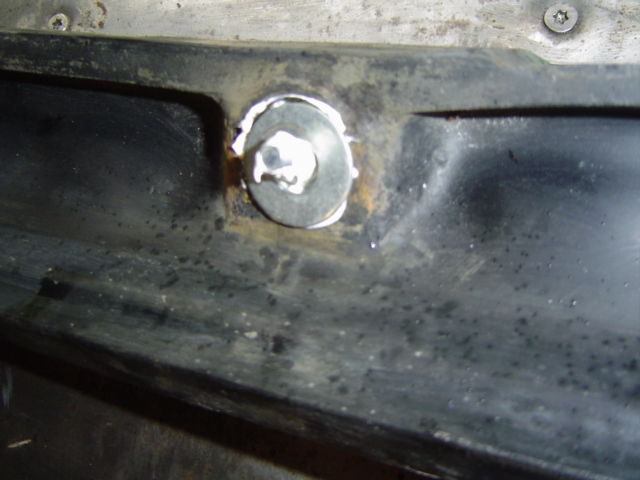 Finally, screw a nut down onto the washer until it flush with the surrounding rubber, slather a bunch more adhesive on and you are done. I did two studs in less than 15 minutes. once the adhesive had dried I did a pull test on the studs and there is no way the stud was coming out without taking a chunk of rubber with it. Best of all, it cost all of $.50 worth of hardware and adhesive. Good luck. Tom |
   |

 
|
| qa1142 |
Sep 11 2010, 05:55 PM
Post
#2
|
|
Whiplash Group: Members Posts: 1,514 Joined: 1-June 04 From: Lake Zurich, Illinois Member No.: 2,140 |
Thanks Tom (IMG:style_emoticons/default/beerchug.gif)
|
|
|
|
| IronHillRestorations |
Sep 12 2010, 09:04 AM
Post
#3
|
|
I. I. R. C. Group: Members Posts: 6,719 Joined: 18-March 03 From: West TN Member No.: 439 Region Association: None |
Great tip!
Now if you could just fix the rippling problem so easily. |
|
|
|
| Cheapsnake |
Sep 13 2010, 07:50 AM
Post
#4
|
|
Member Group: Members Posts: 419 Joined: 15-November 07 From: Door County, WI Member No.: 8,341 |
QUOTE(9146986 @ Sep 12 2010, 07:04 AM)  Great tip! Now if you could just fix the rippling problem so easily. difficult I can do right away, the impossible takes a little longer. Tom |
|
|
|
| realred914 |
Sep 14 2010, 02:13 PM
Post
#5
|
|
Senior Member Group: Retired Members Posts: 1,086 Joined: 1-April 10 From: california Member No.: 11,541 Region Association: None |
use of adhesive like balck silicone rubber RTV works great to secure pads on teh bumber also, helps to have some screws left to hold, but if only one screw is missing a bead of silicone keeps the rubber in place fairly well
|
|
|
|
|
1 User(s) are reading this topic (1 Guests and 0 Anonymous Users)
0 Members:

|
Lo-Fi Version | Time is now: 16th May 2024 - 01:43 AM |
Invision Power Board
v9.1.4 © 2024 IPS, Inc.