|
|
|
Porsche, and the Porsche crest are registered trademarks of Dr. Ing. h.c. F. Porsche AG.
This site is not affiliated with Porsche in any way. Its only purpose is to provide an online forum for car enthusiasts. All other trademarks are property of their respective owners. |
|
|

  |

| tornik550 |
 Sep 17 2010, 08:40 PM Sep 17 2010, 08:40 PM
Post
#1
|
|
Senior Member  Group: Members Posts: 1,248 Joined: 29-January 07 From: Ohio Member No.: 7,486 Region Association: None |
I had to take out my engine to fix a few issues. I took off the heads to inspect a few things. I figure that since I have the heads off, I should see if anything needs replaced. I really don't know the history of the heads. I purchased them from somebody on the internet. I figure the story that I got from the PO was pretty much worthless. Here are my questions-
1. I removed the springs and valve keepers. How do I safely remove the valves from the guides? The end where the keepers connect to the valve seems to get hung up on the valve guide. 2. How can I tell if my valve seats are worn? 3. Approximately, how much am I looking at spending to replace the valve guides? 4. If there are cracks, are they typically visible to the naked eye? 5. Are there any other major issues that I need to look at when inspecting the heads? I am replacing the entire valve train so I am looking more for non-valve train related issues. Almost forgot- I am working with a tight budget (another kid on the way). |
   |

 
|
| JimN73 |
Sep 17 2010, 10:00 PM
Post
#2
|
|
Senior Member Group: Members Posts: 535 Joined: 6-October 07 From: Gig Harbor Member No.: 8,192 Region Association: Pacific Northwest |
You will often find cracks around the spark plug hole. Harder to find are the cracks that often show up in the exhaust port.
Use a Dremel to clean the crud off of the area behind the seats in the exhaust ports. Most cracks will show up as black lines in the material. If the crack is just starting, you will see a straight line (almost white) in the port. I just went through this and couldn't find a head that wasn't cracked. Rimco(??) in Arizona has a good reputation, the guy at the Buggy Patch says he can fix them. There are others, maybe Fat Perfomance. Look at the AA webste, too. I went with new heads because I didn't really trust that I could get a 100% good fix. Jim |
|
|
|
| tornik550 |
Sep 18 2010, 12:53 PM
Post
#3
|
|
Senior Member Group: Members Posts: 1,248 Joined: 29-January 07 From: Ohio Member No.: 7,486 Region Association: None |
QUOTE(JimN73 @ Sep 18 2010, 12:00 AM)  You will often find cracks around the spark plug hole. Harder to find are the cracks that often show up in the exhaust port. Use a Dremel to clean the crud off of the area behind the seats in the exhaust ports. Most cracks will show up as black lines in the material. If the crack is just starting, you will see a straight line (almost white) in the port. I just went through this and couldn't find a head that wasn't cracked. Rimco(??) in Arizona has a good reputation, the guy at the Buggy Patch says he can fix them. There are others, maybe Fat Perfomance. Look at the AA webste, too. I went with new heads because I didn't really trust that I could get a 100% good fix. Jim I did not see any around the spark plug holes. I cannot inspect the exhaust port because I cannot get the valves out. I do not want force the valves out. How to get them out safely? The springs and keepers are off but the end of the valves seem to get hung up on the guides. I would love to buy a new set of heads however with another child on the way, my wife is getting somewhat fed up with me spending large amount of money on my hobbies. |
|
|
|
| brer |
Sep 18 2010, 02:09 PM
Post
#4
|
|
Advanced Member Group: Members Posts: 2,555 Joined: 10-March 05 From: san diego Member No.: 3,736 Region Association: None |
QUOTE(tornik550 @ Sep 17 2010, 07:40 PM) I had to take out my engine to fix a few issues. I took off the heads to inspect a few things. I figure that since I have the heads off, I should see if anything needs replaced. I really don't know the history of the heads. I purchased them from somebody on the internet. I figure the story that I got from the PO was pretty much worthless. Here are my questions- 1. I removed the springs and valve keepers. How do I safely remove the valves from the guides? The end where the keepers connect to the valve seems to get hung up on the valve guide. 2. How can I tell if my valve seats are worn? 3. Approximately, how much am I looking at spending to replace the valve guides? 4. If there are cracks, are they typically visible to the naked eye? 5. Are there any other major issues that I need to look at when inspecting the heads? I am replacing the entire valve train so I am looking more for non-valve train related issues. Almost forgot- I am working with a tight budget (another kid on the way). What type of engine is this? 1. you may be experiencing some spread at the keeper area. I use a very small air tool that looks like a belt sander, but with a fine polishing belt to knock those edges down when this happens. If you are planning on replacing the valve you can do something similar with fine sand paper or a file. If you are unable to remove the valve through the guide your guide may not be too worn, but you would have to have the proper tools to check the wear. "feel" is ok when you are familiar with what a new or worn guide feels like. 2. The more the seats are worn the more recessed into the head they become. You can assess the seats by having a shop inspect them and attempt to freshen the valve job. A quick visual would be possible if you put magic marker on the sealing surface of the valve and with a bit of force engage it against the valve seat. You could then see the size and location of the seat interface with the valve. If its more than a few millimeters and at the outside edge of the valve it may be time to refresh the valve job, and find out if the seats need replacing. *If these are the factory seats you might want to have them replaced full stop. 3. If you replace the guides you need to valve job the head. If you do that you may want to have the seats done as well, and install new valves like most people want to do. If the seats are original then replace them, so you're looking at a full rebuild which is about 600-700 without crack repairs. Of course you would have to find someone you trust to do it.. which is the kicker in the cylinder head game. 4. Cracks are visible when you bead blast the head and heat them in the oven for a bit. Some are under the exhaust seat and may not be visible until the seats are out. Look into the exhaust port from both sides, and carefully at the spark plug holes. Also inspect the exhaust stud bosses as these get cracked all the time. 5. rocker assemblies should be checked for wear. If you are upgrading the valvetrain alot of folks are using the upgraded single spring/cro mo retainer setup from jake. Inspect the tips of your adjusters for wear and pitting. have fun! (IMG:style_emoticons/default/beer.gif) |
|
|
|
| tornik550 |
Sep 18 2010, 02:54 PM
Post
#5
|
|
Senior Member Group: Members Posts: 1,248 Joined: 29-January 07 From: Ohio Member No.: 7,486 Region Association: None |
QUOTE(brer @ Sep 18 2010, 04:09 PM) What type of engine is this? 1. you may be experiencing some spread at the keeper area. I use a very small air tool that looks like a belt sander, but with a fine polishing belt to knock those edges down when this happens. If you are planning on replacing the valve you can do something similar with fine sand paper or a file. If you are unable to remove the valve through the guide your guide may not be too worn, but you would have to have the proper tools to check the wear. "feel" is ok when you are familiar with what a new or worn guide feels like. 2. The more the seats are worn the more recessed into the head they become. You can assess the seats by having a shop inspect them and attempt to freshen the valve job. A quick visual would be possible if you put magic marker on the sealing surface of the valve and with a bit of force engage it against the valve seat. You could then see the size and location of the seat interface with the valve. If its more than a few millimeters and at the outside edge of the valve it may be time to refresh the valve job, and find out if the seats need replacing. *If these are the factory seats you might want to have them replaced full stop. 3. If you replace the guides you need to valve job the head. If you do that you may want to have the seats done as well, and install new valves like most people want to do. If the seats are original then replace them, so you're looking at a full rebuild which is about 600-700 without crack repairs. Of course you would have to find someone you trust to do it.. which is the kicker in the cylinder head game. 4. Cracks are visible when you bead blast the head and heat them in the oven for a bit. Some are under the exhaust seat and may not be visible until the seats are out. Look into the exhaust port from both sides, and carefully at the spark plug holes. Also inspect the exhaust stud bosses as these get cracked all the time. 5. rocker assemblies should be checked for wear. If you are upgrading the valvetrain alot of folks are using the upgraded single spring/cro mo retainer setup from jake. Inspect the tips of your adjusters for wear and pitting. have fun! (IMG:style_emoticons/default/beer.gif) Thank you for the info. That was precisely what I was looking for. My engine is a 2270. For some reason, cyl 3 intake was not opening properly. I thought it was a geometry problem (for some reason I had different shims on that cylinder). When I got the springs off, I found that the intake valve on cyl 3 does not move freely. There are a lot of performance shops around my house but none that specializes in VW/Porsche heads. They mostly do muscle cars. Would a shop like that most likely be able to replace a valve guide on our engines? I think that I am at least going to replace the cyl 3 guide and valve. If I have to get the rest fixed, I will but only if I have too. |
|
|
|
| Mark Henry |
Sep 18 2010, 04:43 PM
Post
#6
|
|
that's what I do! Group: Members Posts: 20,065 Joined: 27-December 02 From: Port Hope, Ontario Member No.: 26 Region Association: Canada |
Most shops that don't do aircooleds try to stick cast iron guides or liners in them which is a hack. You have to de-burr the mushroomed stem on that valve. Flip the valves and install them backwards, with dial indicator you should have >.015 play. Most likely it's seized from bad gas. Guides must be cored before removing, this is really a job for a good shop.
They crack between the seats and seat to spark plug and in the exhaust port, I don't heat them as I've never had a problem seeing the cracks after blasting. You might get lucky as us northern folks have nowhere near the cracking issues that the southern folks do. But that said even up here good heads are getting hard to find. |
|
|
|
| Jake Raby |
Sep 19 2010, 04:59 PM
Post
#7
|
|
Engine Surgeon Group: Members Posts: 9,394 Joined: 31-August 03 From: Lost Member No.: 1,095 Region Association: South East States |
Post some pics of each chamber and the exhaust ports of these heads.
|
|
|
|
| tornik550 |
Sep 19 2010, 08:04 PM
Post
#8
|
|
Senior Member Group: Members Posts: 1,248 Joined: 29-January 07 From: Ohio Member No.: 7,486 Region Association: None |
QUOTE(Jake Raby @ Sep 19 2010, 06:59 PM) Post some pics of each chamber and the exhaust ports of these heads. Here is a pic of cyl 3. I have not gotten the head bead blasted yet. I realize it is impossible to see if there are any cracks from the pic since they are dirty. I posted it just so people can see what I am talking about below. This has been quite interesting. The reason that I am redoing the heads now is when I rebuilt my heads, I had a set of good 2.0l heads but my friend had a set of 1.7l heads with bigger valves. When I got the heads, I they were fully assembled and I was told they were in usable shape. I visually inspected them and everything seemed ok. I figured that I may have problems but the price was right so I put them on. Now that I am getting the valves out, I am able to inspect the head better. I was somewhat surprised when I saw the intake valve seats. The intake valves are 42mm and exhaust is 38mm. When I got the intake valves off I saw that the port is unchanged and it looks like the intake valve seat is slanted to accommodate a larger valve- what is the point of that? If the post is small, who cares what size the valve is? Assuming that both heads are ok, would it be better to use the pictured heads or switch to my 2.0l heads? Disclaimer- I have been hanging around this forum for a few years however I am a big newbie so take it easy on me. I may be missing some obvious stuff. I am learning. Attached image(s) 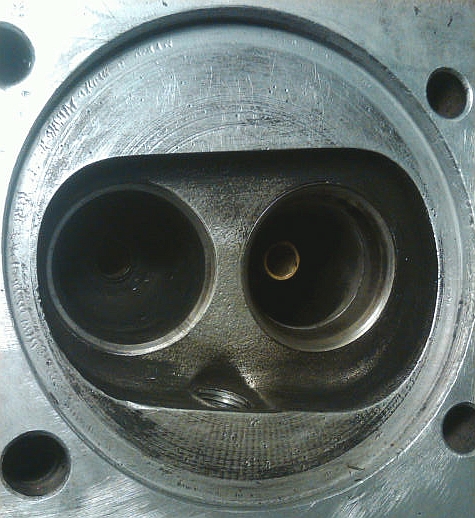
|
|
|
|
|
1 User(s) are reading this topic (1 Guests and 0 Anonymous Users)
0 Members:

|
Lo-Fi Version | Time is now: 21st May 2024 - 05:12 AM |
Invision Power Board
v9.1.4 © 2024 IPS, Inc.