|
|
|
Porsche, and the Porsche crest are registered trademarks of Dr. Ing. h.c. F. Porsche AG.
This site is not affiliated with Porsche in any way. Its only purpose is to provide an online forum for car enthusiasts. All other trademarks are property of their respective owners. |
|
|


| Krieger |
 Sep 24 2010, 08:48 PM Sep 24 2010, 08:48 PM
Post
#21
|
|
Advanced Member  Group: Members Posts: 4,870 Joined: 24-May 04 From: Santa Rosa CA Member No.: 2,104 Region Association: None |
So I have been working like a dog at work, on the house, with my kids, wife and not in this order. The last 20 months have been when the majority of the work has been done. I do enjoy the post here and try to contibute, but I just haven't had the time to make a progress thread. What may or may not be seen in the pics: chasis stiffening kit, engman kit and suspension console reinforcement of my own design. This console reinforcing was detailed on the club site and is in the classics. This car is being built for mostly track use, but I intend for now to keep it street legal...or at least appear like it is. The car started life as a 1972 1.7 I bought for $300 complete with 86k total miles. I got it to run with the replacement of one seal and a used head sensor. I bought it for my ding dong brother who later said he didn't want it. It made sense for me to convert this car for track use rather than butcher up my very nice 75. As luck would have it, about 6 months later I purchased a very wrecked original 70 six with a 3.0L in it........
Attached image(s) 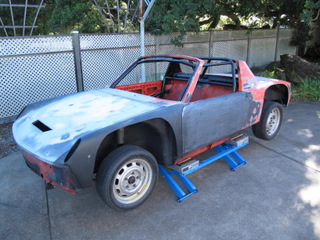
|
   |

 
|
Posts in this topic
 Krieger My 72 3.0 progress thread: Project F-914 Sep 24 2010, 08:48 PM
 Krieger The body on this car is very straight, just uglier... Sep 24 2010, 08:52 PM Krieger I have an RX-7 cooler with a shroud that I built t... Sep 24 2010, 08:53 PM Krieger The cage is from Tangerine racing with some other ... Sep 24 2010, 08:57 PM Krieger The engine compartment, with bracing and angle iro... Sep 24 2010, 08:59 PM Krieger I did some bracing in the rear trunk as well. I c... Sep 24 2010, 09:07 PM Krieger closer Sep 24 2010, 09:08 PM Krieger I also did away with the front trunk springs and m... Sep 24 2010, 09:12 PM Krieger $2.00 Pontiac part and reinforcing for front ... Sep 24 2010, 09:13 PM Krieger Other bits not seen but on:
Rennmetal flat-tow br... Sep 24 2010, 09:21 PM FourBlades This is a cool looking build! :trophy: :wel... Sep 25 2010, 09:30 PM Krieger I have some more time to post pictures correctly. ... Sep 26 2010, 10:49 AM
Krieger The body on this car is very straight, just uglier... Sep 24 2010, 08:52 PM Krieger I have an RX-7 cooler with a shroud that I built t... Sep 24 2010, 08:53 PM Krieger The cage is from Tangerine racing with some other ... Sep 24 2010, 08:57 PM Krieger The engine compartment, with bracing and angle iro... Sep 24 2010, 08:59 PM Krieger I did some bracing in the rear trunk as well. I c... Sep 24 2010, 09:07 PM Krieger closer Sep 24 2010, 09:08 PM Krieger I also did away with the front trunk springs and m... Sep 24 2010, 09:12 PM Krieger $2.00 Pontiac part and reinforcing for front ... Sep 24 2010, 09:13 PM Krieger Other bits not seen but on:
Rennmetal flat-tow br... Sep 24 2010, 09:21 PM FourBlades This is a cool looking build! :trophy: :wel... Sep 25 2010, 09:30 PM Krieger I have some more time to post pictures correctly. ... Sep 26 2010, 10:49 AM
 Randal
I have some more time to post pictures correctly.... Dec 24 2011, 05:16 PM Krieger I thought the big rivets, silver paint, and the ho... Sep 26 2010, 10:52 AM Krieger A dozen spray cans of olive drab was easy to do in... Sep 26 2010, 10:54 AM Krieger It looks so freakin cool :D Sep 26 2010, 10:56 AM Krieger Here is the front trunk with my "deluxe... Sep 26 2010, 10:58 AM DanT looking nice Andy, and some excellent "outsid... Sep 26 2010, 11:06 AM Krieger
looking nice Andy, and some excellent "outsi... Sep 26 2010, 11:09 AM Krieger I owe some credit to Sir Andy for the how I cut th... Sep 26 2010, 11:06 AM Krieger Another rear trunk done! Sep 26 2010, 11:11 AM Phil Plummer
Another rear trunk done!
Hi I have put a 3.0... Apr 2 2013, 06:29 AM Krieger This car will handle like it was on rails so I... Sep 26 2010, 11:16 AM rick 918-S Nice placement of the angle iron rear tower brace.... Sep 26 2010, 11:22 AM Krieger Front suspension detail: Carrera front struts/bra... Sep 26 2010, 11:27 AM Krieger Rear suspension detail: Elephant polybronze, Koni ... Sep 26 2010, 11:32 AM NS914
Rear suspension detail: Elephant polybronze, Koni... Oct 12 2010, 07:12 AM Hontec WOW!! love it !!! :beer2: Sep 26 2010, 12:01 PM 3d914 Very nice job, Andy! Sep 26 2010, 05:26 PM JRust Looking great man! :Qarl: Sep 26 2010, 07:52 PM RobW Nice work Andy! Living the dream! :Qarl: Oct 12 2010, 07:40 AM Krieger Thanks Rob, I am living the dream! I am livi... Oct 12 2010, 08:23 PM ChrisNPDrider Andy! Nice work buddy. It's great to see a... Oct 13 2010, 02:10 PM Krieger Of course I wanted something different for my dash... Oct 17 2010, 09:36 AM Krieger As you can see the dimensions are similar to the s... Oct 17 2010, 09:46 AM gothspeed Great job!!! :beer1: Oct 17 2010, 11:02 AM Krieger Here is the dash bent up. I paid the shop where I... Oct 24 2010, 06:54 PM Krieger Here is the gauge hoop bolted up. A little more f... Oct 24 2010, 06:59 PM Eric_Shea Sweet project Andy. Oct 24 2010, 07:11 PM pete000 What kind of floor lift is that? looks pretty slic... Oct 24 2010, 07:56 PM Krieger A very cool tool. Check post #30 for link. Oct 24 2010, 08:31 PM arkitect Andy,
Cool project, I like the aircraft theme you... Oct 24 2010, 08:40 PM Krieger Got the cover made and riveted in place. I used s... Nov 4 2010, 09:23 PM Krieger Bird's eye. :D I have a can of krylon wrin... Nov 4 2010, 09:25 PM SGB the coolness of simplicity.
So minimalist.
Gre... Nov 5 2010, 07:16 AM tdgray Really Neat... like what you are doing. Nov 5 2010, 09:14 AM Krieger Dash pic added. Wrinkle finished failed large fla... Dec 12 2010, 10:47 PM Krieger Got the engine lid finished. Home depot handle an... Dec 12 2010, 11:22 PM Krieger So I have been working on my car and its been near... Dec 9 2011, 06:30 PM Krieger I need to rebuild the carbs still. The bracket on... Dec 9 2011, 06:34 PM Krieger Since this car is such a mix of parts I needed to ... Dec 9 2011, 06:41 PM Krieger Here is the rest of the harness. Most of my suppl... Dec 9 2011, 06:52 PM Krieger Here is one of my rebuilt Ferrari rear calipers. ... Dec 9 2011, 06:57 PM Krieger Front sway bar and heavy A calipers. When I learn ... Dec 9 2011, 07:02 PM Krieger Something simple, cheap, light and fun. If you we... Dec 9 2011, 07:08 PM Krieger I didn't want to do this project. I'm get... Dec 9 2011, 07:13 PM Krieger One of my "buddies" conviced me I needed... Dec 9 2011, 07:16 PM Krieger Here is the engine compartment with my new connect... Dec 9 2011, 07:22 PM Krieger Oil line routing in front trunk. The lines are go... Dec 9 2011, 07:28 PM Krieger Passenger side. Hole saws courtesy my pal Marty. ... Dec 9 2011, 07:32 PM Krieger Windshield from that same doner car at pick n pull... Dec 9 2011, 07:37 PM Krieger I liked the look of the original chrome wiper harw... Dec 9 2011, 07:46 PM RobW
What you see of the wiper system is all there is.... Dec 10 2011, 06:45 AM Krieger Almost forgot. The MSD 6AL box is wired into the ... Dec 9 2011, 07:50 PM Jeffs9146 What year 3.0L is it? I didn't need a tach ada... Dec 9 2011, 11:33 PM Phil Plummer
What year 3.0L is it? I didn't need a tach ad... Jul 21 2012, 05:03 PM Krieger The engine is from a 78. The tach is from an unkn... Dec 10 2011, 09:05 AM Krieger Here is a close up of the paint, er glass beaded a... Dec 24 2011, 03:26 PM Randal
Here is a close up of the paint, er glass beaded ... Dec 24 2011, 05:13 PM Krieger I had someone spray it in my garage. I'm good... Dec 24 2011, 06:03 PM Krieger Got my oil lines and fuel system done! Mazda R... Apr 20 2012, 11:18 PM Krieger I ran the lines in the long and wrapped them with ... Apr 20 2012, 11:21 PM Krieger The left engine compartment view. Yes the line is... Apr 20 2012, 11:24 PM Krieger Here is the right side detail. with my home grown ... Apr 20 2012, 11:31 PM Krieger A better view of oil thermostat and line routing. Apr 22 2012, 08:06 PM Krieger Carbs done! I did the float bowel mod to keep... Jun 24 2012, 12:27 PM Krieger Engine/trans going in! Jun 24 2012, 12:28 PM Krieger Bingo!! :Qarl: :Qarl: :Qarl: Note the ... Jun 24 2012, 12:30 PM Krieger MSDS 1 1/2" headers ceramic coated. I am usi... Jun 24 2012, 12:52 PM Krieger I came up with a creative solution for an oil tank... Jun 24 2012, 12:57 PM Krieger Installed. I welded in a bracket to support the s... Jun 24 2012, 01:01 PM Krieger Sir Andy style axles. I needed loger CV bolts tha... Jun 24 2012, 01:05 PM Krieger All trim! Jun 24 2012, 01:08 PM Krieger I need to do some ignition, carb sorting and align... Feb 2 2013, 10:49 AM Krieger The rims on it now are my street wheels. Feb 2 2013, 10:52 AM Krieger I had my OMP seats covered in army style heavy OD ... Feb 2 2013, 10:54 AM Krieger :D Feb 2 2013, 10:57 AM Phil Plummer
:D
Hi I am building a 914/6 with a 3.0 in it fro... Mar 6 2013, 08:46 PM Lennies914
:D
Hi I am building a 914/6 with a 3.0 in it fr... Mar 7 2013, 08:59 PM jeff I love it! Feb 2 2013, 02:34 PM Lennies914 Looking awesome Andy! :beer1: Feb 3 2013, 10:43 AM Krieger Hey Phil. I am totally unfamiliar with the factory... Mar 7 2013, 06:38 PM Krieger My car has carburetors. If you look at the pics y... Apr 2 2013, 01:46 PM Mark Henry Cool build :) Jul 16 2013, 12:30 PM MATTYLITE The headlights look great! Is that just flat l... Jul 16 2013, 01:16 PM Krieger Thanks Mark! The covers are just flat Lexan. ... Jul 16 2013, 07:55 PM ChrisNPDrider SWEET :beer2: Jul 17 2013, 11:39 AM 3d914 Looking awesome, Andy. now lets hear that thing gr... Dec 27 2013, 07:31 PM Krieger For fun I had some placards made at Aircraft Engra... Jan 19 2014, 02:31 PM 3d914 Nice touch! I hope those guns are rear-mounted... Mar 28 2014, 12:43 PM
Randal
I have some more time to post pictures correctly.... Dec 24 2011, 05:16 PM Krieger I thought the big rivets, silver paint, and the ho... Sep 26 2010, 10:52 AM Krieger A dozen spray cans of olive drab was easy to do in... Sep 26 2010, 10:54 AM Krieger It looks so freakin cool :D Sep 26 2010, 10:56 AM Krieger Here is the front trunk with my "deluxe... Sep 26 2010, 10:58 AM DanT looking nice Andy, and some excellent "outsid... Sep 26 2010, 11:06 AM Krieger
looking nice Andy, and some excellent "outsi... Sep 26 2010, 11:09 AM Krieger I owe some credit to Sir Andy for the how I cut th... Sep 26 2010, 11:06 AM Krieger Another rear trunk done! Sep 26 2010, 11:11 AM Phil Plummer
Another rear trunk done!
Hi I have put a 3.0... Apr 2 2013, 06:29 AM Krieger This car will handle like it was on rails so I... Sep 26 2010, 11:16 AM rick 918-S Nice placement of the angle iron rear tower brace.... Sep 26 2010, 11:22 AM Krieger Front suspension detail: Carrera front struts/bra... Sep 26 2010, 11:27 AM Krieger Rear suspension detail: Elephant polybronze, Koni ... Sep 26 2010, 11:32 AM NS914
Rear suspension detail: Elephant polybronze, Koni... Oct 12 2010, 07:12 AM Hontec WOW!! love it !!! :beer2: Sep 26 2010, 12:01 PM 3d914 Very nice job, Andy! Sep 26 2010, 05:26 PM JRust Looking great man! :Qarl: Sep 26 2010, 07:52 PM RobW Nice work Andy! Living the dream! :Qarl: Oct 12 2010, 07:40 AM Krieger Thanks Rob, I am living the dream! I am livi... Oct 12 2010, 08:23 PM ChrisNPDrider Andy! Nice work buddy. It's great to see a... Oct 13 2010, 02:10 PM Krieger Of course I wanted something different for my dash... Oct 17 2010, 09:36 AM Krieger As you can see the dimensions are similar to the s... Oct 17 2010, 09:46 AM gothspeed Great job!!! :beer1: Oct 17 2010, 11:02 AM Krieger Here is the dash bent up. I paid the shop where I... Oct 24 2010, 06:54 PM Krieger Here is the gauge hoop bolted up. A little more f... Oct 24 2010, 06:59 PM Eric_Shea Sweet project Andy. Oct 24 2010, 07:11 PM pete000 What kind of floor lift is that? looks pretty slic... Oct 24 2010, 07:56 PM Krieger A very cool tool. Check post #30 for link. Oct 24 2010, 08:31 PM arkitect Andy,
Cool project, I like the aircraft theme you... Oct 24 2010, 08:40 PM Krieger Got the cover made and riveted in place. I used s... Nov 4 2010, 09:23 PM Krieger Bird's eye. :D I have a can of krylon wrin... Nov 4 2010, 09:25 PM SGB the coolness of simplicity.
So minimalist.
Gre... Nov 5 2010, 07:16 AM tdgray Really Neat... like what you are doing. Nov 5 2010, 09:14 AM Krieger Dash pic added. Wrinkle finished failed large fla... Dec 12 2010, 10:47 PM Krieger Got the engine lid finished. Home depot handle an... Dec 12 2010, 11:22 PM Krieger So I have been working on my car and its been near... Dec 9 2011, 06:30 PM Krieger I need to rebuild the carbs still. The bracket on... Dec 9 2011, 06:34 PM Krieger Since this car is such a mix of parts I needed to ... Dec 9 2011, 06:41 PM Krieger Here is the rest of the harness. Most of my suppl... Dec 9 2011, 06:52 PM Krieger Here is one of my rebuilt Ferrari rear calipers. ... Dec 9 2011, 06:57 PM Krieger Front sway bar and heavy A calipers. When I learn ... Dec 9 2011, 07:02 PM Krieger Something simple, cheap, light and fun. If you we... Dec 9 2011, 07:08 PM Krieger I didn't want to do this project. I'm get... Dec 9 2011, 07:13 PM Krieger One of my "buddies" conviced me I needed... Dec 9 2011, 07:16 PM Krieger Here is the engine compartment with my new connect... Dec 9 2011, 07:22 PM Krieger Oil line routing in front trunk. The lines are go... Dec 9 2011, 07:28 PM Krieger Passenger side. Hole saws courtesy my pal Marty. ... Dec 9 2011, 07:32 PM Krieger Windshield from that same doner car at pick n pull... Dec 9 2011, 07:37 PM Krieger I liked the look of the original chrome wiper harw... Dec 9 2011, 07:46 PM RobW
What you see of the wiper system is all there is.... Dec 10 2011, 06:45 AM Krieger Almost forgot. The MSD 6AL box is wired into the ... Dec 9 2011, 07:50 PM Jeffs9146 What year 3.0L is it? I didn't need a tach ada... Dec 9 2011, 11:33 PM Phil Plummer
What year 3.0L is it? I didn't need a tach ad... Jul 21 2012, 05:03 PM Krieger The engine is from a 78. The tach is from an unkn... Dec 10 2011, 09:05 AM Krieger Here is a close up of the paint, er glass beaded a... Dec 24 2011, 03:26 PM Randal
Here is a close up of the paint, er glass beaded ... Dec 24 2011, 05:13 PM Krieger I had someone spray it in my garage. I'm good... Dec 24 2011, 06:03 PM Krieger Got my oil lines and fuel system done! Mazda R... Apr 20 2012, 11:18 PM Krieger I ran the lines in the long and wrapped them with ... Apr 20 2012, 11:21 PM Krieger The left engine compartment view. Yes the line is... Apr 20 2012, 11:24 PM Krieger Here is the right side detail. with my home grown ... Apr 20 2012, 11:31 PM Krieger A better view of oil thermostat and line routing. Apr 22 2012, 08:06 PM Krieger Carbs done! I did the float bowel mod to keep... Jun 24 2012, 12:27 PM Krieger Engine/trans going in! Jun 24 2012, 12:28 PM Krieger Bingo!! :Qarl: :Qarl: :Qarl: Note the ... Jun 24 2012, 12:30 PM Krieger MSDS 1 1/2" headers ceramic coated. I am usi... Jun 24 2012, 12:52 PM Krieger I came up with a creative solution for an oil tank... Jun 24 2012, 12:57 PM Krieger Installed. I welded in a bracket to support the s... Jun 24 2012, 01:01 PM Krieger Sir Andy style axles. I needed loger CV bolts tha... Jun 24 2012, 01:05 PM Krieger All trim! Jun 24 2012, 01:08 PM Krieger I need to do some ignition, carb sorting and align... Feb 2 2013, 10:49 AM Krieger The rims on it now are my street wheels. Feb 2 2013, 10:52 AM Krieger I had my OMP seats covered in army style heavy OD ... Feb 2 2013, 10:54 AM Krieger :D Feb 2 2013, 10:57 AM Phil Plummer
:D
Hi I am building a 914/6 with a 3.0 in it fro... Mar 6 2013, 08:46 PM Lennies914
:D
Hi I am building a 914/6 with a 3.0 in it fr... Mar 7 2013, 08:59 PM jeff I love it! Feb 2 2013, 02:34 PM Lennies914 Looking awesome Andy! :beer1: Feb 3 2013, 10:43 AM Krieger Hey Phil. I am totally unfamiliar with the factory... Mar 7 2013, 06:38 PM Krieger My car has carburetors. If you look at the pics y... Apr 2 2013, 01:46 PM Mark Henry Cool build :) Jul 16 2013, 12:30 PM MATTYLITE The headlights look great! Is that just flat l... Jul 16 2013, 01:16 PM Krieger Thanks Mark! The covers are just flat Lexan. ... Jul 16 2013, 07:55 PM ChrisNPDrider SWEET :beer2: Jul 17 2013, 11:39 AM 3d914 Looking awesome, Andy. now lets hear that thing gr... Dec 27 2013, 07:31 PM Krieger For fun I had some placards made at Aircraft Engra... Jan 19 2014, 02:31 PM 3d914 Nice touch! I hope those guns are rear-mounted... Mar 28 2014, 12:43 PM  |
1 User(s) are reading this topic (1 Guests and 0 Anonymous Users)
0 Members:

|
Lo-Fi Version | Time is now: 22nd July 2026 - 02:01 PM |
Invision Power Board
v9.1.4 © 2026 IPS, Inc.