|
|
|
Porsche, and the Porsche crest are registered trademarks of Dr. Ing. h.c. F. Porsche AG.
This site is not affiliated with Porsche in any way. Its only purpose is to provide an online forum for car enthusiasts. All other trademarks are property of their respective owners. |
|
|

  |

| Bartlett 914 |
 Oct 8 2010, 12:13 PM Oct 8 2010, 12:13 PM
Post
#1
|
|
Advanced Member  Group: Members Posts: 2,214 Joined: 30-August 05 From: South Elgin IL Member No.: 4,707 Region Association: Upper MidWest |
I have a relay board that was giving me grief. Several times the car would not start. Cleaning the fuse seemed to help but once in a great while the problem returned. The problem was the fuse holder. As these connections get dirty, they heat up. The problem in my case was aggravated by the use of the heater fan. This draws more current and made the problem of the fuse heating worse. I have some before and after pictures. You can see how the fuse holder is leaning back. If you look closer, you can see melted plastic where it is mounted. My solution was to install a new fuse holder. I recently installed an Engman fuse panel so now all my fuses will be the newer style. No more VW fuses! Te resin I used was Vagabond Model-cast 3521S black. This stuff flows like water and dries pretty fast. It is hard when cured and looks real nice. The biggest problem is the resin flowing through the board and leaking. I knew this would happen and I taped where I thought it would leak out. I missed the voltage regulator socket. It looked fine from the rear but it leaked real bad. I had quite a time sealing this up. If you do this, try epoxy first to seal where the pins come through.
Attached image(s) 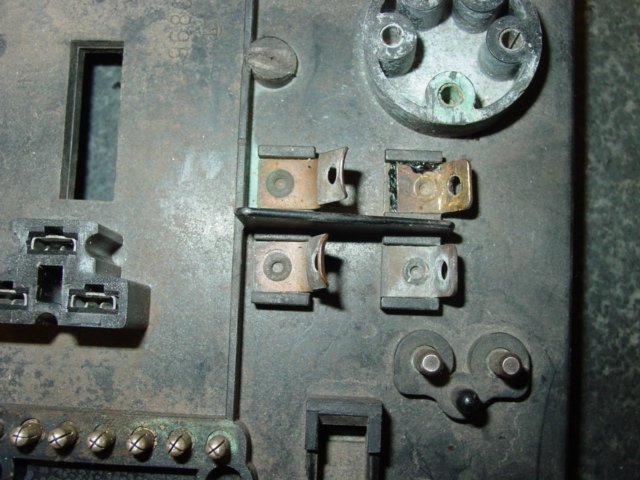 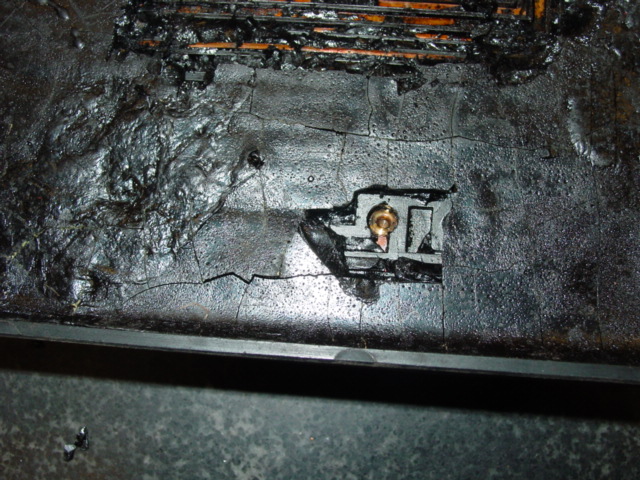 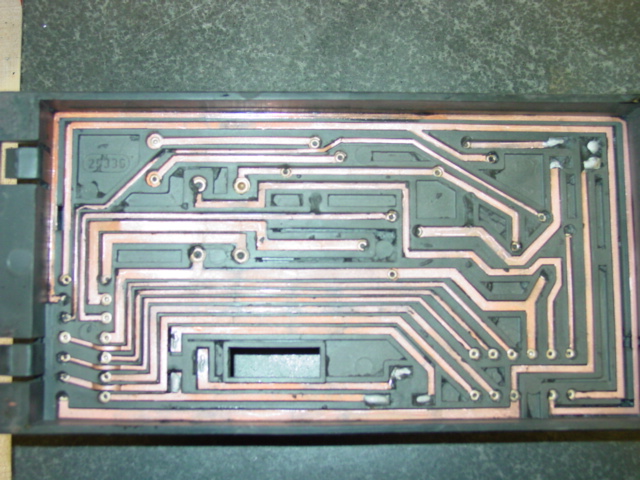
|
   |

 
|
| Bartlett 914 |
Oct 8 2010, 12:15 PM
Post
#2
|
|
Advanced Member Group: Members Posts: 2,214 Joined: 30-August 05 From: South Elgin IL Member No.: 4,707 Region Association: Upper MidWest |
kjyf
Attached image(s) 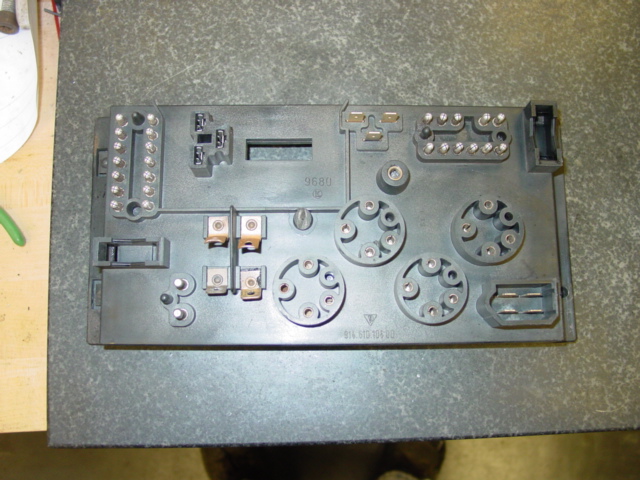 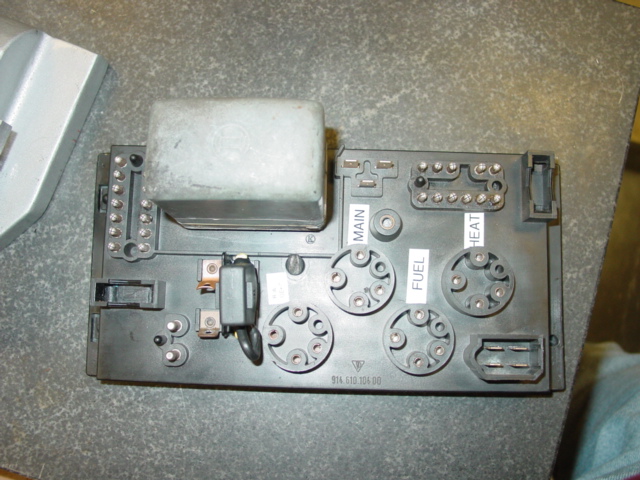 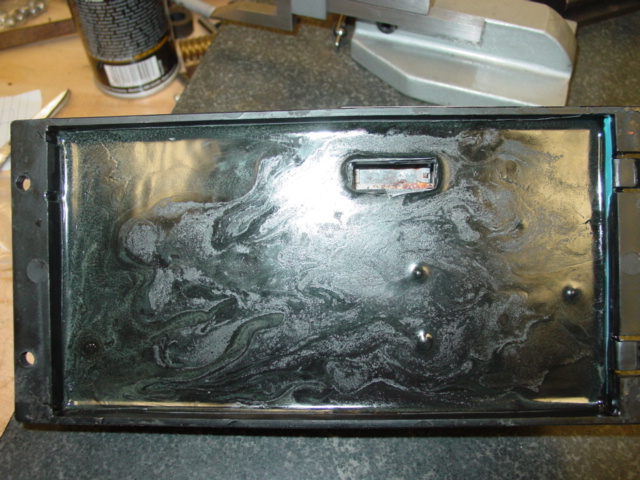
|
|
|
|
| Drums66 |
Oct 8 2010, 12:21 PM
Post
#3
|
|
914 Rudiments Group: Members Posts: 5,321 Joined: 15-January 03 From: Coronado,Cali Member No.: 151 Region Association: Southwest Region |
..Came out decent... (IMG:style_emoticons/default/shades.gif)
what did you use on the corrosion? (IMG:style_emoticons/default/bye1.gif) |
|
|
|
| Bartlett 914 |
Oct 8 2010, 12:38 PM
Post
#4
|
|
Advanced Member Group: Members Posts: 2,214 Joined: 30-August 05 From: South Elgin IL Member No.: 4,707 Region Association: Upper MidWest |
QUOTE(Drums66 @ Oct 8 2010, 01:21 PM)  ..Came out decent... (IMG:style_emoticons/default/shades.gif) what did you use on the corrosion? (IMG:style_emoticons/default/bye1.gif) I gave it a very quick glass bead shot. Front and back. |
|
|
|
| Drums66 |
Oct 8 2010, 03:02 PM
Post
#5
|
|
914 Rudiments Group: Members Posts: 5,321 Joined: 15-January 03 From: Coronado,Cali Member No.: 151 Region Association: Southwest Region |
...Excellent...thank you for the reply sir (IMG:style_emoticons/default/shades.gif)
(good job (IMG:style_emoticons/default/first.gif) ) (IMG:style_emoticons/default/bye1.gif) |
|
|
|
| VaccaRabite |
Aug 21 2018, 07:17 AM
Post
#6
|
|
En Garde! Group: Admin Posts: 13,420 Joined: 15-December 03 From: Dallastown, PA Member No.: 1,435 Region Association: MidAtlantic Region |
QUOTE(Bartlett 914 @ Oct 8 2010, 02:15 PM) kjyf Hey, I know this is an old thread, but I may need to renue my board. How did you get up all the old potting? I know you said you hit everything with a little glass bead, but did you do any testing of the relay board to make sure all the connections were solid? Zach |
|
|
|
| Bartlett 914 |
Aug 21 2018, 08:06 AM
Post
#7
|
|
Advanced Member Group: Members Posts: 2,214 Joined: 30-August 05 From: South Elgin IL Member No.: 4,707 Region Association: Upper MidWest |
QUOTE(Vacca Rabite @ Aug 21 2018, 08:17 AM) QUOTE(Bartlett 914 @ Oct 8 2010, 02:15 PM) kjyf Hey, I know this is an old thread, but I may need to renue my board. How did you get up all the old potting? I know you said you hit everything with a little glass bead, but did you do any testing of the relay board to make sure all the connections were solid? Zach Good news and bad news here. I still have that board. I came out great looking and worked awhile but the old issue came back. I replaced it and I never went back to see exactly where the issue is. I suspect there is a bad connection with the buss bars and probably a relay socket pin. I have heard that these should be soldered first and then the epoxy installed. Now that this has been done, it is too late for mine. I consider the board to be not repairable at this time. The epoxy was from Smooth-on. If someone does this there is a problem with the epoxy running through where relay connections are located. Make extra sure these holes are plugged somehow. |
|
|
|
| bbrock |
Aug 21 2018, 08:16 AM
Post
#8
|
|
914 Guru Group: Members Posts: 5,269 Joined: 17-February 17 From: Montana Member No.: 20,845 Region Association: Rocky Mountains |
QUOTE(Vacca Rabite @ Aug 21 2018, 07:17 AM) QUOTE(Bartlett 914 @ Oct 8 2010, 02:15 PM) kjyf Hey, I know this is an old thread, but I may need to renue my board. How did you get up all the old potting? I know you said you hit everything with a little glass bead, but did you do any testing of the relay board to make sure all the connections were solid? Zach I did mine recently and just chipped the old tar out carefully with a screw driver and dental picks. I used a brass brush and CRC Contact Cleaner and Protectant to clean the traces and connection, then MG Chemicals Black Epoxy Encapsulating and Potting Compound to repot. My board worked fine when the car was retired so I just visually inspected all the traces and connection to pins, but if I suspected anything, I would have tested the resistance between traces and pins and terminals. I also use dielectric grease on all terminal contacts to protect from future corrosion. (IMG:http://www.914world.com/bbs2/uploads/post-20845-1522247648_thumb.jpg) |
|
|
|
| 914_teener |
Aug 21 2018, 09:21 AM
Post
#9
|
|
914 Guru Group: Members Posts: 5,193 Joined: 31-August 08 From: So. Cal Member No.: 9,489 Region Association: Southern California |
QUOTE(Vacca Rabite @ Aug 21 2018, 06:17 AM) QUOTE(Bartlett 914 @ Oct 8 2010, 02:15 PM) kjyf Hey, I know this is an old thread, but I may need to renue my board. How did you get up all the old potting? I know you said you hit everything with a little glass bead, but did you do any testing of the relay board to make sure all the connections were solid? Zach I soaked mine in regular gas in a solvent resistant tray to get the compound soft. soldered all the riveted connectiions. Mine also failed at the Aux heating fan trace. |
|
|
|
| bbrock |
Aug 21 2018, 09:42 AM
Post
#10
|
|
914 Guru Group: Members Posts: 5,269 Joined: 17-February 17 From: Montana Member No.: 20,845 Region Association: Rocky Mountains |
QUOTE(914_teener @ Aug 21 2018, 09:21 AM) soldered all the riveted connectiions. Great idea! Wish I'd done that. (IMG:style_emoticons/default/dry.gif) |
|
|
|
| MarkV |
Aug 21 2018, 08:15 PM
Post
#11
|
|
Fear the Jack Stands Group: Members Posts: 1,493 Joined: 15-January 03 From: Sunny Tucson, AZ Member No.: 154 Region Association: None |
I thought about soldering but wasn't sure I had a way to get the connections hot enough to flow solder. A couple of my connections that were exposed had some green oxide forming on them. I removed all of old tar and then cleaned with spray electrical contact cleaner. I coated the bottom this stuff:
http://www.starbrite.com/item/liquid-electrical-tape It worked well and remains flexible. I think I got the idea from someone here. |
|
|
|
| Bartlett 914 |
Aug 21 2018, 09:23 PM
Post
#12
|
|
Advanced Member Group: Members Posts: 2,214 Joined: 30-August 05 From: South Elgin IL Member No.: 4,707 Region Association: Upper MidWest |
QUOTE(MarkV @ Aug 21 2018, 09:15 PM) I thought about soldering but wasn't sure I had a way to get the connections hot enough to flow solder. A couple of my connections that were exposed had some green oxide forming on them. I removed all of old tar and then cleaned with spray electrical contact cleaner. I coated the bottom this stuff: http://www.starbrite.com/item/liquid-electrical-tape It worked well and remains flexible. I think I got the idea from someone here. I have not tried soldering either. I too was concerned about the heat and melting plastic. |
|
|
|
| porschetub |
Aug 21 2018, 11:15 PM
Post
#13
|
|
Advanced Member Group: Members Posts: 4,696 Joined: 25-July 15 From: New Zealand Member No.: 18,995 Region Association: None |
QUOTE(Bartlett 914 @ Aug 22 2018, 02:06 AM) QUOTE(Vacca Rabite @ Aug 21 2018, 08:17 AM) QUOTE(Bartlett 914 @ Oct 8 2010, 02:15 PM) kjyf Hey, I know this is an old thread, but I may need to renue my board. How did you get up all the old potting? I know you said you hit everything with a little glass bead, but did you do any testing of the relay board to make sure all the connections were solid? Zach Good news and bad news here. I still have that board. I came out great looking and worked awhile but the old issue came back. I replaced it and I never went back to see exactly where the issue is. I suspect there is a bad connection with the buss bars and probably a relay socket pin. I have heard that these should be soldered first and then the epoxy installed. Now that this has been done, it is too late for mine. I consider the board to be not repairable at this time. The epoxy was from Smooth-on. If someone does this there is a problem with the epoxy running through where relay connections are located. Make extra sure these holes are plugged somehow. Seems when they are shite they don't work again after TLC mine was no better and still had a dead pump feed,got a reconditioned unit from a very good seller on here and all is well. |
|
|
|
| VaccaRabite |
Aug 22 2018, 08:00 AM
Post
#14
|
|
En Garde! Group: Admin Posts: 13,420 Joined: 15-December 03 From: Dallastown, PA Member No.: 1,435 Region Association: MidAtlantic Region |
QUOTE(porschetub @ Aug 22 2018, 01:15 AM) Seems when they are shite they don't work again after TLC mine was no better and still had a dead pump feed,got a reconditioned unit from a very good seller on here and all is well. Its a fairly simple board. The idea for cleaning and soldering all the rivets is a good one, as well as checking resistance from pin to pin. If there is a break in the copper somewhere, or corrosion, it should become apparent with a resistance test. If the VR that should be arriving today does not fix my charging system issues, I'm going to pull the board and try to rehab it over the weekend. Zach |
|
|
|
| Bartlett 914 |
Aug 22 2018, 08:33 AM
Post
#15
|
|
Advanced Member Group: Members Posts: 2,214 Joined: 30-August 05 From: South Elgin IL Member No.: 4,707 Region Association: Upper MidWest |
QUOTE(Vacca Rabite @ Aug 22 2018, 09:00 AM) QUOTE(porschetub @ Aug 22 2018, 01:15 AM) Seems when they are shite they don't work again after TLC mine was no better and still had a dead pump feed,got a reconditioned unit from a very good seller on here and all is well. Its a fairly simple board. The idea for cleaning and soldering all the rivets is a good one, as well as checking resistance from pin to pin. If there is a break in the copper somewhere, or corrosion, it should become apparent with a resistance test. If the VR that should be arriving today does not fix my charging system issues, I'm going to pull the board and try to rehab it over the weekend. Zach I really wished I had soldered the connections. I should pick out an old board and see how difficult it will be. Glass bead blasting the copper will help in the soldering as will a good rosin flux (no acid flux). I think with good clean surface to start, it may solder fine. The epoxy is intended to keep atmosphere from corroding the connections. Now that the one I did has been epoxied I will need to wait another 40 years for it to crack out so I can solder it LOL |
|
|
|
| VaccaRabite |
Aug 23 2018, 11:08 AM
Post
#16
|
|
En Garde! Group: Admin Posts: 13,420 Joined: 15-December 03 From: Dallastown, PA Member No.: 1,435 Region Association: MidAtlantic Region |
QUOTE(Bartlett 914 @ Aug 22 2018, 10:33 AM) I really wished I had soldered the connections. I should pick out an old board and see how difficult it will be. Glass bead blasting the copper will help in the soldering as will a good rosin flux (no acid flux). I think with good clean surface to start, it may solder fine. The epoxy is intended to keep atmosphere from corroding the connections. Now that the one I did has been epoxied I will need to wait another 40 years for it to crack out so I can solder it LOL I started stripping mine out last night. Looks straight forward. Of course now that I have 90% of the potting removed, I'm learning that I probably needn't have bothered, and my board was fine as is. Zach |
|
|
|
| Bartlett 914 |
Aug 23 2018, 03:18 PM
Post
#17
|
|
Advanced Member Group: Members Posts: 2,214 Joined: 30-August 05 From: South Elgin IL Member No.: 4,707 Region Association: Upper MidWest |
QUOTE(Vacca Rabite @ Aug 23 2018, 12:08 PM) QUOTE(Bartlett 914 @ Aug 22 2018, 10:33 AM) I really wished I had soldered the connections. I should pick out an old board and see how difficult it will be. Glass bead blasting the copper will help in the soldering as will a good rosin flux (no acid flux). I think with good clean surface to start, it may solder fine. The epoxy is intended to keep atmosphere from corroding the connections. Now that the one I did has been epoxied I will need to wait another 40 years for it to crack out so I can solder it LOL I started stripping mine out last night. Looks straight forward. Of course now that I have 90% of the potting removed, I'm learning that I probably needn't have bothered, and my board was fine as is. Zach If the board is fine then the potting will help keep it that way. If you do, be sure you plug where potting epoxy can run through! |
|
|
|
| Bartlett 914 |
Aug 23 2018, 06:43 PM
Post
#18
|
|
Advanced Member Group: Members Posts: 2,214 Joined: 30-August 05 From: South Elgin IL Member No.: 4,707 Region Association: Upper MidWest |
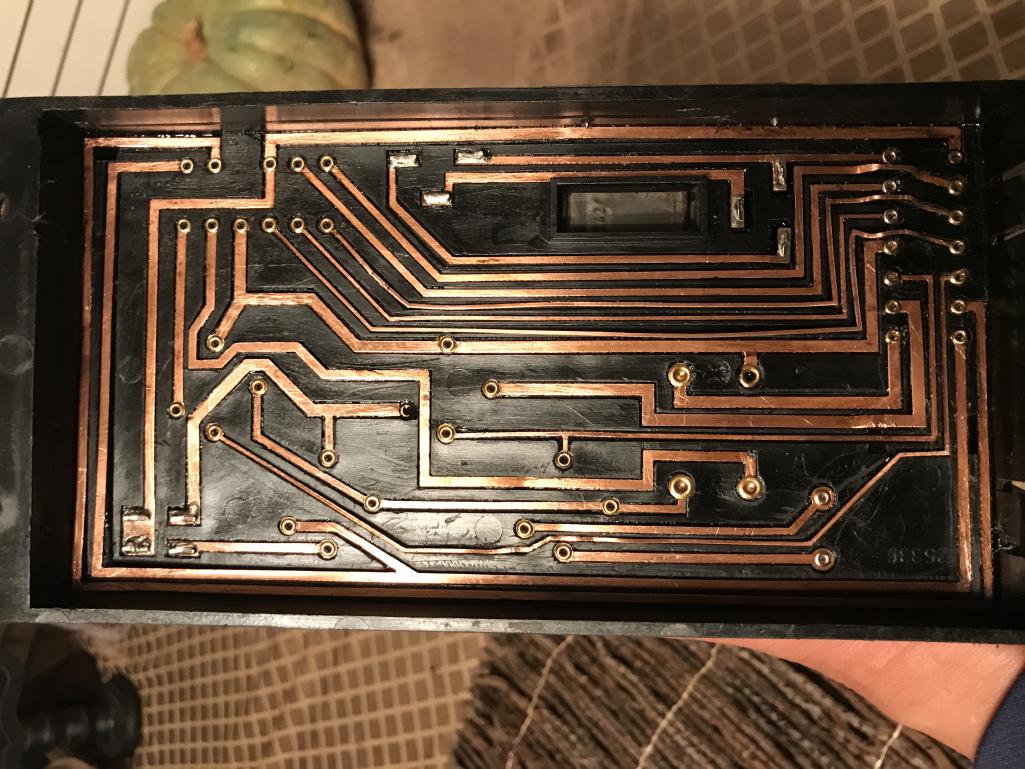
Well Zach got me interested in this board again. It always bothered me that it still had a problem after working on it. The problem was the car sometimes would not start intermittently. I assumed it was the fuse holder as it was messed up pretty bad. Using an ohm meter usually will not find these problems easily as it puts out so little current that poor connections may not show up. I cleaned another relay board and took a picture of the back side. I flipped the picture so I could see the traces as if I was looking through the relay board. I then took a 15 watt light bulb and a power supply and with the lamp in series, used it to ring out the board. All was good. I then cleaned the relay sockets and used Deoxit100 to remove corrosion. I installed the board im my car and it works for now. Here is the picture I used to ring out the board for those wanting to check out a board.
Attached thumbnail(s) 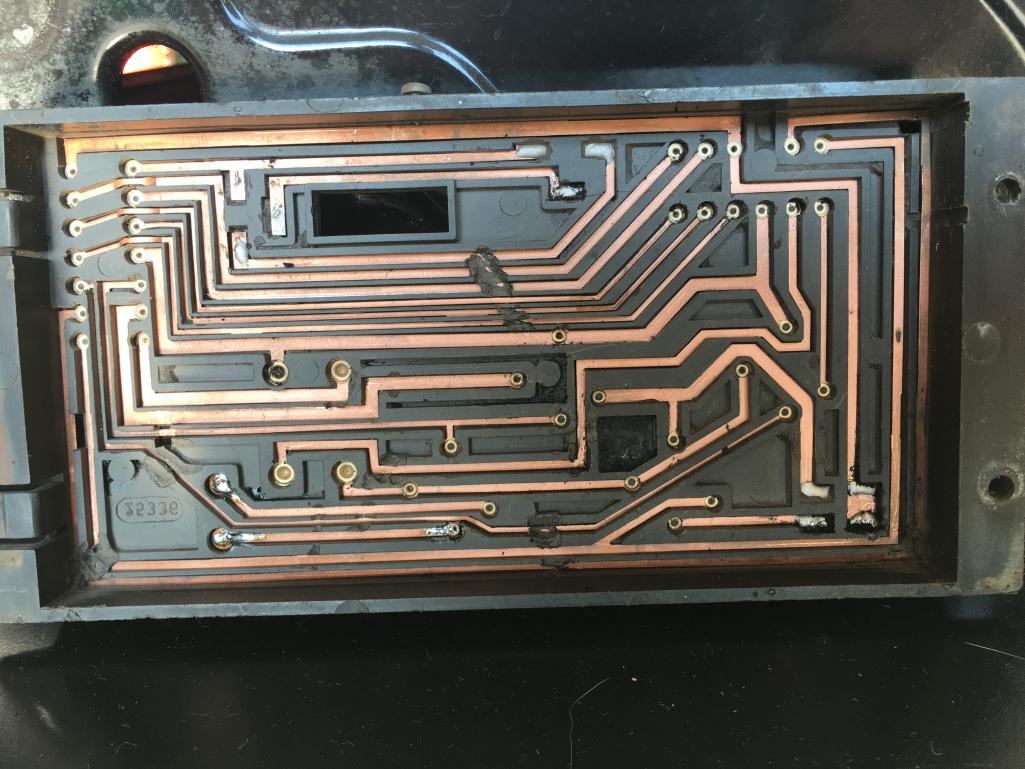
|
|
|
|
| DTMLGND |
Dec 16 2018, 01:36 AM
Post
#19
|
|
Newbie Group: Members Posts: 32 Joined: 6-November 11 From: US Member No.: 13,756 Region Association: Southern California |
Hi! I just acquired my ‘74 2.0 a few months ago and trying to get it started after sitting for possibly 2 years. I’m finding my fuel pump not coming on and upon testing circuits, only two of four injectors functioning. Flipped my board over and it looks like some melted. I chipped away all black epoxy and will proceed with soldering the rivets.
 |
|
|
|
| 930cabman |
May 28 2021, 03:12 PM
Post
#20
|
|
Advanced Member Group: Members Posts: 3,000 Joined: 12-November 20 From: Buffalo Member No.: 24,877 Region Association: North East States |
Again?
I am addressing the relay board and do not know if it has worked recently or not, but while it's out ...... Soldering the factory riveted connections is a good idea after everything is squeaky clean, but re potting? I would prefer to use an original type material. Any ideas? Thanks |
|
|
|
|
1 User(s) are reading this topic (1 Guests and 0 Anonymous Users)
0 Members:

|
Lo-Fi Version | Time is now: 19th April 2024 - 05:39 PM |
Invision Power Board
v9.1.4 © 2024 IPS, Inc.