|
|
|
Porsche, and the Porsche crest are registered trademarks of Dr. Ing. h.c. F. Porsche AG.
This site is not affiliated with Porsche in any way. Its only purpose is to provide an online forum for car enthusiasts. All other trademarks are property of their respective owners. |
|
|

  |

| Mike Bellis |
 Mar 27 2011, 08:33 PM Mar 27 2011, 08:33 PM
Post
#101
|
|
Resident Electrician  Group: Members Posts: 8,348 Joined: 22-June 09 From: Midlothian TX Member No.: 10,496 Region Association: None |
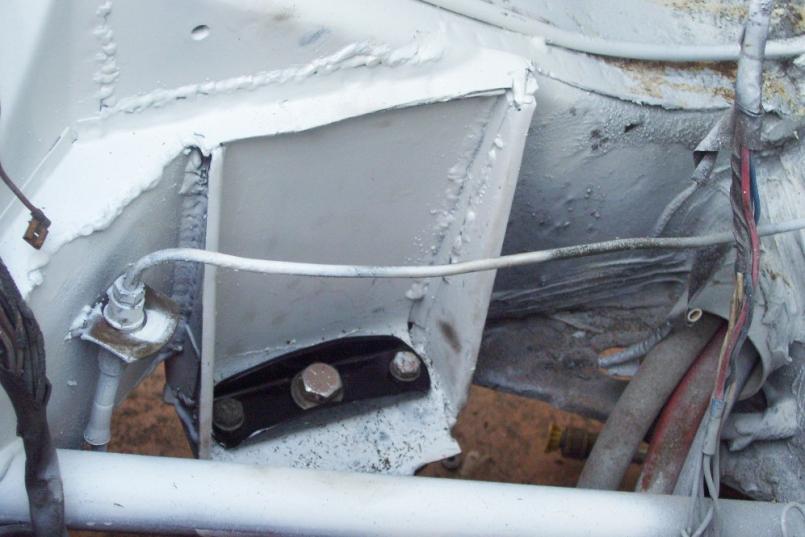
I ground down the welds a little, got it in primer and re-drilled the holes... The 14ga boxed in the mount a little. Should be plenty strong now...
  |
   |

 
|
| Mike Bellis |
Mar 27 2011, 08:38 PM
Post
#102
|
|
Resident Electrician Group: Members Posts: 8,348 Joined: 22-June 09 From: Midlothian TX Member No.: 10,496 Region Association: None |
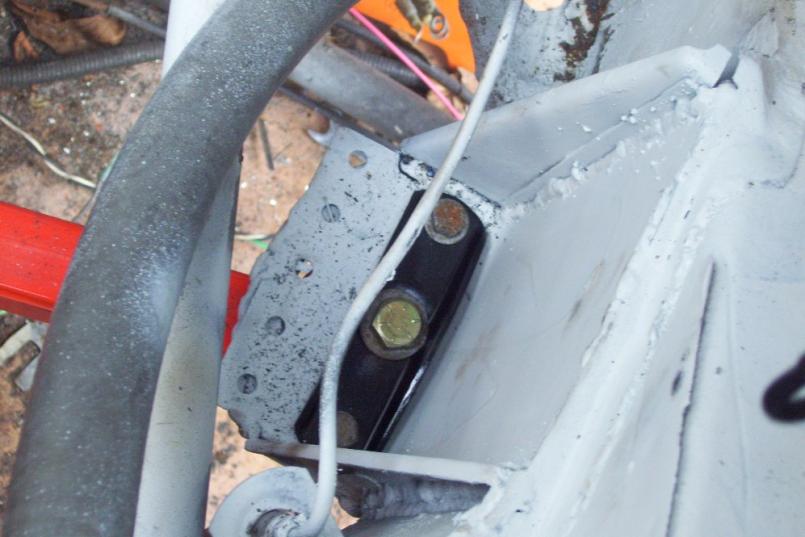
I also moved my urethane mount to the sides. I need to fab a big round plate to sandwhich to the bar...
 Here is the only pic I have of the engine installed. No intake or exhaust and a rag covering. Look how tiny it is.... 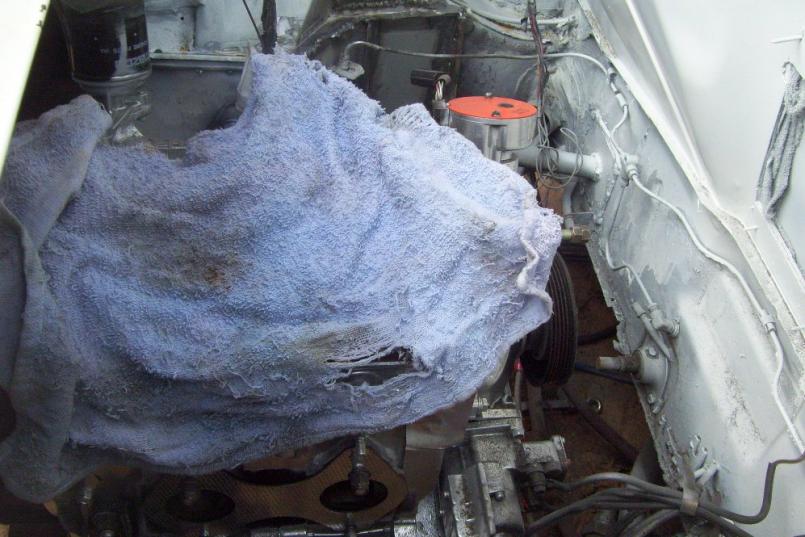 |
|
|
|
| Andyrew |
Mar 28 2011, 11:55 AM
Post
#103
|
|
Spooling.... Please wait Group: Members Posts: 13,380 Joined: 20-January 03 From: Riverbank, Ca Member No.: 172 Region Association: Northern California |
I like the motor mount reinforcements! Probably overkill, but overkill works!
|
|
|
|
| Mike Bellis |
Apr 2 2011, 03:12 PM
Post
#104
|
|
Resident Electrician Group: Members Posts: 8,348 Joined: 22-June 09 From: Midlothian TX Member No.: 10,496 Region Association: None |
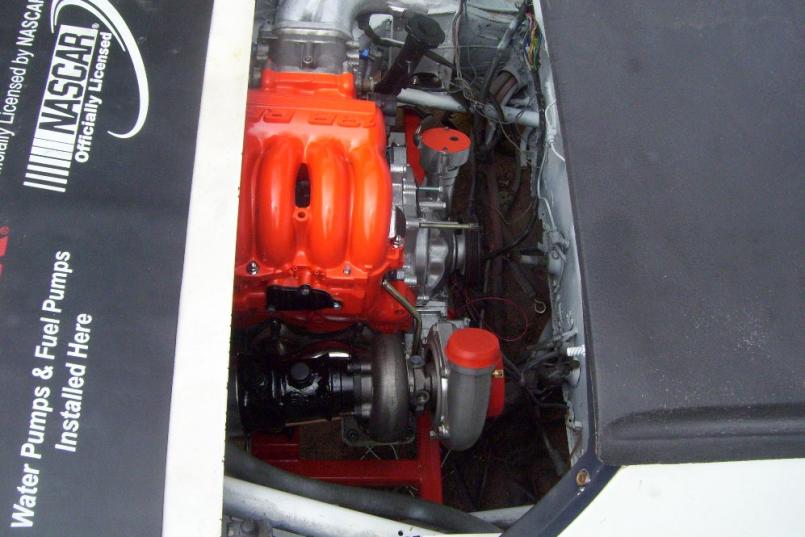
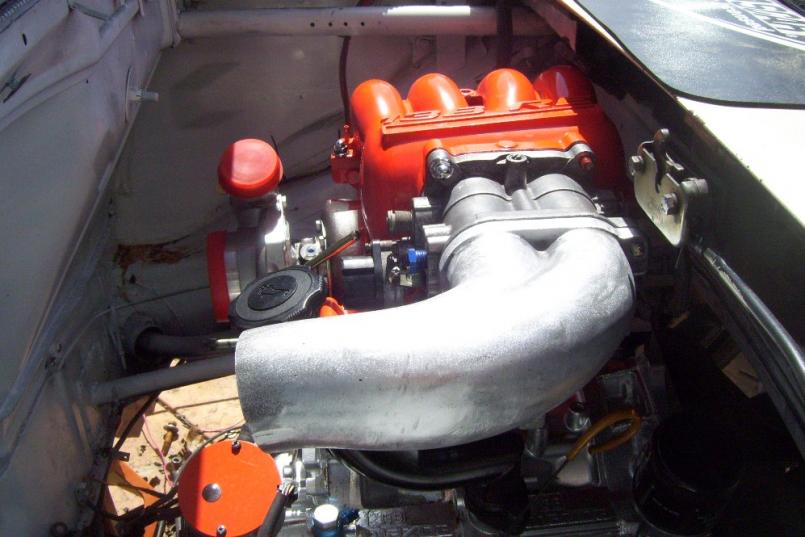
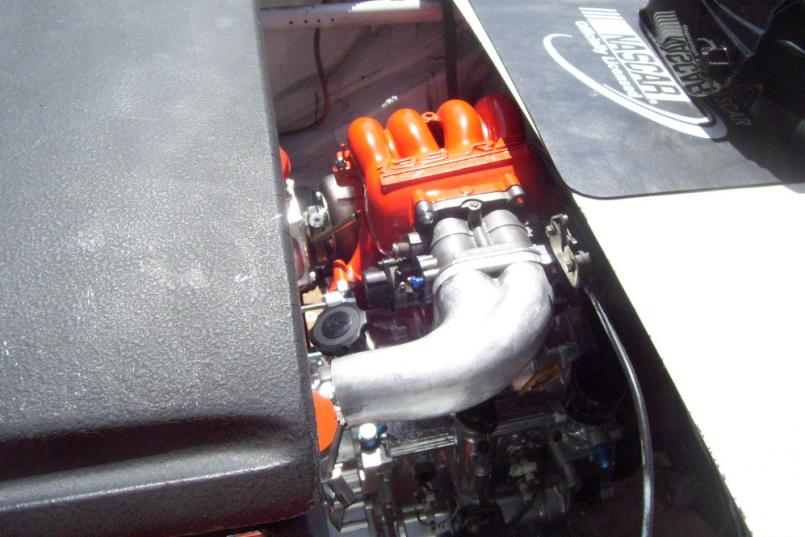
I started mocking up the intake and exhaust. Here's some pics of the almost complete engine in the bay. Sure fits nice...
  |
|
|
|
| Mike Bellis |
Apr 2 2011, 03:14 PM
Post
#105
|
|
Resident Electrician Group: Members Posts: 8,348 Joined: 22-June 09 From: Midlothian TX Member No.: 10,496 Region Association: None |
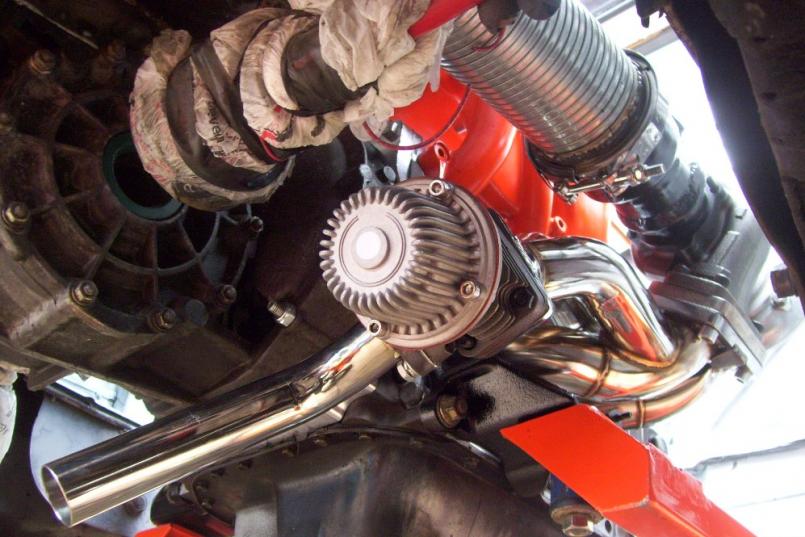
Not exactly sure what I will do with the WG dump. Notice the 3 bung holes for multiple O2 sensors...
  |
|
|
|
| Mike Bellis |
Apr 2 2011, 03:19 PM
Post
#106
|
|
Resident Electrician Group: Members Posts: 8,348 Joined: 22-June 09 From: Midlothian TX Member No.: 10,496 Region Association: None |
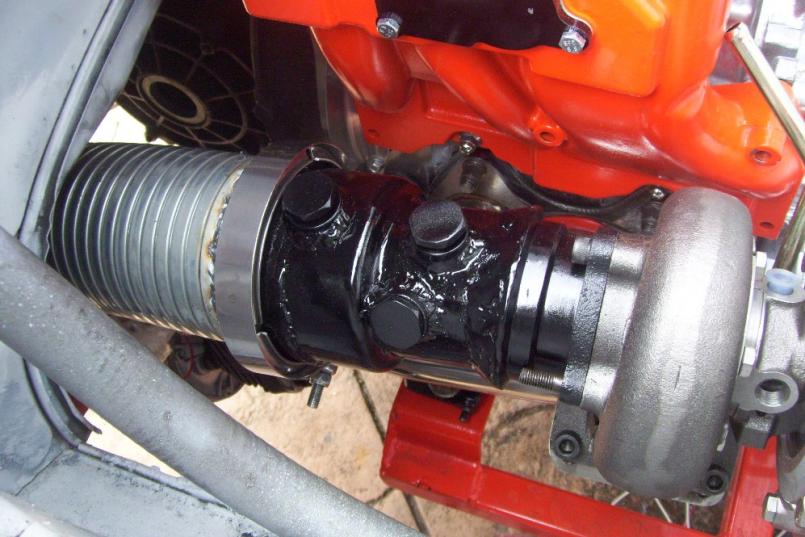
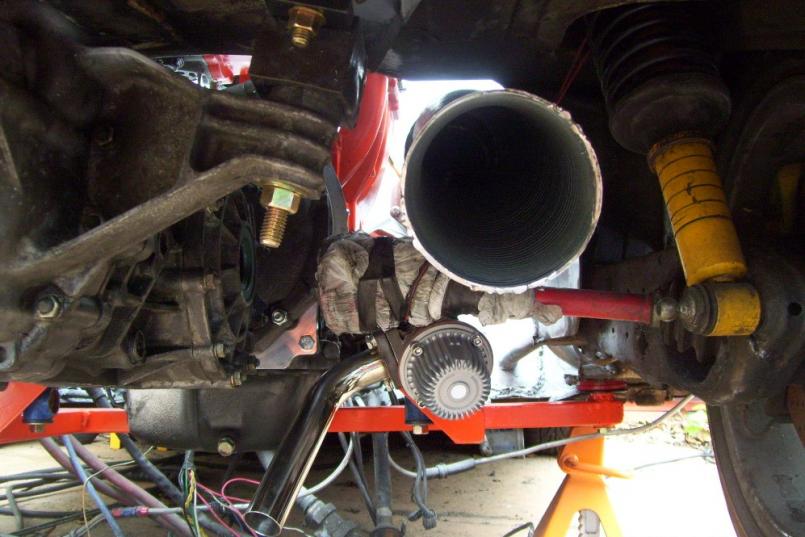
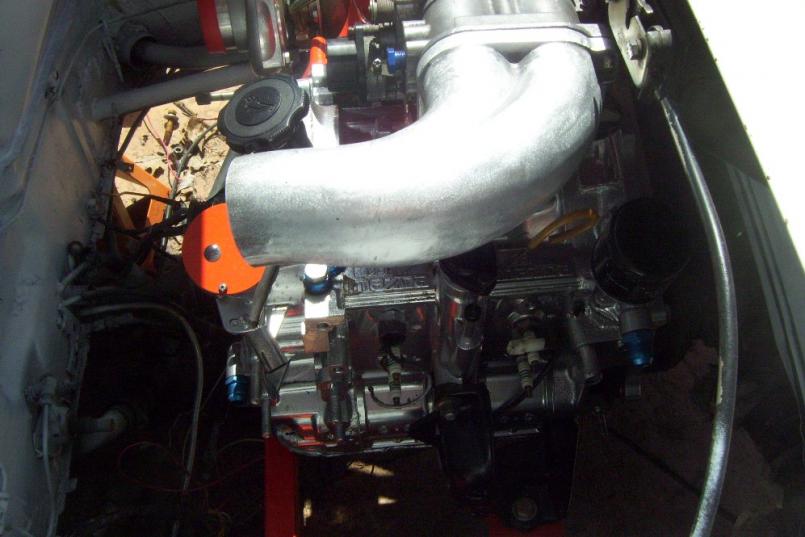
I also need to clock the turbo to its final position. The only piece I can't change is the drain line clearance. I can't put the turbo drain exactly on the bottom. It will get clocked to the 5 O'clock position. I'm using a Semi Truck 4 inch flex pipe for the exhaust...
  |
|
|
|
| Mike Bellis |
Apr 3 2011, 12:23 AM
Post
#107
|
|
Resident Electrician Group: Members Posts: 8,348 Joined: 22-June 09 From: Midlothian TX Member No.: 10,496 Region Association: None |
Few more pics of the engine bay...
  |
|
|
|
| Andyrew |
Apr 4 2011, 09:56 AM
Post
#108
|
|
Spooling.... Please wait Group: Members Posts: 13,380 Joined: 20-January 03 From: Riverbank, Ca Member No.: 172 Region Association: Northern California |
That is one FUNKY exhaust... What material is that made out of? Doesnt look weldable (although im sure it is).
Im just curious.. Why Chevy orange for the engine bits? You gonna repaint your car orange or like the contrast? I like the wastegate dump where it is (Or route it just before the rear wheel (IMG:style_emoticons/default/ohmy.gif)). |
|
|
|
| Mike Bellis |
Apr 4 2011, 12:48 PM
Post
#109
|
|
Resident Electrician Group: Members Posts: 8,348 Joined: 22-June 09 From: Midlothian TX Member No.: 10,496 Region Association: None |
QUOTE(Andyrew @ Apr 4 2011, 08:56 AM)  That is one FUNKY exhaust... What material is that made out of? Doesnt look weldable (although im sure it is). Im just curious.. Why Chevy orange for the engine bits? You gonna repaint your car orange or like the contrast? I like the wastegate dump where it is (Or route it just before the rear wheel (IMG:style_emoticons/default/ohmy.gif)). The flex line is from a Big Rig. It is spiral lock steel. Very thin, weld with care. I love Chevy Orange! I am considering the Red Baron theme (IMG:style_emoticons/default/evilgrin.gif) So the orange will work good with it. Either I leave the dump there or tie it into the exhaust... 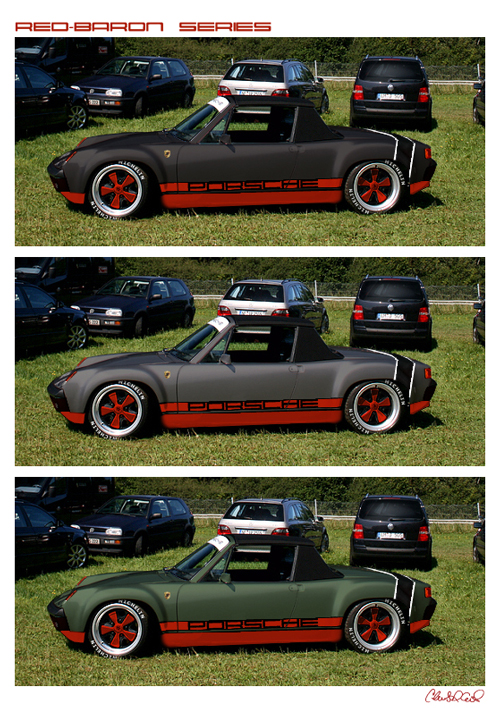 |
|
|
|
| Andyrew |
Apr 4 2011, 01:02 PM
Post
#110
|
|
Spooling.... Please wait Group: Members Posts: 13,380 Joined: 20-January 03 From: Riverbank, Ca Member No.: 172 Region Association: Northern California |
Well if you make the rest of the exhaust out of regular steel you could easily tie it into the exhaust later if/when you find out that its loud as f*&*...
Love the Baron theme! If you go black/orange you would be opposite of my color scheme! (orange/black). So you know what direction I vote for (IMG:style_emoticons/default/smile.gif) |
|
|
|
| Mike Bellis |
Apr 4 2011, 01:07 PM
Post
#111
|
|
Resident Electrician Group: Members Posts: 8,348 Joined: 22-June 09 From: Midlothian TX Member No.: 10,496 Region Association: None |
Yes, The flex will be cut back and tied into a 4" mandrel bent 90, then to my muffler and another 90 turned to the rear. Only 2 bends in my exhaust. I may make the second one a 45 if it looks right.
|
|
|
|
| Mike Bellis |
Apr 4 2011, 06:11 PM
Post
#112
|
|
Resident Electrician Group: Members Posts: 8,348 Joined: 22-June 09 From: Midlothian TX Member No.: 10,496 Region Association: None |
Since I got laid off. I'm staying busy. The PO left me the piece of the firewall cut out for the V8. I spent some time welding it back together. While I was at it, I made an aluminum plats to mount my ECU and misc devices. I also cut a hole for the wiring gromet left over from the Cosmo Turbo (donar car).
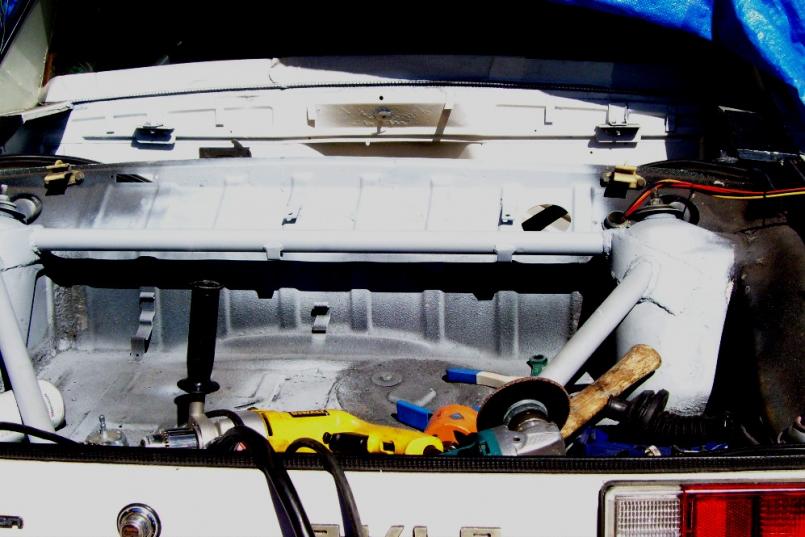 It still needs some grinding and finishing but it will do for now. I still have to pull the car back apart and snad blast it after I get it running... I welded some mounting tabs to hold this plate. I painted it orange for Andrew... 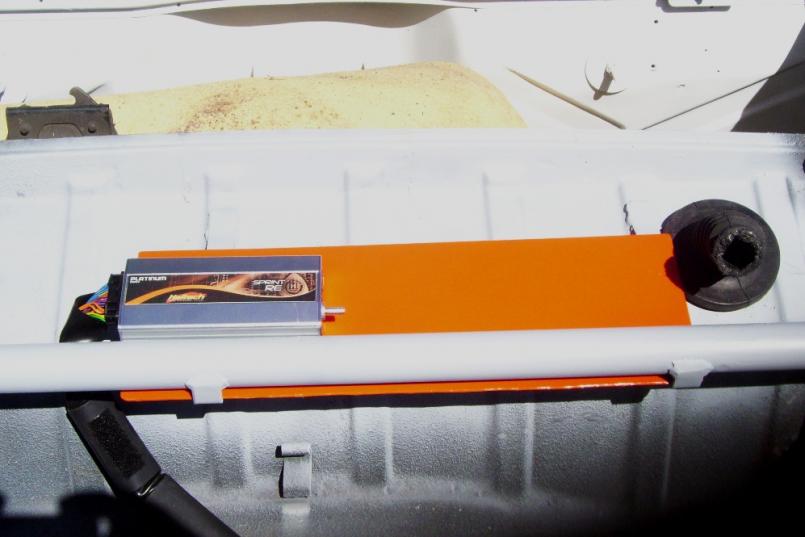 |
|
|
|
| Lennies914 |
Apr 4 2011, 06:29 PM
Post
#113
|
|
Slacker Group: Members Posts: 828 Joined: 9-January 10 From: NorCal Member No.: 11,216 Region Association: Northern California |
[quote name='kg6dxn' date='Apr 4 2011, 05:11 PM' post='1453714']
Since I got laid off. I'm staying busy. Now I understand how you're making so much progress. Sorry to hear it though. (IMG:style_emoticons/default/sad.gif) I'm really enjoying watching Sasquach come together. It's looking great (IMG:style_emoticons/default/piratenanner.gif) |
|
|
|
| Mike Bellis |
Apr 4 2011, 06:35 PM
Post
#114
|
|
Resident Electrician Group: Members Posts: 8,348 Joined: 22-June 09 From: Midlothian TX Member No.: 10,496 Region Association: None |
QUOTE(Lennies914 @ Apr 4 2011, 05:29 PM) Now I understand how you're making so much progress. Sorry to hear it though. (IMG:style_emoticons/default/sad.gif) I'm really enjoying watching Sasquach come together. It's looking great (IMG:style_emoticons/default/piratenanner.gif) Yea, it sucks. First time I've been laid off in 20 years... My right hinge pivot broke too. the bolt sheared off. The PO Brazed the pivot on, real crappy. Used my air chisel to pop it off. I had to drill it out and weld a metrix nut on the back side.. Grond off all the brass and welded it back on. I stole a pivot bot from the red car in the garage... 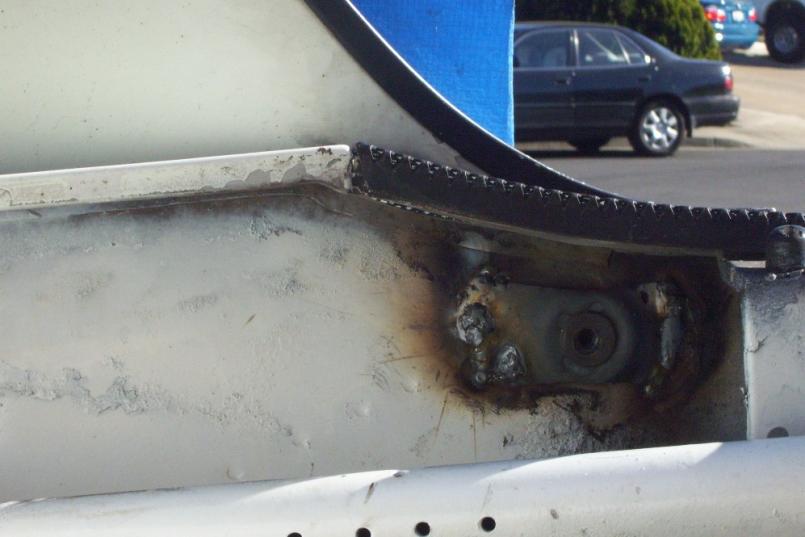 |
|
|
|
| JRust |
Apr 4 2011, 09:56 PM
Post
#115
|
|
914 Guru Group: Members Posts: 6,317 Joined: 10-January 03 From: Albany Oregon Member No.: 129 Region Association: Pacific Northwest |
Good your keeping busy Mike! Went throu a short stretch of being without work a few years back. Drove me nuts! Of course it didn't help that I didn't have a teener to work on at the time (IMG:style_emoticons/default/dry.gif) . Must be why I always seem to have 4 on hand now huh (IMG:style_emoticons/default/WTF.gif)
|
|
|
|
| Andyrew |
Apr 4 2011, 10:36 PM
Post
#116
|
|
Spooling.... Please wait Group: Members Posts: 13,380 Joined: 20-January 03 From: Riverbank, Ca Member No.: 172 Region Association: Northern California |
QUOTE(kg6dxn @ Apr 4 2011, 05:35 PM) My right hinge pivot broke too. the bolt sheared off. The PO Brazed the pivot on, real crappy. Used my air chisel to pop it off. I had to drill it out and weld a metrix nut on the back side.. Grond off all the brass and welded it back on. I stole a pivot bot from the red car in the garage... This is exactly what Dave (Arkitect) needs to do. Oh and I like orange (IMG:style_emoticons/default/smile.gif) |
|
|
|
| Mike Bellis |
Apr 5 2011, 01:57 PM
Post
#117
|
|
Resident Electrician Group: Members Posts: 8,348 Joined: 22-June 09 From: Midlothian TX Member No.: 10,496 Region Association: None |
Deciced to build a shift rod today. The design concept is similar to the J West system. Much props to J West but I am a CSOB. The oil pan is in the way of a striaght shot to the shift console. My design includes 2 U Joints and a bent rod. On my other tranny (this one is for mock up only) I have dual bushing. One in the stock location and one on a custom bracket at the rear of the console. Just as in the J West design, the dual bushings hold the rod from flopping around and allow the use of the rear U Joint. My system is built with 5/8", 0.120 wall DOM. I had a long piece laying around. The U Joints were $7 on eBay. Remember I'm a CSOB.
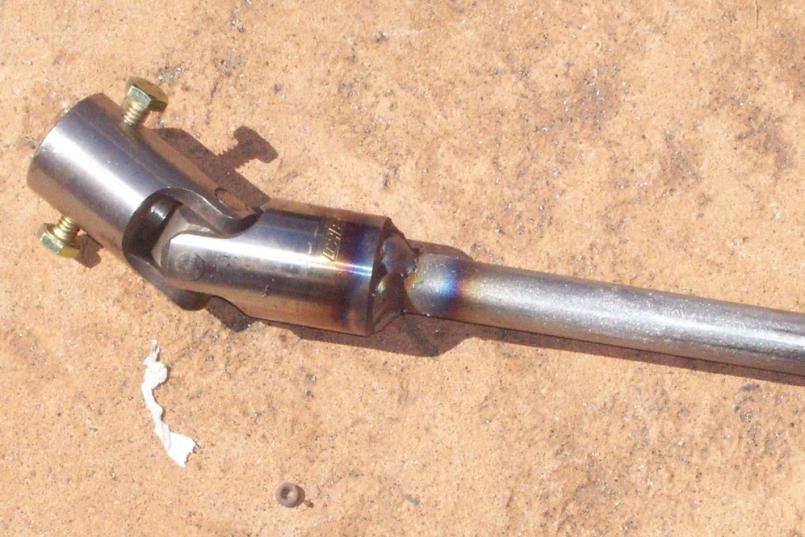
First thing was to drill and tap two holes in the U Joint. I tapped for 1/4-20 thread. This will be the connection point to the front rod and the rear console rod. The bolts will allow adjustment and fine tuning the gear selection. 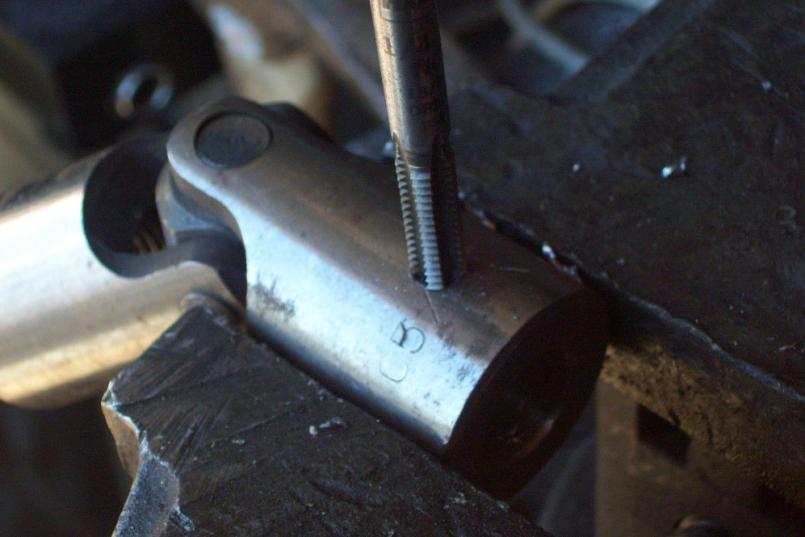 I had to hone the inside a little to fit the DOM. I had solid rod too but it is much heavier Than the tubing. 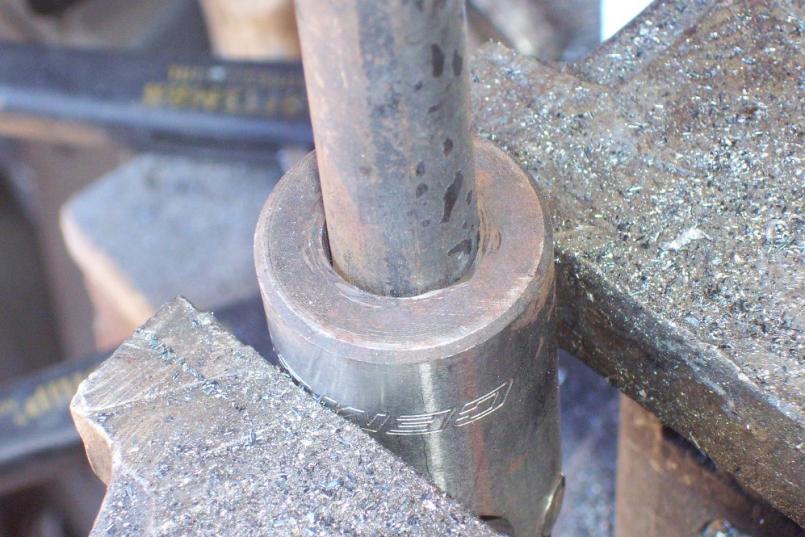 |
|
|
|
| Mike Bellis |
Apr 5 2011, 02:00 PM
Post
#118
|
|
Resident Electrician Group: Members Posts: 8,348 Joined: 22-June 09 From: Midlothian TX Member No.: 10,496 Region Association: None |
Next I had to figure how far off the rod was. From the console, I had to offset 3" around the oil pan and low oil sender.
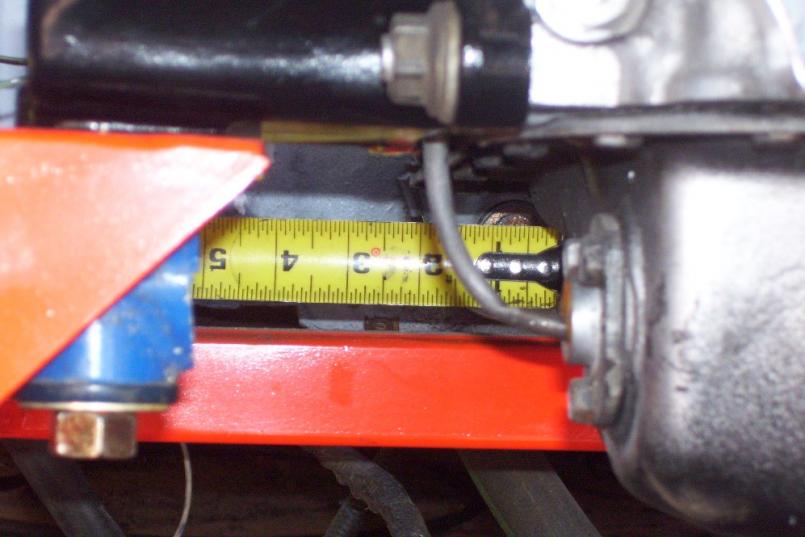 I then bent and welded the U Joints on to the DOM. 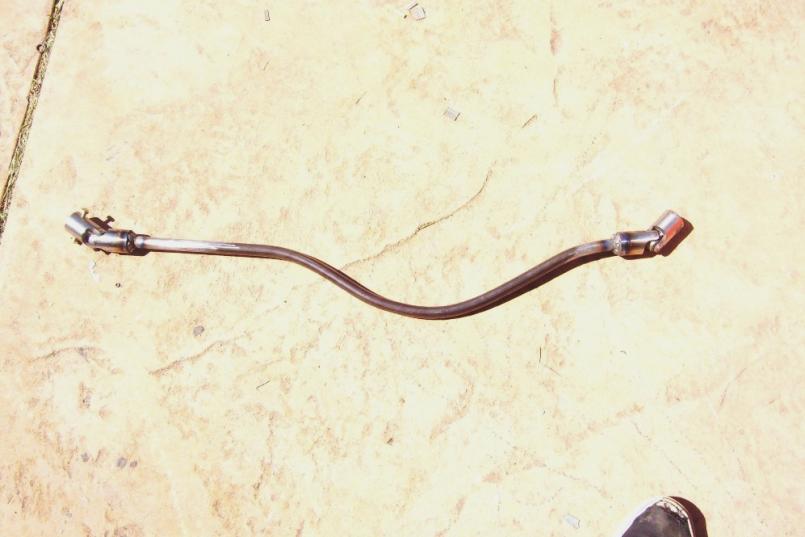 |
|
|
|
| Mike Bellis |
Apr 5 2011, 02:03 PM
Post
#119
|
|
Resident Electrician Group: Members Posts: 8,348 Joined: 22-June 09 From: Midlothian TX Member No.: 10,496 Region Association: None |
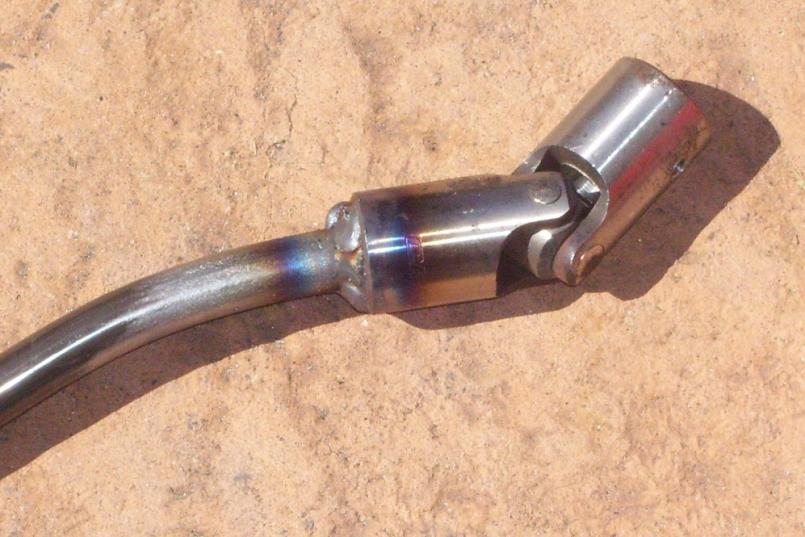
Looks like even penitration...
  |
|
|
|
| Mike Bellis |
Apr 5 2011, 02:08 PM
Post
#120
|
|
Resident Electrician Group: Members Posts: 8,348 Joined: 22-June 09 From: Midlothian TX Member No.: 10,496 Region Association: None |
Little sanding and paint (orange for Andrew). I used a self volcanizing rubber to cover the joint. Before I install for good, I will pack the tube with marine grease. Since it is hollow. it should hold quite a bit and should flow a little as the engine bay gets warm.
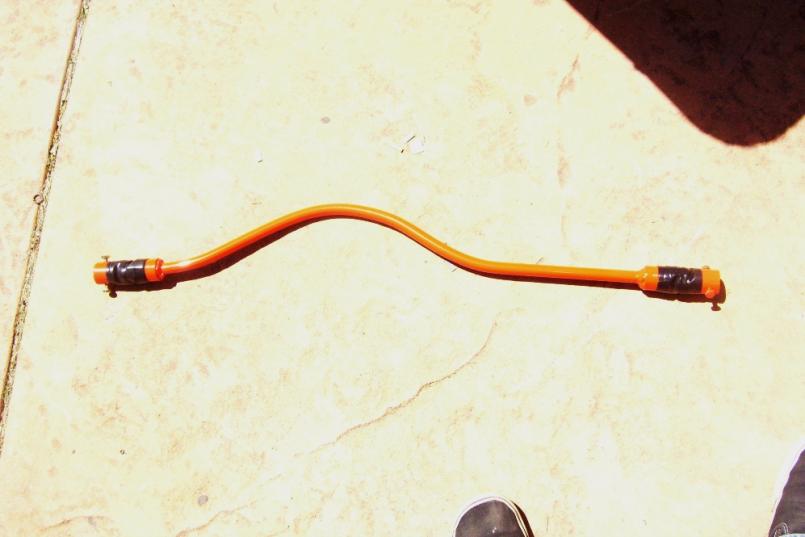 close up of the rubber. it it not sticky, but it does stick to itself. Water proof, oil resistant and heat resistant... 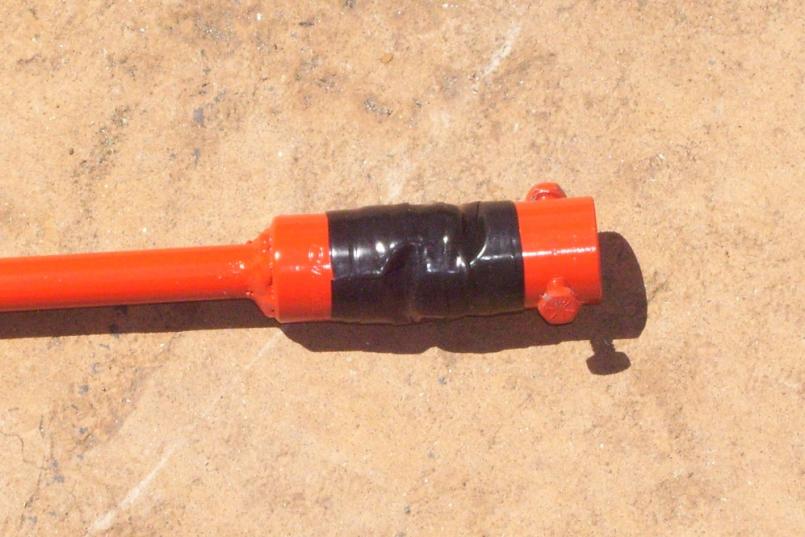 |
|
|
|
|
1 User(s) are reading this topic (1 Guests and 0 Anonymous Users)
0 Members:

|
Lo-Fi Version | Time is now: 6th June 2026 - 11:06 AM |
Invision Power Board
v9.1.4 © 2026 IPS, Inc.