|
|
|
Porsche, and the Porsche crest are registered trademarks of Dr. Ing. h.c. F. Porsche AG.
This site is not affiliated with Porsche in any way. Its only purpose is to provide an online forum for car enthusiasts. All other trademarks are property of their respective owners. |
|
|


| Mike Bellis |
 Nov 20 2010, 02:20 PM Nov 20 2010, 02:20 PM
Post
#341
|
|
Resident Electrician  Group: Members Posts: 8,348 Joined: 22-June 09 From: Midlothian TX Member No.: 10,496 Region Association: None |
Many of you know my car. It was Steve Malmz's car he found in a yard as a roller. It was a former SCCA club racer. Malmz named the car Sasquach. Malmz put a V8 in it and drove it until his priorities changed. It was sold to a guy in Kentucky (unknown name), he regeared the transaxle and drove it little. He sold it to a PCA member in Irvine, CA. That guy used it as a DE car until I purchased it. I installed an EFI system and drove the crap out of it. Recently my clutch went out and I decided it was time for a change. The V8 is going to another member. My engine choice is
 The car has 930 suspension and brakes. 930 steel flairs grafted on, a total of 8 flairs were used. Two per corner to make up the radius. There is a roll cage with removable door bars. The cage is tied to the rear suspension but not the front. The bodywork ant paint are 10+ years old and the car is several shades of white. The chassis is super solid. Only minor surface rust has been found. The Original owner/racer installer a stiffening kit and various braces. The suspension console is unusual. Steel plats replace the inboard pivots. 1/8" & 1/4" plate steel reenforcement plates are surrounding the console. A 1" bar ties in the console to the firewall. 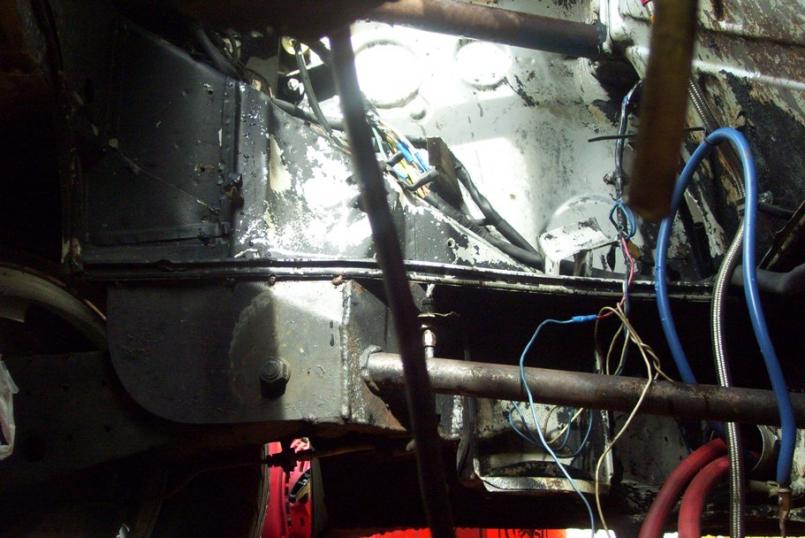 Here are the first pics of me stripping paint from the engine bay and the unusual consoles. |
   |

 
|
Posts in this topic
 kg6dxn Official Sasquatch build thread Part 1 Nov 20 2010, 02:20 PM
 kg6dxn More
Nov 20 2010, 02:21 PM campbellcj Subscribed! I remember that car back when Ste... Nov 20 2010, 02:30 PM kg6dxn Here's a nostalgic pic from when Malmz owned i... Nov 20 2010, 02:38 PM RJMII oooh... 914 TT for a plate. :D I'm hooked! Nov 20 2010, 03:17 PM Andyrew Audi 2.7TT? Subaru TT?
You gonna cut the engine s... Nov 20 2010, 03:27 PM
kg6dxn More
Nov 20 2010, 02:21 PM campbellcj Subscribed! I remember that car back when Ste... Nov 20 2010, 02:30 PM kg6dxn Here's a nostalgic pic from when Malmz owned i... Nov 20 2010, 02:38 PM RJMII oooh... 914 TT for a plate. :D I'm hooked! Nov 20 2010, 03:17 PM Andyrew Audi 2.7TT? Subaru TT?
You gonna cut the engine s... Nov 20 2010, 03:27 PM
 kg6dxn
Audi 2.7TT? Subaru TT?
You gonna cut the engine ... Nov 20 2010, 03:44 PM Andyrew Oh ps..
:Qarl: Nov 20 2010, 03:27 PM RJMII
Are they held in with spot welds that can be dr... Nov 20 2010, 03:31 PM McMark
Are they held in with spot welds that can be dril... Nov 20 2010, 03:51 PM ConeDodger Cool! Nov 20 2010, 04:48 PM JRust Excellent! Can't wait to see what you do w... Nov 20 2010, 05:12 PM strawman Subscribed! Good luck Mike; let me know if you... Nov 20 2010, 05:42 PM kg6dxn
Subscribed! Good luck Mike; let me know if yo... Nov 20 2010, 05:52 PM Lennies914 Subscribed as well.
I thought you were thinking r... Nov 20 2010, 07:32 PM kg6dxn
Subscribed as well.
I thought you were thinking ... Nov 20 2010, 08:48 PM roadster fan Hmmm....a 13B-REW Rotary/Wankel motor would be coo... Nov 22 2010, 12:12 PM kg6dxn
Hmmm....a 13B-REW Rotary/Wankel motor would be co... Nov 22 2010, 01:44 PM Andyrew So you decided 15mpg is still OK huh? :D
Going ... Nov 22 2010, 02:03 PM kg6dxn
So you decided 15mpg is still OK huh? :D
Going... Nov 22 2010, 02:22 PM strawman When I was into MR2s (albeit the early models, not... Nov 22 2010, 03:02 PM kg6dxn
When I was into MR2s (albeit the early models, no... Nov 22 2010, 03:36 PM Andyrew 200ft lbs at what RPM?
How much tq will you have ... Nov 22 2010, 04:08 PM kg6dxn
200ft lbs at what RPM?
How much tq will you have... Nov 22 2010, 05:34 PM Andyrew Wait, your using the 901 as a 4 speed or 5 speed?
... Nov 22 2010, 05:59 PM kg6dxn Here's some stock specks from turborx7.com
... Nov 22 2010, 07:23 PM jmmotorsports
Here's some stock specks from turborx7.com
... Nov 22 2010, 10:14 PM kg6dxn
What V8 that will fit in a 914 weigh's 800 ... Nov 22 2010, 10:24 PM Lennies914 Mike,
Do you already have a motor? There was a gu... Nov 22 2010, 07:25 PM kg6dxn
Mike,
Do you already have a motor? There was a g... Nov 22 2010, 07:30 PM Andyrew Thats the way to go.. Hack up the ECU yourself so ... Nov 22 2010, 08:32 PM matthepcat Right on Mike!
I would recommend muffling the... Nov 23 2010, 05:41 PM kg6dxn
Right on Mike!
I would recommend muffling th... Nov 23 2010, 05:50 PM matthepcat No that was a moment of weakness. I have been lurk... Nov 23 2010, 06:16 PM kg6dxn Not much to update. I've been collecting parts... Dec 11 2010, 06:40 PM RJMII
So are you switching to single turbo with the b... Dec 11 2010, 10:20 PM kg6dxn
So are you switching to single turbo with the bal... Dec 11 2010, 11:08 PM Andyrew I still think your going to be pushing way more HP... Dec 11 2010, 11:12 PM kg6dxn
I still think your going to be pushing way more H... Dec 11 2010, 11:23 PM Andyrew Holy Shit, 2000CC? how many do you use? for the A4... Dec 12 2010, 03:17 PM kg6dxn
Holy Shit, 2000CC? how many do you use? for the A... Dec 12 2010, 05:50 PM oldschool
Holy Shit, 2000CC? how many do you use? for the ... Dec 12 2010, 07:46 PM Andyrew
Holy Shit, 2000CC? how many do you use? for the ... Dec 12 2010, 08:59 PM kg6dxn
To be perfectly honest, it sounds to me like you... Dec 12 2010, 10:13 PM kg6dxn Oh, I forgot...
Here are some pics for Oldschool.... Dec 12 2010, 10:17 PM Andyrew Is that an HTA compressor side? If so, SWEET!... Dec 13 2010, 12:07 AM kg6dxn This pic is for Andrew. It shows the chosen turbo ... Dec 13 2010, 07:11 PM Andyrew Not bad, A little low for the turbo size, but stil... Dec 14 2010, 10:37 AM kg6dxn Quick update... Home refi has slowed down my purch... Jan 18 2011, 10:05 PM Rotary'14
Quick update... Home refi has slowed down my purc... Jan 19 2011, 02:56 PM oldschool
Quick update... Home refi has slowed down my pur... Jan 19 2011, 08:12 PM strawman Lookin' good Mike! At the rate I've be... Jan 19 2011, 03:06 AM mikey63 How about (TT) TURBO TRANSFORMATION! Jan 19 2011, 11:14 AM 914Timo Could you show more pics about the front lights in... Jan 22 2011, 01:28 PM kg6dxn
Could you show more pics about the front lights i... Jan 22 2011, 02:44 PM roadster fan Looking Good! surfer dudes would call it Tota... Jan 22 2011, 10:21 PM thenewwazoo Just found your build - it looks nice! A few t... Feb 16 2011, 01:00 AM kg6dxn
Just found your build - it looks nice! A few ... Feb 16 2011, 09:39 AM Rotary'14
Just found your build - it looks nice! A few... Feb 17 2011, 08:18 PM kg6dxn Got my V Band exhaust clamps in... 4 INCHES!... Feb 17 2011, 08:05 PM Andyrew NICE! I love Vband clamps. 4" is Biiiig A... Feb 17 2011, 08:07 PM kg6dxn
NICE! I love Vband clamps. 4" is Biiiig ... Feb 17 2011, 08:20 PM ChrisNPDrider I thought "TT" meant Targa Top?
:D
You... Feb 17 2011, 10:03 PM kg6dxn My adapter showed up. Now i can finish the fab of ... Mar 6 2011, 01:11 AM kg6dxn Another...
Mar 6 2011, 01:12 AM kg6dxn I did some work inside. I welded a bracket that bo... Mar 6 2011, 01:18 AM kg6dxn Now I have to figure out where I am putting my boo... Mar 6 2011, 01:23 AM kg6dxn Now for the sad part. My car is outside! I was... Mar 6 2011, 01:25 AM Andyrew Mike it looks like your making great progress... Mar 6 2011, 04:10 AM Lennies914 You are moving right along! Everythings lookin... Mar 6 2011, 10:14 AM kg6dxn Thanks for the support guys!
For the historic... Mar 6 2011, 11:46 AM kg6dxn I forgot to mention. I found some major California... Mar 7 2011, 09:51 PM Lennies914
I forgot to mention. I found some major Californi... Mar 7 2011, 09:55 PM kg6dxn More...
Mar 7 2011, 09:53 PM roadster fan :headbanger: Looking good, keep up the good work... Mar 7 2011, 10:01 PM Andyrew My honda has more rust than that! Mar 7 2011, 11:11 PM kg6dxn I finally got my engine mount finished and install... Mar 20 2011, 04:48 PM kg6dxn Here's another pic. The rain in Cali is really... Mar 20 2011, 04:49 PM kg6dxn I have also been working on my trailer hitch. I to... Mar 20 2011, 07:26 PM kg6dxn More...
Mar 20 2011, 07:27 PM kg6dxn More...
Mar 20 2011, 07:29 PM kg6dxn Goober welds... Before I added gas to my mig welde... Mar 20 2011, 07:32 PM kg6dxn The money shot. Can't even see the motor hardl... Mar 20 2011, 07:35 PM Andyrew I like it all!!!
Remember to primer ... Mar 21 2011, 09:38 AM kg6dxn
I like it all!!!
Remember to primer... Mar 21 2011, 09:50 AM Andyrew Ahh, that makes more sense. I didnt put 2 and 2 to... Mar 21 2011, 10:10 AM ChrisNPDrider Awesome progress! I feel your pain about havin... Mar 21 2011, 12:08 PM kg6dxn Tossed the bumper on for some quick pics. The old ... Mar 21 2011, 10:13 PM JRust Looking good Mike! Keep up the good work Mar 21 2011, 10:42 PM Andyrew Looks Awesome Mike!
One of those mods that I ... Mar 22 2011, 08:24 AM kg6dxn
Whats next?
Injectors 4@ $180 each, 2-850cc... Mar 22 2011, 09:27 AM Andyrew Ouch!
The little stuff just adds right up.. Mar 22 2011, 09:39 AM trojanhorsepower
Injectors 4@ $180 each, 2-850cc, 2-1600cc
Fu... Mar 22 2011, 06:15 PM Lennies914
Injectors 4@ $180 each, 2-850cc, 2-1600cc
F... Mar 22 2011, 08:58 PM campbellcj LOL...whenever you get the empty wallet blues, jus... Mar 22 2011, 09:36 PM kg6dxn Did some more work in the trunk today. Cut out the... Mar 26 2011, 07:30 PM kg6dxn Got it trimed and welded. I also welded in some 1.... Mar 26 2011, 07:33 PM kg6dxn Got everything tied in and primered...
Mar 26 2011, 07:35 PM kg6dxn Strawman get me thinking about the engine bar moun... Mar 26 2011, 07:38 PM kg6dxn I beefed up the engine mounts with some 14ga steel... Mar 27 2011, 08:30 PM
kg6dxn
Audi 2.7TT? Subaru TT?
You gonna cut the engine ... Nov 20 2010, 03:44 PM Andyrew Oh ps..
:Qarl: Nov 20 2010, 03:27 PM RJMII
Are they held in with spot welds that can be dr... Nov 20 2010, 03:31 PM McMark
Are they held in with spot welds that can be dril... Nov 20 2010, 03:51 PM ConeDodger Cool! Nov 20 2010, 04:48 PM JRust Excellent! Can't wait to see what you do w... Nov 20 2010, 05:12 PM strawman Subscribed! Good luck Mike; let me know if you... Nov 20 2010, 05:42 PM kg6dxn
Subscribed! Good luck Mike; let me know if yo... Nov 20 2010, 05:52 PM Lennies914 Subscribed as well.
I thought you were thinking r... Nov 20 2010, 07:32 PM kg6dxn
Subscribed as well.
I thought you were thinking ... Nov 20 2010, 08:48 PM roadster fan Hmmm....a 13B-REW Rotary/Wankel motor would be coo... Nov 22 2010, 12:12 PM kg6dxn
Hmmm....a 13B-REW Rotary/Wankel motor would be co... Nov 22 2010, 01:44 PM Andyrew So you decided 15mpg is still OK huh? :D
Going ... Nov 22 2010, 02:03 PM kg6dxn
So you decided 15mpg is still OK huh? :D
Going... Nov 22 2010, 02:22 PM strawman When I was into MR2s (albeit the early models, not... Nov 22 2010, 03:02 PM kg6dxn
When I was into MR2s (albeit the early models, no... Nov 22 2010, 03:36 PM Andyrew 200ft lbs at what RPM?
How much tq will you have ... Nov 22 2010, 04:08 PM kg6dxn
200ft lbs at what RPM?
How much tq will you have... Nov 22 2010, 05:34 PM Andyrew Wait, your using the 901 as a 4 speed or 5 speed?
... Nov 22 2010, 05:59 PM kg6dxn Here's some stock specks from turborx7.com
... Nov 22 2010, 07:23 PM jmmotorsports
Here's some stock specks from turborx7.com
... Nov 22 2010, 10:14 PM kg6dxn
What V8 that will fit in a 914 weigh's 800 ... Nov 22 2010, 10:24 PM Lennies914 Mike,
Do you already have a motor? There was a gu... Nov 22 2010, 07:25 PM kg6dxn
Mike,
Do you already have a motor? There was a g... Nov 22 2010, 07:30 PM Andyrew Thats the way to go.. Hack up the ECU yourself so ... Nov 22 2010, 08:32 PM matthepcat Right on Mike!
I would recommend muffling the... Nov 23 2010, 05:41 PM kg6dxn
Right on Mike!
I would recommend muffling th... Nov 23 2010, 05:50 PM matthepcat No that was a moment of weakness. I have been lurk... Nov 23 2010, 06:16 PM kg6dxn Not much to update. I've been collecting parts... Dec 11 2010, 06:40 PM RJMII
So are you switching to single turbo with the b... Dec 11 2010, 10:20 PM kg6dxn
So are you switching to single turbo with the bal... Dec 11 2010, 11:08 PM Andyrew I still think your going to be pushing way more HP... Dec 11 2010, 11:12 PM kg6dxn
I still think your going to be pushing way more H... Dec 11 2010, 11:23 PM Andyrew Holy Shit, 2000CC? how many do you use? for the A4... Dec 12 2010, 03:17 PM kg6dxn
Holy Shit, 2000CC? how many do you use? for the A... Dec 12 2010, 05:50 PM oldschool
Holy Shit, 2000CC? how many do you use? for the ... Dec 12 2010, 07:46 PM Andyrew
Holy Shit, 2000CC? how many do you use? for the ... Dec 12 2010, 08:59 PM kg6dxn
To be perfectly honest, it sounds to me like you... Dec 12 2010, 10:13 PM kg6dxn Oh, I forgot...
Here are some pics for Oldschool.... Dec 12 2010, 10:17 PM Andyrew Is that an HTA compressor side? If so, SWEET!... Dec 13 2010, 12:07 AM kg6dxn This pic is for Andrew. It shows the chosen turbo ... Dec 13 2010, 07:11 PM Andyrew Not bad, A little low for the turbo size, but stil... Dec 14 2010, 10:37 AM kg6dxn Quick update... Home refi has slowed down my purch... Jan 18 2011, 10:05 PM Rotary'14
Quick update... Home refi has slowed down my purc... Jan 19 2011, 02:56 PM oldschool
Quick update... Home refi has slowed down my pur... Jan 19 2011, 08:12 PM strawman Lookin' good Mike! At the rate I've be... Jan 19 2011, 03:06 AM mikey63 How about (TT) TURBO TRANSFORMATION! Jan 19 2011, 11:14 AM 914Timo Could you show more pics about the front lights in... Jan 22 2011, 01:28 PM kg6dxn
Could you show more pics about the front lights i... Jan 22 2011, 02:44 PM roadster fan Looking Good! surfer dudes would call it Tota... Jan 22 2011, 10:21 PM thenewwazoo Just found your build - it looks nice! A few t... Feb 16 2011, 01:00 AM kg6dxn
Just found your build - it looks nice! A few ... Feb 16 2011, 09:39 AM Rotary'14
Just found your build - it looks nice! A few... Feb 17 2011, 08:18 PM kg6dxn Got my V Band exhaust clamps in... 4 INCHES!... Feb 17 2011, 08:05 PM Andyrew NICE! I love Vband clamps. 4" is Biiiig A... Feb 17 2011, 08:07 PM kg6dxn
NICE! I love Vband clamps. 4" is Biiiig ... Feb 17 2011, 08:20 PM ChrisNPDrider I thought "TT" meant Targa Top?
:D
You... Feb 17 2011, 10:03 PM kg6dxn My adapter showed up. Now i can finish the fab of ... Mar 6 2011, 01:11 AM kg6dxn Another...
Mar 6 2011, 01:12 AM kg6dxn I did some work inside. I welded a bracket that bo... Mar 6 2011, 01:18 AM kg6dxn Now I have to figure out where I am putting my boo... Mar 6 2011, 01:23 AM kg6dxn Now for the sad part. My car is outside! I was... Mar 6 2011, 01:25 AM Andyrew Mike it looks like your making great progress... Mar 6 2011, 04:10 AM Lennies914 You are moving right along! Everythings lookin... Mar 6 2011, 10:14 AM kg6dxn Thanks for the support guys!
For the historic... Mar 6 2011, 11:46 AM kg6dxn I forgot to mention. I found some major California... Mar 7 2011, 09:51 PM Lennies914
I forgot to mention. I found some major Californi... Mar 7 2011, 09:55 PM kg6dxn More...
Mar 7 2011, 09:53 PM roadster fan :headbanger: Looking good, keep up the good work... Mar 7 2011, 10:01 PM Andyrew My honda has more rust than that! Mar 7 2011, 11:11 PM kg6dxn I finally got my engine mount finished and install... Mar 20 2011, 04:48 PM kg6dxn Here's another pic. The rain in Cali is really... Mar 20 2011, 04:49 PM kg6dxn I have also been working on my trailer hitch. I to... Mar 20 2011, 07:26 PM kg6dxn More...
Mar 20 2011, 07:27 PM kg6dxn More...
Mar 20 2011, 07:29 PM kg6dxn Goober welds... Before I added gas to my mig welde... Mar 20 2011, 07:32 PM kg6dxn The money shot. Can't even see the motor hardl... Mar 20 2011, 07:35 PM Andyrew I like it all!!!
Remember to primer ... Mar 21 2011, 09:38 AM kg6dxn
I like it all!!!
Remember to primer... Mar 21 2011, 09:50 AM Andyrew Ahh, that makes more sense. I didnt put 2 and 2 to... Mar 21 2011, 10:10 AM ChrisNPDrider Awesome progress! I feel your pain about havin... Mar 21 2011, 12:08 PM kg6dxn Tossed the bumper on for some quick pics. The old ... Mar 21 2011, 10:13 PM JRust Looking good Mike! Keep up the good work Mar 21 2011, 10:42 PM Andyrew Looks Awesome Mike!
One of those mods that I ... Mar 22 2011, 08:24 AM kg6dxn
Whats next?
Injectors 4@ $180 each, 2-850cc... Mar 22 2011, 09:27 AM Andyrew Ouch!
The little stuff just adds right up.. Mar 22 2011, 09:39 AM trojanhorsepower
Injectors 4@ $180 each, 2-850cc, 2-1600cc
Fu... Mar 22 2011, 06:15 PM Lennies914
Injectors 4@ $180 each, 2-850cc, 2-1600cc
F... Mar 22 2011, 08:58 PM campbellcj LOL...whenever you get the empty wallet blues, jus... Mar 22 2011, 09:36 PM kg6dxn Did some more work in the trunk today. Cut out the... Mar 26 2011, 07:30 PM kg6dxn Got it trimed and welded. I also welded in some 1.... Mar 26 2011, 07:33 PM kg6dxn Got everything tied in and primered...
Mar 26 2011, 07:35 PM kg6dxn Strawman get me thinking about the engine bar moun... Mar 26 2011, 07:38 PM kg6dxn I beefed up the engine mounts with some 14ga steel... Mar 27 2011, 08:30 PM  |
1 User(s) are reading this topic (1 Guests and 0 Anonymous Users)
0 Members:

|
Lo-Fi Version | Time is now: 13th May 2026 - 06:37 AM |
Invision Power Board
v9.1.4 © 2026 IPS, Inc.