|
|
|
Porsche, and the Porsche crest are registered trademarks of Dr. Ing. h.c. F. Porsche AG.
This site is not affiliated with Porsche in any way. Its only purpose is to provide an online forum for car enthusiasts. All other trademarks are property of their respective owners. |
|
|


| gasman |
 Nov 25 2010, 09:42 AM Nov 25 2010, 09:42 AM
Post
#1
|
|
Member  Group: Members Posts: 107 Joined: 21-January 08 From: Mooresville, nc Member No.: 8,602 Region Association: South East States |
Happy Thanksgiving everyone........Anyone know how to restore the fan air box???? I don't want to paint it....just want to make it look kinda new as the rest of the engine is being restored....Thanks
|
   |

 
|
  |
Replies(1 - 18)
| Gint |
Nov 25 2010, 01:53 PM
Post
#2
|
|
Mike Ginter Group: Admin Posts: 16,075 Joined: 26-December 02 From: Denver CO. Member No.: 20 Region Association: Rocky Mountains |
Shea-ster was just asking questions about air box and/or flapper/diverter boxes. I thought he mentioned plastic polish. Maybe he'll chime in soon. I need to do something like that in the future also.
(IMG:style_emoticons/default/icon_bump.gif) |
|
|
|
| jim_hoyland |
Nov 25 2010, 04:56 PM
Post
#3
|
|
Get that VIN ? Group: Members Posts: 9,302 Joined: 1-May 03 From: Sunset Beach, CA Member No.: 643 Region Association: Southern California |
If you mean the air-box up front, I painted mine with outdoor plastic furniture paint. OSH, aka Orchard Supply, sells it and it really works good. Used their Ivory plastic furniture paint on headlight surrounds for excellent results as well.
The prep is minimal, use 250 or + wet/dry sand paper and get it clean. I think i sanded between coats and did used 2 coats. One would have been enough |
|
|
|
| Tom_T |
Nov 26 2010, 12:39 PM
Post
#4
|
|
TMI.... Group: Members Posts: 8,318 Joined: 19-March 09 From: Orange, CA Member No.: 10,181 Region Association: Southern California |
Making a WAG since you mentioned the engine is being rebuilt/restored, I'm guessing you mean the cast aluminum fan shroud.
That can be just cleaned up with the gentlest cleaner which will take off the grease/grime - if you want to retain the original patina & non-shiny surface, to fine steel wool/aluminum polish to shine it up, or some folks paint it with high temp silver or aluminum color paint. Soda blasting will give it something between the first 2 - semi-shiny, but remove from the engine & blase off the motor to avoid soda into the motor/etc. (same for transaxle cases, etc.). If you're looking for concours/original, try posting over in O&H Forum to see if anyone has any special tricks beyond these. If my WAG is wrong & you mean the 2 heater flapper boxes on either side of the motor which moves the HE hot air into the cabin (or ejects it into the engine bay), then soda or media blast the rust off, neutralize/eat the rust, prime & paint with satin black (mask off silver zinc/cad plated lever arms/shaft which connects to the floor heater lever cables & moves the flapper). Post at O&H for the best color match, or the satin black sold at 356 & VW resto suppliers online is close (maybe the closest?). Look here for one source - note that Beetle & Bus colors in your same MY will be the same color per 914 codes: http://www.wolfsburgwest.com/colors/ccfaq.cfm This or L41 black may be close - http://www.wolfsburgwest.com/cart/DetailsL...cfm?ID=PAINTL43 |
|
|
|
| tod914 |
Nov 26 2010, 12:46 PM
Post
#5
|
|
Advanced Member Group: Members Posts: 3,755 Joined: 19-January 03 From: Lincoln Park, NJ Member No.: 170 |
Plastic airbox up front? I used Mequires plastic polish on. Worked great. Don't use rubbing compound on it. It softens the plastic and will make a mess.
|
|
|
|
| TJB/914 |
Nov 26 2010, 12:50 PM
Post
#6
|
|
Mid-Engn. Group: Members Posts: 4,328 Joined: 24-February 03 From: Plymouth & Petoskey, MI Member No.: 346 Region Association: Upper MidWest |
Hi Guys,
I just found some photo's of the air box restoration on my 914. Hope it helps. Tom Attached thumbnail(s)  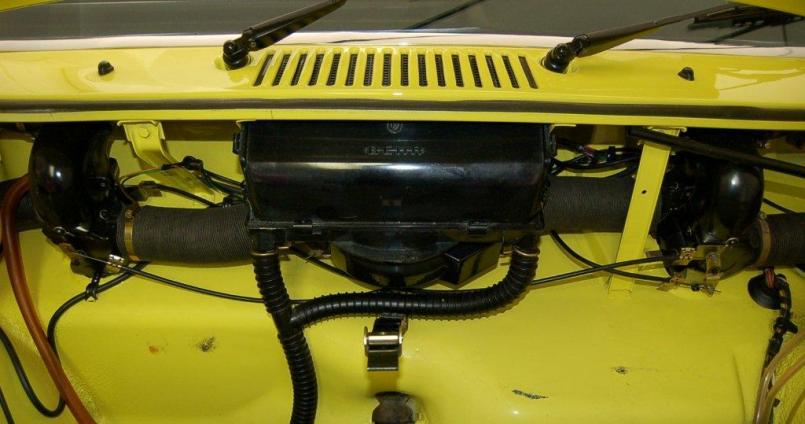 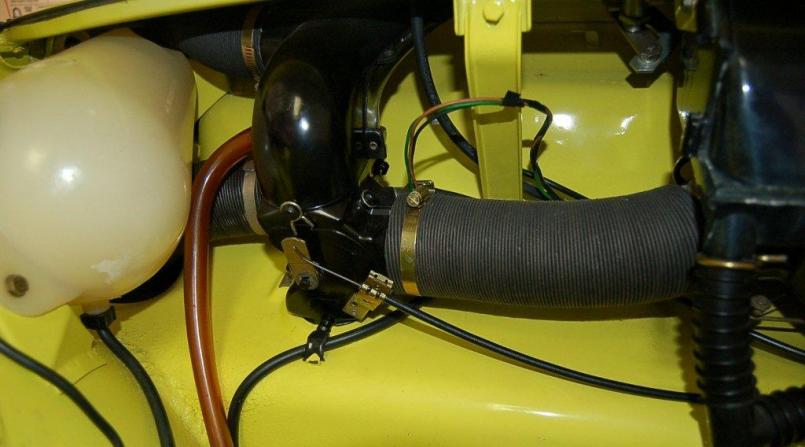 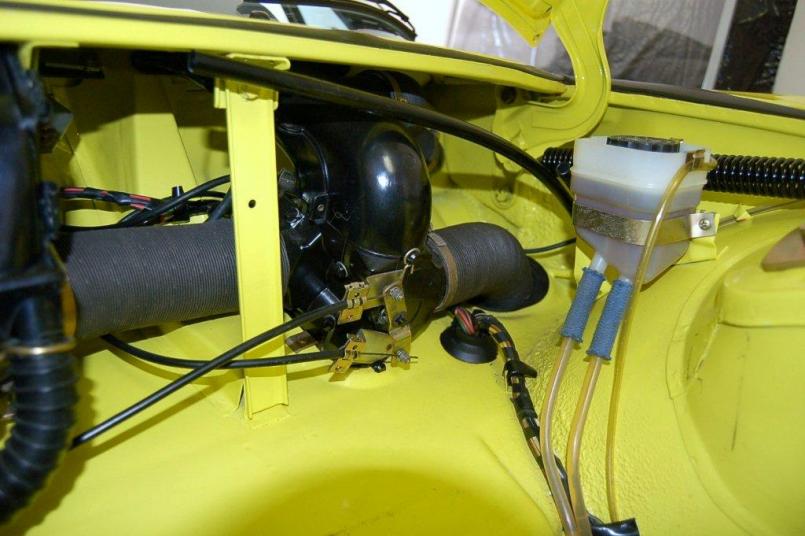
|
|
|
|
| TJB/914 |
Nov 26 2010, 12:54 PM
Post
#7
|
|
Mid-Engn. Group: Members Posts: 4,328 Joined: 24-February 03 From: Plymouth & Petoskey, MI Member No.: 346 Region Association: Upper MidWest |
Few more, this area takes a lot of manhours to restore. The #1 manhour area is the engine compartment.
T Attached thumbnail(s) 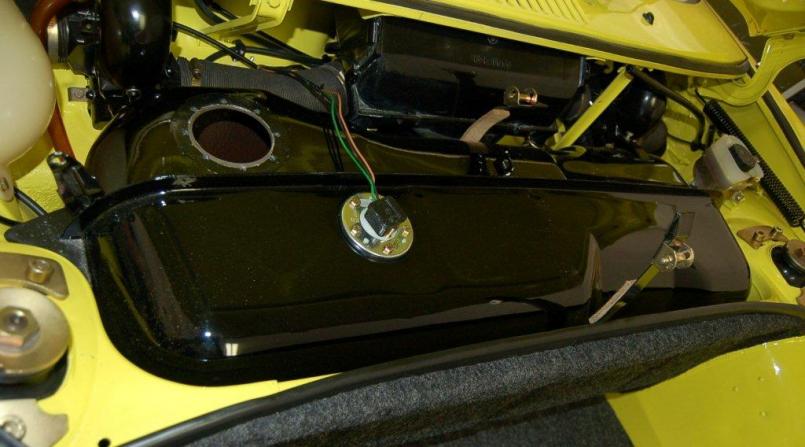 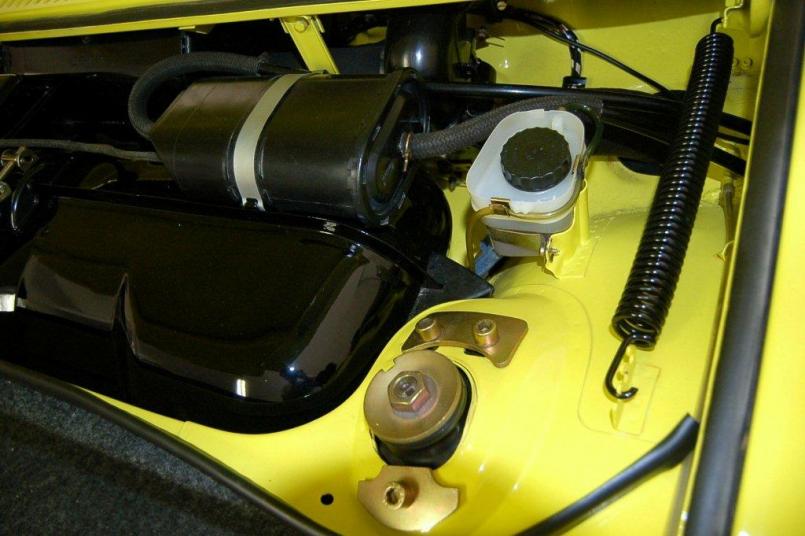 Attached image(s) 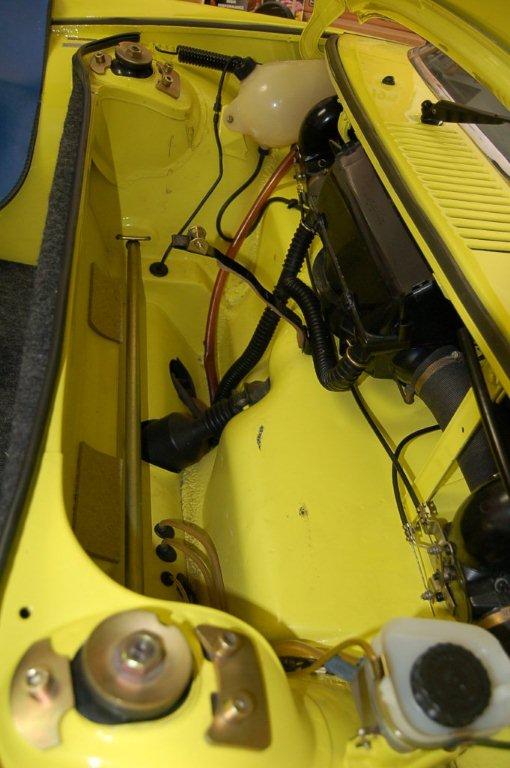 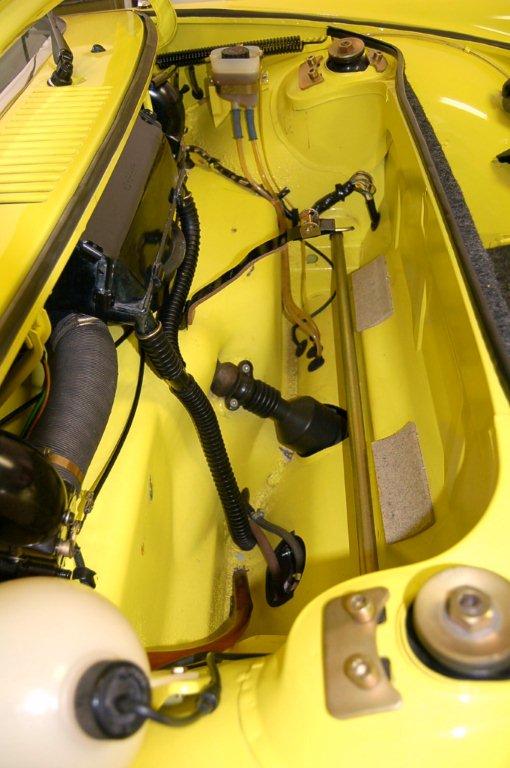
|
|
|
|
| TJB/914 |
Nov 26 2010, 01:02 PM
Post
#8
|
|
Mid-Engn. Group: Members Posts: 4,328 Joined: 24-February 03 From: Plymouth & Petoskey, MI Member No.: 346 Region Association: Upper MidWest |
QUOTE(tod914 @ Nov 26 2010, 10:46 AM)  Plastic airbox up front? I used Mequires plastic polish on. Worked great. Don't use rubbing compound on it. It softens the plastic and will make a mess. (IMG:style_emoticons/default/agree.gif) Any type of plastic polish will work, I used a 3-M plastic polish. Tom |
|
|
|
| Tom_T |
Nov 26 2010, 01:16 PM
Post
#9
|
|
TMI.... Group: Members Posts: 8,318 Joined: 19-March 09 From: Orange, CA Member No.: 10,181 Region Association: Southern California |
QUOTE(tod914 @ Nov 26 2010, 10:46 AM) Plastic airbox up front? I used Mequires plastic polish on. Worked great. Don't use rubbing compound on it. It softens the plastic and will make a mess. Tod - assuming one of my WAGs above for his fla is correct, what was the Satin Black you used for your engine bay flapper boxes (& mine), engine tins, Air Filter box, & other black parts resto? (IMG:style_emoticons/default/confused24.gif) .... was it from Wolfsburg West or what source ?????? (IMG:style_emoticons/default/confused24.gif) Ditto for what you recco to resto the aluminum engine fan shroud of my WAG???? (IMG:style_emoticons/default/confused24.gif) |
|
|
|
| tod914 |
Nov 26 2010, 02:42 PM
Post
#10
|
|
Advanced Member Group: Members Posts: 3,755 Joined: 19-January 03 From: Lincoln Park, NJ Member No.: 170 |
Tom, for the black on the computer bracket & coil bracket that I refinished, I used the Wurth satin black trim paint. Once I polished, buffed, and waxed it, it matched the factory paint very well. Not perfect, but closer than the other blacks I tried. The seat handles I used the Wurth semi gloss paint in laquer. Wurth semi-gloss enamel was used on the coil. Suttle differences between each. I tried to match on a per component basis. The duplicolor low or semi gloss black high temp. might be a better solution for your flapper boxes though. I believe Pat had good success with the Wolfsburg paint on his early tank. Can't recall what he used on his tin though, but I know he was happy with it.
|
|
|
|
| gasman |
Nov 26 2010, 07:05 PM
Post
#11
|
|
Member Group: Members Posts: 107 Joined: 21-January 08 From: Mooresville, nc Member No.: 8,602 Region Association: South East States |
Sorry for the confusion.....what I mean is the engine cooling fan housing at front of engine. It seams that what I do to it, it just looks blah...with all engine tin painted and nice, I just didn't want it to stick out.....Thanks
|
|
|
|
| Tom_T |
Nov 26 2010, 07:40 PM
Post
#12
|
|
TMI.... Group: Members Posts: 8,318 Joined: 19-March 09 From: Orange, CA Member No.: 10,181 Region Association: Southern California |
QUOTE(gasman @ Nov 26 2010, 05:05 PM) Sorry for the confusion.....what I mean is the engine cooling fan housing at front of engine. It seams that what I do to it, it just looks blah...with all engine tin painted and nice, I just didn't want it to stick out.....Thanks Gasman, my 1st WAG (Wild Ass Guess) above was right then. I gave you a couple of methods, & IIRC George Hussey gave you a couple over on 914club. Hope one of those fits the bill. (IMG:style_emoticons/default/beerchug.gif) Also as an added bonus, you got tips on the grab bag of other components discussed above. Tod's paint reccos are usually pretty right on. You may want to look at his air intake tubes' resto topic over in O&H, as he went to great lengths to find a matching paint, and you may want them spruced up on your rebuilt engine. |
|
|
|
| McMark |
Nov 26 2010, 10:26 PM
Post
#13
|
|
914 Freak! Group: Retired Admin Posts: 20,179 Joined: 13-March 03 From: Grand Rapids, MI Member No.: 419 Region Association: None |
Bead blast it, then soak it with WD40. Blasting will open up the pores, and if you don't spray it with WD40, it will grab and hold any dirty fingerprints or dirty oil spray that hits it. This is the best refinishing method I have found so far.
|
|
|
|
| Tom_T |
Nov 27 2010, 12:57 PM
Post
#14
|
|
TMI.... Group: Members Posts: 8,318 Joined: 19-March 09 From: Orange, CA Member No.: 10,181 Region Association: Southern California |
QUOTE(McMark @ Nov 26 2010, 08:26 PM) Bead blast it, then soak it with WD40. Blasting will open up the pores, and if you don't spray it with WD40, it will grab and hold any dirty fingerprints or dirty oil spray that hits it. This is the best refinishing method I have found so far. Hey Mark, have you soda blasted them, or was that just transaxle cases? ... seems to me that sode blasting would be less abrasive & "open the pores" less. BTW - WD40 also works well as a cleaning agent to get off oil/motor grime too on its own. |
|
|
|
| Eric_Shea |
Dec 4 2010, 03:01 PM
Post
#15
|
|
PMB Performance Group: Admin Posts: 19,275 Joined: 3-September 03 From: Salt Lake City, UT Member No.: 1,110 Region Association: Rocky Mountains |
Geez Bliz... couldn't you have done a better job at that? (IMG:style_emoticons/default/lol3.gif)
Amazing! (IMG:style_emoticons/default/smilie_pokal.gif) Gasman... Here's the recipie: 10 parts "Elbow Grease" 1 Part Citrus Cleaner 2-3 Parts Novus Plastic Cleaner/Polish You'll probably find cosmoline on the various areas. A few soakings with the citrus (read: milder but eventually gets the cosmoline) and you should be good. Another thing you may want to do is remove the clips and seperate the box. You'll probably find some crusty's in the corners of the box. (IMG:http://www.914world.com/bbs2/uploads/post-1110-1290060848_thumb.jpg) |
|
|
|
| JmuRiz |
Dec 4 2010, 03:45 PM
Post
#16
|
|
914 Guru Group: Members Posts: 5,427 Joined: 30-December 02 From: NoVA Member No.: 50 Region Association: MidAtlantic Region |
Wow, I'll have to try that technique, looks great!
|
|
|
|
| Pat Garvey |
Dec 4 2010, 05:06 PM
Post
#17
|
|
Do I or don't I...........? Group: Members Posts: 5,899 Joined: 24-March 06 From: SE PA, near Philly Member No.: 5,765 Region Association: North East States |
QUOTE(tod914 @ Nov 26 2010, 03:42 PM) Tom, for the black on the computer bracket & coil bracket that I refinished, I used the Wurth satin black trim paint. Once I polished, buffed, and waxed it, it matched the factory paint very well. Not perfect, but closer than the other blacks I tried. The seat handles I used the Wurth semi gloss paint in laquer. Wurth semi-gloss enamel was used on the coil. Suttle differences between each. I tried to match on a per component basis. The duplicolor low or semi gloss black high temp. might be a better solution for your flapper boxes though. I believe Pat had good success with the Wolfsburg paint on his early tank. Can't recall what he used on his tin though, but I know he was happy with it. Very happy with the Wolfsburg Gray-Black paint on the tank. Not a perfect match to my original tank, but VERY close. When I redid the tin, including all underside plumbing for heat (1988!) I used high quality paints of the period (22 years ago). After having everything blasted with walnut shells I Prep Solv'd them & quickly put on a fine coat of Rustoleum primer, followed by 3 coats of Krylon satin black. I would use different paints today, going with something that has a very hard finish without orangepeel. Dropped sparkpluds, sockets, etc take a toll. I also wouldn't even attempt to refinish heating plumbing, but that's because I have a stash of new parts. Agree w/Mark's suggestion of WD40 on the engine airbox. Cleans it up & keeps its patina - was never meant to be painted or shiney. Will be using Tod's/Bliz's techniques on the front airbox & plumbing, since the tank comes out. Thought they looked OK until I saw Bliz's results! Pat |
|
|
|
| Tom_T |
Dec 4 2010, 05:20 PM
Post
#18
|
|
TMI.... Group: Members Posts: 8,318 Joined: 19-March 09 From: Orange, CA Member No.: 10,181 Region Association: Southern California |
Thanx Bliz, Eric, Mark, Tod, Pat et al - good tips on many areas that I have to resto on mine too! (IMG:style_emoticons/default/biggrin.gif)
Just looked over the state of mine this am with a buddy - until it started raining (IMG:style_emoticons/default/dry.gif) - & the airbox up front definitely needs an elbow-grease treatment, & keeping the patina on the magnesium fan/impeller housing/shroud has been a question I had. I guess I'll have to see what "modern paints" are available for the engine tins & aircleaner box/etc. Pat, as I didn't want to powder coat them when the finish didn't seem close to the original satin black. |
|
|
|
| realred914 |
Dec 4 2010, 07:38 PM
Post
#19
|
|
Senior Member Group: Retired Members Posts: 1,086 Joined: 1-April 10 From: california Member No.: 11,541 Region Association: None |
tooth paste works great as a plastic polish.
when reinstall be sure to add a bug screen to the fresh air box, and if your talking abou the engine fan inlet, add a VW bus style plastic inlet guard, on the engine fan this will keep out rags, towels, bits of tape, and leaves that make it in. this is really important cuase there is really no way out, the debries stack up on the cooling fins on th ehead and jugs, and that makes hot spots!!! on the freash air fan box, early cars had no screen under teh louvers on teh cowl, later cars had a factory course plastric bug screen, that would only keep out the larger bugs, adn all ow pine needles adn leave debries to enter. these can clog the drain holes, backing up water, and high water will flood the fan motor!(and your feet) so add a piece of aluminum (not nylon, you want it to last) window screen on top the the factory screen, this will pe=revent smaller bugs, pine needles adn lots of other trash from accumalating in the fan box. paint the aluminum window screen with several fine coats of black spray paint on both sides before install. trim it carefully becuase a water tight fit of the air box to the cowl is critical!!!!!! (thats why the factoyr had that fat rubber gasket around it) get this wrong and your feet may get wet, your paper heater tubes soaked and even your gas tank etxerior rust (under the felt pads, which could become soaked if this cowl to fan box seal is leaky) any ways, good lucky!!!!! |
|
|
|
|
1 User(s) are reading this topic (1 Guests and 0 Anonymous Users)
0 Members:

|
Lo-Fi Version | Time is now: 19th May 2024 - 10:43 AM |
Invision Power Board
v9.1.4 © 2024 IPS, Inc.