|
|
|
Porsche, and the Porsche crest are registered trademarks of Dr. Ing. h.c. F. Porsche AG.
This site is not affiliated with Porsche in any way. Its only purpose is to provide an online forum for car enthusiasts. All other trademarks are property of their respective owners. |
|
|

  |

| McMark |
 Nov 28 2010, 12:20 PM Nov 28 2010, 12:20 PM
Post
#1
|
|
914 Freak!  Group: Retired Admin Posts: 20,180 Joined: 13-March 03 From: Grand Rapids, MI Member No.: 419 Region Association: None |
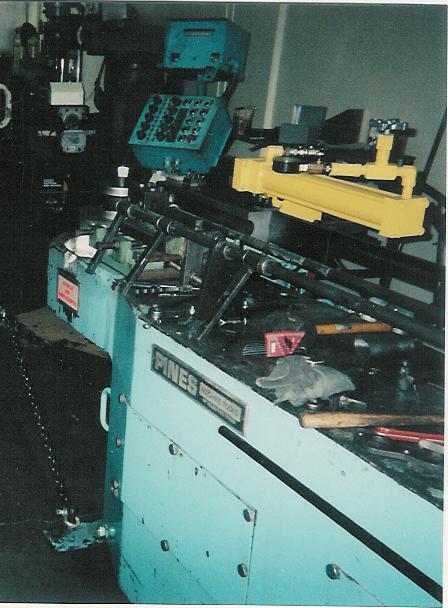
I'm got a tubing bender to make a replica GT half cage for a customer car. This is the style of bolt in cage used on some of the GT cars pictured on Armando's AWESOME GT site, as well as the style used in the PMB GT.
Material is mandrel bent 1.75" DOM 0.95", notched and will be completely welded. Plates are laser cut steel, ensuring they look great and fit perfectly. You will be required to weld the provided receiver plates onto your longs. These cages will keep the seats from moving all the way back because of the center brace bars. I have some ideas that will adapt the cage to work better with stock seats. PM me for details. Also, these cages will obviously not work with a stock backpad, nor the door handle/pocket. Each cage will be $xxx in bare steel, with powdercoating available. Shipping is possible, we're probably looking at crate and freight shipping, which should be around $175 (give or take $25). Cages are built to order. --Optional Item 1-- Leave off the two bars going to the center hump. This would let you keep the backpad and knock $xxx off the price. --Optional Item 2-- Leave off the forward/door bars. These add a lot of rigidity, but make getting in and out of the car harder. Leave these off and knock $xx off the price. Custom alterations are also available at full shop rate of $125/hr for actual time spent beyond the building of the standard cage. These cages are now special order. Contact me for details. 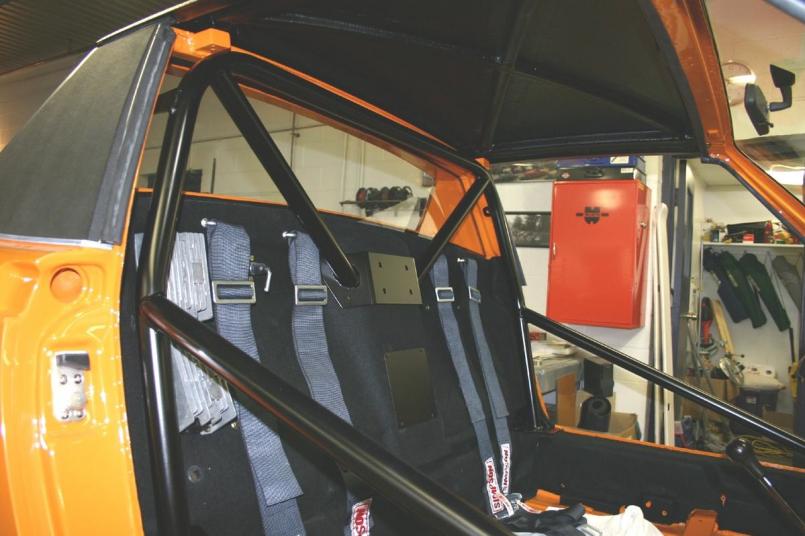 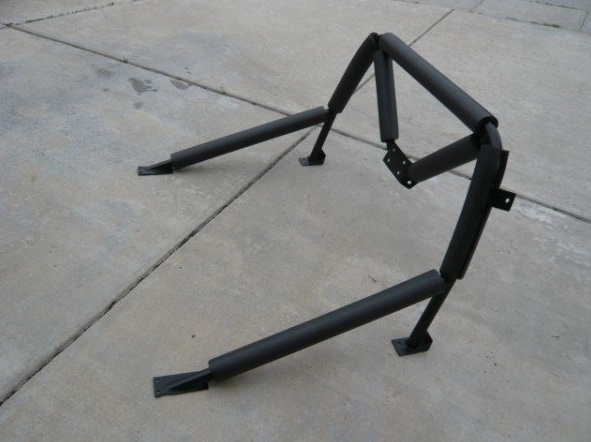 Installation Info: 1. Use a jack on both sides of the car, in the middle of car (between the wheels) with slight pressure simply to counteract the weight of the car. If you think about the way the weight is distributed, it's split between four wheels roughly equally. You're using the jack to try and distribute the weight six ways evenly. If you lift too much in the middle, you're changing the bias. This is not an exact science or setting. You just have to use your best judgement. 2. Test and measure the door gaps and opening closing effort before and during the welding process. Also measure between the targa bar and the windshield hoop, using the attached picture. Anything within 2-3mm is considered correct. But keep checking that measurement as you weld to make sure things aren't moving. 3. Do not run a bead longer than 1" ever on any joint. Long continuous welds are how cars get warped. 4. If you're using the bolt-in setup, weld the base plates in while they are bolted to the cage. Welding the base plates with the cage fully assembled ensures that everything lines up. 5. Get the cage to sit correctly, fully assembled, before fully welding a single piece. You cannot adjust things as you go. Get them all lined up, sitting flat, etc before you start permanently attaching things. 6. Tack weld the forward bars to the main hoop first, but fully weld the rear bottom plates first. Then weld the forward bottom plates and the forward bars to the main hoop at the same time. A little weld on each bottom plate, a little weld on the forward bar joint, then a little time to let things cool off. Then repeat. 7. Leave time for welds to cool completely between steps. This can seem long and tedious and it's REALLY hard to slow down and take your time. Ideally you'll have 30m of welding time spread out over 1.5-2h. More cooling time reduces the risk of warping the car and you can't let it cool too much. The times I just mentioned allow the welds to cool at the rate of 2-3m cooling for each minute of welding time. 8. Read #5 again. Good installs require good prep. The quality and success of your install ALL happens before you pick up the welder. Good luck. (IMG:style_emoticons/default/welder.gif) Attached image(s) 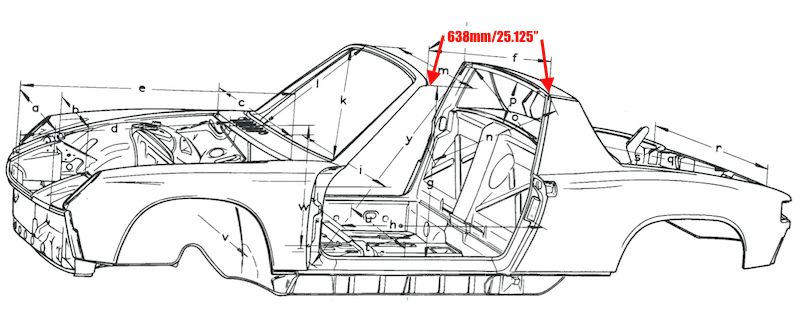
|
   |

 
|
| pete-stevers |
Nov 28 2010, 01:07 PM
Post
#2
|
|
Shinee Side Up Group: Members Posts: 2,674 Joined: 10-October 04 From: Abbotsford,BC, Canada Member No.: 2,914 Region Association: Pacific Northwest |
looks great!!!
|
|
|
|
| Mark Henry |
Nov 28 2010, 01:16 PM
Post
#3
|
|
that's what I do! Group: Members Posts: 20,065 Joined: 27-December 02 From: Port Hope, Ontario Member No.: 26 Region Association: Canada |
If you also offered this raw without the brace bars welded in (DYI) it could save peeps a lot in shipping. Flat box might be UPS shippable.
Looks nice. |
|
|
|
| Eric_Shea |
Nov 28 2010, 01:30 PM
Post
#4
|
|
PMB Performance Group: Admin Posts: 19,304 Joined: 3-September 03 From: Salt Lake City, UT Member No.: 1,110 Region Association: Rocky Mountains |
I'll give testimony. When this cage is bolted in, your car changes.
The side bars extend along your longitudinals to the base of the A-Pillar tieing that area into the back wall and original targa hoop. Great vintage look. The GT V-Bar is amazing in my book. I also think this should be kit for for a few reasons: 1) It should be tacked and built in the vehicle (then removed, powder coated etc.). 2) Shipping. Are you planning on including scab plates? |
|
|
|
| Brett W |
Nov 28 2010, 02:31 PM
Post
#5
|
|
Advanced Member Group: Members Posts: 2,862 Joined: 17-September 03 From: huntsville, al Member No.: 1,169 Region Association: None |
Mark, you may want to check on a waiver or certs for SCCA and NASA, so that can expand your market to allow the time trial people to get in on this.
|
|
|
|
| McMark |
Nov 28 2010, 02:58 PM
Post
#6
|
|
914 Freak! Group: Retired Admin Posts: 20,180 Joined: 13-March 03 From: Grand Rapids, MI Member No.: 419 Region Association: None |
This would include scab plates and all hardware. The complete package. I could do a partially welded kit to save on shipping (IMG:style_emoticons/default/idea.gif) The cage would cost the same, but it might save $100 on shipping.
Brett - I haven't heard of these. Do you have more info or a link? |
|
|
|
| JmuRiz |
Nov 28 2010, 03:49 PM
Post
#7
|
|
914 Guru Group: Members Posts: 5,633 Joined: 30-December 02 From: NoVA Member No.: 50 Region Association: MidAtlantic Region |
Could/would you make one with the angled side-bars that are removable...so you can take them out for street driving? Would it still be stiff? Also would it be beneficial to add a Perry or Engman long stiff kit along with this?
Man I need a new job so I can afford this! I'll do some figuring and get back to you. |
|
|
|
| mepstein |
Nov 28 2010, 03:52 PM
Post
#8
|
|
914-6 GT in waiting Group: Members Posts: 20,754 Joined: 19-September 09 From: Landenberg, PA/Wilmington, DE Member No.: 10,825 Region Association: MidAtlantic Region |
Everything I have heard says you shouldn't use a cage in a street car.
|
 |
|
| ChrisFoley |
Nov 28 2010, 04:01 PM
Post
#9
|
|
I am Tangerine Racing Group: Members Posts: 8,030 Joined: 29-January 03 From: Bolton, CT Member No.: 209 Region Association: None |
It's really a roll bar, not a cage. None of the bars in this design present the danger of side hoops and windshield crossbar of a full cage.
|
|
|
|
| Randal |
Nov 28 2010, 04:23 PM
Post
#10
|
|
Advanced Member Group: Members Posts: 4,446 Joined: 29-May 03 From: Los Altos, CA Member No.: 750 |
QUOTE(Racer Chris @ Nov 28 2010, 02:01 PM)  It's really a roll bar, not a cage. None of the bars in this design present the danger of side hoops and windshield crossbar of a full cage. Absolutely right as usual Chris. The danger of having a cage in a car is the front top bar and side top bars, neither of which Mark's combination roll bar contain. Mark is making up a sticker, "Safe for the Street." (IMG:style_emoticons/default/laugh.gif) |
|
|
|
| URY914 |
Nov 28 2010, 04:27 PM
Post
#11
|
|
I built the lightest 914 in the history of mankind. Group: Members Posts: 133,410 Joined: 3-February 03 From: Jacksonville, FL Member No.: 222 Region Association: None |
Shipping the side bars loose would be a good thing to do. You could tape them to the main piece and ship them w/o a problem. No box required.
|
|
|
|
| ChrisFoley |
Nov 28 2010, 05:32 PM
Post
#12
|
|
I am Tangerine Racing Group: Members Posts: 8,030 Joined: 29-January 03 From: Bolton, CT Member No.: 209 Region Association: None |
QUOTE(URY914 @ Nov 28 2010, 05:27 PM) No box required. FedEx and UPS have a hefty surcharge for items that are not boxed, in addition to the oversize charges for an item as large as a main roll hoop. OTOH, making a suitable box is time consuming. If the forward braces of the "half cage" are pre-installed the shipping charges will be even higher. I can currently ship a basic full cage kit which weighs 65lbs to CA for about $140. That includes all my direct costs and a little bit for time spent with packaging. |
|
|
|
| EdwardBlume |
Nov 28 2010, 05:36 PM
Post
#13
|
|
914 Wizard Group: Members Posts: 12,340 Joined: 2-January 03 From: SLO Member No.: 81 Region Association: Central California |
(IMG:style_emoticons/default/aktion035.gif) (IMG:style_emoticons/default/w00t.gif) (IMG:style_emoticons/default/idea.gif)
Attached image(s) 
|
|
|
|
| ONTHEGRIND |
Nov 28 2010, 06:26 PM
Post
#14
|
|
Member Group: Members Posts: 286 Joined: 10-November 08 From: California Member No.: 9,738 Region Association: None |
Do I get a napa valley discount if so Im in..
|
|
|
|
| plymouth37 |
Nov 28 2010, 07:37 PM
Post
#15
|
|
Senior Member Group: Members Posts: 1,825 Joined: 24-May 05 From: Snoqualmie, WA Member No.: 4,138 Region Association: Pacific Northwest |
Looks great!
|
|
|
|
| 9146BRUCE |
Nov 28 2010, 07:43 PM
Post
#16
|
|
Member Group: Members Posts: 57 Joined: 16-April 07 From: Northridge Calif. Member No.: 7,670 Region Association: Southern California |
Hi Mark if the setup you will make is like the one in the picture and the one Eric made I will take one how do you want me to pay. where do you live I could drive up and pick it up when I go up to Weidmans with some wheels.
Bruce |
|
|
|
| Maltese Falcon |
Nov 28 2010, 07:49 PM
Post
#17
|
|
914 Guru Group: Members Posts: 5,298 Joined: 14-September 04 From: Mulholland SoCal Member No.: 2,755 Region Association: None |
 McMark, if you get to where you need a small production run on the bent section let me know. We are always able to run several mandrel benders on different sizes. Pricing is not in the stratosphere (IMG:style_emoticons/default/smile.gif) Marty |
|
|
|
| McMark |
Nov 28 2010, 08:00 PM
Post
#18
|
|
914 Freak! Group: Retired Admin Posts: 20,180 Joined: 13-March 03 From: Grand Rapids, MI Member No.: 419 Region Association: None |
Bruce, you have a PM! (IMG:style_emoticons/default/biggrin.gif)
I need one more person to sign up for this to move forward. |
|
|
|
| Zimms |
Nov 28 2010, 08:13 PM
Post
#19
|
|
Senior Member Group: Members Posts: 1,416 Joined: 11-February 06 From: Michigan Member No.: 5,565 Region Association: Upper MidWest |
QUOTE(Eric_Shea @ Nov 28 2010, 02:30 PM) I'll give testimony. When this cage is bolted in, your car changes. The side bars extend along your longitudinals to the base of the A-Pillar tieing that area into the back wall and original targa hoop. Great vintage look. The GT V-Bar is amazing in my book. I also think this should be kit for for a few reasons: 1) It should be tacked and built in the vehicle (then removed, powder coated etc.). 2) Shipping. Are you planning on including scab plates? Would you recommend going this route versus a long strengthening kit to tighten up the frame or would both help? How much of a pain in the ass is it to get in and out with the side bar of the cage? I am 6ft, 220#. |
|
|
|
| moparrob |
Nov 28 2010, 08:13 PM
Post
#20
|
|
Senior Member Group: Members Posts: 646 Joined: 27-April 10 From: Los Angeles Member No.: 11,663 Region Association: None |
Awesome! Good luck with it. (IMG:style_emoticons/default/beer.gif)
|
|
|
|
|
1 User(s) are reading this topic (1 Guests and 0 Anonymous Users)
0 Members:

|
Lo-Fi Version | Time is now: 9th June 2026 - 05:47 PM |
Invision Power Board
v9.1.4 © 2026 IPS, Inc.