|
|
|
Porsche, and the Porsche crest are registered trademarks of Dr. Ing. h.c. F. Porsche AG.
This site is not affiliated with Porsche in any way. Its only purpose is to provide an online forum for car enthusiasts. All other trademarks are property of their respective owners. |
|
|

  |

| Eric_Shea |
 Jan 4 2011, 10:42 PM Jan 4 2011, 10:42 PM
Post
#1
|
|
PMB Performance  Group: Admin Posts: 19,304 Joined: 3-September 03 From: Salt Lake City, UT Member No.: 1,110 Region Association: Rocky Mountains |
I get this question a lot so I thought it might help to have it posted in a thread that can be searched etc.
The best way to set a piston angle without using the gauge is to draw an imaginary “Center Line” down the center of the pad cavity. This is illustrated by the “Red” line in this picture. Set the angle facing the side that has the bleeder. This is illustrated by the yellow arrow in this picture. This denotes the “Top” of the caliper. By setting the bottom notch of the piston on the center line it will automatically give you the 20º angle as illustrated by the “Green” line in this picture. For an updated version of this click here: https://pmbperformance.com/pages/no-tool-br...ngle-adjustment 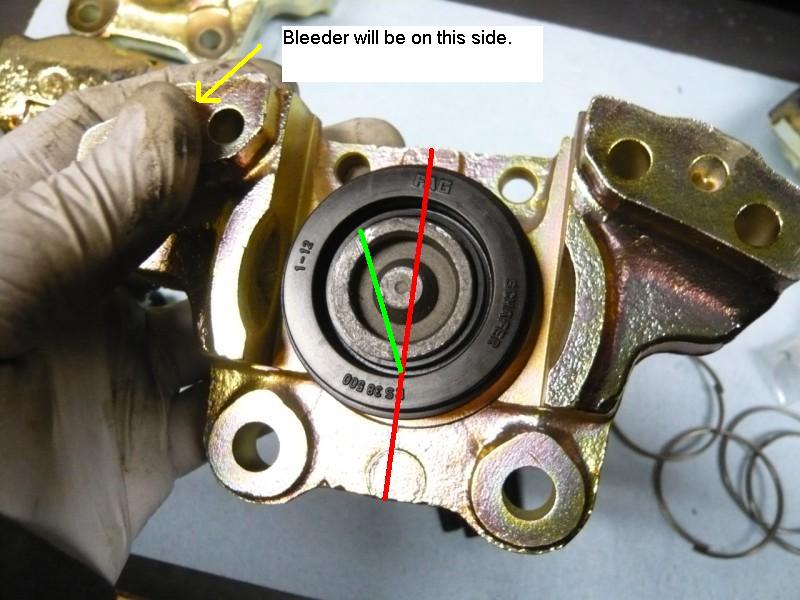 |
   |

 
|
| geniusanthony |
Jan 5 2011, 01:22 AM
Post
#2
|
|
Its a brand new "Chrome-sicle" Group: Members Posts: 517 Joined: 12-December 05 From: Alexandria,VA Member No.: 5,266 Region Association: MidAtlantic Region |
Eric, you took the time to post this so rather than it getting lost in the board, Hows about it gets moved to classics?
|
|
|
|
| sixnotfour |
Jan 5 2011, 04:08 AM
Post
#3
|
|
914 Wizard Group: Members Posts: 11,272 Joined: 12-September 04 Member No.: 2,744 Region Association: NineFourteenerVille |
Attached image(s) 
|
|
|
|
| Eric_Shea |
Jan 5 2011, 08:03 AM
Post
#4
|
|
PMB Performance Group: Admin Posts: 19,304 Joined: 3-September 03 From: Salt Lake City, UT Member No.: 1,110 Region Association: Rocky Mountains |
Thanks Jeff, that's probably a better picture to give people a more complete understanding.
It shows the center line and how it relates to the notch and the special tool used to position the pistons. I've used a green line here to illustrate once again. The pads need to open into the face of the oncoming rotor. 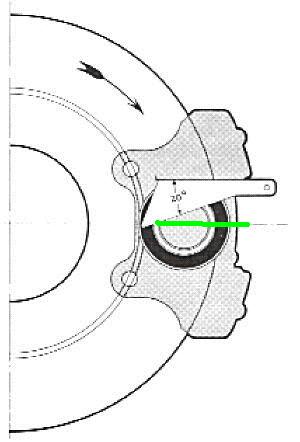 |
|
|
|
| willamp |
Jan 5 2011, 08:20 AM
Post
#5
|
|
Drivin' in Texas Hill Country Group: Members Posts: 76 Joined: 1-October 10 From: Austin, Texas Member No.: 12,232 Region Association: None |
I recently changed pads and rotors and simply pushed the pistons home with a c-clamp before inserting the new pads in the front, and used the adjusters to pull them home in the rear.
Did I miss some important step ??? And is this the front or rear you are referring to? thx |
|
|
|
| Eric_Shea |
Jan 5 2011, 09:48 AM
Post
#6
|
|
PMB Performance Group: Admin Posts: 19,304 Joined: 3-September 03 From: Salt Lake City, UT Member No.: 1,110 Region Association: Rocky Mountains |
Good question Phil.
The answer is "probably not". Hopefully, your pistons had been set at the correct angle when they were rebuilt. Always good to check when you're changing pads. A lot of the mass-rebuilders often miss this step or have it backward. This brings up another good point. "Do not try to change this piston angle while the piston is fully seated in the bore." To do this properly requires special tools and chances are "great" that you don't have them. I simply cannot count the number of pistons I've removed with "Vise-Grip" marks on them. If you're rebuiling your calipers and you goofed... best to blow the pistons back out and start over. It takes a few minutes to get it right vs. a lifetime of chewed up pistons. Regarding the rears... 914 rears all have flat pistons so, this is not an issue here. It brings up another interesting fact though; ever wonder why 914's have a fat pin and a skinny pin on the rears? The rear pads were actually tappered back in the day to accomplish this. 914 rear caliper are about the only caliper out there that doesn't incorporate this feature. If we can rope Jeff back in here, I believe he has a picture of an old tappered pad set. |
|
|
|
| sean_v8_914 |
Jan 5 2011, 09:53 AM
Post
#7
|
|
Chingon 601 Group: Members Posts: 4,011 Joined: 1-February 05 From: San Diego Member No.: 3,541 |
what is teh reason for this piston orientation?
|
|
|
|
| SLITS |
Jan 5 2011, 11:31 AM
Post
#8
|
|
"This Utah shit is HARSH!" Group: Benefactors Posts: 13,602 Joined: 22-February 04 From: SoCal Mountains ... Member No.: 1,696 Region Association: None |
QUOTE(sean_v8_914 @ Jan 5 2011, 07:53 AM)  what is teh reason for this piston orientation? To confuse you ...... (IMG:style_emoticons/default/happy11.gif) (actually, I think it was a function of pad wear. but I don't know anything anyway). And Eric ... in your image, the green line is 340 degrees ... (IMG:style_emoticons/default/poke.gif) |
|
|
|
| Eric_Shea |
Jan 5 2011, 12:31 PM
Post
#9
|
|
PMB Performance Group: Admin Posts: 19,304 Joined: 3-September 03 From: Salt Lake City, UT Member No.: 1,110 Region Association: Rocky Mountains |
QUOTE And Eric ... in your image, the green line is 340 degrees That's because you like to view things from the far right (caliper). We need an equally opposing far left viewpoint to make the world "right"... err... correct: 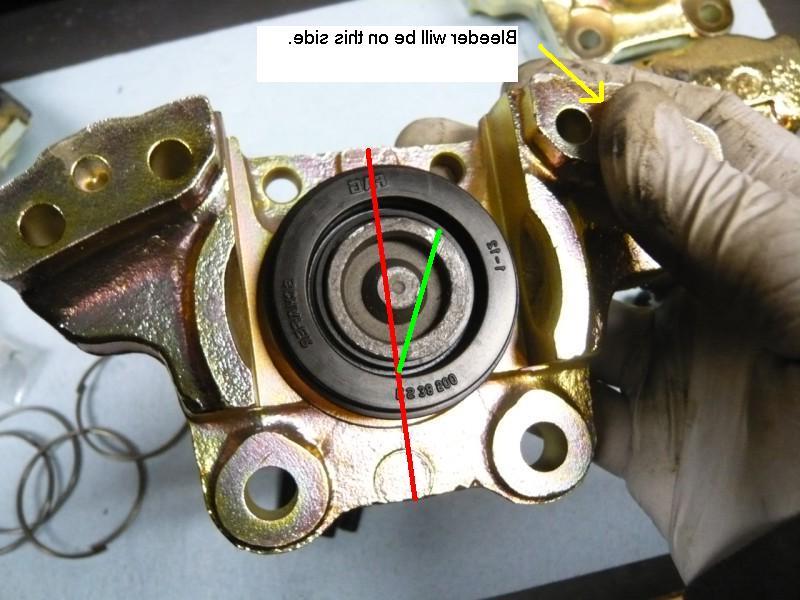 |
|
|
|
| 76-914 |
Jan 5 2011, 01:09 PM
Post
#10
|
|
Repeat Offender & Resident Subaru Antagonist Group: Members Posts: 13,900 Joined: 23-January 09 From: Temecula, CA Member No.: 9,964 Region Association: Southern California |
QUOTE(geniusanthony @ Jan 4 2011, 11:22 PM) Eric, you took the time to post this so rather than it getting lost in the board, Hows about it gets moved to classics? I would 2nd that but unfortunately, you've got a better chance of seeing God. A total of 3 posts have been added to that forum in the past 21 month's! (IMG:style_emoticons/default/popcorn[1].gif) |
|
|
|
| Eric_Shea |
Jan 5 2011, 03:27 PM
Post
#11
|
|
PMB Performance Group: Admin Posts: 19,304 Joined: 3-September 03 From: Salt Lake City, UT Member No.: 1,110 Region Association: Rocky Mountains |
I saw God at WCR. Had a red mohawk... or was it purple? (IMG:style_emoticons/default/idea.gif)
We generally let threads play out before they head over there but, with the new way of doing it, I'd don't even recall the process. I think there's just a link to the thread there so it may be possible. |
|
|
|
| sixnotfour |
Jan 14 2011, 01:10 AM
Post
#12
|
|
914 Wizard Group: Members Posts: 11,272 Joined: 12-September 04 Member No.: 2,744 Region Association: NineFourteenerVille |
If we can rope Jeff back in here, I believe he has a picture of an old tappered pad set.
Attached image(s) 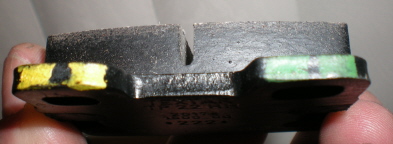
|
|
|
|
| realred914 |
Jan 14 2011, 10:50 AM
Post
#13
|
|
Senior Member Group: Retired Members Posts: 1,086 Joined: 1-April 10 From: california Member No.: 11,541 Region Association: None |
QUOTE(sean_v8_914 @ Jan 5 2011, 07:53 AM) what is teh reason for this piston orientation? the bump on the piston top is desinged to force one side of the pad on the rotor first, this gives smoother transition from no pad contact to full pad contact. one easy other way to get the angle right is to simply use the metal pad spacer that should be under each front pad, the angle is cut into tha metal spacer, line up that angle with the cut bump in the piston top and your in ok this spacer serves to prevent the piston from rotating out of postion. it is the perfect tool for checking the angle. |
|
|
|
| Eric_Shea |
Jan 14 2011, 11:00 AM
Post
#14
|
|
PMB Performance Group: Admin Posts: 19,304 Joined: 3-September 03 From: Salt Lake City, UT Member No.: 1,110 Region Association: Rocky Mountains |
Only 914 kits come with the angle piece. All others do not. The main purpose of the thread is to show people how to set the angle "without" that piece.
For an updated version of this document click here: https://pmbperformance.com/pages/no-tool-br...ngle-adjustment |
|
|
|
|
3 User(s) are reading this topic (3 Guests and 0 Anonymous Users)
0 Members:

|
Lo-Fi Version | Time is now: 21st June 2026 - 05:11 AM |
Invision Power Board
v9.1.4 © 2026 IPS, Inc.