|
|

|
Porsche, and the Porsche crest are registered trademarks of Dr. Ing. h.c. F. Porsche AG.
This site is not affiliated with Porsche in any way. Its only purpose is to provide an online forum for car enthusiasts. All other trademarks are property of their respective owners. |
|
|
  |
| mepstein |
 Jul 18 2012, 12:29 PM Jul 18 2012, 12:29 PM
Post
#21
|
|
914-6 GT in waiting                Group: Members Posts: 20,340 Joined: 19-September 09 From: Landenberg, PA/Wilmington, DE Member No.: 10,825 Region Association: MidAtlantic Region 
|
Nice!
|
| jkb944t |
 Jul 20 2012, 05:30 AM Jul 20 2012, 05:30 AM
Post
#22
|
|
Member   Group: Members Posts: 470 Joined: 17-January 05 From: Canton, OH Member No.: 3,459 Region Association: None |
I would like to find a good condition right rear fender section to replace the section that is outlined in the picture below. I already have the top section that I got from Restoration Design some time ago. I need to replace this area due to poor repair that was done sometime in the past.
Does anyone have the section of fender that is outlined in the picture that is in good condition? 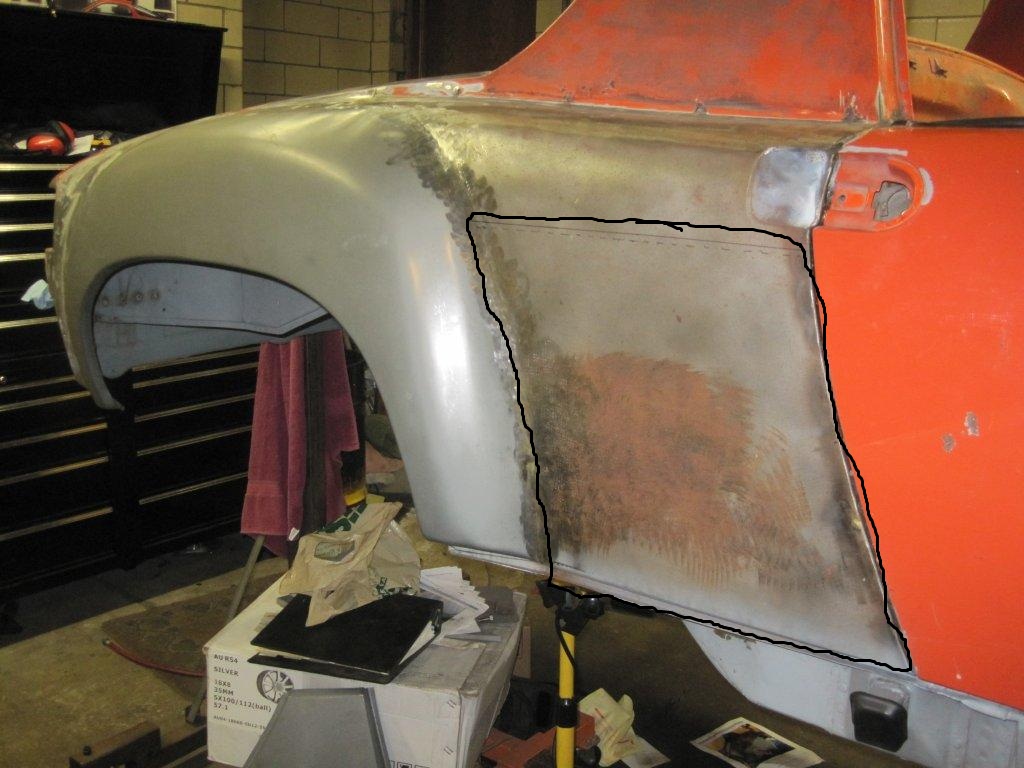 Jeff B |
| speed metal army |
 Jul 20 2012, 05:44 PM Jul 20 2012, 05:44 PM
Post
#23
|
|
Waiting for the rain to stop...    Group: Members Posts: 1,072 Joined: 4-September 10 From: PNW Member No.: 12,137 Region Association: Canada |
I'm sure McMaster has to have a suitable replacement for cheaper. I already looked. Get the 928 part. When a bearing gets loose inside, replacement is the only fix. Let me check one of my shitboxes.I probably have one you can have gratis, but you have to pay shipping from Canada( west coast ) |
| jkb944t |
 Jul 23 2012, 05:41 AM Jul 23 2012, 05:41 AM
Post
#24
|
|
Member   Group: Members Posts: 470 Joined: 17-January 05 From: Canton, OH Member No.: 3,459 Region Association: None |
If you find a good one just let me know what the shipping will be. Thanks!
Jeff B |
| gothspeed |
 Jul 26 2012, 10:46 AM Jul 26 2012, 10:46 AM
Post
#25
|
|
Senior Member    Group: Members Posts: 1,539 Joined: 3-February 09 From: SoCal Member No.: 10,019 Region Association: None |
Great thread and even better work! I too have a 1973 that will be getting the GT replica treatment (IMG:style_emoticons/default/smile.gif) ....... I will be following this thread (IMG:style_emoticons/default/beerchug.gif)
|
| jkb944t |
 Nov 1 2012, 02:55 PM Nov 1 2012, 02:55 PM
Post
#26
|
|
Member   Group: Members Posts: 470 Joined: 17-January 05 From: Canton, OH Member No.: 3,459 Region Association: None |
Well I am actually going backwards on this project now. I found that the inner right panel (marked with an X in the picture) was pretty rusted from the battery so I am replacing it now.
My question for others who have performed this repair is should I splice in the panel even with the bottom of the sail support (shown with an arrow in the picture) or should I go above that where the spot welds are? 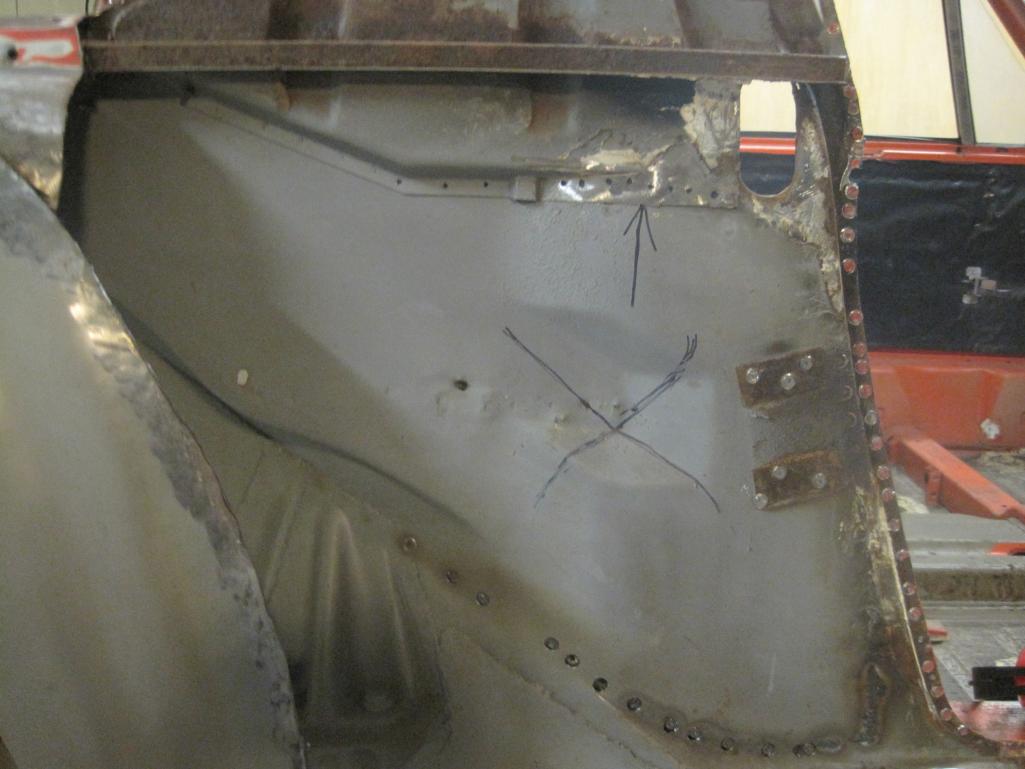 |
| jkb944t |
 Oct 10 2013, 05:59 AM Oct 10 2013, 05:59 AM
Post
#27
|
|
Member   Group: Members Posts: 470 Joined: 17-January 05 From: Canton, OH Member No.: 3,459 Region Association: None |
I am trying to get back to work on this project and need some advice. The only rust issue on this car is the upper section of the firewall due to the pad holding moisture. A club member hooked me up with a good upper firewall section a while back.
Can anyone give me some tips on installing the upper section of the firewall? It looks like it will be rather difficult so any ideas or experience would be appreciated. Jeff B |
| rick 918-S |
 Oct 10 2013, 07:05 AM Oct 10 2013, 07:05 AM
Post
#28
|
|
Hey nice rack! -Celette                Group: Members Posts: 21,172 Joined: 30-December 02 From: Now in Superior WI Member No.: 43 Region Association: Northstar Region 

|
Just spotted your thread. Post some photos of what your trying to do and I'll try to check in later. (IMG:style_emoticons/default/welder.gif)
|
| sean_v8_914 |
 Oct 10 2013, 09:16 AM Oct 10 2013, 09:16 AM
Post
#29
|
|
Chingon 601     Group: Members Posts: 4,011 Joined: 1-February 05 From: San Diego Member No.: 3,541 |
lookin good.
if you do not reinforce teh entire inner suspension pick up console it will rip at teh cross brace and or the 2 underside ribs |
| jkb944t |
 Oct 11 2013, 05:30 AM Oct 11 2013, 05:30 AM
Post
#30
|
|
Member   Group: Members Posts: 470 Joined: 17-January 05 From: Canton, OH Member No.: 3,459 Region Association: None |
This is a picture of the upper section of the firewall that has the rust on it, especially in both lower corner sections.
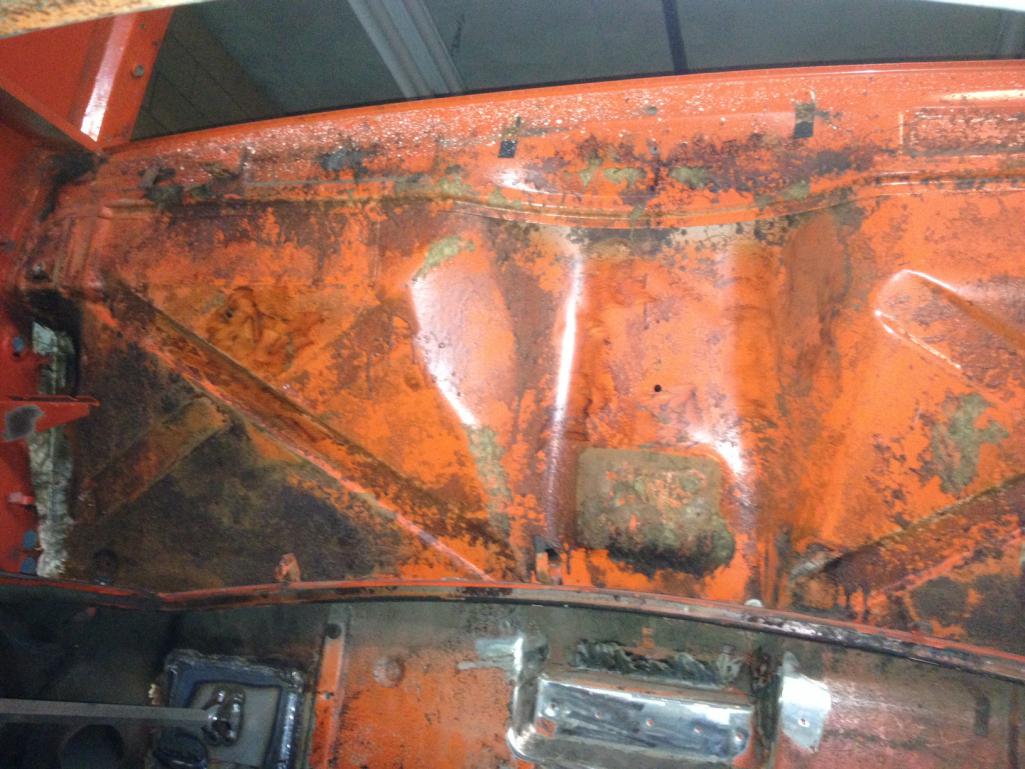 This is the piece that I am going to use to replace the bad section which has just been blasted to clean it up. 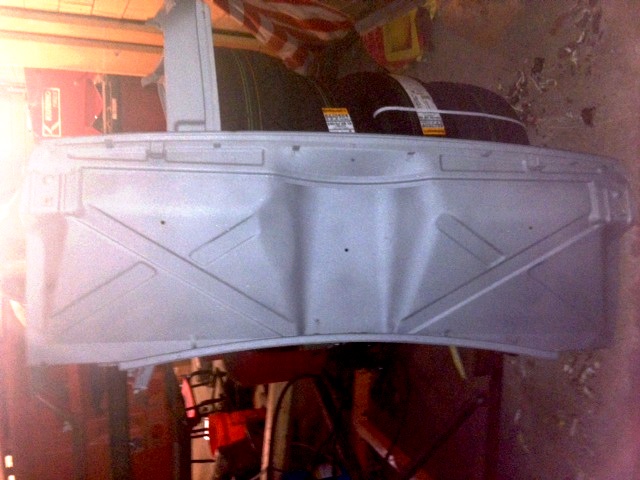 I am hoping that someone has replaced this panel before and can give me some advice on how to do it. Jeff B |
| OllieG |
 Oct 11 2013, 06:18 AM Oct 11 2013, 06:18 AM
Post
#31
|
|
OllieG   Group: Members Posts: 212 Joined: 6-July 11 From: UK Member No.: 13,282 Region Association: England |
Do you really need to replace the entire Firewall? I'm making repairs to the Firewall on my car right now and just patching up the rusty sections.. Yours doesn't look that bad from the photo at least.
I personally would use a cup brush on an angle grinder and see just how bad it is before diving in and replacing the entire thing - I think that would be a big and possibly unnecessary job... Just my 2 cents... |
| OllieG |
 Oct 11 2013, 08:25 AM Oct 11 2013, 08:25 AM
Post
#32
|
|
OllieG   Group: Members Posts: 212 Joined: 6-July 11 From: UK Member No.: 13,282 Region Association: England |
If you do decide to cut out the old one, I would definitely brace the opening...
|
| Eric_Shea |
 Oct 11 2013, 08:53 AM Oct 11 2013, 08:53 AM
Post
#33
|
|
PMB Performance                Group: Admin Posts: 19,304 Joined: 3-September 03 From: Salt Lake City, UT Member No.: 1,110 Region Association: Rocky Mountains  |
Loving this project. If love to watch it get kick started again.
I would soda blast the existing piece and see where you really are. I tend to agree with Ollie here. We've replaced sections in the past. If it comes to that, it looks like you have good metal. I would simply lay out where you would like to cut and weld. That upper section you're talking about is fairly straight forward with the exception of the double walled bits and frankly... I don't see any issue that would make me cut there. Again, if you "need" to, just cut and patch the areas of concern. |
| Eric_Shea |
 Oct 11 2013, 08:57 AM Oct 11 2013, 08:57 AM
Post
#34
|
|
PMB Performance                Group: Admin Posts: 19,304 Joined: 3-September 03 From: Salt Lake City, UT Member No.: 1,110 Region Association: Rocky Mountains  |
Also... In reference to post#26. I'd just patch the areas needed.
|
| jkb944t |
 Feb 3 2014, 06:55 AM Feb 3 2014, 06:55 AM
Post
#35
|
|
Member   Group: Members Posts: 470 Joined: 17-January 05 From: Canton, OH Member No.: 3,459 Region Association: None |
I am finally getting back to my project. My son and son-in-law are going to help me as well so it will be a family effort going forward.
I am getting ready to install a used sail panel/lower fender section. It is in good shape except for some internal rust from the internal foam weather stripping. There are only a few minor holes that extent to the outside of the panel. 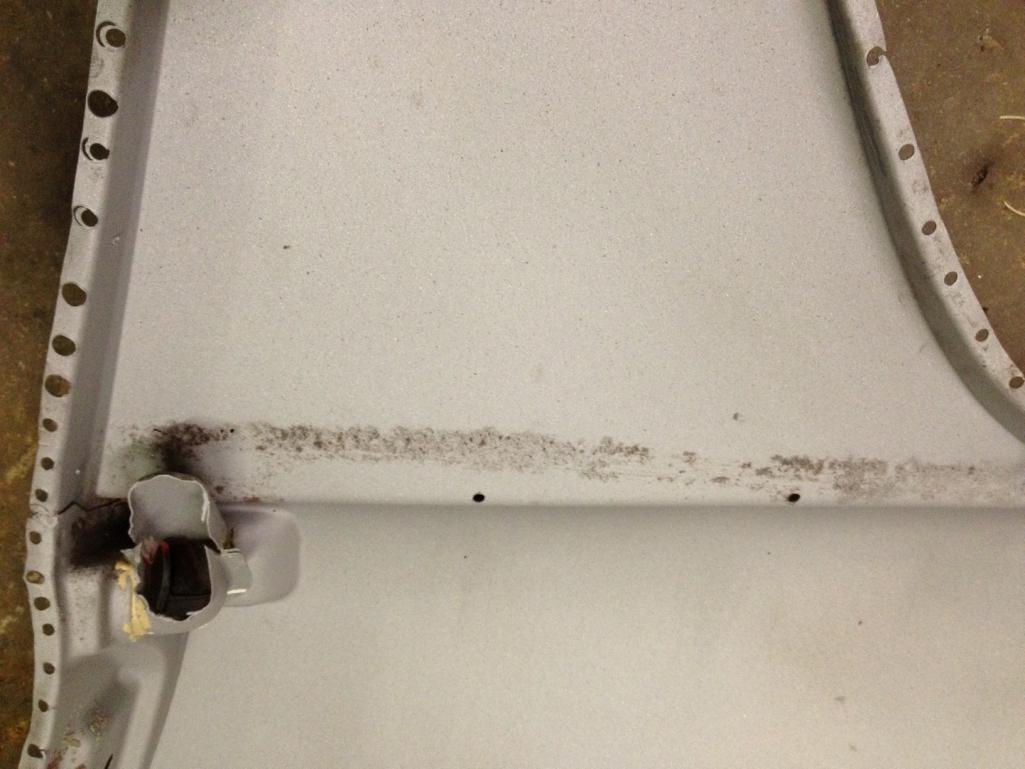 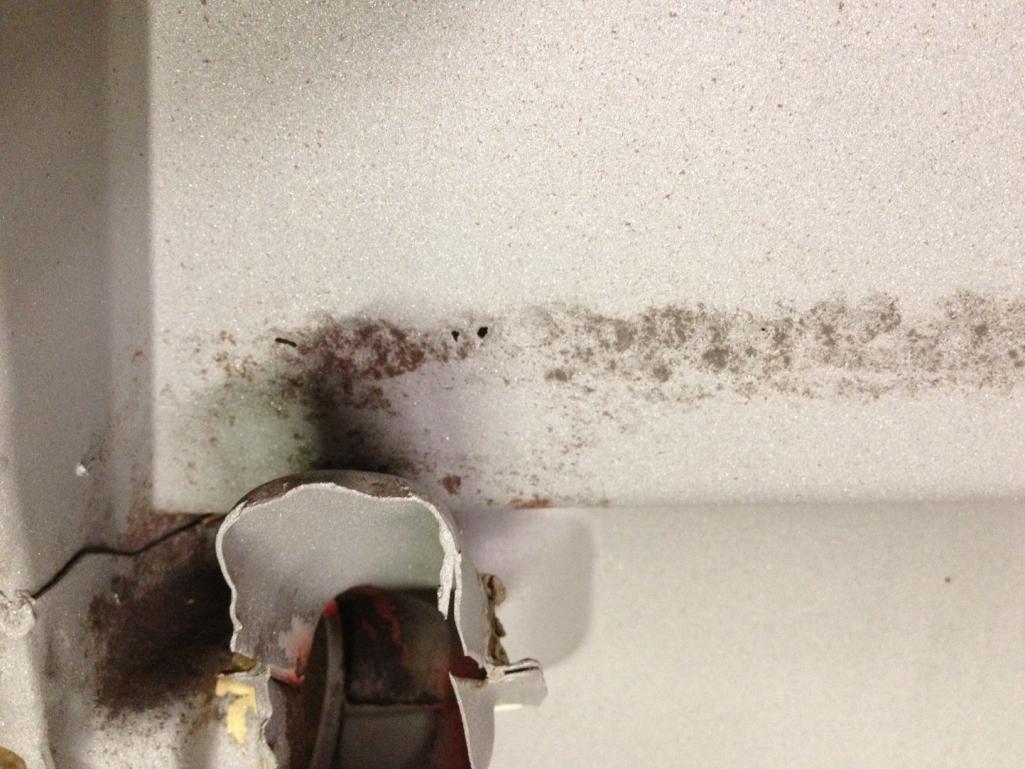 I need suggestions on repairing this before I install it. Should I weld or braze the minor pin holes shut and then use a fiberglass body filler to fill the rest of the imperfections? Jeff B |
| jkb944t |
 Mar 10 2015, 06:56 AM Mar 10 2015, 06:56 AM
Post
#36
|
|
Member   Group: Members Posts: 470 Joined: 17-January 05 From: Canton, OH Member No.: 3,459 Region Association: None |
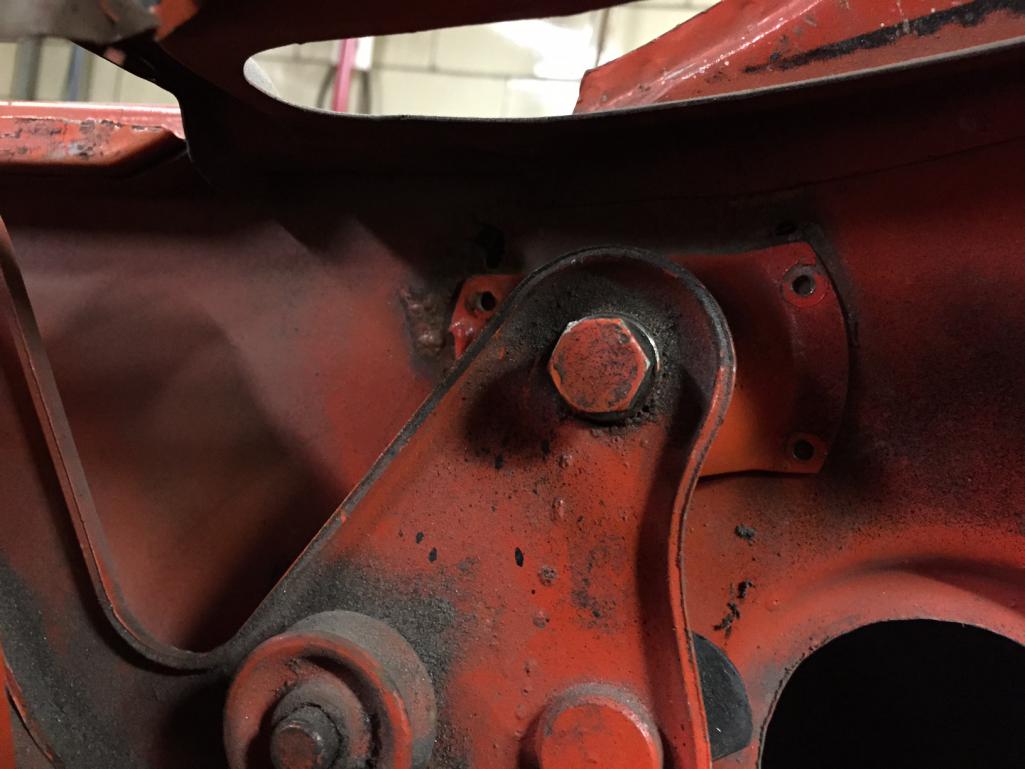 As you can see from the photo the mounting ear for my rear trunk was just screwed into the body. Both sides are screwed on but I would assume that they should be welded onto the body. I don’t believe that that they are currently located correctly either. Does anyone know if there is a measurement for aligning these mounting ears? Jeff B |
| brant |
 Mar 10 2015, 07:30 AM Mar 10 2015, 07:30 AM
Post
#37
|
|
914 Wizard           Group: Members Posts: 12,120 Joined: 30-December 02 From: Colorado Member No.: 47 Region Association: Rocky Mountains 

|
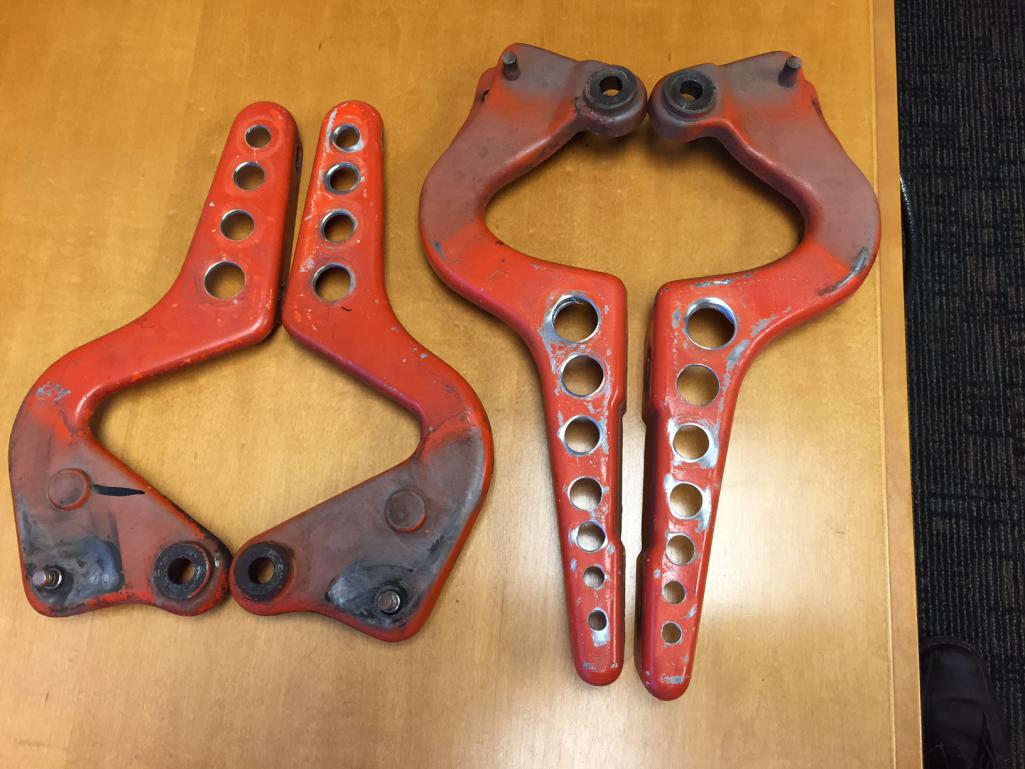
I am finishing up the rear camber adjustment links. Jeff B These are actually to lock in the rear tow and not camber If you eliminate enough rear flex with the right bushings and swing arms you can run zero rear toe. These bars help with flex but mostly help lock in your settings and prevent setting slip from side loading |
| rgalla9146 |
 Mar 10 2015, 08:12 AM Mar 10 2015, 08:12 AM
Post
#38
|
|
Advanced Member     Group: Members Posts: 4,906 Joined: 23-November 05 From: Paramus NJ Member No.: 5,176 Region Association: None 
|
I don't know where you can get dimensions for location of the hinge bracket.
Maybe someone here knows a source. What I've done is mount the hinges in the middle of their adjustment slots, put the lid on and adjust to proper fit starting at the latch/ receiver, then tack weld. Obviously with no torsion bars. Then operate the lid to verify that it is located well / that it is adjustable to uniform gaps and height. |
| jkb944t |
 Mar 12 2015, 06:01 AM Mar 12 2015, 06:01 AM
Post
#39
|
|
Member   Group: Members Posts: 470 Joined: 17-January 05 From: Canton, OH Member No.: 3,459 Region Association: None |
|
| OllieG |
 Mar 13 2015, 01:51 AM Mar 13 2015, 01:51 AM
Post
#40
|
|
OllieG   Group: Members Posts: 212 Joined: 6-July 11 From: UK Member No.: 13,282 Region Association: England |
...put the lid on and adjust to proper fit starting at the latch/ receiver, then tack weld. (IMG:style_emoticons/default/agree.gif) That's how I'm going to do mine. The PO had made a proper mess of the hinge mounts on mine so I had to cut them out and patch in new metal behind. Now I'll put the lid in place to find the right mount location. I'm going to use gas struts on mine like those available from Camp914…eventually. |
  |
1 User(s) are reading this topic (1 Guests and 0 Anonymous Users)
0 Members:

|
Lo-Fi Version | Time is now: 17th January 2026 - 09:40 AM |
Invision Power Board
v9.1.4 © 2026 IPS, Inc.


