|
|
|
Porsche, and the Porsche crest are registered trademarks of Dr. Ing. h.c. F. Porsche AG.
This site is not affiliated with Porsche in any way. Its only purpose is to provide an online forum for car enthusiasts. All other trademarks are property of their respective owners. |
|
|


| jkb944t |
 Apr 14 2011, 05:55 AM Apr 14 2011, 05:55 AM
Post
#41
|
|
Member  Group: Members Posts: 470 Joined: 17-January 05 From: Canton, OH Member No.: 3,459 Region Association: None |
I am working on restoring a 1973 914 and converting it to a GT clone with the flares and chassis stiffening. Here is a picture of where I am on it.
Jeff B Attached image(s) 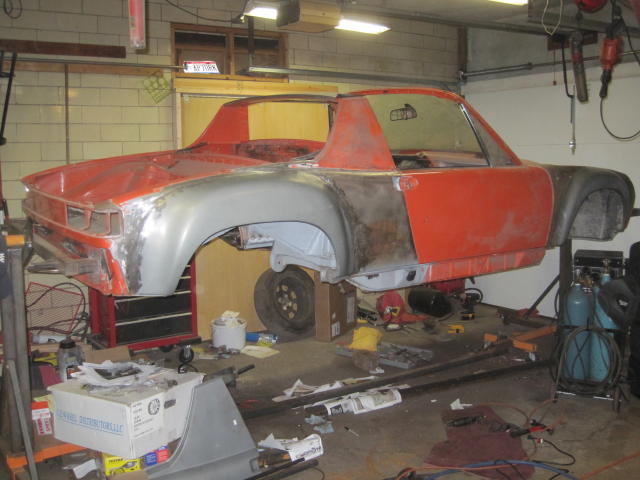 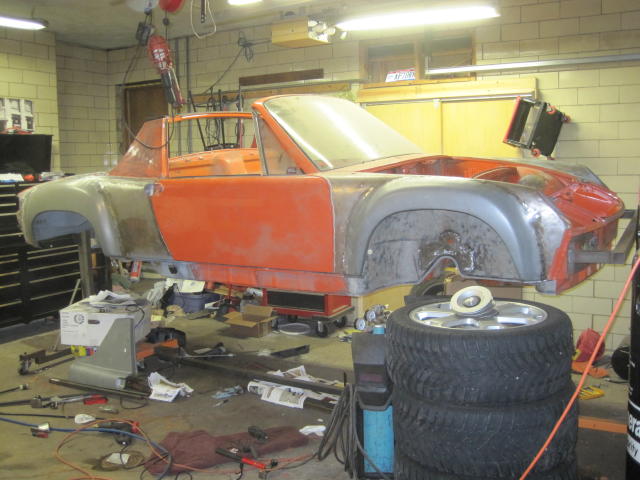
|
   |

 
|
Posts in this topic
jkb944t BUILD-OFF CHALLENGE: Another 914-GT Conversion Project Apr 14 2011, 05:55 AM jkb944t I removed the tar sound insulation on the floor pa... Apr 14 2011, 05:58 AM jkb944t I can see rust inside the center tunnel but it is ... Apr 14 2011, 06:03 AM
 jasons
I can see rust inside the center tunnel but it is... Apr 14 2011, 11:31 PM type47 I think Eastwood, probably among others, offers a ... Apr 14 2011, 06:11 AM proto31 Nice start! Are you going to keep it Tangerine... Apr 14 2011, 08:06 AM jkb944t I am going to keep it the same color but it is act... Apr 14 2011, 09:24 PM FourBlades That is a very solid looking car.
Looks like yo... Apr 14 2011, 11:51 PM ellisor3 I used the Eastwood Rust Converter followed by the... Apr 15 2011, 04:50 AM nsr-jamie need more pictures...looks very good for now. I ho... Apr 15 2011, 05:03 AM jkb944t Thanks for the help and encouragement.
The car ... Apr 15 2011, 10:34 AM stugray You can spray the insides of some of the cavities ... Apr 16 2011, 02:19 AM jkb944t Made some more progress on the front swaybar impro... Apr 26 2011, 11:01 AM jkb944t I am finishing up the rear camber adjustment links... Apr 27 2011, 05:31 AM brant
I am finishing up the rear camber adjustment link... Mar 10 2015, 07:30 AM jkb944t I thought that since I am converting a 1973 I woul... May 2 2011, 06:17 AM PeeGreen 914
I thought that since I am converting a 1973 I wou... May 2 2011, 02:59 PM 396 very interesting project- good luck! May 2 2011, 07:25 AM Eric_Shea Looking good... I'd say the Eastwood Internal ... May 2 2011, 02:38 PM fasthonda Excellent work. I really like your approach and th... May 2 2011, 04:12 PM jkb944t I have been travelling a lot for work over the pas... Jul 18 2012, 12:03 PM mepstein Nice! Jul 18 2012, 12:29 PM jkb944t I would like to find a good condition right rear f... Jul 20 2012, 05:30 AM jkb944t If you find a good one just let me know what the s... Jul 23 2012, 05:41 AM lonewolfe
I would like to find a good condition right rear ... Dec 22 2015, 03:01 PM speed metal army
I'm sure McMaster has to have a suitable re... Jul 20 2012, 05:44 PM gothspeed Great thread and even better work! I too have ... Jul 26 2012, 10:46 AM jkb944t Well I am actually going backwards on this project... Nov 1 2012, 02:55 PM jkb944t I am trying to get back to work on this project an... Oct 10 2013, 05:59 AM rick 918-S Just spotted your thread. Post some photos of what... Oct 10 2013, 07:05 AM sean_v8_914 lookin good.
if you do not reinforce teh entire in... Oct 10 2013, 09:16 AM jkb944t This is a picture of the upper section of the fire... Oct 11 2013, 05:30 AM OllieG Do you really need to replace the entire Firewall?... Oct 11 2013, 06:18 AM OllieG If you do decide to cut out the old one, I would d... Oct 11 2013, 08:25 AM Eric_Shea Loving this project. If love to watch it get kick ... Oct 11 2013, 08:53 AM Eric_Shea Also... In reference to post#26. I'd just patc... Oct 11 2013, 08:57 AM jkb944t I am finally getting back to my project. My son a... Feb 3 2014, 06:55 AM jkb944t
As you can see from the photo the mounting ear ... Mar 10 2015, 06:56 AM rgalla9146 I don't know where you can get dimensions for ... Mar 10 2015, 08:12 AM OllieG
...put the lid on and adjust to proper fit starti... Mar 13 2015, 01:51 AM jkb944t I was hoping to avoid reassembling the trunk and e... Mar 12 2015, 06:01 AM jkb944t Fortunately the PO just screwed them in so moving ... Mar 13 2015, 06:51 AM jkb944t I was able to finally get the inner wheelhouse wel... Apr 3 2015, 11:05 AM OllieG Nice neat looking job, but I'd get those door ... Apr 3 2015, 02:15 PM pete000 NICE WORK ! Apr 3 2015, 02:53 PM Vysoc I have many of the same issues...enjoying the phot... Apr 7 2015, 04:19 PM jkb944t I am making some more progress and will hopefully ... Apr 30 2015, 10:40 AM trojanhorsepower Oh man, that's cool! Apr 30 2015, 06:38 PM jkb944t I finished up the clutch tube repair and closed up... May 1 2015, 05:16 AM PanelBilly The sooner you get it blasted the better. It just ... May 1 2015, 08:48 AM jkb944t I made some more progress this week. I finally go... May 14 2015, 10:46 AM OllieG
The next item to work on is the battery tray asse... May 16 2015, 01:44 AM 3d914 Jeff, nice solution to the tow hook. I often wonde... May 15 2015, 10:02 AM jkb944t I added a reinforcement plate inside the mounting ... May 15 2015, 08:32 PM jkb944t I went ahead with the bolt in battery tray idea th... May 21 2015, 06:02 AM jkb944t Moved to the front of the car and removed the fron... Jul 13 2015, 06:05 AM jkb944t I fabricated an engine mount that was as close to ... Oct 5 2015, 03:27 PM 914forme Wow great build, and excellent work. Your ahead ... Oct 5 2015, 06:50 PM jkb944t
Wow great build, and excellent work. Your ahead... Oct 6 2015, 06:51 AM OllieG Great thread, continuing to watch with interest...... Oct 11 2015, 04:40 AM falcor75 Great work :) Oct 11 2015, 07:01 AM jkb944t Since the last update the painter sprayed the car ... Oct 20 2015, 05:56 AM Cairo94507 :popcorn: Terrific work. Oct 20 2015, 06:10 AM jkb944t My car finally got painted this weekend. The inte... Dec 21 2015, 06:57 AM altitude411 Wow! Looks fantastic. Congratulations and enjo... Dec 21 2015, 07:12 AM Andyrew What color? Looks great! Dec 21 2015, 07:58 AM jkb944t
What color? Looks great!
Thanks, it is Phoe... Dec 21 2015, 08:04 AM Andyrew
What color? Looks great!
Thanks, it is Pho... Dec 22 2015, 07:30 AM Mikey914 Very nice progress! :Qarl: Dec 22 2015, 01:18 AM SixerJ Looking great, more pictures please ! :drooley... Dec 22 2015, 04:00 AM Cracker Jeff - Looks fantastic...must make you feel great... Dec 22 2015, 07:09 AM sb914 Wow, beautiful that's going to be really fast... Dec 22 2015, 10:12 AM mbseto Gorgeous Dec 22 2015, 03:44 PM trojanhorsepower Looks great! Dec 23 2015, 01:00 PM jkb944t Below is my car finally back in my garage the day ... Dec 30 2015, 07:07 AM 914forme :wub: you are making great progress, love freshly ... Dec 30 2015, 09:38 AM jkb944t I made some additional progress on my 914 project ... Jan 6 2016, 07:31 AM jkb944t I glass beaded some parts this weekend and dropped... Jan 21 2016, 11:22 AM jkb944t I got back my suspension and other misc. parts fro... Feb 1 2016, 12:09 PM jkb944t So far I have been able to assemble everything in ... Feb 1 2016, 12:15 PM Darren C Not installing the outer weather strip aluminium h... Feb 1 2016, 12:24 PM jkb944t
Not installing the outer weather strip aluminium ... Feb 1 2016, 12:47 PM Larmo63 This restoration/mod of yours is a joy to behold... Feb 1 2016, 12:29 PM rick 918-S Nice progress. Nice detail. Your not going to want... Feb 1 2016, 01:08 PM jkb944t
Nice progress. Nice detail. Your not going to wan... Feb 1 2016, 02:18 PM 76-914
[quote name='rick 918-S' post='2297041' date... Feb 1 2016, 08:51 PM Darren C We have a WINNER! That didn't take long at... Feb 1 2016, 01:31 PM jkb944t This month I have had a lot of help from Mark at 9... Mar 17 2016, 05:36 AM 914forme :drooley: Mar 17 2016, 12:45 PM iwanta914-6 So shiny! Mar 17 2016, 01:03 PM pete000 Impressive !!! Mar 17 2016, 04:36 PM jkb944t I have been making some good progress on the car t... Apr 4 2016, 06:02 AM mb911 Wow looks great very similar to what I am doing.. ... Apr 4 2016, 05:44 PM jkb944t
Wow looks great very similar to what I am doing..... Apr 5 2016, 05:45 AM jkb944t The 914 is finally off the rotisserie!
Jeff... May 2 2016, 05:52 AM mb911
The 914 is finally off the rotisserie!
Jef... May 17 2016, 08:09 AM jkb944t
The 914 is finally off the rotisserie!
Je... May 27 2016, 06:02 AM mb911 Thanks I appreciate it. I know a couple others are... May 27 2016, 01:28 PM jkb944t I have started to reseal and clean up the engine.
... Jun 5 2016, 08:59 AM jkb944t Even my granddaughter is helping me finish this pr... Jun 22 2016, 06:04 AM
jasons
I can see rust inside the center tunnel but it is... Apr 14 2011, 11:31 PM type47 I think Eastwood, probably among others, offers a ... Apr 14 2011, 06:11 AM proto31 Nice start! Are you going to keep it Tangerine... Apr 14 2011, 08:06 AM jkb944t I am going to keep it the same color but it is act... Apr 14 2011, 09:24 PM FourBlades That is a very solid looking car.
Looks like yo... Apr 14 2011, 11:51 PM ellisor3 I used the Eastwood Rust Converter followed by the... Apr 15 2011, 04:50 AM nsr-jamie need more pictures...looks very good for now. I ho... Apr 15 2011, 05:03 AM jkb944t Thanks for the help and encouragement.
The car ... Apr 15 2011, 10:34 AM stugray You can spray the insides of some of the cavities ... Apr 16 2011, 02:19 AM jkb944t Made some more progress on the front swaybar impro... Apr 26 2011, 11:01 AM jkb944t I am finishing up the rear camber adjustment links... Apr 27 2011, 05:31 AM brant
I am finishing up the rear camber adjustment link... Mar 10 2015, 07:30 AM jkb944t I thought that since I am converting a 1973 I woul... May 2 2011, 06:17 AM PeeGreen 914
I thought that since I am converting a 1973 I wou... May 2 2011, 02:59 PM 396 very interesting project- good luck! May 2 2011, 07:25 AM Eric_Shea Looking good... I'd say the Eastwood Internal ... May 2 2011, 02:38 PM fasthonda Excellent work. I really like your approach and th... May 2 2011, 04:12 PM jkb944t I have been travelling a lot for work over the pas... Jul 18 2012, 12:03 PM mepstein Nice! Jul 18 2012, 12:29 PM jkb944t I would like to find a good condition right rear f... Jul 20 2012, 05:30 AM jkb944t If you find a good one just let me know what the s... Jul 23 2012, 05:41 AM lonewolfe
I would like to find a good condition right rear ... Dec 22 2015, 03:01 PM speed metal army
I'm sure McMaster has to have a suitable re... Jul 20 2012, 05:44 PM gothspeed Great thread and even better work! I too have ... Jul 26 2012, 10:46 AM jkb944t Well I am actually going backwards on this project... Nov 1 2012, 02:55 PM jkb944t I am trying to get back to work on this project an... Oct 10 2013, 05:59 AM rick 918-S Just spotted your thread. Post some photos of what... Oct 10 2013, 07:05 AM sean_v8_914 lookin good.
if you do not reinforce teh entire in... Oct 10 2013, 09:16 AM jkb944t This is a picture of the upper section of the fire... Oct 11 2013, 05:30 AM OllieG Do you really need to replace the entire Firewall?... Oct 11 2013, 06:18 AM OllieG If you do decide to cut out the old one, I would d... Oct 11 2013, 08:25 AM Eric_Shea Loving this project. If love to watch it get kick ... Oct 11 2013, 08:53 AM Eric_Shea Also... In reference to post#26. I'd just patc... Oct 11 2013, 08:57 AM jkb944t I am finally getting back to my project. My son a... Feb 3 2014, 06:55 AM jkb944t
As you can see from the photo the mounting ear ... Mar 10 2015, 06:56 AM rgalla9146 I don't know where you can get dimensions for ... Mar 10 2015, 08:12 AM OllieG
...put the lid on and adjust to proper fit starti... Mar 13 2015, 01:51 AM jkb944t I was hoping to avoid reassembling the trunk and e... Mar 12 2015, 06:01 AM jkb944t Fortunately the PO just screwed them in so moving ... Mar 13 2015, 06:51 AM jkb944t I was able to finally get the inner wheelhouse wel... Apr 3 2015, 11:05 AM OllieG Nice neat looking job, but I'd get those door ... Apr 3 2015, 02:15 PM pete000 NICE WORK ! Apr 3 2015, 02:53 PM Vysoc I have many of the same issues...enjoying the phot... Apr 7 2015, 04:19 PM jkb944t I am making some more progress and will hopefully ... Apr 30 2015, 10:40 AM trojanhorsepower Oh man, that's cool! Apr 30 2015, 06:38 PM jkb944t I finished up the clutch tube repair and closed up... May 1 2015, 05:16 AM PanelBilly The sooner you get it blasted the better. It just ... May 1 2015, 08:48 AM jkb944t I made some more progress this week. I finally go... May 14 2015, 10:46 AM OllieG
The next item to work on is the battery tray asse... May 16 2015, 01:44 AM 3d914 Jeff, nice solution to the tow hook. I often wonde... May 15 2015, 10:02 AM jkb944t I added a reinforcement plate inside the mounting ... May 15 2015, 08:32 PM jkb944t I went ahead with the bolt in battery tray idea th... May 21 2015, 06:02 AM jkb944t Moved to the front of the car and removed the fron... Jul 13 2015, 06:05 AM jkb944t I fabricated an engine mount that was as close to ... Oct 5 2015, 03:27 PM 914forme Wow great build, and excellent work. Your ahead ... Oct 5 2015, 06:50 PM jkb944t
Wow great build, and excellent work. Your ahead... Oct 6 2015, 06:51 AM OllieG Great thread, continuing to watch with interest...... Oct 11 2015, 04:40 AM falcor75 Great work :) Oct 11 2015, 07:01 AM jkb944t Since the last update the painter sprayed the car ... Oct 20 2015, 05:56 AM Cairo94507 :popcorn: Terrific work. Oct 20 2015, 06:10 AM jkb944t My car finally got painted this weekend. The inte... Dec 21 2015, 06:57 AM altitude411 Wow! Looks fantastic. Congratulations and enjo... Dec 21 2015, 07:12 AM Andyrew What color? Looks great! Dec 21 2015, 07:58 AM jkb944t
What color? Looks great!
Thanks, it is Phoe... Dec 21 2015, 08:04 AM Andyrew
What color? Looks great!
Thanks, it is Pho... Dec 22 2015, 07:30 AM Mikey914 Very nice progress! :Qarl: Dec 22 2015, 01:18 AM SixerJ Looking great, more pictures please ! :drooley... Dec 22 2015, 04:00 AM Cracker Jeff - Looks fantastic...must make you feel great... Dec 22 2015, 07:09 AM sb914 Wow, beautiful that's going to be really fast... Dec 22 2015, 10:12 AM mbseto Gorgeous Dec 22 2015, 03:44 PM trojanhorsepower Looks great! Dec 23 2015, 01:00 PM jkb944t Below is my car finally back in my garage the day ... Dec 30 2015, 07:07 AM 914forme :wub: you are making great progress, love freshly ... Dec 30 2015, 09:38 AM jkb944t I made some additional progress on my 914 project ... Jan 6 2016, 07:31 AM jkb944t I glass beaded some parts this weekend and dropped... Jan 21 2016, 11:22 AM jkb944t I got back my suspension and other misc. parts fro... Feb 1 2016, 12:09 PM jkb944t So far I have been able to assemble everything in ... Feb 1 2016, 12:15 PM Darren C Not installing the outer weather strip aluminium h... Feb 1 2016, 12:24 PM jkb944t
Not installing the outer weather strip aluminium ... Feb 1 2016, 12:47 PM Larmo63 This restoration/mod of yours is a joy to behold... Feb 1 2016, 12:29 PM rick 918-S Nice progress. Nice detail. Your not going to want... Feb 1 2016, 01:08 PM jkb944t
Nice progress. Nice detail. Your not going to wan... Feb 1 2016, 02:18 PM 76-914
[quote name='rick 918-S' post='2297041' date... Feb 1 2016, 08:51 PM Darren C We have a WINNER! That didn't take long at... Feb 1 2016, 01:31 PM jkb944t This month I have had a lot of help from Mark at 9... Mar 17 2016, 05:36 AM 914forme :drooley: Mar 17 2016, 12:45 PM iwanta914-6 So shiny! Mar 17 2016, 01:03 PM pete000 Impressive !!! Mar 17 2016, 04:36 PM jkb944t I have been making some good progress on the car t... Apr 4 2016, 06:02 AM mb911 Wow looks great very similar to what I am doing.. ... Apr 4 2016, 05:44 PM jkb944t
Wow looks great very similar to what I am doing..... Apr 5 2016, 05:45 AM jkb944t The 914 is finally off the rotisserie!
Jeff... May 2 2016, 05:52 AM mb911
The 914 is finally off the rotisserie!
Jef... May 17 2016, 08:09 AM jkb944t
The 914 is finally off the rotisserie!
Je... May 27 2016, 06:02 AM mb911 Thanks I appreciate it. I know a couple others are... May 27 2016, 01:28 PM jkb944t I have started to reseal and clean up the engine.
... Jun 5 2016, 08:59 AM jkb944t Even my granddaughter is helping me finish this pr... Jun 22 2016, 06:04 AM  |
51 User(s) are reading this topic (51 Guests and 0 Anonymous Users)
0 Members:

|
Lo-Fi Version | Time is now: 24th June 2026 - 04:15 PM |
Invision Power Board
v9.1.4 © 2026 IPS, Inc.