|
|
|
Porsche, and the Porsche crest are registered trademarks of Dr. Ing. h.c. F. Porsche AG.
This site is not affiliated with Porsche in any way. Its only purpose is to provide an online forum for car enthusiasts. All other trademarks are property of their respective owners. |
|
|

  |

| kconway |
 Apr 21 2011, 07:35 PM Apr 21 2011, 07:35 PM
Post
#1
|
|
Senior Member  Group: Members Posts: 1,347 Joined: 6-December 04 From: Monrovia, CA Member No.: 3,231 Region Association: Southern California |
I have an non-functioning odometer and figured one of the gears inside was broken. Following the Pelican DIY article I carefully opened it up expecting to find something broken. I don't see anything out of the ordinary but I've never been inside before.
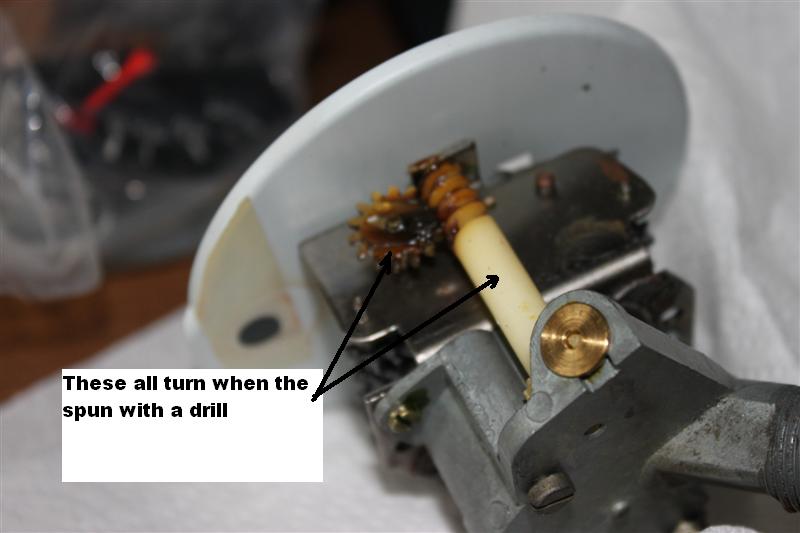
With the trip reset cable inserted in the speedo port I spun it up with a drill. The speedo works just fine but the mile don't increment on the odometer. The trip reset works when turned except I can never get it to 0000. The "ones" column never turns to 0. Anybody see anthing out of the ordinary or is this just a lost cause? Kev 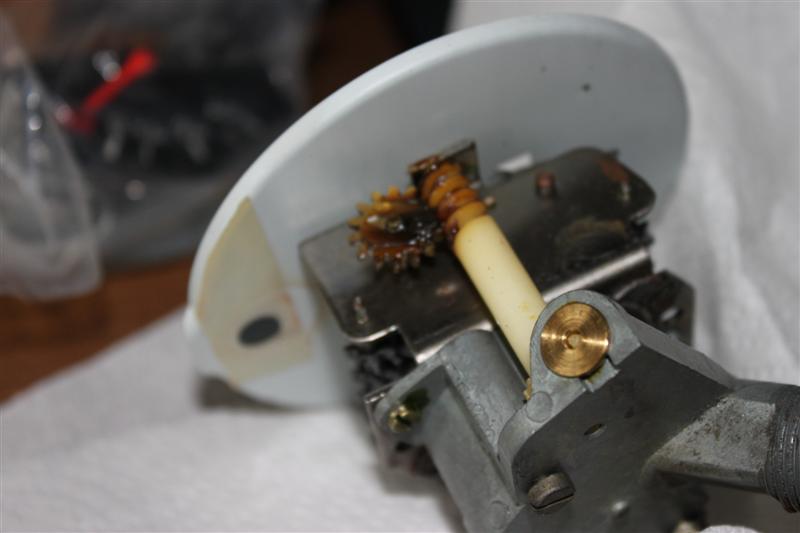  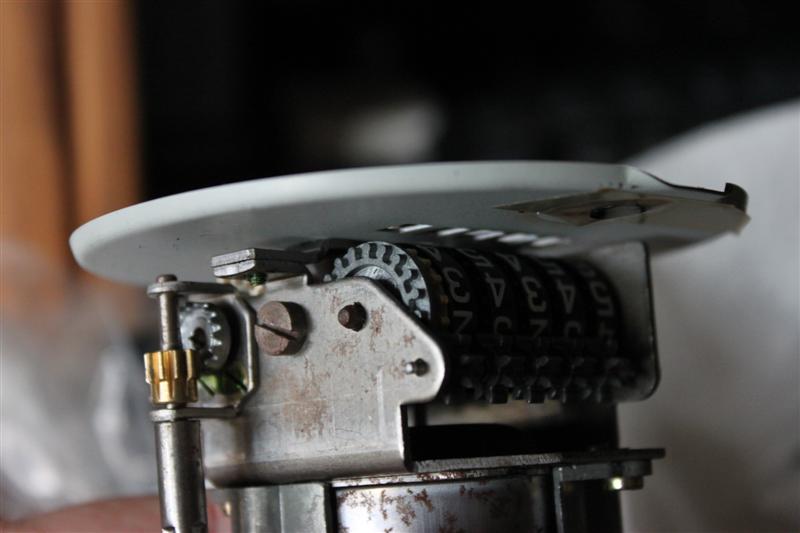 |
   |

 
|
| kconway |
Apr 21 2011, 08:11 PM
Post
#2
|
|
Senior Member Group: Members Posts: 1,347 Joined: 6-December 04 From: Monrovia, CA Member No.: 3,231 Region Association: Southern California |
  |
|
|
|
| patssle |
Apr 21 2011, 08:20 PM
Post
#3
|
|
Senior Member Group: Members Posts: 981 Joined: 28-August 09 From: Houston, TX Member No.: 10,741 Region Association: None |
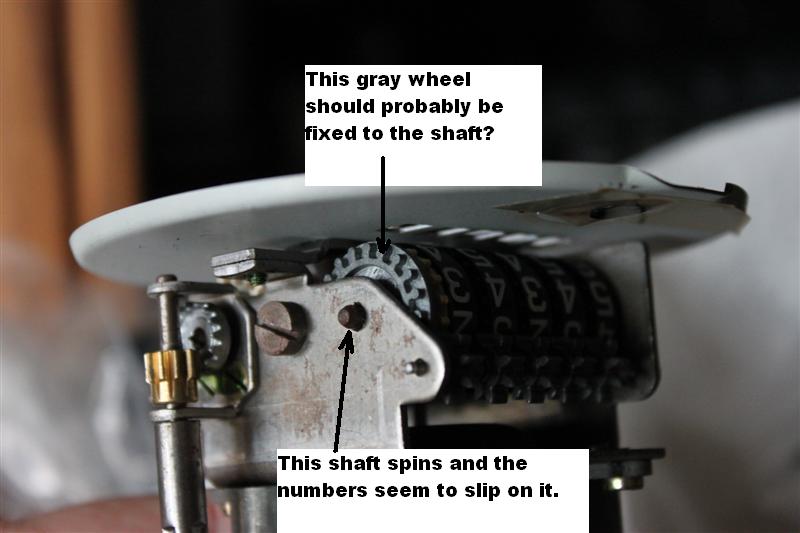
I have the same problem, everything looks perfect, but I do believe my gray wheel doesn't spin either. I think glue or something would fix it?
|
|
|
|
| Als914 |
Apr 21 2011, 08:48 PM
Post
#4
|
|
Lighting my way Group: Members Posts: 330 Joined: 1-January 06 From: Hemet,Ca. Member No.: 5,346 Region Association: Southern California |
Nope. You will leave a trace of glue on the numbers tumblers and that will be trouble.
|
|
|
|
| patssle |
Apr 21 2011, 09:06 PM
Post
#5
|
|
Senior Member Group: Members Posts: 981 Joined: 28-August 09 From: Houston, TX Member No.: 10,741 Region Association: None |
What's the fix then?
|
|
|
|
| tradisrad |
Apr 21 2011, 09:19 PM
Post
#6
|
|
Senior Member Group: Members Posts: 985 Joined: 11-September 06 From: San Mateo, CA Member No.: 6,815 Region Association: Northern California |
I tried to fix mine by crimping the gray gear onto the shaft and it worked for 50 miles; maybe I did not crimp it tight enough. The second time I used some loctite 4014 with a very fine needle and wicked a drop of glue between the gear and shaft. 3k miles later it is still working. I was very nervous about the glue and having it wick somewhere I did not want it. It worked for me.
|
|
|
|
| saigon71 |
Apr 21 2011, 09:22 PM
Post
#7
|
|
Senior Member Group: Members Posts: 1,999 Joined: 1-June 09 From: Dillsburg, PA Member No.: 10,428 Region Association: MidAtlantic Region |
QUOTE(patssle @ Apr 21 2011, 11:06 PM)  What's the fix then? Run masking tape acrosss the numbers to hold them in place. Then gently remove the shaft until the gear is free. I took a pair of vice grips and squeezed on both sides of the gear hole a little at a time until it would hold on the shaft (cue the "that's what she said" or other such comment). Odometer worked well after this operation. I think this procedure is included in the Pelican article. Good luck! |
|
|
|
| bugsy0 |
Apr 21 2011, 11:10 PM
Post
#8
|
|
Member Group: Members Posts: 191 Joined: 26-July 06 Member No.: 6,508 Region Association: None |
(IMG:style_emoticons/default/agree.gif) That pot-metal wheel is soft. You can squeeze its hub pretty hard, compressing it all around the shaft. I've got about 2k miles on my repair so far.
|
|
|
|
| kconway |
Apr 21 2011, 11:43 PM
Post
#9
|
|
Senior Member Group: Members Posts: 1,347 Joined: 6-December 04 From: Monrovia, CA Member No.: 3,231 Region Association: Southern California |
I followed the Pelican DIY and crimped the gray wheel and roughened up the shaft. All went back together and the odometer is now operational! Easy Peasy! (IMG:style_emoticons/default/piratenanner.gif) (IMG:style_emoticons/default/smilie_pokal.gif) (IMG:style_emoticons/default/beer3.gif)
|
|
|
|
| euro911 |
Apr 22 2011, 12:05 AM
Post
#10
|
|
Retired & living the dream. God help me if I wake up! Group: Members Posts: 8,849 Joined: 2-December 06 From: So.Cal. & No.AZ (USA) Member No.: 7,300 Region Association: Southern California |
Hey Kevin - I saw your post earlier this evening and got caught up with other things. I had to search for it, but found a post on NARP from back in 2007. Looks like you don't need it now (IMG:style_emoticons/default/headbang.gif)
Curiosity got the best of me, Took a Silver Dot speedo apart ... I ended up scribing some splines in the shaft then pressed the wheel back onto the shaft ... |
|
|
|
| Elliot Cannon |
Apr 22 2011, 12:09 AM
Post
#11
|
|
914 Guru Group: Retired Members Posts: 8,487 Joined: 29-December 06 From: Paso Robles Ca. (Central coast) Member No.: 7,407 Region Association: None |
QUOTE(euro911 @ Apr 21 2011, 11:05 PM) Hey Kevin - I saw your post earlier this evening and got caught up with other things. I had to search for it, but found a post on NARP from back in 2007. Looks like you don't need it now (IMG:style_emoticons/default/headbang.gif) Curiosity got the best of me, Took a Silver Dot speedo apart ... I ended up scribing some splines in the shaft then pressed the wheel back onto the shaft ... Yer up kinda late fer an old bastid aincha? |
|
|
|
| johannes |
Apr 22 2011, 05:23 AM
Post
#12
|
|
Club Porsche 914 France President Group: Members Posts: 3,084 Joined: 13-January 06 From: France Member No.: 5,409 Region Association: France |
I had the same issue. Followed step by step instructions on Pelican. I only roughened up the shaft . Works perfectly now.
|
|
|
|
| euro911 |
Apr 22 2011, 09:51 AM
Post
#13
|
|
Retired & living the dream. God help me if I wake up! Group: Members Posts: 8,849 Joined: 2-December 06 From: So.Cal. & No.AZ (USA) Member No.: 7,300 Region Association: Southern California |
QUOTE(Elliot Cannon @ Apr 21 2011, 11:09 PM) Yer up kinda late fer an old bastid aincha? Yeah, but I'm still young enough to notice 5 (count them) spelling errors in your pesky little retort ...(IMG:style_emoticons/default/laugh.gif) See ya @ G&R |
|
|
|
| charliew |
Apr 22 2011, 10:39 AM
Post
#14
|
|
Advanced Member Group: Members Posts: 2,363 Joined: 31-July 07 From: Crawford, TX. Member No.: 7,958 |
You can also use a pair of side cutters and put some diagonal dents or small cuts in the shaft where it fits in the gray wheel and it will hold. It's like knurling te shaft. The gray wheel probably starts slipping because the torque needed to turn it all is increased from lack of lubrication in the mechanism. Lack of lubrication in old stuff causes most of the problems from door hinges to latches to wheel bearings to steering boxes or whatever. If it moves it needs lube.
|
|
|
|
| Als914 |
Apr 22 2011, 11:15 AM
Post
#15
|
|
Lighting my way Group: Members Posts: 330 Joined: 1-January 06 From: Hemet,Ca. Member No.: 5,346 Region Association: Southern California |
QUOTE(charliew @ Apr 22 2011, 09:39 AM) You can also use a pair of side cutters and put some diagonal dents or small cuts in the shaft where it fits in the gray wheel and it will hold. It's like knurling te shaft. The gray wheel probably starts slipping because the torque needed to turn it all is increased from lack of lubrication in the mechanism. Lack of lubrication in old stuff causes most of the problems from door hinges to latches to wheel bearings to steering boxes or whatever. If it moves it needs lube. This works best along with distorting the ID of the grey gear. To distort the gear ID I use a small center punch and place a punch on opposite sides of the ID then turn the gear over rotate it 90 deg. from the first two punch marks and make two more punch marks. You should now have four punch marks ( two on one side and two on the opposite side ) at 45 deg. from each other around the ID. Note that the gear ID is now distorted. With the material on the shaft distorted and the grey gear ID distorted you will find it to be a very tight reassembly. I use a very small finishing hammer to gently tap the shaft through the final grey gear. You should now have a long lasting odometer/trip odometer. Just remember to NOT reset the trip odometer while the car is in motion. Al |
|
|
|
|
1 User(s) are reading this topic (1 Guests and 0 Anonymous Users)
0 Members:

|
Lo-Fi Version | Time is now: 26th May 2024 - 12:22 AM |
Invision Power Board
v9.1.4 © 2024 IPS, Inc.