|
|
|
Porsche, and the Porsche crest are registered trademarks of Dr. Ing. h.c. F. Porsche AG.
This site is not affiliated with Porsche in any way. Its only purpose is to provide an online forum for car enthusiasts. All other trademarks are property of their respective owners. |
|
|

  |

| william harris |
 Jun 13 2004, 09:42 PM Jun 13 2004, 09:42 PM
Post
#61
|
|
914 Restorer  Group: Members Posts: 1,459 Joined: 9-January 04 From: Hamilton, MA Member No.: 1,539 |
Since the weather was good, I also took the time to degrease the area around the gas tank and the front trunk. These areas really cleaned up nice.
Attached image(s) 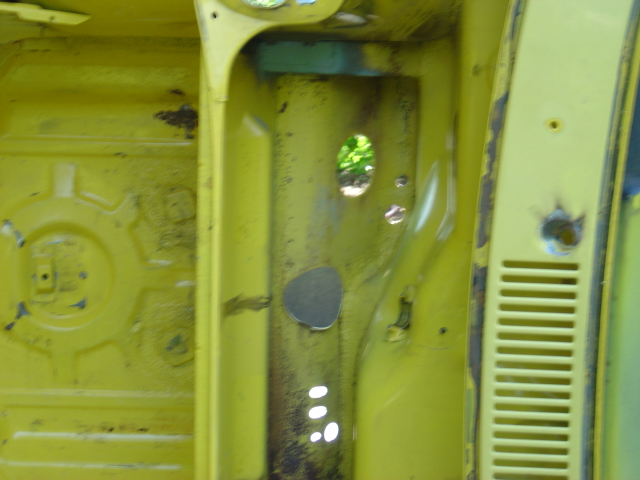
|
   |

 
|
| ChrisFoley |
Jun 13 2004, 09:50 PM
Post
#62
|
|
I am Tangerine Racing Group: Members Posts: 7,990 Joined: 29-January 03 From: Bolton, CT Member No.: 209 Region Association: None |
I say remove as much sealer as you can in as many areas as possible, unless there is really no chance of rust hiding behind an area.
As far as the trunk, wire brush and clean the area so no paint or rust is left around the pinholes. If they don't get much bigger then filling them with the mig is the best approach. I can use a backing bar of copper to help control the heat and fill the holes more easily. Looks like I may be making a house call. (IMG:style_emoticons/default/wink.gif) |
|
|
|
| McMark |
Jun 13 2004, 09:55 PM
Post
#63
|
|
914 Freak! Group: Retired Admin Posts: 20,180 Joined: 13-March 03 From: Grand Rapids, MI Member No.: 419 Region Association: None |
Front trunk springs are easy. Get a ViceGrip or pliers and grab them. They're not very tight. You'll be surprised.
The rear are more tricky. I haven't found a great way yet myself. Stick a block of wood in its path or it'll bend the metal up real good. |
|
|
|
| william harris |
Jun 13 2004, 09:56 PM
Post
#64
|
|
914 Restorer Group: Members Posts: 1,459 Joined: 9-January 04 From: Hamilton, MA Member No.: 1,539 |
Here's the front trunk.
Attached image(s) 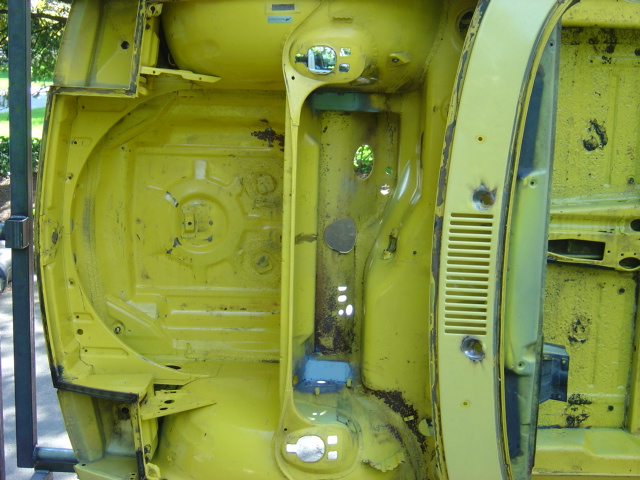
|
|
|
|
| william harris |
Jun 13 2004, 09:58 PM
Post
#65
|
|
914 Restorer Group: Members Posts: 1,459 Joined: 9-January 04 From: Hamilton, MA Member No.: 1,539 |
I also cleaned inside the pedal box area. This was a real mess because the master clyinder was leaking hydralic fulid inside the car. Does a number on the sound deadening crap. Also dissolves paint.
Attached image(s) 
|
|
|
|
| william harris |
Jun 13 2004, 09:59 PM
Post
#66
|
|
914 Restorer Group: Members Posts: 1,459 Joined: 9-January 04 From: Hamilton, MA Member No.: 1,539 |
Here she goes back into the garage after another fun filled day.
Attached image(s) 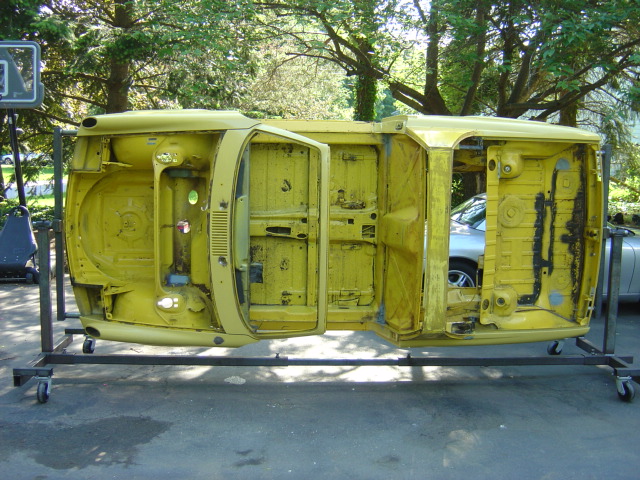
|
|
|
|
| william harris |
Jun 13 2004, 10:04 PM
Post
#67
|
|
914 Restorer Group: Members Posts: 1,459 Joined: 9-January 04 From: Hamilton, MA Member No.: 1,539 |
Racer Chris: House call, house call! Let me finish scraping and wire brushing this trunk floor and get it all ready for you. I was thinking about using a wire wheel on a drill to clean it up, but I like the control with a small stainless steel brush. Don't want to be too agressive if it is not needed. The seam sealer looks OK everywhere else in the trunk. I'm exploring the area under the gas tank next. Glad to know your keeping watch. (IMG:style_emoticons/default/welder.gif)
Attached image(s) 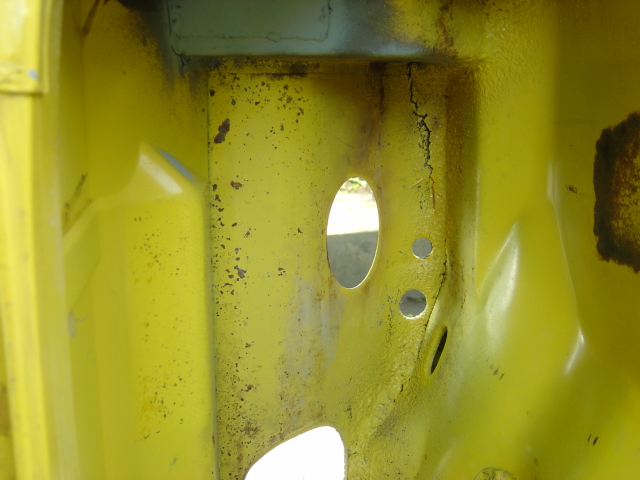
|
|
|
|
| william harris |
Jun 14 2004, 06:20 PM
Post
#68
|
|
914 Restorer Group: Members Posts: 1,459 Joined: 9-January 04 From: Hamilton, MA Member No.: 1,539 |
6/14/04 at 8:18 p.m. EST: Racer Chris: After we talked today I decided to get very aggressive with the trunk floor to expose and remove all the rusted areas. Spent over an hour with a 3 inch coarse wire wheel to remove as much paint/rust debris as possible. Not really any big changes in appearance all though a few more small pin holes opened up. Here's a group of pictures taken from both sides.
Attached image(s) 
|
|
|
|
| william harris |
Jun 14 2004, 06:23 PM
Post
#69
|
|
914 Restorer Group: Members Posts: 1,459 Joined: 9-January 04 From: Hamilton, MA Member No.: 1,539 |
Pin holes don't vizualize very well inside the garage. Much better view from the inside.
Attached image(s) 
|
|
|
|
| william harris |
Jun 14 2004, 06:25 PM
Post
#70
|
|
914 Restorer Group: Members Posts: 1,459 Joined: 9-January 04 From: Hamilton, MA Member No.: 1,539 |
Another view from the bottom.
Attached image(s) 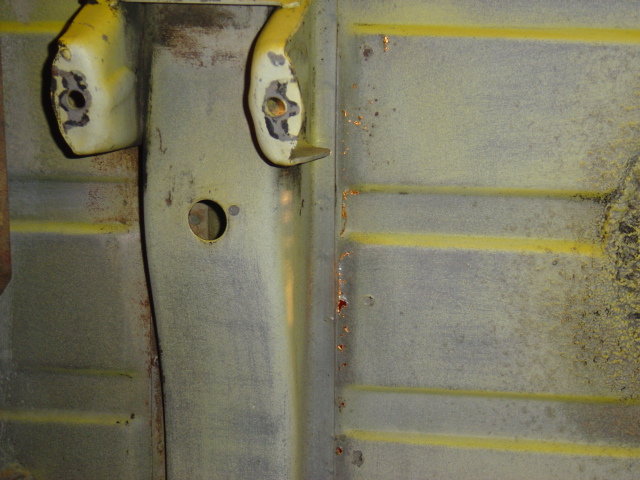
|
|
|
|
| william harris |
Jun 14 2004, 06:27 PM
Post
#71
|
|
914 Restorer Group: Members Posts: 1,459 Joined: 9-January 04 From: Hamilton, MA Member No.: 1,539 |
Here's the last one from the inside of the trunk. Let's go ahead and plan for you to make the repairs. Bring your gear and lunch is on me. Early Saturday would be good. Call me at the office tomorrow.
Attached image(s) 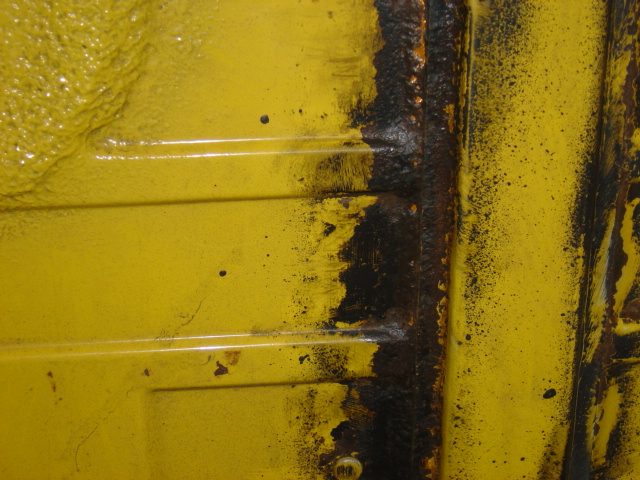
|
|
|
|
| ChrisFoley |
Jun 14 2004, 07:51 PM
Post
#72
|
|
I am Tangerine Racing Group: Members Posts: 7,990 Joined: 29-January 03 From: Bolton, CT Member No.: 209 Region Association: None |
QUOTE(william harris @ Jun 14 2004, 08:27 PM) Early Saturday would be good. Call me at the office tomorrow. Re saturday, I think I can get to your place before 11. With luck we'll be finished by noon. I'll call you Tues. am to discuss. |
|
|
|
| william harris |
Jun 26 2004, 12:44 PM
Post
#73
|
|
914 Restorer Group: Members Posts: 1,459 Joined: 9-January 04 From: Hamilton, MA Member No.: 1,539 |
Chris Foley drove over 110 miles one way to come weld up my rusty trunk floor. He spent almost 2 hours with his MIG welder to give me a nice solid trunk floor. Guys here in NE, Chris Foley is our HPH. Support him with your business. Here's a view of the bottom.
Attached image(s) 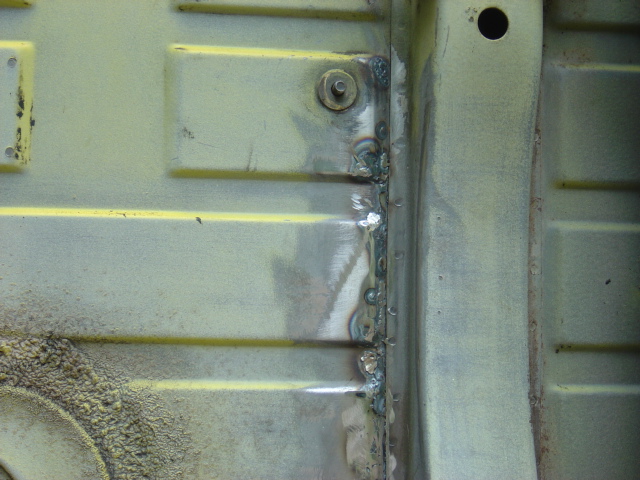
|
|
|
|
| william harris |
Jun 26 2004, 12:45 PM
Post
#74
|
|
914 Restorer Group: Members Posts: 1,459 Joined: 9-January 04 From: Hamilton, MA Member No.: 1,539 |
As you might imagine, when Chris put the MIG welder on this rusty floor, more and larger holes opened up. He stuck with it and saved the panel. Lower view which was a much worse area.
|
|
|
|
| william harris |
Jun 26 2004, 12:46 PM
Post
#75
|
|
914 Restorer Group: Members Posts: 1,459 Joined: 9-January 04 From: Hamilton, MA Member No.: 1,539 |
Damn, forgot to attach the picture. Duh (IMG:style_emoticons/default/wacko.gif)
Attached image(s) 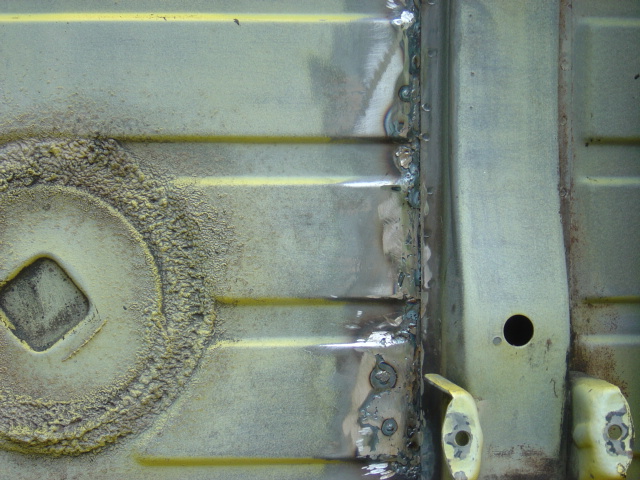
|
|
|
|
| william harris |
Jun 26 2004, 12:47 PM
Post
#76
|
|
914 Restorer Group: Members Posts: 1,459 Joined: 9-January 04 From: Hamilton, MA Member No.: 1,539 |
Here's another view of the same area. Needless to say, this floor sorta looked like swiss cheese.
Attached image(s) 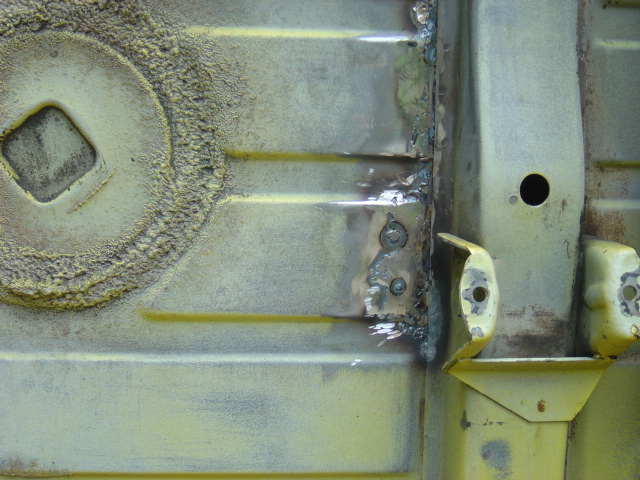
|
|
|
|
| william harris |
Jun 26 2004, 12:48 PM
Post
#77
|
|
914 Restorer Group: Members Posts: 1,459 Joined: 9-January 04 From: Hamilton, MA Member No.: 1,539 |
Here's a view from inside the trunk. Compare this to the earlier ones.
Attached image(s) 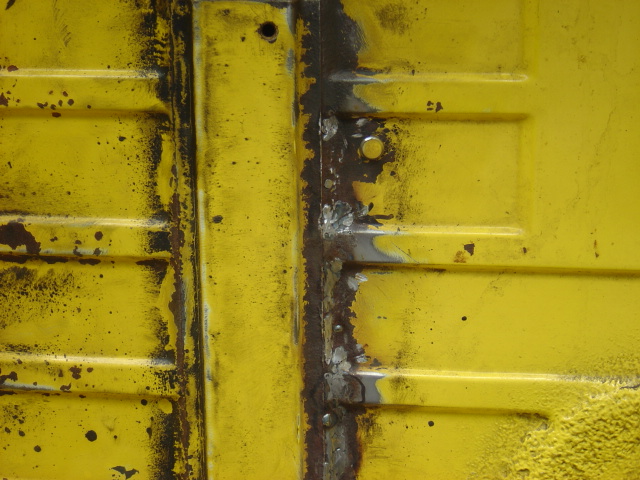
|
|
|
|
| william harris |
Jun 26 2004, 12:49 PM
Post
#78
|
|
914 Restorer Group: Members Posts: 1,459 Joined: 9-January 04 From: Hamilton, MA Member No.: 1,539 |
Another view from inside the trunk. What a big improvement!
Attached image(s) 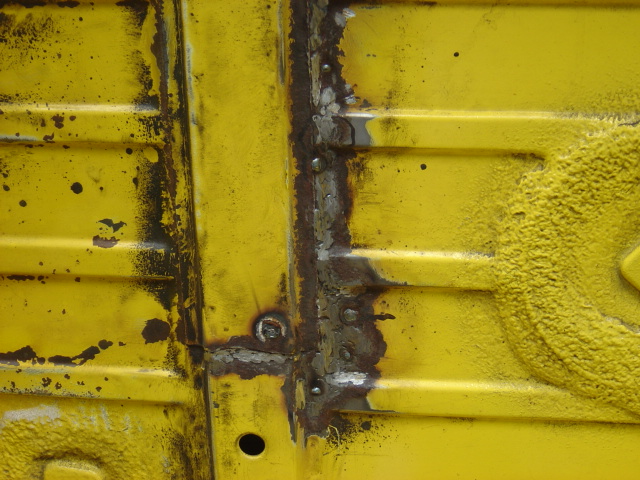
|
|
|
|
| william harris |
Jun 26 2004, 12:51 PM
Post
#79
|
|
914 Restorer Group: Members Posts: 1,459 Joined: 9-January 04 From: Hamilton, MA Member No.: 1,539 |
So my next project has been to remove the undercoating so that I can inspect the bottom of the car for any hidden rust. Scraping this crap off is a slow job.
Attached image(s) 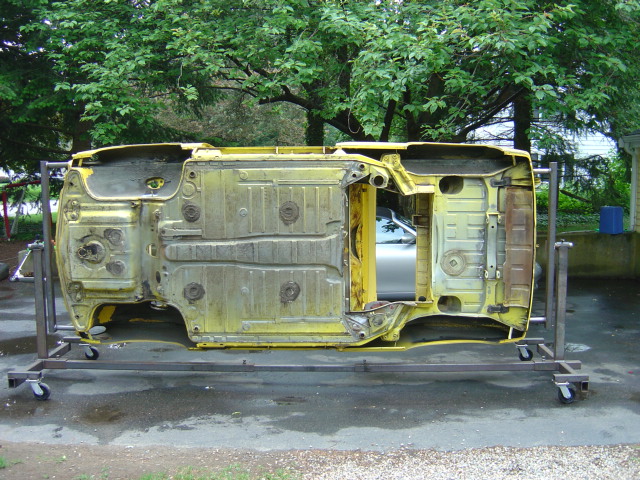
|
|
|
|
| william harris |
Jun 26 2004, 12:52 PM
Post
#80
|
|
914 Restorer Group: Members Posts: 1,459 Joined: 9-January 04 From: Hamilton, MA Member No.: 1,539 |
I haven't tackled the wheel wells yet. It is really thick in there. The suspension ears were also heavily coated. Took a couple of hours for these areas.
Attached image(s) 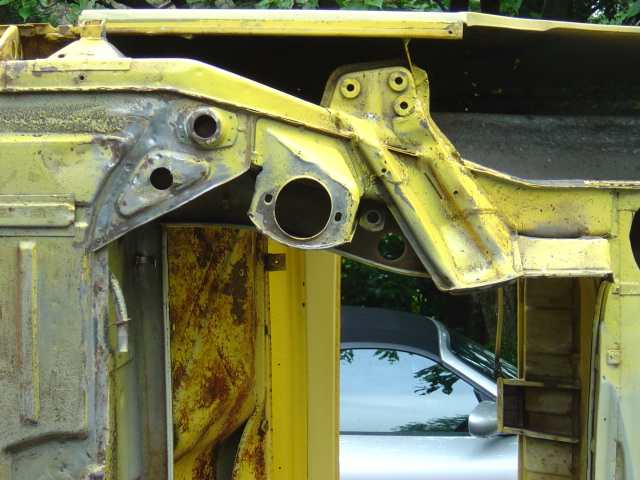
|
|
|
|
|
1 User(s) are reading this topic (1 Guests and 0 Anonymous Users)
0 Members:

|
Lo-Fi Version | Time is now: 5th July 2025 - 12:42 AM |
Invision Power Board
v9.1.4 © 2025 IPS, Inc.