|
|
|
Porsche, and the Porsche crest are registered trademarks of Dr. Ing. h.c. F. Porsche AG.
This site is not affiliated with Porsche in any way. Its only purpose is to provide an online forum for car enthusiasts. All other trademarks are property of their respective owners. |
|
|

  |

| type11969 |
 May 30 2004, 01:41 PM May 30 2004, 01:41 PM
Post
#1
|
|
Senior Member  Group: Members Posts: 1,231 Joined: 2-December 03 From: Collingswood, NJ Member No.: 1,410 Region Association: North East States |
I just bought the furniture dolly and with the help of PP's article, I'm going to go pull the engine out of the 914 in my avatar. Never done this before, should be interesting. Gonna give the engine a breeze through to look for anything questionable, maybe swap it with a 1.8l that I was going to put into my beetle, install a working alternator that I just won on the bay, and go from there. I'm finally done with school, don't have a job yet but once I obtain one (hopefully, anyone want an EE/ME?) I am going to try to start as late as I can. With any luck I'll be able to get this 914 in solid shape in the time that I have free. Just a fair warning that questions may be pouring in from here on out.
Ahhh, a summer filled with no responsibilities and working on my 914, can it get any better? -Chris |
   |

 
|
| SirAndy |
May 30 2004, 10:10 PM
Post
#2
|
|
Resident German Group: Admin Posts: 41,634 Joined: 21-January 03 From: Oakland, Kalifornia Member No.: 179 Region Association: Northern California |
QUOTE(type11969 @ May 30 2004, 12:41 PM) can it get any better? yes! "while you're at it" you will find many more "little" things you want to do to the car, "improvements" and such, and pretty soon, this one "summer of love" will turn into 2 or 3 or 4 summer of "she's still sitting on jackstands, but i swear i will have her ready for next spring!" ... BTDT (IMG:style_emoticons/default/wacko.gif) Andy |
|
|
|
| type11969 |
May 30 2004, 10:26 PM
Post
#3
|
|
Senior Member Group: Members Posts: 1,231 Joined: 2-December 03 From: Collingswood, NJ Member No.: 1,410 Region Association: North East States |
Oh I've already discovered more than a summer's worth of problems just today. I got the engine out, but also did some poking around in questionable areas and found that they were a lot worse than I though. Once the engine was out I also found some more areas of rot that I didn't know about. Plus I knew the drivers side rear fender needed to be replaced, but it seems like the passenger side could be a hack job too. Oh well, I wanted to learn how to weld, looks like I'll get the opportunity.
Attached image(s) 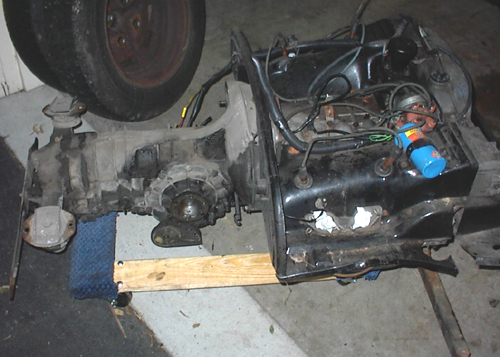
|
|
|
|
| type11969 |
May 30 2004, 10:32 PM
Post
#4
|
|
Senior Member Group: Members Posts: 1,231 Joined: 2-December 03 From: Collingswood, NJ Member No.: 1,410 Region Association: North East States |
As you can see from the pic, the engine made it out successfully. I actually think it was easier to take out than the engine in my Beetle. This next picture shows that both of the inner CV boots were hanging off, dunno how long they were like that but looks like I'll have to take them apart and check them out. Odd thing is that the flanges that the CV boots clamp to are not circular, the PO somehow banged them out of shape. Also, that glossyness around where the tubes exit the bulkhead I think is painted over seam sealer, should be interesting to see what is underneath there. The PO obviously did some repairs on this car, but it seems he used an arc welder from the quality of his welds. And he didn't grind them smooth.
Attached image(s) 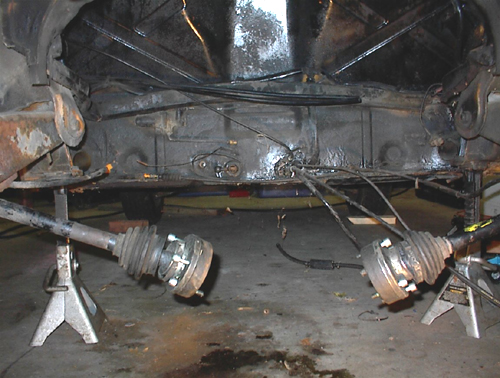
|
|
|
|
| type11969 |
May 30 2004, 10:34 PM
Post
#5
|
|
Senior Member Group: Members Posts: 1,231 Joined: 2-December 03 From: Collingswood, NJ Member No.: 1,410 Region Association: North East States |
Here is the area under the battery tray. More seam sealer in this area too. The console looks great though. Out of curiousity, what all is considered the hell hole?
Attached image(s) 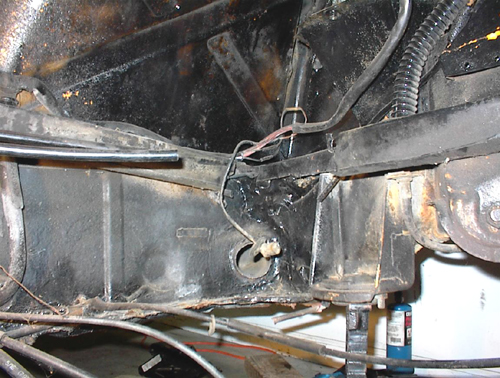
|
|
|
|
| type11969 |
May 30 2004, 10:37 PM
Post
#6
|
|
Senior Member Group: Members Posts: 1,231 Joined: 2-December 03 From: Collingswood, NJ Member No.: 1,410 Region Association: North East States |
Another picture of what I believe to be the hell hole area. Looks okay, but it obvioulsy has been recently repainted, and seems to be a bunch of seam sealer. My concern is that if the PO didn't grind and rustproof his arc welds, the oxidation contained within them from the welding process could be rearing its ugly head underneath all that white (well painted black) goop.
|
|
|
|
| type11969 |
May 30 2004, 10:38 PM
Post
#7
|
|
Senior Member Group: Members Posts: 1,231 Joined: 2-December 03 From: Collingswood, NJ Member No.: 1,410 Region Association: North East States |
oops, here is the pic
Attached image(s) 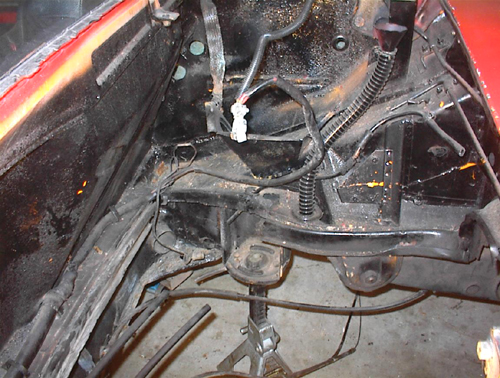
|
|
|
|
| type11969 |
May 30 2004, 10:41 PM
Post
#8
|
|
Senior Member Group: Members Posts: 1,231 Joined: 2-December 03 From: Collingswood, NJ Member No.: 1,410 Region Association: North East States |
Here is a pic of the passenger side rear fender well, red circle is the backside of a repair that wasn't finished off very well, and the white circle is a rust out that I found out goes clear through the long below it. The long had a gold ball sized glob of epoxy filling the hole, dunno what the PO thought that would do.
Attached image(s) 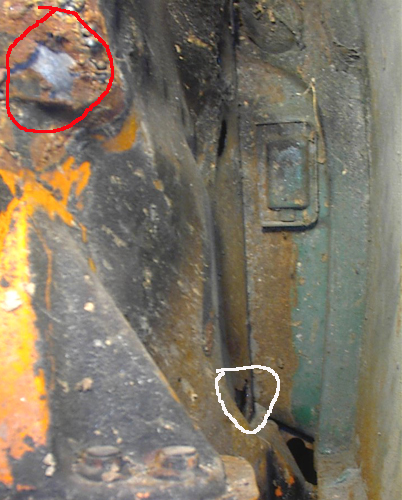
|
|
|
|
| type11969 |
May 30 2004, 10:46 PM
Post
#9
|
|
Senior Member Group: Members Posts: 1,231 Joined: 2-December 03 From: Collingswood, NJ Member No.: 1,410 Region Association: North East States |
Here is another pic of the pass side rear fender well. Circled in white looks like a whole bunch of rivets/ holes with plastic body filler poking through. Yikes! Gotta strip the area where the sail meets the fender and see what is really going on. Below that is what looks to be a tube that should empty into the engine compartment, but it is cut off before it does and the engine compartment doesn't have a place for this tube to connect. And the door doesn't have a vent tube running through it either. My guess is that this fender has been replaced with one from a later car? This is a 71.
|
|
|
|
| type11969 |
May 30 2004, 10:47 PM
Post
#10
|
|
Senior Member Group: Members Posts: 1,231 Joined: 2-December 03 From: Collingswood, NJ Member No.: 1,410 Region Association: North East States |
dammit, here is the pic
Attached image(s) 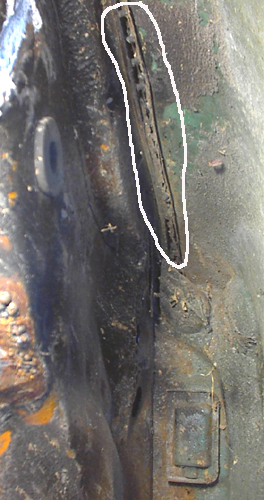
|
|
|
|
| type11969 |
May 30 2004, 10:49 PM
Post
#11
|
|
Senior Member Group: Members Posts: 1,231 Joined: 2-December 03 From: Collingswood, NJ Member No.: 1,410 Region Association: North East States |
Here is the sexy hole in the long. Gross, huh. Its amazing how bad things look once you start poking around. As you can see, the PO replaced the pass side floor and used an arc welder again. Also obvious in the pic is the rotted jack point. Well at least the lower part. A bunch of drit and crap came out of there when I opened up that hole.
Attached image(s) 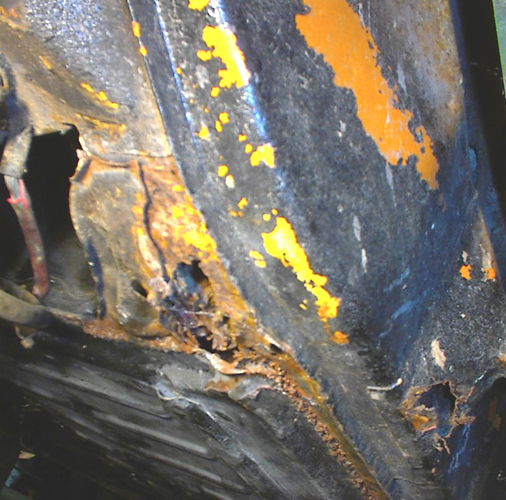
|
|
|
|
| type11969 |
May 30 2004, 10:51 PM
Post
#12
|
|
Senior Member Group: Members Posts: 1,231 Joined: 2-December 03 From: Collingswood, NJ Member No.: 1,410 Region Association: North East States |
Here is the drivers side of the engine compartment, all in all looks pretty good. Doesn't seem to be any overzealous seam sealer usage.
Attached image(s) 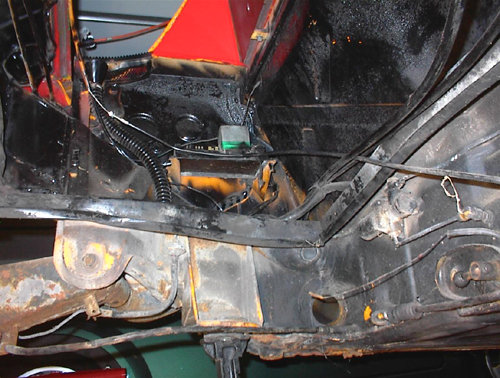
|
|
|
|
| type11969 |
May 30 2004, 10:52 PM
Post
#13
|
|
Senior Member Group: Members Posts: 1,231 Joined: 2-December 03 From: Collingswood, NJ Member No.: 1,410 Region Association: North East States |
As you can see, more bullshit rivets/body filler poking through. But this fender is f-ed anyway so I was planning on replacing it.
Attached image(s) 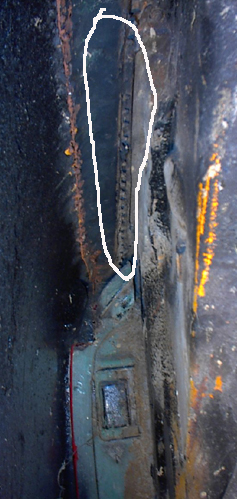
|
|
|
|
| type11969 |
May 30 2004, 10:55 PM
Post
#14
|
|
Senior Member Group: Members Posts: 1,231 Joined: 2-December 03 From: Collingswood, NJ Member No.: 1,410 Region Association: North East States |
Here is the driver's side long and floorpan. The drivers side pan is obviously beginning to go, but I think I can just weld in a bit of a patch panel instead of doing the whole thin. Jack point is rotted also. The long itself seems to be in great shape. Actually most of the passenger long is in good shape except for at the rear.
Attached image(s) 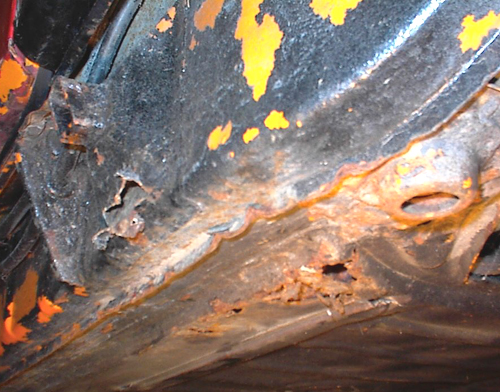
|
|
|
|
| SirAndy |
May 30 2004, 10:59 PM
Post
#15
|
|
Resident German Group: Admin Posts: 41,634 Joined: 21-January 03 From: Oakland, Kalifornia Member No.: 179 Region Association: Northern California |
you might want to open up the longs and see how they look from the INSIDE ...
there's a old thread here on the board where brad shows how to cut and where to drill the spotwelds out. (IMG:style_emoticons/default/smash.gif) (IMG:style_emoticons/default/welder.gif) Andy |
|
|
|
| type11969 |
May 30 2004, 11:03 PM
Post
#16
|
|
Senior Member Group: Members Posts: 1,231 Joined: 2-December 03 From: Collingswood, NJ Member No.: 1,410 Region Association: North East States |
So those are my finding for the day. A good deal more work than I anticipated, probably not worth the money I paid for it, but I will definitely know how to weld by the time I am done with the car. I'm certainly not upset that I got it, I am looking forward to the challenge. Not sure what to do tommorow, start looking over the engine or look more into the rust issues.
On the good side of things, before I started taking everything apart, the car ran and stopped well, all of the accesories worked, didn't shift so hot, but the structural components of the car all seemed to be in good shape. I guess that last one could change. I'll keep you all updated. Now I just gotta get my girlfriend's dad's mig setup. Mmm, free welder. |
|
|
|
| Gint |
May 31 2004, 08:08 AM
Post
#17
|
|
Mike Ginter Group: Admin Posts: 16,071 Joined: 26-December 02 From: Denver CO. Member No.: 20 Region Association: Rocky Mountains |
Yup, you've got the standard rust repair ahead of you. Good luck! And have fun with that welder.
You answered your own question about the "hell hole". It's the passenger side engine shelf at the front corner of the engine bay. |
|
|
|
| type11969 |
Nov 14 2004, 07:13 PM
Post
#18
|
|
Senior Member Group: Members Posts: 1,231 Joined: 2-December 03 From: Collingswood, NJ Member No.: 1,410 Region Association: North East States |
Well Summer turned to fall, and fall is quickly turning into winter. Haven't gotten a whole lot done on the 914, got a job though and got a t4 engine into my Beetle instead so all is not lost. With the Beetle squared away, now I am devoting my free time to repairing my 914. It is a bit of a mess, but I wanted a project to learn how to weld on, I will certainly have that opportunity here. I plan on keeping track of what I do here, and probably posting questions too. First, here is the part of the scab plate and the huge chunks of epoxy a PO used to fix a rotted out hell hole. And I thought the hell hole was fine . . .
Attached image(s) 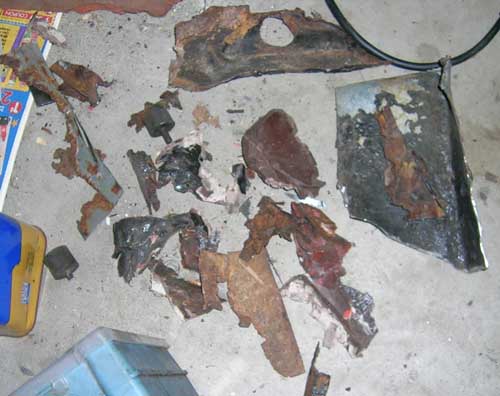
|
|
|
|
| type11969 |
Nov 14 2004, 07:14 PM
Post
#19
|
|
Senior Member Group: Members Posts: 1,231 Joined: 2-December 03 From: Collingswood, NJ Member No.: 1,410 Region Association: North East States |
Here is the scab plate removed and the rusted metal underneath cut away.
Attached image(s) 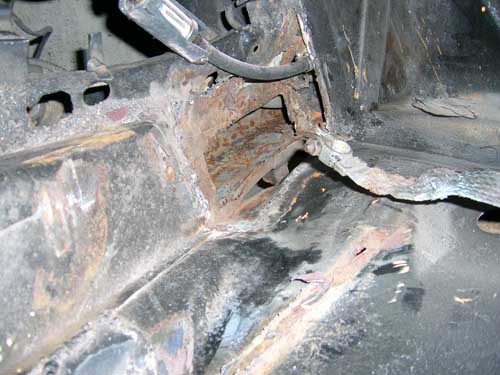
|
|
|
|
| type11969 |
Nov 14 2004, 07:15 PM
Post
#20
|
|
Senior Member Group: Members Posts: 1,231 Joined: 2-December 03 From: Collingswood, NJ Member No.: 1,410 Region Association: North East States |
Here is a shot down the long. Hello hello hello
Attached image(s) 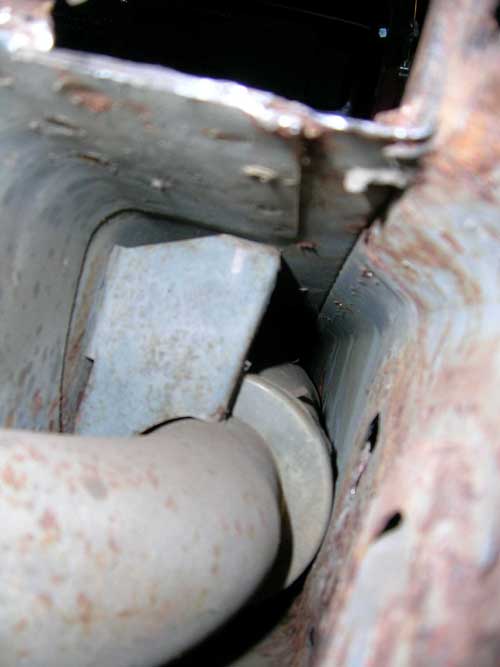
|
|
|
|
|
1 User(s) are reading this topic (1 Guests and 0 Anonymous Users)
0 Members:

|
Lo-Fi Version | Time is now: 12th May 2024 - 09:54 PM |
Invision Power Board
v9.1.4 © 2024 IPS, Inc.