|
|
|
Porsche, and the Porsche crest are registered trademarks of Dr. Ing. h.c. F. Porsche AG.
This site is not affiliated with Porsche in any way. Its only purpose is to provide an online forum for car enthusiasts. All other trademarks are property of their respective owners. |
|
|

  |

| 76-914 |
 Aug 21 2011, 10:46 PM Aug 21 2011, 10:46 PM
Post
#1
|
|
Repeat Offender & Resident Subaru Antagonist  Group: Members Posts: 13,828 Joined: 23-January 09 From: Temecula, CA Member No.: 9,964 Region Association: Southern California |
I think my back pad is like most. Looks good from a distance......
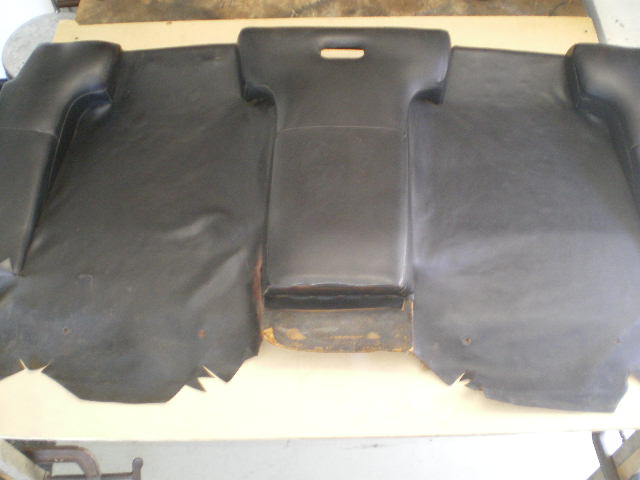 but a wreck upon closer examination. Like the bottoms which have wicked up water and warped like this center piece....... 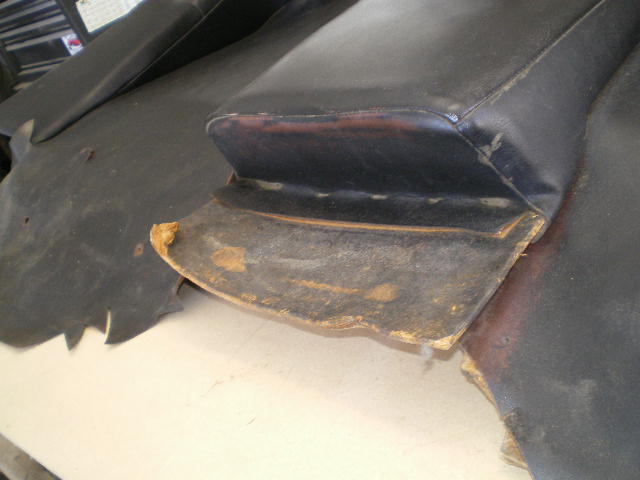 Or worse; like breaking off like this drivers side as viewed from the rear....... 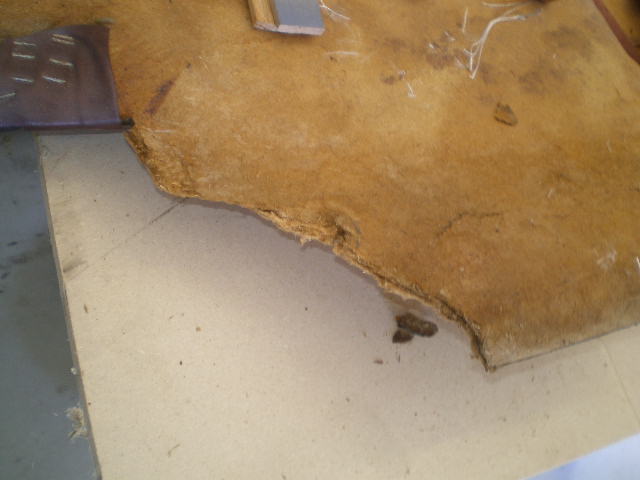 or this passanger side which is missing the bottom 6" all the way across 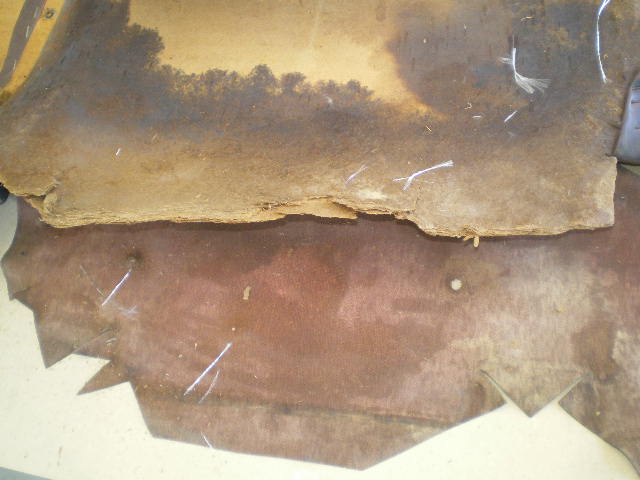 and several edges like this one that have become delaminated. 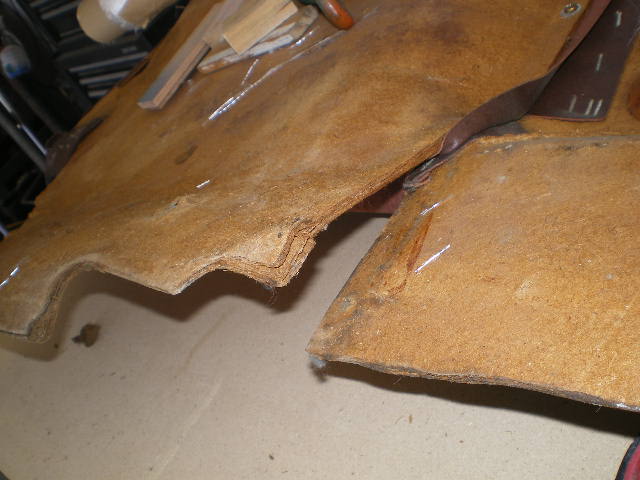 These spots and the warped pieces are easiest to repair so I'll start there. This is a shot of a warped bottom on the center piece. This one was removed for another repair but as you will see in other pic's I did not separate the pieces or removed the vinyl to make repairs. 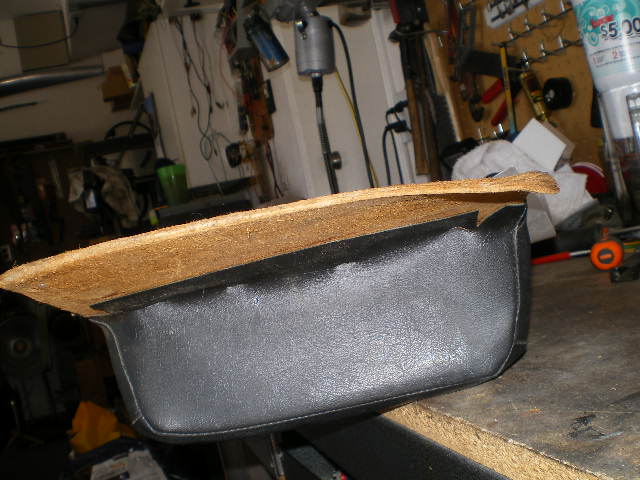 First you will need to wet the piece, both sides................. 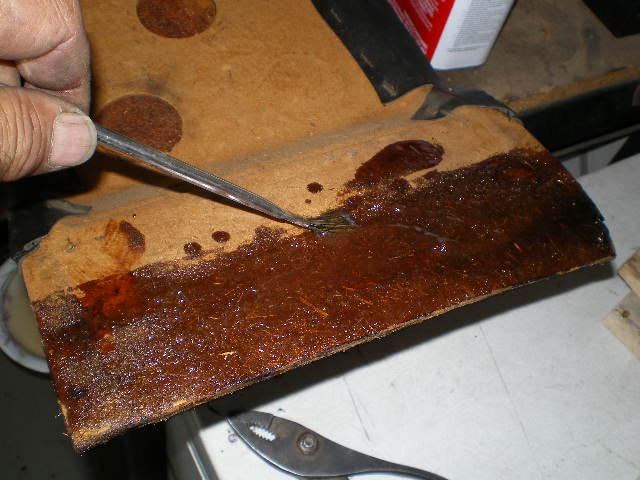 Then place wax paper on the wetted sides............ 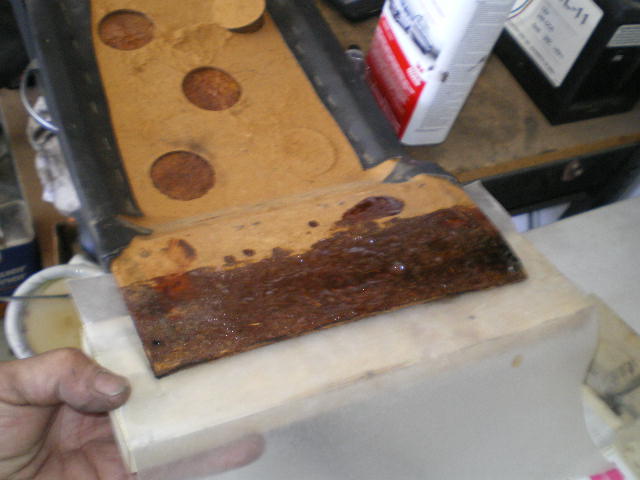 Then place a "flat" piece of wood on both sides and clamp in place........ 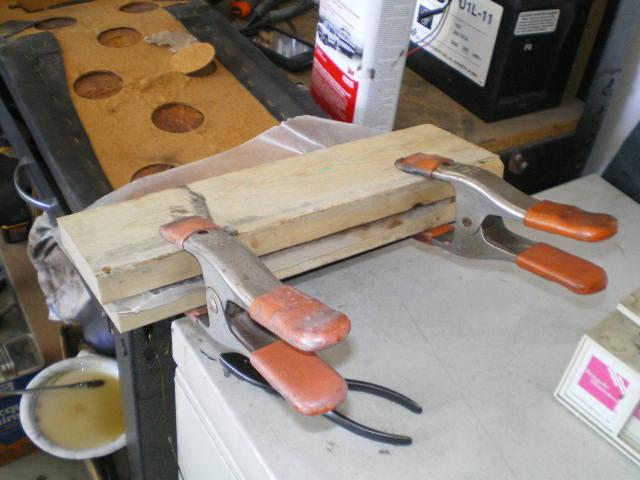 2 hr's later................... 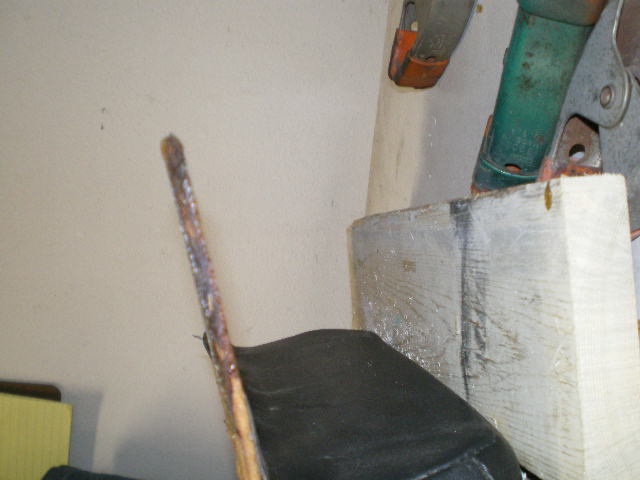 This pic shows the actual center piece in clamps as shown in an earlier shot but I wanted to show that frayed edge in the single clamp above and to the left of the board. The same is done to the frayed areas as the warped areas. After drying they will be flat as a pancake and water resistant. 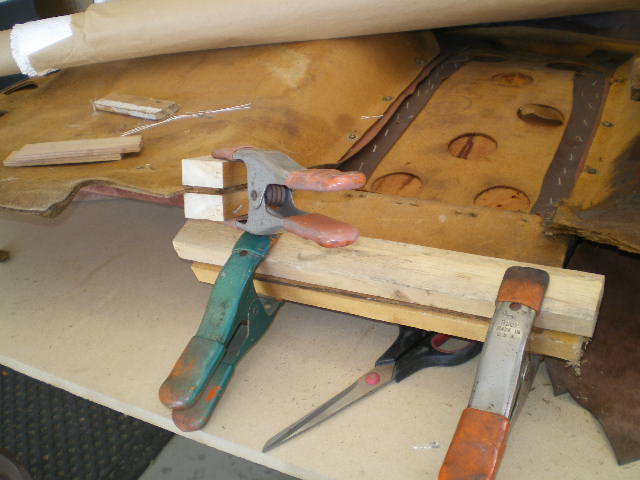 The most common complaint is that one or more of the upper clips has broken off. This is a very simple repair. Simply wet any remaining board on the clip and back pad, then I laid 2 pieces of 2" fiberglass across the clips, wetted them and placed a piece of Armaflex foam which was covered in wax paper and compressed with a board and clamp. This helps when dealing with uneven surfaces if you can't vacuum bag it. 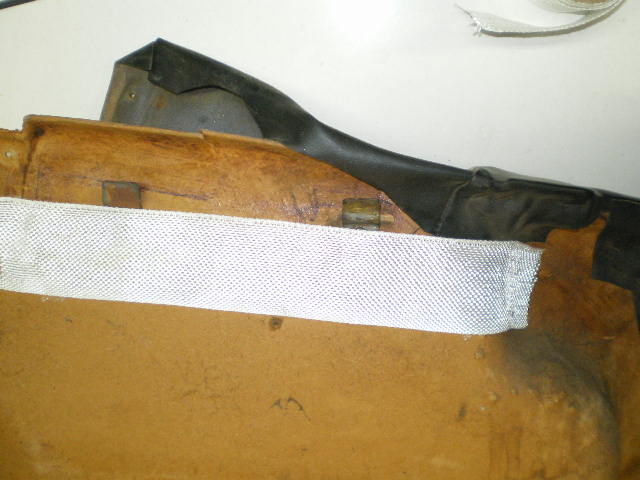 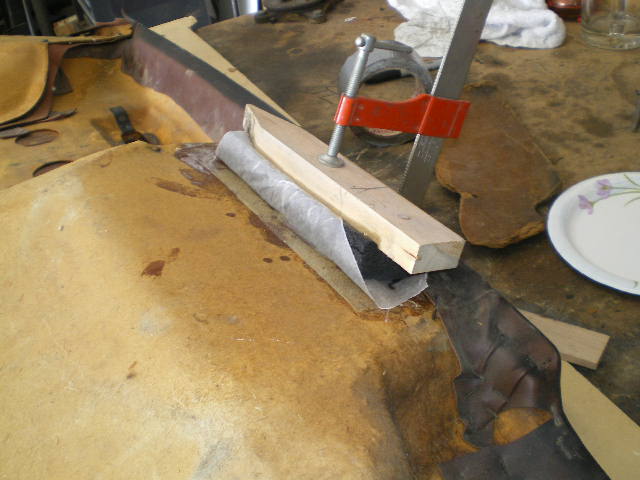  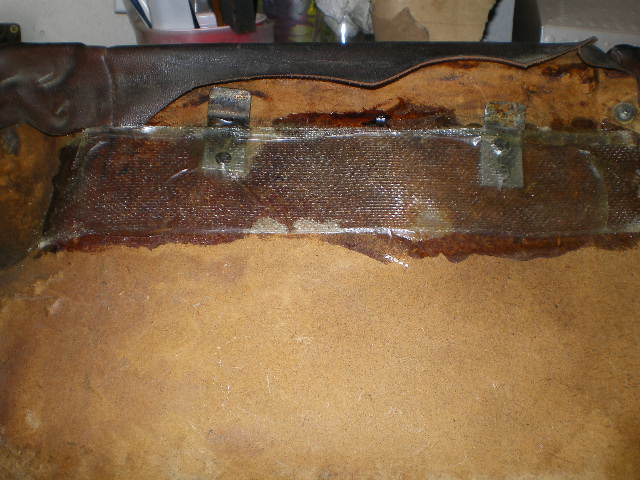 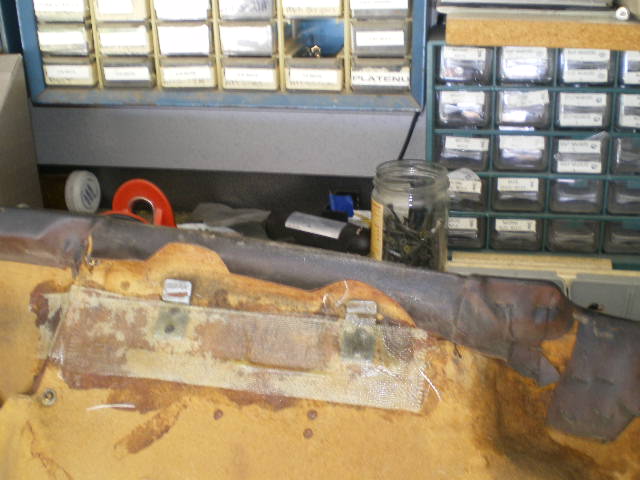 Speaking of that rubber; my shop stool had lived thru 1 puppy then another. Between the two there wasn't much left of the padding or covering. So I cut a piece out for my stool while I was at it and recovered my stool seat with a scrap piece from a seat back so n ow it is a Porsche Seat. LOL 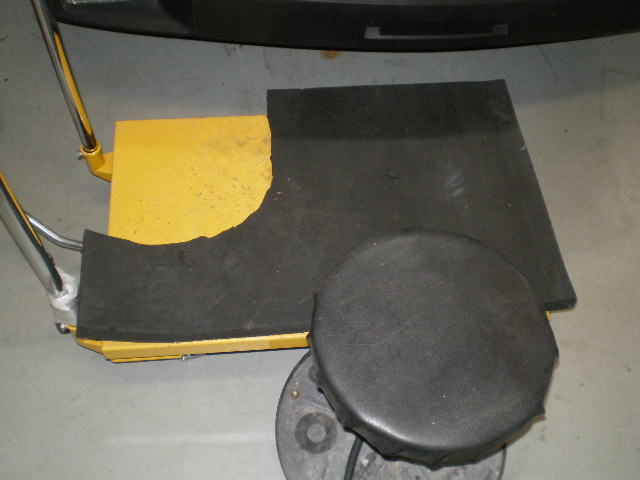 The drivers side will take a little more work but still easy to do. We'll need some underlayment for support so I used a thin piece of cardboard similar to a phone book cover. By massaging the piece and placeing the various clamps in different positions the cardboard assumes the contour of the back pad, as seen in the 2nd pic....... 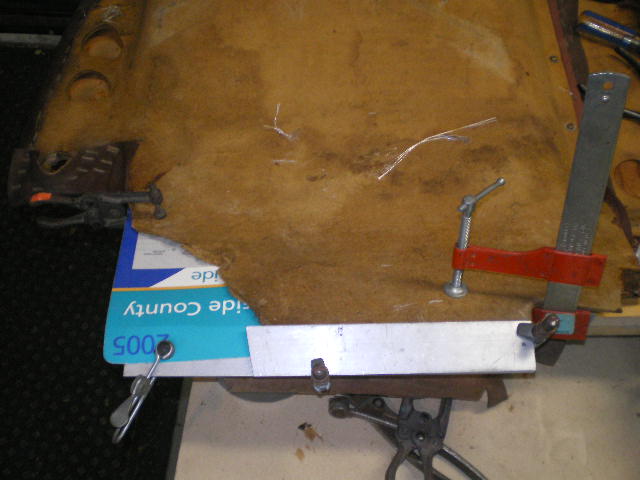 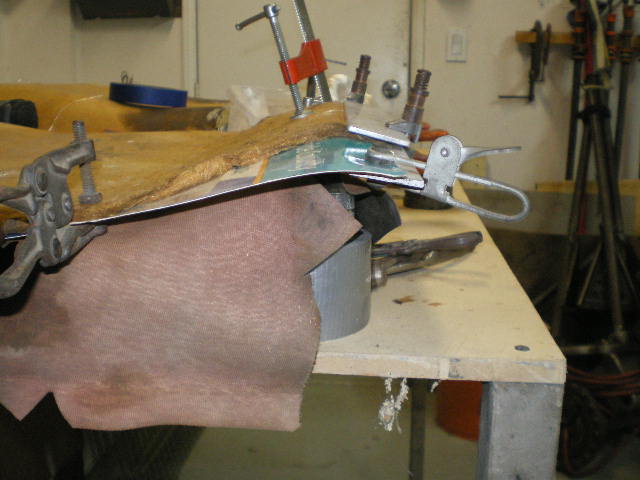 Now a piece of regular cardboard is traced out to fill the void.............. 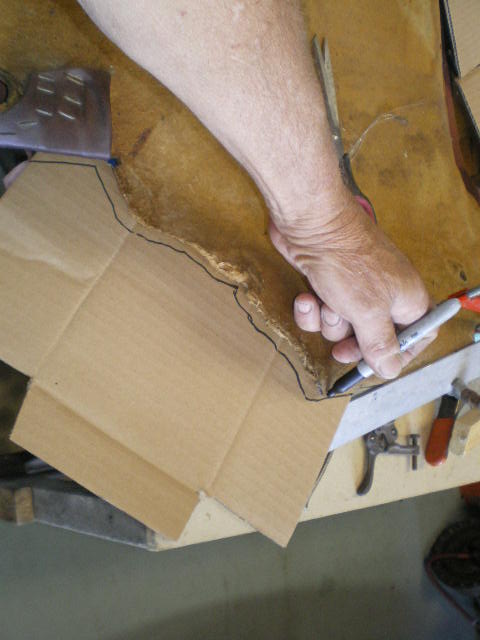 Filler piece of cardboard in place.......... 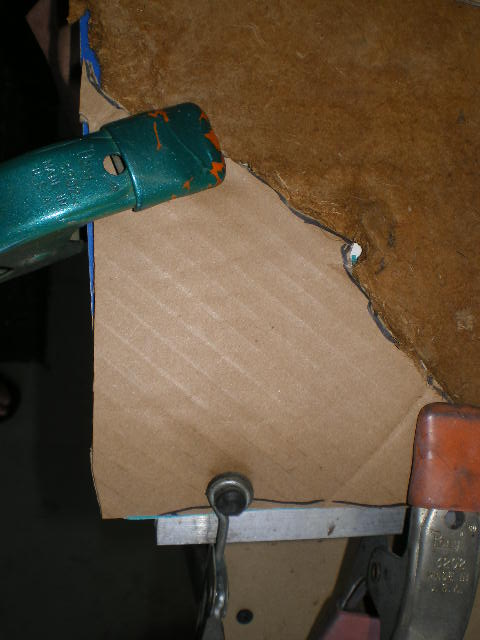 And the same area with a small fiberglass patch in place and dried. This area will get a few more layers of glass later. 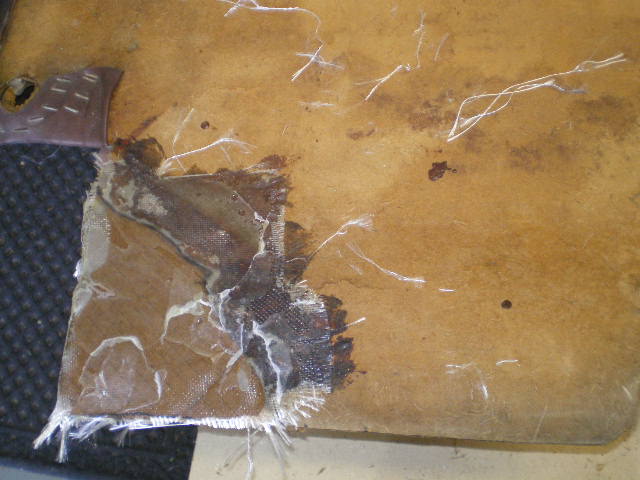 The same area but viewed from the front....... 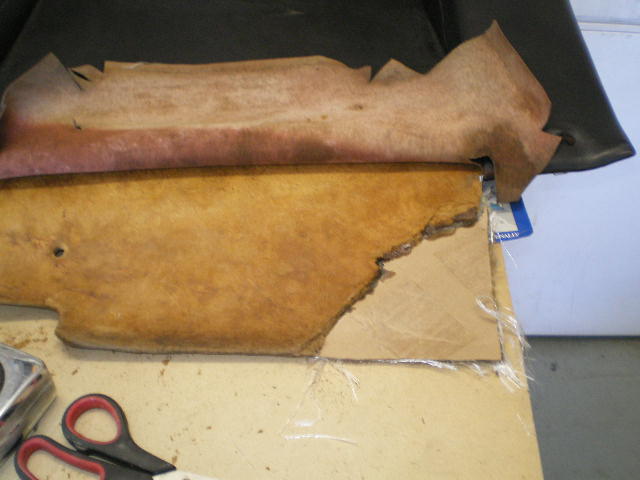 Now for the passenger side. I didn't have an existing piece to graft onto like the drivers side and I was missing the bottom 6" all the way across. But I did have a donor to use as a model.............. 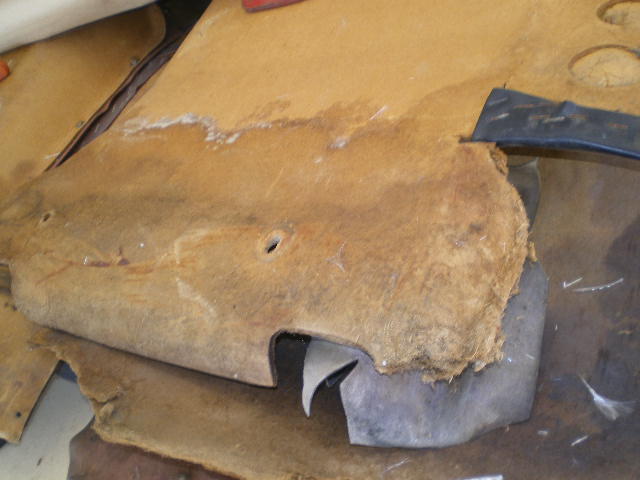 So I taped some wax paper on the area first.............. 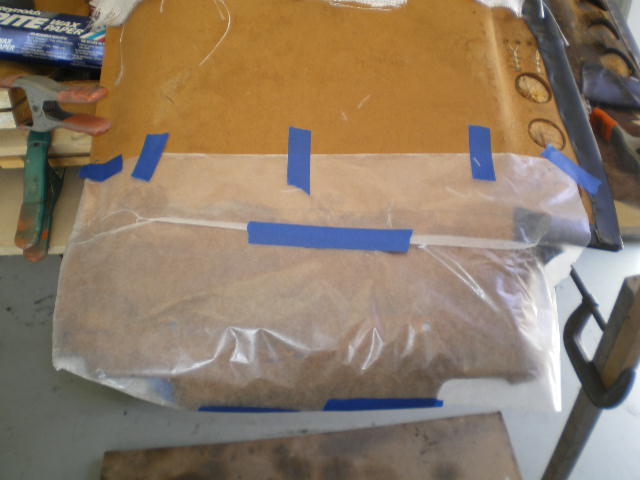 Then a couple pieces of glass........... 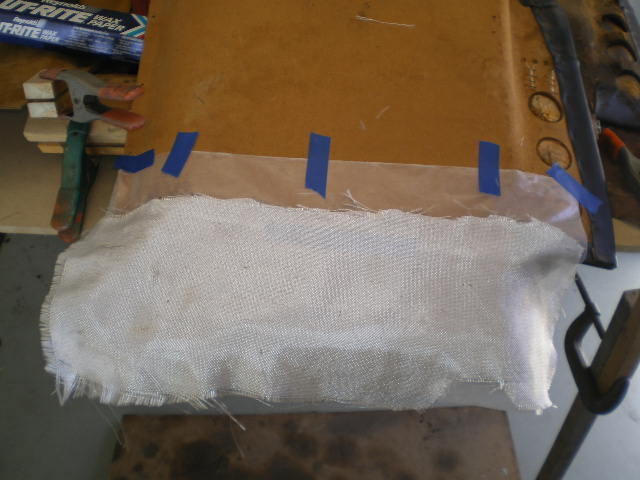 Here is another pic of the rubber used to conform to the rolled edge............ 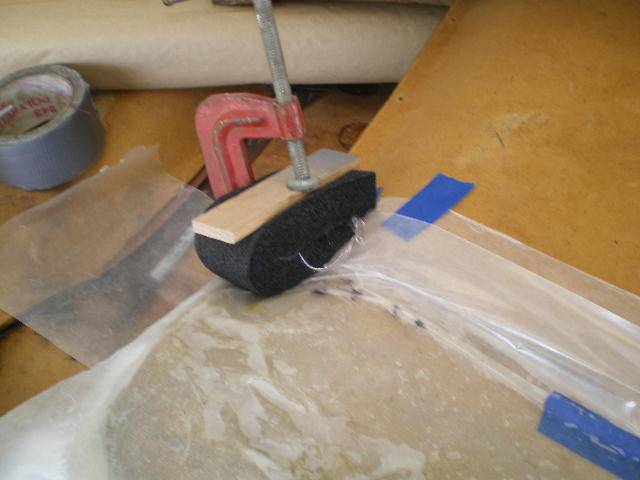 When the piece dried it was removed from the donor piece that was used as a mold and stapled to the passenger back pad as viewed now from the front..... it has a few more layers added later. 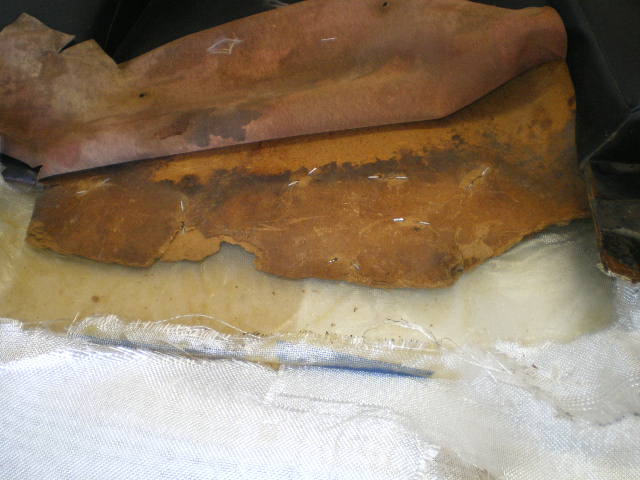 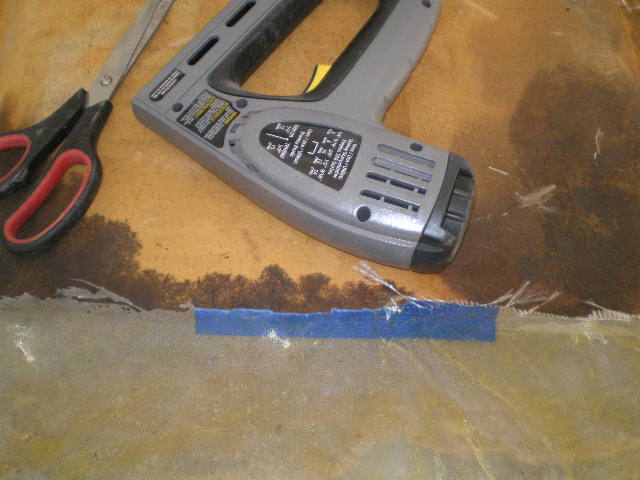 Here is the psgr back side with a more glass ans untrimmed.............. 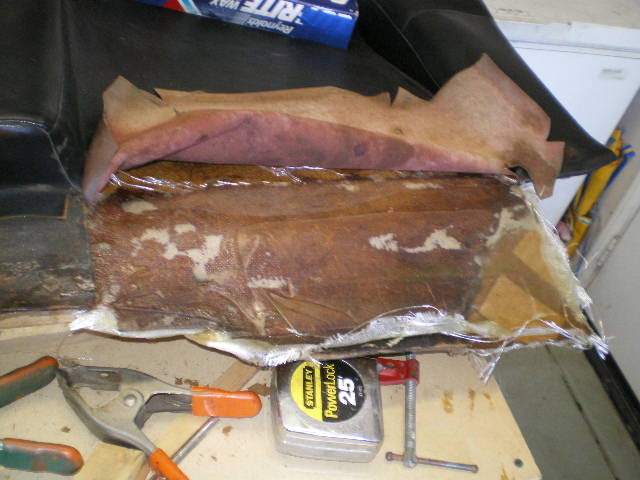 Now the back side pieces get a few layers of glass 7" x 16" wetted, wax paper and longer wood pieces clamped and glassed to keep her straight and tie it all together. 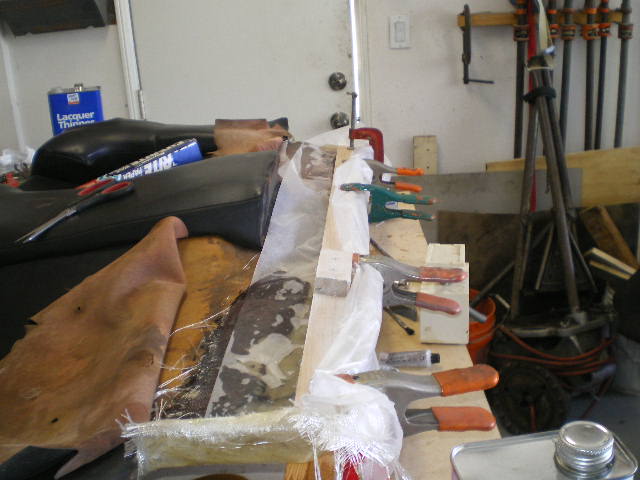 An untrimmed shot............... 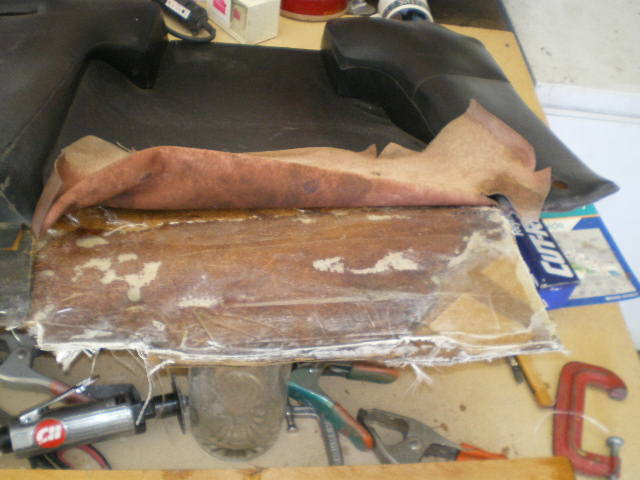 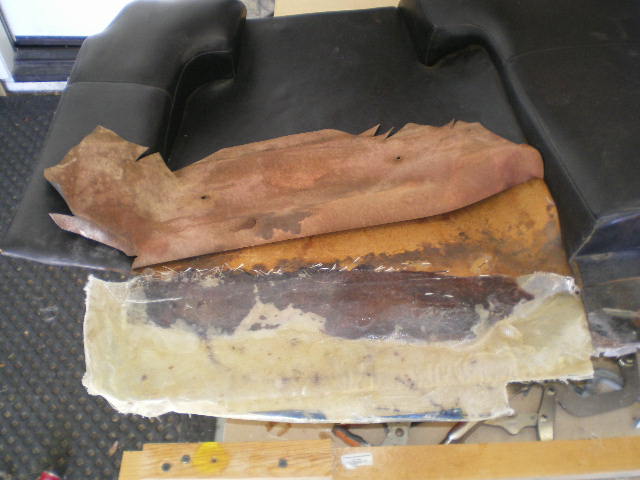 Standing on it's own now waiting on a small bit of trimming for final fit........ 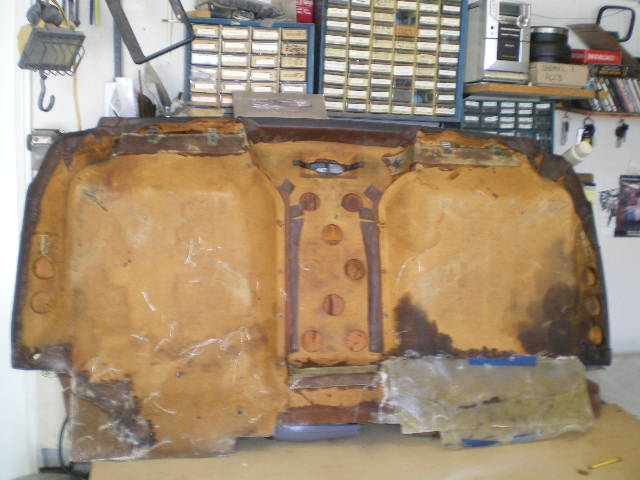 And now installed. Those screw thimbles fit quite solidly in the fiberglass so mark your 4 bottom holes carefully, pilot drill with a small bit and adjust hole as necessary. Now I don't have to keep the seat all the way back to keep the pad up. (IMG:style_emoticons/default/laugh.gif)   Attached image(s)  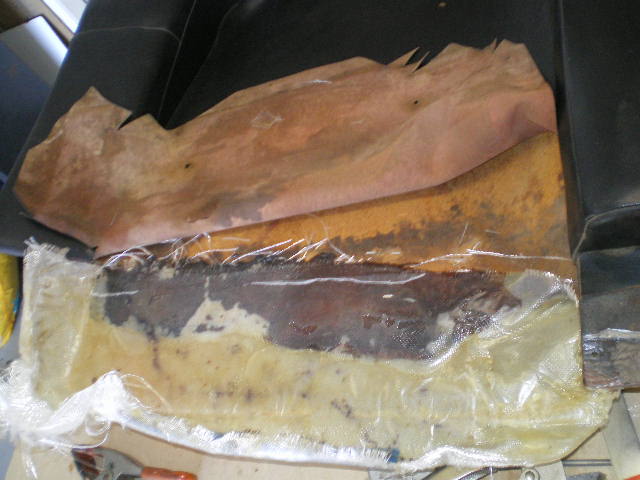 
|
   |

 
|
| markb |
Aug 21 2011, 11:16 PM
Post
#2
|
|
914less :( Group: Members Posts: 5,450 Joined: 22-January 03 From: Nipomo, CA Member No.: 180 Region Association: Central California |
Nice job! I've never worked with fiberglass before, what are you wetting it with to help pull the layers back together?
|
|
|
|
| poorsche914 |
Aug 21 2011, 11:39 PM
Post
#3
|
|
T4 Supercharged Group: Members Posts: 3,145 Joined: 28-May 09 From: Smoky Mountains Member No.: 10,419 Region Association: South East States |
|
|
|
|
| saigon71 |
Aug 22 2011, 06:03 AM
Post
#4
|
|
Advanced Member Group: Members Posts: 2,019 Joined: 1-June 09 From: Dillsburg, PA Member No.: 10,428 Region Association: MidAtlantic Region |
(IMG:style_emoticons/default/beerchug.gif) Great work!
|
|
|
|
| nsr-jamie |
Aug 22 2011, 09:15 AM
Post
#5
|
|
914 guy in Japan Group: Members Posts: 1,182 Joined: 7-November 07 From: Nagoya, Japan Member No.: 8,305 Region Association: None |
Excellent !! Perfect thread with easy to understand descriptions with pictures. Thank you !!!!!!!!!! This is something I have been thinking about doing myself but not sure really how to do until now. Thank you !!!!!!!
(IMG:style_emoticons/default/beerchug.gif) (IMG:style_emoticons/default/beerchug.gif) (IMG:style_emoticons/default/beerchug.gif) (IMG:style_emoticons/default/beerchug.gif) (IMG:style_emoticons/default/beerchug.gif) Also noticed you have Corduroy seat inserts...very jealous |
|
|
|
| 76-914 |
Aug 22 2011, 09:19 AM
Post
#6
|
|
Repeat Offender & Resident Subaru Antagonist Group: Members Posts: 13,828 Joined: 23-January 09 From: Temecula, CA Member No.: 9,964 Region Association: Southern California |
QUOTE(markb @ Aug 21 2011, 10:16 PM)  Nice job! I've never worked with fiberglass before, what are you wetting it with to help pull the layers back together? Mark, wetting is a glass term. It means to saturate with the resin. Sorry, I left that out. WalMart is a cheap outlet for the fiberglass resin. The fiberglass can be had from many places but I recommend a good bidirectional cloth (Aircraft Spruce is one local supplier). The cloth that comes with most "repair kits" is fine for a flat surface but if you need to conform to changing shapes then you need a bidirectional cloth. If you use foam as a backer and a styrene resin like I used, be sure it is urethane foam (available from hobby shops and floral suppliers). Otherwise, the foam will disolve. Don't be intimidated by fiberglass. Any mistake (as long as it is not structual) can be ground down and re-fiberglassed. |
|
|
|
| windforfun |
Aug 22 2011, 10:15 AM
Post
#7
|
|
Advanced Member Group: Members Posts: 2,082 Joined: 17-December 07 From: Blackhawk, CA Member No.: 8,476 Region Association: None |
If anybody needs some panels or a center pad, let me know. They're in pretty good shape & you can have them cheap.
|
|
|
|
| DRPHIL914 |
Aug 23 2011, 12:00 PM
Post
#8
|
|
Dr. Phil Group: Members Posts: 5,874 Joined: 9-December 09 From: Bluffton, SC Member No.: 11,106 Region Association: South East States |
Pretty cool, - i was lazy and ordered replacement with fiberglass core and vinyl from Morph-(James at 914AP)
phil i still have the old ones with the original pads, they were in pretty good shape if anyone is interested- i just changed from Tan to Black. |
|
|
|
| fteixeira |
Aug 23 2011, 02:43 PM
Post
#9
|
|
Newbie Group: Members Posts: 32 Joined: 25-February 11 From: Santa Clara, CA Member No.: 12,754 Region Association: None |
QUOTE(windforfun @ Aug 22 2011, 09:15 AM) If anybody needs some panels or a center pad, let me know. They're in pretty good shape & you can have them cheap. Windforfun: are you talking about door panels? I may be interested. The PO had to "screw" the panels along the bottom because he said they wouldn't stay put. Messed everything up. I'd like to replace with something not hacked up. Nevermind, you are obviously talking about the back pad. Thanks. fteixeira |
|
|
|
| windforfun |
Aug 23 2011, 03:04 PM
Post
#10
|
|
Advanced Member Group: Members Posts: 2,082 Joined: 17-December 07 From: Blackhawk, CA Member No.: 8,476 Region Association: None |
QUOTE(fteixeira @ Aug 23 2011, 01:43 PM) QUOTE(windforfun @ Aug 22 2011, 09:15 AM) If anybody needs some panels or a center pad, let me know. They're in pretty good shape & you can have them cheap. Windforfun: are you talking about door panels? I may be interested. The PO had to "screw" the panels along the bottom because he said they wouldn't stay put. Messed everything up. I'd like to replace with something not hacked up. Nevermind, you are obviously talking about the back pad. Thanks. fteixeira Call Rich at High Performance House in Redwood City. He's a little $$$, but has a TON of stuff. Google HPH for his contact info. (IMG:style_emoticons/default/shades.gif) (IMG:style_emoticons/default/shades.gif) (IMG:style_emoticons/default/shades.gif) |
|
|
|
| Dutchy914 |
Feb 5 2022, 05:01 PM
Post
#11
|
|
Newbie Group: Members Posts: 4 Joined: 4-July 21 From: Texas Member No.: 25,696 Region Association: Southwest Region |
I have same issue,
thanks for your post, nice work I think I can do this as well (just need some patience) CAN YOU SEND ME LIST / Name THE PRODUCTS / MATERIALS YOU USED ?? thanks so much !!! Attached thumbnail(s) 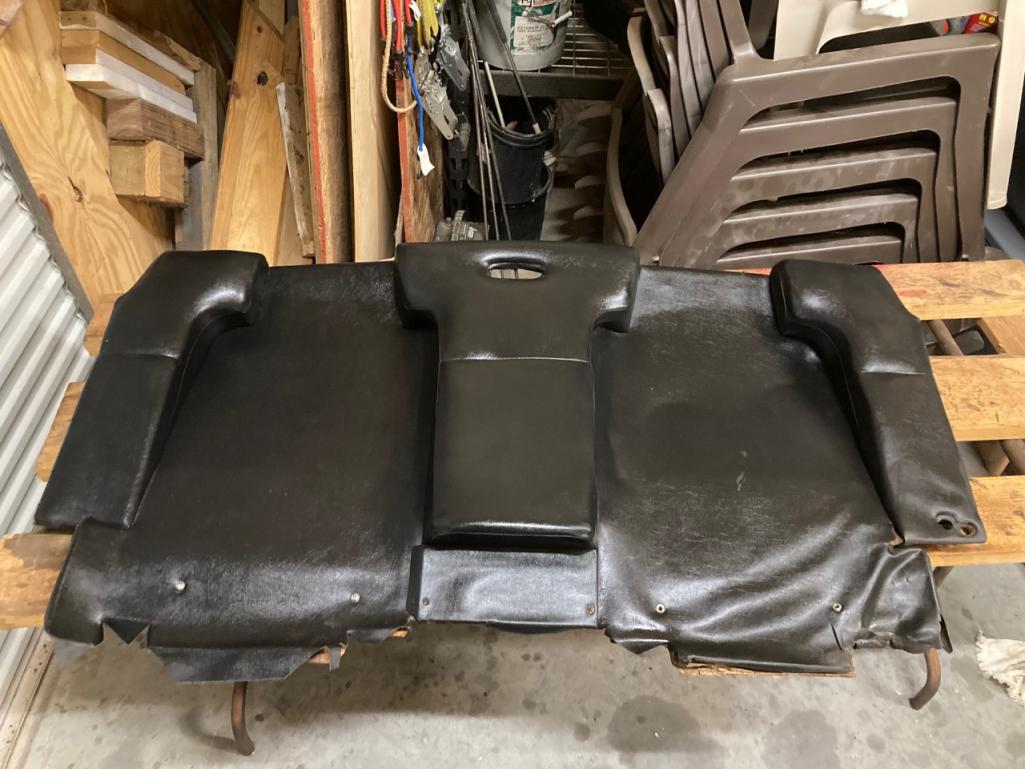 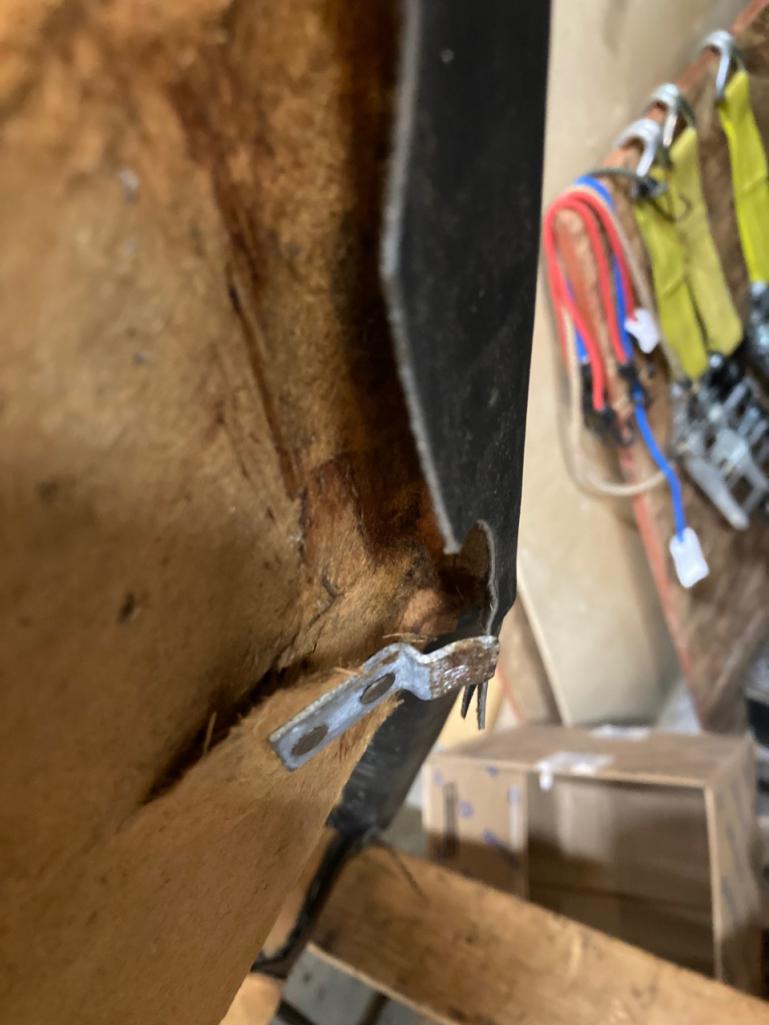  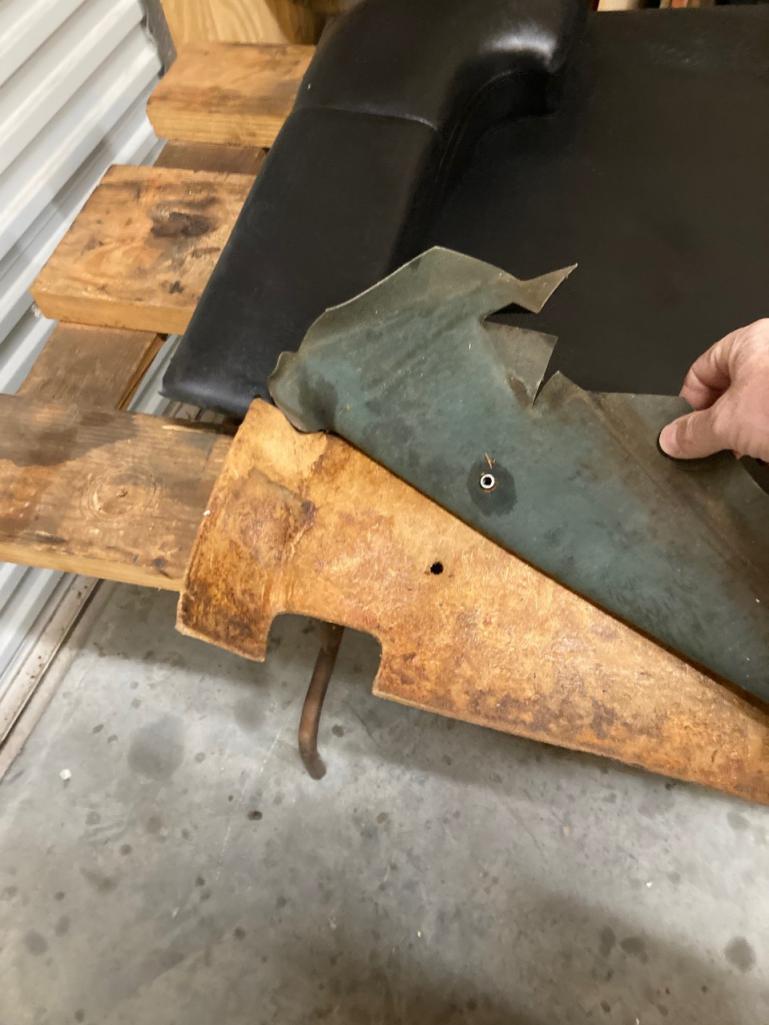
|
|
|
|
| windforfun |
Feb 5 2022, 08:32 PM
Post
#12
|
|
Advanced Member Group: Members Posts: 2,082 Joined: 17-December 07 From: Blackhawk, CA Member No.: 8,476 Region Association: None |
I have extra backpad panels for sale for cheap. You can have a complete set for $100 plus shipping (which will probably be at least that much). Let me know if you're really interested. I'll need to dig them up, so to speak, & send you some pics. They're in much better condition than what's pictured above.
|
|
|
|
| pfreiburger |
Feb 6 2022, 06:24 AM
Post
#13
|
|
Member Group: Members Posts: 129 Joined: 6-October 20 From: Fond du Lac, WI Member No.: 24,738 Region Association: None |
Thanks much, very good info and your repair was nicely documented, will help many for sure (my back pad is out at them moment and it does have a crack at the engine lid hole). BTW, I also have used Aircraft Spruce over the years - great source for all kinds of stuff like AN washers and other higher quality fasteners.
|
|
|
|
| Superhawk996 |
Feb 6 2022, 10:55 AM
Post
#14
|
|
914 Guru Group: Members Posts: 7,592 Joined: 25-August 18 From: Woods of N. Idaho Member No.: 22,428 Region Association: Galt's Gulch |
Based on CSOB title I expected Duct Tape.
Nice job! (IMG:style_emoticons/default/smilie_pokal.gif) Great pictures and great how to thread. |
|
|
|
| rhodyguy |
Feb 6 2022, 11:04 AM
Post
#15
|
|
Chimp Sanctuary NW. Check it out. Group: Members Posts: 22,252 Joined: 2-March 03 From: Orion's Bell. The BELL! Member No.: 378 Region Association: Galt's Gulch |
The 3 piece design ships pretty cheaply if you break it down. Pretty sure it will fall in to the oversized money pit if you try to ship it in one piece when all boxed up.
|
|
|
|
| tygaboy |
Feb 7 2022, 09:57 AM
Post
#16
|
|
914 Guru Group: Members Posts: 5,723 Joined: 6-October 15 From: Petaluma, CA Member No.: 19,241 Region Association: Northern California |
Kent isn't SuperMan. SuperMan is only "The Man of Steel"...
Kent is "The Man of Steel, Aluminum, Cardboard and Fiberglass"! (IMG:style_emoticons/default/pray.gif) Great stuff! And soooo cool that you document and share all this helpful stuff. Good on 'ya! (IMG:style_emoticons/default/beerchug.gif) |
|
|
|
| 76-914 |
Feb 8 2022, 12:16 AM
Post
#17
|
|
Repeat Offender & Resident Subaru Antagonist Group: Members Posts: 13,828 Joined: 23-January 09 From: Temecula, CA Member No.: 9,964 Region Association: Southern California |
Hah. Thx Chris. I'd forgotten about this thread. Been busy with rust repairs and getting ready for paint on old #1 the past 2 weeks. (IMG:style_emoticons/default/beerchug.gif)
|
|
|
|
| partwerks |
Nov 3 2022, 06:48 PM
Post
#18
|
|
Senior Member Group: Members Posts: 1,618 Joined: 7-September 06 From: Grand Island, NE Member No.: 6,787 |
Mine wasn't near that bad, but made one good one from two from the junk yard. Lucky it was the DS, cuz the donor was an early pad.
I used Elmer's glue, and some thin spots I added some wood dust from a table top saw to add some body to it. I only had to graft in one spot. |
|
|
|
| windforfun |
Nov 5 2022, 03:36 PM
Post
#19
|
|
Advanced Member Group: Members Posts: 2,082 Joined: 17-December 07 From: Blackhawk, CA Member No.: 8,476 Region Association: None |
You can still buy brand new ones from Porsche. At least they were available a few years ago.
|
|
|
|
| worn |
Nov 5 2022, 05:02 PM
Post
#20
|
|
Winner of the Utah Twisted Joint Award Group: Members Posts: 3,518 Joined: 3-June 11 From: Madison, WI Member No.: 13,152 Region Association: Upper MidWest |
QUOTE(windforfun @ Nov 5 2022, 02:36 PM) You can still buy brand new ones from Porsche. At least they were available a few years ago. The acrylic resin and the pressed board for the back pad seems a match made in heaven. I did basically the same thing for my 3.2. Works for door cubbies or glove boxes too. British, American or German, they all respond well to being plasticized. |
|
|
|
|
1 User(s) are reading this topic (1 Guests and 0 Anonymous Users)
0 Members:

|
Lo-Fi Version | Time is now: 16th December 2025 - 12:40 AM |
Invision Power Board
v9.1.4 © 2025 IPS, Inc.