|
|
|
Porsche, and the Porsche crest are registered trademarks of Dr. Ing. h.c. F. Porsche AG.
This site is not affiliated with Porsche in any way. Its only purpose is to provide an online forum for car enthusiasts. All other trademarks are property of their respective owners. |
|
|

  |

| kconway |
 Oct 22 2011, 03:20 PM Oct 22 2011, 03:20 PM
Post
#1
|
|
Senior Member  Group: Members Posts: 1,347 Joined: 6-December 04 From: Monrovia, CA Member No.: 3,231 Region Association: Southern California |
I'm installing a new targa seal and need some eyes on this. I removed the old one so long ago I can't remember if something is missing. The horizontal member seems empty and the seal doesn't stay put. Am I missing something or should something go on before the seal in photo 1?
In photo 2, I'm wondering about the little flap on the a-pilar seal land. The little flap seems long and prevents the seal from seating in the corner at the transistion to the horizontal member. Does that flap stay on or do I snap it off? Kev Photo 1  Photo 2 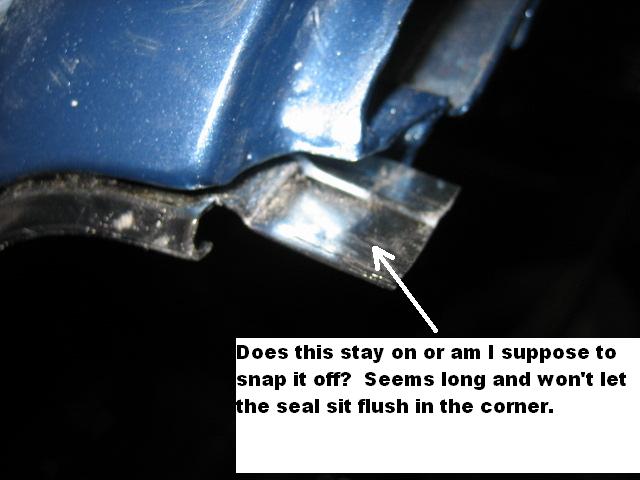 |
   |

 
|
| MDG |
Oct 22 2011, 03:28 PM
Post
#2
|
|
Wolf in wolf's clothing. Group: Members Posts: 8,652 Joined: 3-February 09 From: Toronto Member No.: 10,018 Region Association: None |
In photo 1, do you mean the inner targa seal?
Photo 2 - no you do not snap those flimsy, PITA - did I say flimsy - tabs off. There is a slit inside the channel of the seal. You carefully work that tab into it. It anchors the seal at the corner where it makes a right angle down the side. I did say it's a pain in the ass, right? |
|
|
|
| ellisor3 |
Oct 22 2011, 03:35 PM
Post
#3
|
|
HPWhore Group: Members Posts: 811 Joined: 23-October 08 From: Fleming Island, Florida Member No.: 9,683 Region Association: South East States |
Thre are 2 parts to the targa seal, an inner seal and the longer outerseal.
I did trim that little tab back some, especially if you have Mikey's kit. I found that mine was to long and caused it not to go all the way down. I also had to use some 3M sealant on the top of the targa seal where it meets the the area above the windshield, otherwise it will simply pull out when you remove the top. |
|
|
|
| Mikey914 |
Oct 22 2011, 03:36 PM
Post
#4
|
|
The rubber man Group: Members Posts: 12,638 Joined: 27-December 04 From: Hillsboro, OR Member No.: 3,348 Region Association: None |
Yes you are missing the lower targa seal. I just dropped you a set of instructions I use for my main seal. You can PM me if you need any info. I think the one you bought was mine so it should be a pretty quick install. Hoyland and I swapped his out in about 15 min. in the parking lot of the hotel I stay in.
|
|
|
|
| jim_hoyland |
Oct 22 2011, 03:53 PM
Post
#5
|
|
Get that VIN ? Group: Members Posts: 9,262 Joined: 1-May 03 From: Sunset Beach, CA Member No.: 643 Region Association: Southern California |
I did the swap with Marks help. Be sure you lube the sides so the rubber slips easily down the channeling. I used glycerine I bought at CVS.
The tricky part was the corner plugs. I had one side askew a tiny bit. Mark showed me the way. The upper end of the channeling could be a tad to long to fit into the plug as well. Kevin, the flap has to be shortened about 1/4 to 1/2 inch. It still has to slip into the plug. |
 |
|
| kconway |
Oct 22 2011, 04:05 PM
Post
#6
|
|
Senior Member Group: Members Posts: 1,347 Joined: 6-December 04 From: Monrovia, CA Member No.: 3,231 Region Association: Southern California |
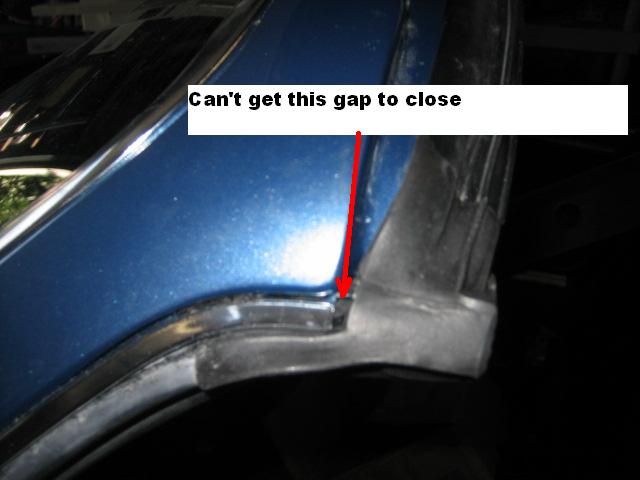
I think I have to shorten that tab. Here's what it looks like. I can't get the horizontal across the top to stay in place it just flops back down. This is a seal I bought from the Porsche dealer about 5 years ago.
  |
|
|
|
| Mikey914 |
Oct 22 2011, 04:30 PM
Post
#7
|
|
The rubber man Group: Members Posts: 12,638 Joined: 27-December 04 From: Hillsboro, OR Member No.: 3,348 Region Association: None |
Kevin,
There is a short piece of an clip seal that the extrusion is designed to mold to, you will need that, as that's what holds the seal in place. |
|
|
|
| kconway |
Oct 22 2011, 04:33 PM
Post
#8
|
|
Senior Member Group: Members Posts: 1,347 Joined: 6-December 04 From: Monrovia, CA Member No.: 3,231 Region Association: Southern California |
I think I'm missing a "Inner Clip" for the horizontal?
Kev |
|
|
|
| Mikey914 |
Oct 22 2011, 04:41 PM
Post
#9
|
|
The rubber man Group: Members Posts: 12,638 Joined: 27-December 04 From: Hillsboro, OR Member No.: 3,348 Region Association: None |
You are, if you can't find it, I can send you another one no problem. Also the corner can be held up if the inner corner is not lined up correctly. I just sent you a copy of the instructions to your email, check out pg 2-3 refered to as "B". It could be that. or call me and I can talk you through it.
-Mark |
|
|
|
| MDG |
Oct 22 2011, 04:58 PM
Post
#10
|
|
Wolf in wolf's clothing. Group: Members Posts: 8,652 Joined: 3-February 09 From: Toronto Member No.: 10,018 Region Association: None |
QUOTE(Mikey914 @ Oct 22 2011, 06:30 PM)  Kevin, There is a short piece of an clip seal that the extrusion is designed to mold to, you will need that, as that's what holds the seal in place. +1 on that. Also make sure that tab isn't folding up on itself like an accordion. One of mine did that and if so it will not seat in properly. Patience and the odd expletive is what is called for on these. If it is a factory seal you should not have to trim that tab. There is a kind of pinch clip molded into the seal at the corners that those tabs go into; when you are stretching the seals across the frame, the pressure can squeeze them shut. Use something dull like a butter knife in the seal and try to open them up a bit - the tabs should be easier to slide in. |
|
|
|
| HansJan |
Oct 8 2018, 04:17 PM
Post
#11
|
|
Member Group: Members Posts: 394 Joined: 5-April 16 From: Sugar Land TX Member No.: 19,860 Region Association: Southwest Region |
Hello,
Does anyone have a copy of the installation instructions for the front targa seal (that Mark is talking about)? I rather not bother Mark at the moment. Ps: any other pointers to installing seals are welcome. My car will come back from painter this week and most body/door seals need to be reinstalled. |
|
|
|
| 1adam12 |
Jan 13 2019, 11:34 AM
Post
#12
|
|
Member Group: Members Posts: 209 Joined: 25-May 17 From: Chino Hills, CA Member No.: 21,132 Region Association: Southern California |
Okay, this is my 7th attempt at trying to install the main targa seal. I keep getting hung up with the upright seal channel. Using glycerin now and only getting 5 inches or so down the channel and then nothing.
Definitely frustrating especially with the current downpour of rain were getting now and I have to mask off the targa and window gaps in between attempts. This is the 914 Rubber version. Attached thumbnail(s) 
|
|
|
|
| IronHillRestorations |
Jan 13 2019, 01:15 PM
Post
#13
|
|
I. I. R. C. Group: Members Posts: 6,714 Joined: 18-March 03 From: West TN Member No.: 439 Region Association: None |
Don't try and slide the seal down, it will only increase your desire to say bad words.
Push the inside lip of the vertical part in the channel and the work the outer lip into the channel with a flat screwdriver, or a plastic glass install tool.  First thing to do is make sure the corners fit correctly in/on the aluminum tab that sticks out, don't proceed until you get this to fit right, and smoothly. I do each side first and then start in the center and work outboard (going back and forth) a little at a time. Once you get it fit perfectly you can put a couple crimps in the channel to keep the seal in place. There should be some witness marks from where this was done at the factory. |
|
|
|
| 1adam12 |
Jan 13 2019, 02:15 PM
Post
#14
|
|
Member Group: Members Posts: 209 Joined: 25-May 17 From: Chino Hills, CA Member No.: 21,132 Region Association: Southern California |
QUOTE(IronHillRestorations @ Jan 13 2019, 11:15 AM) Don't try and slide the seal down, it will only increase your desire to say bad words. Push the inside lip of the vertical part in the channel and the work the outer lip into the channel with a flat screwdriver, or a plastic glass install tool. First thing to do is make sure the corners fit correctly in/on the aluminum tab that sticks out, don't proceed until you get this to fit right, and smoothly. I do each side first and then start in the center and work outboard (going back and forth) a little at a time. Once you get it fit perfectly you can put a couple crimps in the channel to keep the seal in place. There should be some witness marks from where this was done at the factory. Thanks for the install tips. I tried this method in my third attempt but I'll give it a go again. I understand fitting the seal on that tab is crucial and may need to be trimmed a little. I cut myself on that damn thing once already so here we go! |
|
|
|
| Matty900 |
Jan 13 2019, 03:10 PM
Post
#15
|
|
Senior Member Group: Members Posts: 1,269 Joined: 21-February 15 From: Oregon Member No.: 18,454 Region Association: Pacific Northwest |
I am working on a video to help but I don't have it edited yet. You can OM me and I will send you a link of the raw video files to help you in the meantime. (IMG:style_emoticons/default/beerchug.gif)
|
|
|
|
| 914_teener |
Feb 4 2019, 07:49 PM
Post
#16
|
|
914 Guru Group: Members Posts: 5,194 Joined: 31-August 08 From: So. Cal Member No.: 9,489 Region Association: Southern California |
I.m soing this soon.
How was the outcome? |
|
|
|
| 914_teener |
Feb 4 2019, 07:49 PM
Post
#17
|
|
914 Guru Group: Members Posts: 5,194 Joined: 31-August 08 From: So. Cal Member No.: 9,489 Region Association: Southern California |
So I'm Doing the lower seal this weekend. It's done raining for now.
So I PM'd Mark for instructions. I understand for JUST to replace the lower targa seal: Fit the corners first and then the center (the notch should be center), and then push the seal into the channel from the center outwards? Does anybody have a picture of fitting the lower seal into the corner piece? Thanks in Advance. |
|
|
|
| 914_teener |
Feb 9 2019, 01:26 PM
Post
#18
|
|
914 Guru Group: Members Posts: 5,194 Joined: 31-August 08 From: So. Cal Member No.: 9,489 Region Association: Southern California |
|
|
|
|
| 1adam12 |
Feb 9 2019, 02:24 PM
Post
#19
|
|
Member Group: Members Posts: 209 Joined: 25-May 17 From: Chino Hills, CA Member No.: 21,132 Region Association: Southern California |
I fi ally had success with this install the other week. I started with the top portion first going from center and working outwards to the corners. Once at the corners, you can determine how much you need to trim the metal tabs to make a flush fit.
At the lower portion (vertical seals) the suggestion of working inside first in the channels and then using a flat edge tool to punch the outer side into the channel worked perfectly! Definitely use some glycerin which you can find at you local CVS store. |
|
|
|
| 914_teener |
Feb 9 2019, 03:56 PM
Post
#20
|
|
914 Guru Group: Members Posts: 5,194 Joined: 31-August 08 From: So. Cal Member No.: 9,489 Region Association: Southern California |
QUOTE(1adam12 @ Feb 9 2019, 12:24 PM) I fi ally had success with this install the other week. I started with the top portion first going from center and working outwards to the corners. Once at the corners, you can determine how much you need to trim the metal tabs to make a flush fit. At the lower portion (vertical seals) the suggestion of working inside first in the channels and then using a flat edge tool to punch the outer side into the channel worked perfectly! Definitely use some glycerin which you can find at you local CVS store. What about if you are only replacing the lower targa seal? Should you unclip the top and side or should you just trim it square and be done with it? Any info is appreciated. I'll post a pic later. |
|
|
|
|
1 User(s) are reading this topic (1 Guests and 0 Anonymous Users)
0 Members:

|
Lo-Fi Version | Time is now: 25th April 2024 - 09:18 PM |
Invision Power Board
v9.1.4 © 2024 IPS, Inc.