|
|
|
Porsche, and the Porsche crest are registered trademarks of Dr. Ing. h.c. F. Porsche AG.
This site is not affiliated with Porsche in any way. Its only purpose is to provide an online forum for car enthusiasts. All other trademarks are property of their respective owners. |
|
|

  |

| siverson |
 Oct 23 2011, 08:20 PM Oct 23 2011, 08:20 PM
Post
#1
|
|
Advanced Member  Group: Benefactors Posts: 2,448 Joined: 5-May 03 From: San Diego, CA Member No.: 654 Region Association: Southern California |
Has anyone ever tried *removing* the Brad Meyeur longitudinal kit? Did it work without creating even more problems?
-Steve |
   |

 
|
| siverson |
Oct 23 2011, 08:20 PM
Post
#2
|
|
Advanced Member Group: Benefactors Posts: 2,448 Joined: 5-May 03 From: San Diego, CA Member No.: 654 Region Association: Southern California |
(It just seems like the Engman kit and other tricks are the way to go now.)
|
|
|
|
| GaroldShaffer |
Oct 23 2011, 08:35 PM
Post
#3
|
|
You bought another 914? Group: Benefactors Posts: 7,622 Joined: 27-June 03 From: Portage, IN Member No.: 865 Region Association: None |
I have to ask if you have one of his kits installed why do you want remove it? Is it not doing what it is supposed to do?
I have Brad's kit on both my cars. I like them over the others as they tie into the rear suspension pickup points. Now I haven't tried the others setup or been in a 914 that has one of the other kits installed so my opinion is biased I guess. |
|
|
|
| iamchappy |
Oct 23 2011, 08:41 PM
Post
#4
|
|
It all happens so fast! Group: Members Posts: 4,893 Joined: 5-November 03 From: minnetonka, mn Member No.: 1,315 Region Association: Upper MidWest |
I have both the Engman inner kit and the Meyeur outer on mine.... I can see how it can hurt having the extra support.
|
|
|
|
| siverson |
Oct 23 2011, 08:41 PM
Post
#5
|
|
Advanced Member Group: Benefactors Posts: 2,448 Joined: 5-May 03 From: San Diego, CA Member No.: 654 Region Association: Southern California |
Yeah, I think it's ok, but I'm doing a bunch of work on my car now (had some front end damage) so "while I'm in there" I'm considering removing this and installing the Engman kit.
Also, now that I have some miles on mine (about 25k) and lots of horsepower/tires, the chassis is loosening up again. I suspect (I have not confirmed) that the spot welds that this kit attaches to has loosened up and so it's a lot less effective than when I first installed it. I may just end up leaving it, but then that's 50+ (? I don't recall, but it was heavy) extra pounds stuck on the car. -Steve |
|
|
|
| siverson |
Oct 23 2011, 08:42 PM
Post
#6
|
|
Advanced Member Group: Benefactors Posts: 2,448 Joined: 5-May 03 From: San Diego, CA Member No.: 654 Region Association: Southern California |
> I can see how it can hurt having the extra support.
True, other than weight. If I recall, that thing was a beast when I installed it! -Steve |
|
|
|
| hot_shoe914 |
Oct 23 2011, 09:03 PM
Post
#7
|
|
on ramp passer Group: Members Posts: 3,802 Joined: 20-November 07 From: Earle, Ar. Member No.: 8,354 Region Association: None |
Try asking Brad, only makes sense to me. (IMG:style_emoticons/default/poke.gif) (IMG:style_emoticons/default/confused24.gif)
|
|
|
|
| Montreal914 |
Oct 23 2011, 09:06 PM
Post
#8
|
|
Senior Member Group: Members Posts: 1,547 Joined: 8-August 10 From: Claremont, CA Member No.: 12,023 Region Association: Southern California |
QUOTE(siverson @ Oct 23 2011, 07:41 PM)  Yeah, I think it's ok, but I'm doing a bunch of work on my car now (had some front end damage) so "while I'm in there" I'm considering removing this and installing the Engman kit. Also, now that I have some miles on mine (about 25k) and lots of horsepower/tires, the chassis is loosening up again. I suspect (I have not confirmed) that the spot welds that this kit attaches to has loosened up and so it's a lot less effective than when I first installed it. I may just end up leaving it, but then that's 50+ (? I don't recall, but it was heavy) extra pounds stuck on the car. -Steve I think it is more like 30lbs. |
 |
|
| shoguneagle |
Oct 23 2011, 10:58 PM
Post
#9
|
|
shoguneagle Group: Members Posts: 1,180 Joined: 3-January 03 From: CA, OR, AZ (CAZOR); New Mexico Member No.: 84 Region Association: Northern California |
Ask Brad!! He developed the long which I have on my car along with Engman's interior kit. Love both of them. The car does not flex and is true to the handling; I have a 3.2 1987 Carrera Sixer and I enjoy the car setup. Mostly street driving wiith 911 Carrera front (22mm sway bar and torsion bars), red koni shocks, turbo steering, red konis on back with 200# springs, transaxle built for the 3.2 engine, plus numerous other items.
I do not produce the power iamchappy does but it does move; I would think twice before removing. If welds are breaking, then make sure the item is welded for stress and strength. Both Brad Mayuer and Engman produce excellent product and service. |
|
|
|
| siverson |
Oct 23 2011, 11:44 PM
Post
#10
|
|
Advanced Member Group: Benefactors Posts: 2,448 Joined: 5-May 03 From: San Diego, CA Member No.: 654 Region Association: Southern California |
Yeah, maybe I'm over thinking this. It's not that big of weight penalty and likely still provides some stiffness. I'll probably just install both.
-Steve |
|
|
|
| VaccaRabite |
Oct 24 2011, 08:01 AM
Post
#11
|
|
En Garde! Group: Admin Posts: 13,442 Joined: 15-December 03 From: Dallastown, PA Member No.: 1,435 Region Association: MidAtlantic Region |
Unless the kit was welded over rusty metal as a stopgap, don't remove it. Add the Engman kit. Sound like you need all the help you can get.
Look for cracks though! Since the longs are not flexing other parts of the car are taking the strain. The flex you feel may be the car rending itself at the engine shelf or somewhere else. If it feels like it is flexing you need to find out where. Zach |
|
|
|
| rick 918-S |
Oct 24 2011, 10:14 AM
Post
#12
|
|
Hey nice rack! -Celette Group: Members Posts: 20,451 Joined: 30-December 02 From: Now in Superior WI Member No.: 43 Region Association: Northstar Region |
Both kits do different things. Brads kit will do a better job helping the chassis with sag, (parallel rigidity) while Marks kit will aid in torsional forces and help avoid or repair the chassis crack that we sometimes see next to the tip of the "E" brake handle on the inner long. Both are good
|
|
|
|
| Dave_Darling |
Oct 24 2011, 05:27 PM
Post
#13
|
|
914 Idiot Group: Members Posts: 14,984 Joined: 9-January 03 From: Silicon Valley / Kailua-Kona Member No.: 121 Region Association: Northern California |
Any weight they add is in the least harmful place possible--inside the wheelbase, down very low.
--DD |
|
|
|
| Elliot Cannon |
Oct 24 2011, 05:59 PM
Post
#14
|
|
914 Guru Group: Retired Members Posts: 8,487 Joined: 29-December 06 From: Paso Robles Ca. (Central coast) Member No.: 7,407 Region Association: None |
When you weld the kit in, enlarge the holes to 1/2 or 5/8. It makes for a longer stronger weld instead of a dot.
Attached image(s) 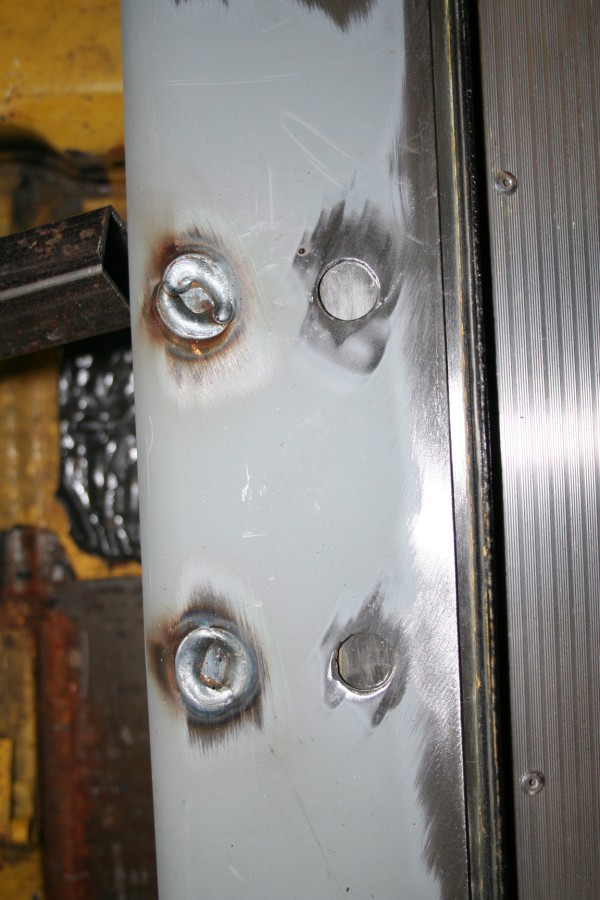
|
|
|
|
| Brett W |
Oct 25 2011, 07:23 AM
Post
#15
|
|
Advanced Member Group: Members Posts: 2,856 Joined: 17-September 03 From: huntsville, al Member No.: 1,169 Region Association: None |
Something I think many people overlook when upgrading the cars is, unlike a coupe or sedan, the only thing really connecting the front and rear halves of the car is two six inch boxes made out of really thin sheet metal. Anything you can do to increase the strength of that box is good. The Mayer kit can add some material to those boxes thus increasing the strength. I would leave it and just go over some over some of the welds to remelt them if you feel they are "loosening up"
|
|
|
|
| Engman |
Oct 25 2011, 03:20 PM
Post
#16
|
|
Zoisite Group: Benefactors Posts: 1,349 Joined: 25-March 03 From: New Albany, IN Member No.: 475 |
QUOTE(Elliot Cannon @ Oct 24 2011, 07:59 PM) When you weld the kit in, enlarge the holes to 1/2 or 5/8. It makes for a longer stronger weld instead of a dot. Actually, there is a correct size for the hole. My earlier kits were on the small side of this. I went to several shows and different people to research the right size of hole. Too large a hole creates a heat affected zone that can cause stress cracking of the underlaying material. The holes in the current version 5 of my kit were made larger as per the shops and builders I talked with. A 1/2" hole is OK but it does mean that you are putting more heat into the long and have to take more time to weld it as you have to move the heat around, and sometime let things cool, to avoid warping the long. Mark |
|
|
|
| Drums66 |
Oct 25 2011, 03:34 PM
Post
#17
|
|
914 Rudiments Group: Members Posts: 5,321 Joined: 15-January 03 From: Coronado,Cali Member No.: 151 Region Association: Southwest Region |
QUOTE(hot_shoe914 @ Oct 23 2011, 08:03 PM) Try asking Brad, only makes sense to me. (IMG:style_emoticons/default/poke.gif) (IMG:style_emoticons/default/confused24.gif) ......I think you're(Siverson) going about it the right way!.......ask somebody neutral not the maker?(engman or brad) (IMG:style_emoticons/default/idea.gif) (IMG:style_emoticons/default/bye1.gif) (IMG:style_emoticons/default/popcorn[1].gif) (IMG:style_emoticons/default/popcorn[1].gif) (interesting) |
|
|
|
| siverson |
Oct 25 2011, 03:45 PM
Post
#18
|
|
Advanced Member Group: Benefactors Posts: 2,448 Joined: 5-May 03 From: San Diego, CA Member No.: 654 Region Association: Southern California |
Thanks for the input. I'll definitely check out the car more to see where it is flexing.
I notice that the door gap changes now when I jack it up. The top gains about 1.5mm - not much, but you can definitely tell I difference. I don't *think* it changed when I first installed the kit, but maybe I wasn't paying close attention. And I'm also pretty sure the BM Kit welds have not loosened up, I suspect the original factory spot welds have, but I'll take a closer look... -Steve |
|
|
|
| Elliot Cannon |
Oct 25 2011, 04:47 PM
Post
#19
|
|
914 Guru Group: Retired Members Posts: 8,487 Joined: 29-December 06 From: Paso Robles Ca. (Central coast) Member No.: 7,407 Region Association: None |
QUOTE(Engman @ Oct 25 2011, 02:20 PM) QUOTE(Elliot Cannon @ Oct 24 2011, 07:59 PM) When you weld the kit in, enlarge the holes to 1/2 or 5/8. It makes for a longer stronger weld instead of a dot. Actually, there is a correct size for the hole. My earlier kits were on the small side of this. I went to several shows and different people to research the right size of hole. Too large a hole creates a heat affected zone that can cause stress cracking of the underlaying material. The holes in the current version 5 of my kit were made larger as per the shops and builders I talked with. A 1/2" hole is OK but it does mean that you are putting more heat into the long and have to take more time to weld it as you have to move the heat around, and sometime let things cool, to avoid warping the long. Mark I have a dvd done by a long time auto body guy and he suggests that you keep a compressed air blower handy and after welding 1/2 inch or so to then cool it off with the compressed air. You can keep it cooler and don't have to wait so long between welds. (IMG:style_emoticons/default/welder.gif) |
|
|
|
|
1 User(s) are reading this topic (1 Guests and 0 Anonymous Users)
0 Members:

|
Lo-Fi Version | Time is now: 11th May 2024 - 12:10 PM |
Invision Power Board
v9.1.4 © 2024 IPS, Inc.