|
|
|
Porsche, and the Porsche crest are registered trademarks of Dr. Ing. h.c. F. Porsche AG.
This site is not affiliated with Porsche in any way. Its only purpose is to provide an online forum for car enthusiasts. All other trademarks are property of their respective owners. |
|
|


| TargaToy |
 Oct 29 2011, 02:00 PM Oct 29 2011, 02:00 PM
Post
#1
|
|
-NONSOLIS RADIOS SEDIOUIS FULMINA MITTO-  Group: Members Posts: 714 Joined: 26-March 10 From: DelMarVa Peninsula Member No.: 11,509 Region Association: MidAtlantic Region |
Sorry for the crappy pics. Shot 'em fast for the sake of the question.
A member here (thanks Doug!) hooked me up with some good vent tubes/door handle recesses to replace the rotten ones in my car. 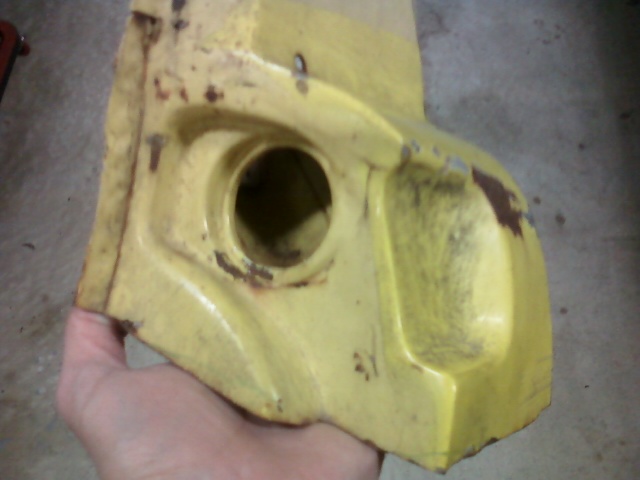 I'm cleaning them up and removing the sealer, etc. How are the oval ends of the tubes fastened to the inner ply? It appears there's an oval inside an oval (2 plys) if that makes sense. Are they spot welded together? Brazed? Friction fit? 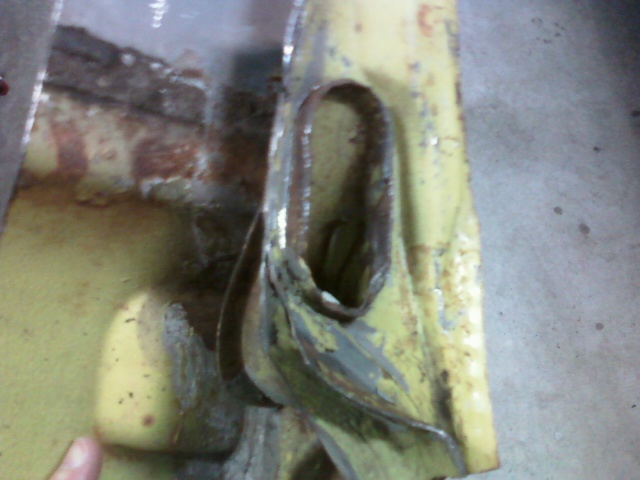 I'm trying to get the oval end of the tube out of the inner skin while keeping the round end attached to the jamb end. |
   |

 
|
Posts in this topic
 TargaToy Oval end of the door jamb vent tube... Oct 29 2011, 02:00 PM
 PanelBilly Rust Oct 29 2011, 02:11 PM rdauenhauer Friction & brazing Oct 29 2011, 02:24 PM TargaToy "Friction and brazing". So if I hit the... Oct 29 2011, 02:35 PM rdauenhauer Depends on the car & the level of focus of the... Oct 29 2011, 09:48 PM TargaToy I hit the oval lip a bit with a wire wheel and it ... Oct 30 2011, 12:01 PM JMKnight :WTF: Awful lot of work . Oct 30 2011, 12:18 PM TargaToy " :WTF: Awful lot of work ."
See my oth... Oct 30 2011, 12:25 PM nathansnathan I've got a piece just like that, now blasted. ... Oct 30 2011, 01:31 PM
PanelBilly Rust Oct 29 2011, 02:11 PM rdauenhauer Friction & brazing Oct 29 2011, 02:24 PM TargaToy "Friction and brazing". So if I hit the... Oct 29 2011, 02:35 PM rdauenhauer Depends on the car & the level of focus of the... Oct 29 2011, 09:48 PM TargaToy I hit the oval lip a bit with a wire wheel and it ... Oct 30 2011, 12:01 PM JMKnight :WTF: Awful lot of work . Oct 30 2011, 12:18 PM TargaToy " :WTF: Awful lot of work ."
See my oth... Oct 30 2011, 12:25 PM nathansnathan I've got a piece just like that, now blasted. ... Oct 30 2011, 01:31 PM
 TargaToy
I've got a piece just like that, now blasted.... Oct 30 2011, 02:32 PM sean_v8_914 be careful when welding that area. I have done a f... Oct 30 2011, 01:46 PM TargaToy
be careful when welding that area. I have done a ... Oct 30 2011, 02:35 PM partwerks I was wondering if those in the door are for the p... Oct 30 2011, 02:26 PM TargaToy
I was wondering if those in the door are for the ... Oct 30 2011, 02:34 PM dlee6204
I was wondering if those in the door are for the... Oct 30 2011, 02:51 PM partwerks ya. Like blowing in a bottle w/o a hole on the oth... Oct 30 2011, 02:57 PM nathansnathan I just took the tube out of my car. Here's the... Oct 30 2011, 03:59 PM TargaToy Thanks for nothing. Now I've got to explain t... Oct 30 2011, 07:37 PM nathansnathan The same part before may help you make your case, ... Oct 30 2011, 10:37 PM TargaToy What media did you use to clean up the donor parts... Oct 31 2011, 08:28 PM nathansnathan
What media did you use to clean up the donor part... Nov 1 2011, 05:28 AM TargaToy Dumb question but what media would be a "no-n... Nov 1 2011, 07:21 PM nathansnathan Picking out media, I found the chart at the bottom... Nov 2 2011, 07:08 AM TargaToy Man, am I glad I stopped to ask how to separate th... Nov 6 2011, 04:33 PM charliew We use sugarsand to remove rust from metal that we... Nov 7 2011, 10:43 AM TargaToy
We use sugarsand to remove rust from metal that w... Nov 8 2011, 01:41 PM SirAndy I blew through a tiny spot when blasting. Rust ha... Nov 8 2011, 02:57 PM
TargaToy
I've got a piece just like that, now blasted.... Oct 30 2011, 02:32 PM sean_v8_914 be careful when welding that area. I have done a f... Oct 30 2011, 01:46 PM TargaToy
be careful when welding that area. I have done a ... Oct 30 2011, 02:35 PM partwerks I was wondering if those in the door are for the p... Oct 30 2011, 02:26 PM TargaToy
I was wondering if those in the door are for the ... Oct 30 2011, 02:34 PM dlee6204
I was wondering if those in the door are for the... Oct 30 2011, 02:51 PM partwerks ya. Like blowing in a bottle w/o a hole on the oth... Oct 30 2011, 02:57 PM nathansnathan I just took the tube out of my car. Here's the... Oct 30 2011, 03:59 PM TargaToy Thanks for nothing. Now I've got to explain t... Oct 30 2011, 07:37 PM nathansnathan The same part before may help you make your case, ... Oct 30 2011, 10:37 PM TargaToy What media did you use to clean up the donor parts... Oct 31 2011, 08:28 PM nathansnathan
What media did you use to clean up the donor part... Nov 1 2011, 05:28 AM TargaToy Dumb question but what media would be a "no-n... Nov 1 2011, 07:21 PM nathansnathan Picking out media, I found the chart at the bottom... Nov 2 2011, 07:08 AM TargaToy Man, am I glad I stopped to ask how to separate th... Nov 6 2011, 04:33 PM charliew We use sugarsand to remove rust from metal that we... Nov 7 2011, 10:43 AM TargaToy
We use sugarsand to remove rust from metal that w... Nov 8 2011, 01:41 PM SirAndy I blew through a tiny spot when blasting. Rust ha... Nov 8 2011, 02:57 PM  |
1 User(s) are reading this topic (1 Guests and 0 Anonymous Users)
0 Members:

|
Lo-Fi Version | Time is now: 16th March 2026 - 03:06 AM |
Invision Power Board
v9.1.4 © 2026 IPS, Inc.