|
|
|
Porsche, and the Porsche crest are registered trademarks of Dr. Ing. h.c. F. Porsche AG.
This site is not affiliated with Porsche in any way. Its only purpose is to provide an online forum for car enthusiasts. All other trademarks are property of their respective owners. |
|
|


| Eric_Shea |
 Aug 17 2004, 06:29 PM Aug 17 2004, 06:29 PM
Post
#1
|
|
PMB Performance  Group: Admin Posts: 19,275 Joined: 3-September 03 From: Salt Lake City, UT Member No.: 1,110 Region Association: Rocky Mountains |
Any advice before I tackle one of the last remaining items on the six restoration?
I absolutely hate putting fuching seals and rubber on my car. (IMG:style_emoticons/default/mad.gif) Has anyone successfully put the a-pillar/top seal in without much in the way of major hassles? If so speak up now please. Silicon? A-pillars first then top? Top first then A-pillars? Thanks in advance! |
   |

 
|
  |
Replies(1 - 17)
| Gint |
Aug 17 2004, 06:34 PM
Post
#2
|
|
Mike Ginter Group: Admin Posts: 16,075 Joined: 26-December 02 From: Denver CO. Member No.: 20 Region Association: Rocky Mountains |
I have no scecrets for installing seals. I can swear with the best of 'em though. I can't wait to read the write-up!
(IMG:style_emoticons/default/lol2.gif) |
|
|
|
| Eric_Shea |
Aug 17 2004, 07:35 PM
Post
#3
|
|
PMB Performance Group: Admin Posts: 19,275 Joined: 3-September 03 From: Salt Lake City, UT Member No.: 1,110 Region Association: Rocky Mountains |
The "Write Up" will be similar to the "Master Cylinder Brake Fluid Tube" write up...
DON'T FU*&^ING DO IT! PAY SOMEONE ELSE!! I'll wait until you come this way... you can help. (IMG:style_emoticons/default/laugh.gif) Now... anyone else? |
|
|
|
| 94teener |
Aug 17 2004, 08:23 PM
Post
#4
|
|
Member Group: Members Posts: 209 Joined: 6-February 04 From: Jacksonville, FL Member No.: 1,636 |
Eric,
I replaced the big U shaped main windshield seal (along with all the other seals) in my wife's 914 a month or two back. It ain't easy but, I did learn a few things and finally got it right. After the old seal is removed, perform a complete cleaning of the virtical and horizontal seal channels. I use a 50/50 solution on dish washing liquid and water in a clean can with a small sponge to wipe down the seal channels and the seal just before each phase of the seal installation. Start by inserting the left and right uprights of the seal into the top A piller chanels. Pull down left and right sides by hand, alternately, with pushing down from the upper part of the virticals like a catipiller creeping down the A piller until the horizontal part of the seal makes contact with the top of the windshield frame. You will have to wipe down several times with the soap solution while doing this. It may become too difficult to pull and push by hand. Near the end, I had to use a vice grip on the bottom ends of the seal in order to get the job done. I didn't damage anything. When you are nearly complete with the virticals, you will be able to push the horizontal segment into its channel to seat it. This can be done by hand. Again, you will have to center the horizontal segment by pulling and pushing right to left and vise versa, again, like the catepiller. When I completed the job, about 3 hours, I had to trim off an inch or so from the bottom of the vertical segments in order to mate at the correct place with the on doors triangle seals. Phil Attached image(s) 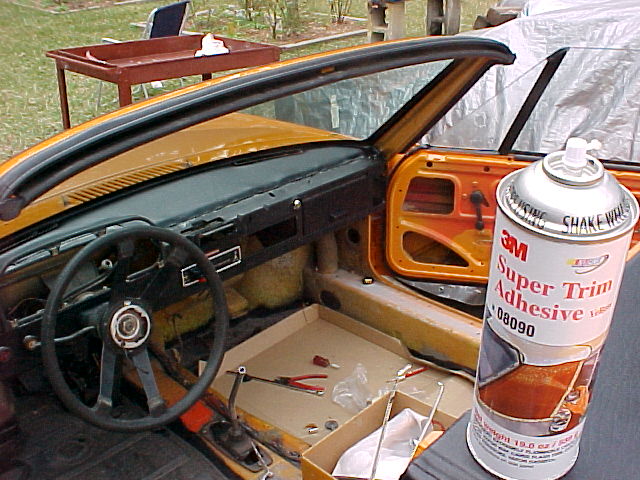
|
|
|
|
| 94teener |
Aug 17 2004, 08:27 PM
Post
#5
|
|
Member Group: Members Posts: 209 Joined: 6-February 04 From: Jacksonville, FL Member No.: 1,636 |
Another picture of the car after I installed the windshield main seal. Does't show the seal but, what the heck.
Phil Attached image(s) 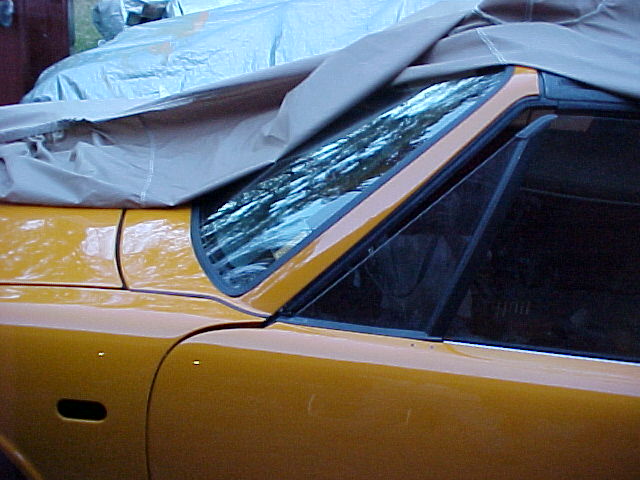
|
|
|
|
| Eric_Shea |
Aug 18 2004, 09:31 AM
Post
#6
|
|
PMB Performance Group: Admin Posts: 19,275 Joined: 3-September 03 From: Salt Lake City, UT Member No.: 1,110 Region Association: Rocky Mountains |
That's what I was looking for. Thanks Phil.
Gint... did you take notes? You can pull and I'll push! When are you coming this way? (IMG:style_emoticons/default/w00t.gif) Looks like I'm in for a fun day... (IMG:style_emoticons/default/laugh.gif) |
|
|
|
| Gint |
Aug 18 2004, 05:55 PM
Post
#7
|
|
Mike Ginter Group: Admin Posts: 16,075 Joined: 26-December 02 From: Denver CO. Member No.: 20 Region Association: Rocky Mountains |
I won't be rolling through there until I head out for German AutoFest. Save me a few... I better stop that sentence right there.
|
|
|
|
| Jenny |
Aug 18 2004, 05:59 PM
Post
#8
|
|
Advanced Member Group: Members Posts: 4,060 Joined: 6-January 03 Member No.: 96 Region Association: None |
Phil, what's that cutout for, the one on the left front fender? Too far back for the side marker...
Jen |
|
|
|
| Dman |
Aug 18 2004, 06:03 PM
Post
#9
|
|
Member Group: Members Posts: 163 Joined: 18-February 03 From: Sacramento CA Member No.: 311 |
Phil is that a modern VW side marker in the works I see in front of your door? (IMG:style_emoticons/default/drooley.gif)
I'm not sure if it deserves a drool smilie but thats way better than the front markers. Please post more pics when you get that done. |
|
|
|
| Eric_Shea |
Aug 20 2004, 05:08 PM
Post
#10
|
|
PMB Performance Group: Admin Posts: 19,275 Joined: 3-September 03 From: Salt Lake City, UT Member No.: 1,110 Region Association: Rocky Mountains |
QUOTE I can't wait to read the write-up! Here ya go Mr. Smarty-Pants... (IMG:style_emoticons/default/smash.gif) Attached thumbnail(s) 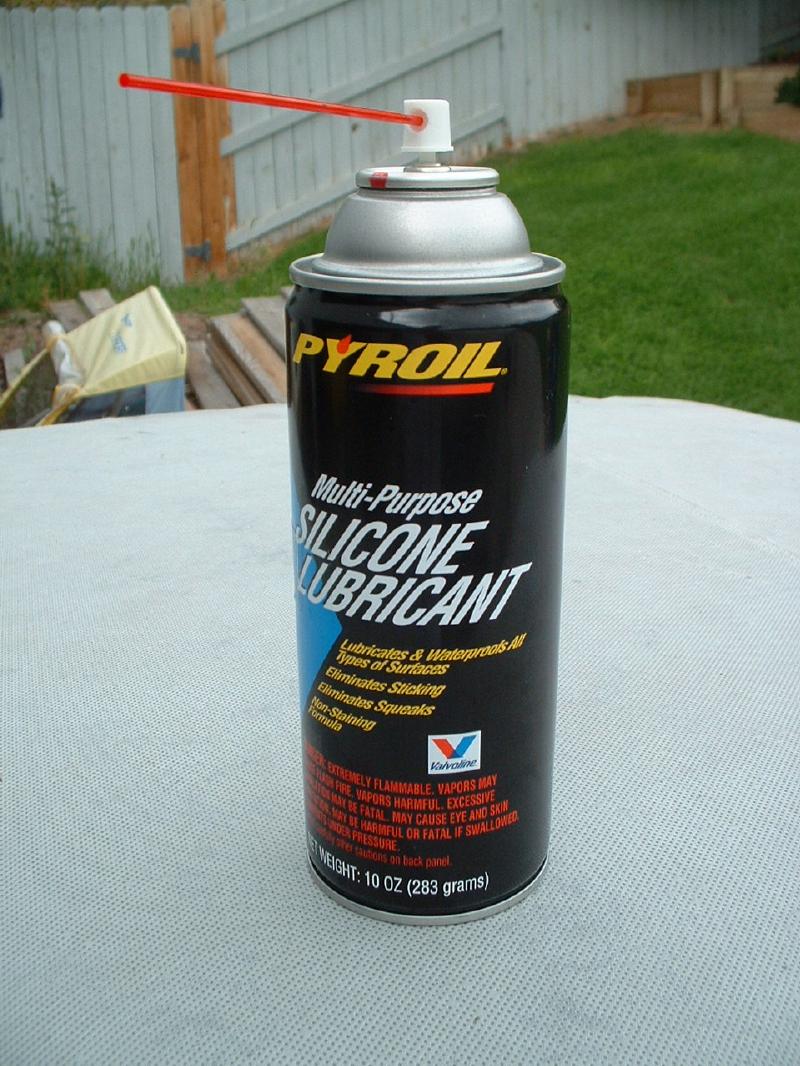
|
|
|
|
| Eric_Shea |
Aug 20 2004, 05:10 PM
Post
#11
|
|
PMB Performance Group: Admin Posts: 19,275 Joined: 3-September 03 From: Salt Lake City, UT Member No.: 1,110 Region Association: Rocky Mountains |
QUOTE Phil, what's that cutout for, the one on the left front fender? Too far back for the side marker... 007 Rocket Launcher (IMG:style_emoticons/default/ar15.gif) |
|
|
|
| Gint |
Aug 20 2004, 05:25 PM
Post
#12
|
|
Mike Ginter Group: Admin Posts: 16,075 Joined: 26-December 02 From: Denver CO. Member No.: 20 Region Association: Rocky Mountains |
What, no pics? Got that done yet?
(IMG:style_emoticons/default/thisthreadisworthlesswithoutpics.gif) |
|
|
|
| Eric_Shea |
Aug 20 2004, 05:49 PM
Post
#13
|
|
PMB Performance Group: Admin Posts: 19,275 Joined: 3-September 03 From: Salt Lake City, UT Member No.: 1,110 Region Association: Rocky Mountains |
That's it... I told ya damn it. What more do ya need? (IMG:style_emoticons/default/mad.gif)
Don't start with me Gint! (IMG:style_emoticons/default/chair.gif) Here's your picture!! (IMG:style_emoticons/default/w00t.gif) Attached image(s) 
|
|
|
|
| Gint |
Aug 20 2004, 05:59 PM
Post
#14
|
|
Mike Ginter Group: Admin Posts: 16,075 Joined: 26-December 02 From: Denver CO. Member No.: 20 Region Association: Rocky Mountains |
So, that's the only finger you got left after the seal install?
I'm off for sushi. (IMG:style_emoticons/default/penguin.gif) (IMG:style_emoticons/default/froggy.gif) |
|
|
|
| Eric_Shea |
Aug 20 2004, 06:06 PM
Post
#15
|
|
PMB Performance Group: Admin Posts: 19,275 Joined: 3-September 03 From: Salt Lake City, UT Member No.: 1,110 Region Association: Rocky Mountains |
That's my picture take'n finger. Enjoy the bait. (IMG:style_emoticons/default/smilie_pokal.gif)
|
|
|
|
| aircooledboy |
Aug 20 2004, 07:59 PM
Post
#16
|
|
Sweet Pea's 1st ride in daddy's "vroom -vroom" Group: Members Posts: 1,672 Joined: 4-February 04 From: Rockford, IL Member No.: 1,629 Region Association: Upper MidWest |
QUOTE(Eric_Shea @ Aug 20 2004, 05:08 PM) [Get a can of this shit for ANY seal install that involves tracks (top seals, side seals, a-piller seals). This should be illegal. It went in so smooth. I wasted more time typing and whining in this post than it to install the damn seals. It dries quick so either reapply or work fast. (IMG:style_emoticons/default/smash.gif) No shit, silicone huh? (IMG:style_emoticons/default/idea.gif) Who was the amazingly smart bastard who suggested that about 2 weeks ago? (IMG:style_emoticons/default/chairfall.gif) |
|
|
|
| rhodyguy |
Aug 20 2004, 08:13 PM
Post
#17
|
|
Chimp Sanctuary NW. Check it out. Group: Members Posts: 22,080 Joined: 2-March 03 From: Orion's Bell. The BELL! Member No.: 378 Region Association: Galt's Gulch |
seals (IMG:style_emoticons/default/rolleyes.gif) . go to your local drug store and buy a little bottle of glycerin. put it on the seal and the chanel. it won't evaporate like crazy. it's what is recomended to help preserve your seals also.
kevin |
|
|
|
| Eric_Shea |
Aug 20 2004, 10:43 PM
Post
#18
|
|
PMB Performance Group: Admin Posts: 19,275 Joined: 3-September 03 From: Salt Lake City, UT Member No.: 1,110 Region Association: Rocky Mountains |
QUOTE Who was the amazingly smart bastard who suggested that about 2 weeks ago? You were but I was too lazy to dig up that old post to praise your monkey ass. I kept thinking about your silly-cone reply in my top seal post and that's why I went out and got some for this jobie-doo. So... here's your praise... (IMG:style_emoticons/default/pray.gif) (IMG:style_emoticons/default/pray.gif) (IMG:style_emoticons/default/pray.gif) (IMG:style_emoticons/default/pray.gif) I (IMG:style_emoticons/default/wub.gif) you... Seriously, that is the trick, ticket, whatever! THANKS! Kevin... I'm still pissed about those white things... (IMG:style_emoticons/default/laugh.gif) |
|
|
|
|
1 User(s) are reading this topic (1 Guests and 0 Anonymous Users)
0 Members:

|
Lo-Fi Version | Time is now: 19th May 2024 - 07:03 AM |
Invision Power Board
v9.1.4 © 2024 IPS, Inc.