|
|
|
Porsche, and the Porsche crest are registered trademarks of Dr. Ing. h.c. F. Porsche AG.
This site is not affiliated with Porsche in any way. Its only purpose is to provide an online forum for car enthusiasts. All other trademarks are property of their respective owners. |
|
|

  |

| ClayPerrine |
 Oct 24 2016, 05:35 AM Oct 24 2016, 05:35 AM
Post
#8161
|
|
Life's been good to me so far.....  Group: Admin Posts: 16,545 Joined: 11-September 03 From: Hurst, TX. Member No.: 1,143 Region Association: NineFourteenerVille |
QUOTE(Mueller @ Oct 24 2016, 12:08 AM)  Busy weekend, only had a little bit of time after dinner tonight to play in the garage, so I got one stud replaced. I used left hand drill bits after milling the stud flat hoping it would loosen the stud, no luck. This works 99% of the time for me. Take an oxygen acetylene torch and weld an 8mm nut onto the remains of the stud. The heat from the welding will break the stud free from the head, allowing you to unscrew it when it cools down. |
   |

 
|
| 914fahrer |
Oct 24 2016, 09:56 AM
Post
#8162
|
|
Member Group: Members Posts: 103 Joined: 12-November 14 From: Berlin/Germany Member No.: 18,115 Region Association: Germany |
QUOTE(BigFour1973 @ Oct 24 2016, 06:50 AM) QUOTE(914fahrer @ Oct 23 2016, 07:04 AM) What was used to remove the seam sealer? I was trying a heat gun and putty knife. Got impatient and figured there was a better way. I use a heat gun and a long self made chisel (10mm) ,a little Wire Wheel Brush, and at last sand blasting. It takes a lot of time to remove this stuff. |
|
|
|
| euro911 |
Oct 24 2016, 04:47 PM
Post
#8163
|
|
Retired & living the dream. God help me if I wake up! Group: Members Posts: 8,937 Joined: 2-December 06 From: So.Cal. & No.AZ (USA) Member No.: 7,300 Region Association: Southern California |
Received some nice 914 goodies before I left town last week:
A set of custom tailored sheep skin seat covers form Jeff (Pursang) ... to keep me butt warm in the winter months (IMG:style_emoticons/default/bootyshake.gif) ... Thanks again, Jeff (IMG:style_emoticons/default/beerchug.gif) Got a new 75A alternator, trunk torsion bar tool and a set of poly front arm bushings from Frank (falconfp2001) ... and just now, saved $256. on a period correct 420mm VDM steering wheel for my 911 (IMG:style_emoticons/default/smile.gif) 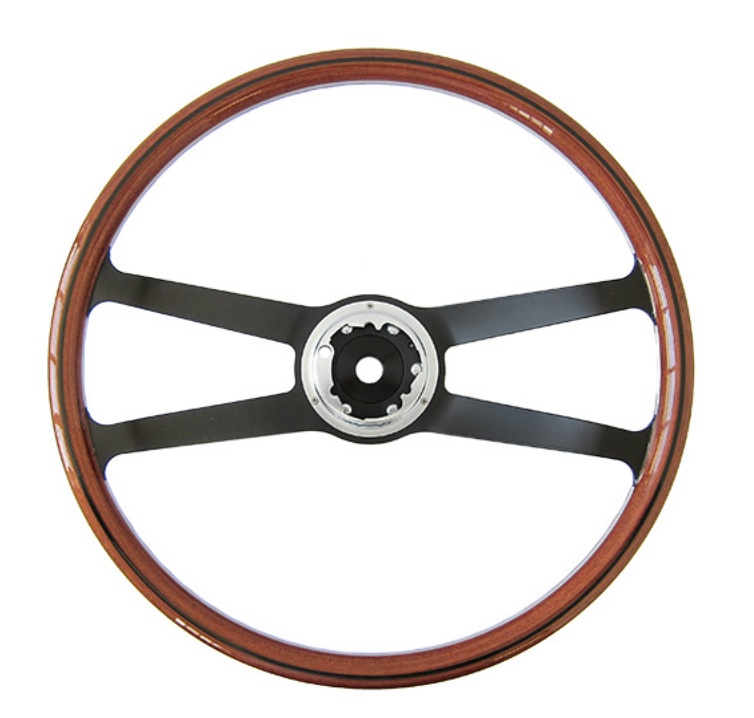 |
|
|
|
| Redraptor |
Oct 24 2016, 05:29 PM
Post
#8164
|
|
Newbie Group: Members Posts: 36 Joined: 18-October 16 From: Louisville, KY Member No.: 20,501 Region Association: MidAtlantic Region |
Pulled the gas tank out actually looks O.K. Good thing I did though the lines were rotted through. I may not even bother with resealing the tank it looks good. What do you guys think? That is all loose dirt that fell in during removal
Attached thumbnail(s) 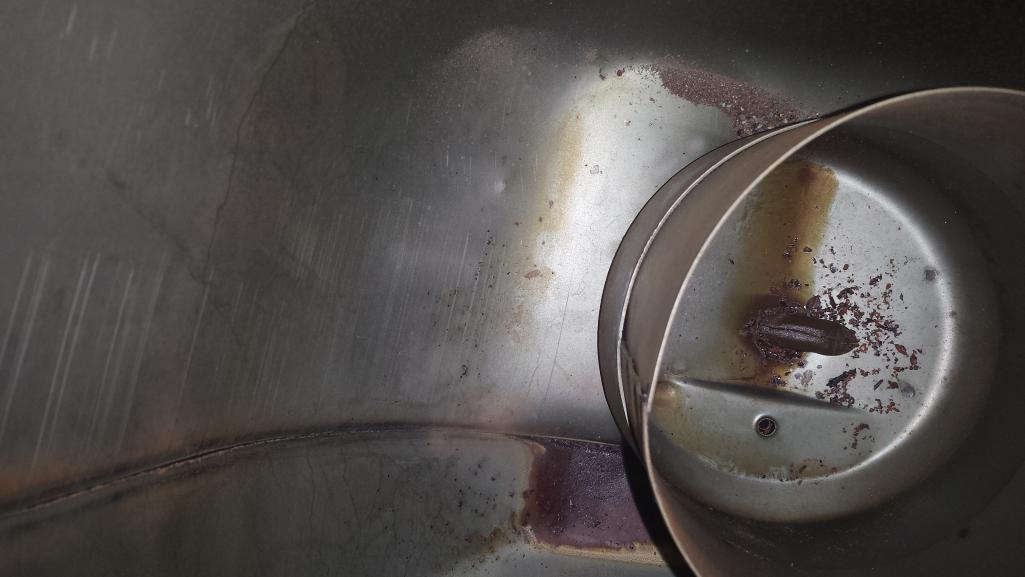
|
|
|
|
| warpig |
Oct 24 2016, 05:54 PM
Post
#8165
|
|
Member Group: Members Posts: 290 Joined: 2-August 10 From: Portland OR Member No.: 12,002 Region Association: Pacific Northwest |
No pics but, after many false starts a few things off the to do list, (IMG:style_emoticons/default/smile.gif)
Loose front BUB and valence - check Install 914 rubber tow bar - check Pull gas tank in prep for reseal and paint - check (almost) Drop 3.0 and 915 trans out of donor 911 - check (almost) (IMG:style_emoticons/default/confused24.gif) |
|
|
|
| BeatNavy |
Oct 24 2016, 06:00 PM
Post
#8166
|
|
Certified Professional Scapegoat Group: Members Posts: 2,963 Joined: 26-February 14 From: Easton, MD Member No.: 17,042 Region Association: MidAtlantic Region |
QUOTE(Redraptor @ Oct 24 2016, 07:29 PM) Pulled the gas tank out actually looks O.K. Good thing I did though the lines were rotted through. I may not even bother with resealing the tank it looks good. What do you guys think? That is all loose dirt that fell in during removal Replace that sock filter! You should also neutralize that minor rust while you can. Otherwise, looks pretty good (IMG:style_emoticons/default/smile.gif) |
|
|
|
| euro911 |
Oct 24 2016, 06:57 PM
Post
#8167
|
|
Retired & living the dream. God help me if I wake up! Group: Members Posts: 8,937 Joined: 2-December 06 From: So.Cal. & No.AZ (USA) Member No.: 7,300 Region Association: Southern California |
QUOTE(Redraptor @ Oct 24 2016, 04:29 PM) Pulled the gas tank out actually looks O.K. Good thing I did though the lines were rotted through. I may not even bother with resealing the tank it looks good. What do you guys think? That is all loose dirt that fell in during removal If you still have plastic fuel lines running through the tunnel, replace them with stainless steel ones. |
|
|
|
| mb911 |
Oct 25 2016, 01:11 PM
Post
#8168
|
|
914 Guru Group: Members Posts: 7,780 Joined: 2-January 09 From: Burlington wi Member No.: 9,892 Region Association: Upper MidWest |
Installed my version of the inner long reinforcement today.. Went well.. Pretty happy with how it stops flexing..
|
 |
|
| Mueller |
Oct 25 2016, 01:24 PM
Post
#8169
|
|
914 Freak! Group: Members Posts: 17,155 Joined: 4-January 03 From: Antioch, CA Member No.: 87 Region Association: None |
QUOTE(ClayPerrine @ Oct 24 2016, 04:35 AM) This works 99% of the time for me. Take an oxygen acetylene torch and weld an 8mm nut onto the remains of the stud. The heat from the welding will break the stud free from the head, allowing you to unscrew it when it cools down. Tried this on the other head last night, 1 out 2 so far. Nut rounded off on the second broken stud. Will try to weld another one and see what happens. |
|
|
|
| ClayPerrine |
Oct 25 2016, 01:51 PM
Post
#8170
|
|
Life's been good to me so far..... Group: Admin Posts: 16,545 Joined: 11-September 03 From: Hurst, TX. Member No.: 1,143 Region Association: NineFourteenerVille |
QUOTE(Mueller @ Oct 25 2016, 02:24 PM) QUOTE(ClayPerrine @ Oct 24 2016, 04:35 AM) This works 99% of the time for me. Take an oxygen acetylene torch and weld an 8mm nut onto the remains of the stud. The heat from the welding will break the stud free from the head, allowing you to unscrew it when it cools down. Tried this on the other head last night, 1 out 2 so far. Nut rounded off on the second broken stud. Will try to weld another one and see what happens. Before you try unscrewing it, tighten it just a fraction. It seems to help with breaking it free. If it fails, I have a jig I made to properly drill out the stud without hurting the head. |
|
|
|
| Coondog |
Oct 25 2016, 05:39 PM
Post
#8171
|
|
Advanced Member Group: Members Posts: 2,089 Joined: 24-September 15 From: Apple Valley Calif Member No.: 19,195 Region Association: Southern California |
Replaced H-4 bulbs with LEDs.........Me (IMG:style_emoticons/default/smile.gif) ....Alternator (IMG:style_emoticons/default/smile.gif) (IMG:style_emoticons/default/smile.gif) (IMG:style_emoticons/default/smile.gif)
|
|
|
|
| Racer |
Oct 25 2016, 05:54 PM
Post
#8172
|
|
Senior Member Group: Members Posts: 787 Joined: 25-August 03 From: Northern Virginia Member No.: 1,073 Region Association: MidAtlantic Region |
Late to post, but I did get my rear sway bar attached. The droplink bushings failed a while back. Even though I got the bushings in, I was struggling to get the bar reattached. Course, if I had just removed the rear wheel earlier, it would have saved me so much time and effort.. Doh!
|
|
|
|
| pbanders |
Oct 25 2016, 09:40 PM
Post
#8173
|
|
Senior Member Group: Members Posts: 990 Joined: 11-June 03 From: Scottsdale, AZ Member No.: 805 Region Association: Southwest Region |
Started working on a project I back-burnered for the last 15+ years, which is to datalog three different vacuum levels on my 2.0L D-Jetronic engine while running on the street, under real-life conditions. I plan on monitoring the manifold vacuum, vacuum advance, and vacuum retard. Each will be monitored under idle, part-load, accelerating, overrun, and full-load. I'm going to use a Fluke PV350 vacuum/pressure module, and plug it directly into my DSO Nano V3 oscilloscope. The timebase on the scope can be as slow as 10 sec/div, so I can get 100 sec of recording per screen. I can then do a screen capture and look at the data later.
Got all the hoses I needed today, as well as t-fittings. Tested out the PV350 with the DSO Nano V3 on the bench, works fine. Just need to put it into the car and run the lead from the PV350 over the targa bar into the passenger compartment. Hope to get to this sometime before Sunday. |
|
|
|
| euro911 |
Oct 25 2016, 10:44 PM
Post
#8174
|
|
Retired & living the dream. God help me if I wake up! Group: Members Posts: 8,937 Joined: 2-December 06 From: So.Cal. & No.AZ (USA) Member No.: 7,300 Region Association: Southern California |
QUOTE(pbanders @ Oct 25 2016, 08:40 PM) Started working on a project I back-burnered for the last 15+ years, which is to datalog three different vacuum levels on my 2.0L D-Jetronic engine while running on the street, under real-life conditions. I plan on monitoring the manifold vacuum, vacuum advance, and vacuum retard. Each will be monitored under idle, part-load, accelerating, overrun, and full-load. I'm going to use a Fluke PV350 vacuum/pressure module, and plug it directly into my DSO Nano V3 oscilloscope. The timebase on the scope can be as slow as 10 sec/div, so I can get 100 sec of recording per screen. I can then do a screen capture and look at the data later. What will you garner from the data, Brad? Got all the hoses I needed today, as well as t-fittings. Tested out the PV350 with the DSO Nano V3 on the bench, works fine. Just need to put it into the car and run the lead from the PV350 over the targa bar into the passenger compartment. Hope to get to this sometime before Sunday. |
|
|
|
| 914_teener |
Oct 25 2016, 10:48 PM
Post
#8175
|
|
914 Guru Group: Members Posts: 5,270 Joined: 31-August 08 From: So. Cal Member No.: 9,489 Region Association: Southern California |
QUOTE(euro911 @ Oct 25 2016, 09:44 PM) QUOTE(pbanders @ Oct 25 2016, 08:40 PM) Started working on a project I back-burnered for the last 15+ years, which is to datalog three different vacuum levels on my 2.0L D-Jetronic engine while running on the street, under real-life conditions. I plan on monitoring the manifold vacuum, vacuum advance, and vacuum retard. Each will be monitored under idle, part-load, accelerating, overrun, and full-load. I'm going to use a Fluke PV350 vacuum/pressure module, and plug it directly into my DSO Nano V3 oscilloscope. The timebase on the scope can be as slow as 10 sec/div, so I can get 100 sec of recording per screen. I can then do a screen capture and look at the data later. What will you garner from the data, Brad?Got all the hoses I needed today, as well as t-fittings. Tested out the PV350 with the DSO Nano V3 on the bench, works fine. Just need to put it into the car and run the lead from the PV350 over the targa bar into the passenger compartment. Hope to get to this sometime before Sunday. Distributors by their part number I'd quess.... Great to see you working on your car Brad. |
|
|
|
| Mueller |
Oct 26 2016, 08:43 AM
Post
#8176
|
|
914 Freak! Group: Members Posts: 17,155 Joined: 4-January 03 From: Antioch, CA Member No.: 87 Region Association: None |
QUOTE(ClayPerrine @ Oct 25 2016, 12:51 PM) Before you try unscrewing it, tighten it just a fraction. It seems to help with breaking it free. If it fails, I have a jig I made to properly drill out the stud without hurting the head. I didn't try tightening it, forgot out that trick. The stud in the picture was drilled out on my CNC mill, so unless I hit the wrong button no worries of damaging the head, thanks for the offer. |
|
|
|
| Mueller |
Oct 26 2016, 08:48 AM
Post
#8177
|
|
914 Freak! Group: Members Posts: 17,155 Joined: 4-January 03 From: Antioch, CA Member No.: 87 Region Association: None |
QUOTE(euro911 @ Oct 25 2016, 09:44 PM) QUOTE(pbanders @ Oct 25 2016, 08:40 PM) Started working on a project I back-burnered for the last 15+ years, which is to datalog three different vacuum levels on my 2.0L D-Jetronic engine while running on the street, under real-life conditions. I plan on monitoring the manifold vacuum, vacuum advance, and vacuum retard. Each will be monitored under idle, part-load, accelerating, overrun, and full-load. I'm going to use a Fluke PV350 vacuum/pressure module, and plug it directly into my DSO Nano V3 oscilloscope. The timebase on the scope can be as slow as 10 sec/div, so I can get 100 sec of recording per screen. I can then do a screen capture and look at the data later. What will you garner from the data, Brad?Got all the hoses I needed today, as well as t-fittings. Tested out the PV350 with the DSO Nano V3 on the bench, works fine. Just need to put it into the car and run the lead from the PV350 over the targa bar into the passenger compartment. Hope to get to this sometime before Sunday. Elevated to an even higher geekdom status ( in a good way!) (IMG:style_emoticons/default/pray.gif) That is a neat 'scope, might have to add that to my Christmas list of things to buy for myself. I half expected you to be using Mathlab or the like....your solution is way cheaper! |
|
|
|
| pbanders |
Oct 26 2016, 01:46 PM
Post
#8178
|
|
Senior Member Group: Members Posts: 990 Joined: 11-June 03 From: Scottsdale, AZ Member No.: 805 Region Association: Southwest Region |
QUOTE(euro911 @ Oct 25 2016, 09:44 PM) What will you garner from the data, Brad? Several things I'm looking for. I want to verify that my vacuum limiter (aka "decel valve") is working and that the vacuum is limited to the setpoint I adjusted it to. I also want to see what the typical part-load vacuum level is, so that when I'm adjusting an MPS and I want to set the part-load mixture, I am doing so at an appropriate vacuum level. I also want to monitor the operation of the vacuum advance and retard on the distributor, I'm thinking of doing some mods to the retard to limit its range. And like any time you take data, who knows what else you'll see that's interesting. |
|
|
|
| euro911 |
Oct 26 2016, 04:56 PM
Post
#8179
|
|
Retired & living the dream. God help me if I wake up! Group: Members Posts: 8,937 Joined: 2-December 06 From: So.Cal. & No.AZ (USA) Member No.: 7,300 Region Association: Southern California |
QUOTE(pbanders @ Oct 26 2016, 12:46 PM) QUOTE(euro911 @ Oct 25 2016, 09:44 PM) What will you garner from the data, Brad? Several things I'm looking for. I want to verify that my vacuum limiter (aka "decel valve") is working and that the vacuum is limited to the setpoint I adjusted it to. I also want to see what the typical part-load vacuum level is, so that when I'm adjusting an MPS and I want to set the part-load mixture, I am doing so at an appropriate vacuum level. I also want to monitor the operation of the vacuum advance and retard on the distributor, I'm thinking of doing some mods to the retard to limit its range. And like any time you take data, who knows what else you'll see that's interesting. |
|
|
|
| SKL1 |
Oct 26 2016, 06:20 PM
Post
#8180
|
|
Senior Member Group: Members Posts: 1,801 Joined: 19-February 11 From: north Scottsdale Member No.: 12,732 Region Association: Upper MidWest |
Charged the battery on the silver '71- last cars and coffee this Saturday for the IA season. Luckily have all winter for cars and coffee in AZ for the '73!
|
|
|
|
|
3 User(s) are reading this topic (3 Guests and 0 Anonymous Users)
0 Members:

|
Lo-Fi Version | Time is now: 10th June 2026 - 06:24 PM |
Invision Power Board
v9.1.4 © 2026 IPS, Inc.