|
|
|
Porsche, and the Porsche crest are registered trademarks of Dr. Ing. h.c. F. Porsche AG.
This site is not affiliated with Porsche in any way. Its only purpose is to provide an online forum for car enthusiasts. All other trademarks are property of their respective owners. |
|
|


| aircooledtechguy |
 Dec 23 2011, 07:20 PM Dec 23 2011, 07:20 PM
Post
#61
|
|
The Aircooledtech Guy  Group: Members Posts: 1,966 Joined: 8-November 08 From: Anacortes, WA Member No.: 9,730 Region Association: Pacific Northwest |
I've had a long term project going now to turn my '67 Squareback into my shop car. While I love driving my 914, it has limitations as a daily parts hauler. I love old styling with new technology and updates, so my goal is to turn my humble Square into the wagon that Porsche never made. I want it to drive and handle more like a Porsche than a VW wagon and it's got to be a true "Sleeper" (not a real problem; since it's a wagon). (IMG:style_emoticons/default/shades.gif)
(IMG:http://www.914world.com/bbs2/uploads_offsite/images.thesamba.com-9730-1324689630.1.jpg) (IMG:http://www.914world.com/bbs2/uploads_offsite/images.thesamba.com-9730-1324689631.2.jpg) This has been a 4-5 phase project. Phase-1 - Convert it to Porsche 914 2.0L motor. Make it physically adapted to the car and running MS2 w/ Ford EDIS ignition. Get it tuned to be a daily driver. DONE!! (IMG:http://www.914world.com/bbs2/uploads_offsite/images.thesamba.com-9730-1324689631.3.jpg) Phase-2 - Make the motor look good and freshen it up with new P&Cs. The heads were freshened only about 2K miles before I got it, by me when it was in a clients 914 that he converted to Subie power. I noticed that once I had a few miles on it myself, it was using a bit of oil. So I upgraded to a new set of 96mm P&Cs. So now it's a 2056. 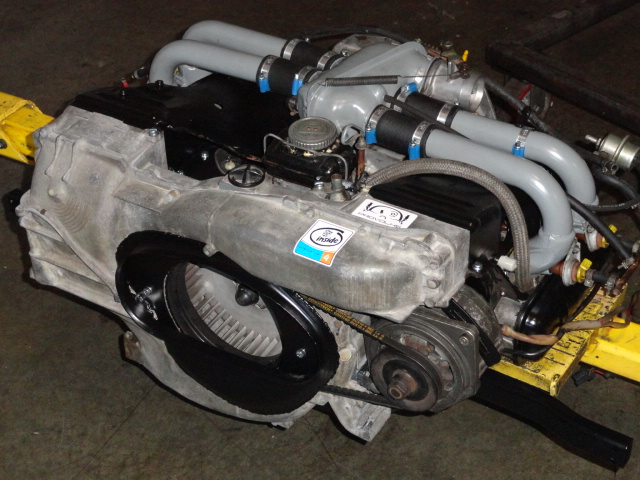 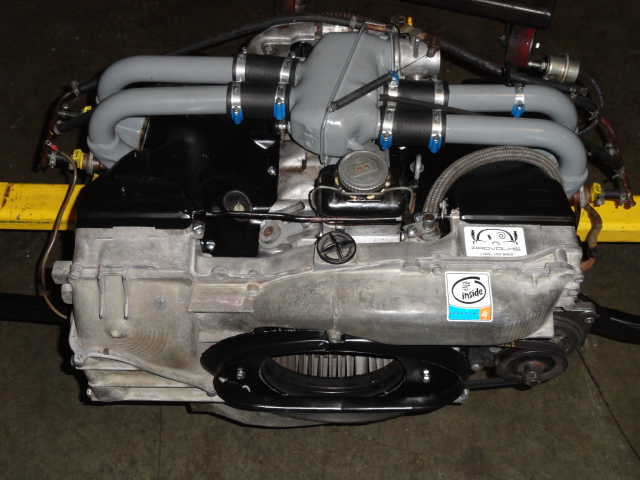 I had my local powder coater do all the tins in black and the plenum and runners in grey for a stock look. I'm running T-4 H/Es with a modified bus header and a Summit Racing Flow Master clone muffler. So I had those ceramic coated in black so they are not attention grabbers from the back. This car is a sleeper (IMG:style_emoticons/default/happy11.gif) 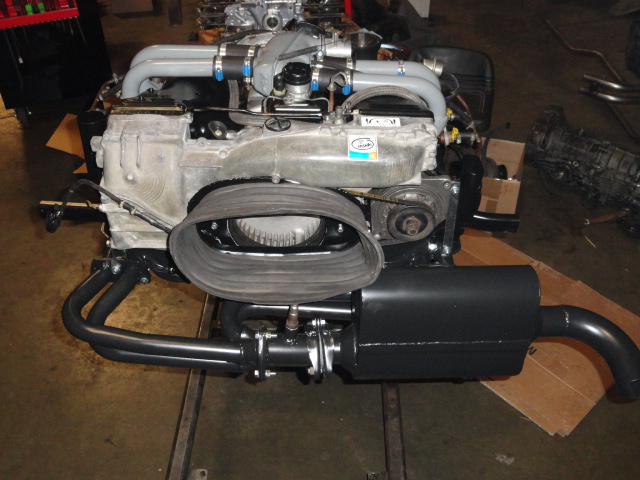 DONE!! Phase-3 - Convert the rear suspension to the later style IRS and install a Porsche 923 trans out of a Porsche 912E. The rear suspension is DONE!! While at it, I upgraded it with 914 rear brakes, urethane bushings, adjustable spring plates and a rear sway bar. (IMG:style_emoticons/default/driving.gif) (IMG:http://www.914world.com/bbs2/uploads_offsite/images.thesamba.com-9730-1324689632.4.jpg) Since the trans is taller than a stock 4-speed and cutting into the car can't happen due to rear seat issues. I gained the 1.5" I needed by spacing the body off the rear suspension with spacers. So here I sit, on the final leg of phase-3. I now need to couple the motor/trans and lift it into it's final place and fab rear engine hanger mounts for the rear bar. It's late and I'm tired. . . Phase-4 - Front suspension upgrade. Currently in-work Phase-5 - Paint so it doesn't look so crappy, though it does add to the "sleeper" persona. . . Stay tuned for more later. . . |
   |

 
|
Posts in this topic
aircooledtechguy OT: Working on my shop car Dec 23 2011, 07:20 PM BajaXJ92 :drooley:
Let me know if you ever want to sell i... Dec 23 2011, 07:30 PM JRust Looks like a cool project! Can't wait to s... Dec 23 2011, 07:47 PM NORD Very Cool
Now Zebra paint job almost there
The M... Dec 23 2011, 07:48 PM Krieger I dig this car! You have to keep us posted. Dec 23 2011, 07:56 PM Tom_T I've always loved those Squarebacks! Seve... Dec 23 2011, 08:45 PM phillstek Looks great and can't wait to see it done (whi... Dec 23 2011, 10:09 PM rdauenhauer :smash: :welder: :sawzall: :trophy: Dec 23 2011, 10:56 PM swood subscribed! looking forward to the "how-t... Dec 23 2011, 11:03 PM 9146986 Very cool project! That's one of my favor... Dec 23 2011, 11:33 PM mrbubblehead too cool. ive never had a type 3. is it i window w... Dec 24 2011, 12:48 AM orange914 5 speed for freeway delivery... cool! Dec 24 2011, 01:24 AM aircooledtechguy Made good progress today. Joined the motor and tr... Dec 24 2011, 05:01 PM
BajaXJ92 :drooley:
Let me know if you ever want to sell i... Dec 23 2011, 07:30 PM JRust Looks like a cool project! Can't wait to s... Dec 23 2011, 07:47 PM NORD Very Cool
Now Zebra paint job almost there
The M... Dec 23 2011, 07:48 PM Krieger I dig this car! You have to keep us posted. Dec 23 2011, 07:56 PM Tom_T I've always loved those Squarebacks! Seve... Dec 23 2011, 08:45 PM phillstek Looks great and can't wait to see it done (whi... Dec 23 2011, 10:09 PM rdauenhauer :smash: :welder: :sawzall: :trophy: Dec 23 2011, 10:56 PM swood subscribed! looking forward to the "how-t... Dec 23 2011, 11:03 PM 9146986 Very cool project! That's one of my favor... Dec 23 2011, 11:33 PM mrbubblehead too cool. ive never had a type 3. is it i window w... Dec 24 2011, 12:48 AM orange914 5 speed for freeway delivery... cool! Dec 24 2011, 01:24 AM aircooledtechguy Made good progress today. Joined the motor and tr... Dec 24 2011, 05:01 PM 3d914
http://www.914world.com/bbs2/uploads_offsite/ima... Dec 24 2011, 05:12 PM
3d914
http://www.914world.com/bbs2/uploads_offsite/ima... Dec 24 2011, 05:12 PM smontanaro
- The clutch cable. The stock one is about a foo... Dec 25 2011, 08:51 AM Jakeodoule Very nice work Nate! Dec 24 2011, 05:20 PM Dr Evil WANT!
Mix that with rootwerks lifted monster ... Dec 24 2011, 05:34 PM Root_Werks
WANT!
Mix that with rootwerks lifted monster... Jan 12 2012, 10:29 AM Dr Evil Ya know, I see things like this and I want to move... Dec 24 2011, 05:36 PM rick 918-S Nice project! Dec 24 2011, 05:36 PM aircooledtechguy Thanks for the kind words guys. I've had this... Dec 24 2011, 08:36 PM Prospectfarms
...The H/Es are from a VW 411/412. They are a v... Feb 14 2012, 08:37 AM Vacca Rabite The T3 Wagons were my favorites of the aircooled V... Dec 24 2011, 08:58 PM Jacob Great build! thanks for posting! :popcorn... Dec 24 2011, 09:40 PM PanelBilly How about spraying the interior with a bed liner. ... Dec 24 2011, 09:53 PM Series9 :first:
I love it. My first car was a Fastbac... Dec 25 2011, 09:01 AM barada Awesome build. I bet some hand drawn logos on it w... Dec 25 2011, 11:38 AM rgalla9146
Awesome build. I bet some hand drawn logos on it ... Dec 25 2011, 12:13 PM aircooledtechguy
[ Trans looks like a 915 ... why 923 ? Great ide... Dec 25 2011, 02:03 PM aircooledtechguy Made some progress this afternoon. Fabbed-up a cu... Jan 11 2012, 09:36 PM plymouth37 Great project! I have always loved these, nice... Jan 12 2012, 08:51 AM PeeGreen 914 This is a very cool SB. I've always liked them... Jan 12 2012, 11:08 AM aircooledtechguy Pulled the motor and trans out to get the last pie... Jan 14 2012, 04:56 PM aircooledtechguy I worked on the shift-shaft and coupling for the P... Jan 17 2012, 12:02 PM ChrisNPDrider sweet :beer2: Jan 17 2012, 03:34 PM rdauenhauer If the starter is in that close proximity to the h... Jan 17 2012, 08:46 PM aircooledtechguy
If the starter is in that close proximity to the ... Jan 18 2012, 02:00 PM smontanaro It shouldn't be a problem since the 411/412 ca... Jan 18 2012, 03:21 PM majkos Great thread!
My first car was a '69 Squa... Jan 18 2012, 08:13 PM zymurgist
Great thread!
My first car was a '69 Squ... Jan 19 2012, 05:01 PM rhodyguy very cool nate. did you have to mount the fresh ai... Jan 19 2012, 01:14 PM aircooledtechguy Awaiting parts on a bunch of stuff, due to all the... Jan 19 2012, 04:35 PM ottox914 Just checked this out- awesome project- keep the p... Jan 19 2012, 05:14 PM aircooledtechguy Saturday I made some progress on the BA4 heater in... Jan 22 2012, 11:09 PM aircooledtechguy A few days ago I got my custom clutch cable from t... Feb 16 2012, 11:17 PM Root_Werks Dang Nate, you are an animal! Keep up the gre... Feb 17 2012, 12:45 PM strawman Been watching this thread closely, as I've alw... Feb 18 2012, 10:51 PM arkitect
Been watching this thread closely, as I've al... Feb 18 2012, 11:39 PM aircooledtechguy Congrats on the new project Geoff!! That... Feb 20 2012, 06:30 PM Bleyseng Great project and good to see how you modernized i... Feb 21 2012, 05:10 AM aircooledtechguy So over the past several weekends I have been work... Feb 29 2012, 12:45 PM Irish914 great project looks like lots of fun :Qarl: Feb 29 2012, 02:46 PM veltror I do like this... Feb 29 2012, 02:54 PM Prospectfarms Fascinating, but the difficulty of fabricating the... Mar 1 2012, 12:31 AM aircooledtechguy Been spending my Saturdays of late, wrapping up al... Mar 20 2012, 12:00 AM rhodyguy heat exchangers, gas fired heater, heated seats...... Mar 20 2012, 10:36 AM aircooledtechguy
heat exchangers, gas fired heater, heated seats..... Mar 20 2012, 01:21 PM aircooledtechguy Been sewing up details on the shop-car over the pa... Apr 16 2012, 06:38 PM aircooledtechguy So I've logged about 60 miles on the Square si... Apr 19 2012, 10:08 PM kg6dxn I run one of those hydraulic brakes. It will loose... Apr 19 2012, 10:26 PM aircooledtechguy As I log more and more miles onto my shop car, I h... Jun 20 2012, 02:55 PM Jamie Dangit, the guy can even make a custom fuel tank... Jun 20 2012, 08:00 PM Jakeodoule Nice work Nate! really cool ride! Jun 20 2012, 09:15 PM aircooledtechguy Thanks for the kind words guys; it's been a re... Jul 9 2012, 04:37 PM Mr.242 ARE you fricken kidding me? Nate...you've be... Jul 9 2012, 09:07 PM aircooledtechguy I finally got the chance to install the new seats.... Jul 11 2012, 06:08 PM rdauenhauer :headbanger: Jul 12 2012, 08:39 AM Tom Nice work Nate. What a cool shop car! Would p... Jul 12 2012, 08:53 AM aircooledtechguy
Would putting baffles in the tank help with weigh... Jul 12 2012, 04:01 PM OU8AVW Awesome! Simply Awesome! Jul 12 2012, 09:12 AM aircooledtechguy The Porsche fornication continues. . . :evilgrin:... Aug 9 2012, 08:23 PM aircooledtechguy I finally got a chance to really put the "Squ... Aug 31 2012, 12:22 AM FourBlades This is such a great thread.
You've got some ... Aug 31 2012, 06:19 AM NORD I'm glad you all got to see I let Nate by me. ... Aug 31 2012, 04:26 PM aircooledtechguy
Nate was lieing about the speeds
we were going ... Aug 31 2012, 09:11 PM speed metal army I love this thing! Buddy of mine is scooping a... Aug 31 2012, 10:10 PM aircooledtechguy
Question!
Why the heck did you weld up the ta... Aug 31 2012, 11:19 PM speed metal army
Question!
Why the heck did you weld up the t... Aug 31 2012, 11:37 PM aircooledtechguy Here's the 2nd leg from the ski lodge down abo... Sep 1 2012, 08:42 AM aircooledtechguy The relentless quest for more power and speed cont... Sep 19 2012, 10:04 AM Cap'n Krusty Having had a bad experience with hydraulic hand br... Sep 19 2012, 10:44 AM aircooledtechguy One thing that consistently bugs me about ALL A/C ... Sep 27 2012, 09:05 AM Vacca Rabite
...Porsche 911 Nikasil-coated Aluminum cylinders.... Apr 3 2013, 12:22 PM aircooledtechguy
I was thinking about this today.
Wouldn't th... Apr 3 2013, 03:18 PM aircooledtechguy I finally got the opportunity to make a mount for ... Nov 26 2012, 01:47 PM JRust Nice! Love heated seats in the good old PNW. E... Nov 26 2012, 02:41 PM ChrisNPDrider OMG I want cup holders like those! :beer2: Nov 26 2012, 03:34 PM aircooledtechguy Big changes coming to the ProVolks shop car. . .
... Mar 4 2013, 10:52 PM aircooledtechguy Friday, a friend of mine came by the shop to help ... Mar 19 2013, 06:18 PM Vacca Rabite Badassed! Mar 19 2013, 07:14 PM Kirmizi :popcorn: Mar 19 2013, 09:26 PM RickS This is good stuff! Mar 19 2013, 10:43 PM audio_file I'm such a sucker for (all) wagons, love it... Mar 20 2013, 06:38 AM rdauenhauer Break out the Teener front end! Mar 20 2013, 08:22 PM aircooledtechguy
Break out the Teener front end!
Patients Ri... Mar 20 2013, 10:14 PM aircooledtechguy Am I missing something here????? :shock: The ... Apr 3 2013, 11:55 AM aircooledtechguy Made a fair bit of progress today. Made the box-i... Apr 4 2013, 07:24 PM aircooledtechguy I finally got the Porsche front mounts that I cut ... Apr 9 2013, 10:46 AM aircooledtechguy Made a ton of progress this Saturday. Here are th... Apr 29 2013, 09:03 AM Dr Evil Dibs if you ever sell this :) Apr 29 2013, 04:06 PM
smontanaro
- The clutch cable. The stock one is about a foo... Dec 25 2011, 08:51 AM Jakeodoule Very nice work Nate! Dec 24 2011, 05:20 PM Dr Evil WANT!
Mix that with rootwerks lifted monster ... Dec 24 2011, 05:34 PM Root_Werks
WANT!
Mix that with rootwerks lifted monster... Jan 12 2012, 10:29 AM Dr Evil Ya know, I see things like this and I want to move... Dec 24 2011, 05:36 PM rick 918-S Nice project! Dec 24 2011, 05:36 PM aircooledtechguy Thanks for the kind words guys. I've had this... Dec 24 2011, 08:36 PM Prospectfarms
...The H/Es are from a VW 411/412. They are a v... Feb 14 2012, 08:37 AM Vacca Rabite The T3 Wagons were my favorites of the aircooled V... Dec 24 2011, 08:58 PM Jacob Great build! thanks for posting! :popcorn... Dec 24 2011, 09:40 PM PanelBilly How about spraying the interior with a bed liner. ... Dec 24 2011, 09:53 PM Series9 :first:
I love it. My first car was a Fastbac... Dec 25 2011, 09:01 AM barada Awesome build. I bet some hand drawn logos on it w... Dec 25 2011, 11:38 AM rgalla9146
Awesome build. I bet some hand drawn logos on it ... Dec 25 2011, 12:13 PM aircooledtechguy
[ Trans looks like a 915 ... why 923 ? Great ide... Dec 25 2011, 02:03 PM aircooledtechguy Made some progress this afternoon. Fabbed-up a cu... Jan 11 2012, 09:36 PM plymouth37 Great project! I have always loved these, nice... Jan 12 2012, 08:51 AM PeeGreen 914 This is a very cool SB. I've always liked them... Jan 12 2012, 11:08 AM aircooledtechguy Pulled the motor and trans out to get the last pie... Jan 14 2012, 04:56 PM aircooledtechguy I worked on the shift-shaft and coupling for the P... Jan 17 2012, 12:02 PM ChrisNPDrider sweet :beer2: Jan 17 2012, 03:34 PM rdauenhauer If the starter is in that close proximity to the h... Jan 17 2012, 08:46 PM aircooledtechguy
If the starter is in that close proximity to the ... Jan 18 2012, 02:00 PM smontanaro It shouldn't be a problem since the 411/412 ca... Jan 18 2012, 03:21 PM majkos Great thread!
My first car was a '69 Squa... Jan 18 2012, 08:13 PM zymurgist
Great thread!
My first car was a '69 Squ... Jan 19 2012, 05:01 PM rhodyguy very cool nate. did you have to mount the fresh ai... Jan 19 2012, 01:14 PM aircooledtechguy Awaiting parts on a bunch of stuff, due to all the... Jan 19 2012, 04:35 PM ottox914 Just checked this out- awesome project- keep the p... Jan 19 2012, 05:14 PM aircooledtechguy Saturday I made some progress on the BA4 heater in... Jan 22 2012, 11:09 PM aircooledtechguy A few days ago I got my custom clutch cable from t... Feb 16 2012, 11:17 PM Root_Werks Dang Nate, you are an animal! Keep up the gre... Feb 17 2012, 12:45 PM strawman Been watching this thread closely, as I've alw... Feb 18 2012, 10:51 PM arkitect
Been watching this thread closely, as I've al... Feb 18 2012, 11:39 PM aircooledtechguy Congrats on the new project Geoff!! That... Feb 20 2012, 06:30 PM Bleyseng Great project and good to see how you modernized i... Feb 21 2012, 05:10 AM aircooledtechguy So over the past several weekends I have been work... Feb 29 2012, 12:45 PM Irish914 great project looks like lots of fun :Qarl: Feb 29 2012, 02:46 PM veltror I do like this... Feb 29 2012, 02:54 PM Prospectfarms Fascinating, but the difficulty of fabricating the... Mar 1 2012, 12:31 AM aircooledtechguy Been spending my Saturdays of late, wrapping up al... Mar 20 2012, 12:00 AM rhodyguy heat exchangers, gas fired heater, heated seats...... Mar 20 2012, 10:36 AM aircooledtechguy
heat exchangers, gas fired heater, heated seats..... Mar 20 2012, 01:21 PM aircooledtechguy Been sewing up details on the shop-car over the pa... Apr 16 2012, 06:38 PM aircooledtechguy So I've logged about 60 miles on the Square si... Apr 19 2012, 10:08 PM kg6dxn I run one of those hydraulic brakes. It will loose... Apr 19 2012, 10:26 PM aircooledtechguy As I log more and more miles onto my shop car, I h... Jun 20 2012, 02:55 PM Jamie Dangit, the guy can even make a custom fuel tank... Jun 20 2012, 08:00 PM Jakeodoule Nice work Nate! really cool ride! Jun 20 2012, 09:15 PM aircooledtechguy Thanks for the kind words guys; it's been a re... Jul 9 2012, 04:37 PM Mr.242 ARE you fricken kidding me? Nate...you've be... Jul 9 2012, 09:07 PM aircooledtechguy I finally got the chance to install the new seats.... Jul 11 2012, 06:08 PM rdauenhauer :headbanger: Jul 12 2012, 08:39 AM Tom Nice work Nate. What a cool shop car! Would p... Jul 12 2012, 08:53 AM aircooledtechguy
Would putting baffles in the tank help with weigh... Jul 12 2012, 04:01 PM OU8AVW Awesome! Simply Awesome! Jul 12 2012, 09:12 AM aircooledtechguy The Porsche fornication continues. . . :evilgrin:... Aug 9 2012, 08:23 PM aircooledtechguy I finally got a chance to really put the "Squ... Aug 31 2012, 12:22 AM FourBlades This is such a great thread.
You've got some ... Aug 31 2012, 06:19 AM NORD I'm glad you all got to see I let Nate by me. ... Aug 31 2012, 04:26 PM aircooledtechguy
Nate was lieing about the speeds
we were going ... Aug 31 2012, 09:11 PM speed metal army I love this thing! Buddy of mine is scooping a... Aug 31 2012, 10:10 PM aircooledtechguy
Question!
Why the heck did you weld up the ta... Aug 31 2012, 11:19 PM speed metal army
Question!
Why the heck did you weld up the t... Aug 31 2012, 11:37 PM aircooledtechguy Here's the 2nd leg from the ski lodge down abo... Sep 1 2012, 08:42 AM aircooledtechguy The relentless quest for more power and speed cont... Sep 19 2012, 10:04 AM Cap'n Krusty Having had a bad experience with hydraulic hand br... Sep 19 2012, 10:44 AM aircooledtechguy One thing that consistently bugs me about ALL A/C ... Sep 27 2012, 09:05 AM Vacca Rabite
...Porsche 911 Nikasil-coated Aluminum cylinders.... Apr 3 2013, 12:22 PM aircooledtechguy
I was thinking about this today.
Wouldn't th... Apr 3 2013, 03:18 PM aircooledtechguy I finally got the opportunity to make a mount for ... Nov 26 2012, 01:47 PM JRust Nice! Love heated seats in the good old PNW. E... Nov 26 2012, 02:41 PM ChrisNPDrider OMG I want cup holders like those! :beer2: Nov 26 2012, 03:34 PM aircooledtechguy Big changes coming to the ProVolks shop car. . .
... Mar 4 2013, 10:52 PM aircooledtechguy Friday, a friend of mine came by the shop to help ... Mar 19 2013, 06:18 PM Vacca Rabite Badassed! Mar 19 2013, 07:14 PM Kirmizi :popcorn: Mar 19 2013, 09:26 PM RickS This is good stuff! Mar 19 2013, 10:43 PM audio_file I'm such a sucker for (all) wagons, love it... Mar 20 2013, 06:38 AM rdauenhauer Break out the Teener front end! Mar 20 2013, 08:22 PM aircooledtechguy
Break out the Teener front end!
Patients Ri... Mar 20 2013, 10:14 PM aircooledtechguy Am I missing something here????? :shock: The ... Apr 3 2013, 11:55 AM aircooledtechguy Made a fair bit of progress today. Made the box-i... Apr 4 2013, 07:24 PM aircooledtechguy I finally got the Porsche front mounts that I cut ... Apr 9 2013, 10:46 AM aircooledtechguy Made a ton of progress this Saturday. Here are th... Apr 29 2013, 09:03 AM Dr Evil Dibs if you ever sell this :) Apr 29 2013, 04:06 PM  |
1 User(s) are reading this topic (1 Guests and 0 Anonymous Users)
0 Members:

|
Lo-Fi Version | Time is now: 25th July 2026 - 03:47 AM |
Invision Power Board
v9.1.4 © 2026 IPS, Inc.