|
|
|
Porsche, and the Porsche crest are registered trademarks of Dr. Ing. h.c. F. Porsche AG.
This site is not affiliated with Porsche in any way. Its only purpose is to provide an online forum for car enthusiasts. All other trademarks are property of their respective owners. |
|
|

  |

| mikea100 |
 Jan 8 2012, 08:52 PM Jan 8 2012, 08:52 PM
Post
#1
|
|
Member  Group: Members Posts: 180 Joined: 28-December 09 From: Edison, NJ Member No.: 11,182 Region Association: North East States |
While replacing the fuel lines and installing sway bar I noticed that boxes in the gas tank area are filled with dirt and leafs (IMG:style_emoticons/default/stromberg.gif) (IMG:style_emoticons/default/barf.gif) . I'd like to clean up and rust proof that area once and for all. What is the purpose of those boxes, how critical are they structurally, has anybody removed them? Normally, I wouldn't think twice, cut the metal, clean the area and weld it back. However, in this case, it will be very uncomfortable to weld bending over the fender and looking upside down. What are my options? Can I devise some kind of bracketry to replace those boxes? Any ideas are greatly appreciated.
Thanks, Mike Attached image(s)  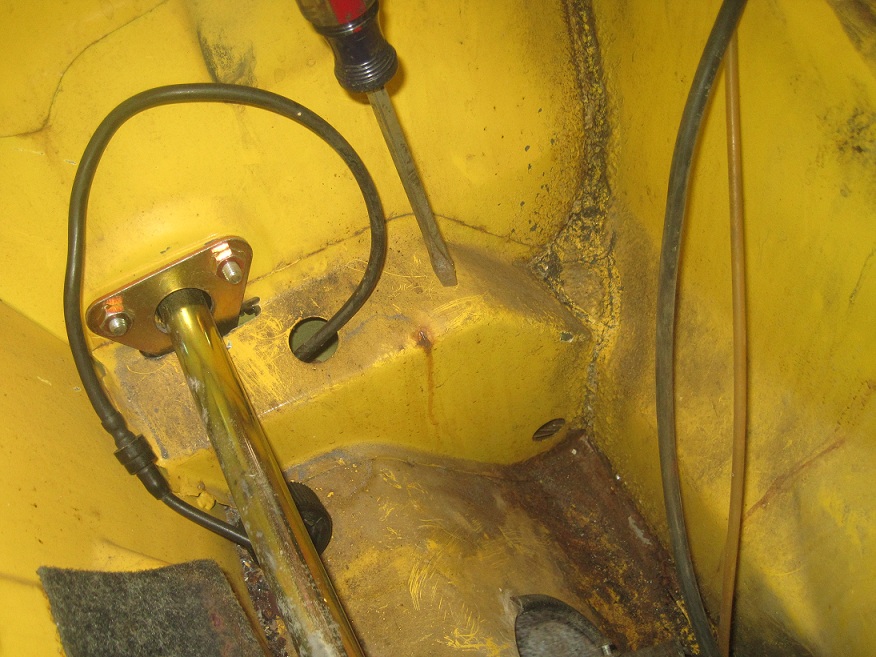
|
   |

 
|
| kconway |
Jan 8 2012, 10:05 PM
Post
#2
|
|
Senior Member Group: Members Posts: 1,347 Joined: 6-December 04 From: Monrovia, CA Member No.: 3,231 Region Association: Southern California |
Torque box?
|
|
|
|
| rick 918-S |
Jan 8 2012, 10:17 PM
Post
#3
|
|
Hey nice rack! -Celette Group: Members Posts: 20,460 Joined: 30-December 02 From: Now in Superior WI Member No.: 43 Region Association: Northstar Region |
That is actually the unitbody chassis rail. It's a structual member.
|
|
|
|
| EdwardBlume |
Jan 8 2012, 10:28 PM
Post
#4
|
|
914 Wizard Group: Members Posts: 12,338 Joined: 2-January 03 From: SLO Member No.: 81 Region Association: Central California |
QUOTE(rick 918-S @ Jan 8 2012, 08:17 PM)  That is actually the unitbody chassis rail. It's a structual member. (IMG:style_emoticons/default/type.gif) (IMG:style_emoticons/default/type.gif) (IMG:style_emoticons/default/type.gif) To quote the founder of Faber College "Knowledge is good". |
|
|
|
| mikea100 |
Jan 8 2012, 10:54 PM
Post
#5
|
|
Member Group: Members Posts: 180 Joined: 28-December 09 From: Edison, NJ Member No.: 11,182 Region Association: North East States |
Thank you, Rick. I'm thinking of cutting it and welding tick angle steel on its place. My second option is to cut access panel, do the work and weld it back or make a cover plate just like front/rear tunnel.
|
|
|
|
| SirAndy |
Jan 9 2012, 12:21 AM
Post
#6
|
|
Resident German Group: Admin Posts: 41,641 Joined: 21-January 03 From: Oakland, Kalifornia Member No.: 179 Region Association: Northern California |
Seems like a lot of work for something that doesn't look bad at all from your pics.
I just gave mine a good cleaning with a shop-vac, doused it in Metal-Ready and moved on. (IMG:style_emoticons/default/popcorn[1].gif) |
|
|
|
| Gint |
Jan 9 2012, 06:43 AM
Post
#7
|
|
Mike Ginter Group: Admin Posts: 16,075 Joined: 26-December 02 From: Denver CO. Member No.: 20 Region Association: Rocky Mountains |
(IMG:style_emoticons/default/agree.gif) Seems completely unnecessary to me.
|
|
|
|
| TheCabinetmaker |
Jan 9 2012, 07:48 AM
Post
#8
|
|
I drive my car everyday Group: Members Posts: 8,300 Joined: 8-May 03 From: Tulsa, Ok. Member No.: 666 |
I gotta agree with Andy and Gint. Lot of work for dirt and leaf removal. 120 psi air in one hole oughta blow everything out the other hole.
|
|
|
|
| mikea100 |
Jan 9 2012, 08:21 AM
Post
#9
|
|
Member Group: Members Posts: 180 Joined: 28-December 09 From: Edison, NJ Member No.: 11,182 Region Association: North East States |
Thank you, guys for solid advice. You're right, that metal is in really good shape and it would be a shame to butcher it. I'll just blow out and vacuum as much crap as I can and leave it alone.
|
|
|
|
| rick 918-S |
Jan 9 2012, 08:55 AM
Post
#10
|
|
Hey nice rack! -Celette Group: Members Posts: 20,460 Joined: 30-December 02 From: Now in Superior WI Member No.: 43 Region Association: Northstar Region |
If your compelled to try to prevent any long term rust damage to the inside of the rail use a high pressure sprayer and blast the crap out of it. Use a blow gun with compressed air and blast it again. Once you know its dry (maybe with the aid of a heat gun) go to your local autobody supply store, get some brand of metal conditioner/rust converter and use rag swabs on the end of a twisted wire to wash what you can through the holes in the rail. Once you have completed the conversion as outlined on the instructions on the container or what ever brand product you used, break out the POR 15 and use the swab method to coat whatever exposed rust you can get to through the holes. Your autobody supply store should sell the swabs on a wire. you will need about a half dozen to finish the job. A 1/4" drain hole at the lowest point of the under body pan may help and water, rust converter and POR15 drain out.
|
|
|
|
| windforfun |
Jan 9 2012, 08:58 AM
Post
#11
|
|
Senior Member Group: Members Posts: 1,789 Joined: 17-December 07 From: Blackhawk, CA Member No.: 8,476 Region Association: None |
I have a modified nozzle for my vacuum cleaner. It has a 3/4" dia. hose on it that fits into tight places like those that you're showing. It works great, but after about 15 min.s or so the vacuum cleaner overheats & temporarily shuts off. FYI. Whatever.
|
|
|
|
| ChrisFoley |
Jan 9 2012, 09:19 AM
Post
#12
|
|
I am Tangerine Racing Group: Members Posts: 7,925 Joined: 29-January 03 From: Bolton, CT Member No.: 209 Region Association: None |
I recommend welding those anti-sway bar brackets in place.
To do it right requires opening up the box so you can weld all the way around the bottom of the triangular plate. If you don't weld them securely, the inner fender will eventually spider-crack around the bolt holes. |
|
|
|
| pcar916 |
Jan 9 2012, 10:01 AM
Post
#13
|
|
Is that a Lola? Group: Members Posts: 1,523 Joined: 2-June 05 From: Little Rock, AR Member No.: 4,188 Region Association: None |
QUOTE(Racer Chris @ Jan 9 2012, 09:19 AM) I recommend welding those anti-sway bar brackets in place. Ditto. Doing it before they crack is the ticket. Mine cracked around the sway bar boss... all the way around it, but only on the right side. It wasn't hard to weld but took more time than if I'd anticipated it. You can schedule PM. |
|
|
|
| mikea100 |
Jan 9 2012, 11:17 AM
Post
#14
|
|
Member Group: Members Posts: 180 Joined: 28-December 09 From: Edison, NJ Member No.: 11,182 Region Association: North East States |
QUOTE(Racer Chris @ Jan 9 2012, 10:19 AM) I recommend welding those anti-sway bar brackets in place. To do it right requires opening up the box so you can weld all the way around the bottom of the triangular plate. If you don't weld them securely, the inner fender will eventually spider-crack around the bolt holes. Excellent point, Chris, Thank you. I will open it up and weld in the sway bar plate. But can I leave it open or I must close it. If I have to close it, can I just make a cover plate or I have to weld it closed? I will cut along red lines. Attached image(s) 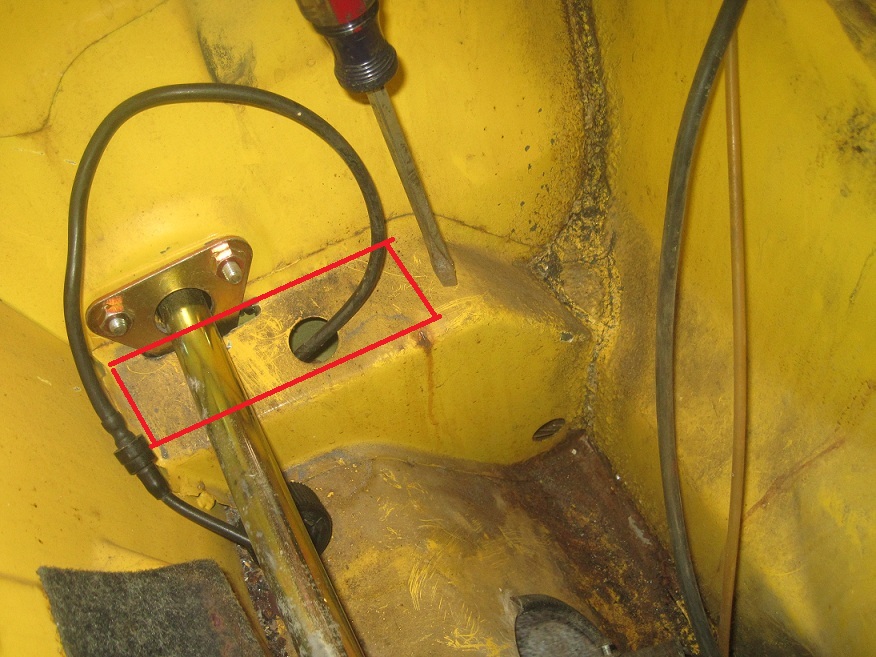
|
|
|
|
| sean_v8_914 |
Jan 9 2012, 11:23 AM
Post
#15
|
|
Chingon 601 Group: Members Posts: 4,011 Joined: 1-February 05 From: San Diego Member No.: 3,541 |
the factory welded those plates on the outside and didnt cut into the frame rail
|
|
|
|
| Dave_Darling |
Jan 9 2012, 11:42 AM
Post
#16
|
|
914 Idiot Group: Members Posts: 14,986 Joined: 9-January 03 From: Silicon Valley / Kailua-Kona Member No.: 121 Region Association: Northern California |
On my car, the stock sway bar mounting was just three nuts welded to the sheet-metal of the fender. Or at least that was how it looked. One of the welds failed while I was removing the bar, so I used a plain nut in place of the weld-nut. Fortunately, it was one of the upper ones that failed.
--DD |
|
|
|
| ChrisFoley |
Jan 9 2012, 02:40 PM
Post
#17
|
|
I am Tangerine Racing Group: Members Posts: 7,925 Joined: 29-January 03 From: Bolton, CT Member No.: 209 Region Association: None |
QUOTE(Dave_Darling @ Jan 9 2012, 12:42 PM) On my car, the stock sway bar mounting was just three nuts welded to the sheet-metal of the fender. Or at least that was how it looked. One of the welds failed while I was removing the bar, so I used a plain nut in place of the weld-nut. Fortunately, it was one of the upper ones that failed. --DD The three nuts were welded to a reinforcing plate which was then spot welded to the inner fender. |
|
|
|
| ChrisFoley |
Jan 9 2012, 02:44 PM
Post
#18
|
|
I am Tangerine Racing Group: Members Posts: 7,925 Joined: 29-January 03 From: Bolton, CT Member No.: 209 Region Association: None |
QUOTE(mikea100 @ Jan 9 2012, 12:17 PM) Excellent point, Chris, Thank you. I will open it up and weld in the sway bar plate. But can I leave it open or I must close it. If I have to close it, can I just make a cover plate or I have to weld it closed? I will cut along red lines. We cut the top of the box open, weld the reinforcing plate, then weld the top closed. It may be easier to make a new cover rather than re-using the piece you cut out. The hole in the top of the box on the pass. side was for the washer bottle pressure hose from the spare tire. |
|
|
|
|
1 User(s) are reading this topic (1 Guests and 0 Anonymous Users)
0 Members:

|
Lo-Fi Version | Time is now: 18th May 2024 - 04:04 AM |
Invision Power Board
v9.1.4 © 2024 IPS, Inc.