|
|
|
Porsche, and the Porsche crest are registered trademarks of Dr. Ing. h.c. F. Porsche AG.
This site is not affiliated with Porsche in any way. Its only purpose is to provide an online forum for car enthusiasts. All other trademarks are property of their respective owners. |
|
|

  |

| mikea100 |
 Jan 9 2012, 08:28 PM Jan 9 2012, 08:28 PM
Post
#1
|
|
Member  Group: Members Posts: 180 Joined: 28-December 09 From: Edison, NJ Member No.: 11,182 Region Association: North East States |
Yesterday, with some help from my 2 boys, I got my '76 2.0 short block on the engine run stand. I need help setting it up. It's late 2.0, complete, all stock, EFI. I'm looking for any info, any help at all. I've read few dozen threads about engine stands, but most of them deal with yokes, adapters and such. I need help with wiring and actually test running the engine. If local guys can stop by this long weekend and land me a hand, you'd really do me a solid and I'll return the favor. I'll serve beer of your choice. (IMG:style_emoticons/default/beerchug.gif)
Thanks, Mike Attached image(s) 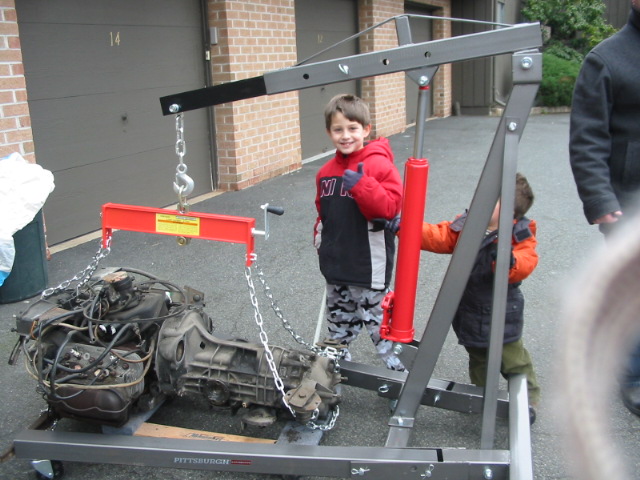 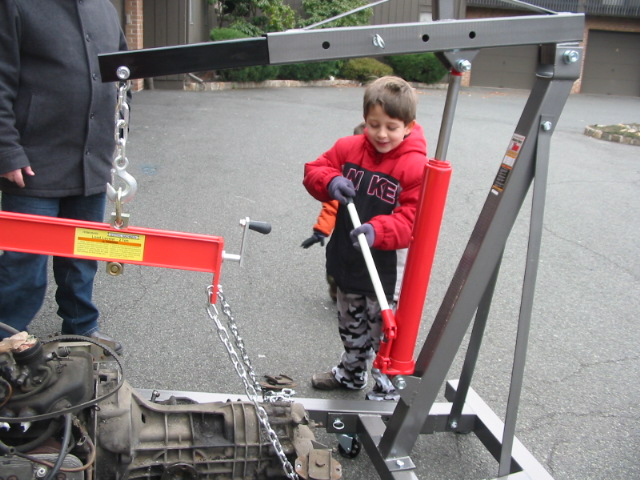 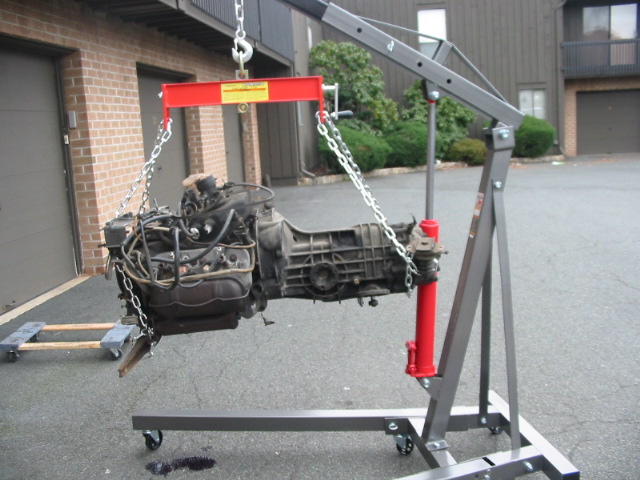 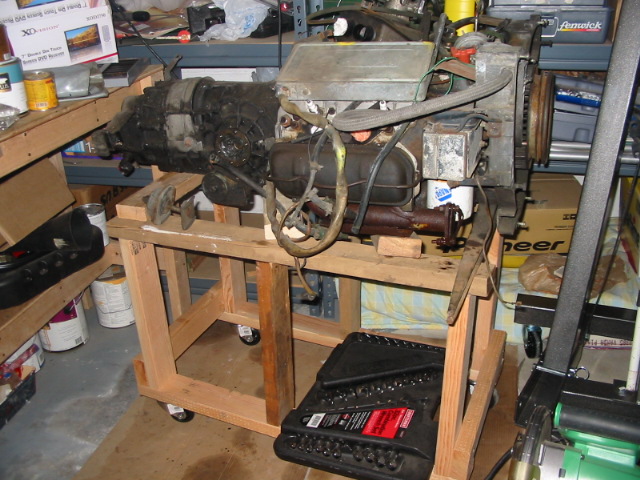
|
   |

 
|
| Jeffs9146 |
Jan 9 2012, 09:24 PM
Post
#2
|
|
Ski Bum Group: Members Posts: 4,062 Joined: 10-January 03 From: Discovery Bay, Ca Member No.: 128 |
It looks like you used nails or screws to hold that together? (IMG:style_emoticons/default/blink.gif) How long do you plan on running it?
I am not close so I cant come by but there is quite a bit of vibration from a running motor and you may want to at least run some bolts through those 2x4's! |
|
|
|
| mikea100 |
Jan 9 2012, 10:35 PM
Post
#3
|
|
Member Group: Members Posts: 180 Joined: 28-December 09 From: Edison, NJ Member No.: 11,182 Region Association: North East States |
QUOTE(Jeffs9146 @ Jan 9 2012, 10:24 PM)  It looks like you used nails or screws to hold that together? (IMG:style_emoticons/default/blink.gif) How long do you plan on running it? I am not close so I cant come by but there is quite a bit of vibration from a running motor and you may want to at least run some bolts through those 2x4's! I used screws to hold it together. I want to run it for just few seconds as proof of concept. I will definitely reinforce it if I run it longer. I was checking out some diagrams and it seems that I'll need complete wiring harness (which I have), is that right? |
|
|
|
| EdwardBlume |
Jan 9 2012, 10:40 PM
Post
#4
|
|
914 Wizard Group: Members Posts: 12,338 Joined: 2-January 03 From: SLO Member No.: 81 Region Association: Central California |
What are you testing?
|
|
|
|
| mikea100 |
Jan 10 2012, 05:56 PM
Post
#5
|
|
Member Group: Members Posts: 180 Joined: 28-December 09 From: Edison, NJ Member No.: 11,182 Region Association: North East States |
QUOTE(RobW @ Jan 9 2012, 11:40 PM) What are you testing? I just want to make sure that engine runs before I put back in the car. |
|
|
|
| Jeffs9146 |
Jan 10 2012, 06:22 PM
Post
#6
|
|
Ski Bum Group: Members Posts: 4,062 Joined: 10-January 03 From: Discovery Bay, Ca Member No.: 128 |
I have some engine run stand exhaust that you might be interested in!?
Attached image(s) 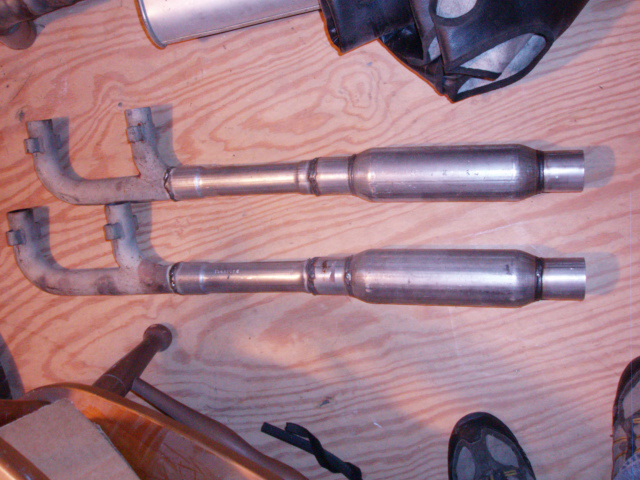
|
|
|
|
| windforfun |
Jan 10 2012, 07:24 PM
Post
#7
|
|
Senior Member Group: Members Posts: 1,779 Joined: 17-December 07 From: Blackhawk, CA Member No.: 8,476 Region Association: None |
Too bad Thomas isn't around to help. Sorry, I couldn't resist after seeing your address.
|
|
|
|
| VaccaRabite |
Jan 10 2012, 08:42 PM
Post
#8
|
|
En Garde! Group: Admin Posts: 13,441 Joined: 15-December 03 From: Dallastown, PA Member No.: 1,435 Region Association: MidAtlantic Region |
Actually, as long as you have the engine like that, mount the regular exhaust. Then you can put the whole package in the car.
This is a great exercise. It is a lot easier to find oil leaks with the engine out of the car, and it is way easier to find exhaust leaks too. This was the stand I build for my engine: (IMG:http://www.914world.com/bbs2/uploads_offsite/farm4.staticflickr.com-1435-1326249740.1.jpg) Its low to the ground, and on wheels, with a slot in the middle for a jack. When I am done testing, I just roll the whole thing under the car for install EASY! The "Dash" is just a push button for the starter and a switch for the ignition and fuel. For FI I might have to add a few more circuits. I did it like this so I could run the starter to build oil pressure, test compression, etc, without having the fuel or spark firing. The tack is there for cam run in, to make ssure I don't let the idle under 2000 rpm for the 20 minute run in. Zach |
|
|
|
| mikea100 |
Jan 10 2012, 09:26 PM
Post
#9
|
|
Member Group: Members Posts: 180 Joined: 28-December 09 From: Edison, NJ Member No.: 11,182 Region Association: North East States |
QUOTE(Vacca Rabite @ Jan 10 2012, 09:42 PM) Actually, as long as you have the engine like that, mount the regular exhaust. Then you can put the whole package in the car. This is a great exercise. It is a lot easier to find oil leaks with the engine out of the car, and it is way easier to find exhaust leaks too. This was the stand I build for my engine: Its low to the ground, and on wheels, with a slot in the middle for a jack. When I am done testing, I just roll the whole thing under the car for install EASY! The "Dash" is just a push button for the starter and a switch for the ignition and fuel. For FI I might have to add a few more circuits. I did it like this so I could run the starter to build oil pressure, test compression, etc, without having the fuel or spark firing. The tack is there for cam run in, to make ssure I don't let the idle under 2000 rpm for the 20 minute run in. Zach Zach, You’re right, it is a great exercise. I will be backdating exhaust using SSI HE, that's why I built the stand high like that for easy access. I think that for running FI I will need to connect the relay board somehow. I will probably use the main harness. I'm not sure that I'll be able to wire starter and fuel/fire separately like you did, I'll try though as I think that it's a great idea. What king of ignition switch and push botton start did you use? Thanks, Mike |
|
|
|
| VaccaRabite |
Jan 10 2012, 10:49 PM
Post
#10
|
|
En Garde! Group: Admin Posts: 13,441 Joined: 15-December 03 From: Dallastown, PA Member No.: 1,435 Region Association: MidAtlantic Region |
I used the cheapest push button starter switch I could find from Autozone that would handle 40+amps for the starter, and whatever 2 position switch my hands found first for the fuel and spark.
Zach |
|
|
|
| jcd914 |
Jan 11 2012, 02:49 AM
Post
#11
|
|
Advanced Member Group: Members Posts: 2,081 Joined: 7-February 08 From: Sacramento, CA Member No.: 8,684 Region Association: Northern California |
Add to your engine stand a place to hang your FI computer, MPS and relay board. Pull your relay board from your car (or if you have a spare use it) and plug all the engine wiring in just like it was in the car. Hang the FI computer and mount the MPS and hook it up. You need the fuel pump off the car or a spare, some thing to serve as a fuel tank (I used a my lawn mower fuel can) and some hose to plumb it in and a battery. Now all you have to do is add a couple switch to get power to the relay board and the starter and some wiring to the fuel pump.
You'll have to look over a wiring diagram and figure out the wiring connections you need but they will all go to the 14 pin connector at the relay board except the main battery cable that need to go to the start and to the engine or trans case. I just set my engine on jack stands (seem like the right thing for a 914 engine), 1 under each end of the engine cross bar and 1 under the tail end of the trans. Then I made a little stand to hold the relay board and some switches. Just layed the FI computer and MPS on top of the engine, a bit sloppy but it worked. Here is what I have for the 14 pin connector for the Relay Panel. 1 - Power in from starter switch 2 - Power/ground for Alternator light 3 - 4 - 5 - From Oil Press Light 6 - 7 - Signal to Tach 8 - Power in from Ignition switch 9 - To Heater Fan Switch 10 - To Main Ground 11 - Power out to Heater Fan 12 - Power in from Battery 13 - Power out to Fuel Pump 14 - Power in from Battery Jim |
 |
|
| mikea100 |
Jan 17 2012, 11:26 PM
Post
#12
|
|
Member Group: Members Posts: 180 Joined: 28-December 09 From: Edison, NJ Member No.: 11,182 Region Association: North East States |
First of, please be patient with me as I'm new at this and will ask for help.
I'm just going to go down the list. Solenoid (starter) has a heavy black wire (probably gauge 4) going to the battery + terminal. Where do I connect the power from switch? I'm assuming that it goes to light spade connector, correct? Attached image(s) 
|
|
|
|
| dlee6204 |
Jan 18 2012, 12:09 PM
Post
#13
|
|
Howdy Group: Members Posts: 2,162 Joined: 30-April 06 From: Burnsville, NC Member No.: 5,956 |
QUOTE Where do I connect the power from switch? I'm assuming that it goes to light spade connector, correct? Correct |
|
|
|
| Dave_Darling |
Jan 18 2012, 12:28 PM
Post
#14
|
|
914 Idiot Group: Members Posts: 14,982 Joined: 9-January 03 From: Silicon Valley / Kailua-Kona Member No.: 121 Region Association: Northern California |
You'll need power to the coil.
You'll need to provide 29 PSI fuel to the fuel rail, and provide a place to dump the fuel coming out of the pressure regulator. You'll need to supply power to the EFI through the 4-pin connector. I think two of the pins get power and two get the starter wire signal; double-check the relay board diagram on that though. You'll need to ground the case to the battery. You'll want a way to hold the engine onto the stand. You might want to hook up a light to the oil pressure sender. A bulb with +12V on one side and the other connected to the sender should be good enough. If you have a mechanical oil pressure gauge you're using, you can ignore the light. I can't think of anything else off the top of my head. --DD |
|
|
|
| jcd914 |
Jan 18 2012, 05:48 PM
Post
#15
|
|
Advanced Member Group: Members Posts: 2,081 Joined: 7-February 08 From: Sacramento, CA Member No.: 8,684 Region Association: Northern California |
The connector pin list I posted was inputs/outputs for the 14 pin connector on the fuse/relay panel. I found it easier to connect the original engine harness to the fuse/relay panel, then there are just a few connections to be made at the 14 pin connector to the panel. QUOTE(jcd914 @ Jan 11 2012, 12:49 AM) Here is what I have for the 14 pin connector for the Relay Panel. 1 - Power IN from starter switch 2 - Power/ground for Alternator light 3 - 4 - 5 - From Oil Press Light 6 - 7 - Signal to Tach 8 - Power IN from Ignition switch 9 - To Heater Fan Switch 10 - To Main Ground 11 - Power out to Heater Fan 12 - Power IN from Battery 13 - Power OUT to Fuel Pump 14 - Power IN from Battery Jim |
|
|
|
| mikea100 |
Jan 22 2012, 06:28 PM
Post
#16
|
|
Member Group: Members Posts: 180 Joined: 28-December 09 From: Edison, NJ Member No.: 11,182 Region Association: North East States |
I'm having trouble with this seemingly easy task. I tried set up above with no luck. I then studied electrical diagrams on Pelican and changed the set up and still no luck.
Picture 1 shows set up #1 as desribed above - power from battery to the big left terminal and 2 small spade terminals. Picture 2 shows setup #2, as I understood it from diagram, power to 2 small spade terminals and ground to the big terminal. Link to the pelican's diagram http://www.pelicanparts.com/914/parts/Elec...lectric_74E.jpg Any help is greatly apreciated. Attached image(s) 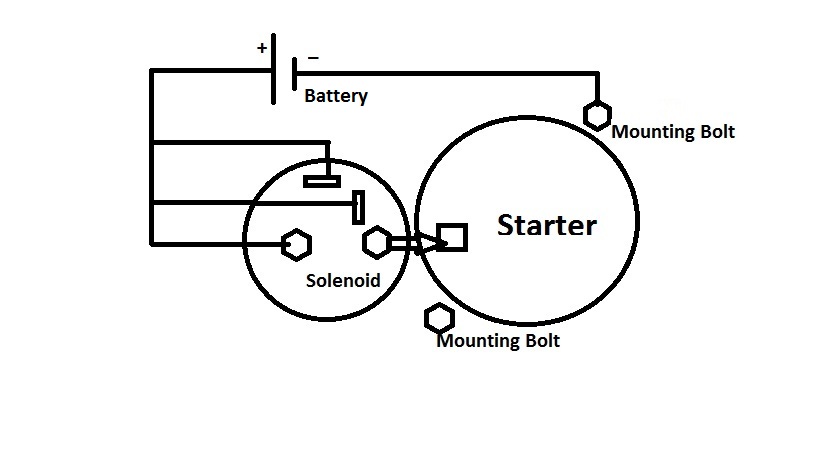 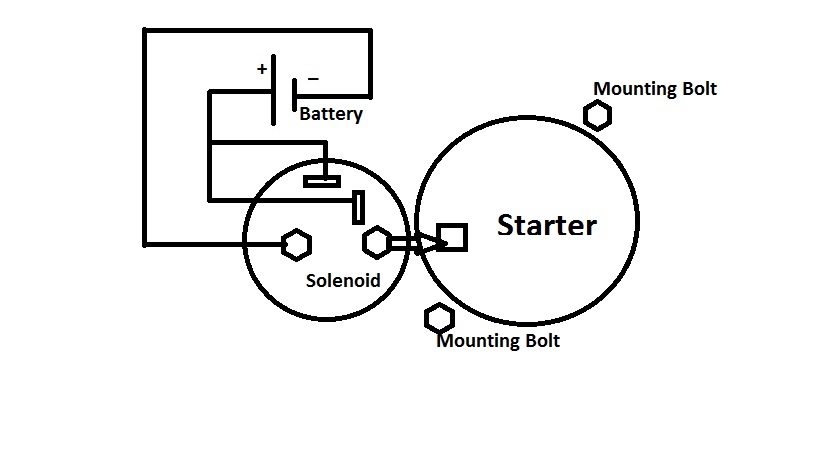
|
|
|
|
| Dave_Darling |
Jan 22 2012, 07:14 PM
Post
#17
|
|
914 Idiot Group: Members Posts: 14,982 Joined: 9-January 03 From: Silicon Valley / Kailua-Kona Member No.: 121 Region Association: Northern California |
The battery + should connect to the big post on the solenoid. The first pic has that right. The battery - would connect to the mounting bolt as in the first pic as well.
The flags on the back of the solenoid are electrically the same thing as each other. You connect one (any of them) to the battery + when you want the starter to crank. --DD |
|
|
|
| PRS914-6 |
Jan 22 2012, 09:04 PM
Post
#18
|
|
Excellence Magazine Project 914 3.6 Group: Retired Members Posts: 1,278 Joined: 20-May 06 From: Central California Member No.: 6,031 Region Association: None |
Posted on this thread as well: Ready for break in- need additional info
Personally I would not run a new engine unloaded for that length of time. The cam is not the only thing to break in. The cam manufacturers want their ass covered and they could care less about any other engine component as long as they don't have to warranty the cam. Rings are also critical in the first hour of running. If you don't put the engine under a load quickly the rings will not likely seat as fast as you would like or perhaps forever. Steady RPM being the worst. When you load an engine, gas pressure increases, goes behind the rings and increases the ring to cylinder wall pressure. This pressure is critical for sealing and is also critical that the pressure takes advantage of the sharp honing in the cylinder and to break in the rings. The cylinder walls quickly "glaze" after the engine is fired up, friction is lost and you are stuck with whatever you got. Every engine component has a special need for break in....don't focus on just one. Some engines get assembled with NO OIL ON THE RINGS to aid this.....it's that critical. My recommendation is to fire it up, get it quickly on the road and load/unload...load/unload A good way to do this is stay in second or third gear....step on it hard, let it rev and get off it....cruise (to cool) and repeat 10 times and allow to fully cool....Start over I have seen far more people ruin a new engine (usually a smoker) from loving it than driving it like you stole it. Everyone has a different opinion on break-in so YMMV....good luck |
|
|
|
| mikea100 |
Jan 23 2012, 10:54 AM
Post
#19
|
|
Member Group: Members Posts: 180 Joined: 28-December 09 From: Edison, NJ Member No.: 11,182 Region Association: North East States |
QUOTE(Dave_Darling @ Jan 22 2012, 08:14 PM) The battery + should connect to the big post on the solenoid. The first pic has that right. The battery - would connect to the mounting bolt as in the first pic as well. The flags on the back of the solenoid are electrically the same thing as each other. You connect one (any of them) to the battery + when you want the starter to crank. --DD Thank you Dave. I got Cranky! The ground connection was loose, once that was taken care of, everything fell into place. |
|
|
|
| mikea100 |
Jan 23 2012, 11:05 AM
Post
#20
|
|
Member Group: Members Posts: 180 Joined: 28-December 09 From: Edison, NJ Member No.: 11,182 Region Association: North East States |
QUOTE(PRS914-6 @ Jan 22 2012, 10:04 PM) Posted on this thread as well: Ready for break in- need additional info Personally I would not run a new engine unloaded for that length of time. The cam is not the only thing to break in. The cam manufacturers want their ass covered and they could care less about any other engine component as long as they don't have to warranty the cam. Rings are also critical in the first hour of running. If you don't put the engine under a load quickly the rings will not likely seat as fast as you would like or perhaps forever. Steady RPM being the worst. When you load an engine, gas pressure increases, goes behind the rings and increases the ring to cylinder wall pressure. This pressure is critical for sealing and is also critical that the pressure takes advantage of the sharp honing in the cylinder and to break in the rings. The cylinder walls quickly "glaze" after the engine is fired up, friction is lost and you are stuck with whatever you got. Every engine component has a special need for break in....don't focus on just one. Some engines get assembled with NO OIL ON THE RINGS to aid this.....it's that critical. My recommendation is to fire it up, get it quickly on the road and load/unload...load/unload A good way to do this is stay in second or third gear....step on it hard, let it rev and get off it....cruise (to cool) and repeat 10 times and allow to fully cool....Start over I have seen far more people ruin a new engine (usually a smoker) from loving it than driving it like you stole it. Everyone has a different opinion on break-in so YMMV....good luck Paul, thank you for the advice, but I'm not trying to break in new/rebuilt engine. I have a 2.0 engine in unknown condition and trying to determine what it needs to make it run. |
|
|
|
|
1 User(s) are reading this topic (1 Guests and 0 Anonymous Users)
0 Members:

|
Lo-Fi Version | Time is now: 7th May 2024 - 11:49 PM |
Invision Power Board
v9.1.4 © 2024 IPS, Inc.