|
|
|
Porsche, and the Porsche crest are registered trademarks of Dr. Ing. h.c. F. Porsche AG.
This site is not affiliated with Porsche in any way. Its only purpose is to provide an online forum for car enthusiasts. All other trademarks are property of their respective owners. |
|
|

  |

| rick 918-S |
 Mar 1 2012, 10:01 PM Mar 1 2012, 10:01 PM
Post
#1
|
|
Hey nice rack! -Celette  Group: Members Posts: 21,288 Joined: 30-December 02 From: Now in Superior WI Member No.: 43 Region Association: Northstar Region |
Like I've said before. When your working on old cars you have to realize they are like a box of Cracker Jacks. Everyone has a surprise. In most cases it's a cheap nasty surprise. In this case The dent in this panel was not that bad. The problem became complicated but the person that filled it in. Instead of working the damage out the person took a pick hammer and drove about a hundred dents in the panel trying to chase high metal from the top of the panel being driven down. Normally I would just replace a panel that was damaged to this degree. But this is a special car. There is zero rust so I will take the time to bump the panel back into shape. There will still be a finishing glaze used but in a manor appropriate for restoration not amature night at the Drive Inn Autobody Shop.
Here's what I Found when I started stripping off the panel. 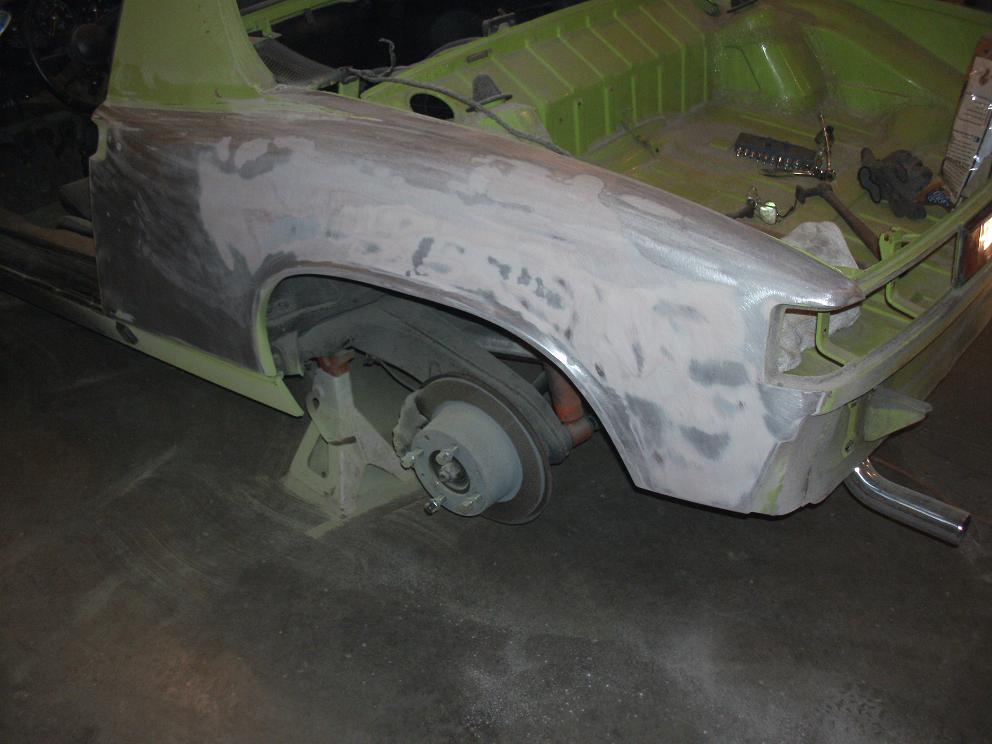 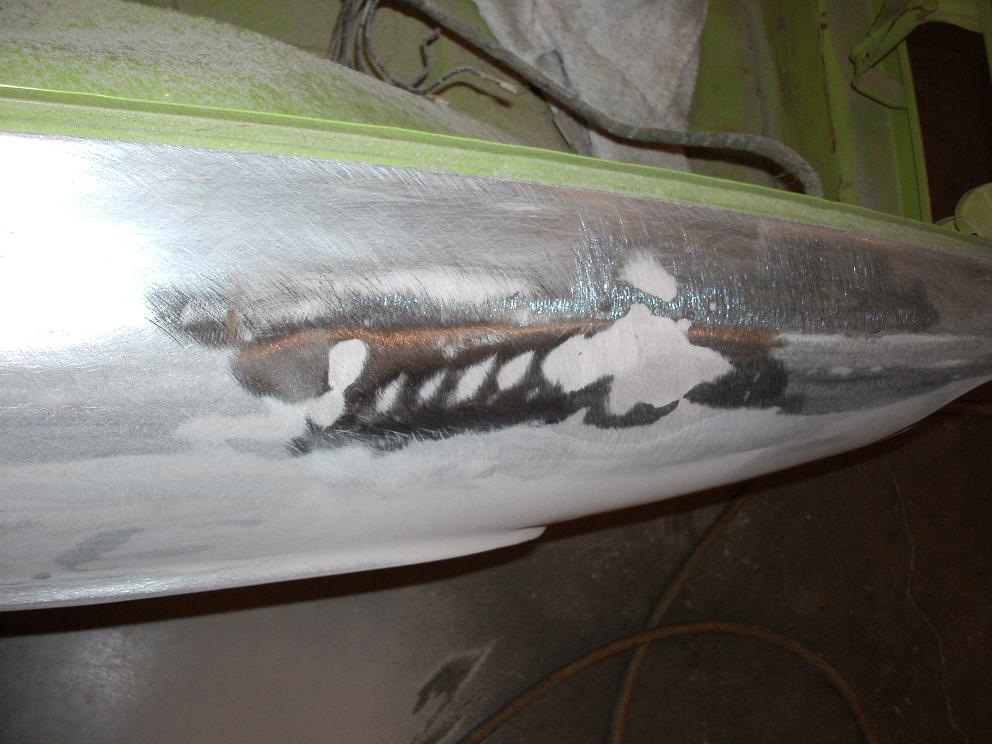 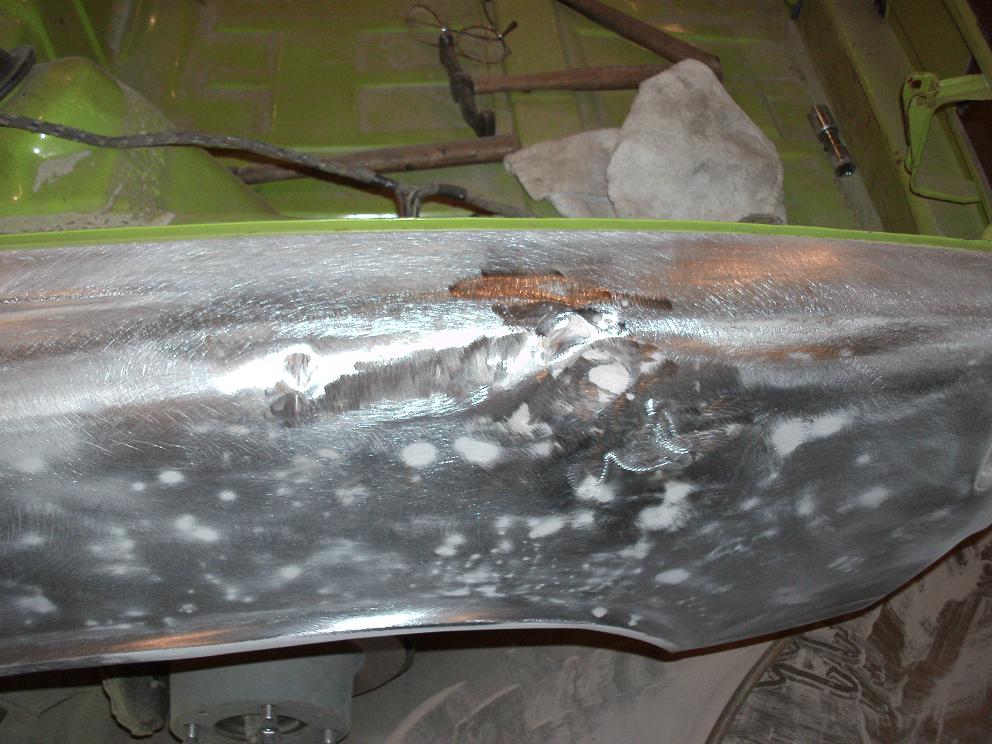 I used a Tig welding rod so you could see how deep the damage is. 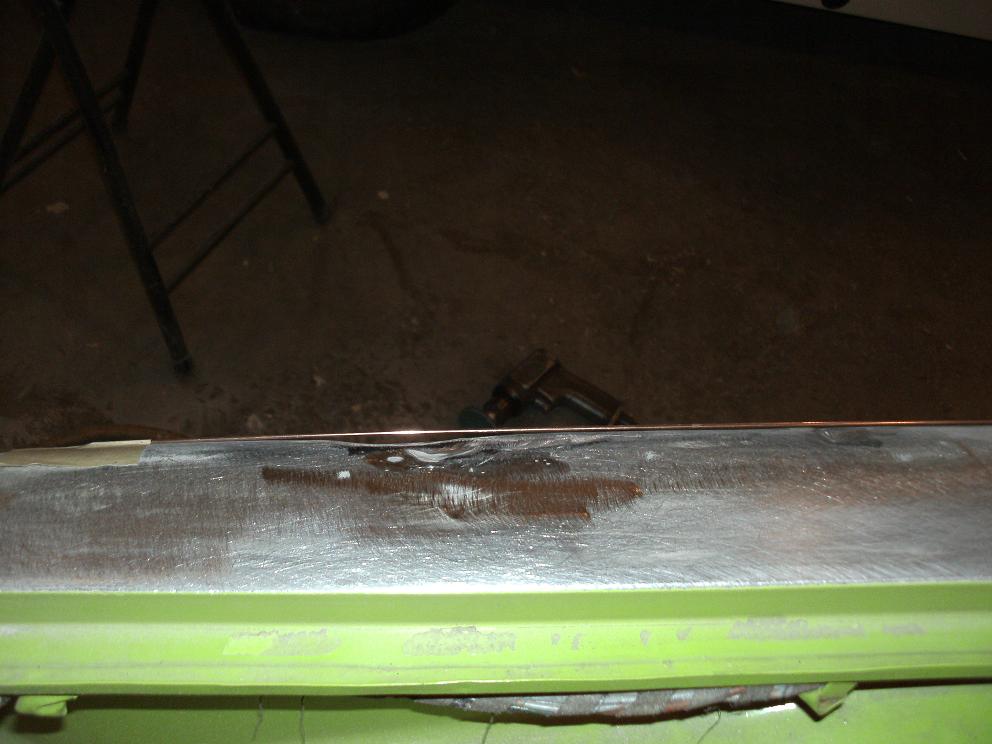 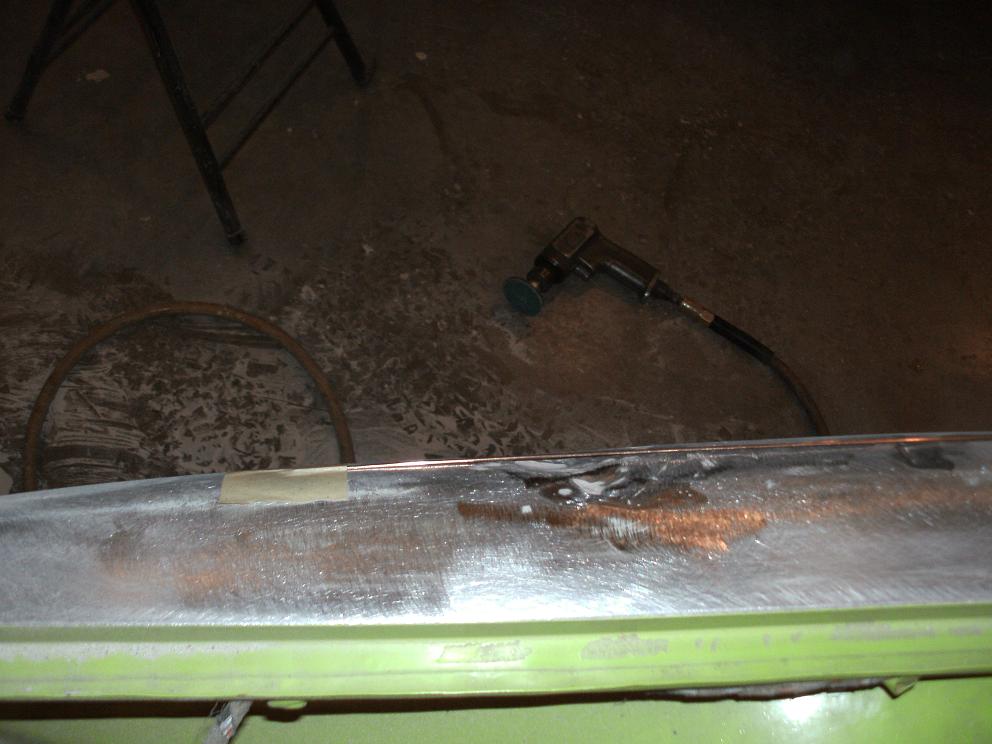 Here are only some of the tools I used. I also used a couple wood blocks ground into different contours as a backer for shrinking. 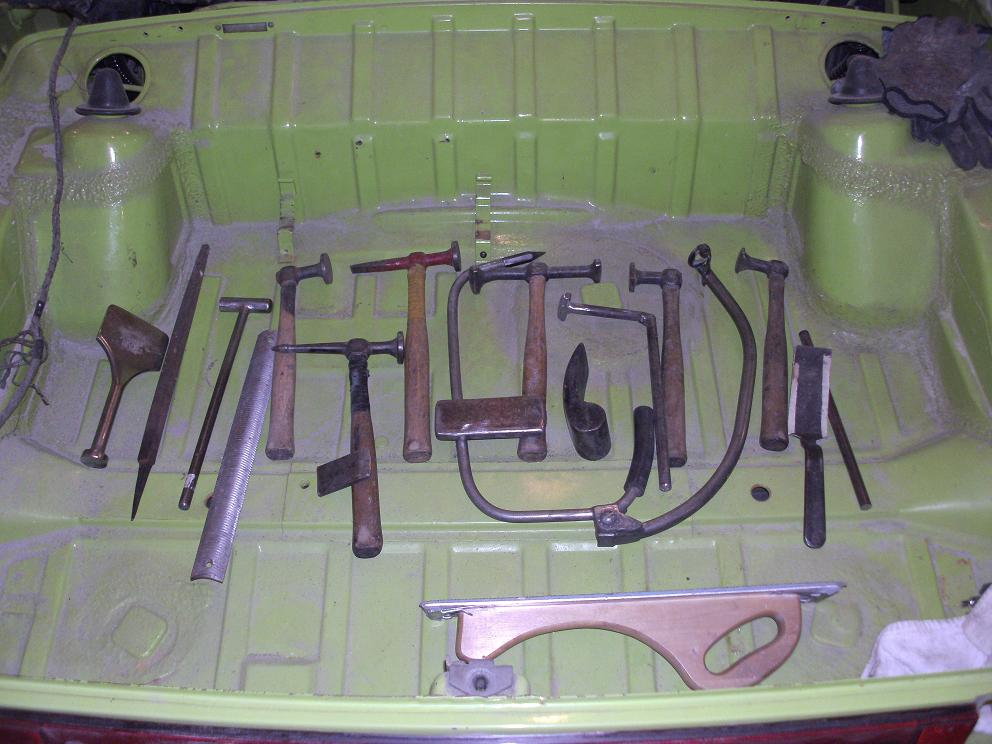 I'm sure some of you have never really tried to work a serious dent and wonder how to start. In this case I started with this heavy dolly. I used every combination and angle of this thing to get up into the curve. Don't be afraid. Worse case, you end up cutting the panel off and replacing it. (IMG:style_emoticons/default/confused24.gif) (IMG:style_emoticons/default/biggrin.gif) Think out of the box. You can't alway swing a hammer up inside a tight panel. Sometimes you need a fist! 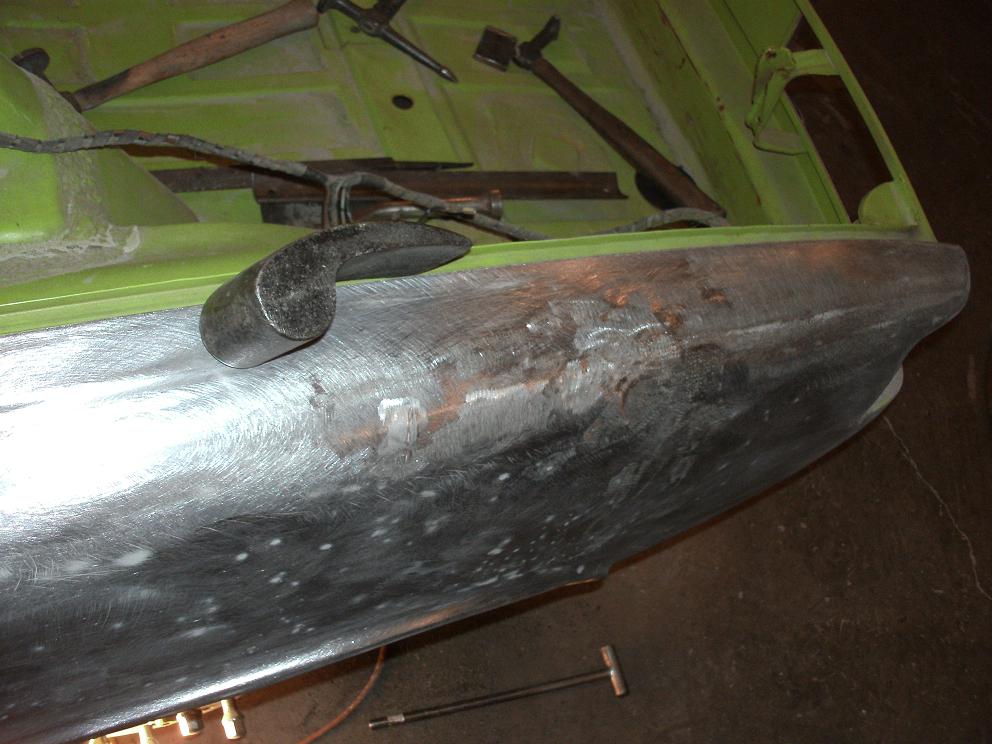 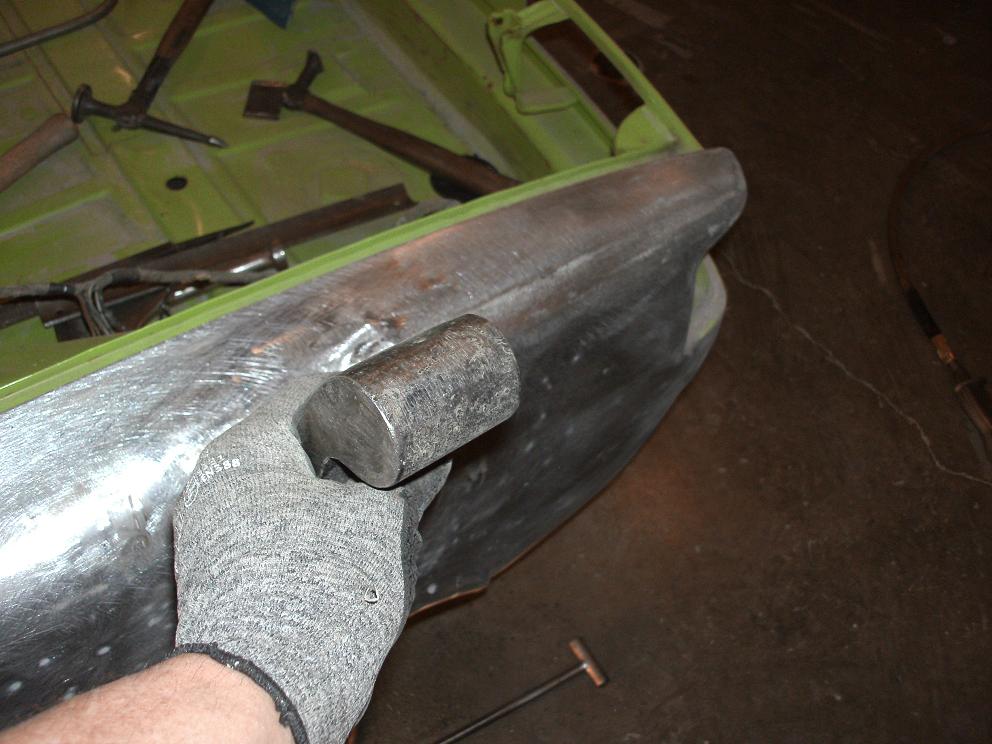 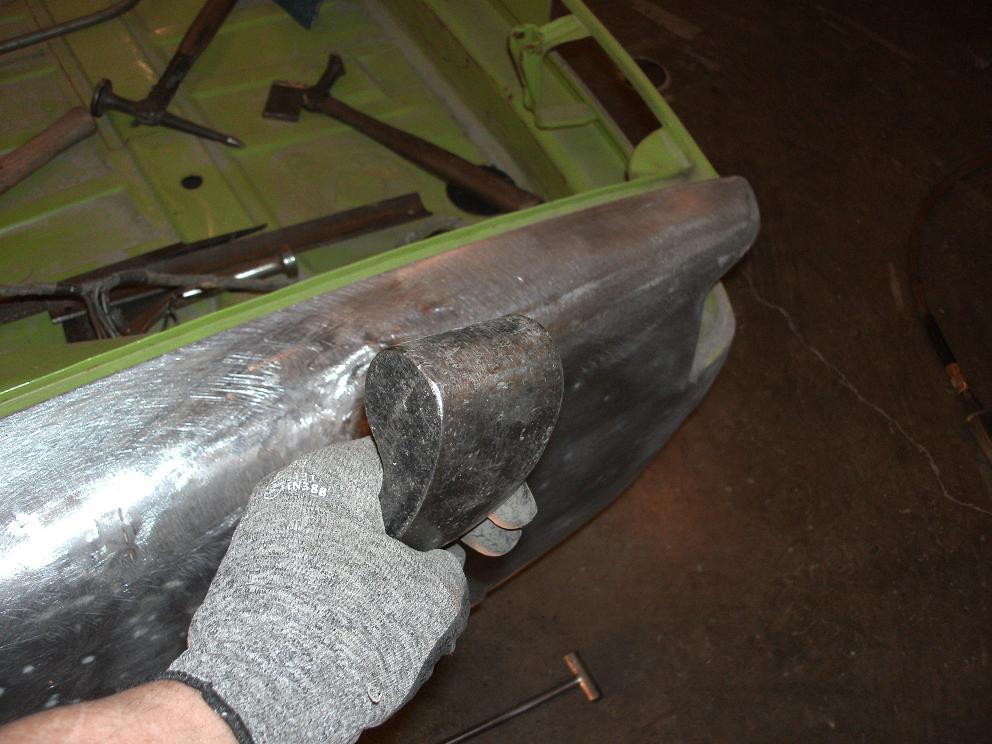 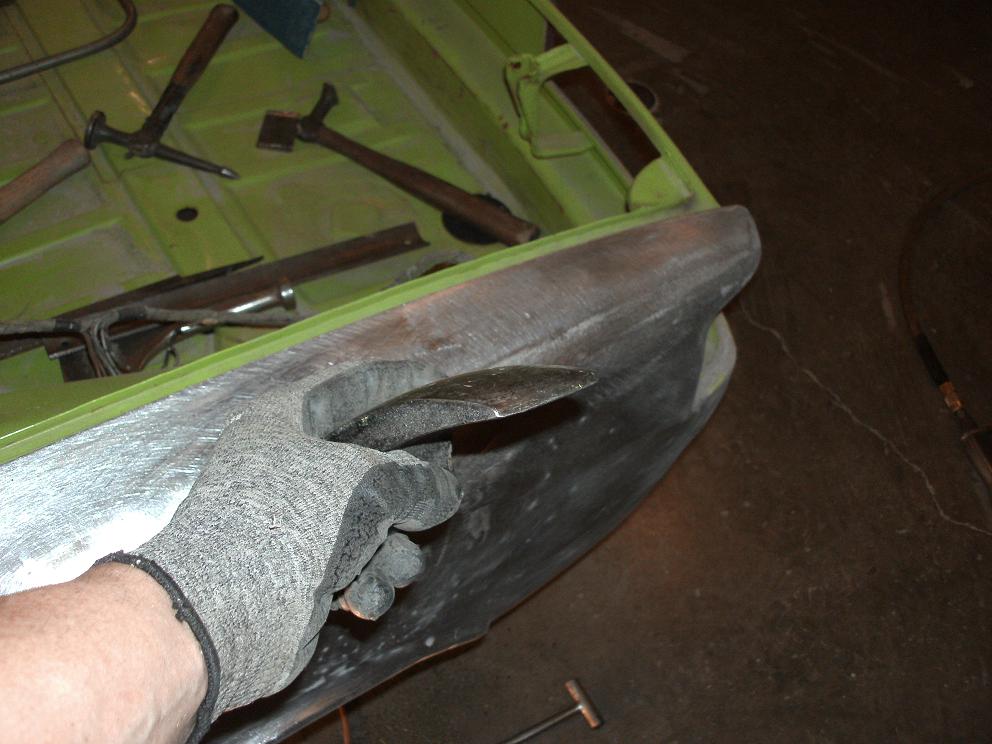 Here it is roughed in. I used the above dolly, and a couple other heavy blocks. Just because I call the tools heavy doesn't mean you abuse the panel. Lots of light blows spread out over the area while off hammering on the outside of the panel with help bring things around. 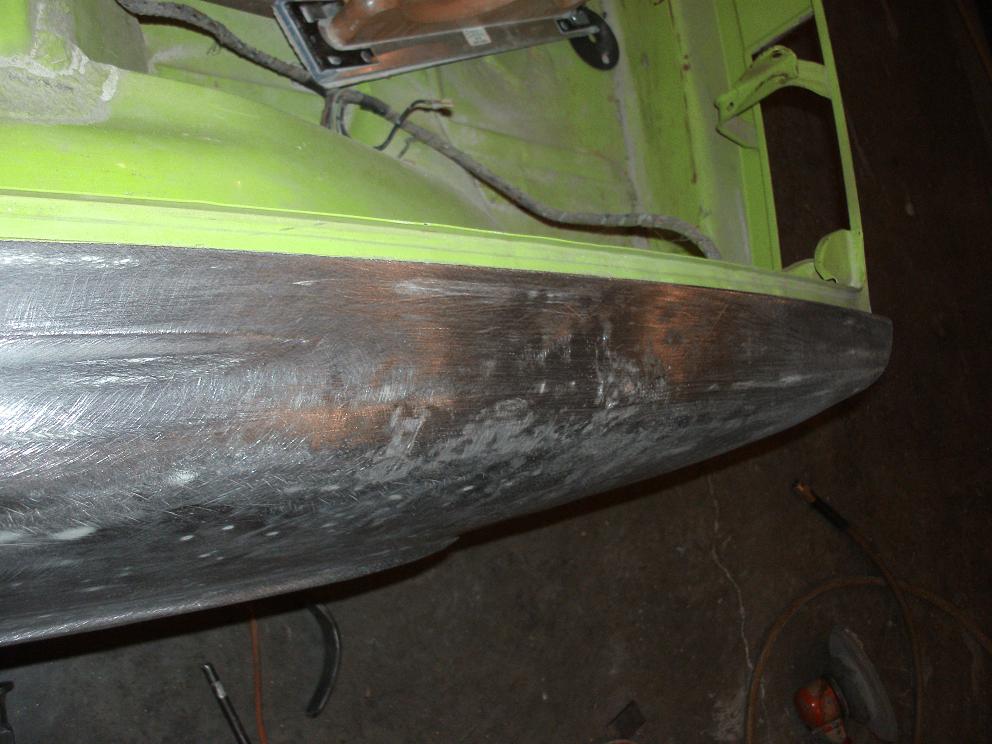 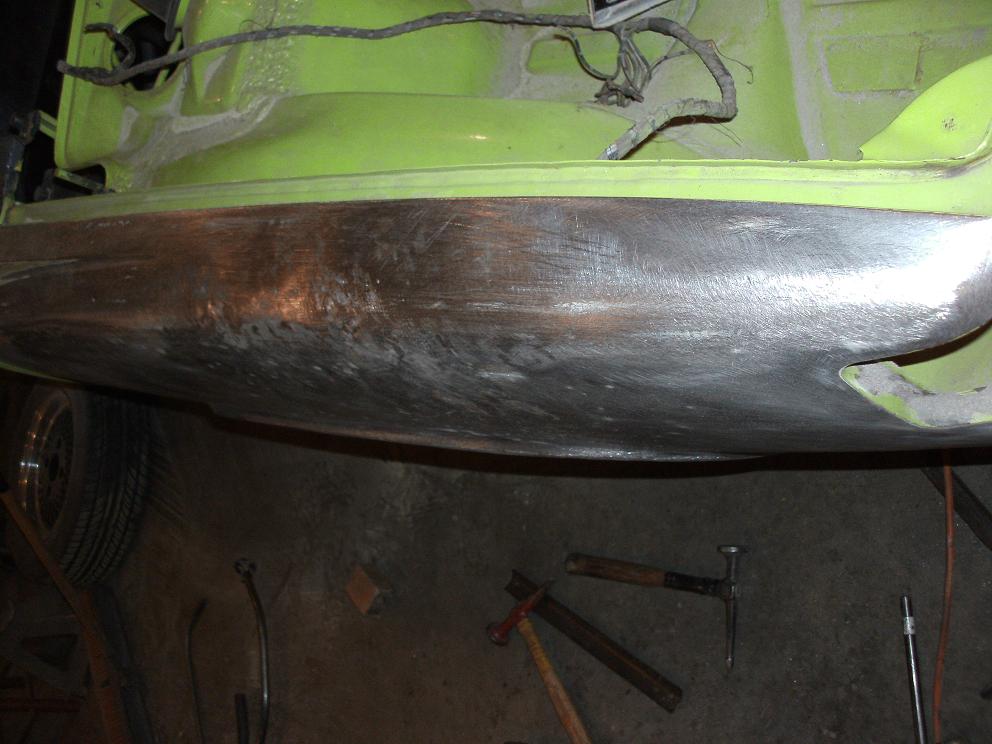 Here's the panel after about 3 solid hours of blocking, bumping and shrinking. I rough in the panel and then spray paint it. You can just dust a light coat of spray paint or use dykem if you have it. Then I use my bulleye pick and carefully and slowly work the low spots out as I check the panel with my body file. This photo is after I filed the panel then used a long board sander with a new sheet of 36 grit to check the panel. You can use the straight lines of the sander and check the panel with a light. The side panel was sanded with a 8" DA 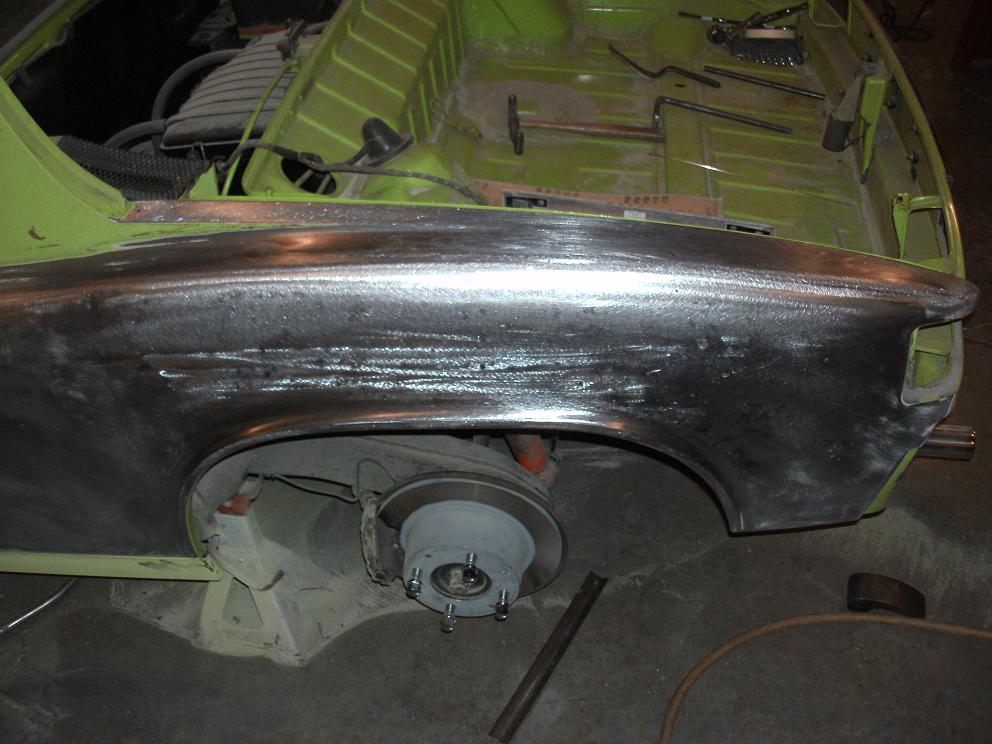 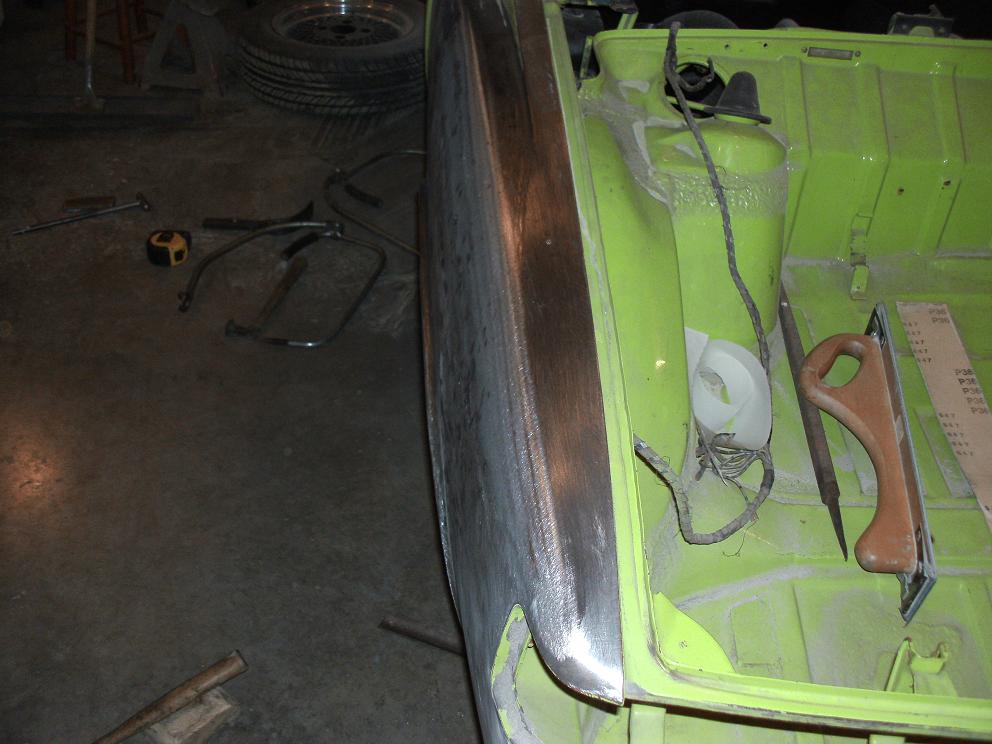 There are still several pick hammer marks left in the panel from the last guy but I will work them out over the weekend and get them close. Like I said there will still be a fine glazing filler used to define the final shape. I think you'll all appreciate the final product.  Attached image(s) 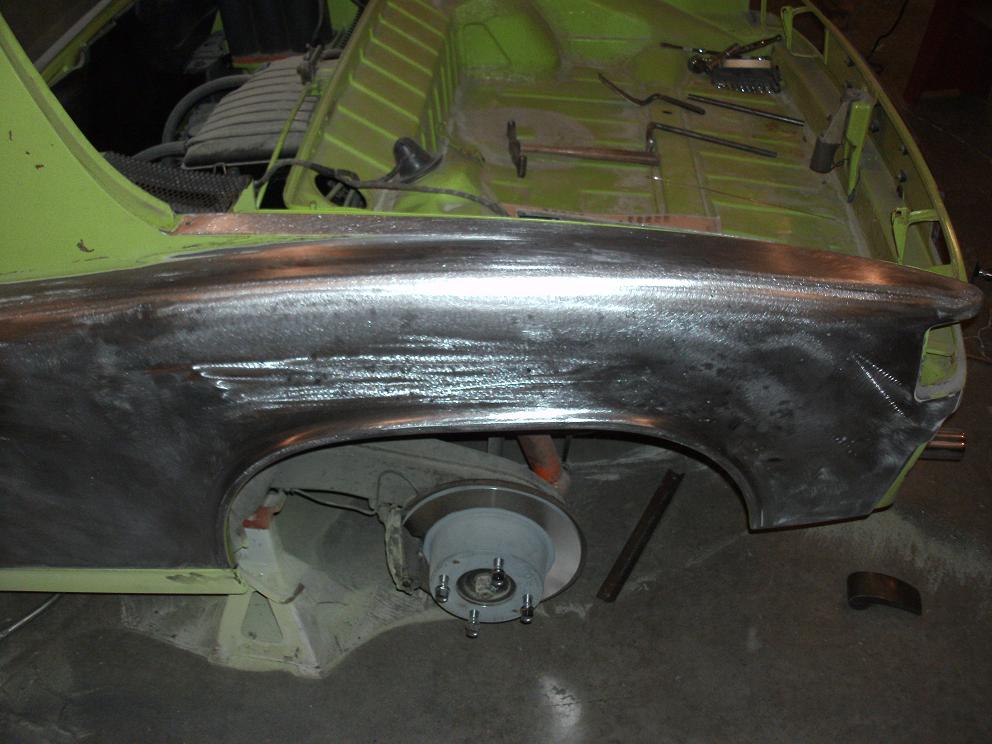
|
   |

 
|
| 3d914 |
Mar 1 2012, 10:29 PM
Post
#2
|
|
Senior Member Group: Members Posts: 1,275 Joined: 24-September 03 From: Benson, AZ Member No.: 1,191 Region Association: Southwest Region |
Awesome work Rick. Thanks for the insights.
The dolly work I can understand, but can you elaborate on "shrinking"? |
|
|
|
| rick 918-S |
Mar 1 2012, 10:33 PM
Post
#3
|
|
Hey nice rack! -Celette Group: Members Posts: 21,288 Joined: 30-December 02 From: Now in Superior WI Member No.: 43 Region Association: Northstar Region |
I'll add more about that later. Let me get a couple photos to add if I can.
|
|
|
|
| r_towle |
Mar 1 2012, 10:50 PM
Post
#4
|
|
Custom Member Group: Members Posts: 24,705 Joined: 9-January 03 From: Taxachusetts Member No.: 124 Region Association: North East States |
I am just going to ship you my beatster....
I got one fender close, but I am about 20 steps back from your handy work and I was done IMHO...haha Awesome work buddy. rich |
|
|
|
| Socalandy |
Mar 1 2012, 10:52 PM
Post
#5
|
|
Its got to be Yellow!!! Group: Members Posts: 2,432 Joined: 29-August 09 From: Orange Member No.: 10,742 Region Association: Southern California |
Crazy mad skills sir!!! (IMG:style_emoticons/default/pray.gif) I'm still over working the hammer and making more work for myself
|
|
|
|
| rick 918-S |
Mar 1 2012, 11:04 PM
Post
#6
|
|
Hey nice rack! -Celette Group: Members Posts: 21,288 Joined: 30-December 02 From: Now in Superior WI Member No.: 43 Region Association: Northstar Region |
QUOTE(r_towle @ Mar 1 2012, 10:50 PM)  I am just going to ship you my beatster.... I got one fender close, but I am about 20 steps back from your handy work and I was done IMHO...haha Awesome work buddy. rich Where yout been buddy! |
|
|
|
| rick 918-S |
Mar 1 2012, 11:04 PM
Post
#7
|
|
Hey nice rack! -Celette Group: Members Posts: 21,288 Joined: 30-December 02 From: Now in Superior WI Member No.: 43 Region Association: Northstar Region |
QUOTE(Socalandy @ Mar 1 2012, 10:52 PM) Crazy mad skills sir!!! (IMG:style_emoticons/default/pray.gif) I'm still over working the hammer and making more work for myself Your car is coming along nicely Andy! |
|
|
|
| Tom_T |
Mar 1 2012, 11:10 PM
Post
#8
|
|
TMI.... Group: Members Posts: 8,321 Joined: 19-March 09 From: Orange, CA Member No.: 10,181 Region Association: Southern California |
Rick,
I haven't seen a panel master like you work since my Uncle's good buddy back in the 60's on his Model A Roadster Hot Rod! (IMG:style_emoticons/default/blink.gif) So many shops in the 60's - 90's & even now might or might not drill & pull a bit, then just slather on the Bondo & paint! (IMG:style_emoticons/default/dry.gif) Thanx for sharing! Tom /////// |
|
|
|
| cary |
Mar 2 2012, 12:05 AM
Post
#9
|
|
Advanced Member Group: Members Posts: 3,900 Joined: 26-January 04 From: Sherwood Oregon Member No.: 1,608 Region Association: Pacific Northwest |
Nice work.
|
|
|
|
| rick 918-S |
Mar 2 2012, 12:37 AM
Post
#10
|
|
Hey nice rack! -Celette Group: Members Posts: 21,288 Joined: 30-December 02 From: Now in Superior WI Member No.: 43 Region Association: Northstar Region |
QUOTE(Tom_T @ Mar 1 2012, 11:10 PM) Rick, I haven't seen a panel master like you work since my Uncle's good buddy back in the 60's on his Model A Roadster Hot Rod! (IMG:style_emoticons/default/blink.gif) So many shops in the 60's - 90's & even now might or might not drill & pull a bit, then just slather on the Bondo & paint! (IMG:style_emoticons/default/dry.gif) Thanx for sharing! Tom /////// Ya Tom, Around here we call them California rivets when they drill holes and pack on the mud. I have purchased really nice cars from Cali and found the only thing holding the body filler on the panel was those damned rivets. I had an MGA with a crease in the rear fender that was filled that way. The body guy never even ground off the paint. Also a 100-4 Healey with the same issue. It's like the guy was too lazy to reach inside the panel and bump out the damage. |
|
|
|
| Tom_T |
Mar 2 2012, 04:13 AM
Post
#11
|
|
TMI.... Group: Members Posts: 8,321 Joined: 19-March 09 From: Orange, CA Member No.: 10,181 Region Association: Southern California |
QUOTE(rick 918-S @ Mar 1 2012, 10:37 PM) QUOTE(Tom_T @ Mar 1 2012, 11:10 PM) Rick, I haven't seen a panel master like you work since my Uncle's good buddy back in the 60's on his Model A Roadster Hot Rod! (IMG:style_emoticons/default/blink.gif) So many shops in the 60's - 90's & even now might or might not drill & pull a bit, then just slather on the Bondo & paint! (IMG:style_emoticons/default/dry.gif) Thanx for sharing! Tom /////// Ya Tom, Around here we call them California rivets when they drill holes and pack on the mud. I have purchased really nice cars from Cali and found the only thing holding the body filler on the panel was those damned rivets. I had an MGA with a crease in the rear fender that was filled that way. The body guy never even ground off the paint. Also a 100-4 Healey with the same issue. It's like the guy was too lazy to reach inside the panel and bump out the damage. Rick, it's laziness & high volume quick in-n-out shops that crank out the collision work, which apparently is what they're teaching at many of the tech schools now too, unfortunately. Low bid is usually not the best work! Usually the "mud" cracks or falls off within a couple of years! (IMG:style_emoticons/default/dry.gif) I've seen a couple of what would otherwise be very valuable 356s around here with huge chunks of bondo coming off the body! (IMG:style_emoticons/default/sad.gif) |
|
|
|
| zymurgist |
Mar 2 2012, 05:57 AM
Post
#12
|
|
"Ace" Mechanic Group: Members Posts: 7,411 Joined: 9-June 05 From: Hagerstown, MD Member No.: 4,238 Region Association: None |
Very cool! (IMG:style_emoticons/default/thumb3d.gif)
|
|
|
|
| westtexass2k |
Mar 2 2012, 07:26 AM
Post
#13
|
|
Newbie Group: Members Posts: 40 Joined: 31-December 11 From: San Angelo Tx Member No.: 13,954 Region Association: None |
Have you ever used a shrinking disc? I haven't tried one myself a friend of mine used one aon his 55 Chevy project and got great results.
|
|
|
|
| VaccaRabite |
Mar 2 2012, 07:37 AM
Post
#14
|
|
En Garde! Group: Admin Posts: 13,885 Joined: 15-December 03 From: Dallastown, PA Member No.: 1,435 Region Association: MidAtlantic Region |
The same fender on my car was and is worse then that. At the time I did not have the knowledge or skills to fix it.
I still don't have the skills. Zach |
|
|
|
| rick 918-S |
Mar 2 2012, 08:28 AM
Post
#15
|
|
Hey nice rack! -Celette Group: Members Posts: 21,288 Joined: 30-December 02 From: Now in Superior WI Member No.: 43 Region Association: Northstar Region |
QUOTE(westtexass2k @ Mar 2 2012, 07:26 AM) Have you ever used a shrinking disc? I haven't tried one myself a friend of mine used one aon his 55 Chevy project and got great results. I don't have one. I've been looking at them on ebay but haven't bought one. I think the side of this panel would be a good candidate with all the pick hammer marks the other guy drove into this panel. I'm having to bump them back out then block them level. It takes hours to work some of the waves it creates. So far I haven't found anything that will require the torch and quench method. Just a serious investment of time. The panel hasn't work hardened yet so I'm still ok. |
|
|
|
| majkos |
Mar 2 2012, 08:50 AM
Post
#16
|
|
Senior Member Group: Members Posts: 1,370 Joined: 29-February 04 From: Mile High 914 Member No.: 1,729 Region Association: Rocky Mountains |
(IMG:style_emoticons/default/popcorn[1].gif) Great thread, Rick.
You make it look so easy, but I'm glad you mention it took three hours between pics. You cannot rush perfection, it's a lot of Love (LABOR) |
|
|
|
| Jacob |
Mar 2 2012, 08:55 AM
Post
#17
|
|
Member Group: Members Posts: 131 Joined: 12-February 08 From: Mansfield, Oh Member No.: 8,705 Region Association: Upper MidWest |
Nice job Rick.
|
|
|
|
| Jacob |
Mar 2 2012, 10:08 AM
Post
#18
|
|
Member Group: Members Posts: 131 Joined: 12-February 08 From: Mansfield, Oh Member No.: 8,705 Region Association: Upper MidWest |
Nice job Rick.
|
|
|
|
| worn |
Mar 2 2012, 10:13 AM
Post
#19
|
|
Winner of the Utah Twisted Joint Award Group: Members Posts: 3,609 Joined: 3-June 11 From: Madison, WI and North Bend WA Member No.: 13,152 Region Association: Upper MidWest |
QUOTE(Jacob @ Mar 2 2012, 06:55 AM) Nice job Rick. Really nice job Rick. Thank you for showing this. I would have made up a home-built hammer or something - never thinking of using the dolly as a moving object. This kind of info really helps. Finding it later on with a million threads is another story (IMG:style_emoticons/default/rolleyes.gif) |
|
|
|
| ww914 |
Mar 2 2012, 10:15 AM
Post
#20
|
|
914 Convert Group: Members Posts: 435 Joined: 29-September 11 From: Central Coast, CA Member No.: 13,621 Region Association: Central California |
Nice work Rick. Looks like you've been reading Cass' book.
|
|
|
|
|
1 User(s) are reading this topic (1 Guests and 0 Anonymous Users)
0 Members:

|
Lo-Fi Version | Time is now: 24th June 2026 - 01:10 AM |
Invision Power Board
v9.1.4 © 2026 IPS, Inc.