|
|
|
Porsche, and the Porsche crest are registered trademarks of Dr. Ing. h.c. F. Porsche AG.
This site is not affiliated with Porsche in any way. Its only purpose is to provide an online forum for car enthusiasts. All other trademarks are property of their respective owners. |
|
|

  |

| Demick |
 Sep 28 2004, 10:06 AM Sep 28 2004, 10:06 AM
Post
#1
|
|
Ernie made me do it!  Group: Benefactors Posts: 2,312 Joined: 6-February 03 From: Pleasanton, CA Member No.: 257 |
I've been running around the last few days with a WB O2 sensor and a vacuum gauge hooked up in my car so that I can understand exactly what my engine is doing under various conditions. It has been quite interesting.
First: my engine is a 2056, #73 Webcam, 8.2:1 compression, and D-jet. The MPS was modified slightly to run with the 2056. So after a few days of driving, and playing with different resistances in-line with the head temp sensor, I've been able to characterize the air fuel ratio as a function of manifold vacuum. Below is a chart. Even though I am using a modified MPS with a modified motor, I think the characterization is typical of stock d-jet 914's (not in terms of actual a/f numbers, but in terms of the shape of the graph a different vacuum levels). While the car runs very well as currently adjusted, it is quite obvious that this is less than ideal. >15 in Hg: This condition is called overrun, or when you are decelerating and dragging the engine along. The engine goes very rich under this condition. This is not really a concern of mine, but it does seem to go overly rich. 15 in Hg: This is about the vacuum level you get when cruising at steady speed down the highway. You can see that the motor is quite rich under this condition (12:1). Ideally, for good fuel economy, I would want to see this number a good bit leaner - like 14:1 or so. Again, not too much of a concern - the motor should run cooler by running rich like this. 10 in Hg: This is the vacuum level when accelerating slightly or going at a steady speed up a small incline. What is very interesting here is that the motor continues to lean out under acceleration all the way until 7 in Hg (which, by the way, is exactly where I had set the MPS diaphragm to come off of it's part-load stop). This condition is definitely not ideal. I would like to see the engine running leanest at steady state cruise, and then slowly richen as I apply acceleration. But just the opposite happens until I get to a medium acceleration level, at which point an abrupt transition happens to richen the motor up for heavy acceleration. 5 in Hg: The transition to richen the motor has happened at this point. From here on to WOT (0 in Hg), the A/F mixture is appropriate. 12.5:1 at WOT is perfect. So what can be done to correct this? Well, the d-jet system is pretty limited in it's adjustments. But what I plan on doing is leaning out the overall mixture (to run leaner at steady speed cruise). This is done by tightening the inner screw on the MPS. Unfortunately, this will lean out the mixture across the entire range making the mixture at slight acceleration worse. So to compensate, I am going to set the point at which the diaphragm comes off of it's part-load stop to happen around 11 in Hg (stock is 6 in Hg). This is done by loosening the outer screw in the MPS. This will cause the transition to richen the motor earlier (at a higher vacuum level). Then in order to keep the motor from going too rich, the full-load stop will also need to be adjusted to stop the enrichment earlier. This is done by tightening the plug on the MPS. The possible disadvantage of this is that the diaphragm is designed to operate from about 0 to 6 inHg of vacuum. I will be using it from more like 4 to 11 inHg. So it may stress the diaphragm much more than normal and shorten it's life. I'll modify the MPS tonight I'll give an update tomorrow on what my findings are...... Demick Attached image(s) 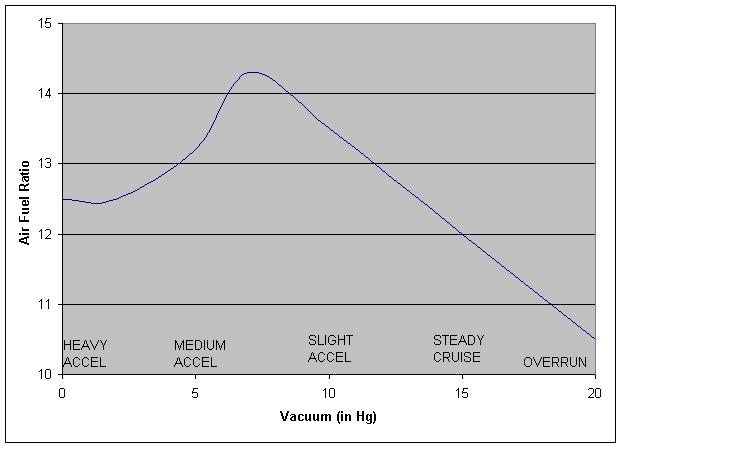
|
   |

 
|
| Britain Smith |
Sep 28 2004, 10:40 AM
Post
#2
|
|
Nano Member Group: Members Posts: 2,354 Joined: 27-February 03 From: Hillsboro, OR Member No.: 364 |
Very intuitive analysis...I look forward to seeing the data after modifing the MPS.
-Britain |
|
|
|
| Bleyseng |
Sep 28 2004, 11:10 AM
Post
#3
|
|
Aircooled Baby! Group: Members Posts: 13,037 Joined: 27-December 02 From: Seattle, Washington (for now) Member No.: 24 Region Association: Pacific Northwest |
You need to set the part load with the inner screw to about 13.7 to 1. The outer screw should be set with a Wavetek meter for the slope or transision.
The WOT is set with the machined plug! Use can screw this in and out to adjust it. If you haven't already done this, heat up the epoxy and carefully pick it off. Then screw the plug into the MPS. Take apart the MPS and remove the plug by screwing it in thus out. Clean the threads (I use a big ole tap for this). Put everything back together and seal it. Adjust the part load Put the plug in so it just touches the diaphram and then adjust the WOT setting to 12.5 to 1. You should have a nice flat A/F mix curve on you graph. Idle is set by the idle mix screws at the end. Geoff (IMG:style_emoticons/default/idea.gif) |
|
|
|
| mike_the_man |
Sep 28 2004, 11:17 AM
Post
#4
|
|
I like stuff! Group: Members Posts: 1,338 Joined: 11-June 03 From: Regina, Saskatchewan, Canada Member No.: 809 |
Very interesting. Are you planning on using anything to adjust the MPS (ie Wavetech, or other type of inductance meter)? Or are you just going to make small adjustments till air/fuel ratios are optimized? What type of O2 sensor did you use and where did you mount it? I would like to do something similar.
Those MPSs are pretty complicated little units. I had to read over Brad Ander's webpage about 4 times before I understood how they worked. |
|
|
|
| Demick |
Sep 28 2004, 11:32 AM
Post
#5
|
|
Ernie made me do it! Group: Benefactors Posts: 2,312 Joined: 6-February 03 From: Pleasanton, CA Member No.: 257 |
I've got a BK 878 LCR meter to do the adjustments with, and have adjusted MPS's before. I've had some pretty lengthy discussions with Brad Anders, read his page many times. Even stuied the original patents on the MPS, so I am pretty familiar with how it works and the effects of each adjustment.
I have a wideband O2 sensor in the exhaust right after the 4 pipes converge into one. Then I have an Innovate Motorsports LM-1 handheld meter to take readings with. Demick |
|
|
|
| nebreitling |
Sep 28 2004, 11:37 AM
Post
#6
|
|
Member Emeritus Group: Members Posts: 3,314 Joined: 26-March 03 From: San Francisco Member No.: 478 |
demick, thanks for posting this stuff. i'm interested in your followups
n |
|
|
|
| mike_the_man |
Sep 28 2004, 11:43 AM
Post
#7
|
|
I like stuff! Group: Members Posts: 1,338 Joined: 11-June 03 From: Regina, Saskatchewan, Canada Member No.: 809 |
I'd love to get one of those LM-1s. I think they would be very helpful for fine tuning. I've adjusted my MPS after replacing the diaphragm, but I think it may be ruinning a little rich yet. I'm sure there is more preformance to be had out of that little 2.0L. Let us know how it goes, I'll be very interested to see your results. In fact, I would enjoy talking with you about this sometime.
|
|
|
|
|
1 User(s) are reading this topic (1 Guests and 0 Anonymous Users)
0 Members:

|
Lo-Fi Version | Time is now: 10th June 2026 - 03:24 AM |
Invision Power Board
v9.1.4 © 2026 IPS, Inc.