|
|
|
Porsche, and the Porsche crest are registered trademarks of Dr. Ing. h.c. F. Porsche AG.
This site is not affiliated with Porsche in any way. Its only purpose is to provide an online forum for car enthusiasts. All other trademarks are property of their respective owners. |
|
|

  |

| sanman |
 Oct 1 2004, 11:02 AM Oct 1 2004, 11:02 AM
Post
#1
|
|
Leaving California  Group: Members Posts: 341 Joined: 17-June 04 From: Houston, TX Member No.: 2,219 Region Association: None |
Has any one sprayed both ppg & Omni.
you can get 2 stage omni for half the price of PPG I have use PPG in the past and was wanting an opinion of the omni which would be better single stage PPG or 2 stage omni. Any words from experiece would be appreciated (IMG:style_emoticons/default/wink.gif) |
   |

 
|
| McMark |
Oct 1 2004, 11:29 AM
Post
#2
|
|
914 Freak! Group: Retired Admin Posts: 20,179 Joined: 13-March 03 From: Grand Rapids, MI Member No.: 419 Region Association: None |
Quality = $
I'm sure you can get a fine looking paint job with Omni. You can't tell someone the difference in look of paint. It can only be seen. If you buy PPG your paint will look better if it's applied correctly and you've done good bodywork. If you didn't spend at least a month on bodywork (3 days making it good, 1 week making it pretty nice, and 3 weeks making it perfect) get the Omni and don't bother with the PPG. If you spend a lot of time making the bodywork perfect then get the PPG and don't waste your good bodywork on cheap paint. |
|
|
|
| 1bad914 |
Oct 1 2004, 11:38 AM
Post
#3
|
|
Senior Member Group: Members Posts: 618 Joined: 6-May 04 From: Battle Creek, MI Member No.: 2,028 |
I have painted with both. The PPG DBC was thicker and would allow you to lay down a thicker first coat. After that I could not tell the difference. I had to almost lay down a tack coat of the Omni, it would run if laid on to thick. Omni is actually less then 1/2. I paid $66.00 a gallon for it. I'll post two pictures, the completed car was painted with DBC, the partial car is with Omni. I would paint with Omni again. Painting is all in the prep! 90% prep, 5 % skill and 5% luck! (IMG:style_emoticons/default/biggrin.gif)
Attached image(s) 
|
|
|
|
| 1bad914 |
Oct 1 2004, 11:43 AM
Post
#4
|
|
Senior Member Group: Members Posts: 618 Joined: 6-May 04 From: Battle Creek, MI Member No.: 2,028 |
Here is the Omni. I actually liked the way the Omni clear layed down. I would never paint single stage, it is not as forgiving. MHO
Attached image(s) 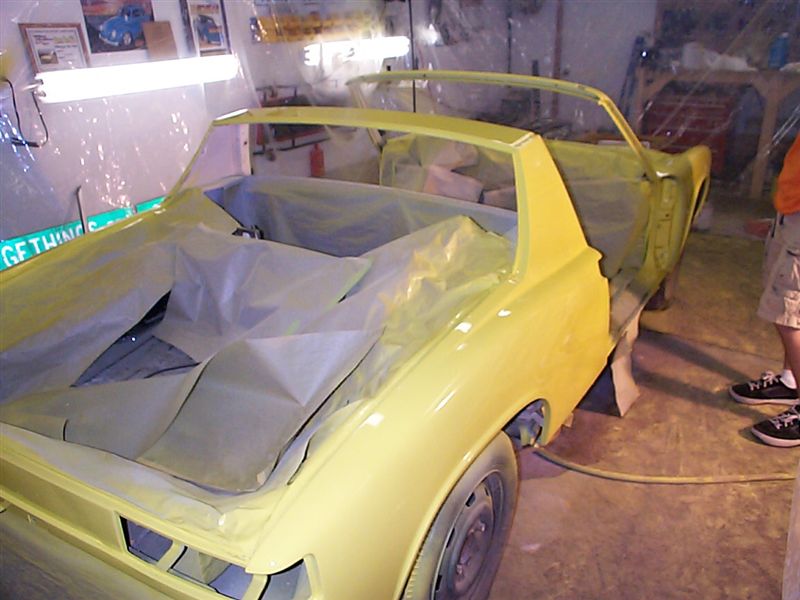
|
|
|
|
| 914forme |
Oct 1 2004, 11:45 AM
Post
#5
|
|
Times a wastin', get wrenchin'! Group: Members Posts: 3,896 Joined: 24-July 04 From: Dayton, Ohio Member No.: 2,388 Region Association: None |
Omni does not have as many pigments so it takes more coats to get the same coverage, thats how they make it cost less.
BTW, PPG is not good either try to find Eikkens or ICI, they are the best but $, but you spray on less. I shot PPG, because it is avalible locally, but only on stuff I really need too. Other peoples cars, repairs on the DDs etc.... For my racecar builds I goto the local tractor supply store and pickup a gallon or two of their lovely tractor enamel. I can buff it out nice and best of all, its only a few $$ and I can get it in JD green and gold. (IMG:style_emoticons/default/barf.gif) I shoot white on the racecars. Let you know JD green gallons all colors are $21, primer is $8 Yeah I know I just killed a few people with this but guess what its cheap and I can pickup a rattle can of white when I am at the track out in BFE, and it will match. And painting a racecar for less than $100 bucks is money in my bank. |
|
|
|
| DonTraver |
Oct 1 2004, 06:22 PM
Post
#6
|
|
Senior Member Group: Members Posts: 829 Joined: 5-August 04 Member No.: 2,461 |
I like the PPG Delstar, doesn't need a clear coat. Color sands and buffs out real nice. Also, real easy to touch up the paint chips you get from all the uncovered dirt trucks running on the freeways.
I use a 2 part epoxy primer, then shot a tack coat of PPG, then a couple of full coats, or until I run out of paint. Once you add the hardener, gotta shoot it. When I did my 6, I did one panel at a time, took 3 1/2 months, but then black is a bitch to shoot, panels have to be perfect. Attached image(s) 
|
|
|
|
| bondo |
Oct 1 2004, 06:52 PM
Post
#7
|
|
Practicing my perpendicular parking Group: Members Posts: 4,277 Joined: 19-April 03 From: Los Osos, CA Member No.: 587 Region Association: Central California |
QUOTE(DonTraver @ Oct 1 2004, 05:22 PM) I like the PPG Delstar, doesn't need a clear coat. Color sands and buffs out real nice. Also, real easy to touch up the paint chips you get from all the uncovered dirt trucks running on the freeways. How much does the delstar cost? I want to go single stage so I can color sand and buff out oxidation. I've never color sanded before... Can you describe the process so first timers like me won't screw up a fresh paintjob? (what grit, what to do, what not to do, etc.) |
|
|
|
| DonTraver |
Oct 1 2004, 07:13 PM
Post
#8
|
|
Senior Member Group: Members Posts: 829 Joined: 5-August 04 Member No.: 2,461 |
OMG, you want the whole procedure, lol, that's gonna take awhile. I'll have to get back to you on that.
Couple of things, basics on paint. You do get what you pay for. Good paint isn't cheap. Neither are the other supplies you're going to need, ie, sand papers, compounds, buffing pads, sealer coats, spot putty, fillers,etc. Preparation and cleanliness is the key to do a good job, shooting the paint is the easy part. I spent approx $1200 on paint and supplies. I took the car to a PCA tech session at Phil Thearles Shop after I finished her, He does all the High End cars. He took a look at the 6, said he'd have charged $8000 for the paint job. Anyway, I'll write up what I did, tools I made, etc, and post it later |
|
|
|
| SirAndy |
Oct 1 2004, 07:32 PM
Post
#9
|
|
Resident German Group: Admin Posts: 41,651 Joined: 21-January 03 From: Oakland, Kalifornia Member No.: 179 Region Association: Northern California |
QUOTE(1bad914 @ Oct 1 2004, 10:38 AM) I paid $66.00 a gallon for it. i paid $650 for a gallon of Guards Red! (IMG:style_emoticons/default/ohmy.gif) and the body-shop guy sold it to me for what *he* paid for it! (IMG:style_emoticons/default/unsure.gif) Andy |
 |
|
| spare time toys |
Oct 1 2004, 07:54 PM
Post
#10
|
|
hooked on grilling food. Group: Members Posts: 4,059 Joined: 3-April 04 From: West Plano Tx Member No.: 1,884 Region Association: Southwest Region |
Im shooting FREE paint. At work we get paint that expires and they throw it out. The feds require an experation date on aircraft paint so whats bad for the company is good for me. (IMG:style_emoticons/default/biggrin.gif)
|
|
|
|
| McMark |
Oct 1 2004, 07:56 PM
Post
#11
|
|
914 Freak! Group: Retired Admin Posts: 20,179 Joined: 13-March 03 From: Grand Rapids, MI Member No.: 419 Region Association: None |
That's what the good paint costs. Brandon just bought paint for the car in the shop and it was that much. OUCH!
|
|
|
|
| DonTraver |
Oct 1 2004, 09:05 PM
Post
#12
|
|
Senior Member Group: Members Posts: 829 Joined: 5-August 04 Member No.: 2,461 |
Supplies: Quantity:
Paint 1 gallon Reducer 1 gallon Hardener 1 pint Fish Eye Reducer 4 oz. Sealer paint 1 qt Epoxy Primer 2 qts Mixing Cups 1 qt size Tact Cloths 6+ Spot Putty 1 tube Super Fine Bondo 1 can Sand Paper: 400 Lots 600 1 package Meguiar’s Unigrit Sand Papers 1000 1 package 1200 1 package 1500 1 package 2000 1 package Compounds: Meguiar’s Heavy, Medium, Light cut 1 bottle of each Swirl Remover 2 bottles Glaze 1 bottle Orbital Buffer 10 inch 1 Orbital Buffer 6 inch 1 Buffing Pads for both 6+ each 36 inch sanding block made one, explain later 2 air filters for paint gun Masking tape lots Masking paper lots Degreaser 1 gallon OK, here goes. Wash car with Degreaser to remove all road dirt and old wax, scrub. I use this degreaser I get at Costco in the Auto dept, pulls the old wax right out of the paint, use full strength, and don’t let it dry. Identify body panels that are going to need work. Mark with a Marker Pen. Remove all body trim and bumpers. Glue 400 paper onto sanding block, go over entire car with sanding block, use a hand spray bottle filled with water and dish washing soap to keep surface wet, keep a hose handy. Rise/dry car, you’ll be able to see all the low spots. If there are small dings, parking lot, try to pound out, and then fill with super fine bondo or JB Weld. I filled the battery tray with JB Weld, and then shaped with a surfacing pad. If the battery ever eats the JB Weld, it’ll be time to throw out the carI removed doors, hoods, hood hinges, engine cover, lights, eyebrows, side marker lights, tail lights, door latches, pretty well stripped her down, if it could come off it did. Made a 36 inch sanding block. Used 1/8 x 2 x 36 inch aluminum flat plate and 1 inch alum angle. I attached the angle to the flat plate with counter sunk screws, 6 inch spacing for screws. Do not weld together, you’ll warp plate. Attached sand paper to sanding block with spray adhesive, pain in the ass to change paper, used razor blades and lacquer thinner to clean plate for new paper. But it worked great on doors and hoods. Note about Bondo, there are a couple of different types, one type holds water, one type doesn’t, get the one that doesn’t. Body shop supply should have it. Start with one panel, I hung doors and hoods in garage and shot them that way. Put eye bolts in ceiling, hung them with bungee cords and wire. If you have old sheets, cover everything up for over spray. THIS IS IMPORTANT: Before any painting. Find a good ground on car and any panels/doors you’re shooting, run a wire to a water pipe, clean water pipe for good connection. I shot 1 fender without doing that, then one fender with a ground. I had at least 80-90% less dust in the paint with the ground wire. I painted my car in the driveway; I always shot the paint in the morning, before any wind came up, prepped car night before. When you think you’re all ready, lol. Mask, prep car for paint. Shoot sealer coat of paint, this seals old paint, preps for primer. Let dry, wet sand with 400 sand paper. You have 48 to 72 hours to shot primer over sealer paint , shoot primer, wet sand with 400 sand paper, then 48 to 72 hours to shoot color coat over primer, or you start over. These times are another reason I worked one panel at a time, easier to shoot one panel, than the whole car. When you shoot color coats, first shoot a light tack coat, let dry 20 minutes, and then shoot at least 2 color coats at around 15 apart. Watch for flies, they like the smell of fresh paint, ask me how I know. This is how I solved the fly problem, I had my neighbor bring his big dog over and take a dump in my yard. Fly strips, fly catchers didn’t work, but that dog sure did lol. Let paint dry 4-5 days, in the sun if you can, then start the color sanding start with 1000 up to 2000, use lots of water mixed with dish washing soap. Then start buffing, heavy, medium, light, swirl remover, glaze, and wax. Change buffing pads a lot, only do about 6-8 square feet before changing pad. I used the degreaser to clean pads, put them in sun to dry. Like I said, there is no way to speed up a good paint job; it’s time consuming, often overwhelming. That’s one reason I did one panel at a time, plus I was driving her and racing her during the restoration. As long as I just concentrated on one panel at a time, I didn’t get overwhelmed. You won’t like this. 2 weeks after I finished all the paint, I went to Harbor Freight to pick up some tools. I’m waiting to check out, this guy comes into the store, says,” Does anyone own a black Porsche”. I said OMG, yes. He’d just backed his Ford F-250 with ugly dock bumper over the front end, got both fenders, turn signals, and the hood. The good news, he didn’t run, the bad news, I got to redo the whole front end, again. Chances are, I forgot somethig, any questions, ask. One other thing, I've been painting Harley's for about 20+ years. I've never had a dis-satisfied customer yet. Take Care, Don |
|
|
|
| URY914 |
Oct 1 2004, 10:34 PM
Post
#13
|
|
I built the lightest 914 in the history of mankind. Group: Members Posts: 120,725 Joined: 3-February 03 From: Jacksonville, FL Member No.: 222 Region Association: None |
Admin needs to put this in the classic threads list.
Don, everbody that has ever or will ever paint thier car themselves thanks you. Paul |
|
|
|
| 914helo |
Oct 1 2004, 11:11 PM
Post
#14
|
|
Member Group: Members Posts: 235 Joined: 29-September 04 From: Southern Utah Member No.: 2,859 Region Association: None |
Don, that's a great write-up. Thanks for taking a few minutes to do that. (IMG:style_emoticons/default/pray.gif)
I'm starting to sand and prep my car for painting. I've done small pieces and panels before, but this will be the first time I do the whole car. Thanks again. |
|
|
|
| scruz914 |
Oct 2 2004, 12:02 AM
Post
#15
|
|
Senior Member Group: Members Posts: 815 Joined: 26-February 04 From: Santa Cruz, CA Member No.: 1,724 |
QUOTE(914forme @ Oct 1 2004, 09:45 AM) when I am at the track out in BFE... OK. Who knows what BFE stands for? I'm pretty sure I know. (IMG:style_emoticons/default/smile.gif) And Don, that was a really great write up! Sorry if this is a hijack.... I think Don already closed things up. -Jeff |
|
|
|
| URY914 |
Oct 2 2004, 04:15 AM
Post
#16
|
|
I built the lightest 914 in the history of mankind. Group: Members Posts: 120,725 Joined: 3-February 03 From: Jacksonville, FL Member No.: 222 Region Association: None |
Bum F...Ejup
(I don't spill too good) |
|
|
|
| BIGKAT_83 |
Oct 2 2004, 04:30 AM
Post
#17
|
|
Senior Member Group: Members Posts: 1,798 Joined: 25-January 03 From: Way down south Bogart,GA Member No.: 194 Region Association: South East States |
QUOTE(URY914 @ Oct 1 2004, 08:34 PM) Admin needs to put this in the classic threads list. Don, everbody that has ever or will ever paint thier car themselves thanks you. Paul (IMG:style_emoticons/default/agree.gif) Great write up and the car backs it up. THANKS Bob |
|
|
|
| F4i |
Oct 2 2004, 12:04 PM
Post
#18
|
|
914 DOG! Group: Benefactors Posts: 482 Joined: 22-December 03 From: AB Canada Member No.: 1,460 |
QUOTE(DonTraver @ Oct 1 2004, 08:05 PM) THIS IS IMPORTANT: Before any painting. Find a good ground on car and any panels/doors you’re shooting, run a wire to a water pipe, clean water pipe for good connection. I shot 1 fender without doing that, then one fender with a ground. I had at least 80-90% less dust in the paint with the ground wire. I painted my car in the driveway; I always shot the paint in the morning, before any wind came up, prepped car night before. (IMG:style_emoticons/default/agree.gif) Grounding is very important fiberglass is even worse. I also reccomend the use of a tack cloth just prior to shooting. |
|
|
|
| DonTraver |
Oct 2 2004, 12:14 PM
Post
#19
|
|
Senior Member Group: Members Posts: 829 Joined: 5-August 04 Member No.: 2,461 |
See, I knew I'd forget something. (IMG:style_emoticons/default/boldblue.gif)
Prep car, the night before, masking tape and paper. The day of the painting. Take a rag, fold it square, soak with reducer, not dripping, just real wet. Lightly wipe down areas to be painted, ONE Direction, ONE Time. Let dry, then lightly use a tack cloth. Now you're ready for the first coat. When you mask off, you're going to get finger prints, finger prints can cause the new paint to lift later on, wiping with reducer will remove the finger print oils. I always wiped down, then went to mix paint to give it time to dry before tack cloth. I'll probably remember more later, anyone else see anything I've missed, wouldn't surprize me. lol |
|
|
|
| DonTraver |
Oct 2 2004, 06:43 PM
Post
#20
|
|
Senior Member Group: Members Posts: 829 Joined: 5-August 04 Member No.: 2,461 |
One last thing. I can not paint your car for you. I can paint mine, but not yours. If I paint your car, the EPA can get involved, since I'm not painting in a booth, don't have a licience, etc.
I CAN teach you how to do it yourself, even supply the guns, blocks, etc. If you want to bring the car over to my place, that's fine too. One thing I've learned about the EPA when I worked for Caterpillar building and running Generator Plants. Once you get the EPA on you ass, you never, never, never get them off. I saw what happened to other companies that did. Better to not get them on your butt in the first place. Take Care, Don |
|
|
|
|
1 User(s) are reading this topic (1 Guests and 0 Anonymous Users)
0 Members:

|
Lo-Fi Version | Time is now: 21st May 2024 - 09:24 AM |
Invision Power Board
v9.1.4 © 2024 IPS, Inc.