|
|
|
Porsche, and the Porsche crest are registered trademarks of Dr. Ing. h.c. F. Porsche AG.
This site is not affiliated with Porsche in any way. Its only purpose is to provide an online forum for car enthusiasts. All other trademarks are property of their respective owners. |
|
|


| bondo |
 Oct 5 2004, 04:01 PM Oct 5 2004, 04:01 PM
Post
#1
|
|
Practicing my perpendicular parking  Group: Members Posts: 4,277 Joined: 19-April 03 From: Los Osos, CA Member No.: 587 Region Association: Central California |
I just took apart my last transmission, and I carefully documented the disassembly with notes and pictures. I did it so I could put one back together, but I might as well post it here for all to benefit from. It is not intened to replace Red-Beard's article, more to supplement it. The parts diagrams and Red-beard's article are not enough to turn a pile of parts into a transmission. (There are three similar tapered washers that are all different thicknesses, for example) You either have to just know where everything goes, or take very good notes while disassembling. I did not fully disassemble the transmission, just the most confusing parts that usually have to come off. I left a bearing race on the input shaft, and a bearing on the pinion shaft. I did not remove the differential. Without further adoo, (I don't even try to spell french) here's step one:
1. Drain the gear lube! Very important! Here's what happens when you don't: Attached image(s) 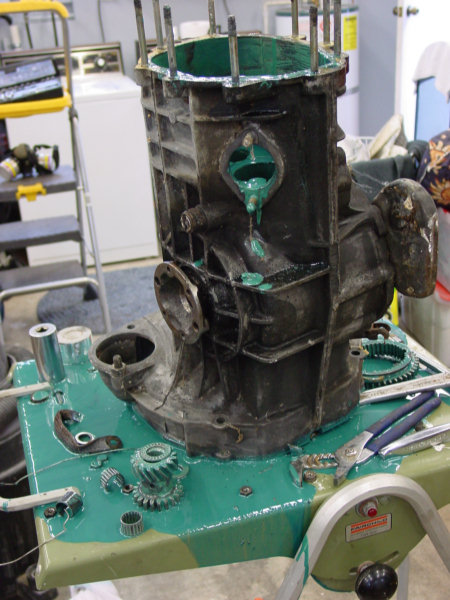
|
   |

 
|
Posts in this topic
 bondo 914 transmission disassembly Oct 5 2004, 04:01 PM
 bondo 2. Remove shifter: (2 13mm nuts with washers) Oct 5 2004, 04:03 PM bondo 3. Remove tail cover nuts: (nine 13mm nuts with ... Oct 5 2004, 04:04 PM bondo 4. lightly tap tail cover "ears" with a rubber mal... Oct 5 2004, 04:06 PM bondo 5. Remove the tail cover once it comes loose. Reve... Oct 5 2004, 04:09 PM bondo The gear that actually does the reversing goes ove... Oct 5 2004, 04:12 PM bondo The roller/thrust bearing goes over the reverse ge... Oct 5 2004, 04:14 PM bondo And the washer with the notch goes on top of the b... Oct 5 2004, 04:16 PM bondo Now tap the 2/3 and 4/5 shift rods into the transm... Oct 5 2004, 04:23 PM bondo With the transmission locked, you can now remove t... Oct 5 2004, 04:28 PM bondo Now remove the 1/reverse shift fork bolt completel... Oct 5 2004, 04:31 PM bondo Then remove the 1/reverse slider hub and first gea... Oct 5 2004, 04:32 PM bondo Next the 1st gear roller bearing and its inner rac... Oct 5 2004, 04:37 PM bondo Now the first tapered washer comes off. It is abou... Oct 5 2004, 04:39 PM bondo Now you can grip the intermediate plate and pull t... Oct 5 2004, 04:42 PM bondo Here you can see the notches in all the shift rods... Oct 5 2004, 04:44 PM bondo Now remove the plug from the bottom of the interme... Oct 5 2004, 04:45 PM bondo Now you can remove the 1/reverse shift rod (make s... Oct 5 2004, 04:59 PM bondo Next, remove the castle nut and washer from the in... Oct 5 2004, 05:02 PM bondo Alternate tapping the two shafts with a brass hamm... Oct 5 2004, 05:06 PM bondo Once you get the shafts out of the intermediate pl... Oct 5 2004, 05:09 PM bondo Ok, for a while we'll concentrate on the pinio... Oct 5 2004, 05:11 PM bondo Next is the second tapered washer. The washer is a... Oct 5 2004, 05:16 PM bondo Now remove the 2/3 slider and its hub. Oct 5 2004, 05:17 PM bondo Next 3rd gear comes off, with it's roller bear... Oct 5 2004, 05:24 PM bondo Then take off the 2.5mm thick flat washer. Oct 5 2004, 05:25 PM bondo Next take off 4th gear. The ridge goes against the... Oct 5 2004, 05:27 PM bondo Now take off the spacer that's between 4th and... Oct 5 2004, 05:28 PM bondo Then remove 5th gear (ridge goes twoards spacer) Oct 5 2004, 05:29 PM bondo Now remove the 4.2mm thick flat wahser. Oct 5 2004, 05:30 PM bondo The last thing to come off the pinion shaft is fou... Oct 5 2004, 05:33 PM bondo Now we move on to the input shaft. Clamp it in a v... Oct 5 2004, 05:35 PM bondo Now pound the locking tab with a screwdriver and a... Oct 5 2004, 05:37 PM bondo Here's where the big-ass crecent wrench comes ... Oct 5 2004, 05:39 PM bondo Once you get that nut and locking washer off, take... Oct 5 2004, 05:42 PM bondo The input shaft parts come off in the following or... Oct 5 2004, 05:54 PM bondo Whelp, there you have it. I hope this helps people... Oct 5 2004, 05:56 PM ambergris :beer1: :headbanger:
Holy cow! Cheers and y... Oct 5 2004, 06:30 PM bondo Thanks! Glad to help. Oct 5 2004, 06:46 PM Lawrence Damn. That's a great article.
I nominate for... Oct 5 2004, 08:06 PM bondo Looks like it's already in the classics.. I gu... Oct 6 2004, 12:22 AM gopack First of all GREAT JOB and THANKS for the hard wor... Oct 6 2004, 08:22 AM bondo I thought about that but I don't have any arro... Oct 6 2004, 11:03 AM joes Good pics and info, thanks. Where do I find "Red B... Oct 6 2004, 11:53 AM bondo
bondo 2. Remove shifter: (2 13mm nuts with washers) Oct 5 2004, 04:03 PM bondo 3. Remove tail cover nuts: (nine 13mm nuts with ... Oct 5 2004, 04:04 PM bondo 4. lightly tap tail cover "ears" with a rubber mal... Oct 5 2004, 04:06 PM bondo 5. Remove the tail cover once it comes loose. Reve... Oct 5 2004, 04:09 PM bondo The gear that actually does the reversing goes ove... Oct 5 2004, 04:12 PM bondo The roller/thrust bearing goes over the reverse ge... Oct 5 2004, 04:14 PM bondo And the washer with the notch goes on top of the b... Oct 5 2004, 04:16 PM bondo Now tap the 2/3 and 4/5 shift rods into the transm... Oct 5 2004, 04:23 PM bondo With the transmission locked, you can now remove t... Oct 5 2004, 04:28 PM bondo Now remove the 1/reverse shift fork bolt completel... Oct 5 2004, 04:31 PM bondo Then remove the 1/reverse slider hub and first gea... Oct 5 2004, 04:32 PM bondo Next the 1st gear roller bearing and its inner rac... Oct 5 2004, 04:37 PM bondo Now the first tapered washer comes off. It is abou... Oct 5 2004, 04:39 PM bondo Now you can grip the intermediate plate and pull t... Oct 5 2004, 04:42 PM bondo Here you can see the notches in all the shift rods... Oct 5 2004, 04:44 PM bondo Now remove the plug from the bottom of the interme... Oct 5 2004, 04:45 PM bondo Now you can remove the 1/reverse shift rod (make s... Oct 5 2004, 04:59 PM bondo Next, remove the castle nut and washer from the in... Oct 5 2004, 05:02 PM bondo Alternate tapping the two shafts with a brass hamm... Oct 5 2004, 05:06 PM bondo Once you get the shafts out of the intermediate pl... Oct 5 2004, 05:09 PM bondo Ok, for a while we'll concentrate on the pinio... Oct 5 2004, 05:11 PM bondo Next is the second tapered washer. The washer is a... Oct 5 2004, 05:16 PM bondo Now remove the 2/3 slider and its hub. Oct 5 2004, 05:17 PM bondo Next 3rd gear comes off, with it's roller bear... Oct 5 2004, 05:24 PM bondo Then take off the 2.5mm thick flat washer. Oct 5 2004, 05:25 PM bondo Next take off 4th gear. The ridge goes against the... Oct 5 2004, 05:27 PM bondo Now take off the spacer that's between 4th and... Oct 5 2004, 05:28 PM bondo Then remove 5th gear (ridge goes twoards spacer) Oct 5 2004, 05:29 PM bondo Now remove the 4.2mm thick flat wahser. Oct 5 2004, 05:30 PM bondo The last thing to come off the pinion shaft is fou... Oct 5 2004, 05:33 PM bondo Now we move on to the input shaft. Clamp it in a v... Oct 5 2004, 05:35 PM bondo Now pound the locking tab with a screwdriver and a... Oct 5 2004, 05:37 PM bondo Here's where the big-ass crecent wrench comes ... Oct 5 2004, 05:39 PM bondo Once you get that nut and locking washer off, take... Oct 5 2004, 05:42 PM bondo The input shaft parts come off in the following or... Oct 5 2004, 05:54 PM bondo Whelp, there you have it. I hope this helps people... Oct 5 2004, 05:56 PM ambergris :beer1: :headbanger:
Holy cow! Cheers and y... Oct 5 2004, 06:30 PM bondo Thanks! Glad to help. Oct 5 2004, 06:46 PM Lawrence Damn. That's a great article.
I nominate for... Oct 5 2004, 08:06 PM bondo Looks like it's already in the classics.. I gu... Oct 6 2004, 12:22 AM gopack First of all GREAT JOB and THANKS for the hard wor... Oct 6 2004, 08:22 AM bondo I thought about that but I don't have any arro... Oct 6 2004, 11:03 AM joes Good pics and info, thanks. Where do I find "Red B... Oct 6 2004, 11:53 AM bondo Oct 6 2004, 12:04 PM
maf914 Bondo,
Great contribution. One day I will need ... Oct 6 2004, 12:30 PM
bondo BTW, if anyone needs further explanations or pics,... Oct 6 2004, 12:36 PM
joes Does anyone have info on where to get cheap trans ... Oct 6 2004, 12:45 PM
bondo You could do what I'm doing.. just replace the... Oct 6 2004, 01:03 PM
Red-Beard Wow. Your shop is way cleaner than mine, huh Mike.... Oct 6 2004, 08:20 PM
bondo Yeah, I tried the vice grip thing first, until I s... Oct 6 2004, 09:30 PM
 Red-Beard The shims are used to line up the gears with the p... Oct 7 2004, 05:15 AM
maf914 Bondo,
Great contribution. One day I will need ... Oct 6 2004, 12:30 PM bondo BTW, if anyone needs further explanations or pics,... Oct 6 2004, 12:36 PM joes Does anyone have info on where to get cheap trans ... Oct 6 2004, 12:45 PM bondo You could do what I'm doing.. just replace the... Oct 6 2004, 01:03 PM Red-Beard Wow. Your shop is way cleaner than mine, huh Mike.... Oct 6 2004, 08:20 PM bondo Yeah, I tried the vice grip thing first, until I s... Oct 6 2004, 09:30 PM Red-Beard The shims are used to line up the gears with the p... Oct 7 2004, 05:15 AM  |
1 User(s) are reading this topic (1 Guests and 0 Anonymous Users)
0 Members:

|
Lo-Fi Version | Time is now: 29th April 2024 - 03:22 AM |
Invision Power Board
v9.1.4 © 2024 IPS, Inc.
| All rights reserved 914World.com © since 2002 |
|
914World.com is the fastest growing online 914 community! We have it all, classifieds, events, forums, vendors, parts, autocross, racing, technical articles, events calendar, newsletter, restoration, gallery, archives, history and more for your Porsche 914 ... |