|
|
|
Porsche, and the Porsche crest are registered trademarks of Dr. Ing. h.c. F. Porsche AG.
This site is not affiliated with Porsche in any way. Its only purpose is to provide an online forum for car enthusiasts. All other trademarks are property of their respective owners. |
|
|

  |

| steuspeed |
 May 3 2012, 02:30 AM May 3 2012, 02:30 AM
Post
#1
|
|
Senior Member  Group: Members Posts: 1,006 Joined: 12-July 11 From: Portland, Oregon Member No.: 13,308 Region Association: Pacific Northwest |
So I attempted a rear brake job today with not much luck. First off the metal cover on the inside adjuster was freaking stuck on. After cooking the caliper on my stove with liquid wrench, freezing it in my freezer over night, cooking it again in the morning the thing would not budge with a 4mm hex wrench on a huge crescent wrench. My hex key was twisting under the force. Finally the hex hole stripped. I cut the edges off the round cover with my dremel cut off tool and made a 13mm hex nut out of it. After hitting the thing with my propane torch it came loose only with a long 13mm craftsman pro wrench. The piston was so far out I had to use a C clamp to get it going back in with the adjuster. Next, one of the rotor screws was stuck. I never got it off despite liquid wrench and rust remover gel. I hit my screwdriver with a hammer while trying to turn it. Used my torch too. No luck. Next, I'm looking at my new Porterfield RS4 pads and notice that the holes are the same size unlike the ones on the car that have one big and one small. These won't work unless I hog out one hole. Any comments on this? Since I can't get this ground up rotor off, I decide to grab an old ATE Alfa Romeo pad I had and hog out one hole just to get by for now. After I get the caliper mounted I notice that setting the pad clearance on the inside pad is going to be next to impossible. How do you get a feeler gauge in there with the dust shield in the way? I bought a long T handle 4mm wrench and it's too long to get through the trailing arm hole to adjust. Looks like you need just the right hex wrench and turning it is not going to be real easy regardless. Any tips or tricks on this job would be appreciated.
|
   |

 
|
| steuspeed |
May 3 2012, 02:42 AM
Post
#2
|
|
Senior Member Group: Members Posts: 1,006 Joined: 12-July 11 From: Portland, Oregon Member No.: 13,308 Region Association: Pacific Northwest |
Might as well cut my new T handle to the perfect length. What else am I going to use it for anyway?
|
|
|
|
| Cracker |
May 3 2012, 05:37 AM
Post
#3
|
|
Advanced Member Group: Members Posts: 2,148 Joined: 2-February 10 From: Atlanta (area) Member No.: 11,316 Region Association: South East States |
throw $60 my way and you can just bolt my old rears in... (IMG:style_emoticons/default/biggrin.gif)
|
|
|
|
| wingnut86 |
May 3 2012, 06:41 AM
Post
#4
|
|
...boola la boo boola boo... Group: Members Posts: 1,053 Joined: 22-April 10 From: South Carolina Member No.: 11,645 Region Association: South East States |
PM the "Shea-man", he will know...
|
|
|
|
| infraredcalvin |
May 15 2012, 11:26 PM
Post
#5
|
|
Distracted Member Group: Members Posts: 1,518 Joined: 25-August 08 From: Ladera Ranch, CA Member No.: 9,463 Region Association: Southern California |
(edit - sorry it has been a long time). For the dust shield, I believe you can unbolt easily from the rear (2 or 3 bolts) and let it hang out of the way so you can put the feeler gauge in.
As for the pads, I recall a similar issue but it's been so long I don't remember if the pads worked as is or if I got a different pair that fit. I don't think I hogged anything out.... Get a power bleeder if you don't have one, one of the best tools I've bought, made the most difference in brake feel to do a proper bleed of the proportion valve and calipers with ate blue or gold. BTW, +1 on Eric Shea, he's the man for 914 brakes. |
|
|
|
| euro911 |
May 15 2012, 11:36 PM
Post
#6
|
|
Retired & living the dream. God help me if I wake up! Group: Members Posts: 8,849 Joined: 2-December 06 From: So.Cal. & No.AZ (USA) Member No.: 7,300 Region Association: Southern California |
I use a 3/8" ratchet handle, long extension and a 4mm Allen socket wrench to get the old ones off.
I remember once having to cut slots it the heads for a large flat blade screwdriver when the Allen sockets stripped-out. I also purchased some hex replacement covers ... (Pelican has them too). A little anti-seize on the threads will keep them from sticking the next time you need to remove them. |
|
|
|
| Dave_Darling |
May 15 2012, 11:46 PM
Post
#7
|
|
914 Idiot Group: Members Posts: 14,990 Joined: 9-January 03 From: Silicon Valley / Kailua-Kona Member No.: 121 Region Association: Northern California |
I don't remember seeing any pads with different-sized holes in years. I just used a drill on the one hole to enlarge it to fit the retaining pin. Been long enough that I don't remember the drill size, though.
--DD |
|
|
|
| steuspeed |
May 26 2012, 11:05 PM
Post
#8
|
|
Senior Member Group: Members Posts: 1,006 Joined: 12-July 11 From: Portland, Oregon Member No.: 13,308 Region Association: Pacific Northwest |
Now that the car is on blocks from last weekends tire slashing, I have easy access to finish the rear brake job. I know it looks super ghetto, but my Alfa is sitting on my jack stands in the garage. Had these concrete chunks left over from busting up a patio in the back. Leaving the new tires off for the long 4 day Memorial weekend in case the jerk offs come back again. Got the rotor screw free with a torch and impact hammer screwdriver. Removed the rotor and caliper without breaking the hydraulic line this time. Decided to hog out one hole bigger on each Porterfield R4-S pad with a rotary file I picked up at Ace Hardware. Found a 5/16 hex wrench that was long enough to adjust the rear pad clearance through the trailing arm hole. While reading through my Pelican Parts instructions I had the a-ha moment that you leave the metal retaining clip off so you can get the feeler gauge straight in where the pads go. After you set the clearance you pull the pins back out and put the cross clip back in there. With the dust shield, there is no way you can set the clearance and the dust shield bolt head are under the rotor which you cannot get to once assembled.
You can see the inside pad was down to the metal and the outside had plenty of pad. This is my adjuster cap I cut to a 13mm head with my dremel cut off tool. Attached thumbnail(s)  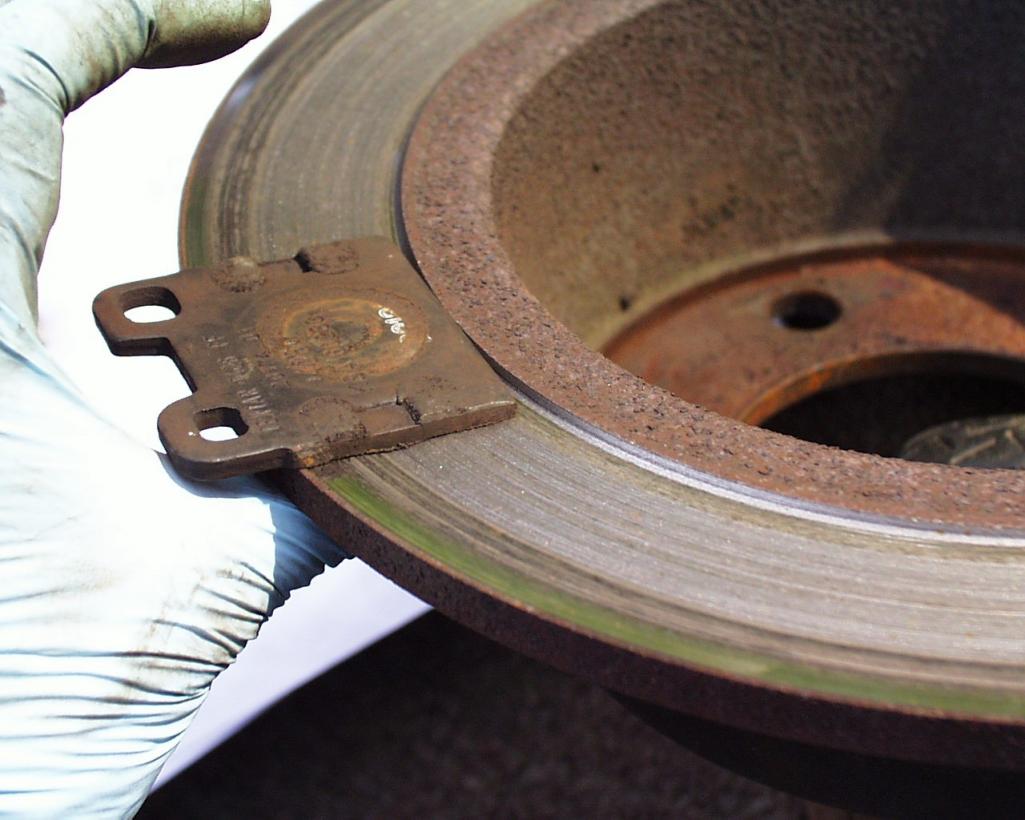 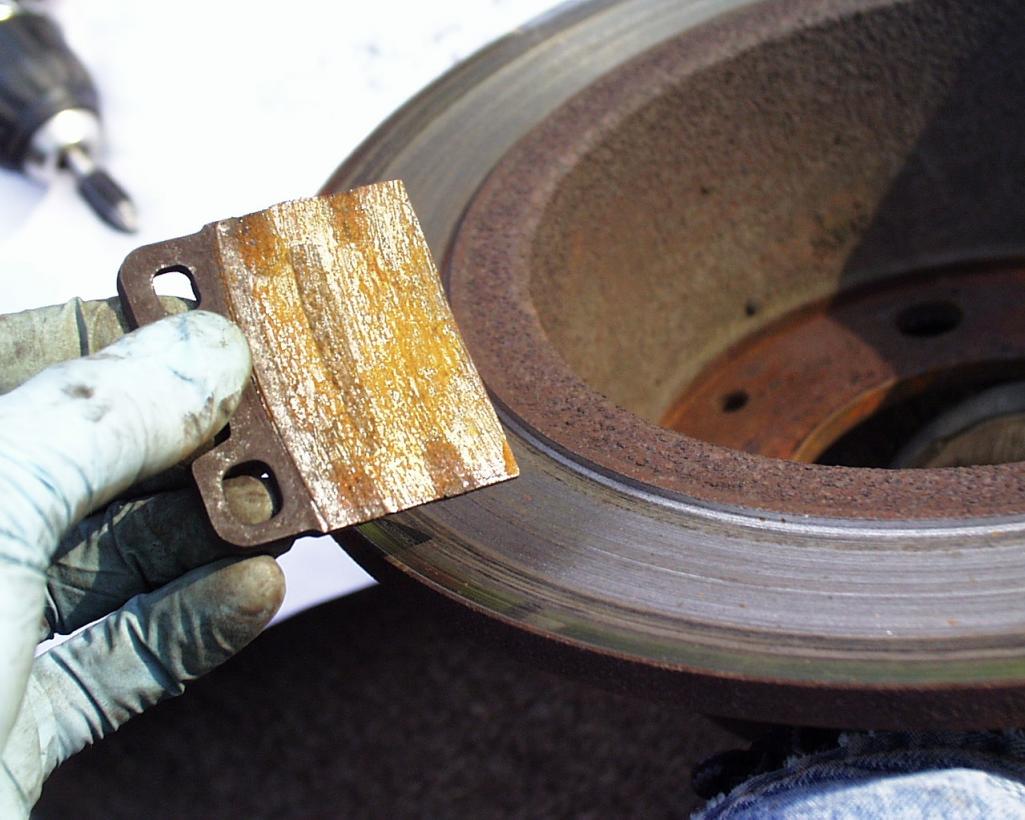 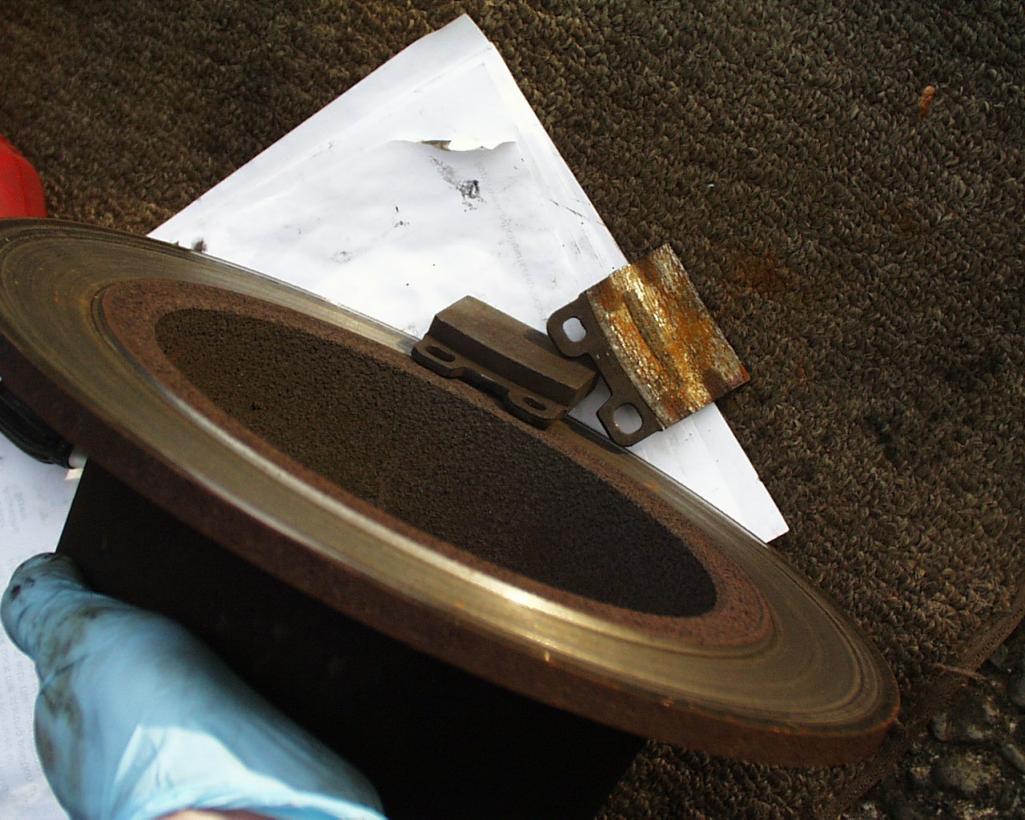 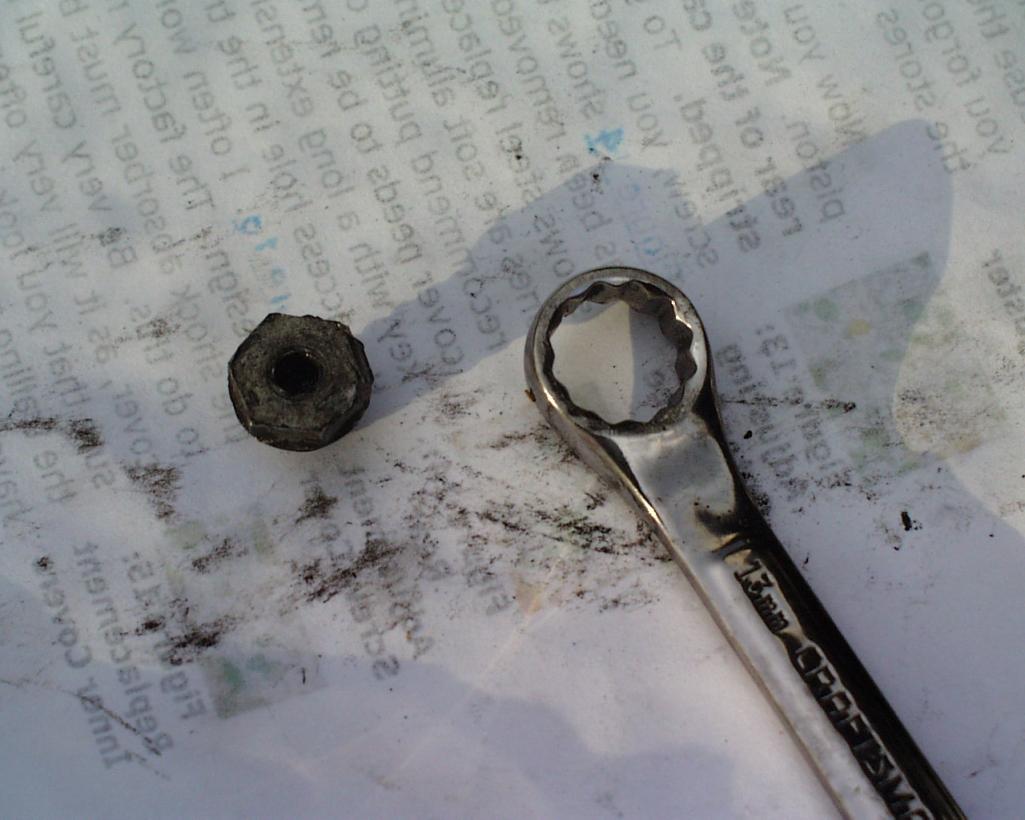
|
|
|
|
| steuspeed |
May 26 2012, 11:11 PM
Post
#9
|
|
Senior Member Group: Members Posts: 1,006 Joined: 12-July 11 From: Portland, Oregon Member No.: 13,308 Region Association: Pacific Northwest |
Rotary File I used on Porterfield R4-S pads.
Attached thumbnail(s) 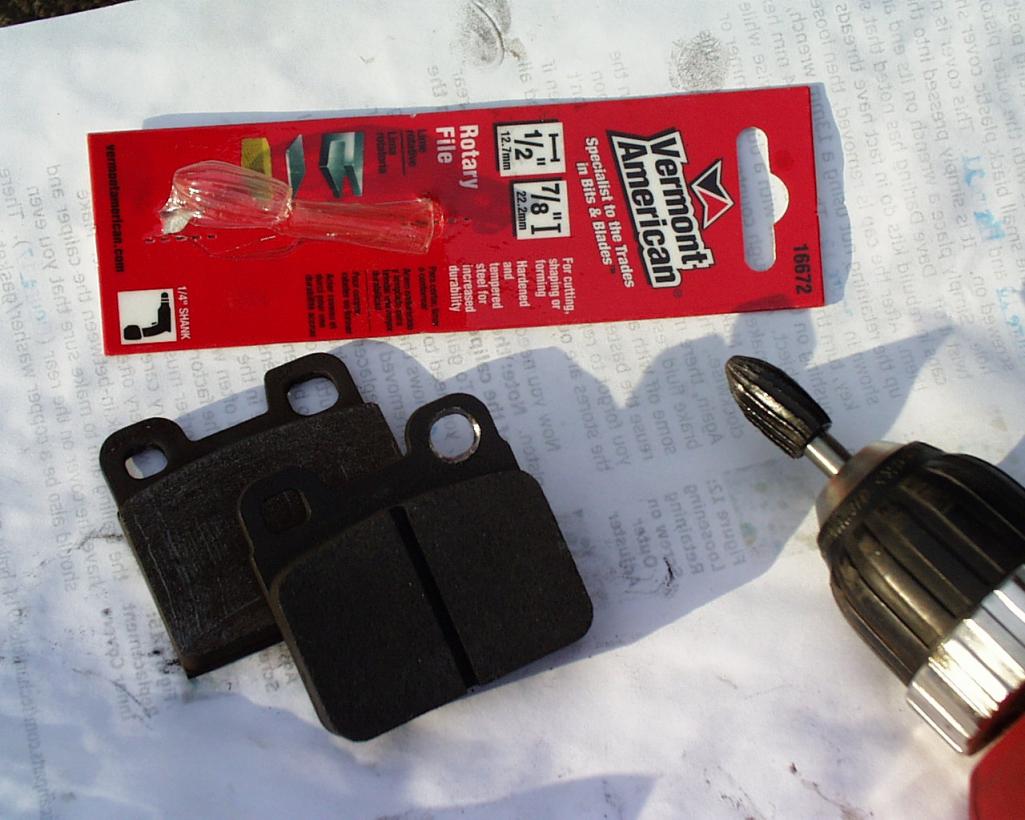
|
|
|
|
| euro911 |
May 27 2012, 12:48 AM
Post
#10
|
|
Retired & living the dream. God help me if I wake up! Group: Members Posts: 8,849 Joined: 2-December 06 From: So.Cal. & No.AZ (USA) Member No.: 7,300 Region Association: Southern California |
If one pad wore down and the other didn't, your caliper isn't working properly and you should rebuild it. I'd recommend doing both at the same time.
Pelican sells rear rebuild kits for $20. each + shipping ... Click here ... or you can buy 2 new rear kits from me for only $40. shipped (IMG:style_emoticons/default/happy11.gif) The reason I'm selling them? I was going to rebuild mine, but due to time constraints, I bought |
|
|
|
| davep |
May 27 2012, 08:25 AM
Post
#11
|
|
914 Historian Group: Benefactors Posts: 5,144 Joined: 13-October 03 From: Burford, ON, N0E 1A0 Member No.: 1,244 Region Association: Canada |
Rebuilding the rear calipers can be really tricky. BTDT. Well, just 30 years experience and a few dozen calipers. While most people can rebuild their own it can be extremely frustrating. I made several tools to make my job easier, but it still takes four hours each. I think that for most people getting Eric at PMB to do a professional job is much better. For one thing, the strip and replate will make them work better and last much longer. If you insist on doing it yourself, then look up Eric's step by step how-to guide.
|
|
|
|
| steuspeed |
May 27 2012, 09:55 AM
Post
#12
|
|
Senior Member Group: Members Posts: 1,006 Joined: 12-July 11 From: Portland, Oregon Member No.: 13,308 Region Association: Pacific Northwest |
I thought the uneven pad wear was a result from driving around with the hand brake on?
|
|
|
|
| infraredcalvin |
May 27 2012, 10:41 AM
Post
#13
|
|
Distracted Member Group: Members Posts: 1,518 Joined: 25-August 08 From: Ladera Ranch, CA Member No.: 9,463 Region Association: Southern California |
QUOTE(steuspeed @ May 27 2012, 08:55 AM)  I thought the uneven pad wear was a result from driving around with the hand brake on? If that's really the case than you need to check your handbrake as well. Even the handbrake should pull evenly. If you're going through the trouble of putting some good pads on, you should be sure you're getting the most from them. Rebuilding is not bad, just take your time and don't skimp if you find issues. After all, what is your safety worth? If you run into too much trouble buying another set that works is relatively cheap and easy to do here. |
|
|
|
| steuspeed |
May 27 2012, 11:25 PM
Post
#14
|
|
Senior Member Group: Members Posts: 1,006 Joined: 12-July 11 From: Portland, Oregon Member No.: 13,308 Region Association: Pacific Northwest |
The adjustment on the handbrake was WAY off on the right side. I had to loosen the clip that holds the cable housing to the bottom of the car in order to adjust the cables properly. Someone that worked on this car prior to me didn't understand what was going on. The left side pads and the right outer pad all looked about the same. With the hand brake off, the inner right pad was still being forced against the disc causing it to wear down to the backing plate.
New Zimmerman rotor and Porterfield R4-S pads installed. Attached thumbnail(s) 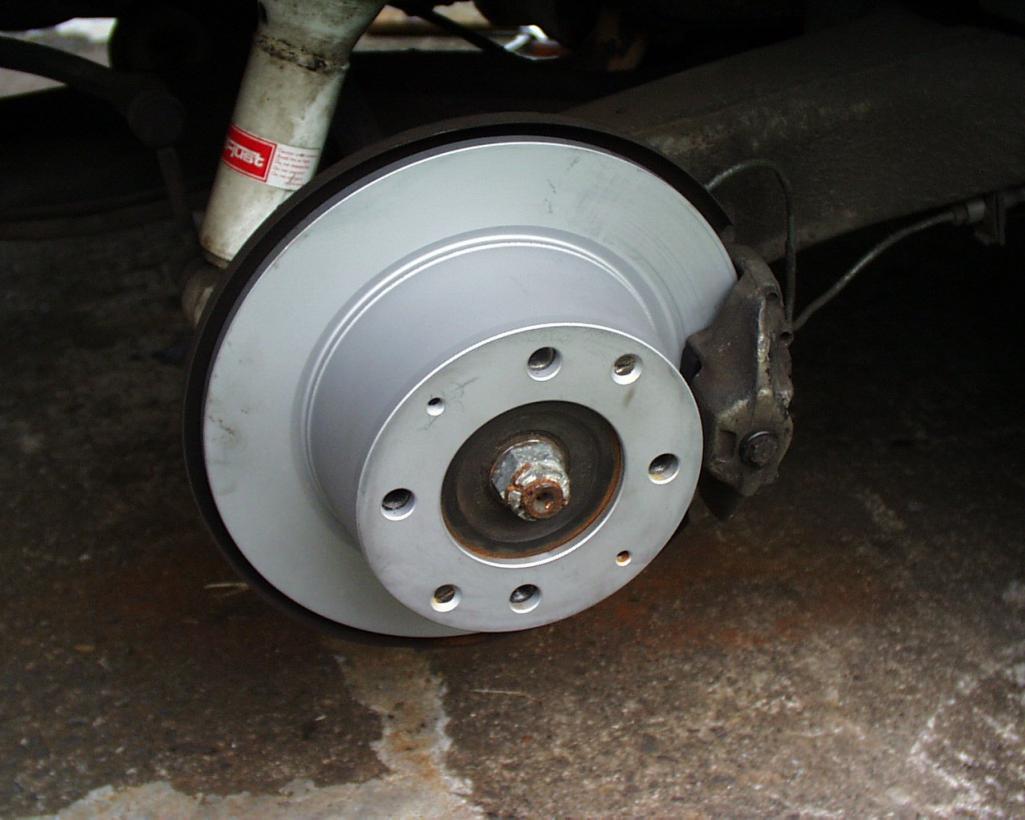
|
|
|
|
| steuspeed |
May 27 2012, 11:32 PM
Post
#15
|
|
Senior Member Group: Members Posts: 1,006 Joined: 12-July 11 From: Portland, Oregon Member No.: 13,308 Region Association: Pacific Northwest |
I had some more trouble getting the inner dust cover off the the driver side caliper. This time I went straight to the the torch and hex wrench with huge crescent wrench. I got it to pop free on the second try.
|
|
|
|
|
1 User(s) are reading this topic (1 Guests and 0 Anonymous Users)
0 Members:

|
Lo-Fi Version | Time is now: 20th May 2024 - 09:07 PM |
Invision Power Board
v9.1.4 © 2024 IPS, Inc.