|
|
|
Porsche, and the Porsche crest are registered trademarks of Dr. Ing. h.c. F. Porsche AG.
This site is not affiliated with Porsche in any way. Its only purpose is to provide an online forum for car enthusiasts. All other trademarks are property of their respective owners. |
|
|

  |

| cary |
 Oct 29 2015, 12:22 PM Oct 29 2015, 12:22 PM
Post
#581
|
|
Advanced Member  Group: Members Posts: 3,900 Joined: 26-January 04 From: Sherwood Oregon Member No.: 1,608 Region Association: Pacific Northwest |
Hindsight ................
The back edge/flap on the engine shelf/shock tower/rear trunk fire wall belongs on the outside. I shouldn't have cut the corners off either. I think that will be a piece I surgically remove from my parts car. On a CW car that would be tough to replicate, its a pressure formed piece. 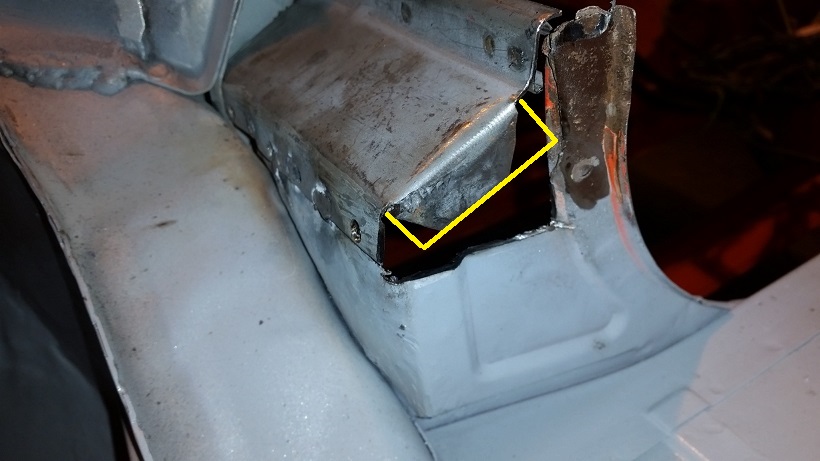 This might be my last installment for a while. For those left coast folks, I manage one of the Haggen supermarkets that is being liquidated. Liquidation starts tomorrow ........ I think I'll be in the store till mid December. After that ................... time will tell. I've got about 3/4's of a new career left to go. Kind of leaving my options open. |
   |

 
|
| worn |
Oct 29 2015, 12:40 PM
Post
#582
|
|
Winner of the Utah Twisted Joint Award Group: Members Posts: 3,609 Joined: 3-June 11 From: Madison, WI and North Bend WA Member No.: 13,152 Region Association: Upper MidWest |
QUOTE(cary @ Oct 29 2015, 11:22 AM)  FWIW my mom used to take me grocery shopping to the first QFC. I suggest liberating a case of smoked salmon, a box of filets, and a very old whisky of cognac. Oh, you said liquidated. Sorry, but with your skills I cannot see this lasting long. I suppose though you might end up posted farther away, and twice as busy. I do love your stuff. Best of luck all around. |
|
|
|
| cary |
Oct 29 2015, 12:40 PM
Post
#583
|
|
Advanced Member Group: Members Posts: 3,900 Joined: 26-January 04 From: Sherwood Oregon Member No.: 1,608 Region Association: Pacific Northwest |
After welding in the trunk pivot I'm almost out of parts to weld in.
So I've placed a couple orders. * Spool of Easyweld .023 wire. (IMG:style_emoticons/default/smile.gif) Lots of work to do in the inside of the doors. * Battery tray from RD, used the other one on the white car. * Inner Long Stiffener and Front Sway Bar Reinforcement Panels, from Maddog. * Suspension Ear reinforcements and braces from Chris @ Tangerine. A box of Epoxy Primer and prep showed up from SPI yesterday. Next project will be SAFE heaters for the hillbilly paint booth. When I get a chance to come up for air ............. |
|
|
|
| cary |
Nov 4 2015, 08:30 AM
Post
#584
|
|
Advanced Member Group: Members Posts: 3,900 Joined: 26-January 04 From: Sherwood Oregon Member No.: 1,608 Region Association: Pacific Northwest |
AX season is over ................
Time for a bit more horsepower. I stumbled upon a pair of SSI's for the 3.2. I need to go and talk to Dr. Gamroth an see what other couple pieces I need to blend with that. 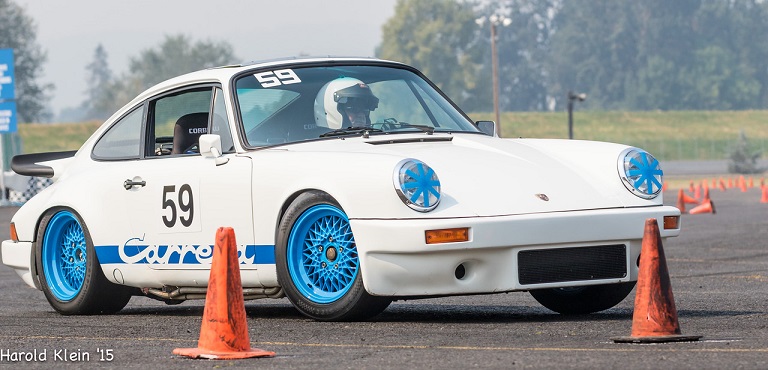 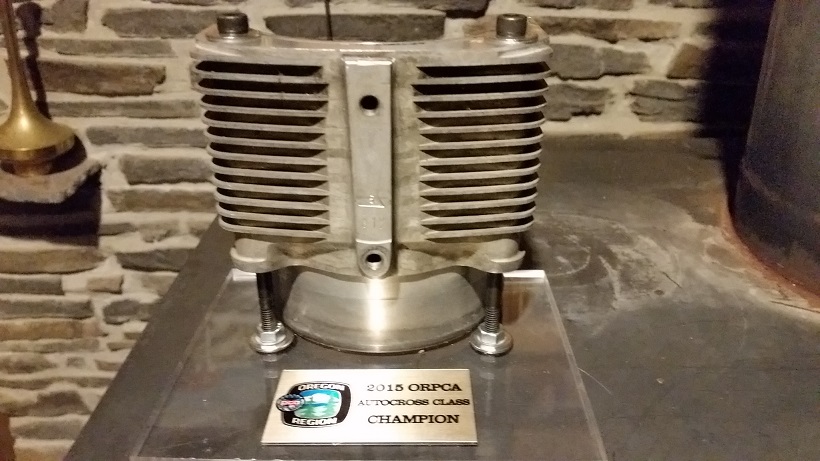 To get to the winners circle sometimes you need to tighten up your line. But not this tight. (IMG:style_emoticons/default/biggrin.gif) (IMG:style_emoticons/default/biggrin.gif) 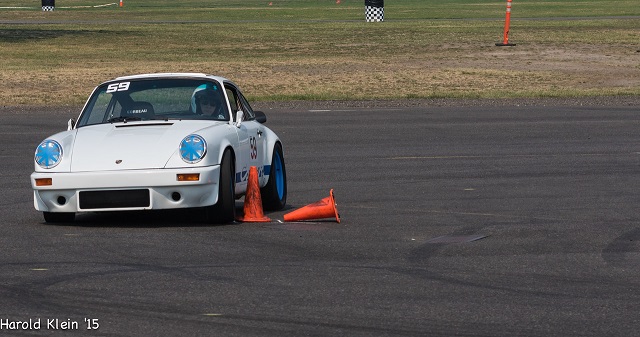  |
|
|
|
| cary |
Nov 6 2015, 08:17 AM
Post
#585
|
|
Advanced Member Group: Members Posts: 3,900 Joined: 26-January 04 From: Sherwood Oregon Member No.: 1,608 Region Association: Pacific Northwest |
Haven't lost my Thursday off, Yet ...........
So we hook up the enclosed trailer to take the 911 out to it's winter home. My primary project today is to determine if I can create a space to maintain 70 degrees so I can paint. So I start with shop lights directly on the metal to see what I can get. Ambient is 52. Looks like I can get 72-74, but a fairly small area. 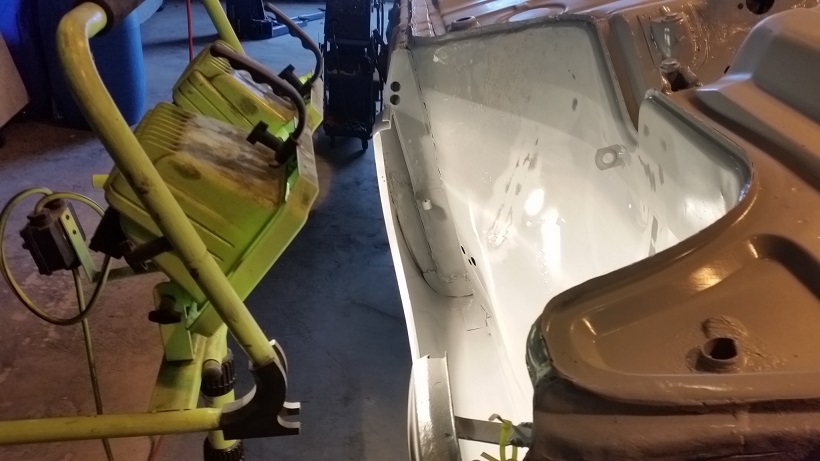 We stop and pick up a couple diary heaters and some light timers on the way back from lunch. I'm a little paranoid about fires so I'm proceeding slowly. All my Porsche's have a Halon extinguisher right in front of the passenger seat. Hope for the best, plan for the worst |
|
|
|
| cary |
Nov 6 2015, 08:38 AM
Post
#586
|
|
Advanced Member Group: Members Posts: 3,900 Joined: 26-January 04 From: Sherwood Oregon Member No.: 1,608 Region Association: Pacific Northwest |
So on to preparing the exhaust heat shield for epoxy primer. First order of business is to fill the spot weld cutter holes.
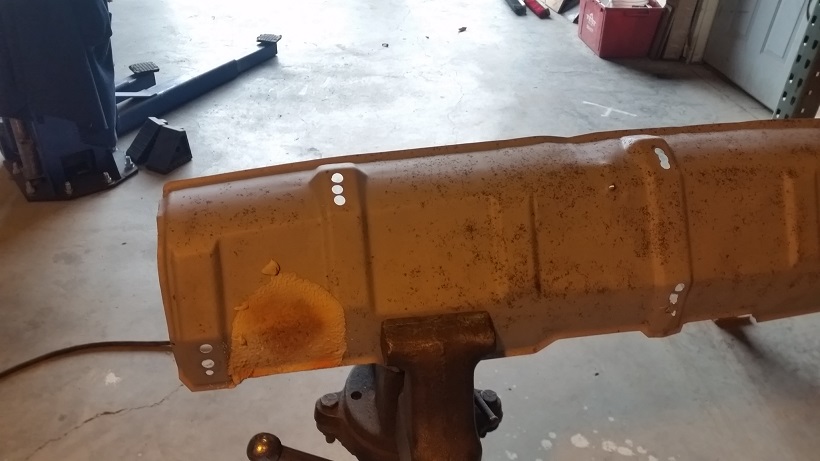 So I (Tool Whore) start looking for some brass or copper to back the holes with. Here's what I start with. 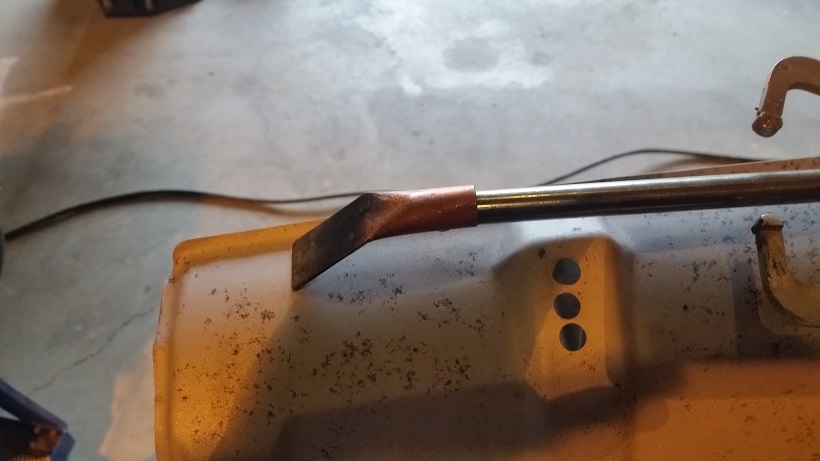 All set up and ready to go. I'll tell you a secret. All that backer is is a copper pipe squished flat. Not up to the task.  The shot above looks like the way you'd like to weld it. But I switched backers and switched the welding to the inside. Much more better Below is the backer I used, much thicker. Backside comes out almost flat. http://www.harborfreight.com/welding-spoon.html All finished up. Shot a little SE primer to keep the welds from rusting. SE primer will have to be shot off in the blast cabinet before the epoxy is sprayed on. 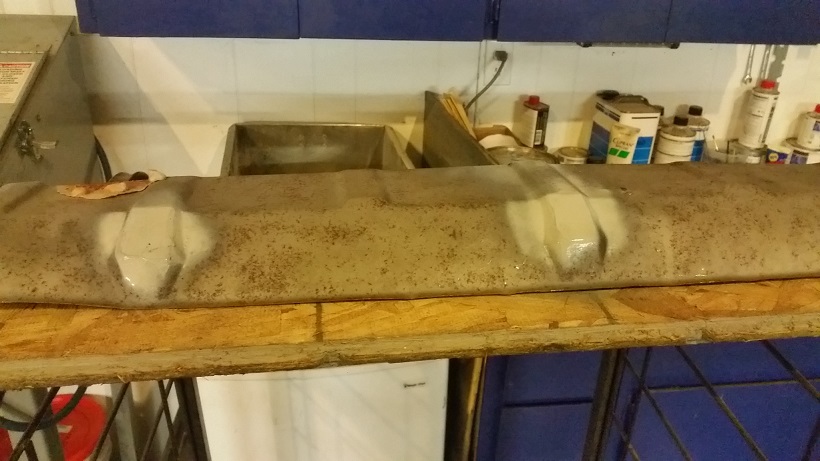 |
|
|
|
| cary |
Nov 6 2015, 08:49 AM
Post
#587
|
|
Advanced Member Group: Members Posts: 3,900 Joined: 26-January 04 From: Sherwood Oregon Member No.: 1,608 Region Association: Pacific Northwest |
Next will be repairing the shield stand offs .................
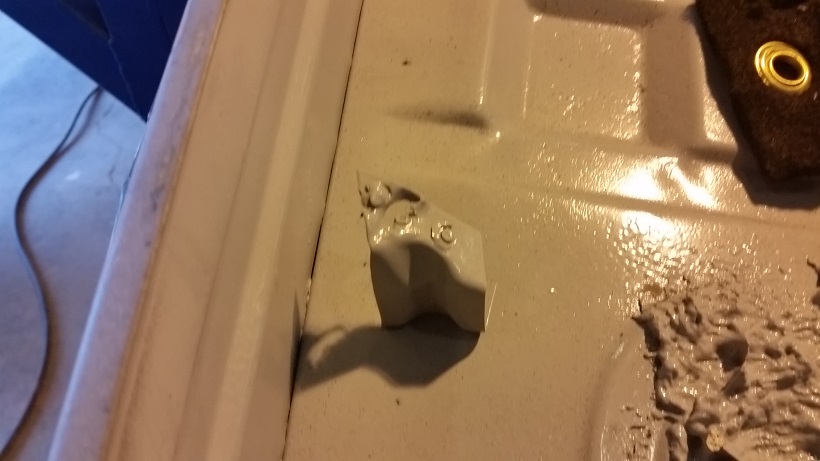 Plan is to weld nuts on the stand offs so that shield can be easily removed (Spoke's idea) In the top right corner you see a soldering shield. I'll slit a hole in that and slide it over the stand off to protect the epoxy while welding. Super In Law is back from San Francisco. He's working on the other targa bar cavity cover. I need to get things warm enough so I can shoot another coat of epoxy inside the fenders. Then I can tack the covers in place. |
|
|
|
| cary |
Nov 22 2015, 09:41 AM
Post
#588
|
|
Advanced Member Group: Members Posts: 3,900 Joined: 26-January 04 From: Sherwood Oregon Member No.: 1,608 Region Association: Pacific Northwest |
Sorry for the time out ................
Been busy at work with the company melt down. And I'm working on the son's A6 at home. Fixing all the cam and valve cover leaks. As for employment. I've committed to staying with Haggen thru the final auction. It might include some out of town work, yet to be determined. So much for getting some time off between jobs. |
|
|
|
| alfadoc |
Nov 24 2015, 12:13 AM
Post
#589
|
|
Newbie Group: Members Posts: 39 Joined: 6-November 15 From: Lynchburg, VA Member No.: 19,340 Region Association: None |
Just read all 30 pages. Massively impressed. Few would have the intestinal fortitude to take this on. I look forward to future installments.
|
|
|
|
| cary |
Dec 5 2015, 10:14 AM
Post
#590
|
|
Advanced Member Group: Members Posts: 3,900 Joined: 26-January 04 From: Sherwood Oregon Member No.: 1,608 Region Association: Pacific Northwest |
QUOTE(cary @ Nov 22 2015, 07:41 AM) Sorry for the time out ................ Been busy at work with the company melt down. And I'm working on the son's A6 at home. Fixing all the cam and valve cover leaks. As for employment. I've committed to staying with Haggen thru the final auction. It might include some out of town work, yet to be determined. So much for getting some time off between jobs. Well I changed my mind. After Haggen decided to put the entire company up for sale I declined the new position they offered me................... So we'll take a small break ............ (IMG:style_emoticons/default/welder.gif) (IMG:style_emoticons/default/sawzall-smiley.gif) (IMG:style_emoticons/default/welder.gif) (IMG:style_emoticons/default/sawzall-smiley.gif) I am on interview #2 with my preferred new employer. And that job wouldn't start till the first of the year. (IMG:style_emoticons/default/cheer.gif) (IMG:style_emoticons/default/cheer.gif) So we'll get back to posting on Monday. |
|
|
|
| worn |
Dec 5 2015, 10:55 AM
Post
#591
|
|
Winner of the Utah Twisted Joint Award Group: Members Posts: 3,609 Joined: 3-June 11 From: Madison, WI and North Bend WA Member No.: 13,152 Region Association: Upper MidWest |
QUOTE(cary @ Dec 5 2015, 08:14 AM) QUOTE(cary @ Nov 22 2015, 07:41 AM) Sorry for the time out ................ Been busy at work with the company melt down. And I'm working on the son's A6 at home. Fixing all the cam and valve cover leaks. As for employment. I've committed to staying with Haggen thru the final auction. It might include some out of town work, yet to be determined. So much for getting some time off between jobs. Well I changed my mind. After Haggen decided to put the entire company up for sale I declined the new position they offered me................... So we'll take a small break ............ (IMG:style_emoticons/default/welder.gif) (IMG:style_emoticons/default/sawzall-smiley.gif) (IMG:style_emoticons/default/welder.gif) (IMG:style_emoticons/default/sawzall-smiley.gif) I am on interview #2 with my preferred new employer. And that job wouldn't start till the first of the year. (IMG:style_emoticons/default/cheer.gif) (IMG:style_emoticons/default/cheer.gif) So we'll get back to posting on Monday. Wow Cary. Autocross champ and grocery store icon as well as a person who can use a MIG to basically 3D print a 914. Off topic but my nephew just quit 15 years at QFC to get a PhD in history at WAZOO. As a professor myself, I kinda pushed the store option, but I only know one side of things. I love your work! |
|
|
|
| cary |
Dec 8 2015, 11:11 AM
Post
#592
|
|
Advanced Member Group: Members Posts: 3,900 Joined: 26-January 04 From: Sherwood Oregon Member No.: 1,608 Region Association: Pacific Northwest |
We start the sabbatical with a record rainfall day for PDX. We won't start calling it unemployment till the first of February. If we were to get that far. I'm a little picky.
The plan/hope is to finish the spraying of the SPI epoxy primer in the fenders. But it wants 24 hours at 70 degrees. So we'll do a test on the hillbilly paint booth with two dairy heaters overnight. Shouldn't be a tough pull with the end of the day being 60 degrees. UPDATE TOMORROW So I decided to unpack the tote of plastic bags. They went on my rolling wall. Not quite the metal wall and magnets that Canepa uses, but it will work. I think the next tear down of a car the bags will go straight on to the wall. Its two sided. I have one bag without a label and I can't remember what they are. I'll post a ? for the entire World. 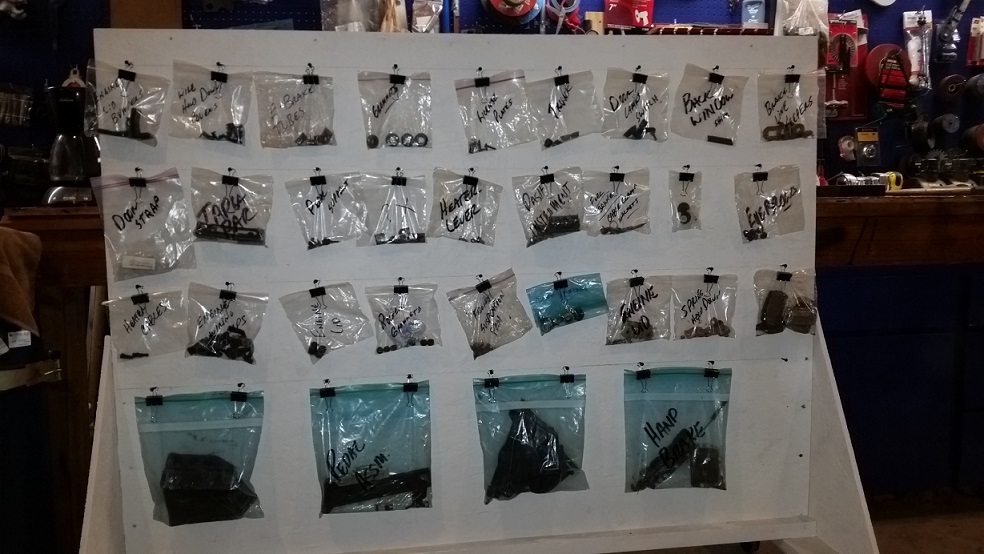 While I'm working on that. Super In Law is building his car stacker. I get the basic design and loading the top car with the lift. His moving it with a snowmobile trailer I'm not quite all in. I'm told yesterday that moving design is based on how they moved 90mm gun emplacements in Korea. More details to follow. 4 * 4's and 2 *6's. 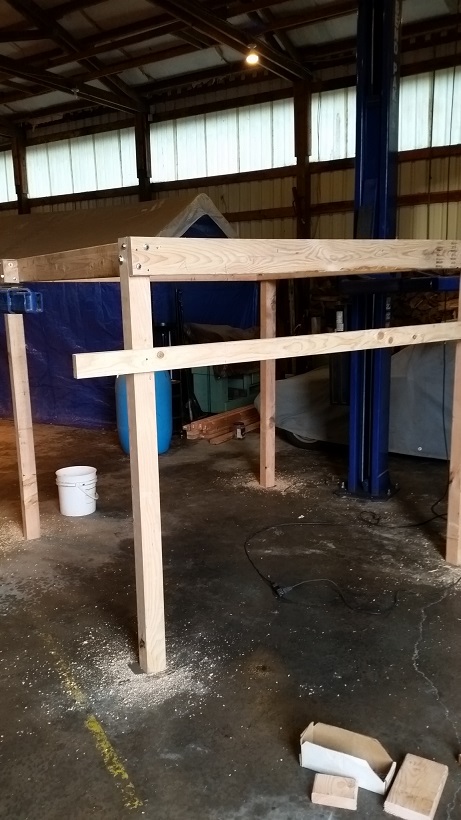 |
|
|
|
| cary |
Dec 8 2015, 11:27 PM
Post
#593
|
|
Advanced Member Group: Members Posts: 3,900 Joined: 26-January 04 From: Sherwood Oregon Member No.: 1,608 Region Association: Pacific Northwest |
The paint booth passed the test. 68 degrees. So we are now ready to paint again.
Decided to coat the inside of the targa bar first. I used their HD Anti Rust with a schutz gun with an interior spray hose. 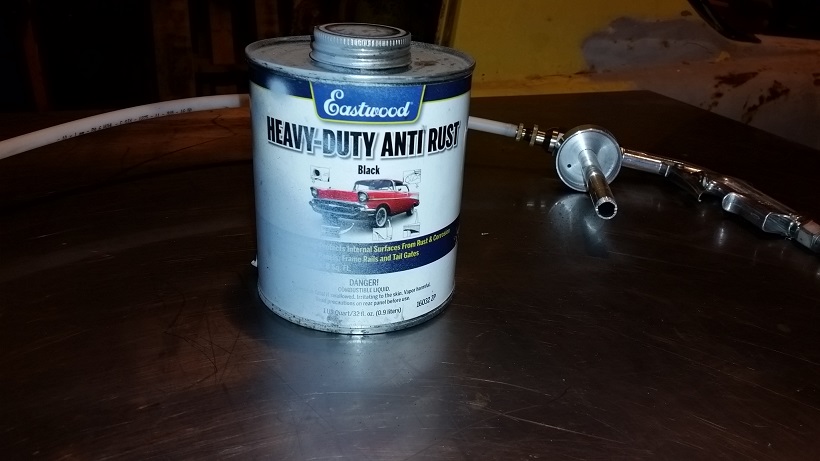 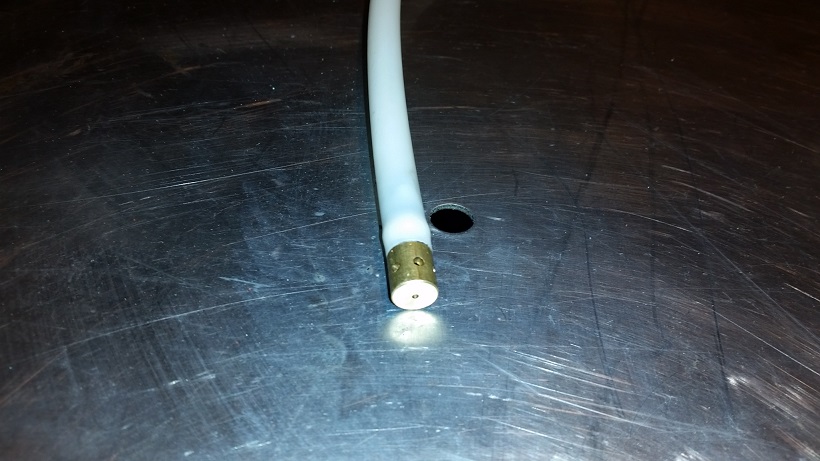 The black stripe is the targa bar cavity hole all sealed up. It's now ready for our custom cover to be tacked into place. 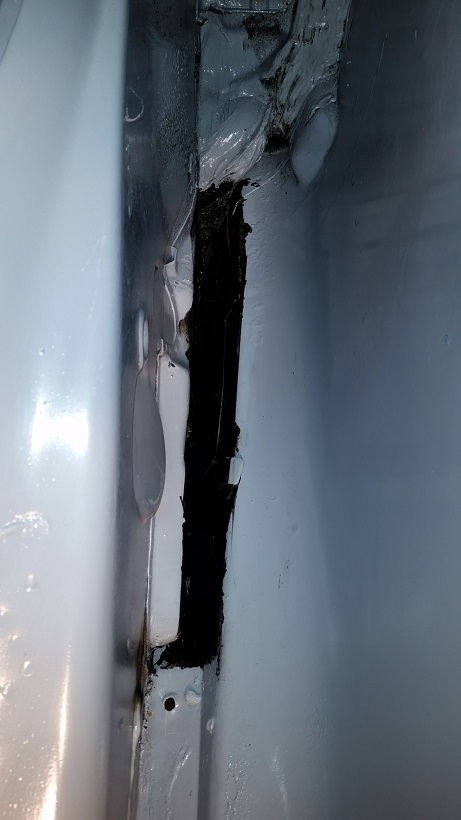 |
|
|
|
| cary |
Dec 8 2015, 11:44 PM
Post
#594
|
|
Advanced Member Group: Members Posts: 3,900 Joined: 26-January 04 From: Sherwood Oregon Member No.: 1,608 Region Association: Pacific Northwest |
Now back to spraying epoxy primer on the inner fenders. On the first go around I couldn't get the primer into the inside of the fender lip.
 So I decided to give the PreVal sprayer a shot. I'll shoot some finished pictures tomorrow. Needed three hands to get the job done. Mirror, flashlight and sprayer. But it got the job done. 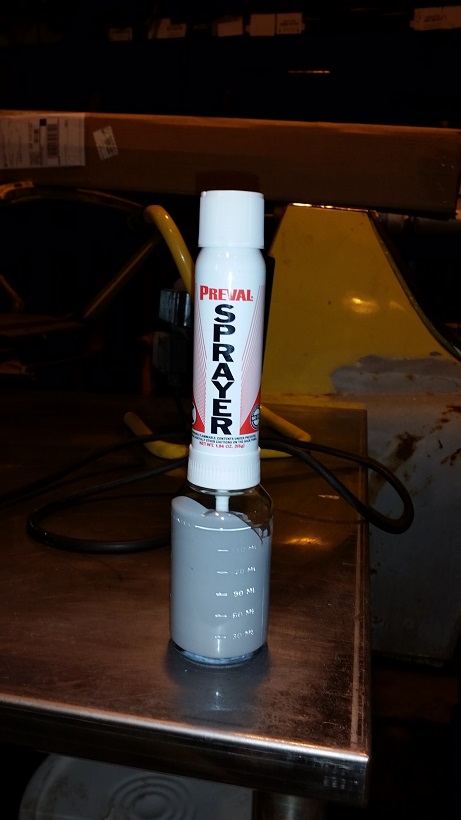 Then I gave the front inner fenders its second coat of epoxy. I built the jumper hose I mentioned earlier so I could use the detail gun without the filter and regulator hanging off the end. 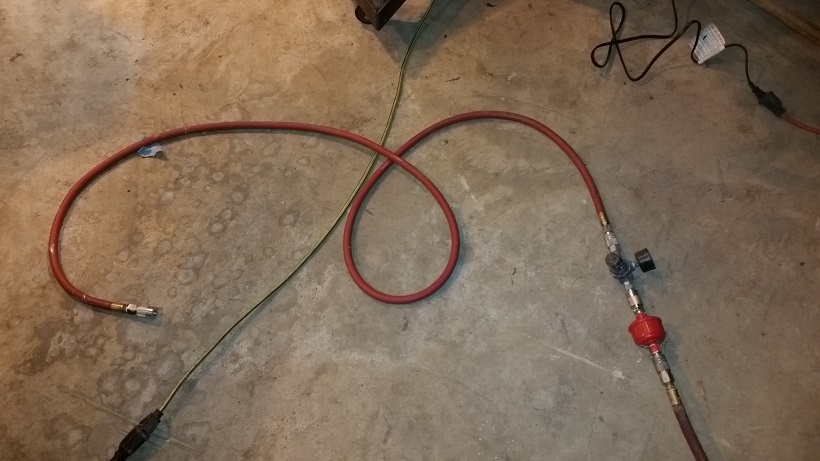 |
|
|
|
| cary |
Dec 9 2015, 10:15 PM
Post
#595
|
|
Advanced Member Group: Members Posts: 3,900 Joined: 26-January 04 From: Sherwood Oregon Member No.: 1,608 Region Association: Pacific Northwest |
Letting the primer cure for 24 hours.
So I set about unpacking the 12 totes of medium sized parts. SOME ASSEMBLY REQUIRED (IMG:style_emoticons/default/bye1.gif) (IMG:style_emoticons/default/bye1.gif) 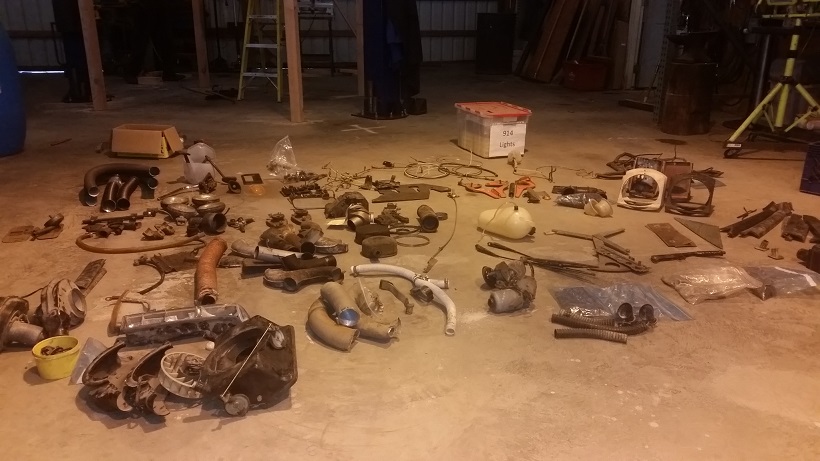 |
|
|
|
| cary |
Dec 14 2015, 10:50 PM
Post
#596
|
|
Advanced Member Group: Members Posts: 3,900 Joined: 26-January 04 From: Sherwood Oregon Member No.: 1,608 Region Association: Pacific Northwest |
So we start the week finishing Super In Laws car stacker.
Loading on the trailer. 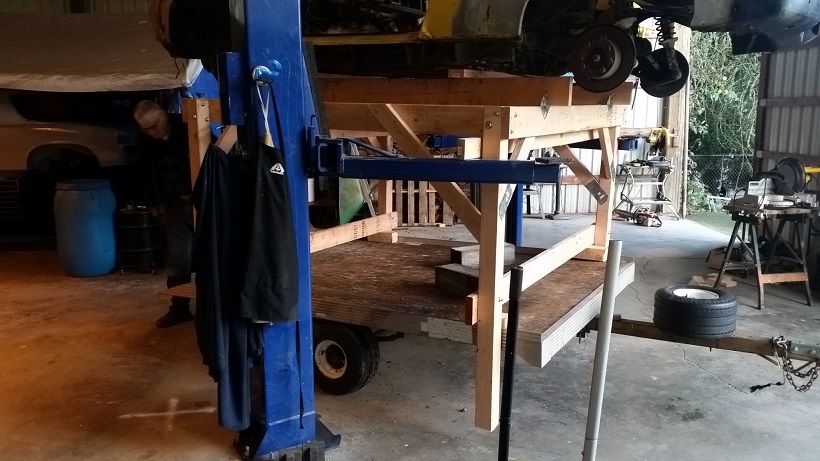 Here I am towing with the truck. 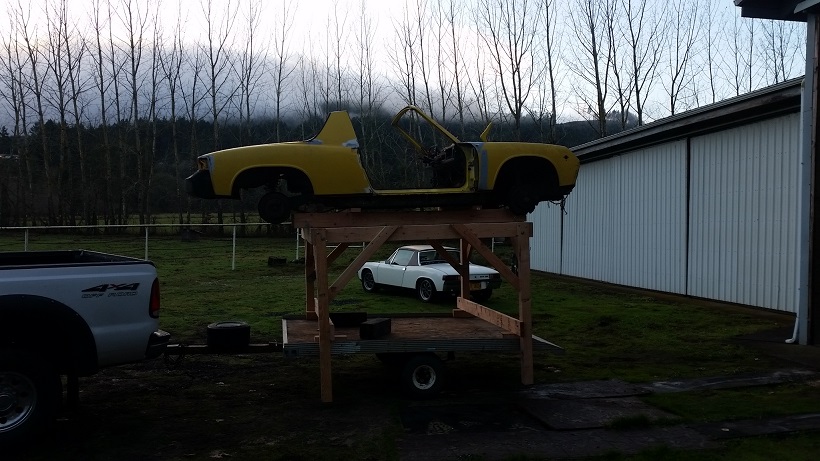 Into its new home/location. Not quite ready to park my car under it. (IMG:style_emoticons/default/popcorn[1].gif) 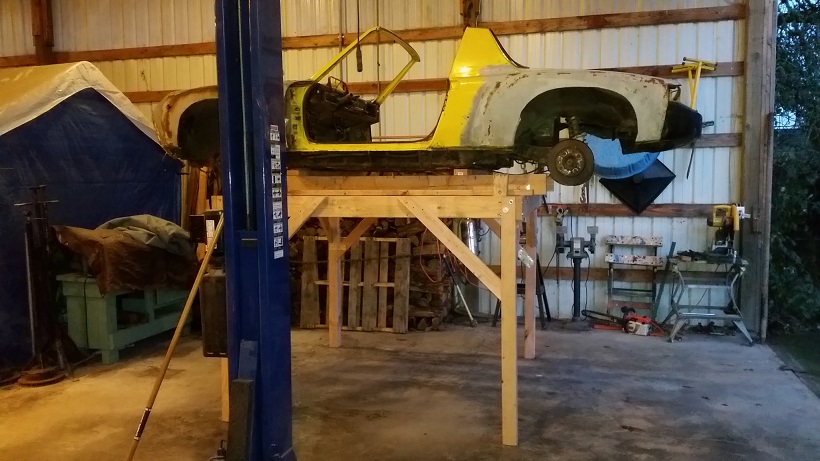 Opened up the paint booth, ready for tomorrow.  |
|
|
|
| sixnotfour |
Dec 15 2015, 10:56 AM
Post
#597
|
|
914 Wizard Group: Members Posts: 11,274 Joined: 12-September 04 Member No.: 2,744 Region Association: NineFourteenerVille |
Old Guys Rule.. (IMG:style_emoticons/default/beerchug.gif) (IMG:style_emoticons/default/flag.gif)
QUOTE I'm told yesterday that moving design is based on how they moved 90mm gun emplacements in Korea. |
|
|
|
| raynekat |
Dec 15 2015, 01:47 PM
Post
#598
|
|
Advanced Member Group: Members Posts: 2,171 Joined: 30-December 14 From: Coeur d'Alene, Idaho Member No.: 18,263 Region Association: Pacific Northwest |
QUOTE(cary @ Dec 14 2015, 08:50 PM) All this needs is some heavy duty castors on it.... (IMG:style_emoticons/default/smile.gif) Looking good. |
|
|
|
| cary |
Dec 16 2015, 08:20 AM
Post
#599
|
|
Advanced Member Group: Members Posts: 3,900 Joined: 26-January 04 From: Sherwood Oregon Member No.: 1,608 Region Association: Pacific Northwest |
That is version #1. The traveling version so we could move cars to and from the other building. Version #2 will have some mods and wheels.
|
|
|
|
| cary |
Dec 16 2015, 08:45 AM
Post
#600
|
|
Advanced Member Group: Members Posts: 3,900 Joined: 26-January 04 From: Sherwood Oregon Member No.: 1,608 Region Association: Pacific Northwest |
Wet and cold ............ 41 degrees in big shop (IMG:style_emoticons/default/sad.gif) (IMG:style_emoticons/default/sad.gif)
Warm and Cozy in wood (madrone) heated middle shop ....... (IMG:style_emoticons/default/biggrin.gif) (IMG:style_emoticons/default/biggrin.gif) 65 degrees Started the day putting wrench holder/dividers in all the drawers of SAE wrenches. (middle shop) www.sears.com/craftsman-universal-tool-divider-system/p-00965397000P Super In Law cut down a couple barrels I got from the store closing. They were put to use storing our scrap metal that is used for fabrication. Forgot to shoot a couple pictures Decided to start tackling the brass e-brake pipes that go thru the firewall. First item to work on is the hoop that holds the right side pipe to the firewall in the engine compartment. Started with this ............. got melted removing the original with the torch 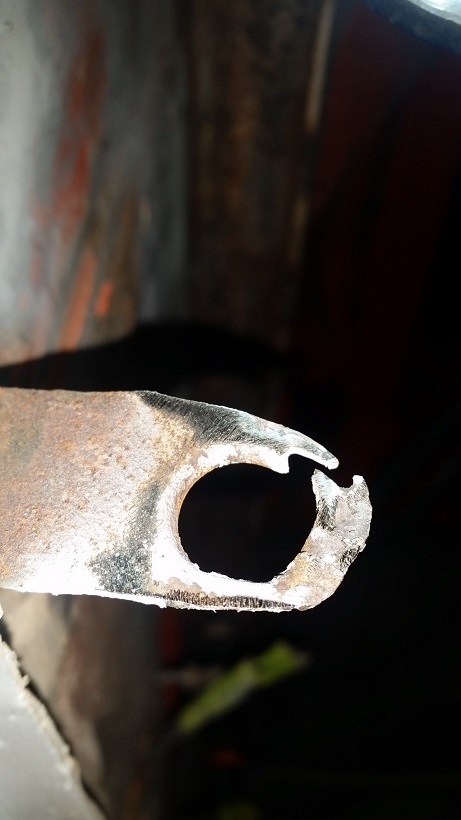 Got some brass backing and started to blip, blip, blip. 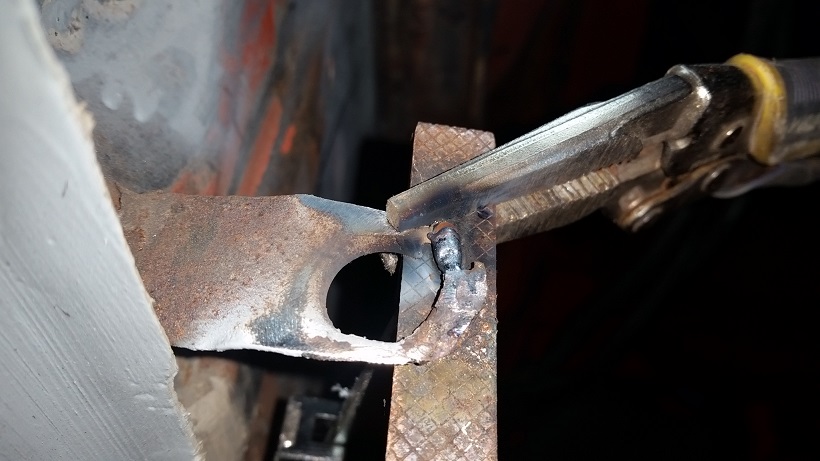 Ended up with this ........... 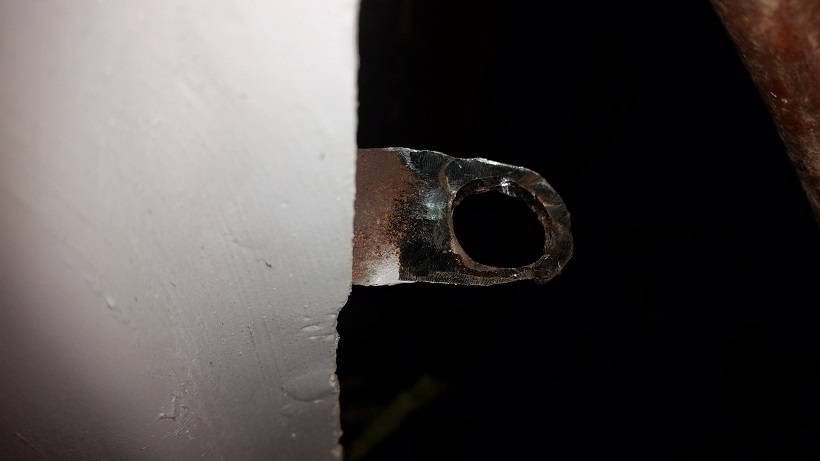 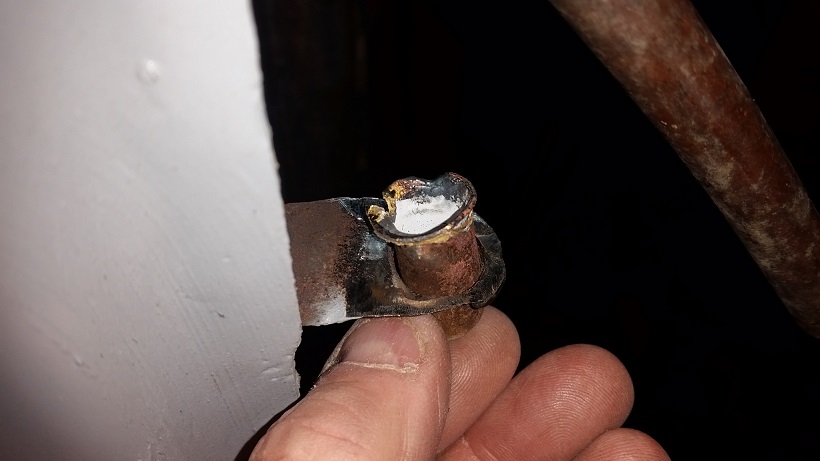 Stopped at Ace on the way home and picked up some 1/2" brass refrigeration pipe. The stuff I had laying around was too old and hard. Wouldn't bend. |
|
|
|
|
1 User(s) are reading this topic (1 Guests and 0 Anonymous Users)
0 Members:

|
Lo-Fi Version | Time is now: 24th June 2026 - 12:59 PM |
Invision Power Board
v9.1.4 © 2026 IPS, Inc.