|
|
|
Porsche, and the Porsche crest are registered trademarks of Dr. Ing. h.c. F. Porsche AG.
This site is not affiliated with Porsche in any way. Its only purpose is to provide an online forum for car enthusiasts. All other trademarks are property of their respective owners. |
|
|

  |

| dw914six |
 Dec 13 2014, 08:58 PM Dec 13 2014, 08:58 PM
Post
#141
|
|
Member  Group: Members Posts: 131 Joined: 18-January 14 From: Houston Member No.: 16,902 Region Association: Southwest Region |
QUOTE(Luke M @ Dec 1 2014, 06:10 AM)  Hey Lars, The 6 is looking good so far and Keep up the great work. It's been a while since I saw a MFI setup running but it can't be too hard to make it work in a 914. Long ago a friend of mine had a 2.4 T MFI engine in his 914 but I can't recall how he did the fuel plumbing on it. If you are going the MFI route then just copy the system off a 911. I do remember him having some issues with trying to figure out the wiring. It can't be too hard now a days with all the info out on the web. (IMG:style_emoticons/default/beerchug.gif) My 1970 orange 914-6 has MFI on a 2.2S engine. Runs flawlessly. Could not ask for a better setup. You will like it. |
   |

 
|
| Speedo |
Dec 14 2014, 07:14 PM
Post
#142
|
|
Senior Member Group: Members Posts: 591 Joined: 7-November 06 From: Boulder Member No.: 7,170 Region Association: Rocky Mountains |
Great! I am looking forward to running the MFI. Can I get some help with install/plumbing/electrical questions when the time comes? (IMG:style_emoticons/default/drunk.gif) Will you post some pics of your engine compartment for me? Speedo |
|
|
|
| Speedo |
Dec 14 2014, 07:27 PM
Post
#143
|
|
Senior Member Group: Members Posts: 591 Joined: 7-November 06 From: Boulder Member No.: 7,170 Region Association: Rocky Mountains |
Need to keep up the pace...snowed here today and a perfect shop afternoon listening to KRFC out of Ft Collins, what a great radio station.
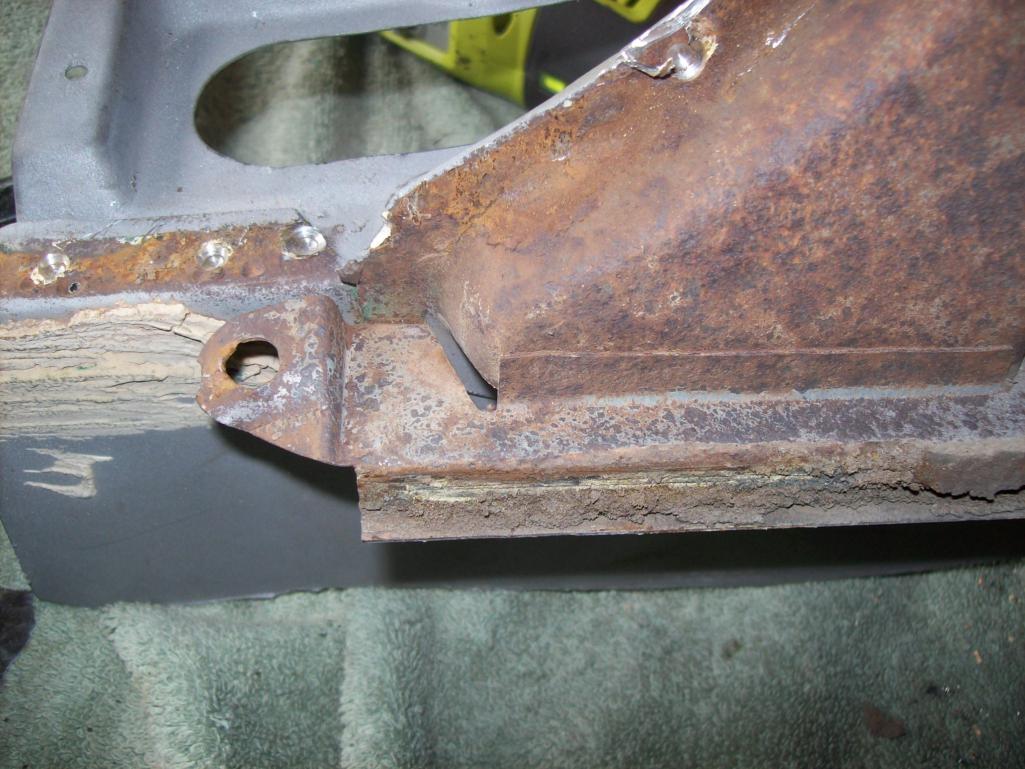
Time to attack...drew the cutting lines. Not really sure what to expect, but need to find out what is behind this 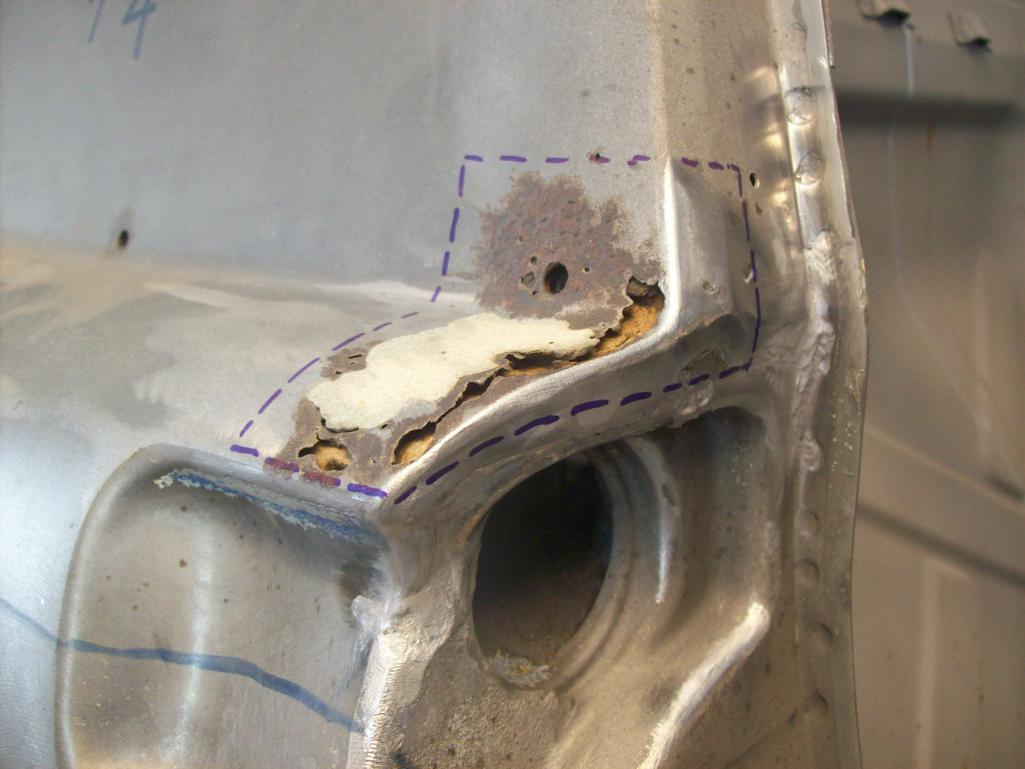 Nurse, scalpel please 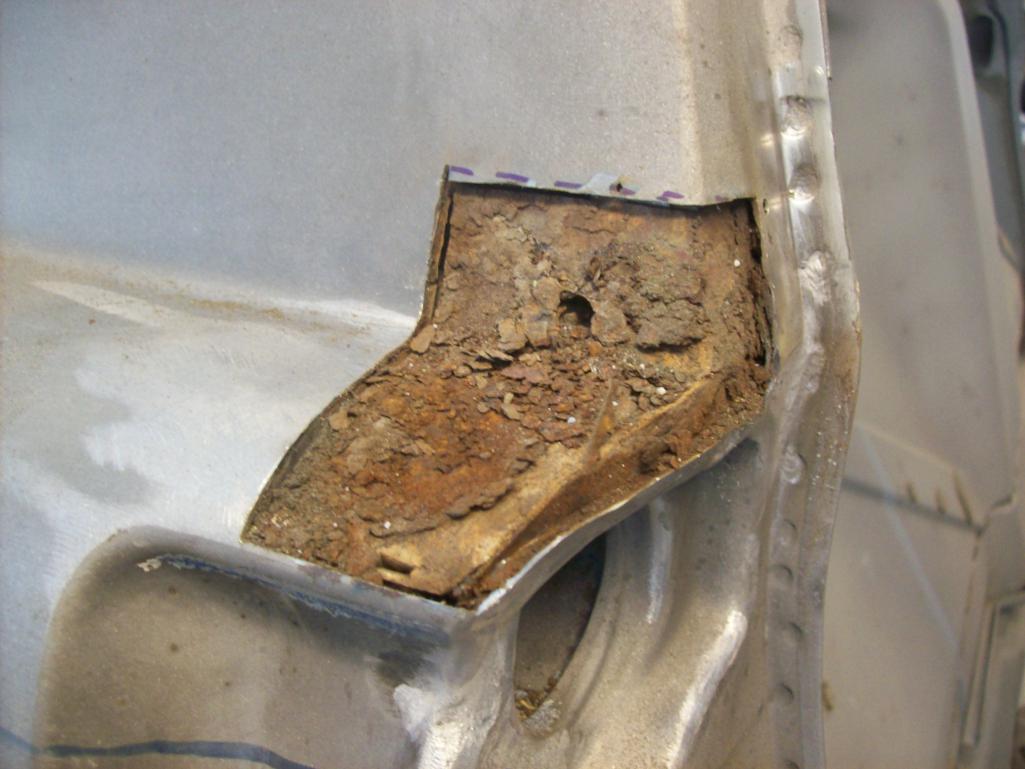 Ugh....this looks terrible. Not what I was expecting. Started to dig out the crap and realized that most of the "turd colored" stuff was the surface rust from the surrounding steel. The bulk of the mound was seam sealer. And it was a pain to get rid of. Very stiff unless heated. Softer when heated...and BTW the fumes are great. Took me an hour and a half to dig out to here 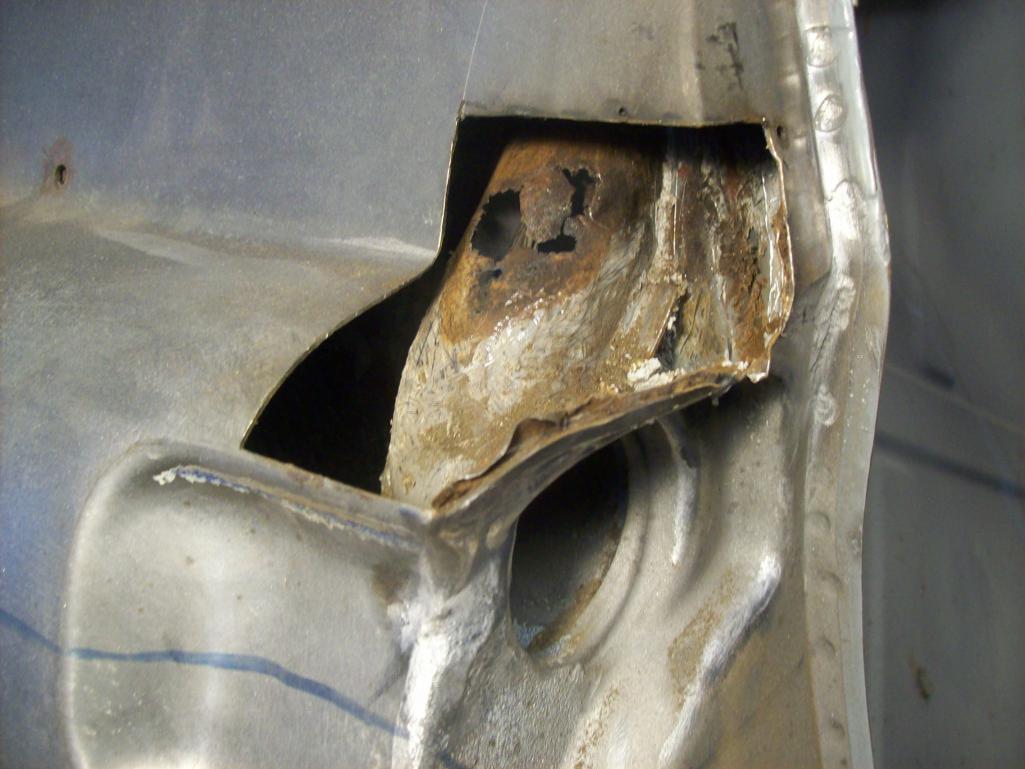 Didn't expect this...damn! 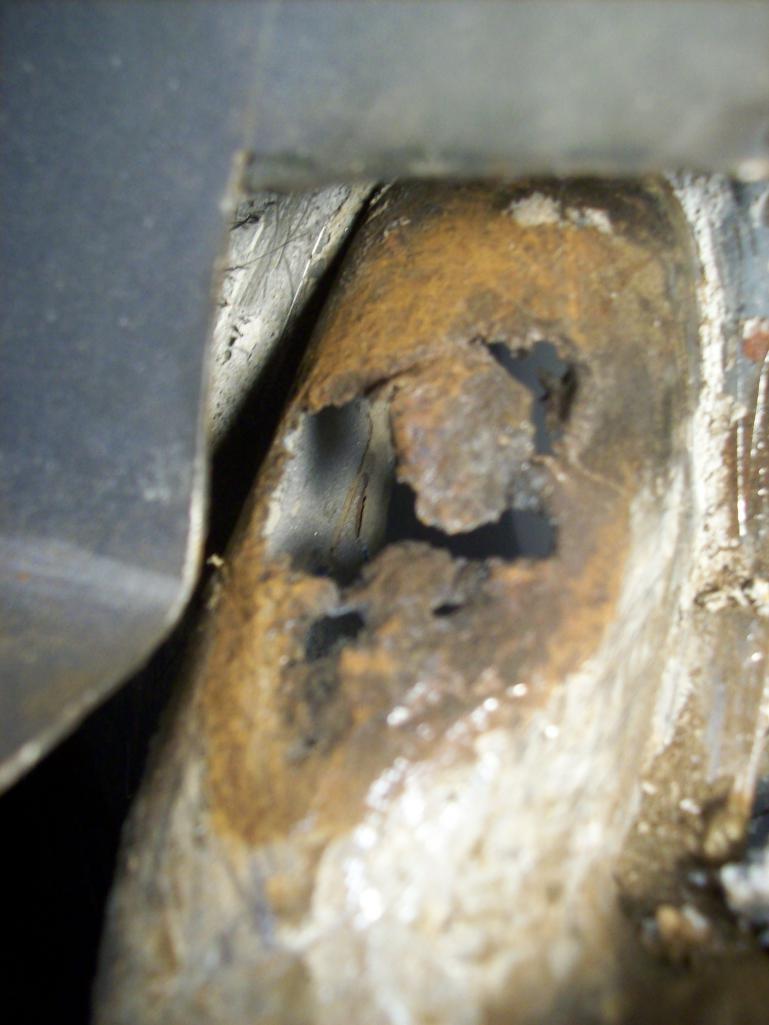 From inside the fender looking up 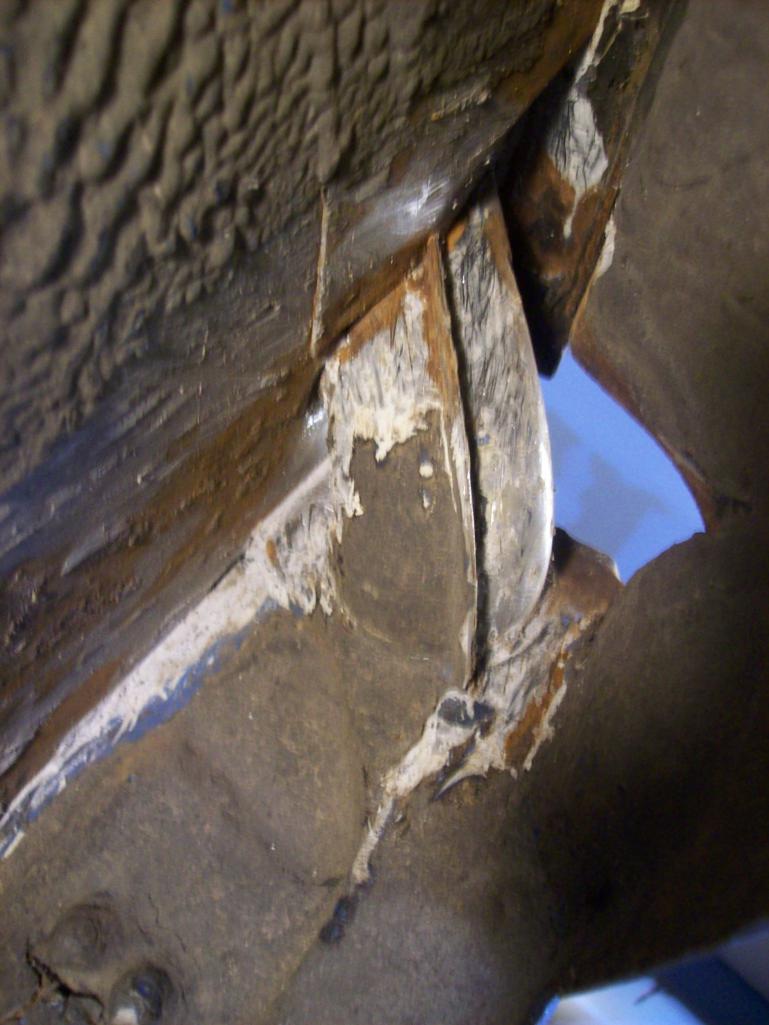 |
|
|
|
| Speedo |
Dec 14 2014, 07:51 PM
Post
#144
|
|
Senior Member Group: Members Posts: 591 Joined: 7-November 06 From: Boulder Member No.: 7,170 Region Association: Rocky Mountains |
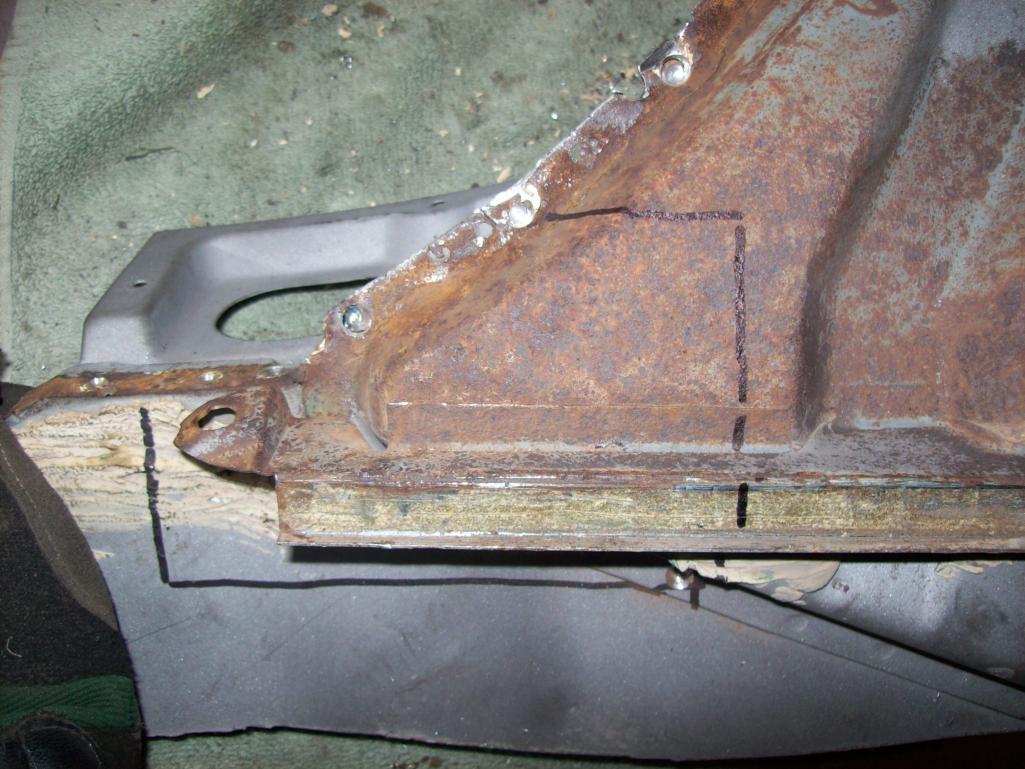
Ok, I am going to need more room to deal with repairing this vent tube.
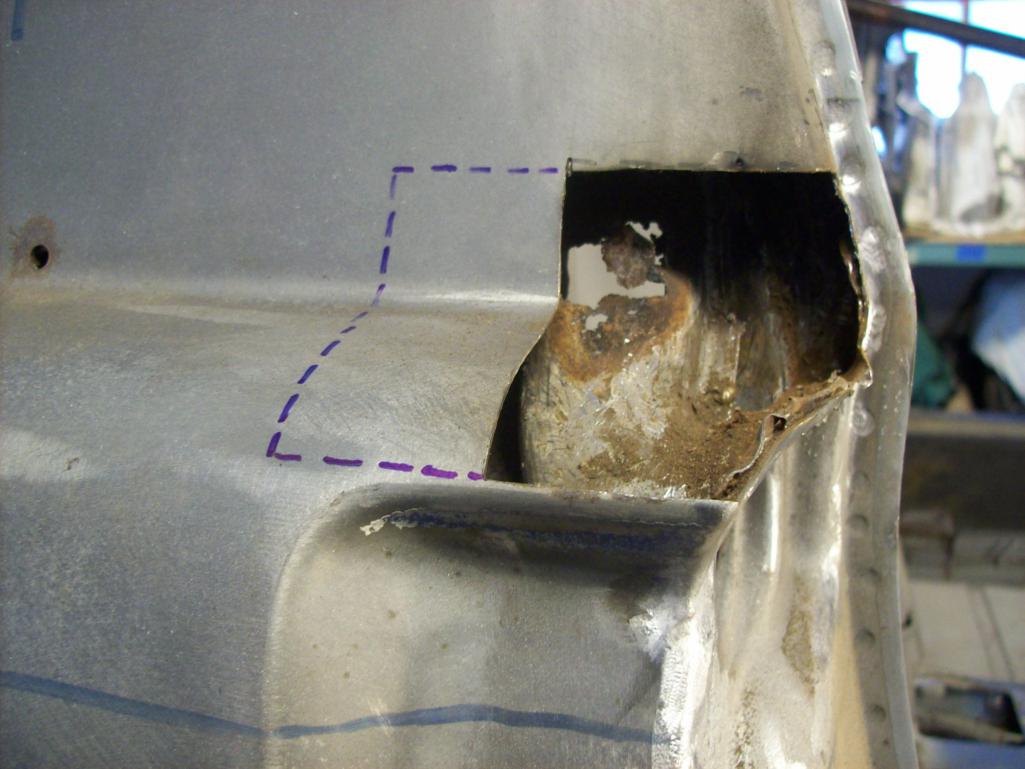 Looks sort of like "Freddie" in his hockey mask 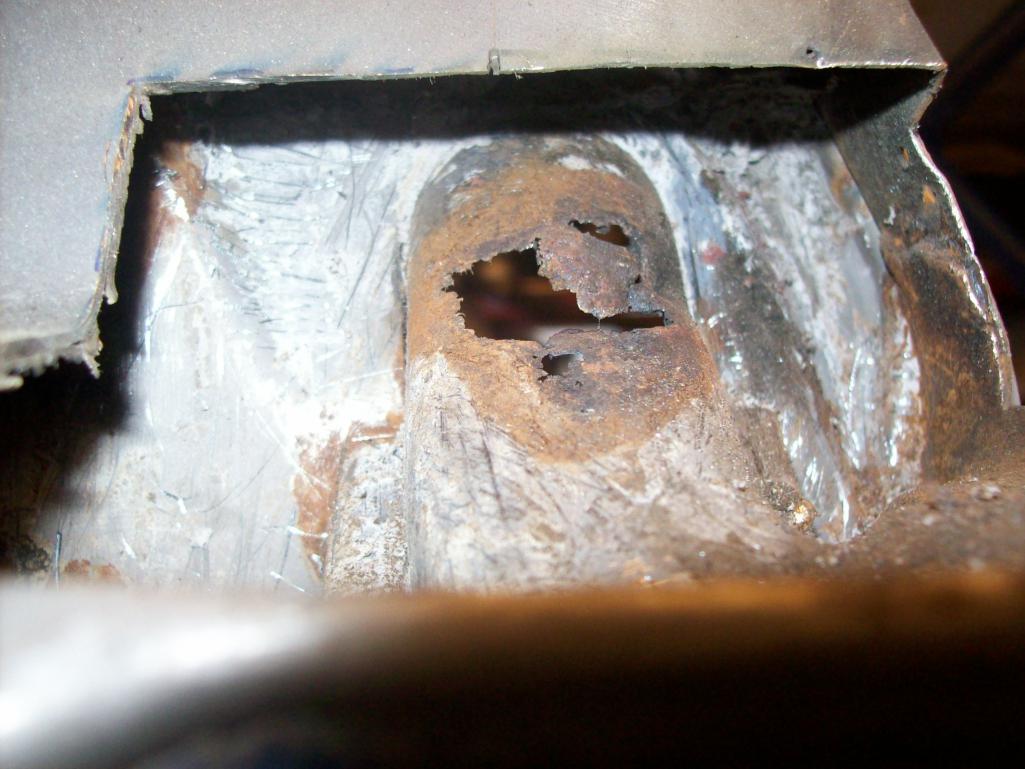 Gotta cut it out and splice a patch in 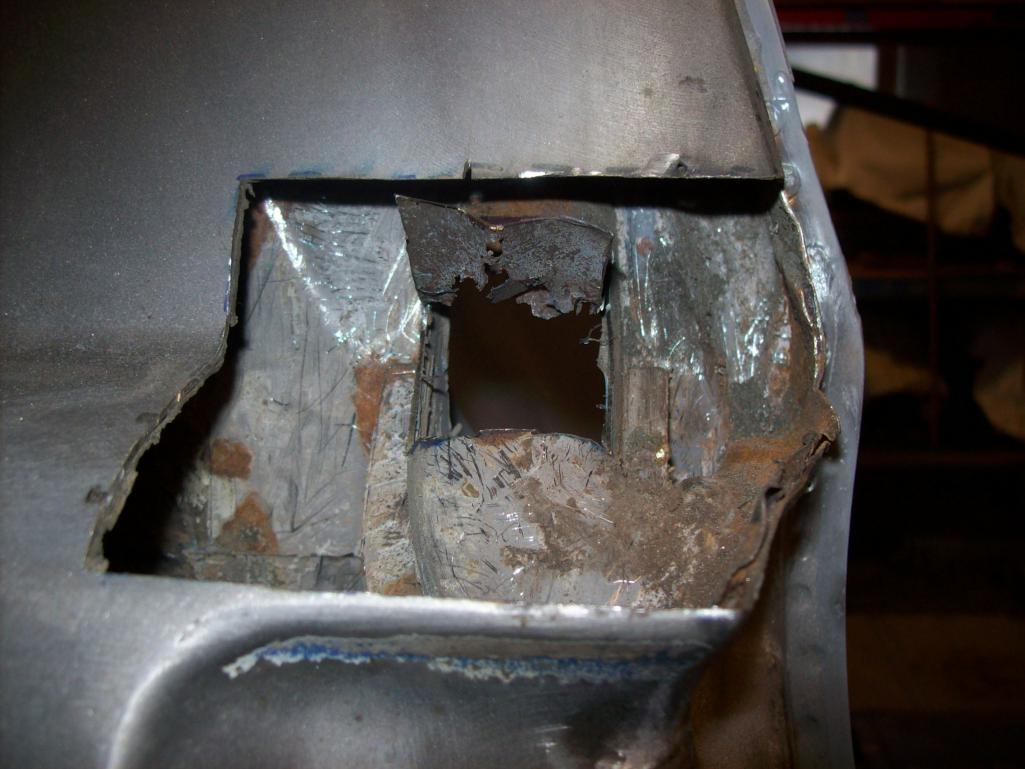 Tight quarters here, hard to access, clean up and prep Inside looking out...rather rough factory finish to this tube...but I guess it is all covered up with the interior 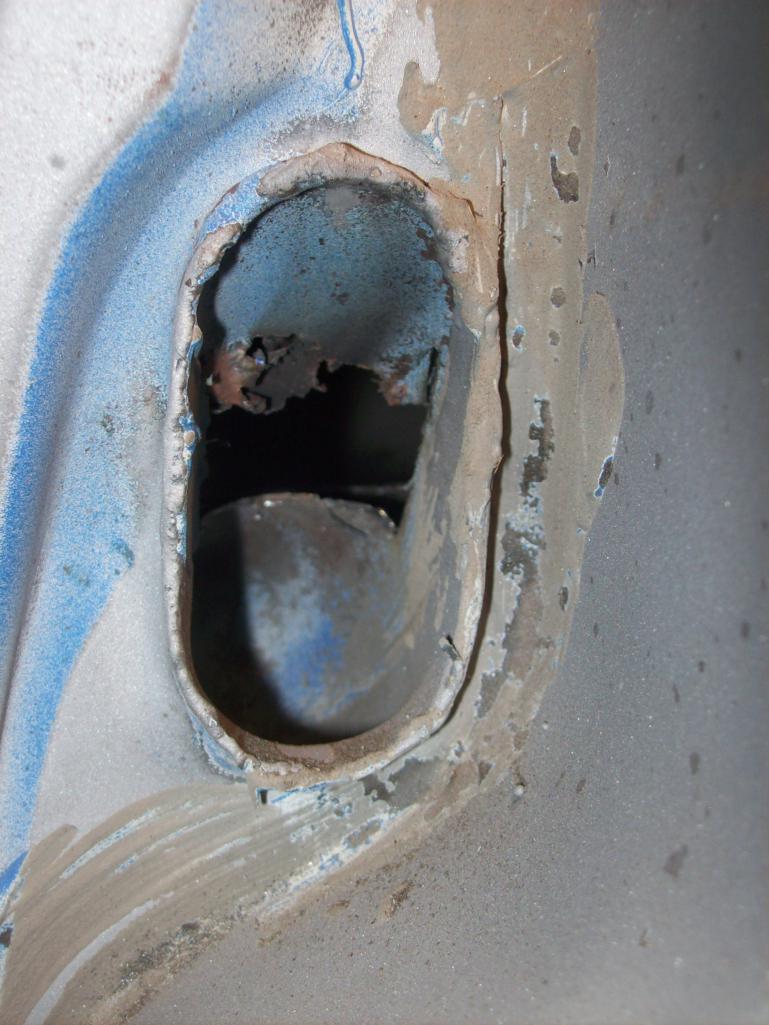 Shaping the patch 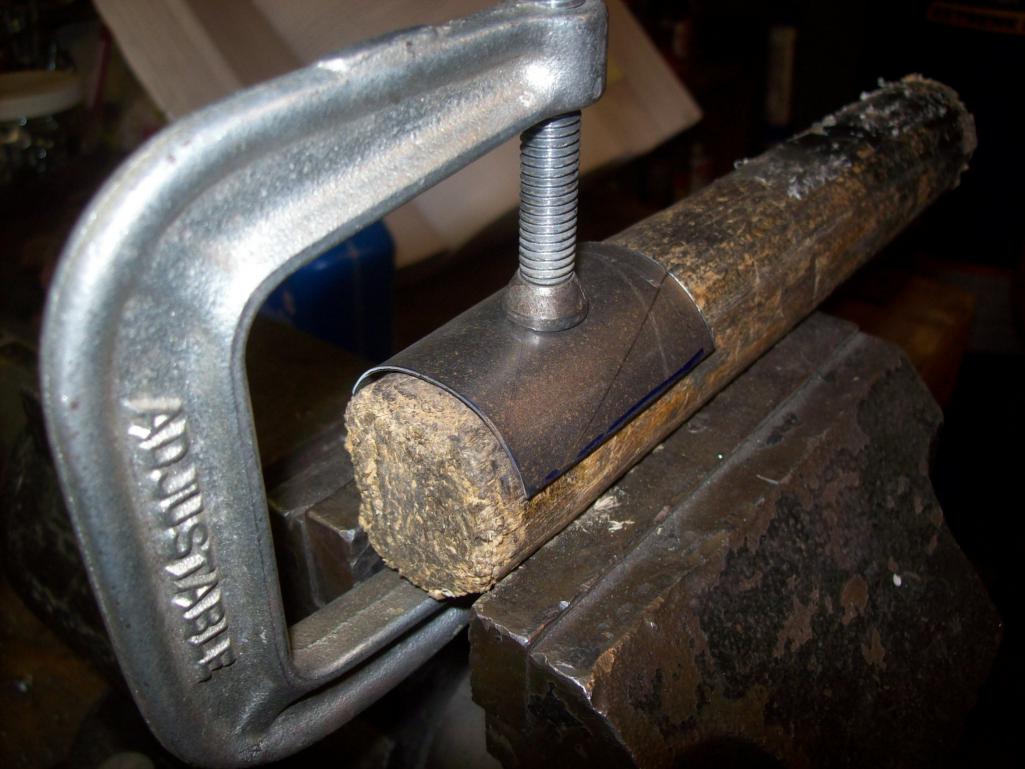 |
|
|
|
| Speedo |
Dec 14 2014, 07:58 PM
Post
#145
|
|
Senior Member Group: Members Posts: 591 Joined: 7-November 06 From: Boulder Member No.: 7,170 Region Association: Rocky Mountains |
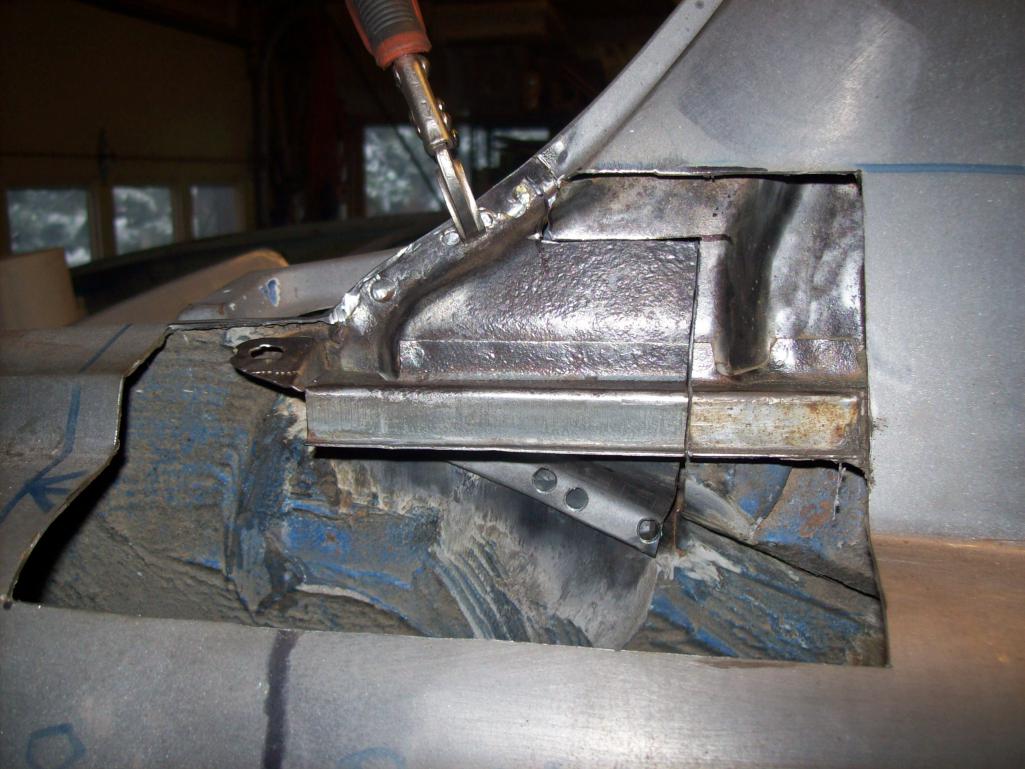
Fitting the patch
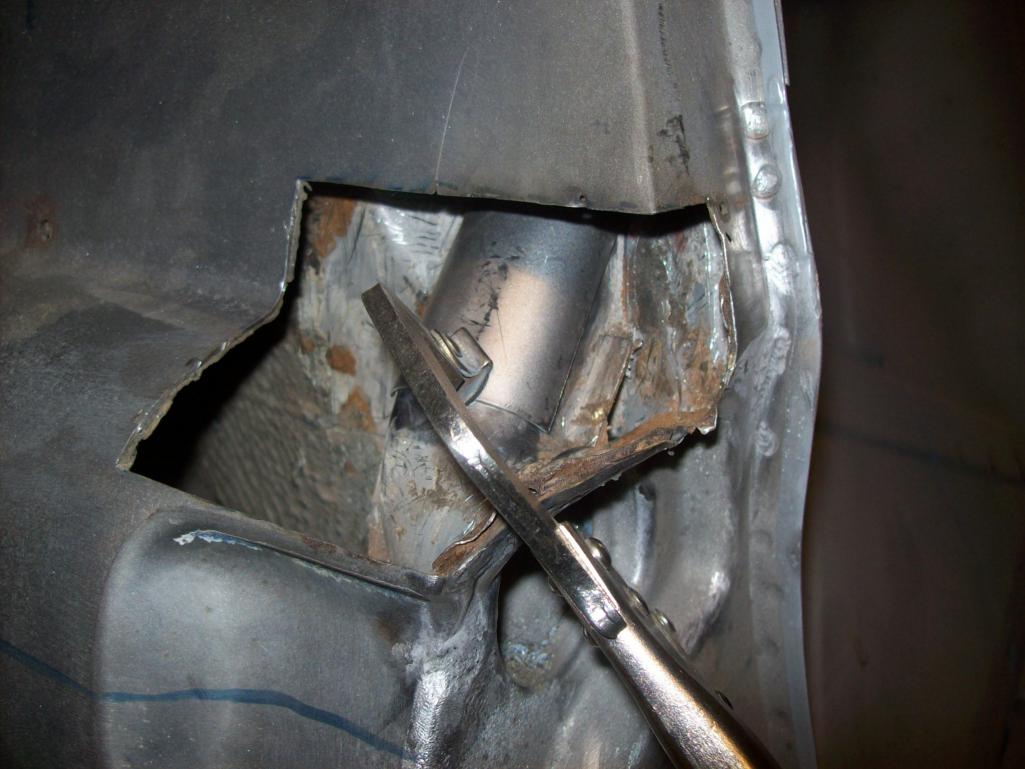 Trimmed 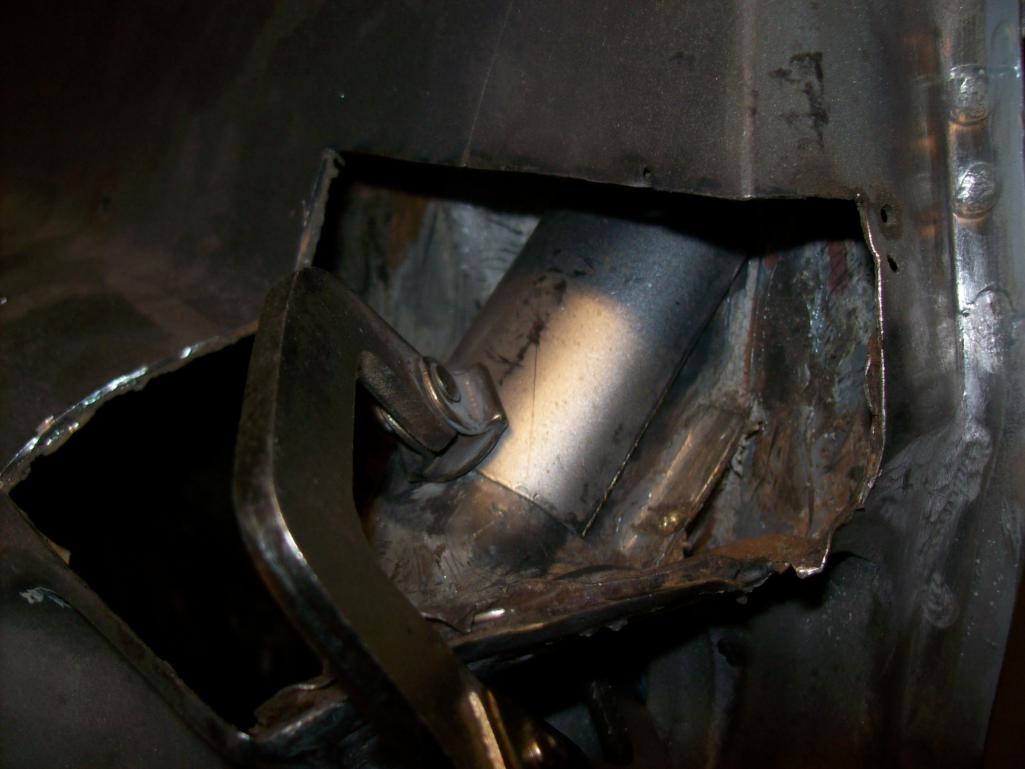 Tacked and welded 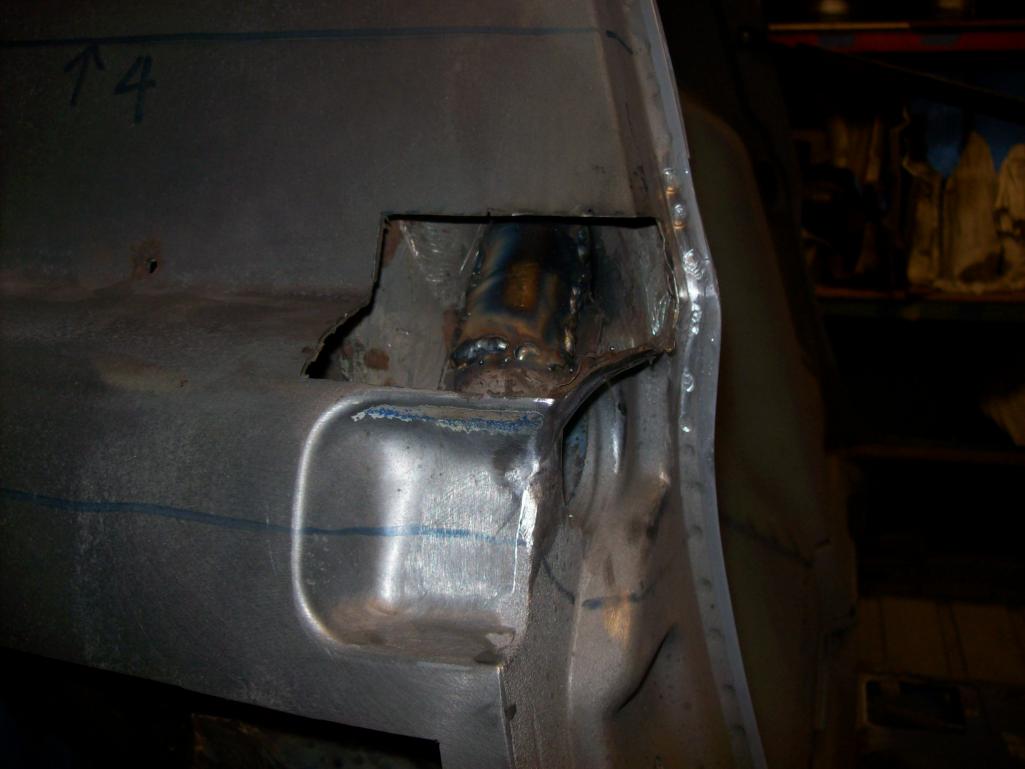 Had to do the top stitch from the inside 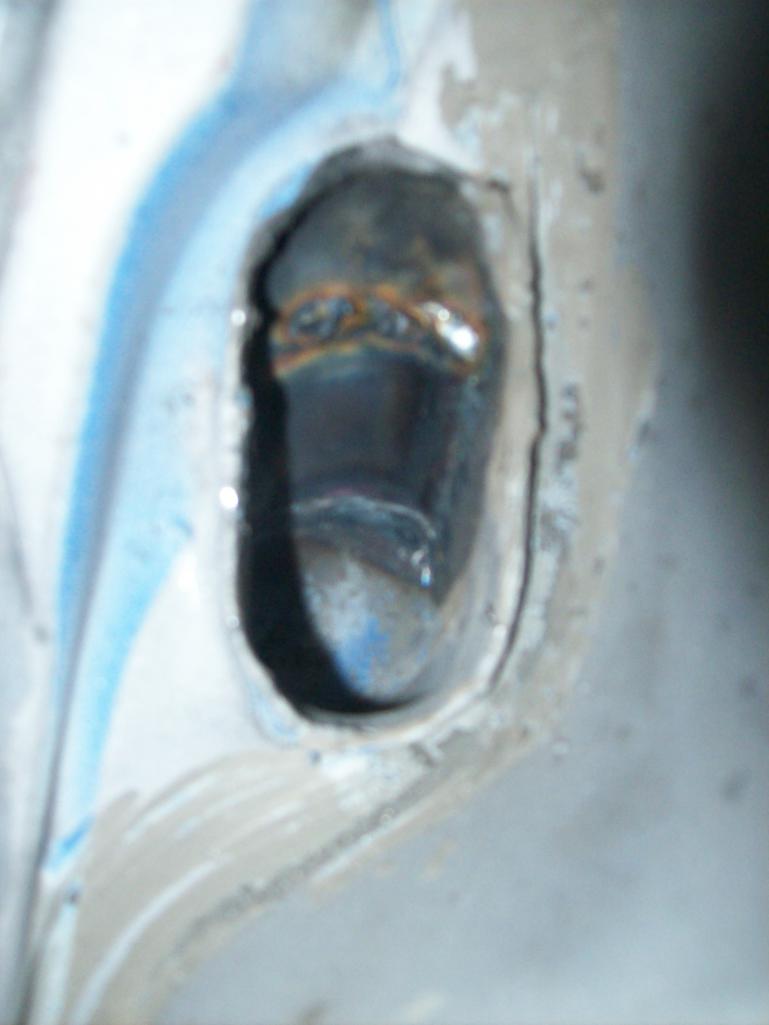 Cleaned up the patch and etch primered the repair. Now on to the exterior skin. There is a lot going on in three dimensions here... I need to figure out the best places for the butt welds in the handle recess area. |
|
|
|
| Ferg |
Dec 15 2014, 07:59 AM
Post
#146
|
|
914 Guru Group: Members Posts: 5,948 Joined: 8-January 03 From: Boulder CO Member No.: 116 Region Association: None |
(IMG:style_emoticons/default/welder.gif) nice job.
|
|
|
|
| Speedo |
Dec 15 2014, 03:12 PM
Post
#147
|
|
Senior Member Group: Members Posts: 591 Joined: 7-November 06 From: Boulder Member No.: 7,170 Region Association: Rocky Mountains |
Just occurred to me that when I fix the perforations in this same area on the driver's side, that I am going to likely find the same mess of over-zealous use of seam sealer there too? Has anybody found the same carnage in that area before? Seriously...3-4 lbs of the muck.
Speedo |
|
|
|
| Ferg |
Dec 15 2014, 03:57 PM
Post
#148
|
|
914 Guru Group: Members Posts: 5,948 Joined: 8-January 03 From: Boulder CO Member No.: 116 Region Association: None |
QUOTE(Speedo @ Dec 15 2014, 02:12 PM) Just occurred to me that when I fix the perforations in this same area on the driver's side, that I am going to likely find the same mess of over-zealous use of seam sealer there too? Has anybody found the same carnage in that area before? Seriously...3-4 lbs of the muck. Speedo Yes, and in both rear fender corners above tail lights. |
|
|
|
| Speedo |
Dec 21 2014, 09:21 PM
Post
#149
|
|
Senior Member Group: Members Posts: 591 Joined: 7-November 06 From: Boulder Member No.: 7,170 Region Association: Rocky Mountains |
QUOTE(Ferg @ Dec 15 2014, 02:57 PM) QUOTE(Speedo @ Dec 15 2014, 02:12 PM) Just occurred to me that when I fix the perforations in this same area on the driver's side, that I am going to likely find the same mess of over-zealous use of seam sealer there too? Has anybody found the same carnage in that area before? Seriously...3-4 lbs of the muck. Speedo Yes, and in both rear fender corners above tail lights. Yeah, I kind of figured that...back there. Just didn't figure on the amount applied at the door receiver. Thanks Ferg...looking forward to the rear corners. So I am still working on the passenger latch/lock area. This is tricky as it is a three dimensional area. And as my replacement piece is solid, I need to remove good and bad steel to make the replacement as easy as possible. Here is my replacement...lined up 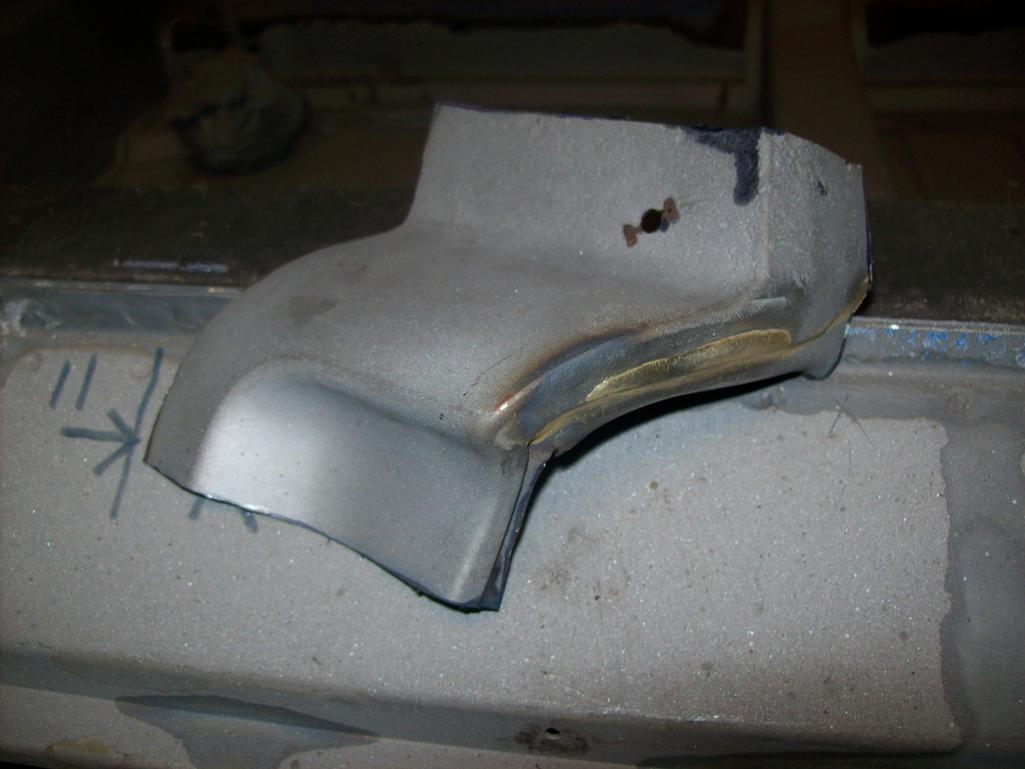 I am feeling rather timid as this is a 3D replacement and it is not a scribe and cut situation. More of an extreme cut and fit X seven. 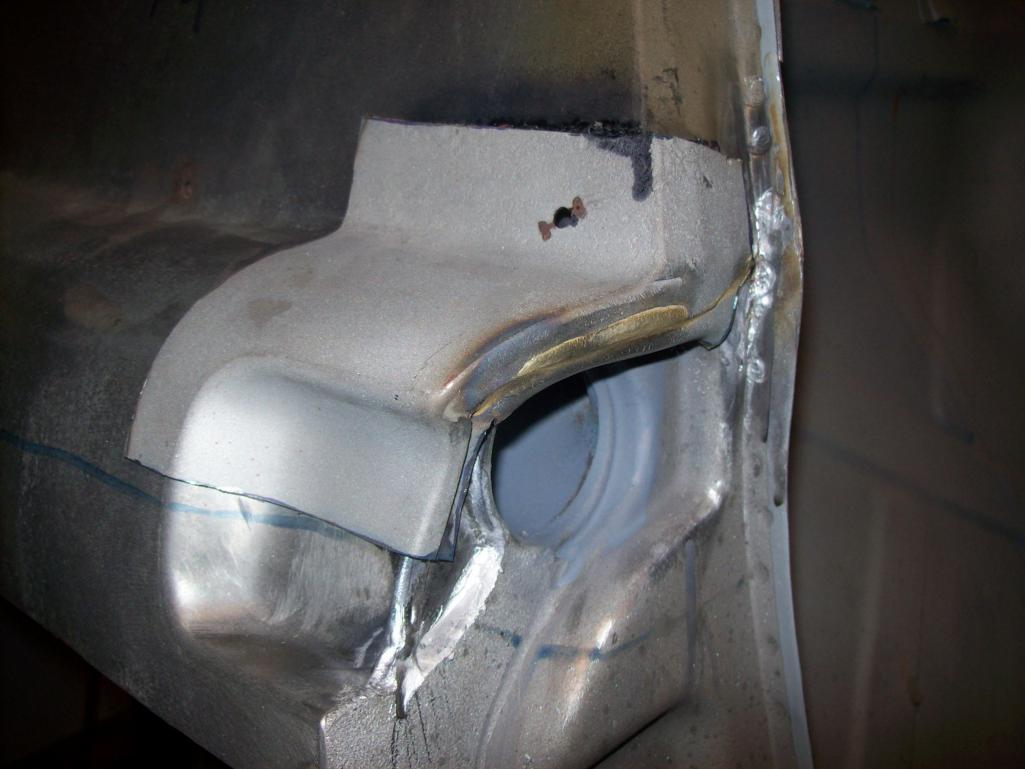  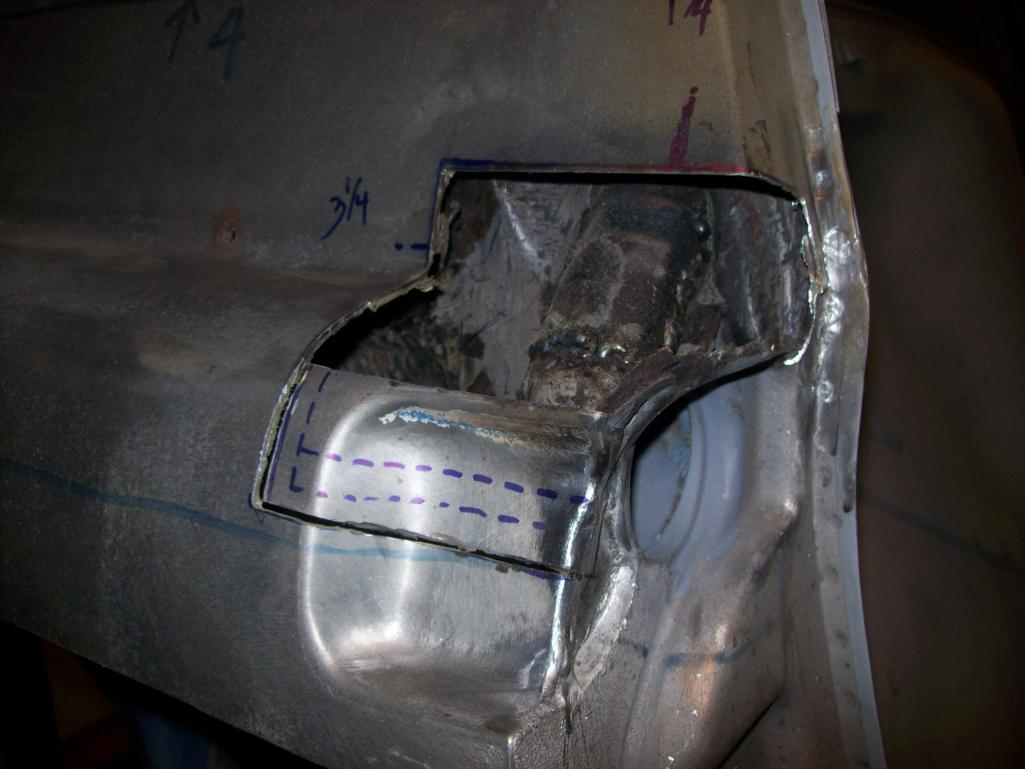 |
|
|
|
| haycait911 |
Dec 21 2014, 09:39 PM
Post
#150
|
|
Newbie Group: Members Posts: 9 Joined: 6-March 08 From: B.C., Canada Member No.: 8,782 Region Association: None |
QUOTE(Speedo @ Dec 21 2014, 08:21 PM) QUOTE(Ferg @ Dec 15 2014, 02:57 PM) QUOTE(Speedo @ Dec 15 2014, 02:12 PM) Just occurred to me that when I fix the perforations in this same area on the driver's side, that I am going to likely find the same mess of over-zealous use of seam sealer there too? Has anybody found the same carnage in that area before? Seriously...3-4 lbs of the muck. Speedo Yes, and in both rear fender corners above tail lights. Yeah, I kind of figured that...back there. Just didn't figure on the amount applied at the door receiver. Thanks Ferg...looking forward to the rear corners. So I am still working on the passenger latch/lock area. This is tricky as it is a three dimensional area. And as my replacement piece is solid, I need to remove good and bad steel to make the replacement as easy as possible. Here is my replacement...lined up I am feeling rather timid as this is a 3D replacement and it is not a scribe and cut situation. More of an extreme cut and fit X seven. make sure you check the fit of a door handle in the detent and compare both sides for an even gap all around. an eighth of an inch in the detent height will show up dramatically when you fit the handle/door. don't trust just measurements. |
|
|
|
| Speedo |
Jan 6 2015, 09:41 PM
Post
#151
|
|
Senior Member Group: Members Posts: 591 Joined: 7-November 06 From: Boulder Member No.: 7,170 Region Association: Rocky Mountains |
Santa brought me a Miller-Matic for being good last year. First thing I did was to practice...say hi to "Snork". Yeah, I am different : )
And I did do a bit more trimming on the passenger side door handle repair. Getting ready to weld up. This was a pain to get right.    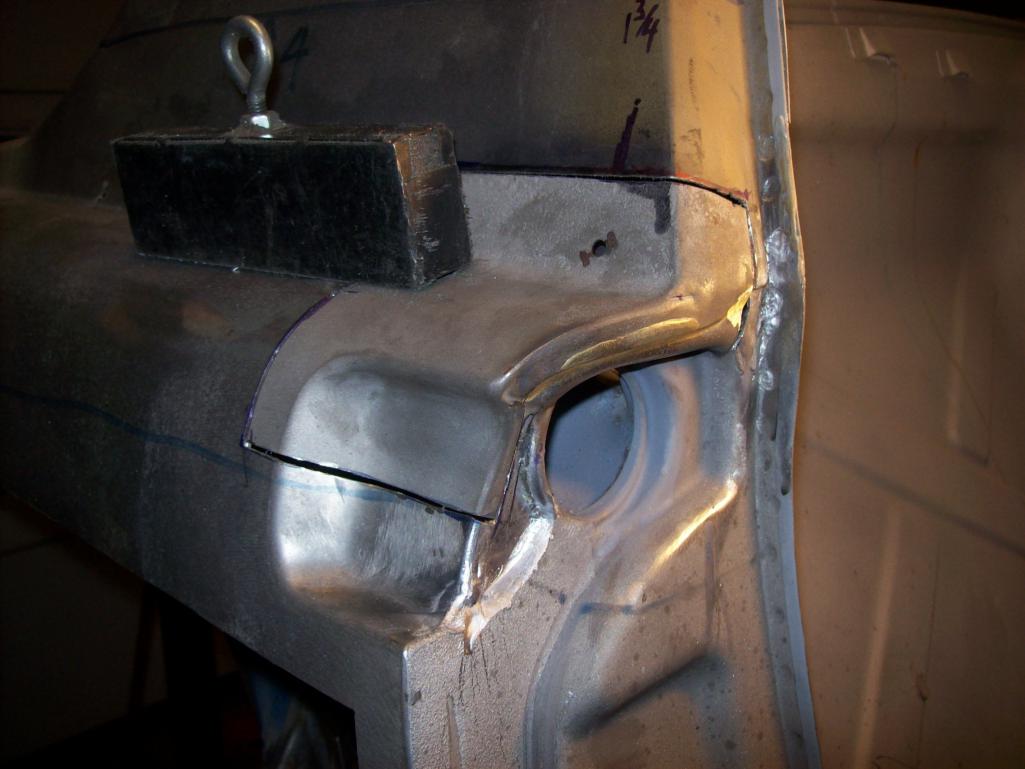 [attachmentid=482 [attachmentid=482221] 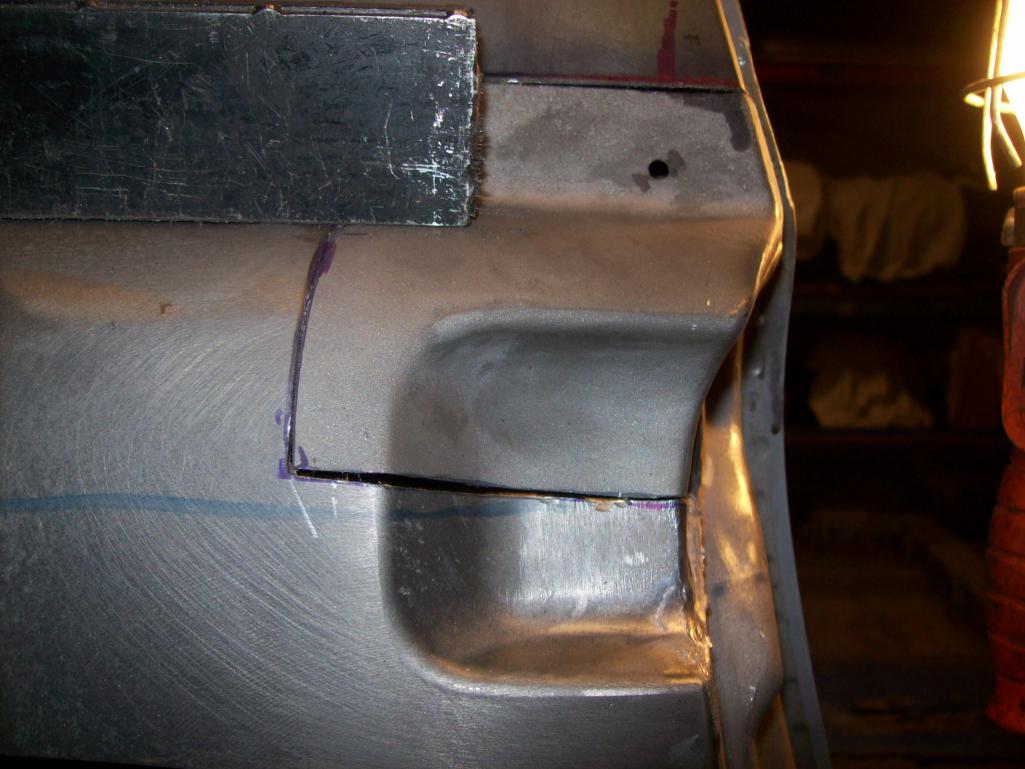 |
|
|
|
| Ferg |
Jan 7 2015, 09:12 AM
Post
#152
|
|
914 Guru Group: Members Posts: 5,948 Joined: 8-January 03 From: Boulder CO Member No.: 116 Region Association: None |
Snork is the perfect shop pet.
|
|
|
|
| brant |
Jan 7 2015, 04:48 PM
Post
#153
|
|
914 Wizard Group: Members Posts: 12,179 Joined: 30-December 02 From: Colorado Member No.: 47 Region Association: Rocky Mountains |
which miller did you get?
110V? cool! |
|
|
|
| Speedo |
Jan 7 2015, 08:03 PM
Post
#154
|
|
Senior Member Group: Members Posts: 591 Joined: 7-November 06 From: Boulder Member No.: 7,170 Region Association: Rocky Mountains |
QUOTE(brant @ Jan 7 2015, 03:48 PM) which miller did you get? 110V? cool! Got a Miller-Matic 211 both 120 and 240. The 240 is really for thick stock up to 3/8ths. I am running it on 120 for the time being although my other welder is set up for the 240 I have accessible in the shop...so that is simply a shift of two internal wires and I am good to go. Not much 3/8ths think steel on a Porsche. |
|
|
|
| haycait911 |
Jan 7 2015, 08:49 PM
Post
#155
|
|
Newbie Group: Members Posts: 9 Joined: 6-March 08 From: B.C., Canada Member No.: 8,782 Region Association: None |
QUOTE(Speedo @ Jan 7 2015, 07:03 PM) QUOTE(brant @ Jan 7 2015, 03:48 PM) which miller did you get? 110V? cool! Got a Miller-Matic 211 both 120 and 240. The 240 is really for thick stock up to 3/8ths. I am running it on 120 for the time being although my other welder is set up for the 240 I have accessible in the shop...so that is simply a shift of two internal wires and I am good to go. Not much 3/8ths think steel on a Porsche. try some test welds. same metal, with 120v then 240v. you'll see a difference. |
|
|
|
| Speedo |
Mar 6 2016, 07:21 PM
Post
#156
|
|
Senior Member Group: Members Posts: 591 Joined: 7-November 06 From: Boulder Member No.: 7,170 Region Association: Rocky Mountains |
Ok...
I am back. Other projects got in the way...but I am now on a mission. I trimmed the replacement steel to repair the passenger handle area, and stopped there. Very delicate repair and I decided to wait to weld it back up. A small rust hole on the back of the passenger sail forced me to open it up...couldn't just weld up the area...not the right way to do a repair. Once in there...it got worse. Then it got even worse. Time to cut it out, clean it up and use good steel to replace the bad. 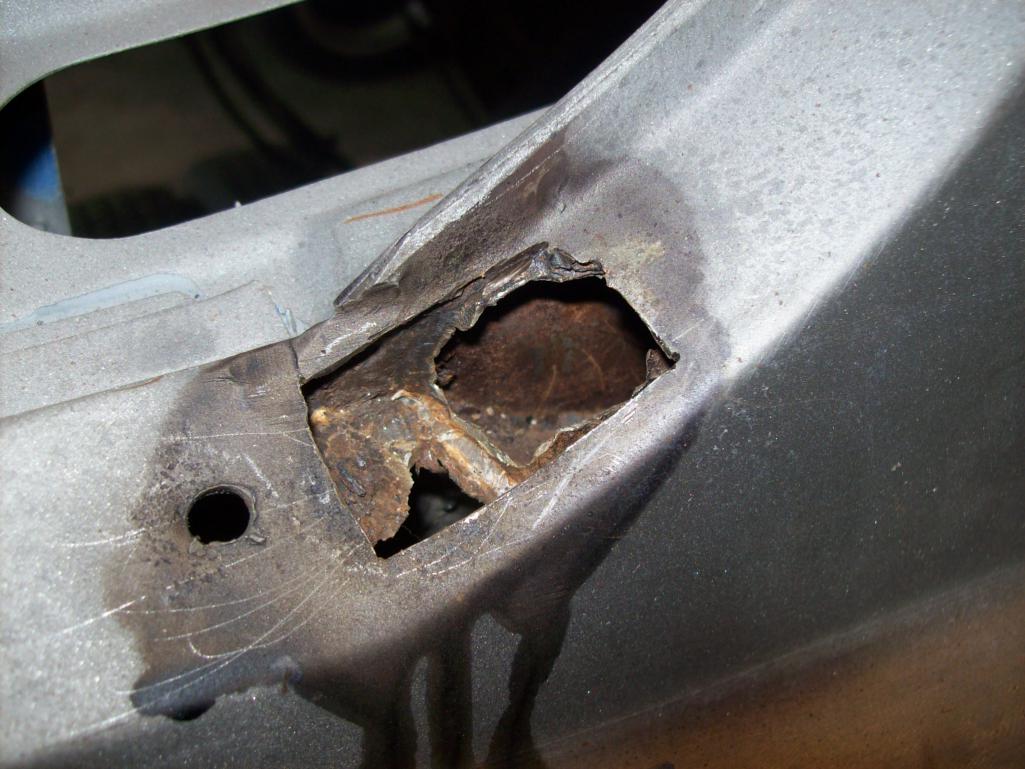 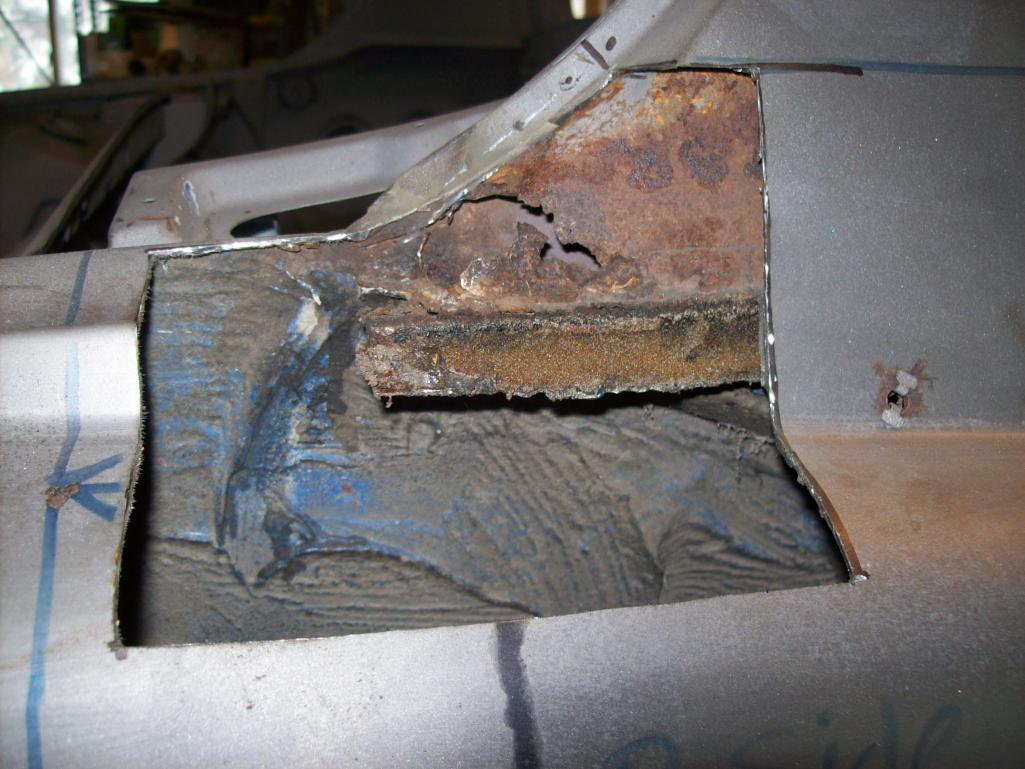 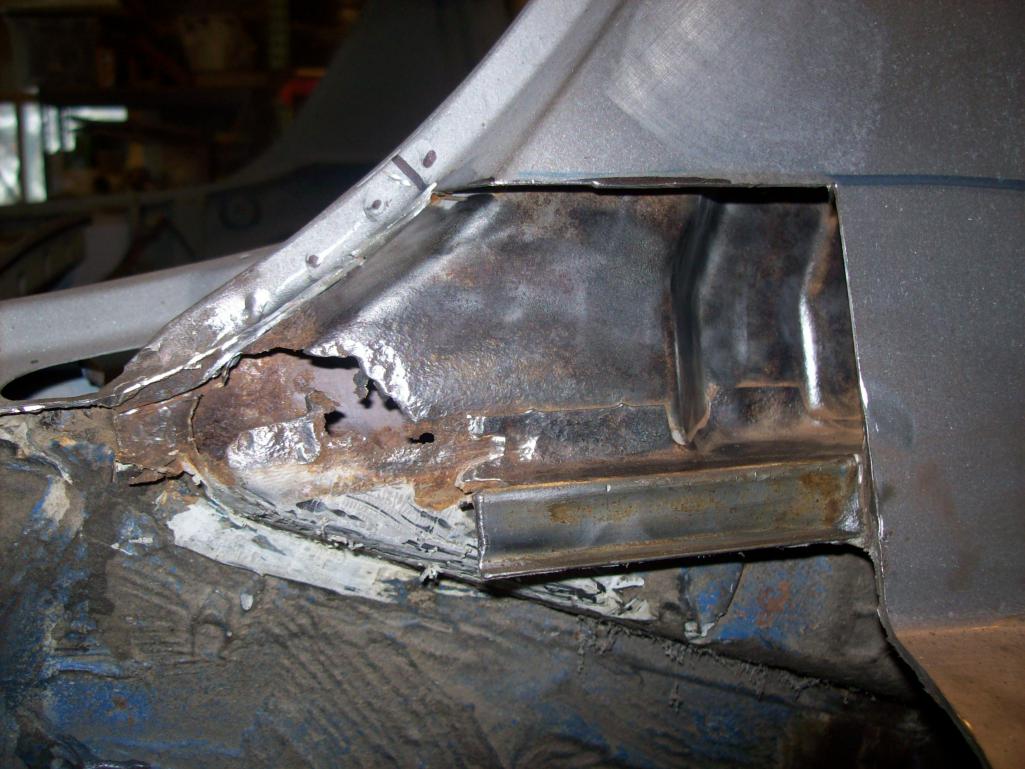 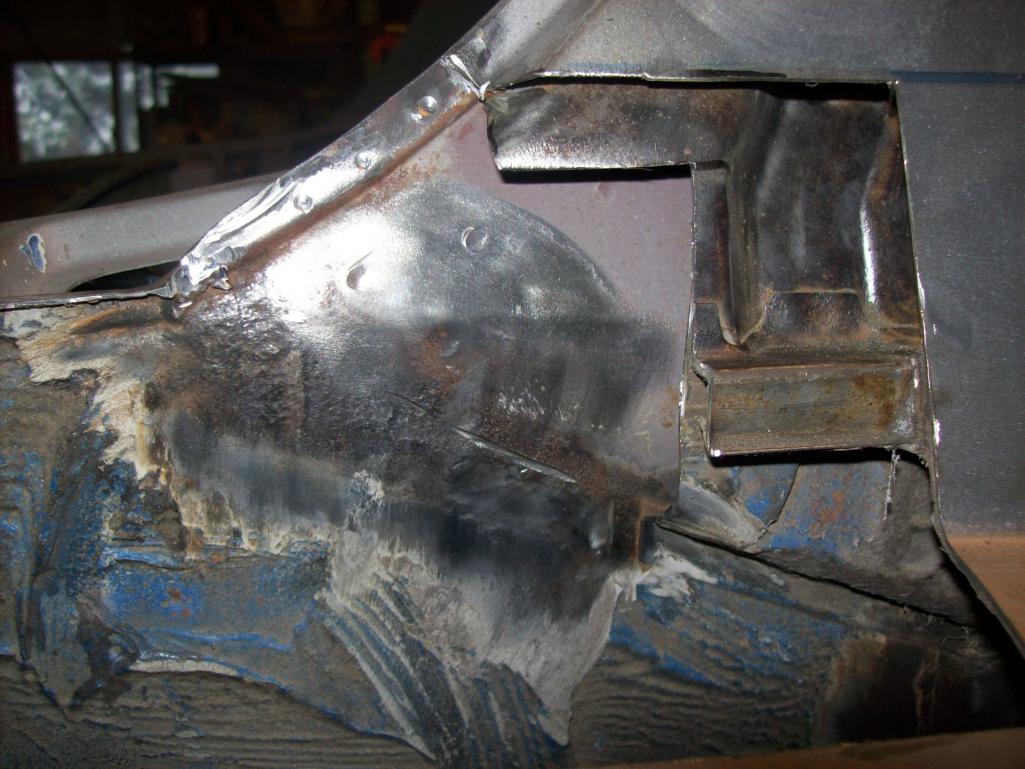 |
|
|
|
| haycait911 |
Mar 6 2016, 07:25 PM
Post
#157
|
|
Newbie Group: Members Posts: 9 Joined: 6-March 08 From: B.C., Canada Member No.: 8,782 Region Association: None |
that's pretty ugly. I wouldn't bother going any further. obviously a basket case. probably best to unload it cheap on a dumb Canadian that doesn't know any better (IMG:style_emoticons/default/bye1.gif)
|
|
|
|
| Speedo |
Mar 6 2016, 07:25 PM
Post
#158
|
|
Senior Member Group: Members Posts: 591 Joined: 7-November 06 From: Boulder Member No.: 7,170 Region Association: Rocky Mountains |
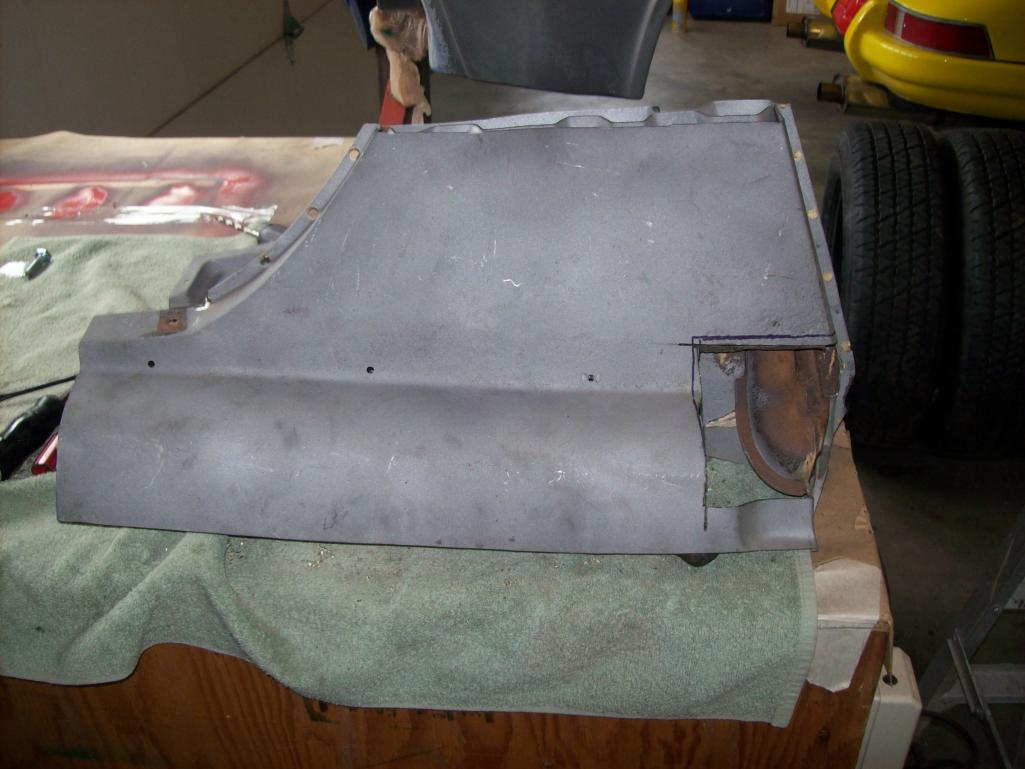
I had a donor sail that I disassembled and harvested the needed part.
    |
|
|
|
| Speedo |
Mar 6 2016, 07:27 PM
Post
#159
|
|
Senior Member Group: Members Posts: 591 Joined: 7-November 06 From: Boulder Member No.: 7,170 Region Association: Rocky Mountains |
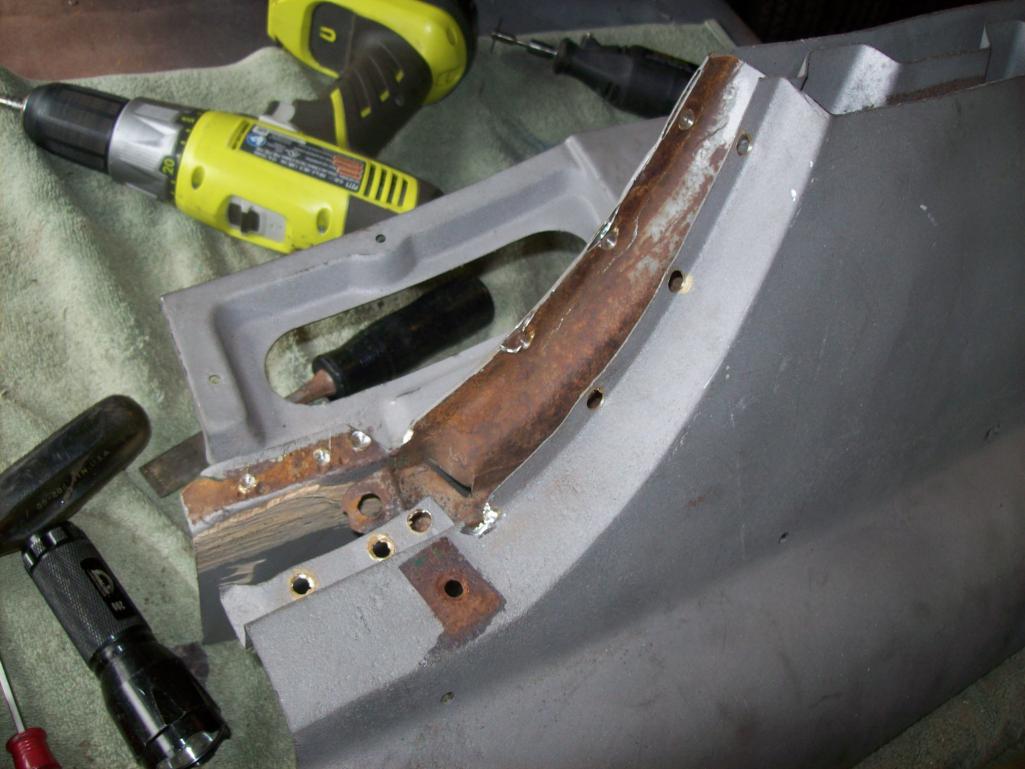
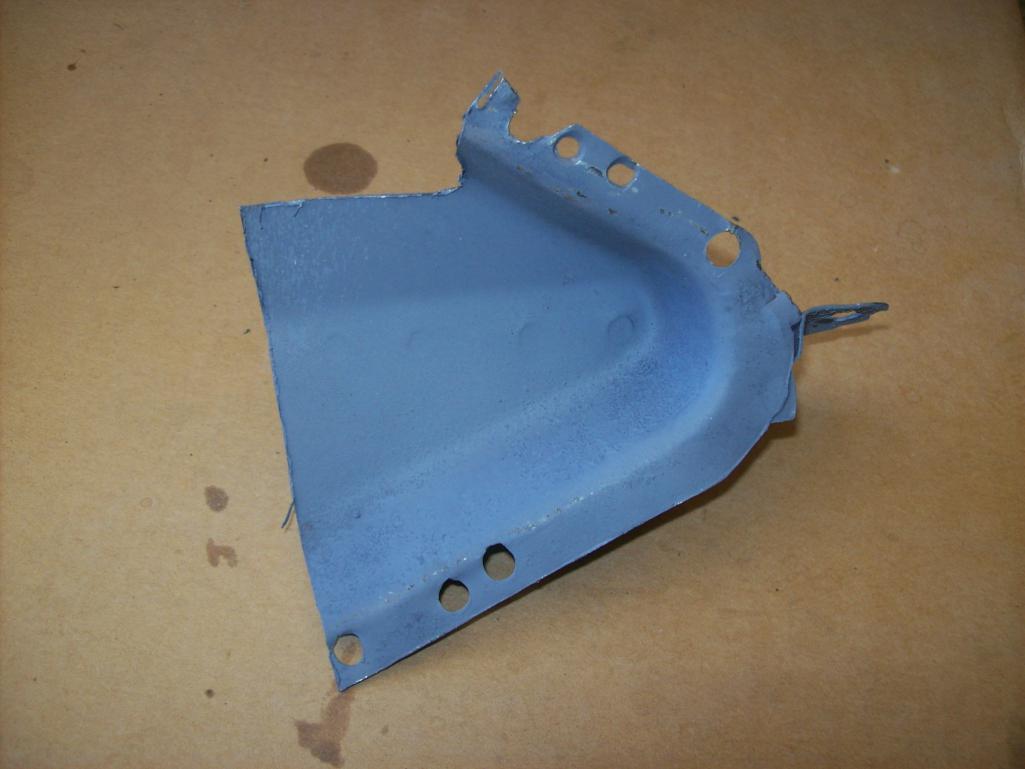
Harvested and cleaned up...needs a little bit of fitting yet, and to be etched.
 |
|
|
|
| Speedo |
Mar 6 2016, 07:31 PM
Post
#160
|
|
Senior Member Group: Members Posts: 591 Joined: 7-November 06 From: Boulder Member No.: 7,170 Region Association: Rocky Mountains |
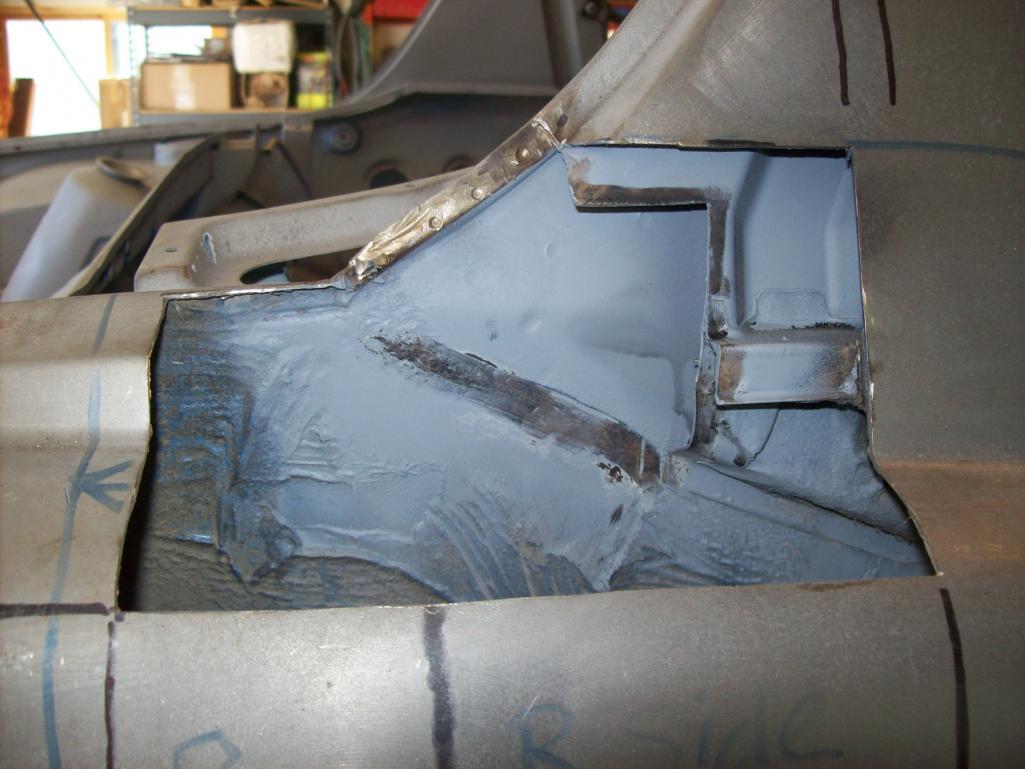
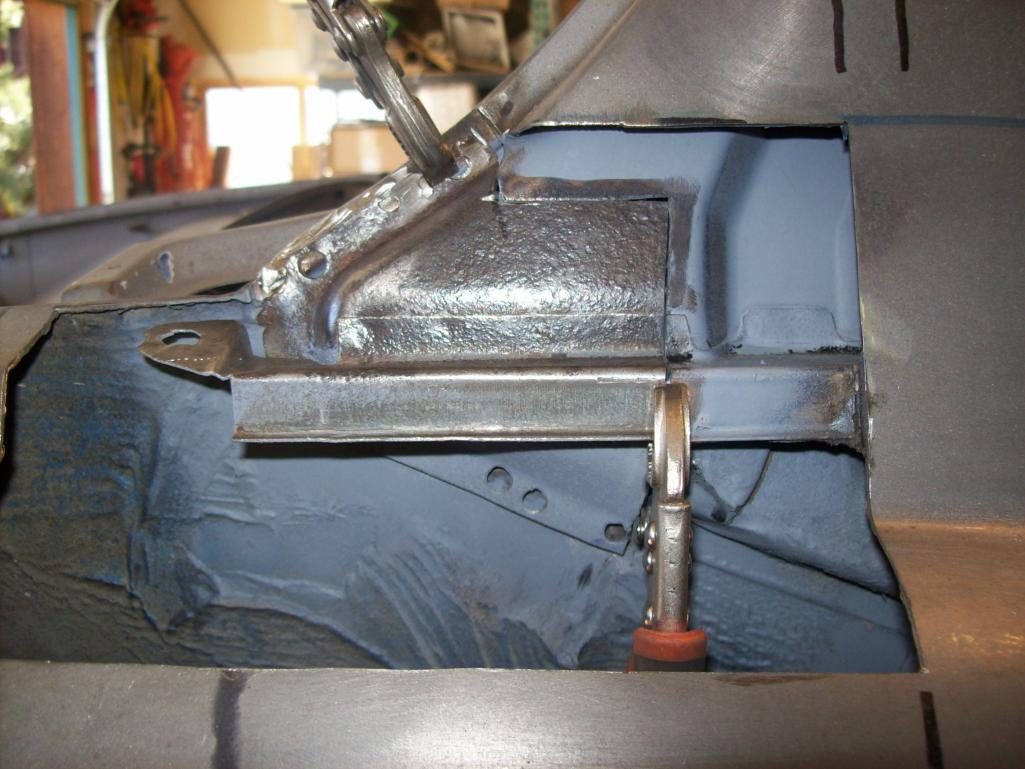
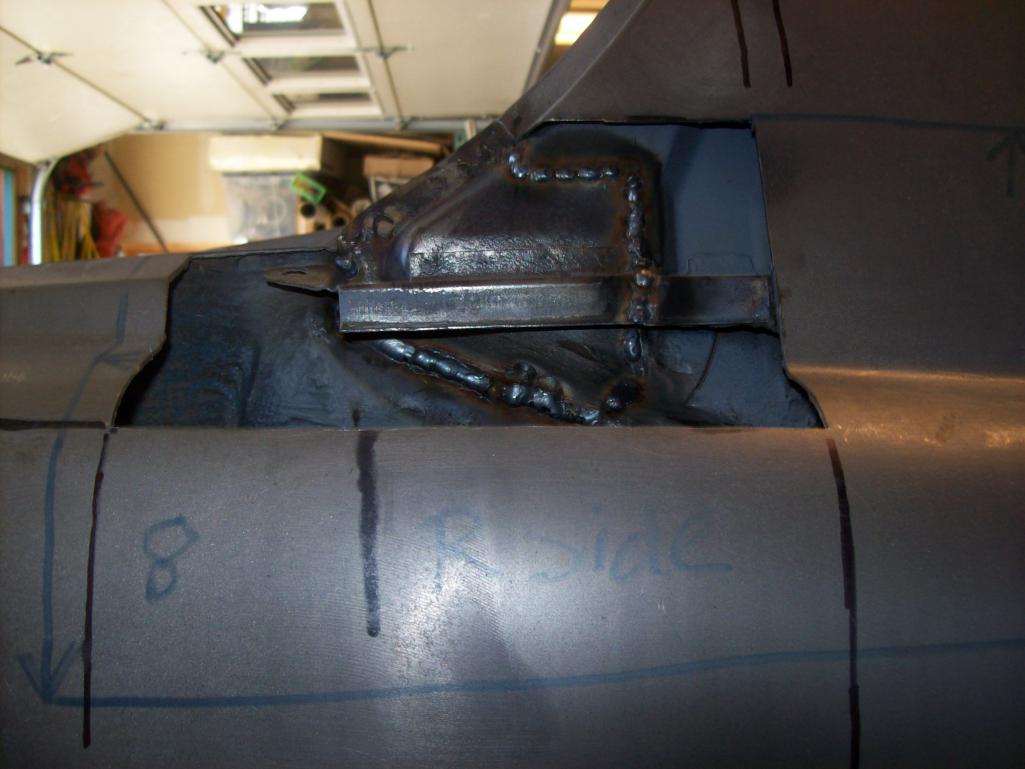
Clean the area up, treat and weld in place.
    |
|
|
|
|
1 User(s) are reading this topic (1 Guests and 0 Anonymous Users)
0 Members:

|
Lo-Fi Version | Time is now: 13th April 2026 - 12:04 AM |
Invision Power Board
v9.1.4 © 2026 IPS, Inc.