|
|
|
Porsche, and the Porsche crest are registered trademarks of Dr. Ing. h.c. F. Porsche AG.
This site is not affiliated with Porsche in any way. Its only purpose is to provide an online forum for car enthusiasts. All other trademarks are property of their respective owners. |
|
|


| wachospeedo |
 Jun 10 2012, 07:10 PM Jun 10 2012, 07:10 PM
Post
#601
|
|
Unregistered |
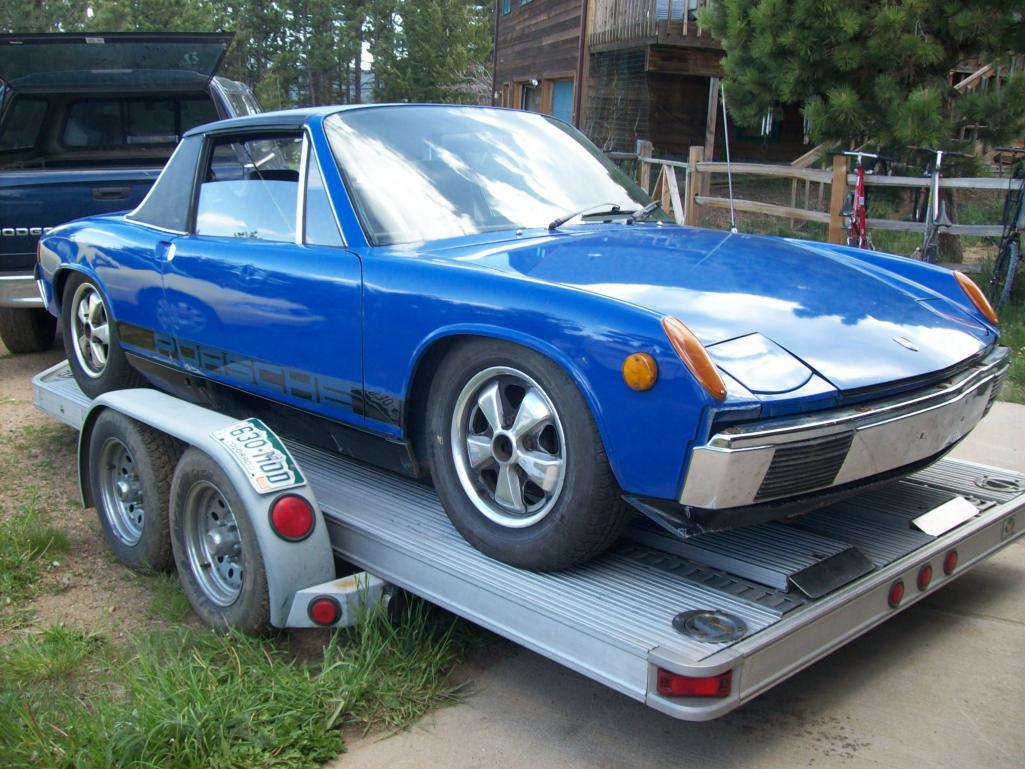
New to the board. Most of my work and experience is over on Pelican with 911 longhoods. I stalked a local PCA guy who was going to eventually sell his 914-6. No pressure, just every few months I let him know I hadn't forgotten. Finally got a chance to see the car in person three weeks ago. Passenger rocker issues as well as surface bubbling in a number of places. Car had been extensively autocrossed at PCA parades for years...very successfully. Owner had pulled the original 2.0 and replaced with a 2.7 RS spec engine with carbs. He bought another mid-engined car (boxster) and ignored the 6. I bought the car (w/ 2.7) and original engine. Got the 2.7 running well enough to drive the car...and decided to dive into the resto. I am familiar with rust, and plan to do it correctly. I have a rotisserie with 911 mounts, but shouldn't be a big deal to make mounts for the 6. Made a couple calls to Resto Design to check on parts...and away I go. I have a 71 911 softie that has been at paint too long...so while I wait for it to come home, thought I would see what my sandblasters schedule was. Turns out he can do the car in two weeks. So, I have a deadline. So...I guess this is my resto thread on my new Adriatic Blue 6...
  I took a few hours Friday afternoon,a couple yesterday, and a few more today. Almost ready for the blaster 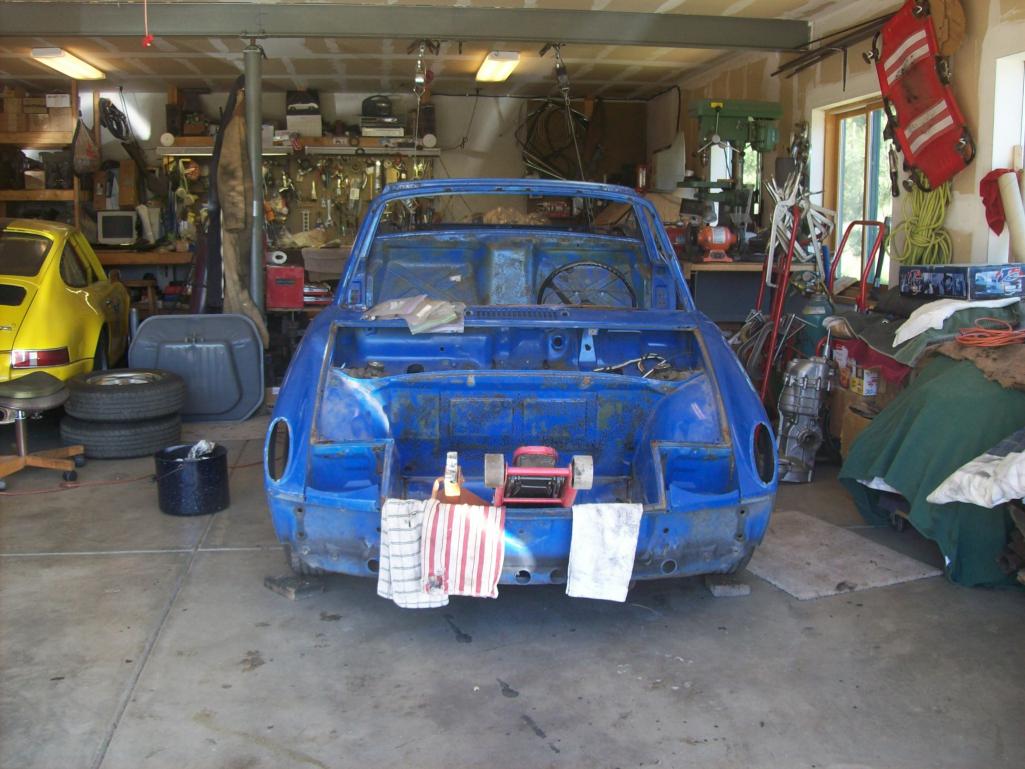 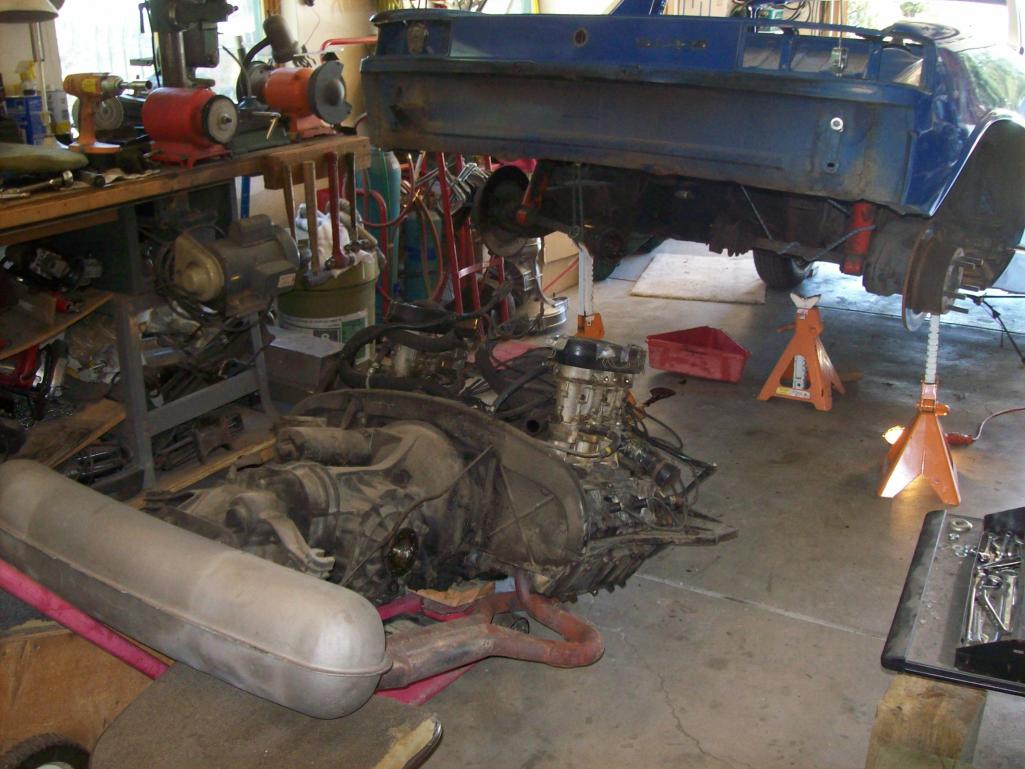 yuck...passenger side. Drivers side looks ok. Before you question...yes I do have some hell-hole issues. More later... Speedo Attached thumbnail(s) 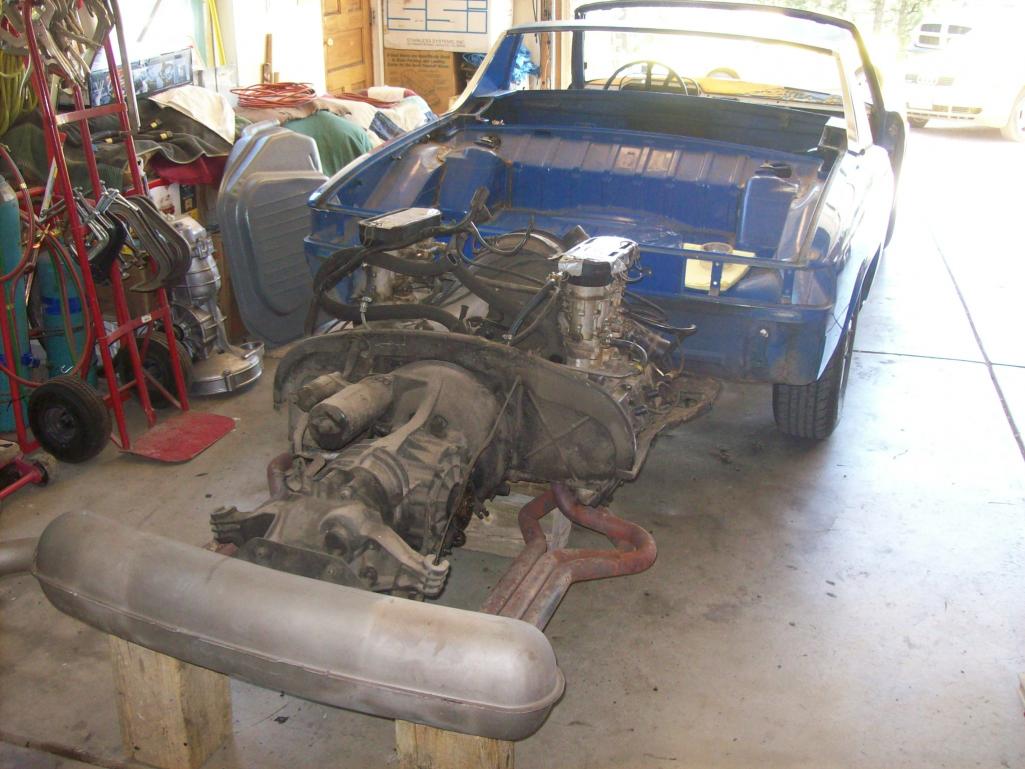
|

 
|
|
Posts in this topic
wachospeedo Fix a six Jun 10 2012, 07:10 PM Cairo94507 Wow, way to tackle the car. Looking forward to se... Jun 10 2012, 07:41 PM dakotaewing If you are going to blast the car, please put qual... Jun 10 2012, 07:49 PM carr914 Looks Nice. Probably too nice for Original Paint. ... Jun 10 2012, 09:06 PM carr914 And
:wttc: Jun 10 2012, 09:07 PM kg6dxn :wttc:
:evilgrin: Jun 10 2012, 09:27 PM smj Welcome, and wow - looks like this -6 didn't f... Jun 10 2012, 09:32 PM Mr.242 Nice work so far! It will be nice to see this... Jun 10 2012, 09:39 PM rick 918-S :wttc: Keep the photos coming! There are seve... Jun 11 2012, 07:48 AM GeorgeRud Actually, it seems this -6 may have found another ... Jun 11 2012, 07:51 AM abnrdo Wow! Thats a quick start! :headbanger: ... Jun 11 2012, 07:53 AM brant Good Work Lars!
this is going to be a great t... Jun 11 2012, 07:54 AM Travis Neff :popcorn: Jun 11 2012, 09:34 AM sixnotfour :wttc:
Has not changed much since I saw it 20 yea... Jun 11 2012, 10:24 AM Ferg Hi Lars!
Gang, mark this thread, Lars has ski... Jun 11 2012, 10:38 AM SirAndy :wttc:
Love that color! :driving: Jun 11 2012, 11:17 AM 6freak 1st picture of the car show what looks like a trai... Jun 11 2012, 03:09 PM
Cairo94507 Wow, way to tackle the car. Looking forward to se... Jun 10 2012, 07:41 PM dakotaewing If you are going to blast the car, please put qual... Jun 10 2012, 07:49 PM carr914 Looks Nice. Probably too nice for Original Paint. ... Jun 10 2012, 09:06 PM carr914 And
:wttc: Jun 10 2012, 09:07 PM kg6dxn :wttc:
:evilgrin: Jun 10 2012, 09:27 PM smj Welcome, and wow - looks like this -6 didn't f... Jun 10 2012, 09:32 PM Mr.242 Nice work so far! It will be nice to see this... Jun 10 2012, 09:39 PM rick 918-S :wttc: Keep the photos coming! There are seve... Jun 11 2012, 07:48 AM GeorgeRud Actually, it seems this -6 may have found another ... Jun 11 2012, 07:51 AM abnrdo Wow! Thats a quick start! :headbanger: ... Jun 11 2012, 07:53 AM brant Good Work Lars!
this is going to be a great t... Jun 11 2012, 07:54 AM Travis Neff :popcorn: Jun 11 2012, 09:34 AM sixnotfour :wttc:
Has not changed much since I saw it 20 yea... Jun 11 2012, 10:24 AM Ferg Hi Lars!
Gang, mark this thread, Lars has ski... Jun 11 2012, 10:38 AM SirAndy :wttc:
Love that color! :driving: Jun 11 2012, 11:17 AM 6freak 1st picture of the car show what looks like a trai... Jun 11 2012, 03:09 PM
 brant
1st picture of the car show what looks like a tra... Jun 11 2012, 05:41 PM pete000 Wow, fast tear down ! Looks like this one shou... Jun 11 2012, 06:26 PM wachospeedo sixnotfour,
Wow! That's the car alright... Jun 11 2012, 07:22 PM TargaToy What a great "find". Really paid off to... Jun 11 2012, 07:37 PM 914Sixer One of my favorite colors. Jun 11 2012, 07:48 PM sixnotfour
not from the factory, but many many have had tha... Jun 11 2012, 08:12 PM PanelBilly Can't wait to seel the build. Is the 2.0 or 2.... Jun 11 2012, 08:19 PM wachospeedo
Can't wait to seel the build. Is the 2.0 or 2... Jun 12 2012, 07:10 PM wachospeedo Couple more...the hell hole. Hopefully after blast... Jun 12 2012, 07:30 PM seanery I know sixes fit the fenders ok with 205s. Not sur... Jun 12 2012, 08:07 PM Cairo94507 I didn't even know the deep six was made in 7... Jun 12 2012, 08:26 PM shuie
I didn't even know the deep six was made in 7... Jun 18 2012, 06:58 PM rick 918-S That is a nice shell! :drooley: Jun 12 2012, 08:35 PM brant pull that oil tank before it goes to the blaster..... Jun 12 2012, 11:01 PM wachospeedo More prepping for sandblaster. Removing the oil ta... Jun 18 2012, 06:52 PM wachospeedo Moving on...This all obviously is bye bye
I atta... Jun 18 2012, 07:11 PM pete000 Great progress ! Jun 18 2012, 10:36 PM Cairo94507 Wow I am really going to enjoy watching this build... Jun 19 2012, 10:00 AM brant Nice job....
time to cut that front fender off...
... Jun 19 2012, 04:53 PM 914Sixer Looking good !!!! Jun 19 2012, 07:37 PM wachospeedo Ok Brant...
Marching orders...cut the bad out befo... Jun 20 2012, 08:25 PM wachospeedo One more view of the perforations in the lip next ... Jun 20 2012, 08:38 PM brant you're moving much too fast to be a real 914 g... Jun 20 2012, 08:57 PM Gint you're moving much too fast to be a real 914 g... Aug 21 2012, 06:13 AM wachospeedo Packed up and ready to go. Trunk is full of small ... Jun 22 2012, 03:46 PM shuie Hi Lars, I hope all is well. Nice work again!
... Aug 3 2012, 11:34 PM Ferg Yo, you get my email? Parts and books in truck if... Jun 22 2012, 04:03 PM Eric_Shea This thing done yet? What's the holdup Lars? ... Jun 22 2012, 05:45 PM Ferg
This thing done yet? What's the holdup Lars?... Jun 23 2012, 08:27 AM Eric_Shea Painters are all like that!! :poke: Jun 23 2012, 08:38 AM brant I want to see it when it comes back too...
also ... Jun 23 2012, 11:00 PM wachospeedo I was going to use the wheels as rollers to get th... Jun 24 2012, 06:58 AM brant I don't know how to tell the mufflers apart vi... Jun 24 2012, 08:08 AM brant stolen picture Jun 24 2012, 08:11 AM wachospeedo Spent a couple hours going through by baggies of p... Jun 24 2012, 06:22 PM Ferg tick tock tick tock :poke: :shades2: Jun 26 2012, 11:38 AM Ferg :bump: Jul 16 2012, 08:21 AM wachospeedo Lots of updates (long overdue) but not till tomorr... Aug 3 2012, 06:30 PM Cairo94507 tease! Aug 3 2012, 07:28 PM Ferg Liar :lol: :poke:
Don't make me come up th... Aug 9 2012, 03:46 PM sixnotfour tomorrow never comes.. Aug 9 2012, 04:44 PM wachospeedo
tomorrow never comes..
It does come ...sometimes... Aug 12 2012, 07:17 AM wachospeedo Clean continued....
Now for something complet... Aug 12 2012, 07:21 AM Cairo94507 Very nice chassis. I hope mine looks reasonably c... Aug 12 2012, 07:53 AM brant Nice progress
car is good
when do you need help l... Aug 12 2012, 08:10 AM wachospeedo The "unwashed"...the worst first
I ... Aug 12 2012, 09:43 AM wachospeedo Instead of "the corner workers", these a... Aug 12 2012, 09:50 AM wachospeedo I ordered a big batch of repro steel from RD with ... Aug 12 2012, 10:05 AM wachospeedo Braces going together...trial fit
I had to use a ... Aug 12 2012, 10:16 AM wachospeedo I needed to massage a few front trunk areas while ... Aug 12 2012, 10:31 AM wachospeedo Crap! I rolled my car!
So not claiming t... Aug 12 2012, 10:54 AM wachospeedo Front suspension first. Nice to have easy access t... Aug 12 2012, 11:06 AM wachospeedo My next concern was whether or not the remaining b... Aug 12 2012, 11:20 AM sixnotfour Boge are Grey on sixes, Aug 12 2012, 11:31 AM wachospeedo Long days work...but it feels good to get the car ... Aug 12 2012, 11:37 AM sixnotfour 2.4 heads only need a chmfer to work for 2.7 PC... Aug 12 2012, 12:51 PM wachospeedo
2.4 heads only need a chmfer to work for 2.7 PC... Aug 12 2012, 06:59 PM Ferg :D Nice work Lars :welder: Aug 12 2012, 09:51 PM brant I think the stock 914/6 wheel stud lengths are the... Aug 13 2012, 09:01 AM wachospeedo So I need to get a concensus as to whether where t... Aug 13 2012, 08:15 PM seanery That looks bent to me. Aug 13 2012, 08:54 PM brant sorry but I agree... bent
can people please add p... Aug 13 2012, 10:40 PM DEC
sorry but I agree... bent
can people please add ... Aug 14 2012, 03:07 AM Cairo94507 Yup; should be flat. Aug 14 2012, 06:25 AM brant Nice shot DEC
does anyone have a frontal shot sho... Aug 14 2012, 08:35 AM peteyd Heres a pic...
Aug 14 2012, 03:12 PM sixnotfour Pete's looks pushed up in the center also. Aug 14 2012, 04:07 PM Katmanken Dang, I wonder if the PO used the flat of the fron... Aug 14 2012, 06:03 PM seanery I like where you're going with that ken. Aug 14 2012, 06:27 PM Speedo I was going to start hammering on the front end to... Aug 19 2012, 07:10 PM Speedo I like the fab work...so we start. Peter's par... Aug 19 2012, 07:18 PM Ferg Nice Lars :welder: Aug 20 2012, 02:43 PM Speedo Pretty straightforward....cut and fit and repeat.
... Aug 20 2012, 08:11 PM Speedo My front A-arms didn't want to give up the t-b... Aug 20 2012, 08:46 PM wachospeedo I needed to beat on something this weekend. As it ... Aug 27 2012, 05:24 PM wachospeedo This is going to take some time...lots of big dama... Aug 27 2012, 05:35 PM Scott S Wow Lars - looks fantastic.
You guys should se... Aug 27 2012, 05:40 PM wachospeedo And the finished product...
Beats replacing the e... Aug 27 2012, 06:09 PM RON S. Lars,
If your mindset is like mine the only... Aug 27 2012, 06:20 PM wachospeedo It is going to get worse before it gets better...s... Sep 3 2012, 07:51 AM wachospeedo It is what it is.....I am going to just open this ... Sep 3 2012, 08:10 AM Ferg :bump: :poke: Sep 25 2012, 04:31 PM Speedo Alright alright.
I've made progress, but an no... Oct 9 2012, 06:37 PM
brant
1st picture of the car show what looks like a tra... Jun 11 2012, 05:41 PM pete000 Wow, fast tear down ! Looks like this one shou... Jun 11 2012, 06:26 PM wachospeedo sixnotfour,
Wow! That's the car alright... Jun 11 2012, 07:22 PM TargaToy What a great "find". Really paid off to... Jun 11 2012, 07:37 PM 914Sixer One of my favorite colors. Jun 11 2012, 07:48 PM sixnotfour
not from the factory, but many many have had tha... Jun 11 2012, 08:12 PM PanelBilly Can't wait to seel the build. Is the 2.0 or 2.... Jun 11 2012, 08:19 PM wachospeedo
Can't wait to seel the build. Is the 2.0 or 2... Jun 12 2012, 07:10 PM wachospeedo Couple more...the hell hole. Hopefully after blast... Jun 12 2012, 07:30 PM seanery I know sixes fit the fenders ok with 205s. Not sur... Jun 12 2012, 08:07 PM Cairo94507 I didn't even know the deep six was made in 7... Jun 12 2012, 08:26 PM shuie
I didn't even know the deep six was made in 7... Jun 18 2012, 06:58 PM rick 918-S That is a nice shell! :drooley: Jun 12 2012, 08:35 PM brant pull that oil tank before it goes to the blaster..... Jun 12 2012, 11:01 PM wachospeedo More prepping for sandblaster. Removing the oil ta... Jun 18 2012, 06:52 PM wachospeedo Moving on...This all obviously is bye bye
I atta... Jun 18 2012, 07:11 PM pete000 Great progress ! Jun 18 2012, 10:36 PM Cairo94507 Wow I am really going to enjoy watching this build... Jun 19 2012, 10:00 AM brant Nice job....
time to cut that front fender off...
... Jun 19 2012, 04:53 PM 914Sixer Looking good !!!! Jun 19 2012, 07:37 PM wachospeedo Ok Brant...
Marching orders...cut the bad out befo... Jun 20 2012, 08:25 PM wachospeedo One more view of the perforations in the lip next ... Jun 20 2012, 08:38 PM brant you're moving much too fast to be a real 914 g... Jun 20 2012, 08:57 PM Gint you're moving much too fast to be a real 914 g... Aug 21 2012, 06:13 AM wachospeedo Packed up and ready to go. Trunk is full of small ... Jun 22 2012, 03:46 PM shuie Hi Lars, I hope all is well. Nice work again!
... Aug 3 2012, 11:34 PM Ferg Yo, you get my email? Parts and books in truck if... Jun 22 2012, 04:03 PM Eric_Shea This thing done yet? What's the holdup Lars? ... Jun 22 2012, 05:45 PM Ferg
This thing done yet? What's the holdup Lars?... Jun 23 2012, 08:27 AM Eric_Shea Painters are all like that!! :poke: Jun 23 2012, 08:38 AM brant I want to see it when it comes back too...
also ... Jun 23 2012, 11:00 PM wachospeedo I was going to use the wheels as rollers to get th... Jun 24 2012, 06:58 AM brant I don't know how to tell the mufflers apart vi... Jun 24 2012, 08:08 AM brant stolen picture Jun 24 2012, 08:11 AM wachospeedo Spent a couple hours going through by baggies of p... Jun 24 2012, 06:22 PM Ferg tick tock tick tock :poke: :shades2: Jun 26 2012, 11:38 AM Ferg :bump: Jul 16 2012, 08:21 AM wachospeedo Lots of updates (long overdue) but not till tomorr... Aug 3 2012, 06:30 PM Cairo94507 tease! Aug 3 2012, 07:28 PM Ferg Liar :lol: :poke:
Don't make me come up th... Aug 9 2012, 03:46 PM sixnotfour tomorrow never comes.. Aug 9 2012, 04:44 PM wachospeedo
tomorrow never comes..
It does come ...sometimes... Aug 12 2012, 07:17 AM wachospeedo Clean continued....
Now for something complet... Aug 12 2012, 07:21 AM Cairo94507 Very nice chassis. I hope mine looks reasonably c... Aug 12 2012, 07:53 AM brant Nice progress
car is good
when do you need help l... Aug 12 2012, 08:10 AM wachospeedo The "unwashed"...the worst first
I ... Aug 12 2012, 09:43 AM wachospeedo Instead of "the corner workers", these a... Aug 12 2012, 09:50 AM wachospeedo I ordered a big batch of repro steel from RD with ... Aug 12 2012, 10:05 AM wachospeedo Braces going together...trial fit
I had to use a ... Aug 12 2012, 10:16 AM wachospeedo I needed to massage a few front trunk areas while ... Aug 12 2012, 10:31 AM wachospeedo Crap! I rolled my car!
So not claiming t... Aug 12 2012, 10:54 AM wachospeedo Front suspension first. Nice to have easy access t... Aug 12 2012, 11:06 AM wachospeedo My next concern was whether or not the remaining b... Aug 12 2012, 11:20 AM sixnotfour Boge are Grey on sixes, Aug 12 2012, 11:31 AM wachospeedo Long days work...but it feels good to get the car ... Aug 12 2012, 11:37 AM sixnotfour 2.4 heads only need a chmfer to work for 2.7 PC... Aug 12 2012, 12:51 PM wachospeedo
2.4 heads only need a chmfer to work for 2.7 PC... Aug 12 2012, 06:59 PM Ferg :D Nice work Lars :welder: Aug 12 2012, 09:51 PM brant I think the stock 914/6 wheel stud lengths are the... Aug 13 2012, 09:01 AM wachospeedo So I need to get a concensus as to whether where t... Aug 13 2012, 08:15 PM seanery That looks bent to me. Aug 13 2012, 08:54 PM brant sorry but I agree... bent
can people please add p... Aug 13 2012, 10:40 PM DEC
sorry but I agree... bent
can people please add ... Aug 14 2012, 03:07 AM Cairo94507 Yup; should be flat. Aug 14 2012, 06:25 AM brant Nice shot DEC
does anyone have a frontal shot sho... Aug 14 2012, 08:35 AM peteyd Heres a pic...
Aug 14 2012, 03:12 PM sixnotfour Pete's looks pushed up in the center also. Aug 14 2012, 04:07 PM Katmanken Dang, I wonder if the PO used the flat of the fron... Aug 14 2012, 06:03 PM seanery I like where you're going with that ken. Aug 14 2012, 06:27 PM Speedo I was going to start hammering on the front end to... Aug 19 2012, 07:10 PM Speedo I like the fab work...so we start. Peter's par... Aug 19 2012, 07:18 PM Ferg Nice Lars :welder: Aug 20 2012, 02:43 PM Speedo Pretty straightforward....cut and fit and repeat.
... Aug 20 2012, 08:11 PM Speedo My front A-arms didn't want to give up the t-b... Aug 20 2012, 08:46 PM wachospeedo I needed to beat on something this weekend. As it ... Aug 27 2012, 05:24 PM wachospeedo This is going to take some time...lots of big dama... Aug 27 2012, 05:35 PM Scott S Wow Lars - looks fantastic.
You guys should se... Aug 27 2012, 05:40 PM wachospeedo And the finished product...
Beats replacing the e... Aug 27 2012, 06:09 PM RON S. Lars,
If your mindset is like mine the only... Aug 27 2012, 06:20 PM wachospeedo It is going to get worse before it gets better...s... Sep 3 2012, 07:51 AM wachospeedo It is what it is.....I am going to just open this ... Sep 3 2012, 08:10 AM Ferg :bump: :poke: Sep 25 2012, 04:31 PM Speedo Alright alright.
I've made progress, but an no... Oct 9 2012, 06:37 PM  |
3 User(s) are reading this topic (3 Guests and 0 Anonymous Users)
0 Members:

|
Lo-Fi Version | Time is now: 12th April 2026 - 10:19 PM |
Invision Power Board
v9.1.4 © 2026 IPS, Inc.