

 Fix a six, Like Neil Young says...rust is an insomniac Fix a six, Like Neil Young says...rust is an insomniac |
|
|

|
Porsche, and the Porsche crest are registered trademarks of Dr. Ing. h.c. F. Porsche AG.
This site is not affiliated with Porsche in any way. Its only purpose is to provide an online forum for car enthusiasts. All other trademarks are property of their respective owners. |
|
|
  |
| barefoot |
 Apr 23 2026, 06:58 AM Apr 23 2026, 06:58 AM
Post
#701
|
|
Senior Member  Group: Members Posts: 1,551 Joined: 19-March 13 From: Charleston SC Member No.: 15,673 Region Association: South East States 
 |
QUOTE(Luke M @ Apr 12 2026, 08:52 PM)  I have one here. I'll take a few pics of it on Monday. I found these pics of Ben's GT mount. I can't recall which members car this was. That muffler mount does not provide any fore & aft flexibility to accommodate differential thermal expansion between the exhaust headers & the engine/tranny combo. The headers will expand much more than the engine/tranny cases at operating temperatures and the mount should be able to flex to handle these movements. Porsche designed the stock muffler brackets with lots of four/ft flex for this reason. A fatigue failure in the making, sorry. Barefoot |
   |

 
|
| rgalla9146 |
Apr 23 2026, 08:33 AM
Post
#702
|
|
Advanced Member Group: Members Posts: 4,997 Joined: 23-November 05 From: Paramus NJ Member No.: 5,176 Region Association: None
|
QUOTE(barefoot @ Apr 23 2026, 08:58 AM) QUOTE(Luke M @ Apr 12 2026, 08:52 PM) I have one here. I'll take a few pics of it on Monday. I found these pics of Ben's GT mount. I can't recall which members car this was. That muffler mount does not provide any fore & aft flexibility to accommodate differential thermal expansion between the exhaust headers & the engine/tranny combo. The headers will expand much more than the engine/tranny cases at operating temperatures and the mount should be able to flex to handle these movements. Porsche designed the stock muffler brackets with lots of four/ft flex for this reason. A fatigue failure in the making, sorry. vibration Barefoot Very keen observation about the OEM 914 6 rear hangar. It seems too simple for its job but it's that way to allow for vibration and expansion. More than is present in 911s with short, rigid HEs. Don't forget, stock 914 6 mufflers have a long curve away from the tail of the transmission |
|
|
|
| mb911 |
Apr 23 2026, 04:49 PM
Post
#703
|
|
914 Guru Group: Members Posts: 7,810 Joined: 2-January 09 From: Burlington wi Member No.: 9,892 Region Association: Upper MidWest
|
QUOTE(barefoot @ Apr 23 2026, 04:58 AM) QUOTE(Luke M @ Apr 12 2026, 08:52 PM) I have one here. I'll take a few pics of it on Monday. I found these pics of Ben's GT mount. I can't recall which members car this was. That muffler mount does not provide any fore & aft flexibility to accommodate differential thermal expansion between the exhaust headers & the engine/tranny combo. The headers will expand much more than the engine/tranny cases at operating temperatures and the mount should be able to flex to handle these movements. Porsche designed the stock muffler brackets with lots of four/ft flex for this reason. A fatigue failure in the making, sorry. Barefoot Well kind of but a GT car had a bracket like that not the v style mount. I sold several thousand mufflers from when I owned M&k exhaust to approximately 2020. I believe Mark is right no one used the stock tranny but a side shift. The reason for the mount that I use to make vs the stock mount is the stock mount only supports the flanges and many muffler would break at the inlets. The stainless is only .036-.040” thick so not much support. I also want you to think about how a 911 muffler is supported. I also suggest that the width of the engine changes much more during heating cycles than lengthens. |
 |
|
| Speedo |
Apr 24 2026, 04:10 PM
Post
#704
|
|
Senior Member Group: Members Posts: 666 Joined: 7-November 06 From: Boulder Member No.: 7,170 Region Association: Rocky Mountains
|
"Porsche designed the stock muffler brackets with lots of four/ft flex for this reason. A fatigue failure in the making, sorry." I planned on using both the factory mount and some sort of GT3 mount in addition. Redundancy to the rescue...problem solved! |
|
|
|
| mepstein |
Apr 24 2026, 04:35 PM
Post
#705
|
|
914-6 GT in waiting Group: Members Posts: 20,919 Joined: 19-September 09 From: Landenberg, PA/Wilmington, DE Member No.: 10,825 Region Association: MidAtlantic Region
|
Ben sold a bunch of these mounts along with his mufflers. I haven’t heard of any failures. That’s not a scientific test but real world for now.
I use it on my 3.2 conversion car. |
|
|
|
| Montreal914 |
Apr 24 2026, 05:24 PM
Post
#706
|
|
Advanced Member Group: Members Posts: 2,199 Joined: 8-August 10 From: Claremont, CA Member No.: 12,023 Region Association: Southern California
|
Maybe Ben can make a nice dimple in your muffler to fit your tail cone? (IMG:style_emoticons/default/confused24.gif)
|
|
|
|
| Speedo |
Apr 24 2026, 05:45 PM
Post
#707
|
|
Senior Member Group: Members Posts: 666 Joined: 7-November 06 From: Boulder Member No.: 7,170 Region Association: Rocky Mountains
|
QUOTE(Montreal914 @ Apr 24 2026, 03:24 PM) Maybe Ben can make a nice dimple in your muffler to fit your tail cone? (IMG:style_emoticons/default/confused24.gif) I was going to "cup" the back of the muffler to create space, but I searched for and found some exhaust flanges that I will use as spacers to keep the muffler away from the nub on the tailcone. I have plenty of room under the heat shield to move the muffler aft 3/4". Interesting aside...Walker makes the flange part #31800. Not only is it difficult to find, but resellers price it $5-$22, it is NLA most places or not in stock. Everybody has it in their catalogue, but it is only available online? I would rather not beat on the muffler, and risk busting the welded seam. At some point I may go back to a stock muffler and would rather not have to explain to a future buyer why I beat the crap out of the back of the very nice muffler. Keeping my options open. |
|
|
|
| porschetub |
Apr 24 2026, 10:34 PM
Post
#708
|
|
914 Guru Group: Members Posts: 5,176 Joined: 25-July 15 From: New Zealand Member No.: 18,995 Region Association: None |
Lars think your last part in your reply makes more sense for the interim and will get up and running ,being a 911 guy you will have a good 911 muffler in your collection and only requires a tailpipe change / remodel to suit the rear valance, cheers.
|
|
|
|
| porschetub |
Apr 24 2026, 10:53 PM
Post
#709
|
|
914 Guru Group: Members Posts: 5,176 Joined: 25-July 15 From: New Zealand Member No.: 18,995 Region Association: None |
Lars think your last part in your reply makes more sense for the interim and will get up and running ,being a 911 guy you will have a good 911 muffler in your collection and only requires a tailpipe change / remodel to suit the rear valance, cheers.
|
|
|
|
| Speedo |
May 2 2026, 05:04 PM
Post
#710
|
|
Senior Member Group: Members Posts: 666 Joined: 7-November 06 From: Boulder Member No.: 7,170 Region Association: Rocky Mountains
|
My flanges and gaskets arrived, and John Hora kindly sold me his early GT3 bracket.
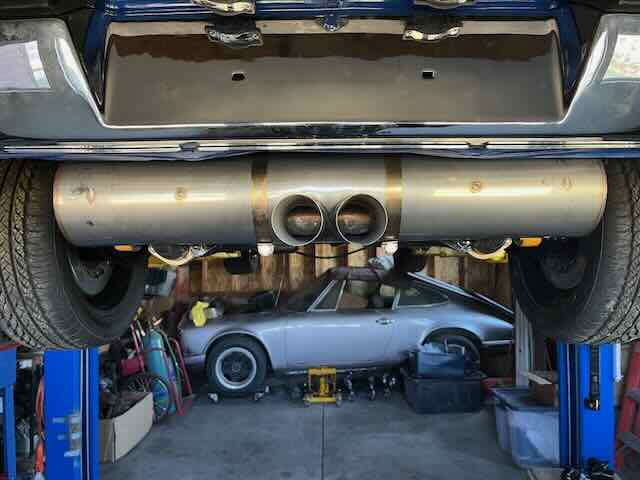
Goal today was to space the GT3 muffler backwards using the flanges and gaskets to clear the "nub" on the tailcone. Several unknowns...1) I just don't know how far back I will have to move the muffler (how many spacers), 2) I'm hoping the original hanger can flex enough aft to still support the end of the HE and the muffler and 3) what that will mean for the use of the GT3 hanger. There are vertical slots in both the original hanger and the GT3 hanger to adjust the position vertically somewhat. First thing I had to do was to remove and replace the tailcone studs the hangers ride on. I may need to put some washers behind the hangers too. I spent a lot of time mounting and un-mounting the muffler. Ben told me the circumference of the muffler was the same as stock and as I had a refinished pair of 911 straps, I had planned to use them. Turns out they were way too big...and I had to cut them and weld them up shorter...twice. (IMG:style_emoticons/default/headbang.gif) Put luck prevailed and here is the finished product that gives me ample room behind the nub, and plenty of clearance under the heat shield. 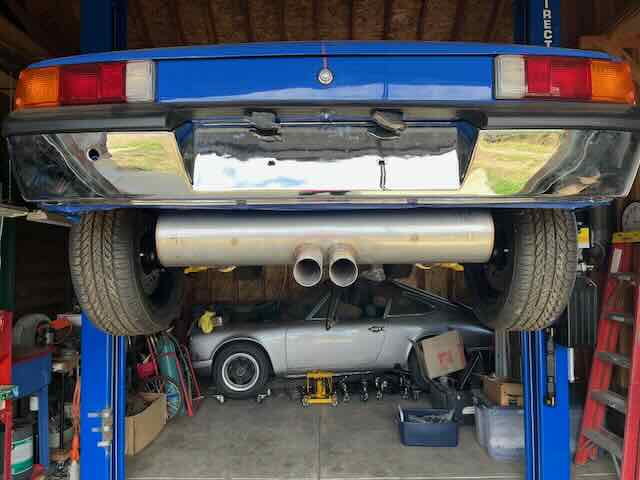 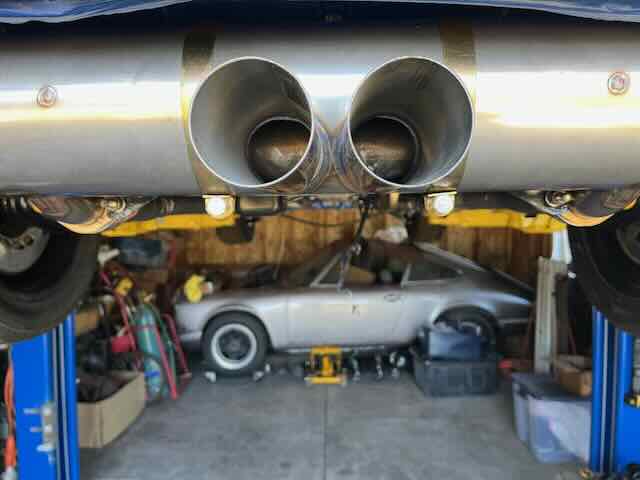 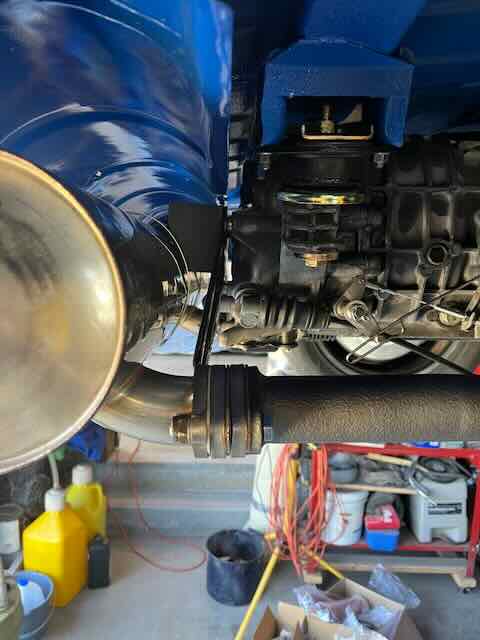 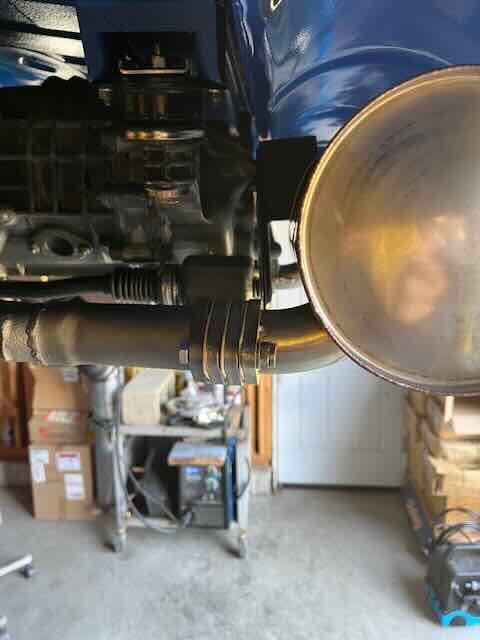 |
|
|
|
| Speedo |
May 2 2026, 05:12 PM
Post
#711
|
|
Senior Member Group: Members Posts: 666 Joined: 7-November 06 From: Boulder Member No.: 7,170 Region Association: Rocky Mountains
|
It appears that the pea shooters are pointing down...thats just the camera view. They are pretty level. The shortened 911 straps came out pretty well too.
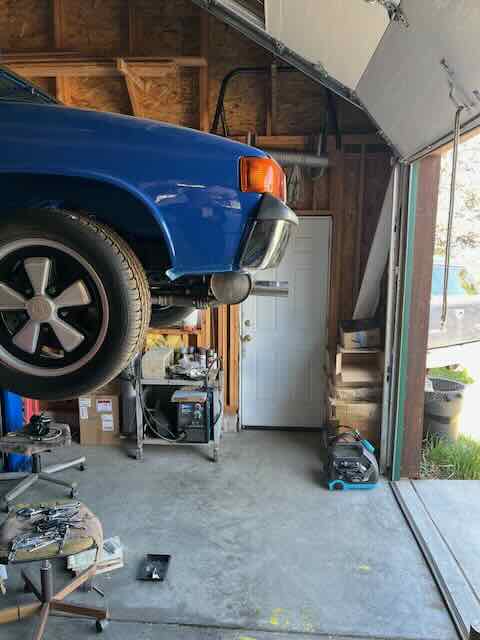 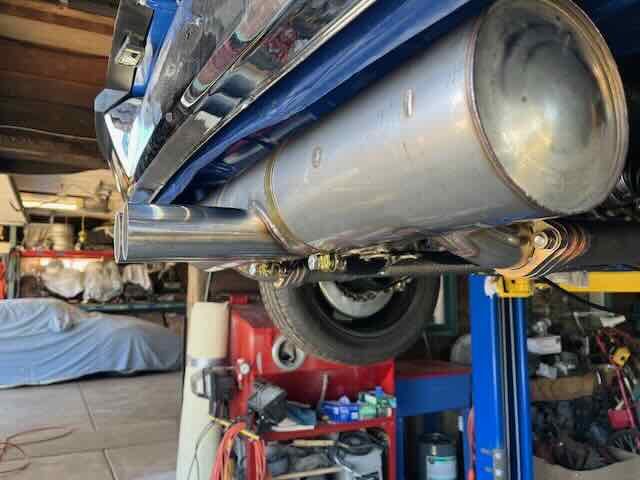 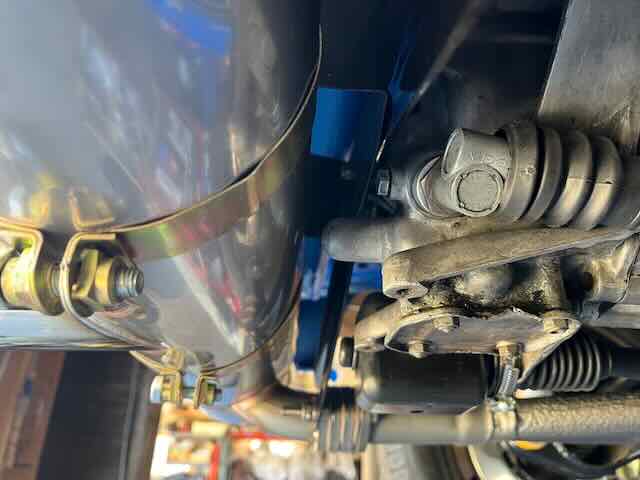 Next plan of attack is to get this trimmed and mounted to clear the exhaust tips. Then I will remove it and finish it so that it can be primed and textured and painted. 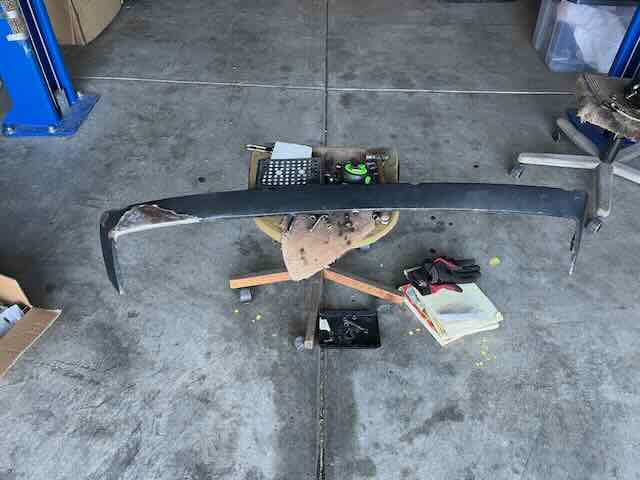 Time for a (IMG:style_emoticons/default/beer3.gif) |
|
|
|
| Speedo |
May 2 2026, 05:22 PM
Post
#712
|
|
Senior Member Group: Members Posts: 666 Joined: 7-November 06 From: Boulder Member No.: 7,170 Region Association: Rocky Mountains
|
Finished and as the muffler is "double hung", there will be no issue with heat expansion...I can do "pull ups" on the pea shooters. (IMG:style_emoticons/default/biggrin.gif)
 |
|
|
|
| porschetub |
May 2 2026, 09:48 PM
Post
#713
|
|
914 Guru Group: Members Posts: 5,176 Joined: 25-July 15 From: New Zealand Member No.: 18,995 Region Association: None |
QUOTE(Speedo @ May 3 2026, 11:22 AM) Finished and as the muffler is "double hung", there will be no issue with heat expansion...I can do "pull ups" on the pea shooters. (IMG:style_emoticons/default/biggrin.gif) Well done with your solution, getting closer for a first start hopefully ?. Noticed your end pieces on your stock exchanger's have been cut and what appears to be new bits welded on ?? ,maybe that caused your length issue ...just saying but the welds don't look factory to me ?. Keep up the good work ,cheers. |
|
|
|
| Speedo |
May 8 2026, 02:53 PM
Post
#714
|
|
Senior Member Group: Members Posts: 666 Joined: 7-November 06 From: Boulder Member No.: 7,170 Region Association: Rocky Mountains
|
There's an old mechanic "Mike" up the road who used to only work on Porsches...in fact he ran a shop for a long time. Fabulous machinist, very creative. But since I have known him going on 28 years, his primary project is a 66 Plymouth that he is tubing into a dragster.
He has been working on it so long that it is now starting to rust through the light blue paint. His problem is that he likes to make stuff instead (if it is available) buying it. Which means its a never ending circle...he needs a part, he doesn't want to buy it, so he decides to make it. But he doesn't have the tool needed to make it...so he decides to make a tool, to make the tool, to make the part. He drives me nuts. If I reach out to him to see if he has a part, or a specific Porsche tool...he tells me to make it. I do like to be creative, but I also like to complete my projects. Moral of the story? I realize that I am slowly becoming "Mike". The trolls in my shop either hid my right side heater valve, or traded it for a left side, so now I have two lefts. I don't want to mount a left valve upside down...the arm will be in the wrong place. Every 914 person I contacted had extra valves...but they were alll...wait for it, lefts. I looked over the extra left and decided I would take it apart and see if there was a way for me to make it a right. Flapper needs to be turned around, and lever arm needs to be mounted on the other end. How difficult could that be? Lets find out.... Two lefts... 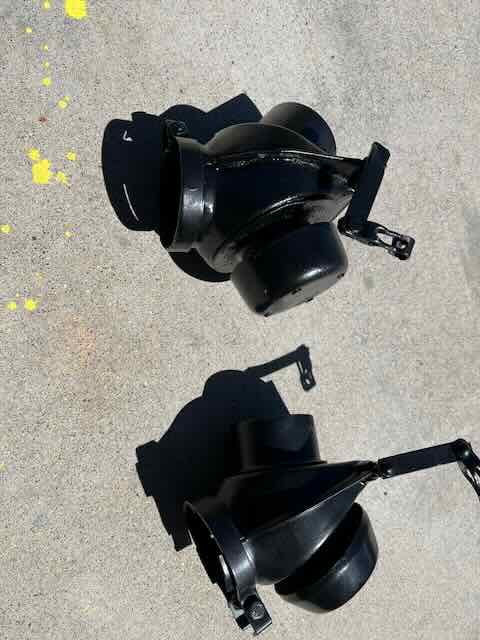 |
|
|
|
| Luke M |
May 9 2026, 07:36 AM
Post
#715
|
|
Senior Member Group: Members Posts: 1,602 Joined: 8-February 05 From: WNY Member No.: 3,574 Region Association: North East States
|
Hi Lars,
FYI, those valves are not the 914-6 units they are the 914-4 version. The factory 6's had a hole in the cap. See attached pics. Attached image(s) 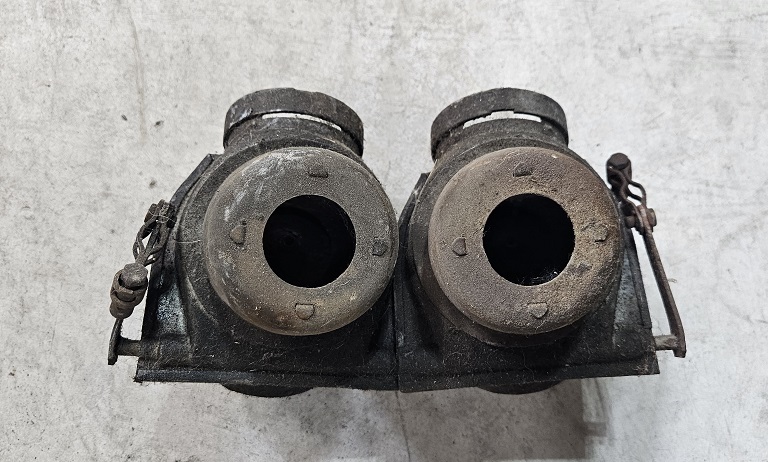 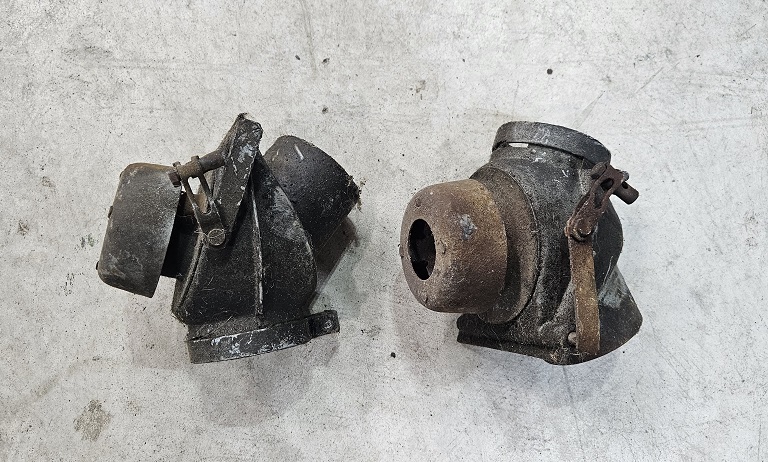 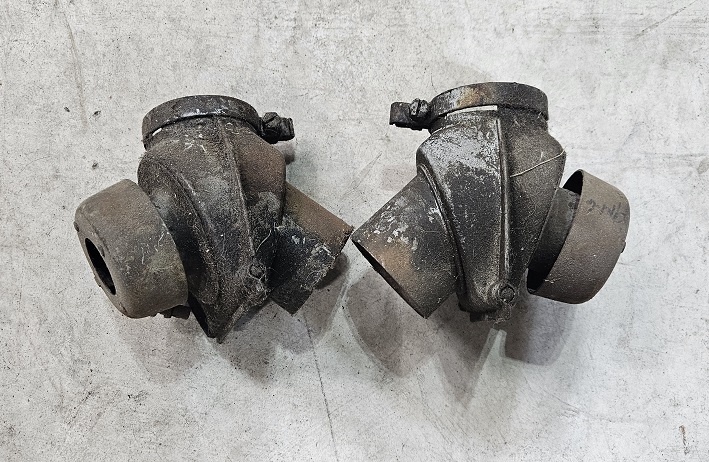
|
|
|
|
| Speedo |
May 9 2026, 08:30 AM
Post
#716
|
|
Senior Member Group: Members Posts: 666 Joined: 7-November 06 From: Boulder Member No.: 7,170 Region Association: Rocky Mountains
|
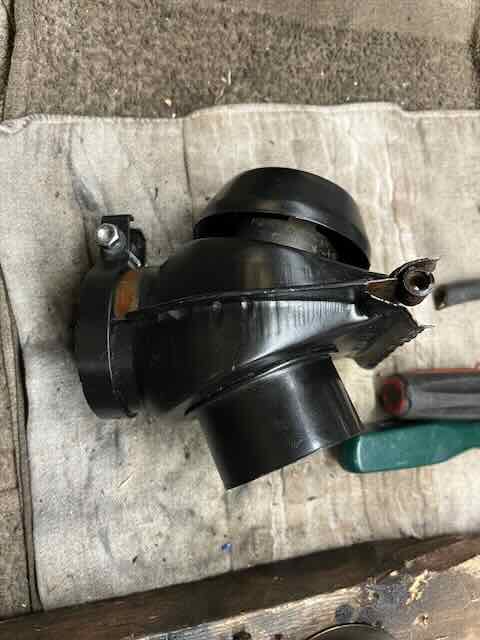
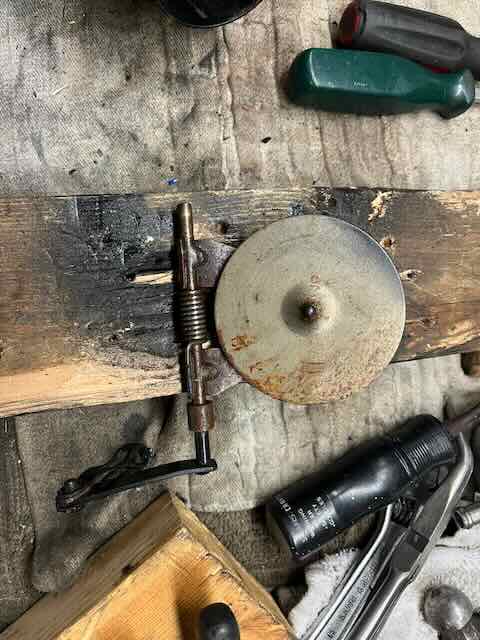
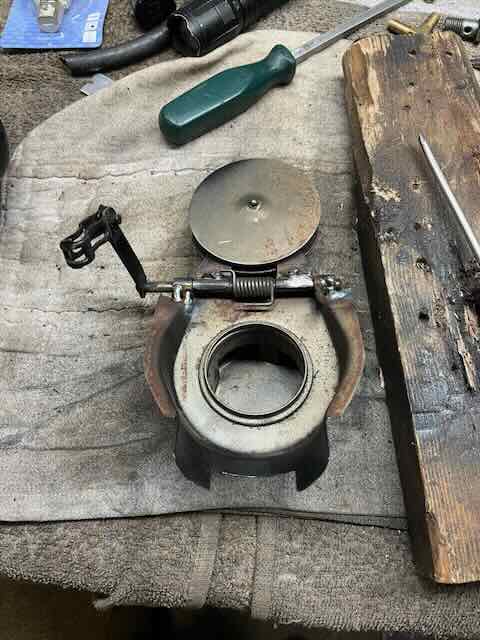
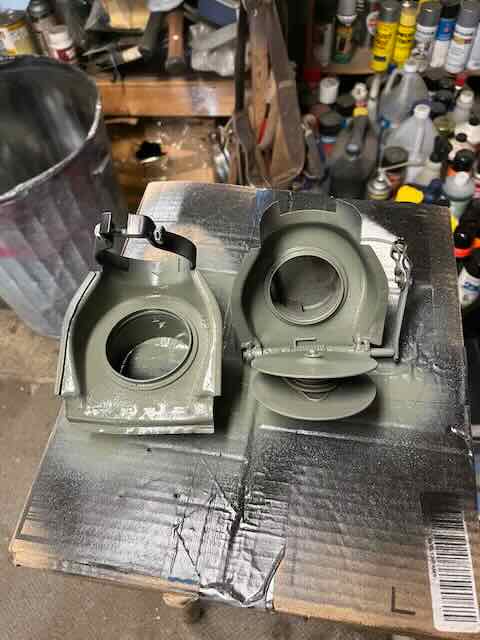
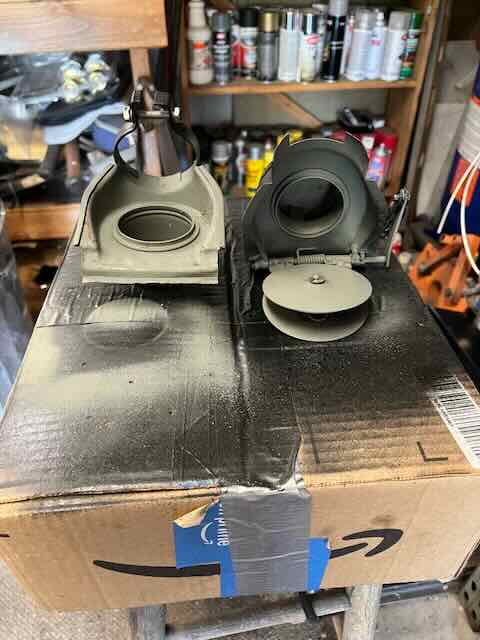
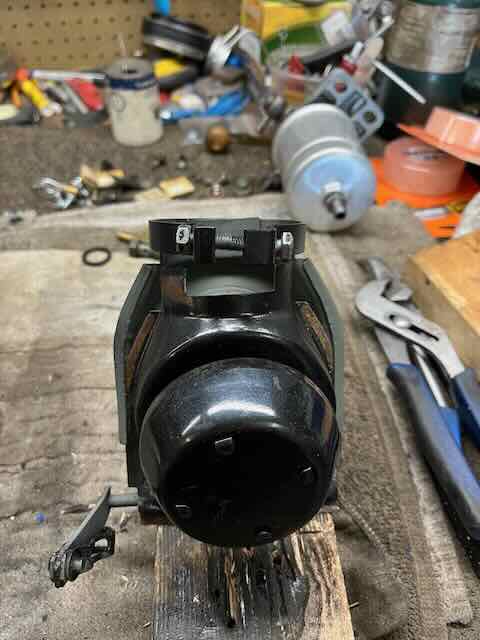
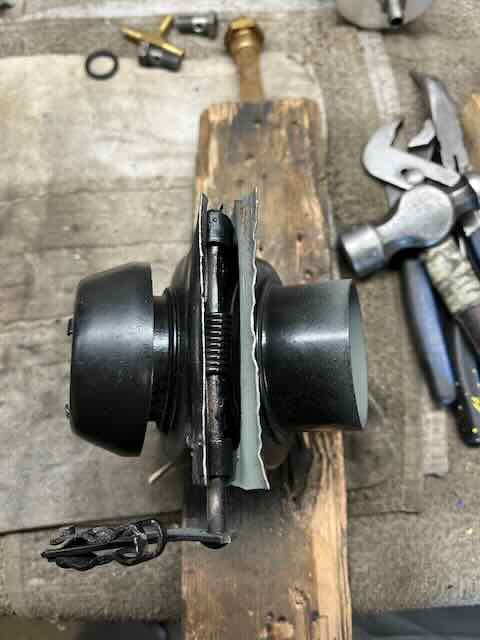
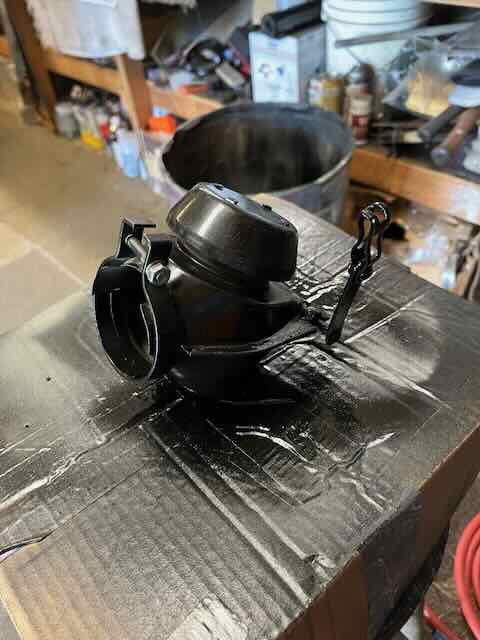
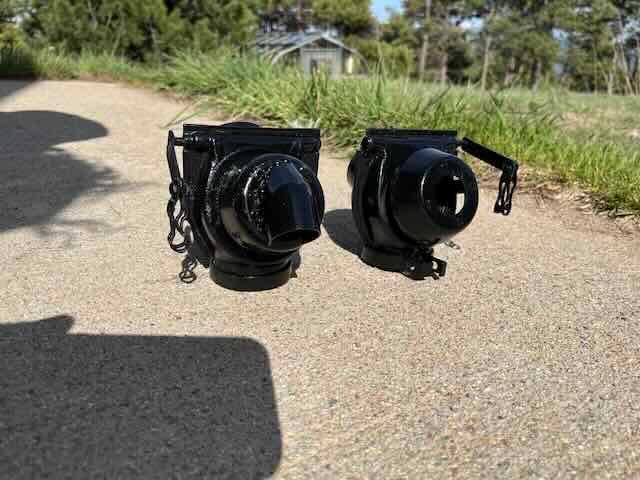
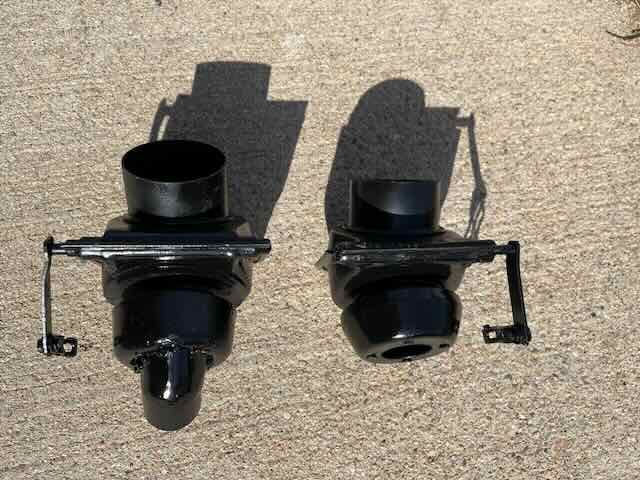
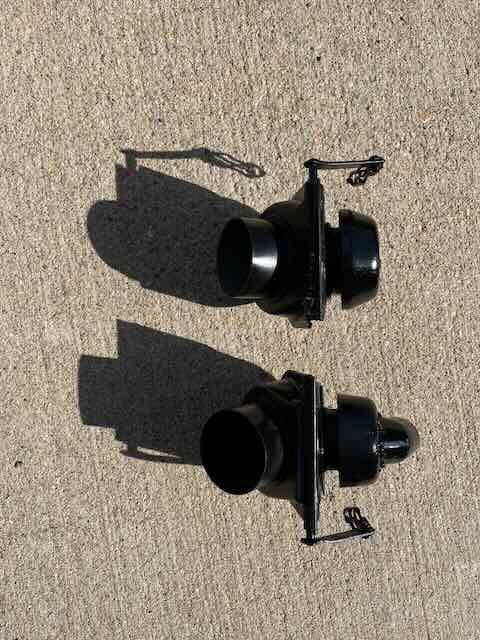
The valves are "sealed" by wrapping the metal around itself next to the shaft that actuates the flapper. Once this is peeled back, one has access to the bearing blocks which are welded in place. There appears to be a bronze bushing in each of these bearing blocks. I cut away the bearing blocks from the valve body, which allowed the body to slide apart.Then I cut the flapper off the shaft, rotated it and re-welded it back to the shaft. I installed the bearing blocks and tension-ed the spring, clamped the shaft back to the half of the valve, primed the internals, and welded the bearing blocks back into place. The two halves of the valve slipped back together, and the metal over the shaft was wrapped back over and sealed. Works great and now I need to decide if I want to "open up" the cones per the original 914-6 valves. Somehow I ended up with 914 valves (albeit two left sides). If I do open them up, I'll need to weld on the deflector to redirect the hot air on the drivers side away from the plastic cover on the shift housing.
    |
|
|
|
| Speedo |
May 9 2026, 08:32 AM
Post
#717
|
|
Senior Member Group: Members Posts: 666 Joined: 7-November 06 From: Boulder Member No.: 7,170 Region Association: Rocky Mountains
|
Finishing up...
    |
|
|
|
| Speedo |
May 9 2026, 04:35 PM
Post
#718
|
|
Senior Member Group: Members Posts: 666 Joined: 7-November 06 From: Boulder Member No.: 7,170 Region Association: Rocky Mountains
|
Drilled 32mm holes in each cap, and shaped a diverter for the drivers side to keep the heat away from the plastic shifter cover. I want to be done with these valves (IMG:style_emoticons/default/beer.gif)
   |
|
|
|
| Speedo |
May 10 2026, 06:30 PM
Post
#719
|
|
Senior Member Group: Members Posts: 666 Joined: 7-November 06 From: Boulder Member No.: 7,170 Region Association: Rocky Mountains
|
Progress on the valence...gotta map this out as I have one try to get it symmetrical and level. There is a 1/2" lip that is folded over and hammered flat on the back for strength. I need to clean it up, shoot some Wurth stone guard and paint.
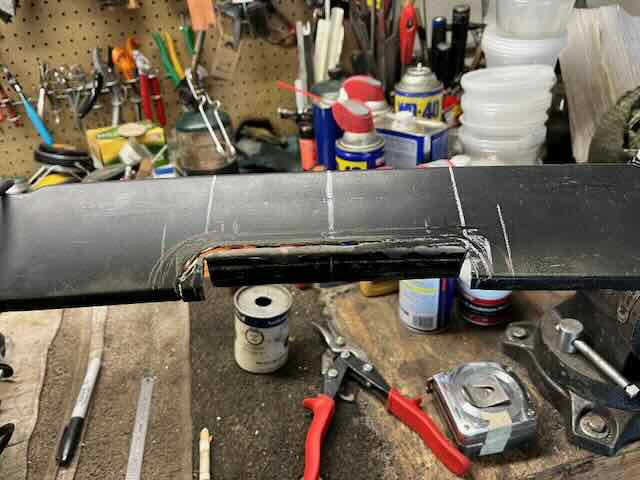 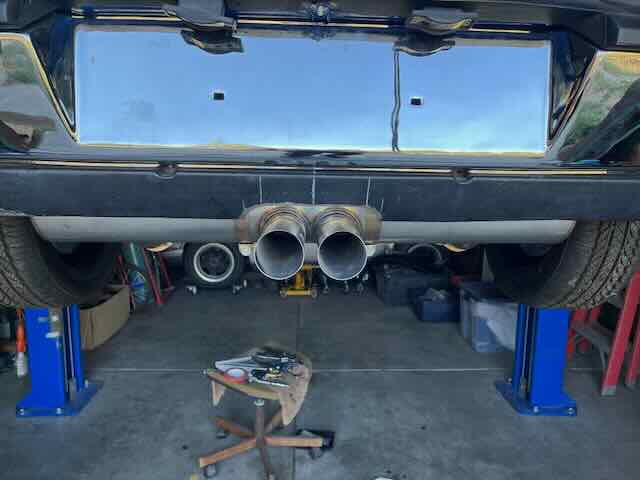 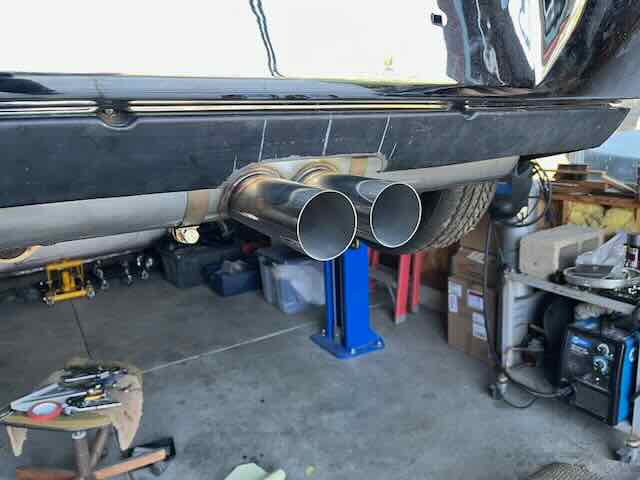 |
|
|
|
| Speedo |
May 12 2026, 04:35 PM
Post
#720
|
|
Senior Member Group: Members Posts: 666 Joined: 7-November 06 From: Boulder Member No.: 7,170 Region Association: Rocky Mountains
|
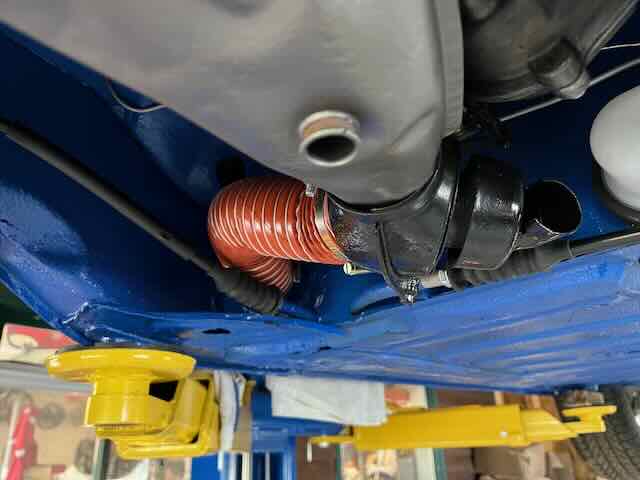
Got the valves done and painted...holes in the cones and diverter installed. New heat ducts look great. The underside of this car will never again be this clean. (IMG:style_emoticons/default/sunglasses.gif)
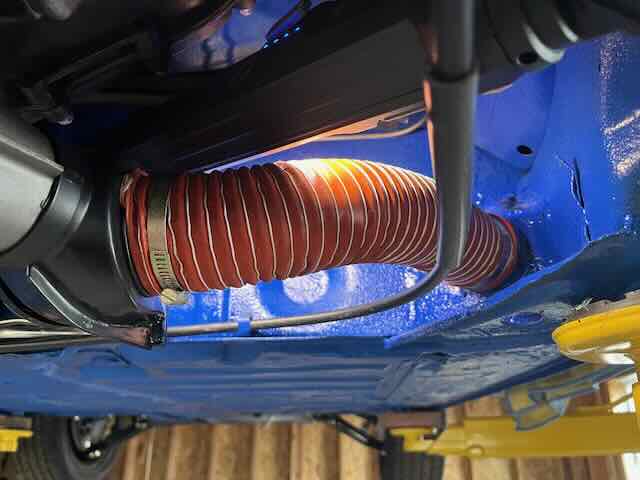  |
|
|
|
|
3 User(s) are reading this topic (2 Guests and 0 Anonymous Users)
1 Members: lalee914

|
Lo-Fi Version | Time is now: 23rd September 2026 - 06:12 PM |
Invision Power Board
v9.1.4 © 2026 IPS, Inc.