|
|
|
Porsche, and the Porsche crest are registered trademarks of Dr. Ing. h.c. F. Porsche AG.
This site is not affiliated with Porsche in any way. Its only purpose is to provide an online forum for car enthusiasts. All other trademarks are property of their respective owners. |
|
|

  |

| dlee6204 |
 Aug 22 2012, 08:05 PM Aug 22 2012, 08:05 PM
Post
#1
|
|
Howdy  Group: Members Posts: 2,162 Joined: 30-April 06 From: Burnsville, NC Member No.: 5,956 |
I thought I would document my A/C adventure in the hopes that it would be a good reference for anyone else considering A/C. I’ll first touch base on the stock system and on custom options and then start building my own system to start testing on. I’ve working on a few systems before but I'm sure there is someone that knows more than me so don't be shy sharing or adding anything. (IMG:style_emoticons/default/smile.gif)
To begin things off here is one of the better overviews of an A/C system. Follow the link and you can see a breakdown of the whole system. 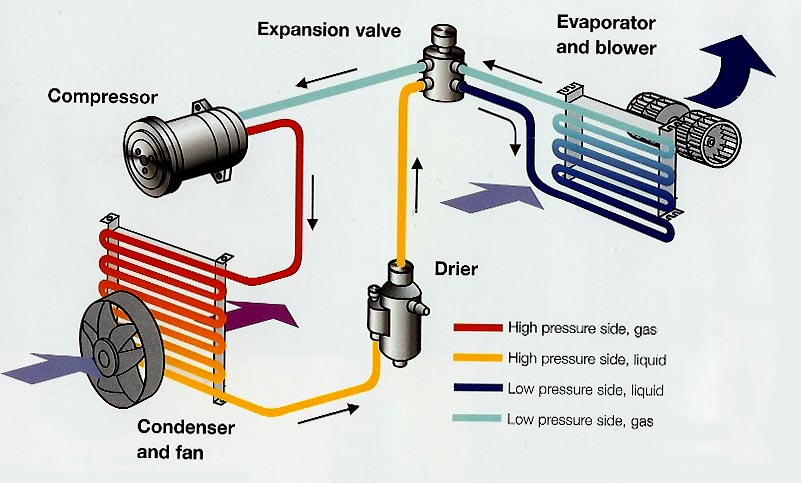 http://www.movacs.com/How%20it%20works/index.html Anytime I refer to the stock system I will be referring to the dealer installed VPC system mostly because the only A/C cars I had came with this system and I have plenty of parts around. I also borrowed some photos off this site so if I used any of yours... Thanks. (IMG:style_emoticons/default/smile.gif) Compressor: The compressor that came on dealer installed A/C systems was a York Piston style compressor that had a capacity of 6 cubic inches/Rev. From what I could find it used about 7-10 horsepower from the engine. You can still use this compressor however there are better, more efficient options out there. When choosing a new compressor it is a good idea to find one with a similar capacity. In this case going bigger does not mean better. An A/C system works as a whole unit and if you dramatically change one aspect of it, you will likely see negatives effects elsewhere. Choosing a compressor that’s too big will overwork the system, yielding no little to no benefit, and create a not-as-efficient system. During my search I looked mostly at Sanden style compressors so that's what I'll be referring to in my build. Using a modern compressor like the Sanden will only use about 3-4 hp from the engine. I have heard quite a few people use the Sanden 508 compressor with good results. It has an approximate displacement of 8 cubic inches/rev, which IMO is slightly more than I'd like to make a jump to. I'm not saying it wouldn't work, it obviously works, however I think I will get slightly better results and pressures using the Sanden 507 (approx. 7 cubic inches/rev). The SD507 is also slightly smaller in size than the 508. Here is a picture of the York Compressor 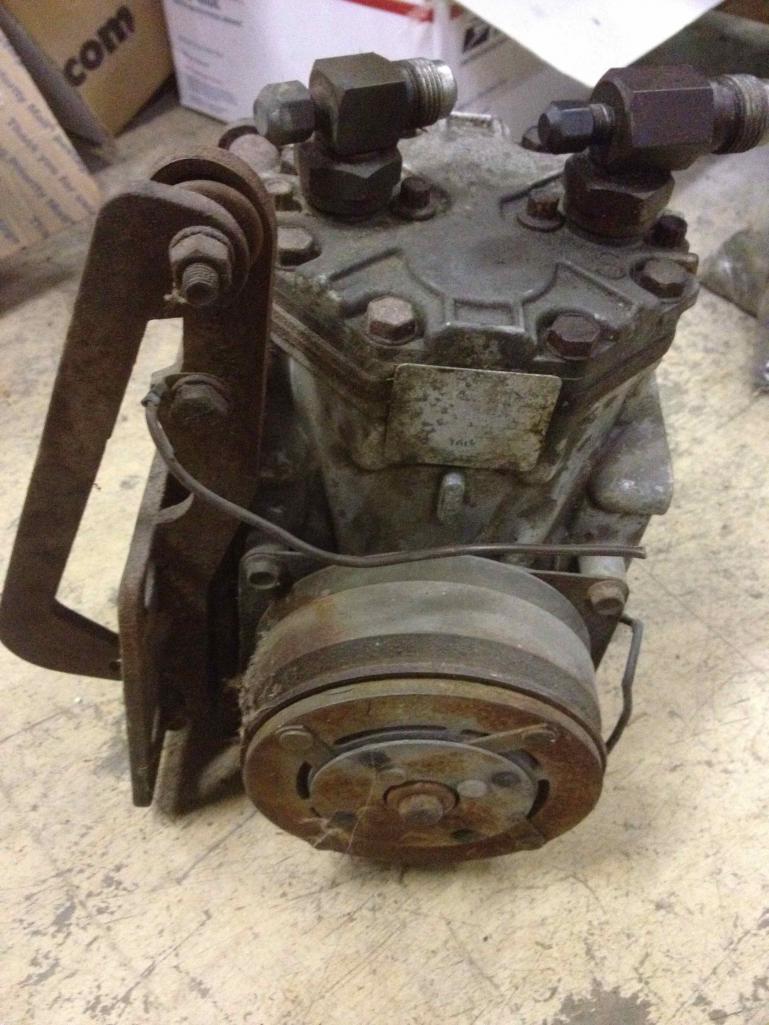 A side by side with the SD507 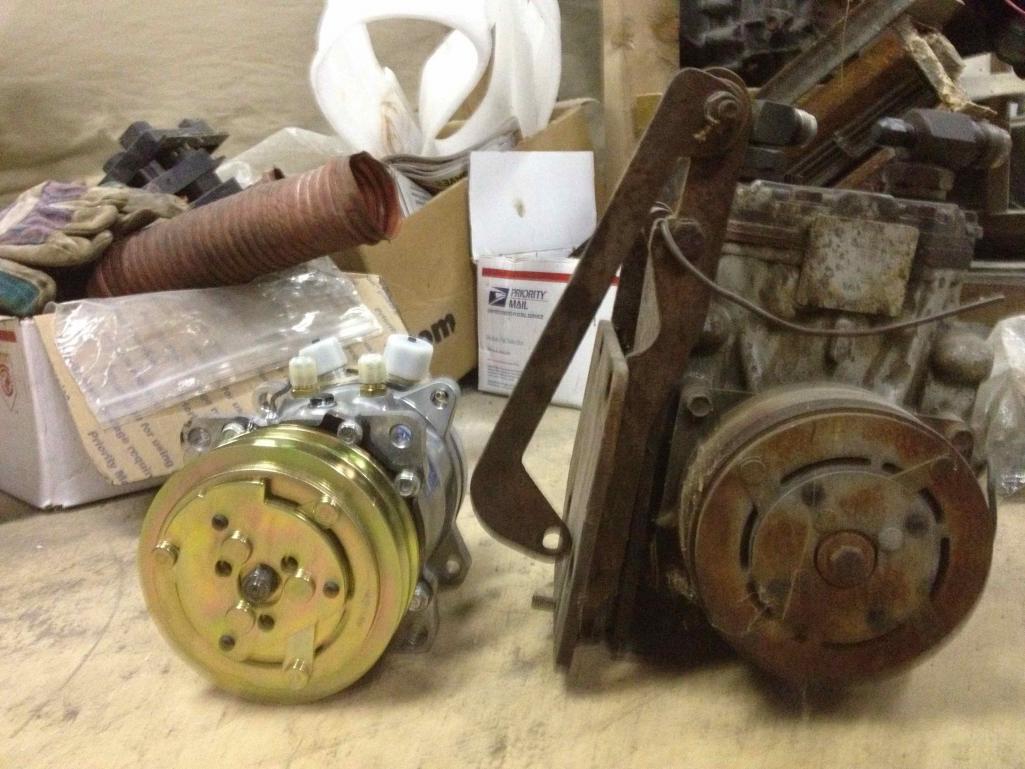 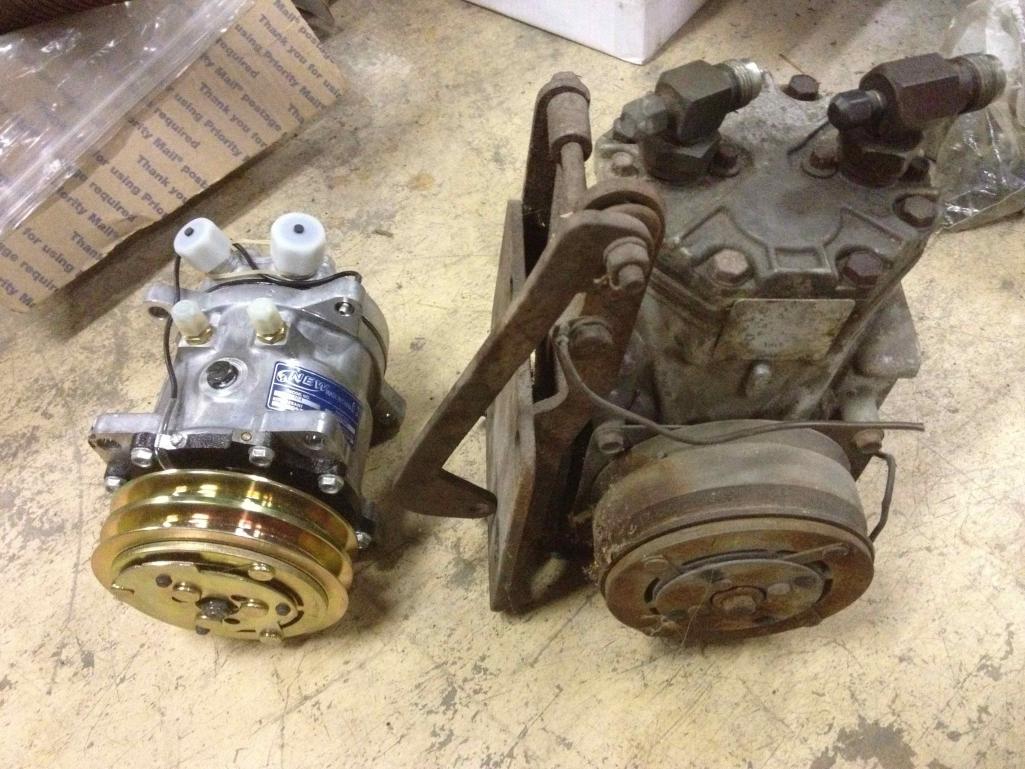 And here is a SD508 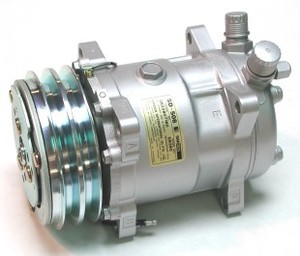 |
   |

 
|
| dlee6204 |
Aug 22 2012, 08:05 PM
Post
#2
|
|
Howdy Group: Members Posts: 2,162 Joined: 30-April 06 From: Burnsville, NC Member No.: 5,956 |
Compressor Mounting:
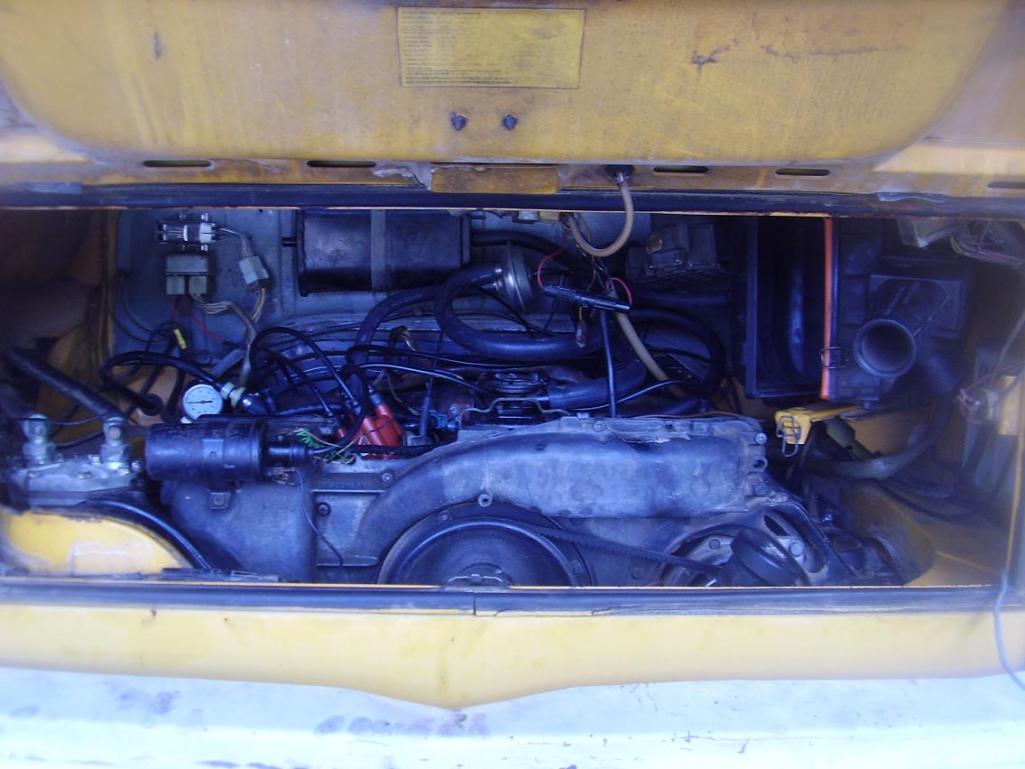
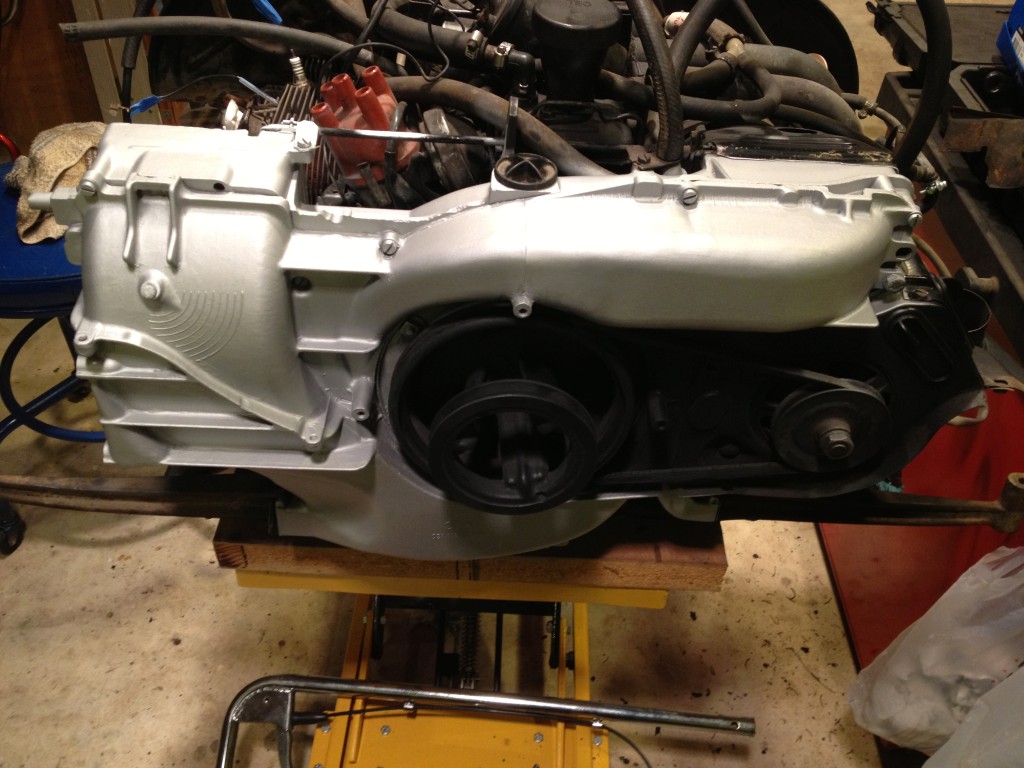
This is probably the biggest obstacle when deciding to go with A/C. The dealer installed the York compressor on the passenger side of the motor. In order for it to fit they had to cut both the engine shelf and the engine tin and in most cases, it looks like they did it with a hacksaw.... while blindfolded. The two disadvantages with this is that it no longer leaves the engine bay sealed and it’s also an ugly installation. The compressor was run via a belt and pulley that was installed behind the engine cooling fan. An idler pulley was also used. With the size of modern compressors, it leaves multiple potential locations to mount a new compressor. Stock Location- There are many Sanden-to-York bracket adapters out there that would allow you to mount the new compressor in the stock location using the stock york mounting bracket. In some cases, depending on what compressor and adapter you use, you are able to install the compressor without cutting the engine shelf. The engine tin still needs to be cut though. [If anyone has detailed pictures of a mounted York compressor, please share. (IMG:style_emoticons/default/smile.gif)] Here is the mount for the York. 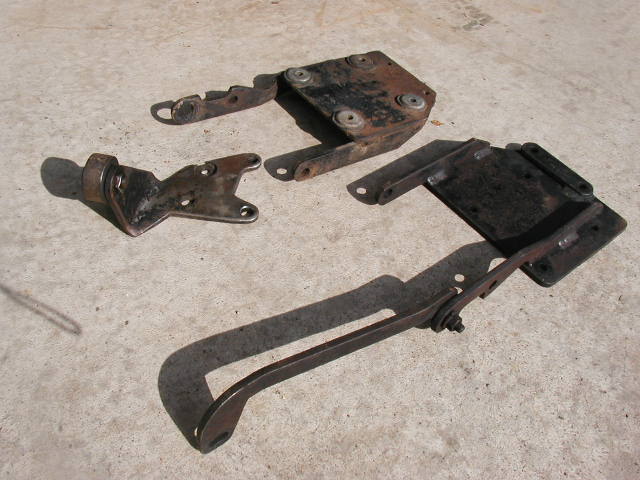 Here are some photos of SD508s mounted on the side. 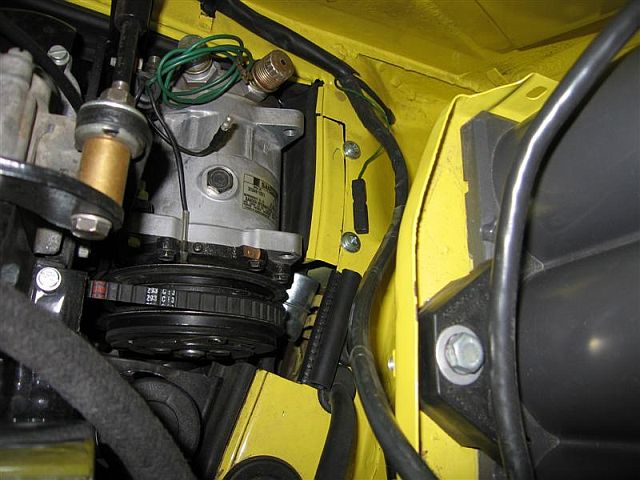  And a SD507 mounted on the side. 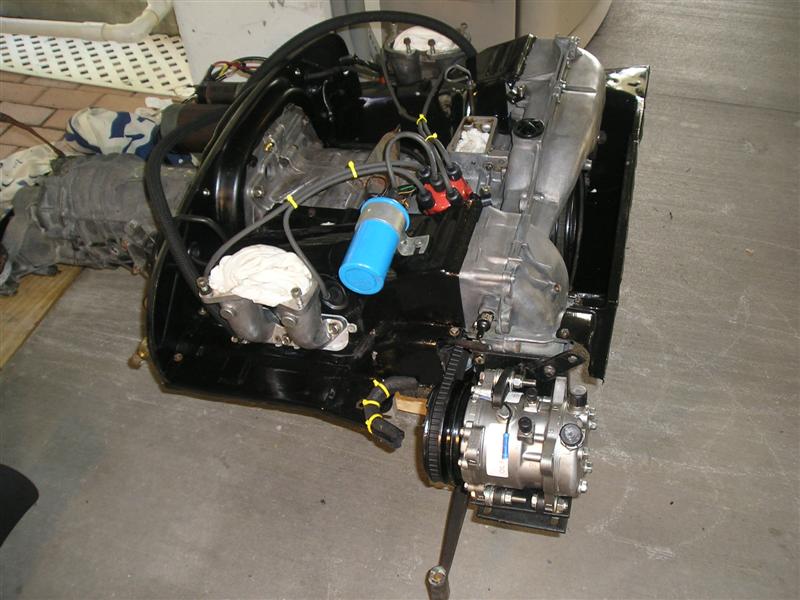 Top of the motor- Another place for installation is the top of the motor utilizing a pulley mounted to the front of the engine. In some rare cases I have seen the York compressor originally mounted on top of the engine which meant no need to cut the engine tin. IIRC 912's also did it this way too. Zambezi on this site is the only person I know who has successfully mounted a Sanden compressor on the top using a custom mount. He also used an offset pulley on the front of the fan to drive the compressor. Some pictures can be seen below. *If anyone is interested in an “offset” pulley, contact me. I’ve been working on something similar that would work. * I plan to mount my compressor on top using a smog pulley assembly to drive it. The smog pulley may or may not hold up to the abuse of driving a compressor… we shall see. Here is a 912 setup 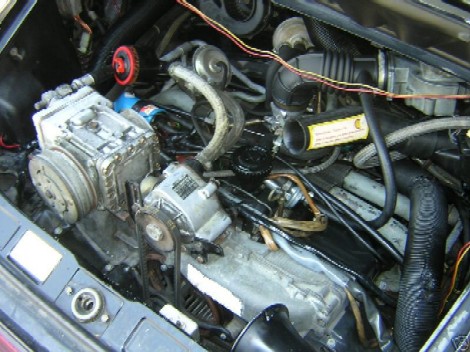 Zambezi's setup 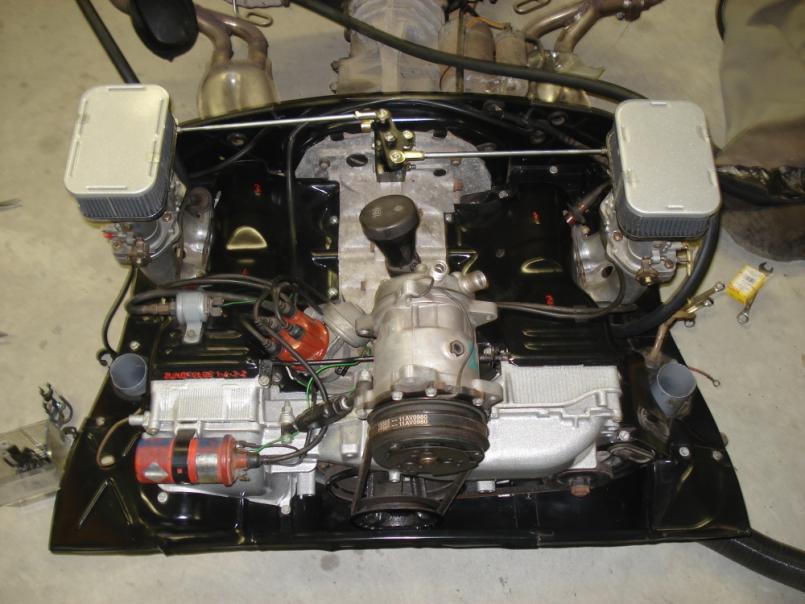 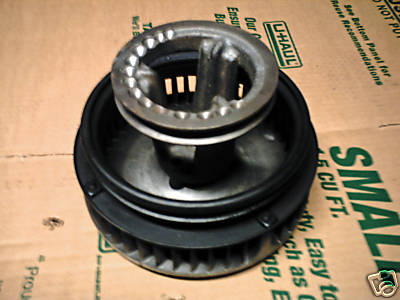 Under the motor- This is another option I have been playing with. I believe that one could mount the compressor on the passenger side of the motor UNDERNEATH the engine tin, similar location to that originally. I believe you would lose your heat on that side but it could still be done without cutting any tin. |
|
|
|
| dlee6204 |
Aug 22 2012, 08:05 PM
Post
#3
|
|
Howdy Group: Members Posts: 2,162 Joined: 30-April 06 From: Burnsville, NC Member No.: 5,956 |
Condenser:
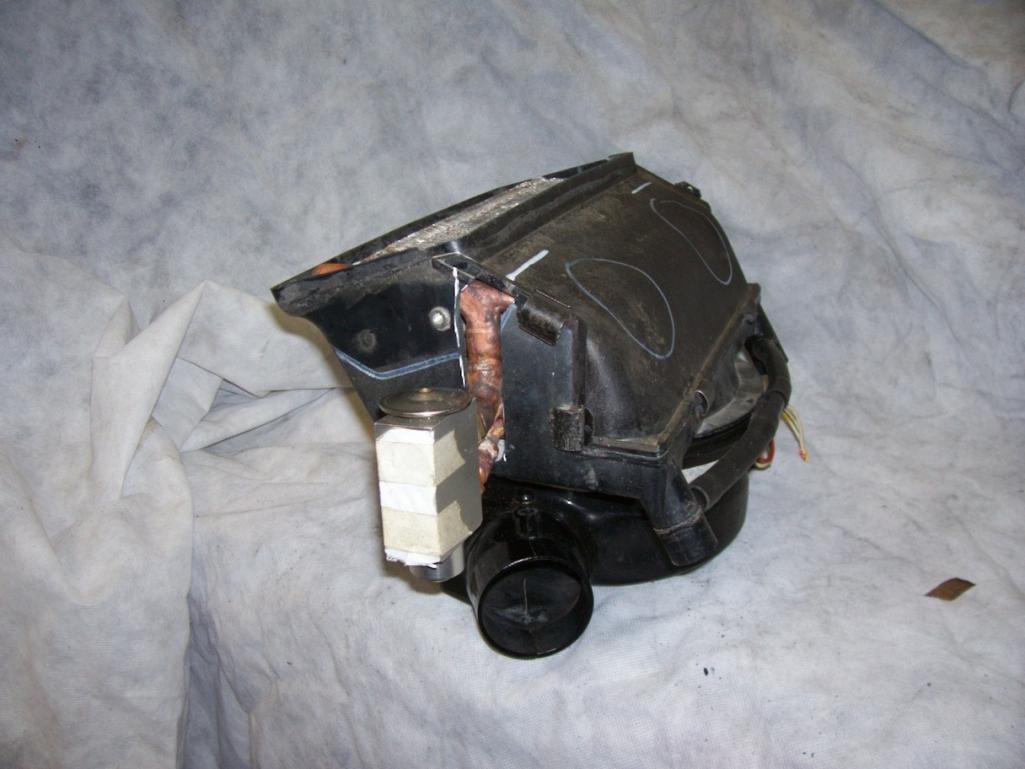
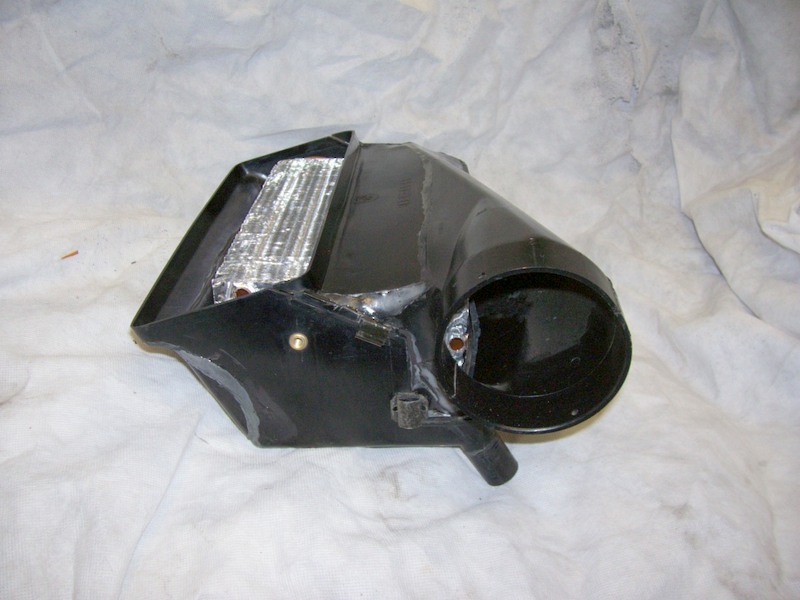
IMO this is where the biggest improvement can be made. Whichever option you go with make sure you get plenty of air movement across the condenser. The way I see it there are three options with mounting the condenser.... -Cut a hole in the front for the original condenser box. If doing this you might consider replacing the old tube&Fin condenser with modern parallel flow condenser. Parallel flow condensers are about 25-35% more efficient than the old style. So a modern condenser would compensate for the inefficiency of using r134. (R134 requires about 30% more condensing area that R12). So in theory it would give you just as cold temperatures for the same size condenser... in theory. I have to be honest though… I think the original condenser will be sufficient for enough for cool temps. It won't take much to cool the cockpit of the 914. Its something I’ll be testing out. The original squirrel cage fan also leaves something to be desired so you might consider upgrading your fan. Original Condenser Box  Tube&Fin Condenser 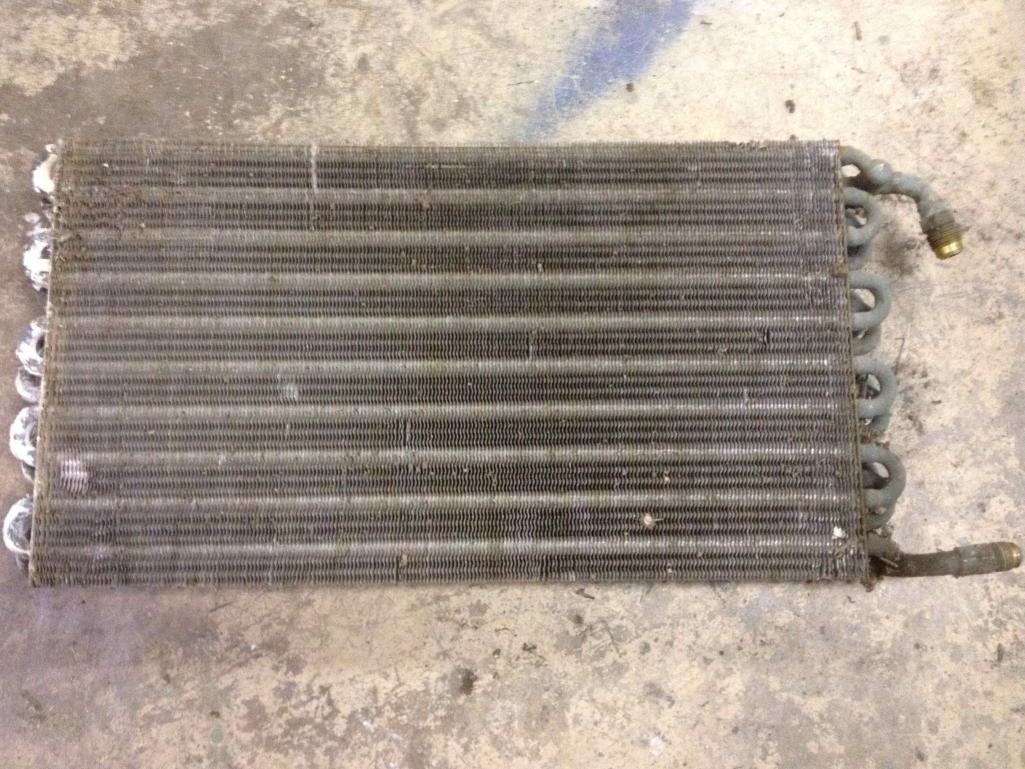 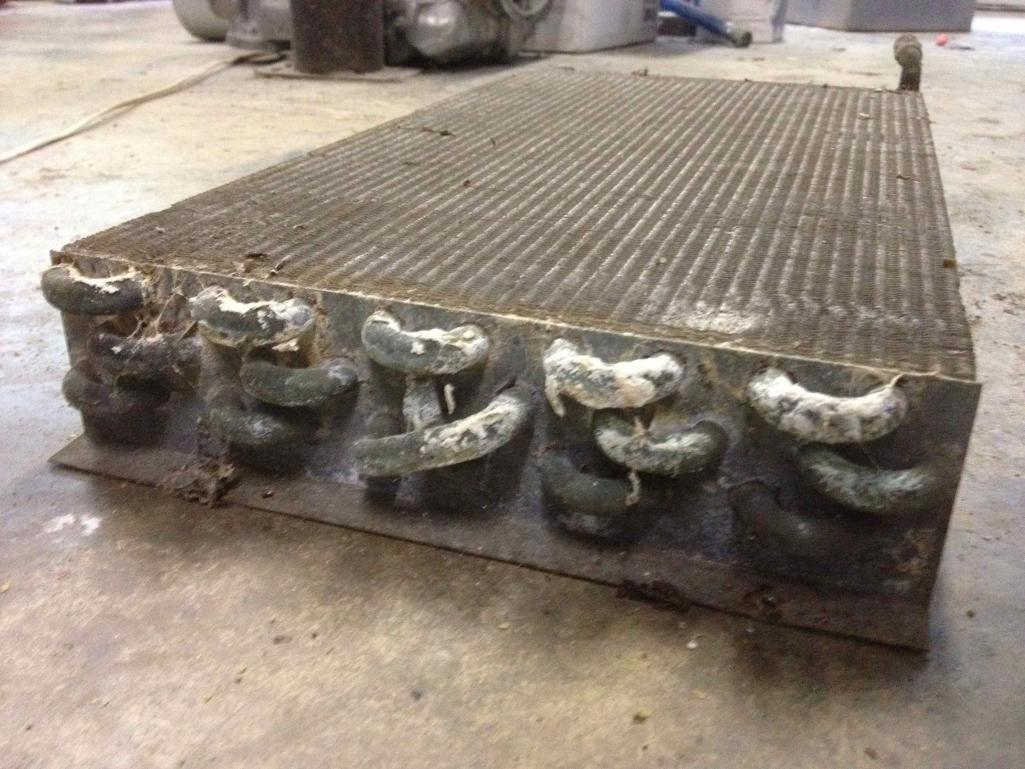 Helpful diagram showing different condensers. 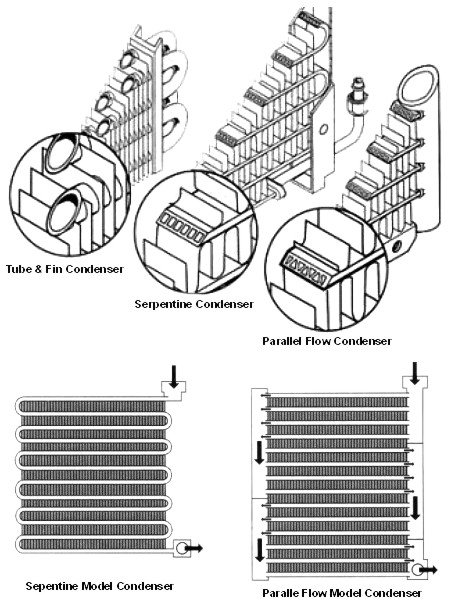 -Install a condenser on the engine lid. If I were to do this I would install a parallel flow condenser with fans and let that be it. The biggest downside to this is introducing even hotter air into the engine bay. Clay Perrine has a similar setup and he said that he hasn't had any issues so that shows that it could be possible. Another thing to note about this setup is that the engine bay is going to get crowded specially if someone has a top-mounted compressor with stock EFI. The top-mounted compressor might even interfere with the condenser. You will also need to mount the receiver drier in the vicinity as well. -Install one in a fender-well. I have heard that some 911's had a condenser in the fender. I haven't looked into this option very much because I think it would be the most difficult to pull off specially when you consider that lack of room under 914 fenders and how big a condenser you would need. Evaporator: There are ample aftermarket evaporator units out there. You simply have to find one that would fit, most however are going to be under-dash units. For my build I am going to use the stock VPC unit. IF using a used unit, make sure to replace the expansion valve. It is usually located at the inlet of the evaporator. If you have a water-cooled car, you might also consider a dual-purpose unit that handles both A/C and heat. VPC Evap. 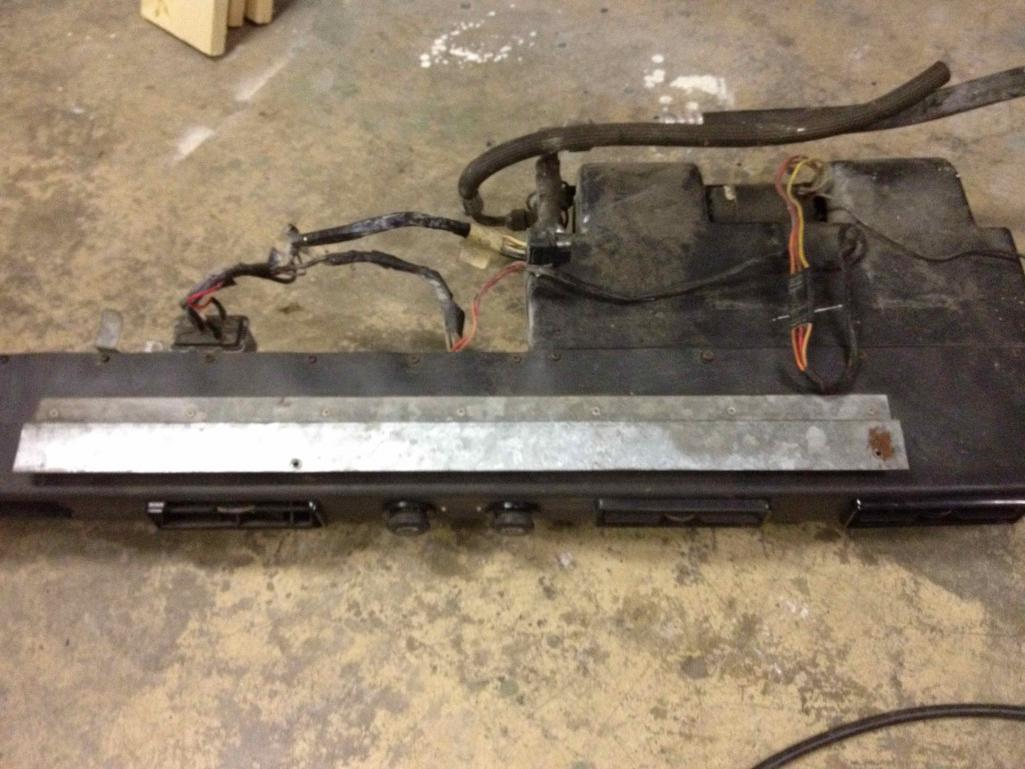 If an under-dash unit doesn’t strike your fancy, one of the best solutions but most difficult would be to install an evaporator unit in place of the fresh-air fan under the cowl. It would have to be a completely custom setup however you would still be able to use the stock heating system in conjunction with the dash air controls. This is something that I might consider later down the road. |
|
|
|
| dlee6204 |
Aug 22 2012, 08:05 PM
Post
#4
|
|
Howdy Group: Members Posts: 2,162 Joined: 30-April 06 From: Burnsville, NC Member No.: 5,956 |
Hoses:
Chances are that anyone doing an A/C system will need all new hoses. The old lines are compatible with R12 only. They allow the R12 to "breathe" and will not work if you are using R134. New Barrier hoses must be used if using R134. Your local A/C shop will probably be your best bet when getting new hoses made. If making your own hoses make sure to use the correct fittings (flare, o-ring, etc.). Some new charge port fittings  New Hose 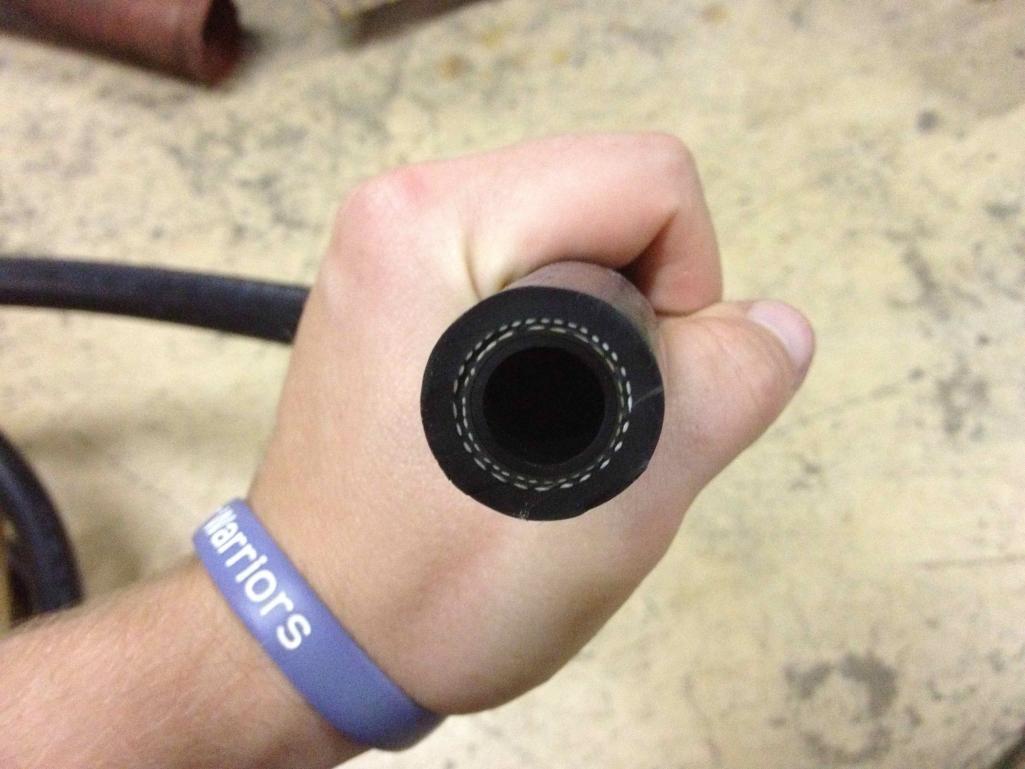 The SD507 was made for o-ring fittings so I acquired some o-ring to flare adapters. I ended up not using these. 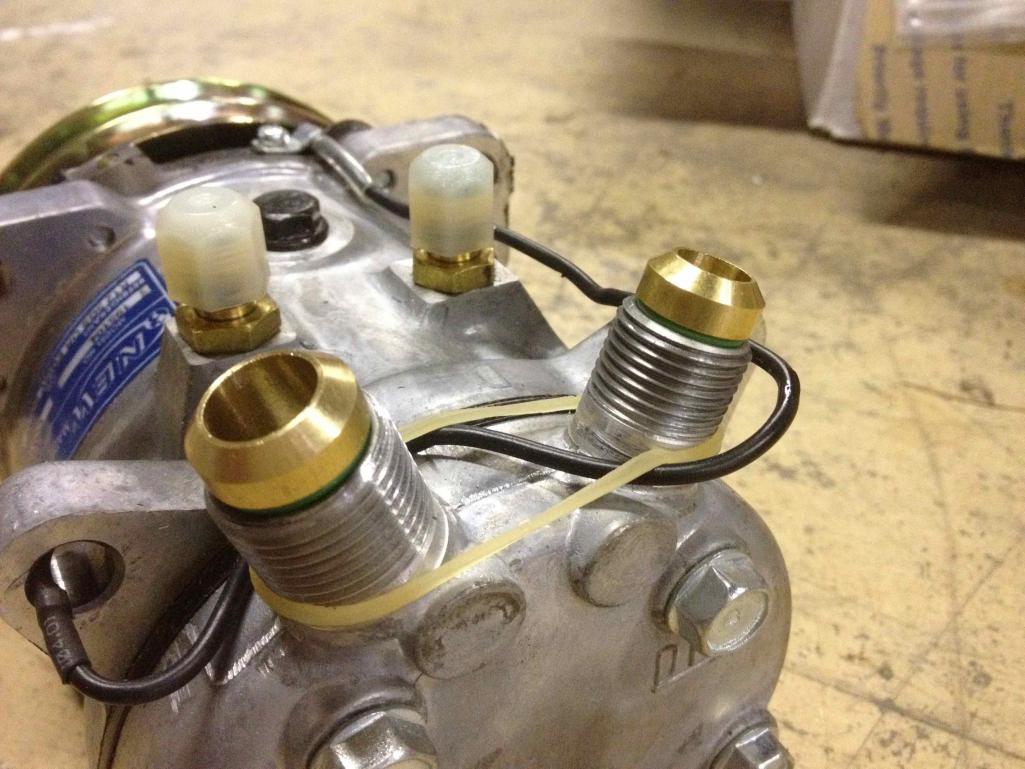 Receiver Drier: The drier contains a desiccant that removes moisture from the system and it also stores extra refrigerant. This item is fairly cheap <$20 and should not be reused. There are a few options out there depending on where you want to mount it. You can find them in a variety of sizes and also ones for lying horizontally. Original 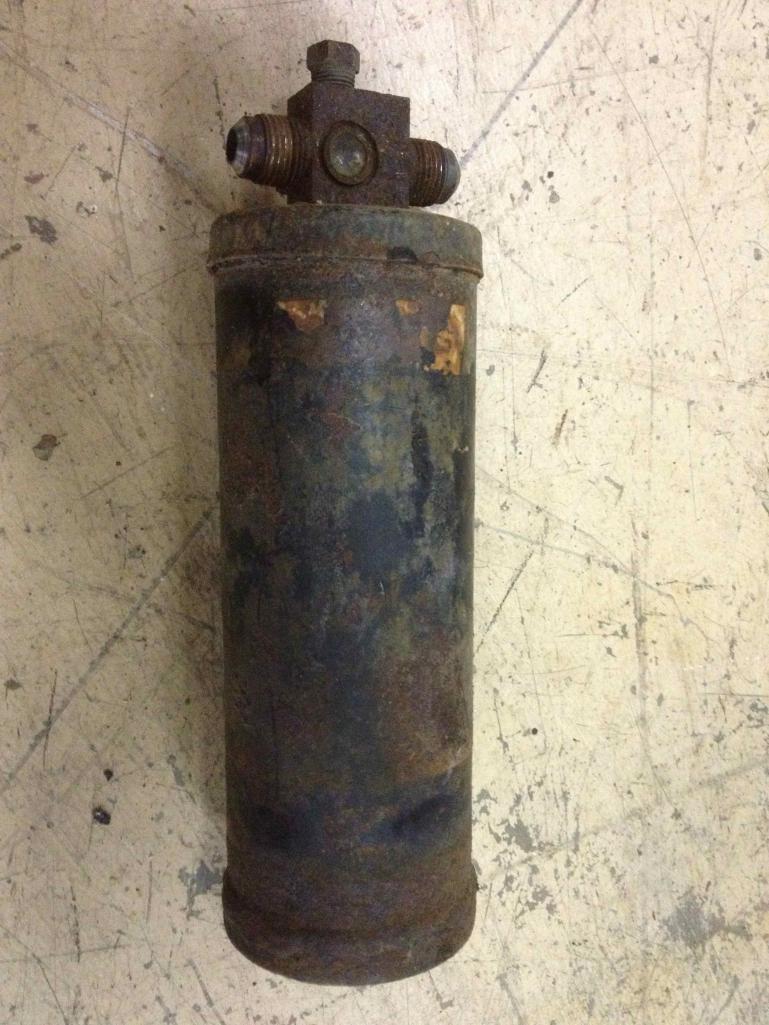 The drier I plan to use. Its a "short" version. It also has ports for using pressure switches. 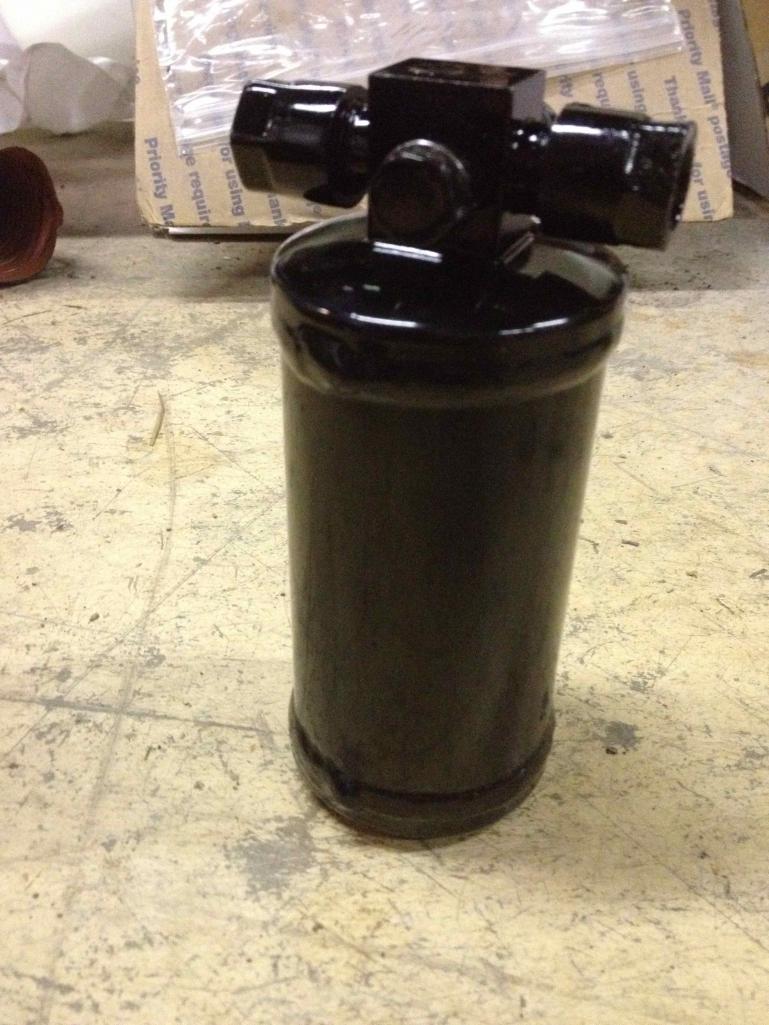 Wiring: Below is a wiring diagram I found for the VPC System. I believe it was made by someone on this site (Thanks). The only change I’m going to add is the addition of a trinary switch on the drier. The trinary switch will cut off the compressor if the pressure is too low or too high and it will also engage the condenser fan after the pressure reaches a certain point. 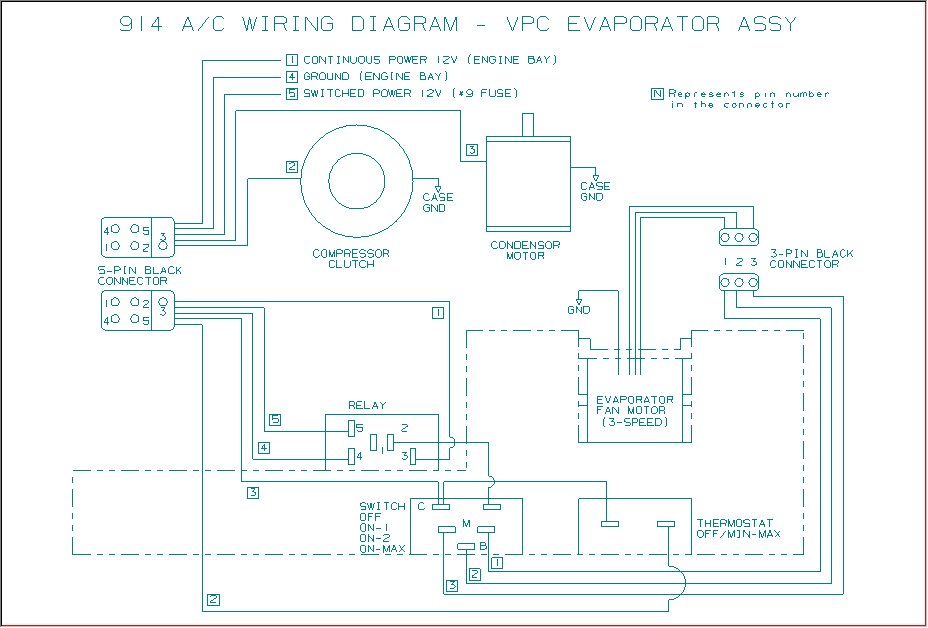 |
|
|
|
| dlee6204 |
Aug 22 2012, 08:05 PM
Post
#5
|
|
Howdy Group: Members Posts: 2,162 Joined: 30-April 06 From: Burnsville, NC Member No.: 5,956 |
[Future Post]
|
|
|
|
| dlee6204 |
Aug 22 2012, 08:05 PM
Post
#6
|
|
Howdy Group: Members Posts: 2,162 Joined: 30-April 06 From: Burnsville, NC Member No.: 5,956 |
Reference Pictures:
    |
|
|
|
| billh1963 |
Aug 22 2012, 08:26 PM
Post
#7
|
|
Car Hoarder! Group: Members Posts: 3,433 Joined: 28-March 11 From: North Carolina Member No.: 12,871 Region Association: South East States |
I just removed my York compressor. I could "put it back together" to show how it mounts
|
|
|
|
| dlee6204 |
Aug 22 2012, 08:57 PM
Post
#8
|
|
Howdy Group: Members Posts: 2,162 Joined: 30-April 06 From: Burnsville, NC Member No.: 5,956 |
QUOTE(billh1963 @ Aug 22 2012, 10:26 PM)  I just removed my York compressor. I could "put it back together" to show how it mounts Unless someone else chimes in, I would greatly appreciate it. (IMG:style_emoticons/default/smile.gif) |
|
|
|
| dlee6204 |
Aug 22 2012, 09:02 PM
Post
#9
|
|
Howdy Group: Members Posts: 2,162 Joined: 30-April 06 From: Burnsville, NC Member No.: 5,956 |
So for my build I will be starting from scratch. My car did not come with A/C. A detailed list of parts can be seen below. I ordered most of the stuff from http://www.nostalgicairparts.com/ I also had to order a few fittings from Coldhose.com however NostalgicAir owns the Coldhose site so its the same company. If anyone needs specific parts numbers I can provide those too as well.
I did buy my compressor on Ebay from johnjoysyl. I'll provide more details on some of the items later in the thread. -Sanden 507 Compressor -VPC Evaporator -Short Style Center Console -VPC Condenser Box -Custom Compressor mount on top -# 8 Straight Flare Fitting (1) -# 6 90 Degree Flare Fitting (2) -# 10 Straight Flare Fitting (1) -# 6 90 Degree Female O-ring Fitting (1) -# 6 Straight Female O-ring Fitting (1) -# 10 90 Degree R-134a Charging Port Fitting (1) -# 8 90 Degree R-134a Charging Port Fitting (1) -Flare Expansion Valve (1) -Shorty Standard O-ring Receiver Drier (1) -Male Trinary Safety Switch For Electric Fans (1) -Grommet Single #6 - #10 (10) -Barrier A/C Hose # 6 Sold By The Foot (9) -Barrier A/C Hose # 8 Sold By The Foot (13) -Barrier A/C Hose # 10 Sold By The Foot (13) 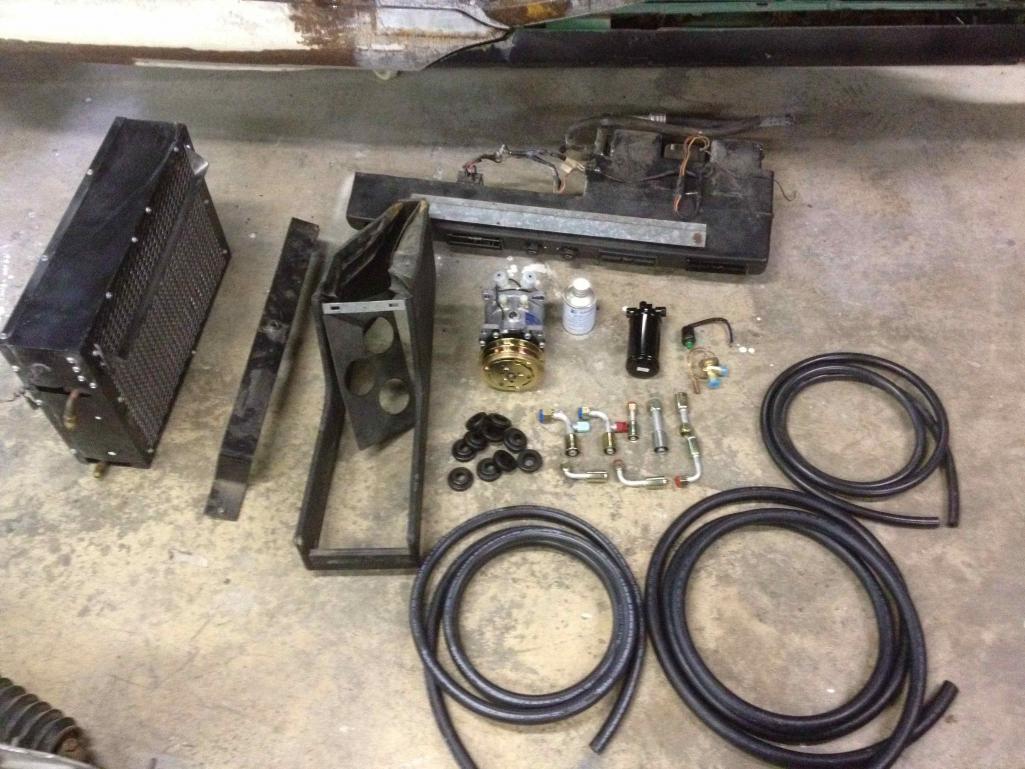 |
|
|
|
| dlee6204 |
Aug 22 2012, 09:08 PM
Post
#10
|
|
Howdy Group: Members Posts: 2,162 Joined: 30-April 06 From: Burnsville, NC Member No.: 5,956 |
The first thing I did was install the front condenser. I didn't mind cutting a hole in my trunk so long as it was a clean install. Plus people cut holes in their trunks all the time for oil coolers, radiators, etc. so I didn't feel too bad cutting into my virgin floor.
About to make the cut 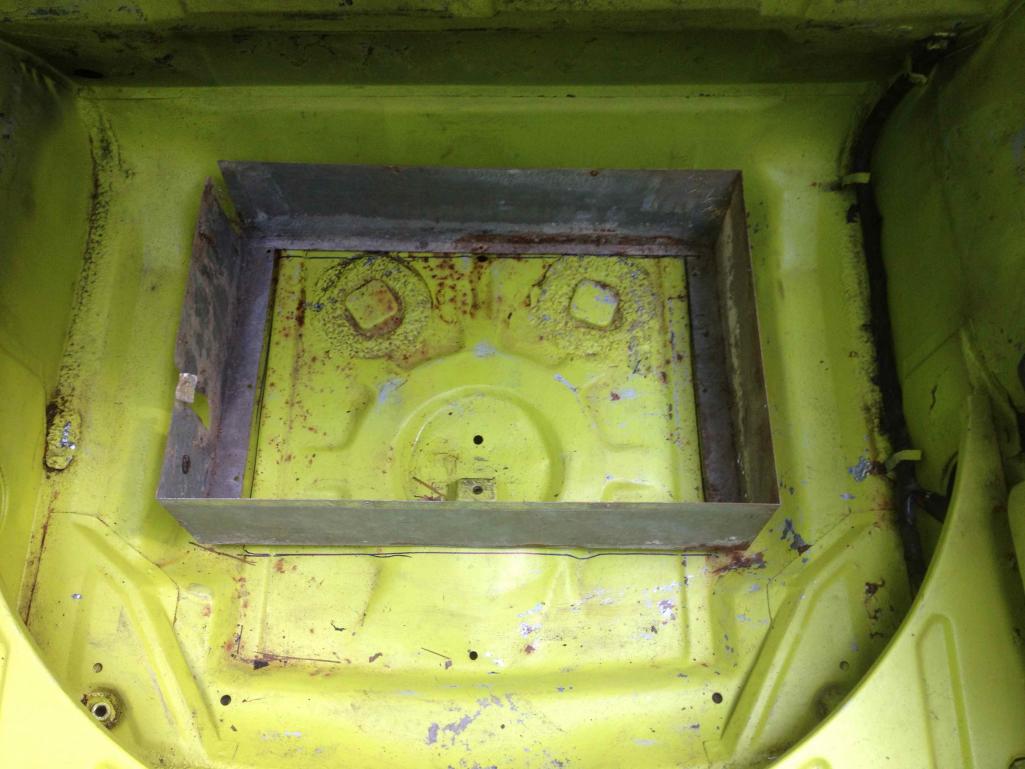 (IMG:style_emoticons/default/w00t2.gif) I saved the cutout incase I ever want to reinstall the floor.  Installed. I still need to install some gaskets to keep water out. 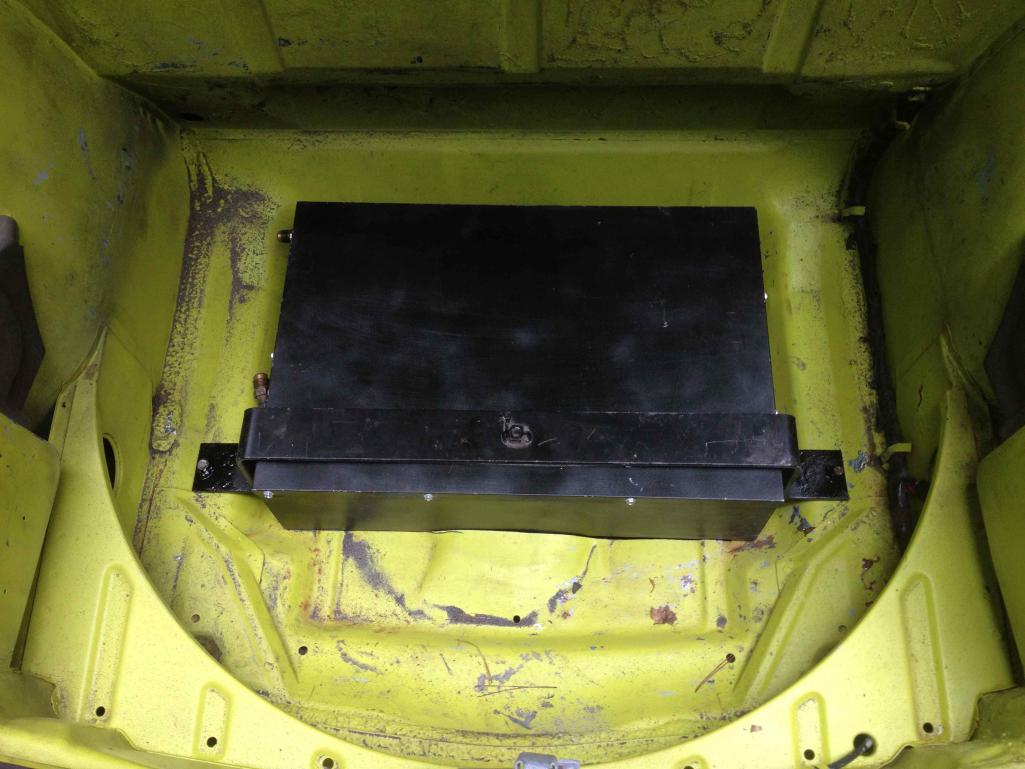 |
|
|
|
| wingnut86 |
Aug 22 2012, 09:49 PM
Post
#11
|
|
...boola la boo boola boo... Group: Members Posts: 1,054 Joined: 22-April 10 From: South Carolina Member No.: 11,645 Region Association: South East States |
I checked into aftermarket systems for ACs last year. Jake Raby had installed one on his wife's Bug he put a Type IV in, I have images around here somewhere that his office manager shared with me. He had a new vendor in Florida build the setup for him. I contacted this gent just as he was putting an ops manual together around this, I actually offered to do the technical writing if he sent me a kit to play with on my 2.0. He never followed up on a final price and email he owed me, so I haven't any further detail. I think his outfit is close to where Joe's setup is for Series9 - Deland maybe.
He was using a similar setup to yours, new condenser, Sanden compressor, smaller & modern fan in the wheelhouse unit. I'll try to find the details Friday. Jake's site may show his wife's car/engine bay, thinking it was top mounted as well - but it may have a DTM - can't remember currently. Dave |
|
|
|
| zambezi |
Aug 22 2012, 11:31 PM
Post
#12
|
|
Senior Member Group: Members Posts: 711 Joined: 14-April 08 From: Lafayette, LA Member No.: 8,920 Region Association: South East States |
Here are some of my condensor mountings. I am running the DPD system because that is how my car was bought new. I am not driving the car yet (still waiting for paint) but it is fully functional and have got 40 degrees out of the vents, and that is with an unsealed cabin with no seals anywhere.
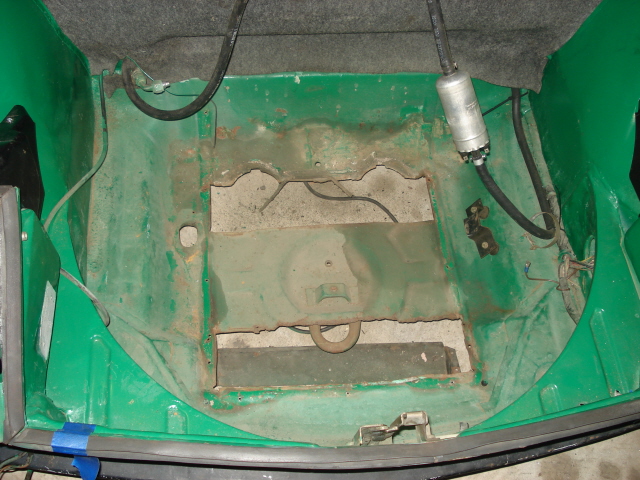 this was the before picture. What a hack job that was done at the dealerships huh!! 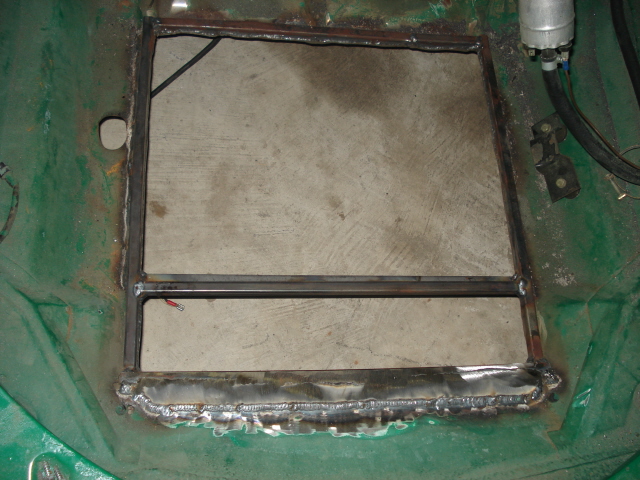 Here is how I braced and cleaned up the opening. 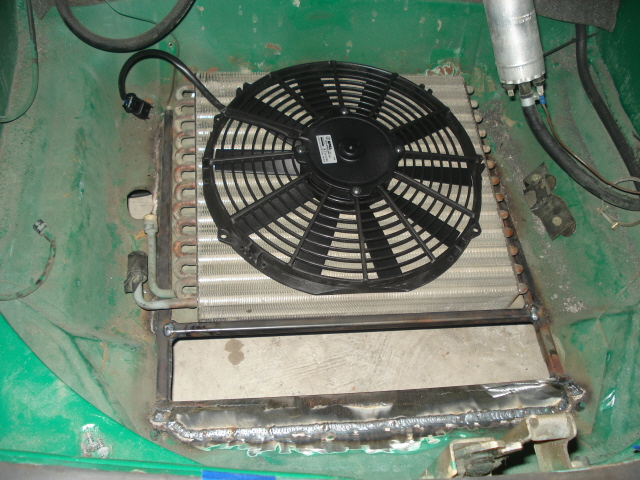 Here it is with the condensor test fit with the new SPAL cooling fan. It cover a much greater area and will flow a ton more air. 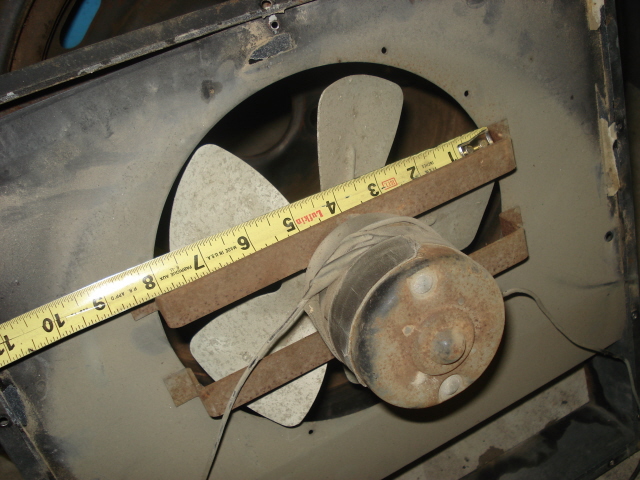 The original fan for comparison. Even the squirrel cage fan that comes with the VPC setup flows better than this. I will have to get out to the shop and take some pics of the final setup showing hose routing and drier location. This is going to be a good thread and should be a great place for all the A/C configurations to be posted. I am curious how your smog pulley system will hold up and how much it is offset towards the front of the car. There is not a lot of room forward towards the firewall. My pulley works good but it is still very close. I would have more room if I was not running the factory sound pad (with a layer of dynamat extreme behind it as well). I will try and get more pics loaded up in a day or two of the rest of it. JIM |
|
|
|
| JRust |
Aug 22 2012, 11:58 PM
Post
#13
|
|
914 Guru Group: Members Posts: 6,317 Joined: 10-January 03 From: Albany Oregon Member No.: 129 Region Association: Pacific Northwest |
Man I appreciate this. I will be setting up a/c in my LS1 conversion. I have the compressor & condensor saved from my donor camaro. I haven't messed with to much a/c so your thread is just what I needed (IMG:style_emoticons/default/biggrin.gif) . Thanks
|
|
|
|
| DRPHIL914 |
Aug 23 2012, 06:46 AM
Post
#14
|
|
Dr. Phil Group: Members Posts: 5,933 Joined: 9-December 09 From: Kennesaw, GA Member No.: 11,106 Region Association: South East States |
(IMG:style_emoticons/default/piratenanner.gif) excellent thread to document for those of us that are contemplating this conversion to our non-A/C cars- being in the south, i really dont drive my 914 in the summer- 95-105 degrees for 3 month, the car just sits- i am looking forward to seeing this documented all the way thru the complete project,
it is sure to be add to the "Classics". if you can share your parts lists and sources for such as the fittings etc, would be greatly appreciated! What do you anticipate you final cost for the project will be? |
|
|
|
| dlee6204 |
Aug 23 2012, 07:39 AM
Post
#15
|
|
Howdy Group: Members Posts: 2,162 Joined: 30-April 06 From: Burnsville, NC Member No.: 5,956 |
QUOTE(Philip W. @ Aug 23 2012, 08:46 AM) if you can share your parts lists and sources for such as the fittings etc, would be greatly appreciated! What do you anticipate you final cost for the project will be? I'll be sharing all this information when I get a chance and get more organized. (IMG:style_emoticons/default/smile.gif) |
|
|
|
| dlee6204 |
Aug 23 2012, 07:56 AM
Post
#16
|
|
Howdy Group: Members Posts: 2,162 Joined: 30-April 06 From: Burnsville, NC Member No.: 5,956 |
QUOTE I will have to get out to the shop and take some pics of the final setup showing hose routing and drier location. This is going to be a good thread and should be a great place for all the A/C configurations to be posted. I am curious how your smog pulley system will hold up and how much it is offset towards the front of the car. There is not a lot of room forward towards the firewall. My pulley works good but it is still very close. I would have more room if I was not running the factory sound pad (with a layer of dynamat extreme behind it as well). I'd be interested in hearing how much clearance you had in front of your engine pulley. My smog pulley has a small diameter pulley and it has very little clearance with the front tin. I can't imagine having a larger diameter pulley. My a/c compressor is already mounted and it fits perfectly center of the "hump" in the firewall so there is quite a bit of room. I'll show more on this later. |
|
|
|
| 76-914 |
Aug 23 2012, 08:16 AM
Post
#17
|
|
Repeat Offender & Resident Subaru Antagonist Group: Members Posts: 13,883 Joined: 23-January 09 From: Temecula, CA Member No.: 9,964 Region Association: Southern California |
|
|
|
|
| TJB/914 |
Aug 23 2012, 08:49 AM
Post
#18
|
|
Mid-Engn. Group: Members Posts: 4,484 Joined: 24-February 03 From: Plymouth & Petoskey, MI Member No.: 346 Region Association: Upper MidWest |
Attached thumbnail(s) 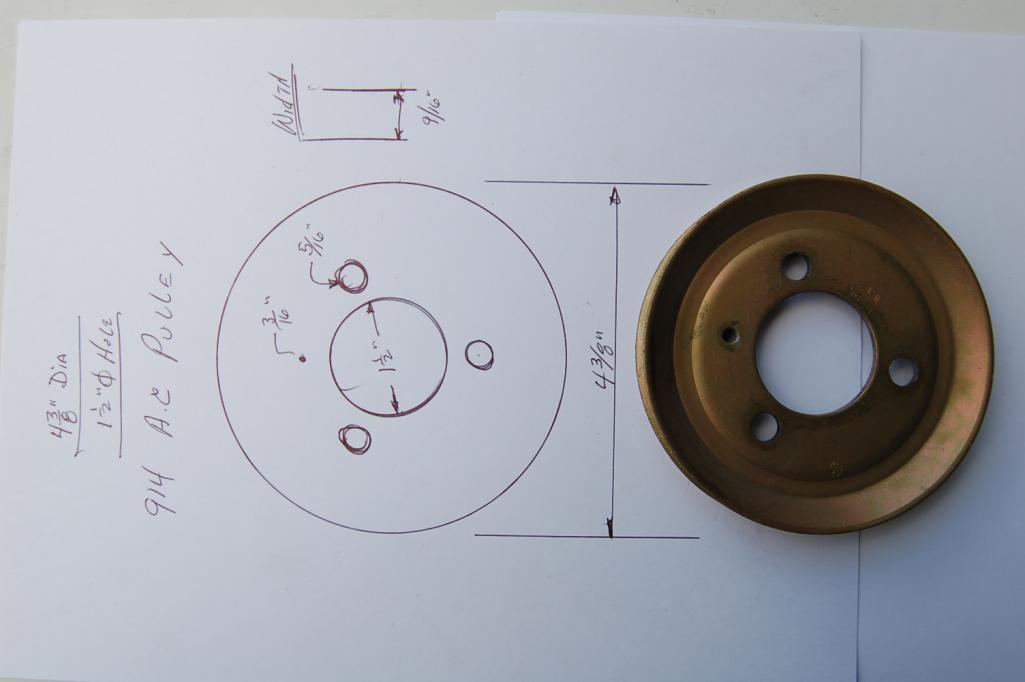 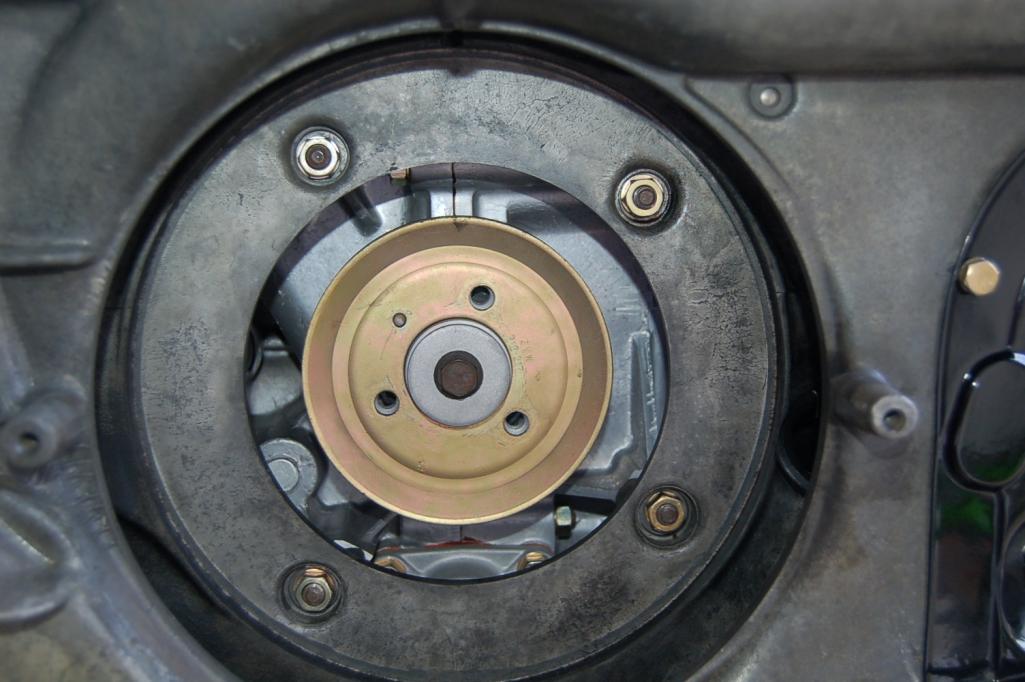
|
|
|
|
| andys |
Aug 23 2012, 09:51 AM
Post
#19
|
|
Advanced Member Group: Members Posts: 2,165 Joined: 21-May 03 From: Valencia, CA Member No.: 721 Region Association: None |
In a couple of days I can hopefully provide some photos of my AC install (LS1 conversion) that may be helpful to the -4 & -6 guys as well. I used an under dash evaporator (Hot Rod Air) that looks somewhat similar to the original dealer installed system (from memory of my '73, but that was more than 30 years ago). I opted to use reduced-diameter barrier hose which, as the name implies, the diameter (outside) is smaller than standard barrier hose. The smaller hose makes routing easier, and you don't have to punch such large holes. The fittings are more difficult to find, but Doc's Blocks (Stark Mfg) makes a whole array of there fittings; they recently stopped selling direct, so you'll have to contact them for a dealer. If you go with the reduced barrier hose, make sure your local AC shop has the correct crimping dies (most do not). Luckily, my local NAPA did have the correct ones, and did a great job.
Andys |
|
|
|
| mtburman |
Aug 23 2012, 11:28 AM
Post
#20
|
|
Newbie Group: Members Posts: 36 Joined: 8-April 10 From: Phoenix Member No.: 11,587 Region Association: Southwest Region |
It's important to watch spacing on the condenser enclosure/fan if you are going to retain the spare tire mounting on top of the cone. Too far back makes it difficult to set/remove tire.
|
|
|
|
|
1 User(s) are reading this topic (1 Guests and 0 Anonymous Users)
0 Members:

|
Lo-Fi Version | Time is now: 17th May 2026 - 05:31 PM |
Invision Power Board
v9.1.4 © 2026 IPS, Inc.