|
|
|
Porsche, and the Porsche crest are registered trademarks of Dr. Ing. h.c. F. Porsche AG.
This site is not affiliated with Porsche in any way. Its only purpose is to provide an online forum for car enthusiasts. All other trademarks are property of their respective owners. |
|
|


| 7TPorsh |
 Sep 26 2012, 10:52 AM Sep 26 2012, 10:52 AM
Post
#1
|
|
7T Porsh  Group: Members Posts: 2,691 Joined: 27-March 06 From: Glendale Ca Member No.: 5,782 Region Association: Southern California |
I am trying to figure out what I have. PO said it was the "standard" 2.0 upgrade. But I don't know what that is. I smiled and said "oh".
So here is what I found in the glove compartment way back. So 2.0 case? what does that mean? Different cam? solid lifters? is that good? 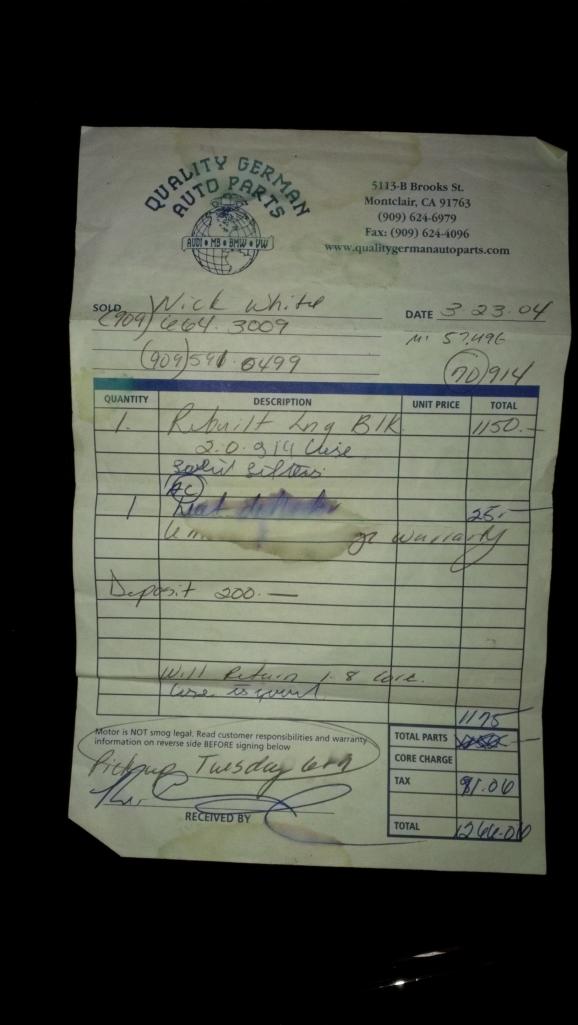 Car slowly started running bad and now I can't seem to get it started and idling. I have changed and relocated the fuel pump and installed a pressure gauge at the carbs...3psi constant. So the investigation moves to the ignition. I took off my pertronix and put the points back, set dwell, played with timing (no light)...no difference. I started reading about dizzys and got dizzy...but I think I will need a better one. So I have dual Webers...and that's all I know. What model? Vacuum...don't know. There is a sticker on them. Is that a rebuild sticker from Internic 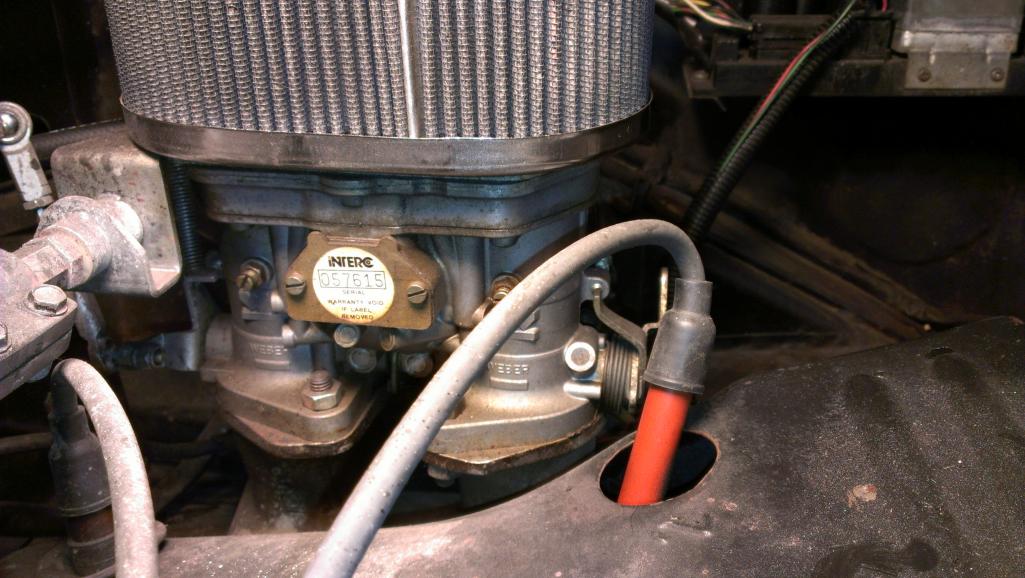 |
   |

 
|
  |
Replies(20 - 35)
| euro911 |
Sep 30 2012, 12:56 PM
Post
#21
|
|
Retired & living the dream. God help me if I wake up! Group: Members Posts: 8,849 Joined: 2-December 06 From: So.Cal. & No.AZ (USA) Member No.: 7,300 Region Association: Southern California |
Determine if there's any new parts you might need (spark plugs, wires, gaskets, and jack stands, etc.), then schedule a tech day at your house. Provide burgers, dogs or pizza and it'll get sorted out (IMG:style_emoticons/default/shades.gif)
|
|
|
|
| jimkelly |
Sep 30 2012, 01:15 PM
Post
#22
|
|
Delaware USA Group: Members Posts: 4,969 Joined: 5-August 04 From: Delaware, USA Member No.: 2,460 Region Association: MidAtlantic Region |
what it means - is that at best - your car increased in HP from 72 to 95.
http://www.914world.com/specs/engnumbs.php jim |
|
|
|
| TheCabinetmaker |
Sep 30 2012, 02:32 PM
Post
#23
|
|
I drive my car everyday Group: Members Posts: 8,300 Joined: 8-May 03 From: Tulsa, Ok. Member No.: 666 |
You can't let the Magic spark out of the diz. It belongs inside. Everything has to be tight or it loses ground and does nothing.
|
|
|
|
| 7TPorsh |
Oct 1 2012, 12:01 PM
Post
#24
|
|
7T Porsh Group: Members Posts: 2,691 Joined: 27-March 06 From: Glendale Ca Member No.: 5,782 Region Association: Southern California |
How can I ground the dizzy? I guess i am missing a wire?
I see this on ebay...but can't see where the other side of that copper braid goes... http://www.ebay.com/itm/Porsche-914-vw-aud...fbc&vxp=mtr |
|
|
|
| euro911 |
Oct 1 2012, 12:44 PM
Post
#25
|
|
Retired & living the dream. God help me if I wake up! Group: Members Posts: 8,849 Joined: 2-December 06 From: So.Cal. & No.AZ (USA) Member No.: 7,300 Region Association: Southern California |
Gary, you need to ground the floating plate (that the points are mounted on) to the body of the dizzy.
Since the plate rotates slightly as it advances, a braided conductor is recommended. You can obtain a short piece of braided shield from a coaxial TV cable. Cut a 2" length of braid (approx. length). Clean and tin both ends of the braid. Install a crimp-on eye-connector on one end of the braid Solder (or tack-weld) the other end to a spot on the plate. (There should already be a glob of solder there now). Insert the other end (with the eye connector) under one of the bolts on the dizzy's body. You're done. The pic on ebay clearly shows the crimp connector end. |
|
|
|
| dlestep |
Oct 1 2012, 06:00 PM
Post
#26
|
|
I am smilin'... Group: Members Posts: 890 Joined: 15-January 08 From: Sunrise Florida Member No.: 8,573 Region Association: South East States |
Just a few more things to think of:
1. check for a braided ground strap between the transaxle and body, and ensure that it has good ground, clean/dry contact at each end. Otherwise, it will seek ground through your clutch cable. 2. find TDC using the marks on the cooling fan and static time to number 1. 3. check spark plug gap and clean each one, taking note what kind of build-up appears on each one and what position they came from. 4. check spark plug wires for shorts (at night while it is idling, No light) bad wiring shows blue flashes = weak spark 5. Check point gap. Check for pitting. replace points and condenser if pitted. 6. Check distributor cap for wear and tracking marks and rotor tip wear. 7. Check that the distributor is fully seated and properly positioned, static. 8. Remove the tops off your air filters and observe each barrel while you blip the throttle. If it fills will fuel on top of the butterflies, you need to adjust the floats. Remove emulsion tubes and check each jet to ensure that they are not plugged. You mentioned that you are running 3psi fuel, but if that is because your motor has a in-line adjustible fuel pressure regulator, you cannot rely on entirely on that alone. Just one carb out of sync can mess things up. 9. Check everything from throttle stops, through the linkage. Balance your carbs at idle with the linkage disconnected. Ensure proper and equal flow then connect your linkage and remove any and all preload. Each throttle arm has to move equally and at the same time. Check on-line for weber carb adjustment procedures...use them ! 10. disconnect your inlet fuel connection and dump line into a coffee can. Test your fuel pump for 1 minute. Dump fuel back into tank. Electric fuel pumps need good clean ground as well. If the fuel spits and it is aireated, check ground. 11. Electrical and fuel problems have similar symtoms in the beginning. You may have both. Learn this rule..."there is alway at least THREE things that are wrong." You need a reference book on these procedures...go purchase one. Fix the electrical and fuel problems then worry about the other things. |
|
|
|
| sean_v8_914 |
Oct 2 2012, 07:39 AM
Post
#27
|
|
Chingon 601 Group: Members Posts: 4,011 Joined: 1-February 05 From: San Diego Member No.: 3,541 |
carbs are dirty, clogged jets.
remove carbs, remove jets, blow it all out with carb cleaner |
|
|
|
| 7TPorsh |
Oct 4 2012, 10:52 AM
Post
#28
|
|
7T Porsh Group: Members Posts: 2,691 Joined: 27-March 06 From: Glendale Ca Member No.: 5,782 Region Association: Southern California |
Well I removed the 19mm bolts under where the fuel lines attach to the carb.
The little screens seemed clean and also some very little metal dust came out. I stuck an air hose in there and blew it out a little and replaced it all back. I haven't tried to start it again yet. Is there another way to "clean" these out without having to remove them? Also I am thinking of just getting a good used replacement dizzy rather than try to solder on the copper braid...I'll still have the 009 crap. Is the better dizzy the 050? Vacuum advance would be nice but can my carbs do it without a mod? |
|
|
|
| 7TPorsh |
Oct 4 2012, 10:56 AM
Post
#29
|
|
7T Porsh Group: Members Posts: 2,691 Joined: 27-March 06 From: Glendale Ca Member No.: 5,782 Region Association: Southern California |
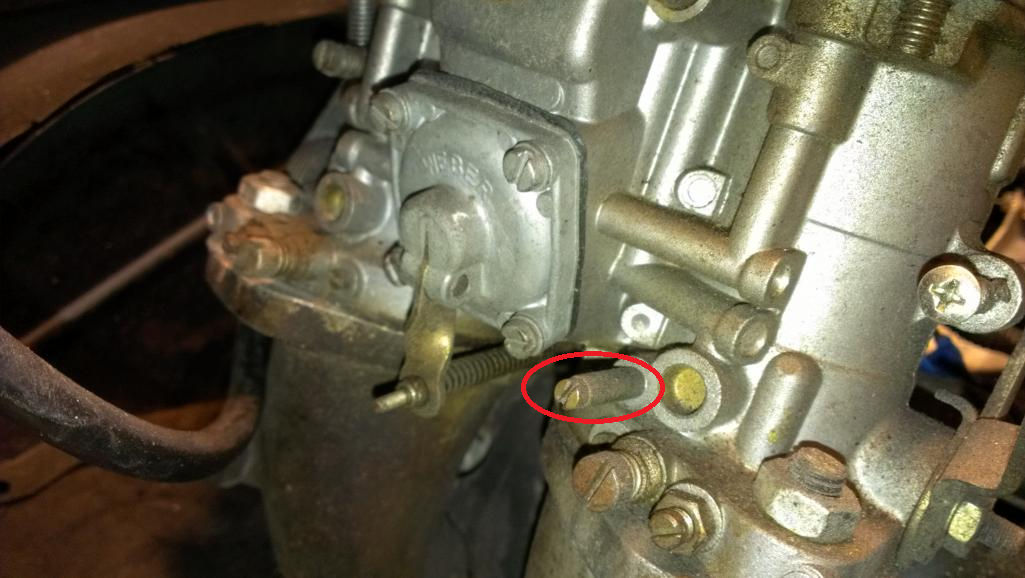
Can I remove this screw and just slide a vacuum hose over it?
 |
|
|
|
| euro911 |
Oct 4 2012, 11:20 AM
Post
#30
|
|
Retired & living the dream. God help me if I wake up! Group: Members Posts: 8,849 Joined: 2-December 06 From: So.Cal. & No.AZ (USA) Member No.: 7,300 Region Association: Southern California |
Yes, that is a vacuum advance port.
You only need to run a hose to one of the carbs For a 2.0L, I believe you'll want the dizzy that ends with 205A. Check Pbanders web site to verify (IMG:style_emoticons/default/type.gif) |
|
|
|
| 7TPorsh |
Oct 5 2012, 04:02 PM
Post
#31
|
|
7T Porsh Group: Members Posts: 2,691 Joined: 27-March 06 From: Glendale Ca Member No.: 5,782 Region Association: Southern California |
looking at the diagram...where are the main jets? I am guessing that's what I need to take out and blow out since the car is idling so it's not the idle jets?
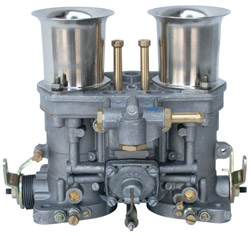
Webers so I am hoping I don;t have to remove the carbs to do this. Anyone know what kind of Webers these are? |
|
|
|
| euro911 |
Oct 5 2012, 06:05 PM
Post
#32
|
|
Retired & living the dream. God help me if I wake up! Group: Members Posts: 8,849 Joined: 2-December 06 From: So.Cal. & No.AZ (USA) Member No.: 7,300 Region Association: Southern California |
Unscrew the two brass emulsion tube/jet stacks that protrude out of the top of the carb between the throat stacks (shown in the pic below)
 The main jets are pressed into the the bottom of the emulsion tubes, air correction jets are pressed into the top. Click here for a 40IDF schematic (.pdf file) 47 main jet 48 emulsion tube 49 air correction jet 50 upper tube extension |
|
|
|
| bandjoey |
Oct 5 2012, 06:52 PM
Post
#33
|
|
bandjoey Group: Members Posts: 4,926 Joined: 26-September 07 From: Bedford Tx Member No.: 8,156 Region Association: Southwest Region |
Time to start over and it'll run great. Toss out what's happened. (Ask me how I know)
Set the valves cold - see 'how to adjust' in the tech section here Static time the points and dwell Regap the spark plugs Locate TDC and be sure plug wires are in position and mark the position on the fan so u can see it with the timing light. Pull all the carb jets and blow them out. Set screws to static turns out Since you know there's fuel pressure ... Start it up. It will run. Set the proper timing. It's different than FI Go read all of the tech articles on Pelican and World 3 times (ask me how I know ) and you shouldn't have any problem Wires, p&c, plugs, cap & rotor are dirt cheap. Just replace 'em I fought this battle for a month. Started completely over and it worked See if there's someone close by see if they can come by tomorrow ????? (IMG:style_emoticons/default/driving-girl.gif) |
|
|
|
| stugray |
Oct 6 2012, 11:02 AM
Post
#34
|
|
Advanced Member Group: Members Posts: 3,824 Joined: 17-September 09 From: Longmont, CO Member No.: 10,819 Region Association: None |
7TPorsh,
From what I am reading above: Put the tools down and go buy a Weber carb book before you go any further. Sorry, but these carbs are not something you can "tinker with" until they work. If you were local, I would GIVE you one of my books for free. You will also need some special tools. Minimum - Carb synch tool (snail) Stu |
|
|
|
| rhodyguy |
Oct 6 2012, 12:34 PM
Post
#35
|
|
Chimp Sanctuary NW. Check it out. Group: Members Posts: 22,080 Joined: 2-March 03 From: Orion's Bell. The BELL! Member No.: 378 Region Association: Galt's Gulch |
your car will idle even with fouled idle jets. until you hit 2700ish+rpm you are running on the idle circuitry. with your car warmed up GENTLY turn 1 idle adj screw in and count the # of turns to seated and write it down noting the cyl #. the #'s are stamped into the engine tin. your engine should start to stumble perhaps a low backfire. no change in idle speed or quality of idle indicates the possibility of a plugged jet. turn it back out the same # you turned in. repeat this 3 more times.
agreed on the manual and sync tool. we can type til our fingers fall off to answer ?s and if you don't understand the components of the carbs, and the functions they perform you'll get frustrated and people will eventually stop responding. note the plug wire in the one picture. there should be a little sealing boot on the plug end and the rest should have them as well. unless you have a receipt i suspect they are pretty old. get new ones. a known to be working distributor for an l-jet fi system is a reasonably priced replacement for the 009. like the 009 the l-jet dist does not require a vacuum signal to provide advance. make sure the vacuum port on the carb is well sealed at this point. all of them if there are more than 1 on your set of webers. there are a number of factors that apply to running a set of carbs. wait til you tackle the linkage. if you offered to pay postage and a nominal fee for his time perhaps stu would be willing to send a weber manual. i imagine it would have plenty of helpful tips written in it. mine does. k |
|
|
|
| stugray |
Oct 6 2012, 01:42 PM
Post
#36
|
|
Advanced Member Group: Members Posts: 3,824 Joined: 17-September 09 From: Longmont, CO Member No.: 10,819 Region Association: None |
At least here is an excellent diagram so you know what parts are what:
(IMG:http://www.914world.com/bbs2/uploads_offsite/www.piercemanifolds.com-10819-1349552533.1.gif) http://www.piercemanifolds.com/category_s/250.htm They are my favorite source for parts. Stu |
|
|
|
|
1 User(s) are reading this topic (1 Guests and 0 Anonymous Users)
0 Members:

|
Lo-Fi Version | Time is now: 20th May 2024 - 03:26 AM |
Invision Power Board
v9.1.4 © 2024 IPS, Inc.