|
|
|
Porsche, and the Porsche crest are registered trademarks of Dr. Ing. h.c. F. Porsche AG.
This site is not affiliated with Porsche in any way. Its only purpose is to provide an online forum for car enthusiasts. All other trademarks are property of their respective owners. |
|
|

  |

| tornik550 |
 Oct 2 2012, 10:51 AM Oct 2 2012, 10:51 AM
Post
#1
|
|
Senior Member  Group: Members Posts: 1,248 Joined: 29-January 07 From: Ohio Member No.: 7,486 Region Association: None |
My master cylinder grommets have a slight leak. They are cracked and old. I purchased some new grommets. I removed the old ones already and did not pay attention to how they were installed. Which side of the grommet goes into the master cylinder- the wide side or the narrow side? Also, when I install the lines from the reservoir, do I push them all the way through the grommet so the line is pushing against the washer in the master cylinder or does the line rest in the bore of the grommet?
Attached image(s) 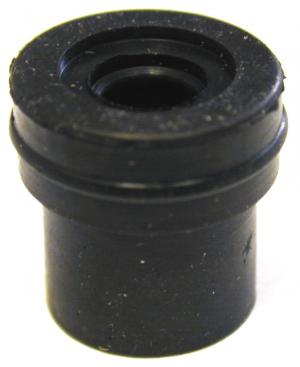
|
   |

 
|
| pilothyer |
Oct 2 2012, 10:58 AM
Post
#2
|
|
Member Group: Members Posts: 838 Joined: 21-May 08 From: N. Alabama Member No.: 9,080 Region Association: South East States |
The wide end goes in first, on top of the washers, then the line just pushes in. You will feel it seat. Since this is not a pressure connection that is all I have ever done and the brake fluid is just gravity fed to the master cylinder.
|
|
|
|
| pilothyer |
Oct 2 2012, 11:02 AM
Post
#3
|
|
Member Group: Members Posts: 838 Joined: 21-May 08 From: N. Alabama Member No.: 9,080 Region Association: South East States |
|
|
|
|
| mepstein |
Oct 2 2012, 11:33 AM
Post
#4
|
|
914-6 GT in waiting Group: Members Posts: 19,258 Joined: 19-September 09 From: Landenberg, PA/Wilmington, DE Member No.: 10,825 Region Association: MidAtlantic Region |
Looks like an easy job but it's not. Patience during and beer after.
|
 |
|
| URY914 |
Oct 2 2012, 12:14 PM
Post
#5
|
|
I built the lightest 914 in the history of mankind. Group: Members Posts: 120,466 Joined: 3-February 03 From: Jacksonville, FL Member No.: 222 Region Association: None |
The picture above is unside down from the correct position.
|
|
|
|
| infraredcalvin |
Oct 2 2012, 11:23 PM
Post
#6
|
|
Distracted Member Group: Members Posts: 1,511 Joined: 25-August 08 From: Ladera Ranch, CA Member No.: 9,463 Region Association: Southern California |
QUOTE(mepstein @ Oct 2 2012, 10:33 AM)  Looks like an easy job but it's not. Patience during and beer after. My method, lay under the car with drops of fluid running down your arm, push real hard for a half hr or so, stop a few times, throw tools around, kick car, try again, push real hard until fingers are too tired, get more frustrated and give a courtesy half pressure attempt before giving up, they'll slide right in. All i could figure is that putting too much pressure causes rubber to expand, blocking clean insertion, moderate pressure seemed to allow lines to slide right in without over compressing rubber. Good luck! |
|
|
|
| cwpeden |
Oct 2 2012, 11:28 PM
Post
#7
|
|
Great White North, huh? Group: Members Posts: 916 Joined: 20-August 06 From: Victoria BC Member No.: 6,693 Region Association: Canada |
I had to loosen of the master cylinder to get the rear one in. It is close to the 'firewall' and can be a bear. Then again I have a 19 mm cylinder, word is they are different in this aspect.
|
|
|
|
| euro911 |
Oct 3 2012, 12:44 AM
Post
#8
|
|
Retired & living the dream. God help me if I wake up! Group: Members Posts: 8,849 Joined: 2-December 06 From: So.Cal. & No.AZ (USA) Member No.: 7,300 Region Association: Southern California |
... and wipe off any brake fluid that gets on the grommets. I didn't properly seat the supply lines when I installed a new M/C and at some point, they leaked.
Sounds weird, but I think the leaking fluid caused the grommets to deteriorate. The grommets just disintegrated when I attempted to pull the lines back out to re-seat them (IMG:style_emoticons/default/blink.gif) Some people remove the fuel tank, disconnect the supply lines from the M/C reservoir and press the nipples into the grommets before bolting the M/C to the floorboard, then re-route and reconnect the supply lines to the reservoir. This way they're sure the nipples seated completely. For the sake of safety, if you haven't already done so, read up on the differences between DOT-3, DOT-4 and DOT-5 (and DOT-5.1) fluids. Know what's in your system and don't change it without knowing all the rules. Someone at a dealership 'accidentally' added some incompatible fluid in one of my cycle's front M/Cs when a new Russell braided brake hose was installed. I noticed the front caliper had started to leak. We had to purge the system, flush with alcohol, replace the seals in the M/C and the caliper, and refill with the proper type fluid. |
|
|
|
|
1 User(s) are reading this topic (1 Guests and 0 Anonymous Users)
0 Members:

|
Lo-Fi Version | Time is now: 9th May 2024 - 10:02 AM |
Invision Power Board
v9.1.4 © 2024 IPS, Inc.