|
|
|
Porsche, and the Porsche crest are registered trademarks of Dr. Ing. h.c. F. Porsche AG.
This site is not affiliated with Porsche in any way. Its only purpose is to provide an online forum for car enthusiasts. All other trademarks are property of their respective owners. |
|
|

  |

| dfelz |
 Mar 29 2013, 01:09 PM Mar 29 2013, 01:09 PM
Post
#61
|
|
beach bum  Group: Members Posts: 419 Joined: 7-June 12 From: San Diego Member No.: 14,538 Region Association: Southern California |
Great build Andy, your work is top notch and looks like nothing was left unnoticed!
In your gas tank compartment, what is the orange material you used as a replacement for the foam pads?? I have been looking for a suitable material for my gas tank compartment.... Thanks |
   |

 
|
| andys |
Mar 29 2013, 01:41 PM
Post
#62
|
|
Advanced Member Group: Members Posts: 2,165 Joined: 21-May 03 From: Valencia, CA Member No.: 721 Region Association: None |
QUOTE(dfelz @ Mar 29 2013, 12:09 PM)  Great build Andy, your work is top notch and looks like nothing was left unnoticed! In your gas tank compartment, what is the orange material you used as a replacement for the foam pads?? I have been looking for a suitable material for my gas tank compartment.... Thanks Thanks, David! Those orange pads are 3/16" textured finish adhesive back silicone foam fom McMaster-Carr p/n 8623K249....too high tech for me, but it was left over from a job at work......Will probably outlast the car. Andys |
|
|
|
| dfelz |
Mar 29 2013, 02:28 PM
Post
#63
|
|
beach bum Group: Members Posts: 419 Joined: 7-June 12 From: San Diego Member No.: 14,538 Region Association: Southern California |
Awesome, thanks! I love McMaster, they have everything!! and i can go pick it up too! (One perk of living in LA) Hope you dont mind me asking, but what do you do for a living that made you soo good at building sweet cars?
Next time i go to six flags i will probably feel a strong urge to come say hi and see your sexy teener (IMG:style_emoticons/default/biggrin.gif) |
|
|
|
| andys |
Mar 29 2013, 02:49 PM
Post
#64
|
|
Advanced Member Group: Members Posts: 2,165 Joined: 21-May 03 From: Valencia, CA Member No.: 721 Region Association: None |
QUOTE(dfelz @ Mar 29 2013, 01:28 PM) Awesome, thanks! I love McMaster, they have everything!! and i can go pick it up too! (One perk of living in LA) Hope you dont mind me asking, but what do you do for a living that made you soo good at building sweet cars? Next time i go to six flags i will probably feel a strong urge to come say hi and see your sexy teener (IMG:style_emoticons/default/biggrin.gif) Engineer for an implantable medical device research foundation, however I've been around racing and working on cars my whole life. Yeah, drop me a line should you plan on Magic Mountain. Andys |
|
|
|
| DBCooper |
Mar 29 2013, 04:28 PM
Post
#65
|
|
14's in the 13's with ATTITUDE Group: Members Posts: 3,079 Joined: 25-August 04 From: Dazed and Confused Member No.: 2,618 Region Association: Northern California |
QUOTE(andys @ Mar 29 2013, 09:10 AM) I'm not worried about explaining anything to my wife, cause she doesn't care. Ha ha ha, yeah, I can understand that. But I didn't mean her as much as the crowd you always attract at gas stations and convenience stores. You know, the ones who start out by saying "I had one of those a long time..." then go quiet when they notice the engine compartment. It's evil, but it's fun to see them squirm in front of their wives. |
|
|
|
| dfelz |
Mar 29 2013, 04:35 PM
Post
#66
|
|
beach bum Group: Members Posts: 419 Joined: 7-June 12 From: San Diego Member No.: 14,538 Region Association: Southern California |
QUOTE(andys @ Mar 29 2013, 01:49 PM) QUOTE(dfelz @ Mar 29 2013, 01:28 PM) Awesome, thanks! I love McMaster, they have everything!! and i can go pick it up too! (One perk of living in LA) Hope you dont mind me asking, but what do you do for a living that made you soo good at building sweet cars? Next time i go to six flags i will probably feel a strong urge to come say hi and see your sexy teener (IMG:style_emoticons/default/biggrin.gif) Engineer for an implantable medical device research foundation Andys What company!?! I did a 6 month internship last year at St. Jude Medical over in Sylmar as a Hardware Engineer! |
|
|
|
| 914GT |
Mar 29 2013, 06:18 PM
Post
#67
|
|
Senior Member Group: Members Posts: 1,100 Joined: 11-October 04 From: Tucson Member No.: 2,923 Region Association: Southwest Region |
Andys
I've been following your build thread for awhile now, and just wanted to say yours is one of the sweetest looking and well thought out conversions I've ever seen. I've done two V8 conversions so far and it's great seeing all the thought and planning you've put into this. The details such as the heat shields is some good engineering work and basically you are designing out a lot of bugs before they ever happen. I'm sure once you get it on the road you'll be chasing a few more, as with any project as complex as this. But I bet they will be minor tweaks if anything. Hope you enjoy driving yours as much as I do mine. For sure yours will show how these conversions ought to be done, instead of the shoddy builds that have given them a bad reputation. Guy |
|
|
|
| andys |
Mar 30 2013, 08:40 PM
Post
#68
|
|
Advanced Member Group: Members Posts: 2,165 Joined: 21-May 03 From: Valencia, CA Member No.: 721 Region Association: None |
QUOTE(dfelz @ Mar 29 2013, 03:35 PM) QUOTE(andys @ Mar 29 2013, 01:49 PM) QUOTE(dfelz @ Mar 29 2013, 01:28 PM) Awesome, thanks! I love McMaster, they have everything!! and i can go pick it up too! (One perk of living in LA) Hope you dont mind me asking, but what do you do for a living that made you soo good at building sweet cars? Next time i go to six flags i will probably feel a strong urge to come say hi and see your sexy teener (IMG:style_emoticons/default/biggrin.gif) Engineer for an implantable medical device research foundation Andys What company!?! I did a 6 month internship last year at St. Jude Medical over in Sylmar as a Hardware Engineer! David, Small world! St. Jude was originally Pacesetter Sys. Inc. which was started by Al Mann. I worked at Pacesetter for 19 years, then moved to The Al Mann Foundation for Sientific Research for 16 years.....Still there. Andys |
|
|
|
| andys |
Mar 30 2013, 08:59 PM
Post
#69
|
|
Advanced Member Group: Members Posts: 2,165 Joined: 21-May 03 From: Valencia, CA Member No.: 721 Region Association: None |
QUOTE(914GT @ Mar 29 2013, 05:18 PM) Andys I've been following your build thread for awhile now, and just wanted to say yours is one of the sweetest looking and well thought out conversions I've ever seen. I've done two V8 conversions so far and it's great seeing all the thought and planning you've put into this. The details such as the heat shields is some good engineering work and basically you are designing out a lot of bugs before they ever happen. I'm sure once you get it on the road you'll be chasing a few more, as with any project as complex as this. But I bet they will be minor tweaks if anything. Hope you enjoy driving yours as much as I do mine. For sure yours will show how these conversions ought to be done, instead of the shoddy builds that have given them a bad reputation. Guy Guy, Thanks for the kind words; I appreciate it. Racing taught me (old cliché here) "To finish first, you must first finish" so reliability and durability must be balanced with performance goals. I'm also a bit anal when it comes to mechanical stuff, so anticipating problems is something I pain over a great deal (IMG:style_emoticons/default/dry.gif) I hope soon to take it out to The Streets of Willow for one of those HPDE's and use it as a testing session to dial in the suspension. Anyway, thanks again, Andys |
|
|
|
| dfelz |
Mar 31 2013, 11:38 AM
Post
#70
|
|
beach bum Group: Members Posts: 419 Joined: 7-June 12 From: San Diego Member No.: 14,538 Region Association: Southern California |
QUOTE(andys @ Mar 30 2013, 07:40 PM) QUOTE(dfelz @ Mar 29 2013, 03:35 PM) QUOTE(andys @ Mar 29 2013, 01:49 PM) QUOTE(dfelz @ Mar 29 2013, 01:28 PM) Awesome, thanks! I love McMaster, they have everything!! and i can go pick it up too! (One perk of living in LA) Hope you dont mind me asking, but what do you do for a living that made you soo good at building sweet cars? Next time i go to six flags i will probably feel a strong urge to come say hi and see your sexy teener (IMG:style_emoticons/default/biggrin.gif) Engineer for an implantable medical device research foundation Andys What company!?! I did a 6 month internship last year at St. Jude Medical over in Sylmar as a Hardware Engineer! David, Small world! St. Jude was originally Pacesetter Sys. Inc. which was started by Al Mann. I worked at Pacesetter for 19 years, then moved to The Al Mann Foundation for Sientific Research for 16 years.....Still there. Andys Thats crazy! What a small world it is! No I am not currently working there, it was just for 6 months and then had to go back to school to finish up my ME undergrad. I will apply to work there though for after I graduate next March, I really enjoyed working at SJM, was a great experience for me! I am assuming The Al Mann Foundation is focused on implantable devices for cardiac stimulation/support? David |
|
|
|
| Mike Bellis |
Mar 31 2013, 11:58 AM
Post
#71
|
|
Resident Electrician Group: Members Posts: 8,345 Joined: 22-June 09 From: Midlothian TX Member No.: 10,496 Region Association: None |
I nominate this thread for the Classics.
It will go down as one of the best engineered conversions in the 914 World. (IMG:style_emoticons/default/smilie_pokal.gif) |
|
|
|
| BIGKAT_83 |
Mar 31 2013, 12:33 PM
Post
#72
|
|
Senior Member Group: Members Posts: 1,798 Joined: 25-January 03 From: Way down south Bogart,GA Member No.: 194 Region Association: South East States |
|
|
|
|
| andys |
Apr 5 2013, 07:19 PM
Post
#73
|
|
Advanced Member Group: Members Posts: 2,165 Joined: 21-May 03 From: Valencia, CA Member No.: 721 Region Association: None |
I'm jumping around a bit, however lets go ahead and paint the car.
I'll start with paint and materials. I went with PPG base coat/clear coat (Deltron 2000 DBC base, and Deltron DCU2010 clear). The color is M7Z GT Silber (silver), which is a Porsche color. I chose this particular silver because it has a deep rich look, rather than some of the more pale silver's. Interesting that when I watched the store mix the paint, they added black to it hence the darkness and richness.....at least that's my take. I bought a sanding block kit from Summit (Dura-Block) and some rolls of various grit 2 3/4" wide adhesive backed sandpaper also from Summit. The sandpaper is Carborundom Gold (not to be confused with Kona (IMG:style_emoticons/default/smile.gif) ), which costs 1/3 less than the 3M brand. I already had some long boards, and various other sanding blocks, and used them all. For Primer, I used PPG Deltron DP40LF epoxy, and chose the straight gray color to maintain the deep look in the color coat. For body filler I used , for the first time, Rage Gold which I like very much. I strongly recommend this product; super quality in my book. For high build primer, I used Shop Line JP205 gray polyester, which is made by PPG. There was an assortment of dings and dents that required the requisite bodywork, but most, unfortunately, were on blind panels, so I couldn't get a dolly behind the dents. I made ample use of my HF stud gun in these areas and used the body filler as required. To get the filling and blending just right, it took A LOT OF WORK for what seemed like never ending sanding, priming, sanding, priming....well you get the picture. I don't think I'll ever do another one again! I ended up with three HVLP guns. For the epoxy primer, I used the slightly better quality HF gun with a 1.4 nozzle. For the high build primer, I used a cheapie HF gun and drilled out the nozzle to 1.9; it worked out very well for this application @ 40psi. For the base and clear, I used a quality Eastwood gun with a 1.4 nozzle. I had other nozzles, but this worked well in both cases. I rented a spray booth from a guy that does a lot of the local hotrod work (as a retirement hobby), and I took a lot of advice from him. Thanks Howard! I towed the car there, which was about 12 miles, and spent two looong days priming, base, and clear coating. I layed down three coats of base, and tthree coats of clear. I used about 2 1/2 quarts of base, and about 3 1/2 quarts of clear for both inside, and out. The doors were removed, as were the hood, trunk, targa, and engine cover and painted while hanging in the booth. After three days (I think), I color sanded the clear (1000, then 1200) before it got too hard. I left it in the color sanded state until I assembled the car, and then went about buffing it out. I used 3M Perfect-It #6085 (step 1), and Perfect-It #6064 (step 2). My biggest hurdle was finding a machine pad that I was happy with, and went through several before I got something that produced a good result. I could have gone finer yet, but this is not a show quality car and I stopped there. All this is from memory (poor memeory at that!), so perhaps I've left something out or got something wrong, but you get the idea. As always, pleaes ask. Andys Attached thumbnail(s) 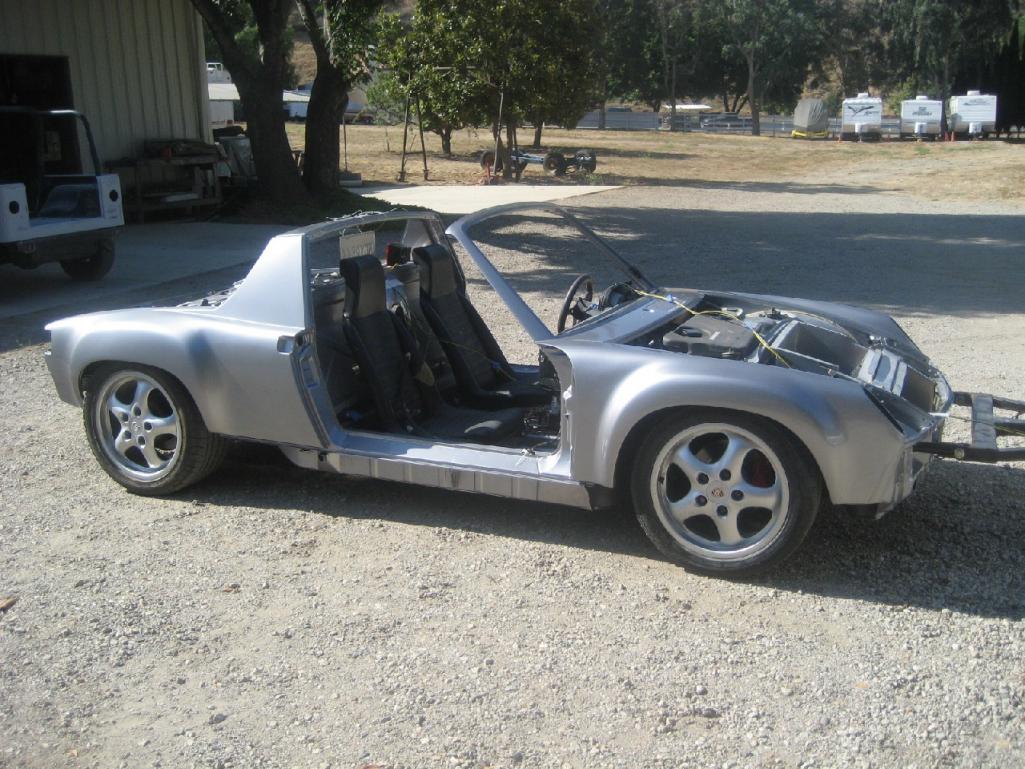 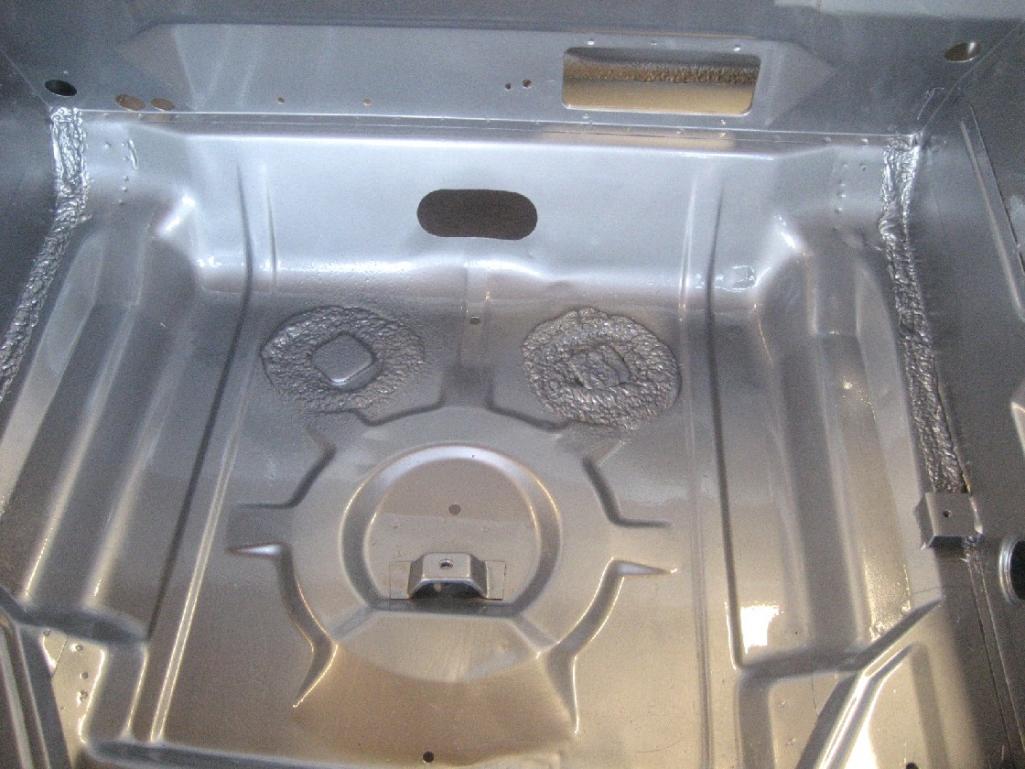 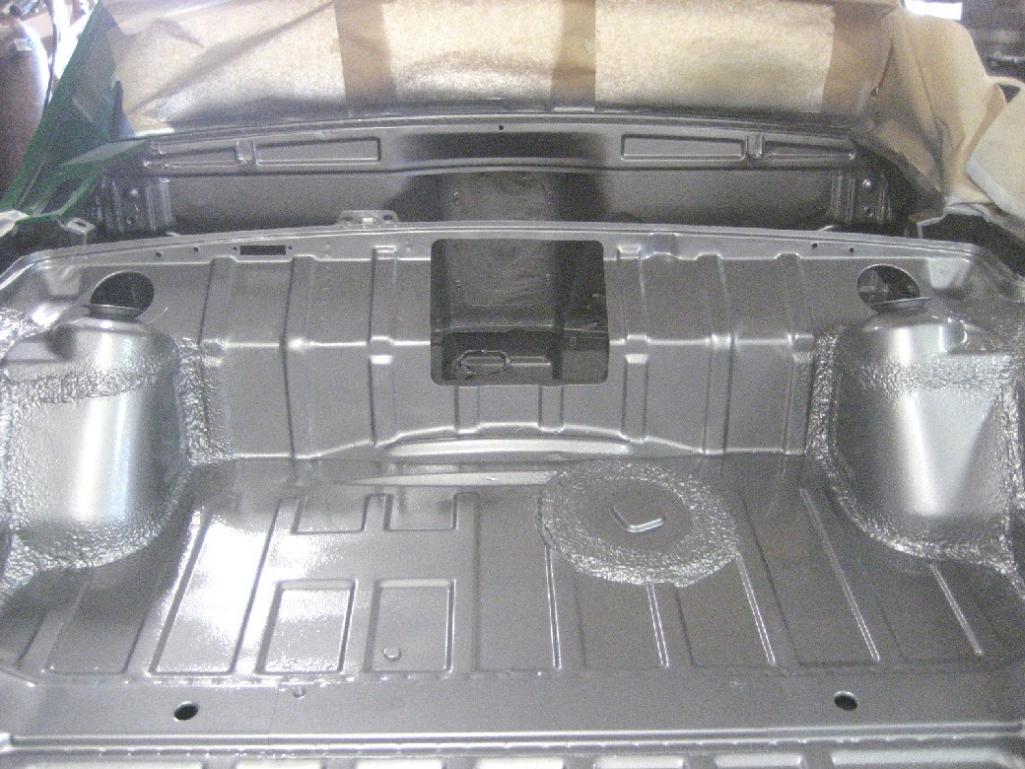 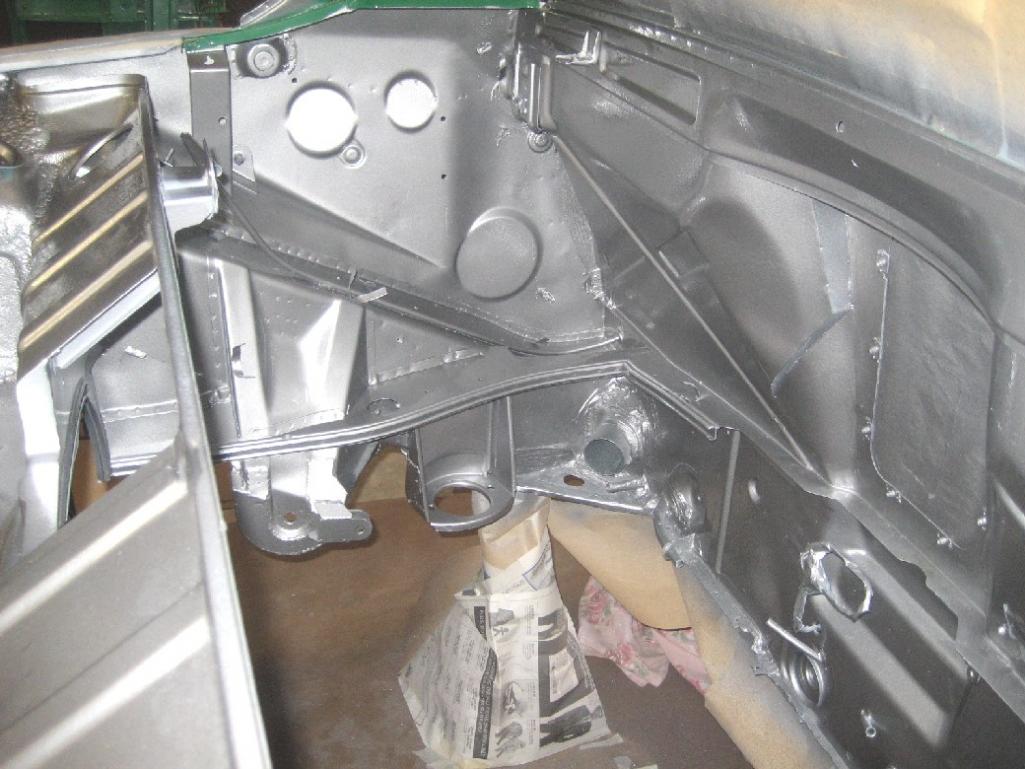 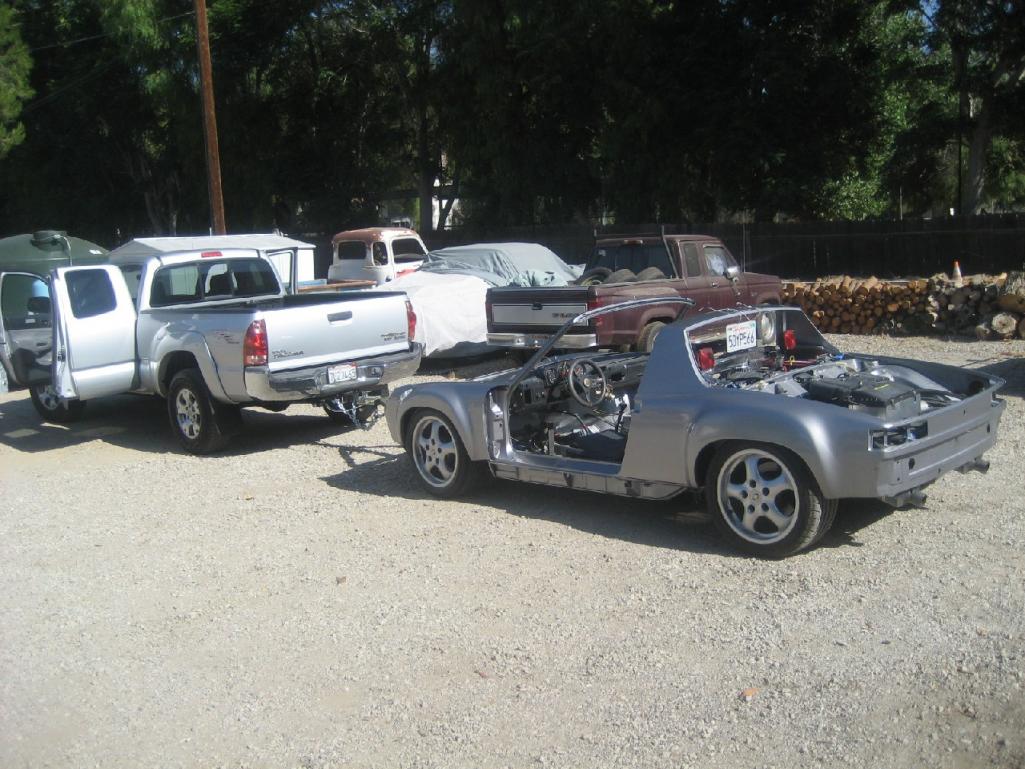
|
|
|
|
| andys |
Apr 11 2013, 12:20 PM
Post
#74
|
|
Advanced Member Group: Members Posts: 2,165 Joined: 21-May 03 From: Valencia, CA Member No.: 721 Region Association: None |
Thought I'd take y'all through the AC system. I posted some of these photos before in answer to another thread, but hopefully these will provide more info.
I bought a Hot Rod Air under dash evaporator based on it's compatability with my existing LS1 variable volume compressor. Vintage air claims their system is not compatible with this copressor, therefore my decision. The Hot Rod Air evaporator includes heat, and has defrost. The Hot Rod Air guys were very helpful, however they apparently went out of business not long after I received the unt from them (IMG:style_emoticons/default/sad.gif) For the condensor, I bought a Vintage Air 12"x20". Since the LS1 PCM has the capability to control the AC, I decided to run a GM AC refrigerant pressure sensor rather than a trinary switch. The GM PCM controls the compressor cycling from the AC request signal output, turns on the radiator fans (and truns them off over 40 MPH), and of course monitors the pressure. It turned out that the biggest challenge, was routing the refrigerant hoses. The 914 just doesn't give you many favorable options in this regard, so I did some serious head scratching and came up with the following. I really dislike the original 914 dealer installed hose routing where they punch holes through inner fender panels ans such, so I went in another direction. The first decision was to use reduced diameter barrier hose, which as the name implys, its diameter is smaller that the standard hose of the same size. Though the fittings are less common, the smaller diameter hose made the routing much nicer. Starting at the compressor, I routed the -8 pressure and -10 suction hoses through the engine firewall and into the lower right passenger side using bulkhead fittings. The hoses run under the engine shelf, pass through the firewall, then with 90 degree ported fittings, the hoses sweep downward and run along the floor where it meets the long in the cabin. You'll see in the photos how the ported fittings intrude into the cabin behind the seat. To keep the seat from crashing into the fittings, I made some seat stops in the seat rails. I only needed to shorten the seat travel by 7/8", so it is really un-noticable. I painted the fittings flat black, so they go un-noticed (and they're behind the seat anyway). Held in place with Adel clamps, the hoses run forward; the -10 to the evaporator, and the -8 forward through the lower floorboard bulkhead, under the fuel tank, through the front trunk blukhead, and on to the condensor. The -6 high pressure hose runs from the condensor to the drier. The GM refrigerant pressure sensor is attached to one of the un-used drier ports using an adapter. From the drier, the -6 hose parallels the -10 hose under the fuel tank and through the floorboard and to the evaporator. By running the hoses along the floor and long joint, once the carpet is in place, it is completely un-noticable. Back at the compressor, I had to get a custom compressor block made such that the hoses would point in the most favorable direction; that was a tough one, as there's so little room to route the hoses effectively away from the headers and keep from abrading against the chassis. I also made a heat shield between the header and the compressor.The custom compressor block was made by Doc's Blocks (Stark Mfg), which would make anything custom from your drawing but unfortunately they've changed thier business model and no longer do custom work and sell only through distributors.....This is really too bad, as they were a fantastic resource up until that time....and their prices were great! For the heat function, I ran two -8 hoses through the passenger side heater duct. I first wrapped them with extra thick electricians tape to help guard against any incidental abrasion. I added 1/2" (-8) x 5/8" adapters on heater core side which made things less tidy than I would have liked, but they're hidden out of sight anyway. The heater (hot water) control valve (HCV) is in the engine compartment. The LS1 heater water flow system logic is such that the HCV is normally open with the engine off (no vauum), but once the motor is started, the vacuum closes the HCV. This requires a different approach to the vacuum switching valve (VSV). You need a VSV that is normally open until heat is requested at which point the VCV closes and vents the NO side which allows the HCV to open. I found a VSV from a Toyota (NAPA P/N: CRB 226873) that had the appropriate logic, so all is good. For a vacuume source, I ran some 1/8" nylon vacuum tubing from the motor to the VSV through the center tunnel, then from the VSV back to the HCV. The nylon tubing is small and easy to route. As always, please ask. Attached thumbnail(s)   Attached image(s) 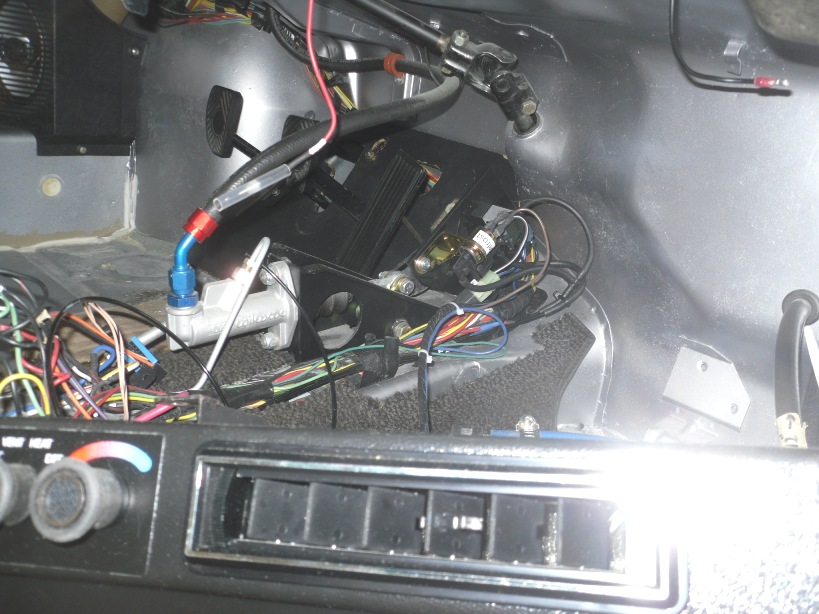 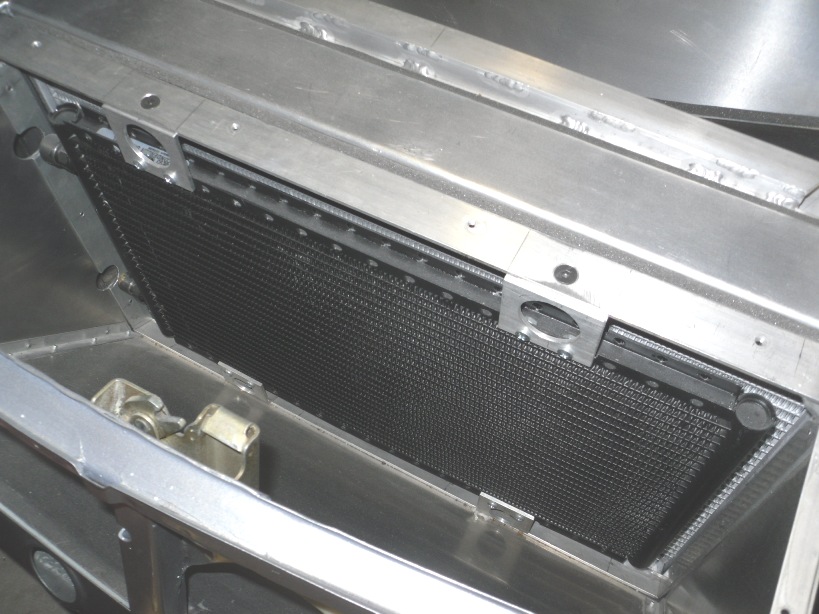 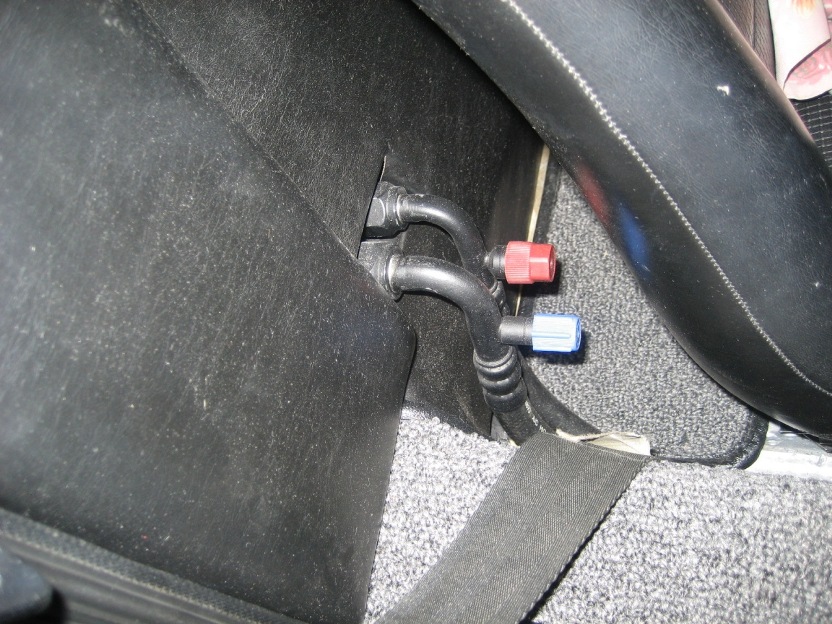 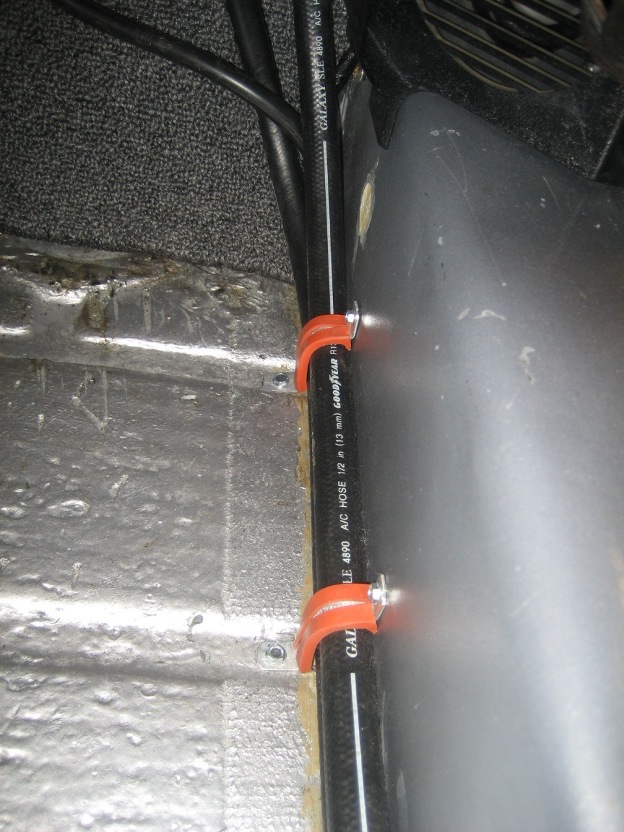 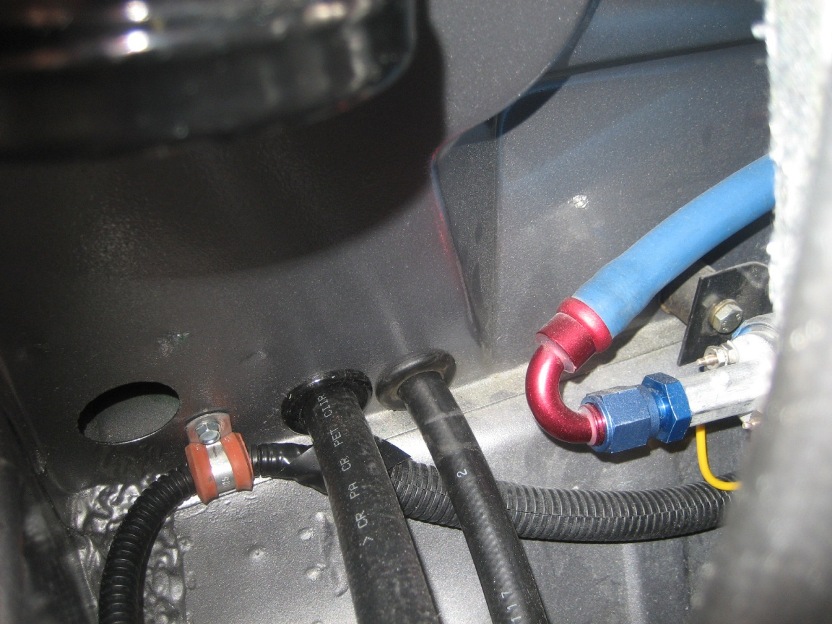 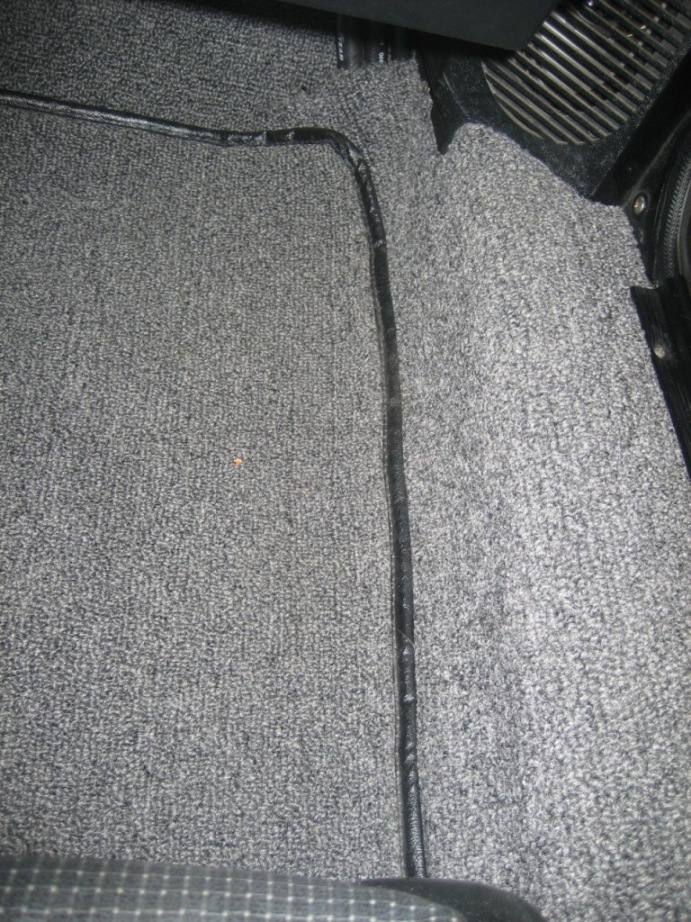
|
|
|
|
| drive-ability |
Oct 7 2013, 11:26 PM
Post
#75
|
|
Senior Member Group: Members Posts: 1,169 Joined: 18-March 05 From: Orange County, California Member No.: 3,782 |
Andy,
That car looks fantastic ! My last (black with the 930 trans) was OK but I really hope to move up and build a car as you have. Just say the word and I'll drive up and go for a ride (IMG:style_emoticons/default/piratenanner.gif) P.S. sent you a P.M. through the other forum ! |
|
|
|
| andys |
Oct 8 2013, 01:45 PM
Post
#76
|
|
Advanced Member Group: Members Posts: 2,165 Joined: 21-May 03 From: Valencia, CA Member No.: 721 Region Association: None |
QUOTE(drive-ability @ Oct 7 2013, 10:26 PM) Andy, That car looks fantastic ! My last (black with the 930 trans) was OK but I really hope to move up and build a car as you have. Just say the word and I'll drive up and go for a ride (IMG:style_emoticons/default/piratenanner.gif) P.S. sent you a P.M. through the other forum ! Well, you're certainly welcome anytime. The car at the moment, is on jack stands (non mechanical) for easier access to fix the front spoiler that I snagged on the dreaded driveway at the G&R. BTW, I just might go to the next G&R comming up soon. You? Check you PM's on the other forum. Andy |
|
|
|
| 914forme |
Oct 8 2013, 06:35 PM
Post
#77
|
|
Times a wastin', get wrenchin'! Group: Members Posts: 3,896 Joined: 24-July 04 From: Dayton, Ohio Member No.: 2,388 Region Association: None |
Okay, I know your not to it in your story but I know its been built. (IMG:style_emoticons/default/happy11.gif) Do tell about the hydraulic clutch setup!! Just like all the other details it looks like a nice solution to not redoing the footwell area.
(IMG:style_emoticons/default/popcorn[1].gif) I can't wait for more. |
|
|
|
| 914forme |
Oct 8 2013, 06:35 PM
Post
#78
|
|
Times a wastin', get wrenchin'! Group: Members Posts: 3,896 Joined: 24-July 04 From: Dayton, Ohio Member No.: 2,388 Region Association: None |
double post- sorry
|
|
|
|
| andys |
Oct 9 2013, 10:10 AM
Post
#79
|
|
Advanced Member Group: Members Posts: 2,165 Joined: 21-May 03 From: Valencia, CA Member No.: 721 Region Association: None |
QUOTE(914forme @ Oct 8 2013, 05:35 PM) Okay, I know your not to it in your story but I know its been built. (IMG:style_emoticons/default/happy11.gif) Do tell about the hydraulic clutch setup!! Just like all the other details it looks like a nice solution to not redoing the footwell area. (IMG:style_emoticons/default/popcorn[1].gif) I can't wait for more. Stephan, I see that I didn't post any detail photos of the hydraulic clutch set up you ask about, so here you go. Brief description: I used a 3/4" Wilwood clutch master with a remote reservoir placed next to the brake reservoir. I mounted the clutch master on a bracket with a bellcrank to reverse the throw. The bellcrank has a rod with heim's that couple to the original clutch lever (slightly modified for double shear). I removed the original spiral spring, and replaced it with one from McMaster-Carr that is wound in the reverse direction so that the clutch pedal is now sprung so it returns to the up position. The clutch master (and shifter, etc.) is hidden by the center console. One photo shows the slave on the trans. Please ask if you don't see. Andys Attached thumbnail(s) 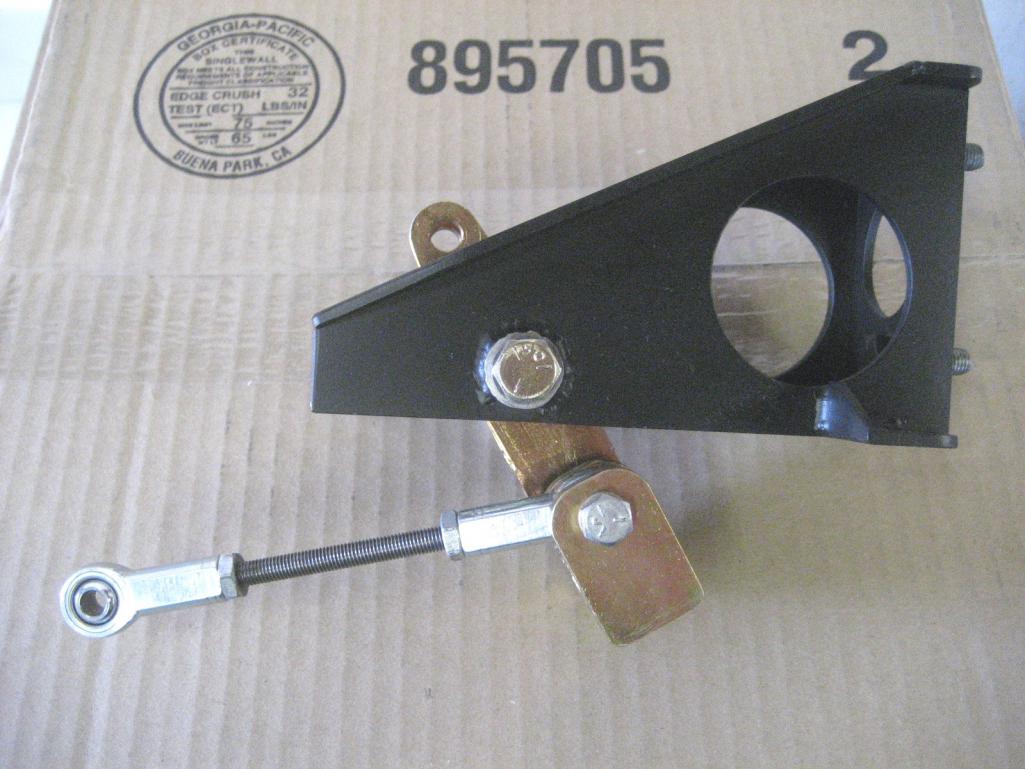 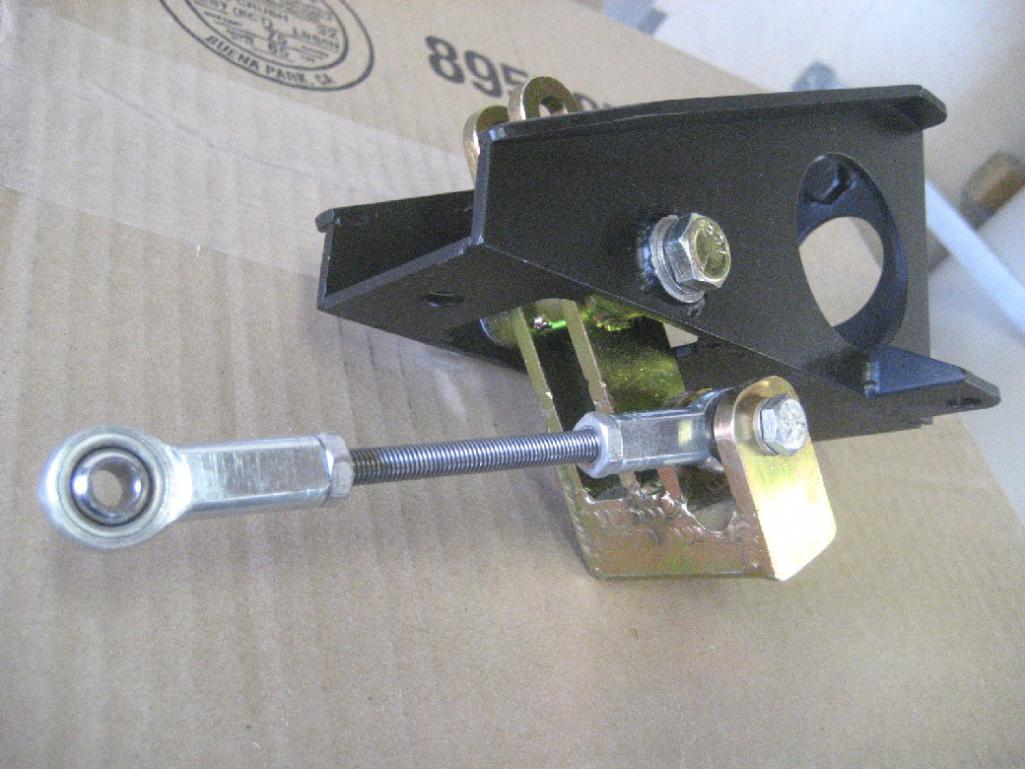 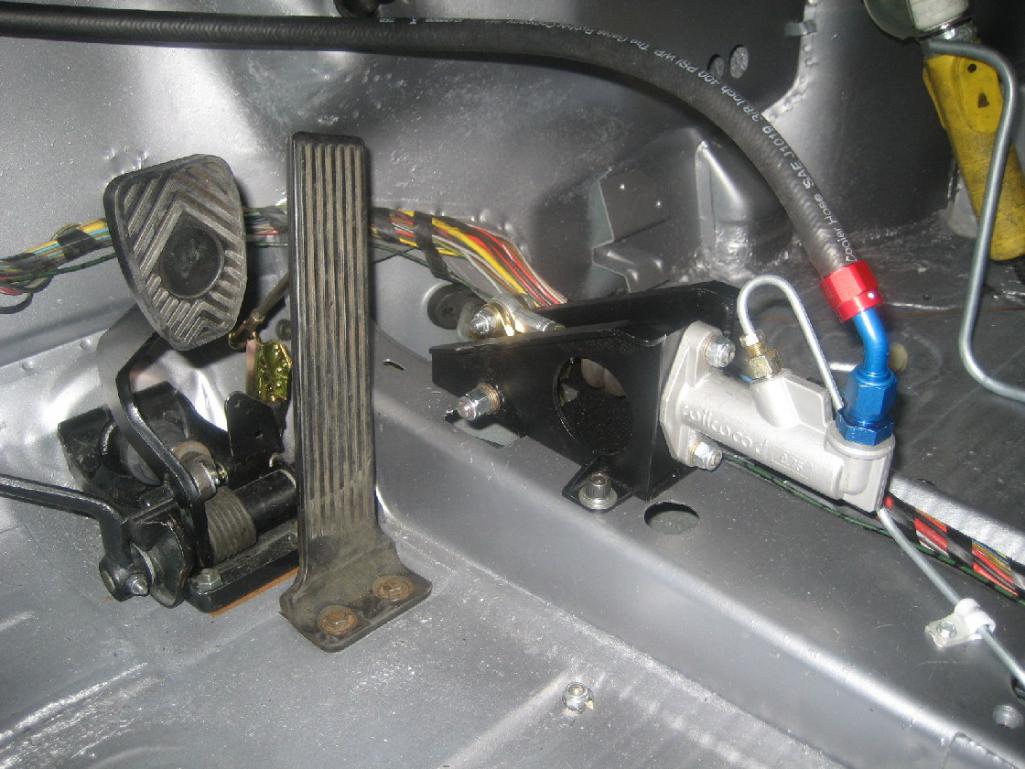 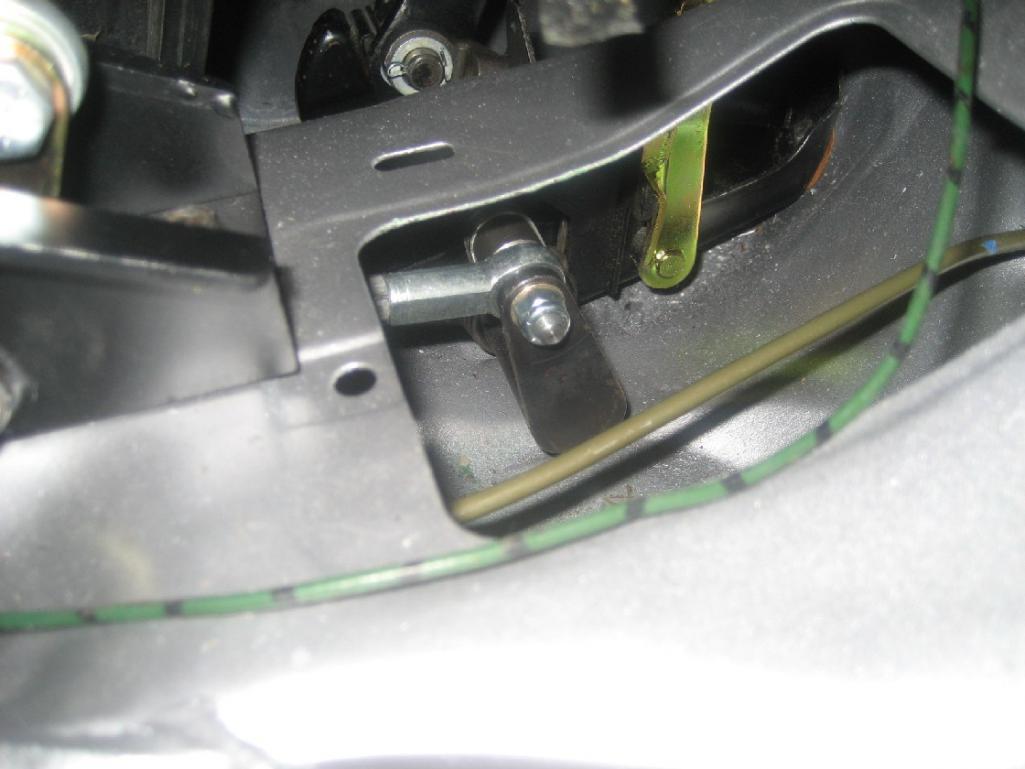 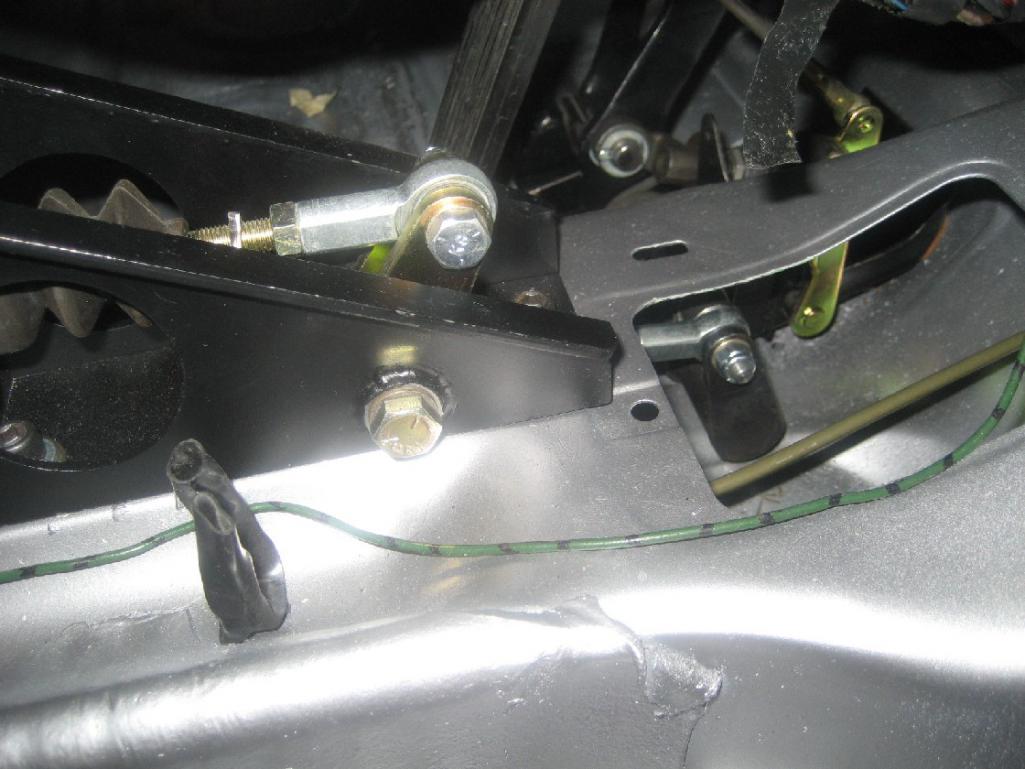 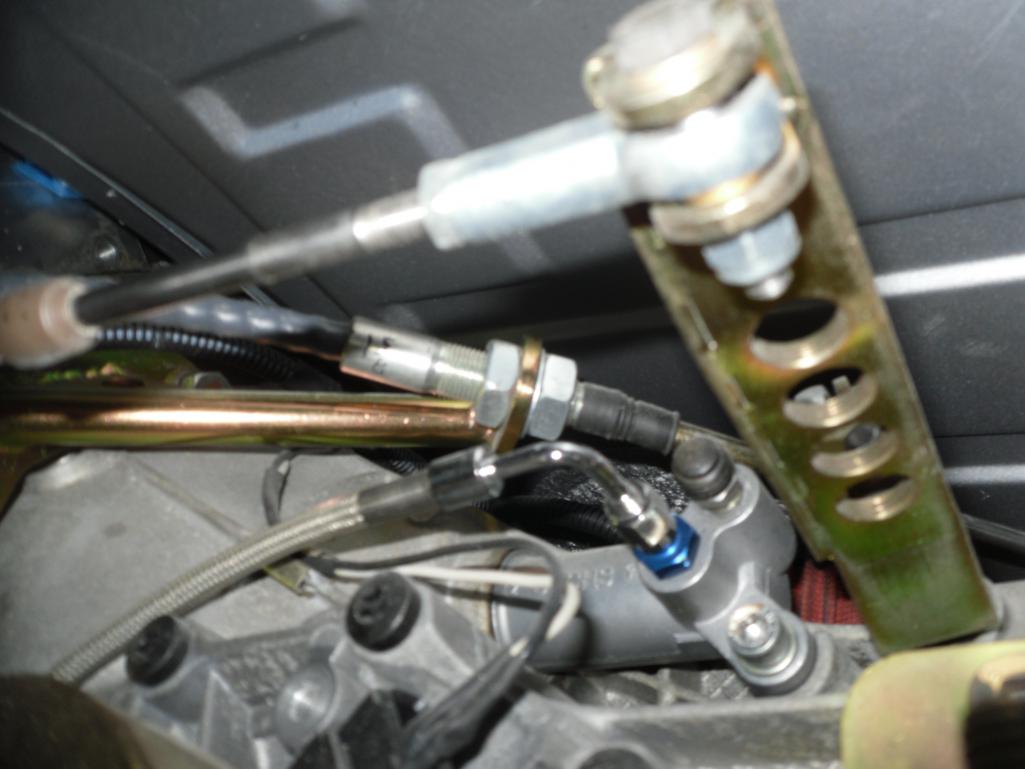 Attached image(s) 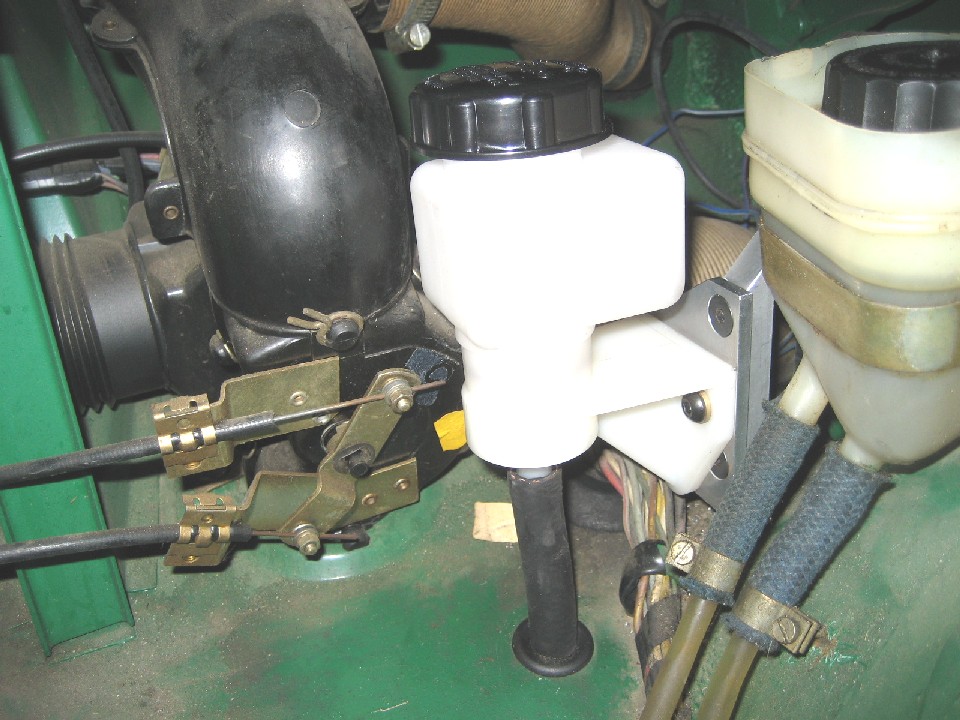 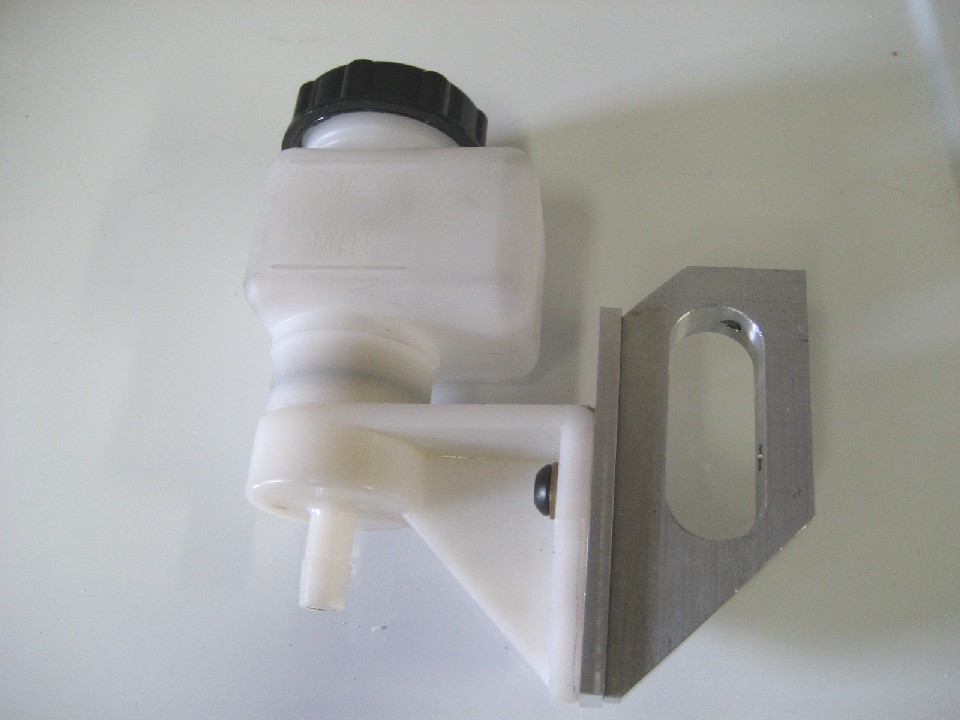
|
|
|
|
| 914forme |
Oct 9 2013, 01:00 PM
Post
#80
|
|
Times a wastin', get wrenchin'! Group: Members Posts: 3,896 Joined: 24-July 04 From: Dayton, Ohio Member No.: 2,388 Region Association: None |
Thank you sir that is absolutely brilliant, and I am going to steal your idea, modify it a little to fit my build. (IMG:style_emoticons/default/pray.gif) Thank you for sharing. (IMG:style_emoticons/default/beerchug.gif)
|
|
|
|
|
1 User(s) are reading this topic (1 Guests and 0 Anonymous Users)
0 Members:

|
Lo-Fi Version | Time is now: 1st May 2024 - 11:57 AM |
Invision Power Board
v9.1.4 © 2024 IPS, Inc.