|
|

|
Porsche, and the Porsche crest are registered trademarks of Dr. Ing. h.c. F. Porsche AG.
This site is not affiliated with Porsche in any way. Its only purpose is to provide an online forum for car enthusiasts. All other trademarks are property of their respective owners. |
|
|
  |
| Curbandgutter |
 Aug 25 2018, 02:05 PM Aug 25 2018, 02:05 PM
Post
#461
|
|
Senior Member    Group: Members Posts: 566 Joined: 8-March 13 From: Murrieta CA Member No.: 15,637 Region Association: Southern California 
|
would you happen to have more pictures of that flare widening? I searched your name and widen flares and did not come up with what I was looking for. I have a collection of pics in my office computer showing more details. I don't recall if I ever posted more of them on the forum. Just checked my facebook company page but only a couple incidental pics of that car in the timeline photos. @chrisfoley I would appreciate it if you could post up a bunch of those pictures to get an idea of how you did it. |
| mepstein |
 Aug 25 2018, 02:20 PM Aug 25 2018, 02:20 PM
Post
#462
|
|
914-6 GT in waiting                Group: Members Posts: 20,242 Joined: 19-September 09 From: Landenberg, PA/Wilmington, DE Member No.: 10,825 Region Association: MidAtlantic Region 
|
Attached image(s) 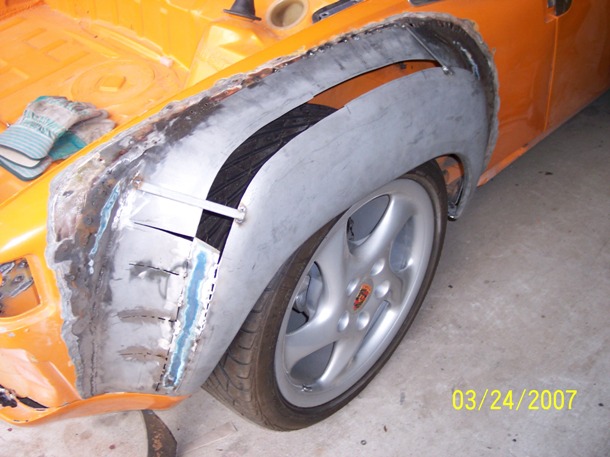 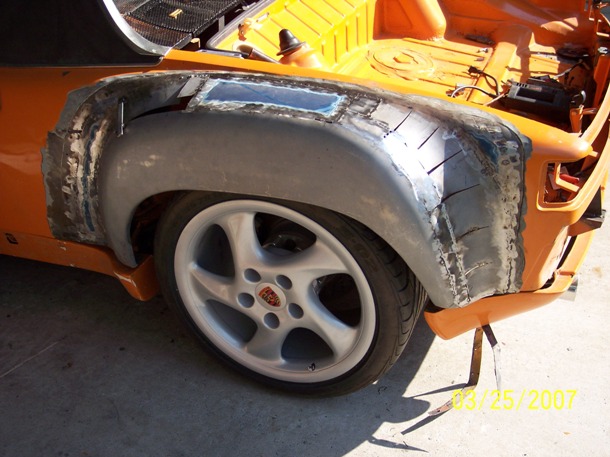
|
| Curbandgutter |
 Aug 25 2018, 03:14 PM Aug 25 2018, 03:14 PM
Post
#463
|
|
Senior Member    Group: Members Posts: 566 Joined: 8-March 13 From: Murrieta CA Member No.: 15,637 Region Association: Southern California 
|
|
| ChrisFoley |
 Aug 25 2018, 03:45 PM Aug 25 2018, 03:45 PM
Post
#464
|
|
I am Tangerine Racing      Group: Members Posts: 8,016 Joined: 29-January 03 From: Bolton, CT Member No.: 209 Region Association: None 
|
I went thru all my pics. Most of the work is undocumented.
The process started with cutting off some crappy custom flares that had really thick bondo to make them smooth. Then I carefully butt welded the AA GT flares in place and hammered the weld seams smooth. Next I chose a cut line just inside the curved edge. The location was chosen so I could shrink the edge of the removed piece to match the new shape. Then, using a modified palm nailer, I hammered the shit out of the part left on the car to raise up the top so the wheel opening would end up at the same height as on the stock flare, and I smoothed all the surfaces with hammer and dolly. The front and rear edges were curved outward to create a smooth shape that would line up with the reworked edge of the removed piece. After many hours of reshaping the loose edge I was satisfied with the transition and clecoed the loose section in place with some small pieces of sheet metal to bridge the gap. This is the point where I started taking pictures. 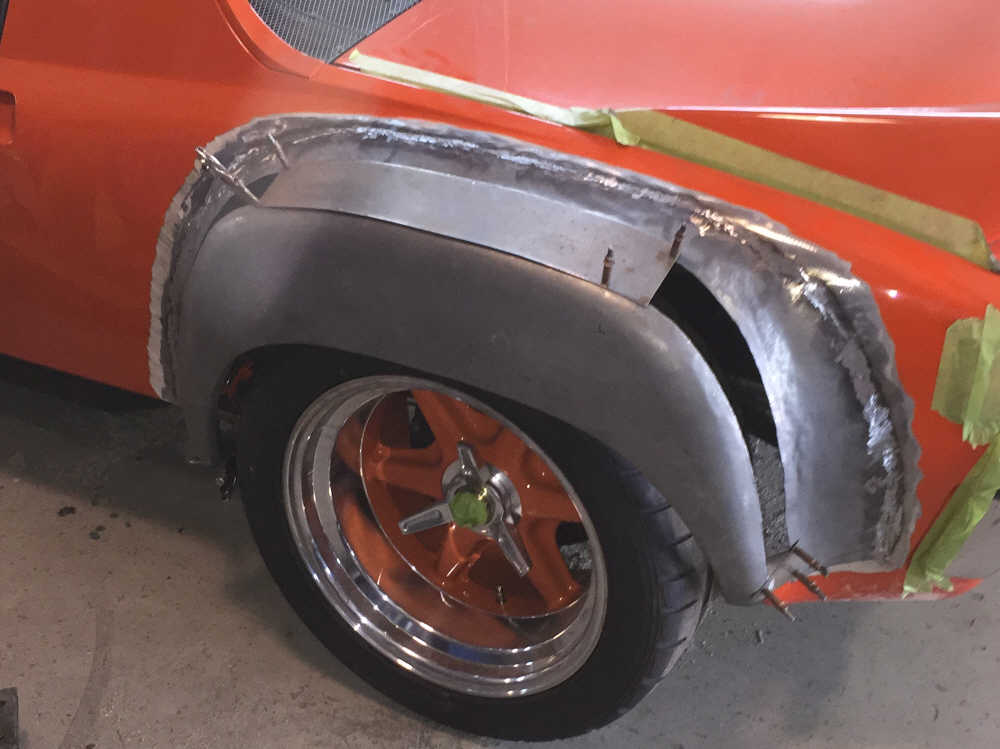 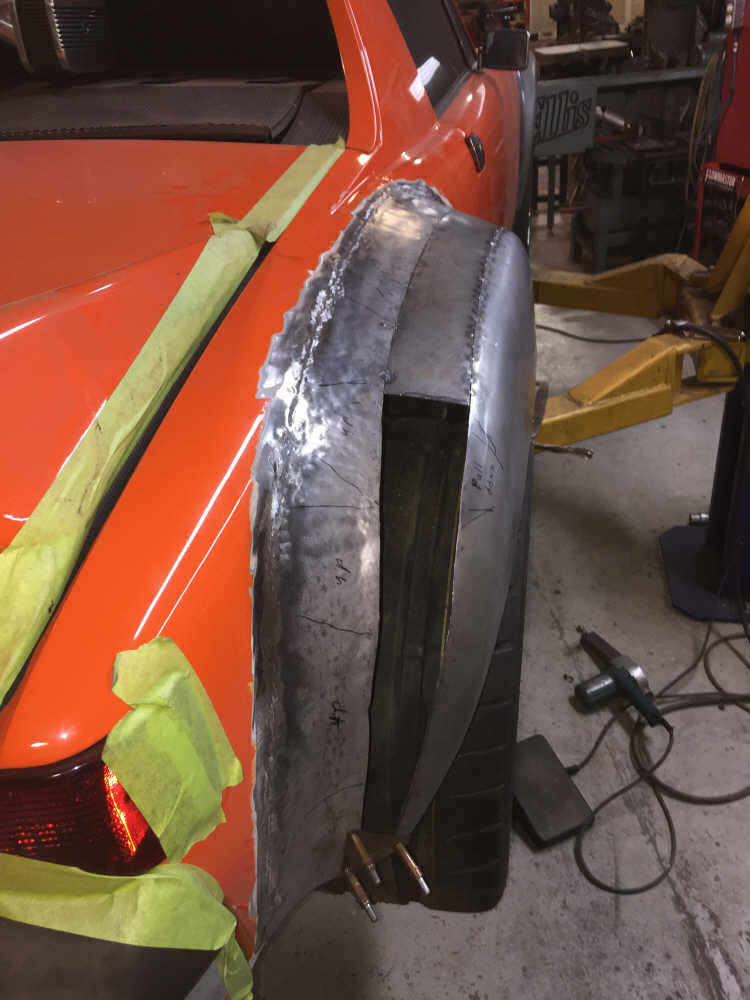 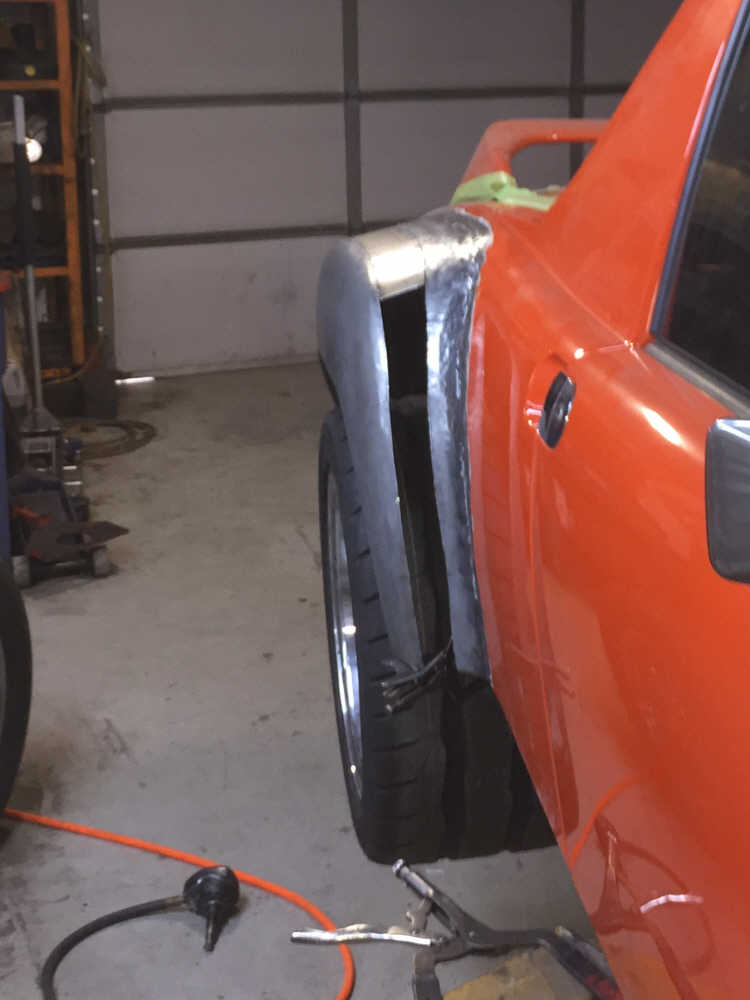 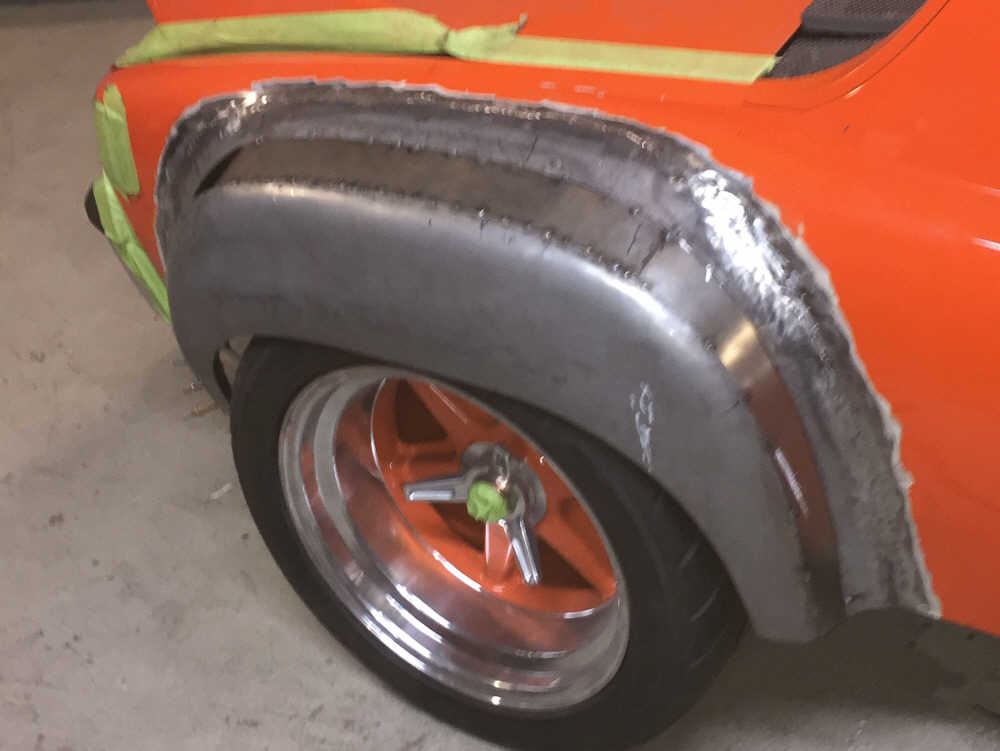 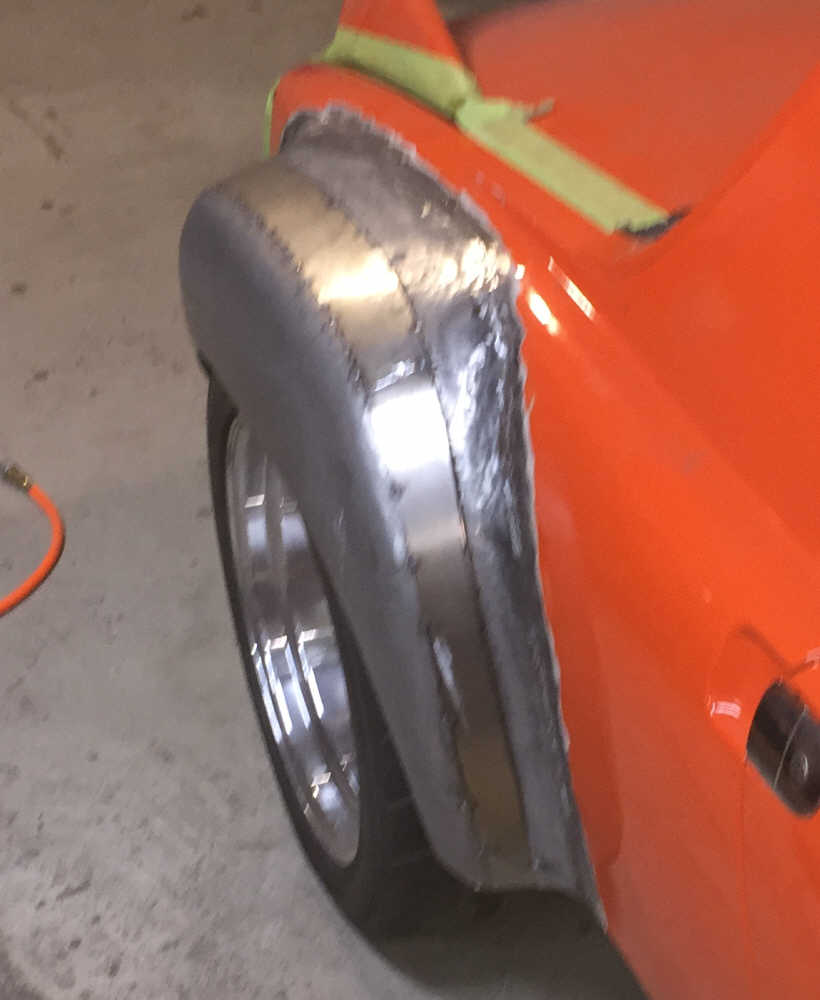 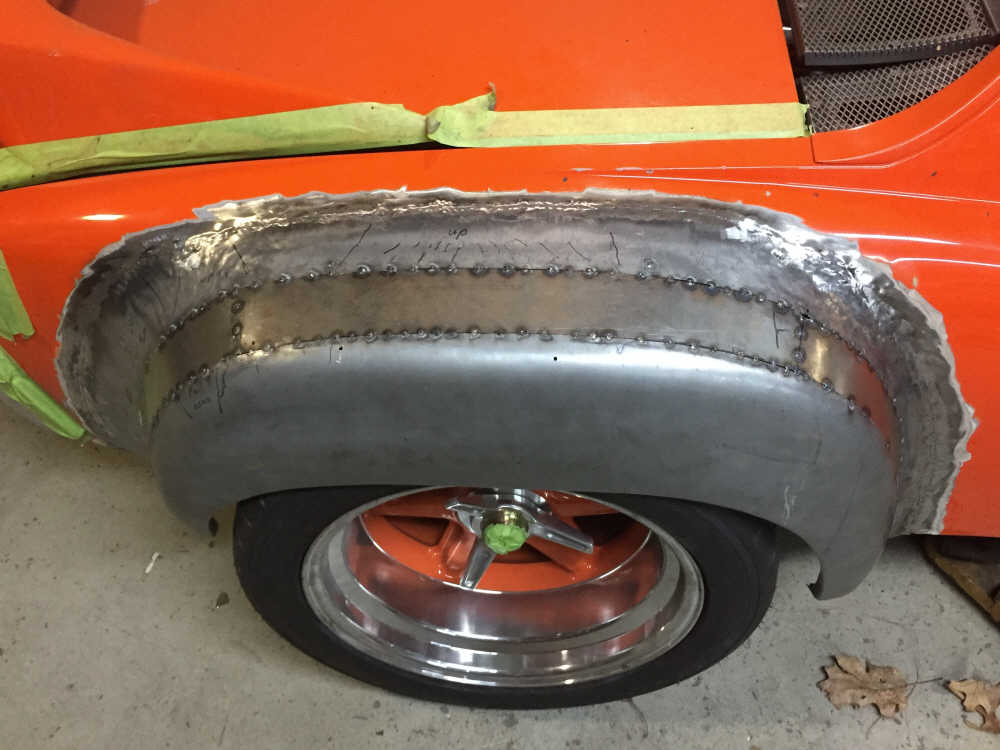 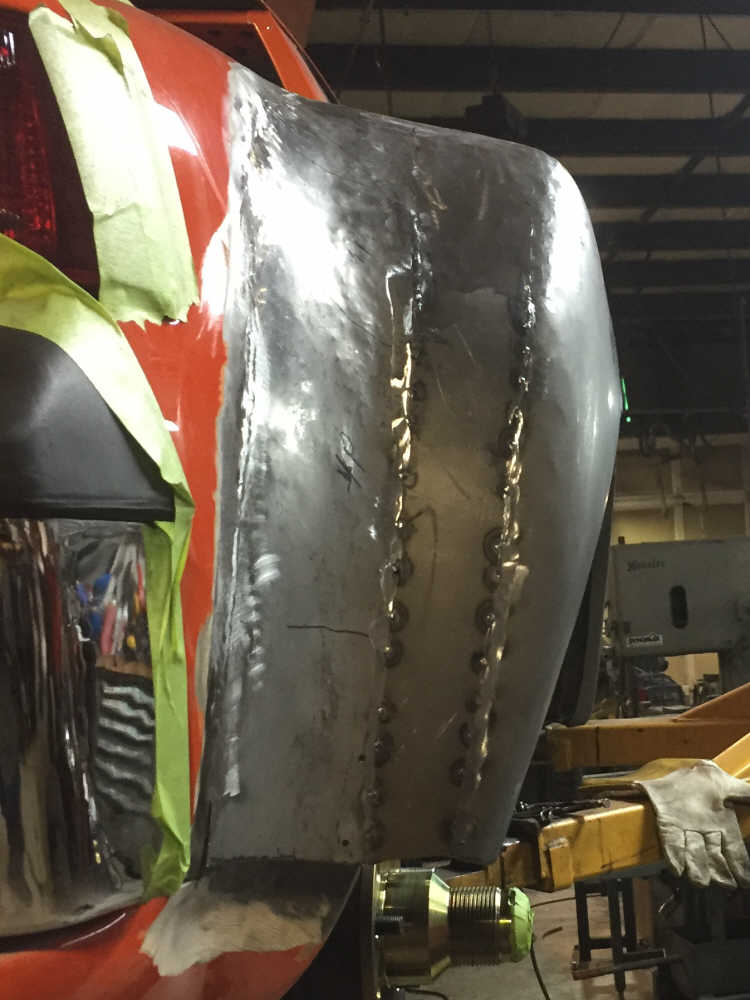 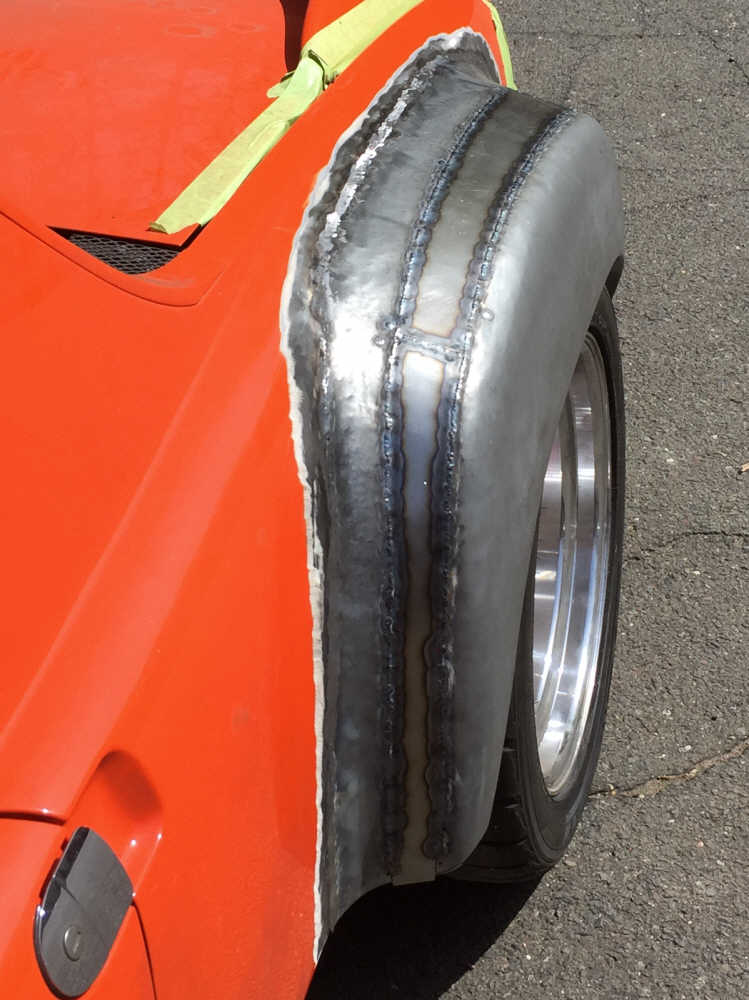 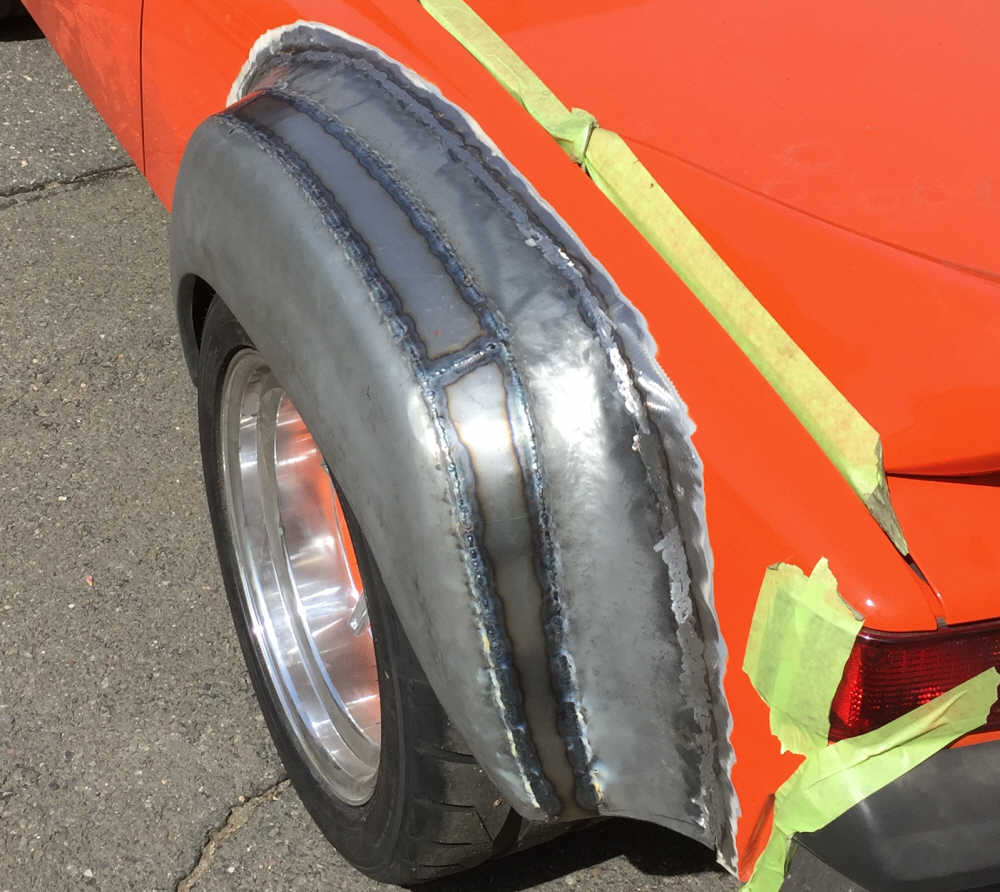 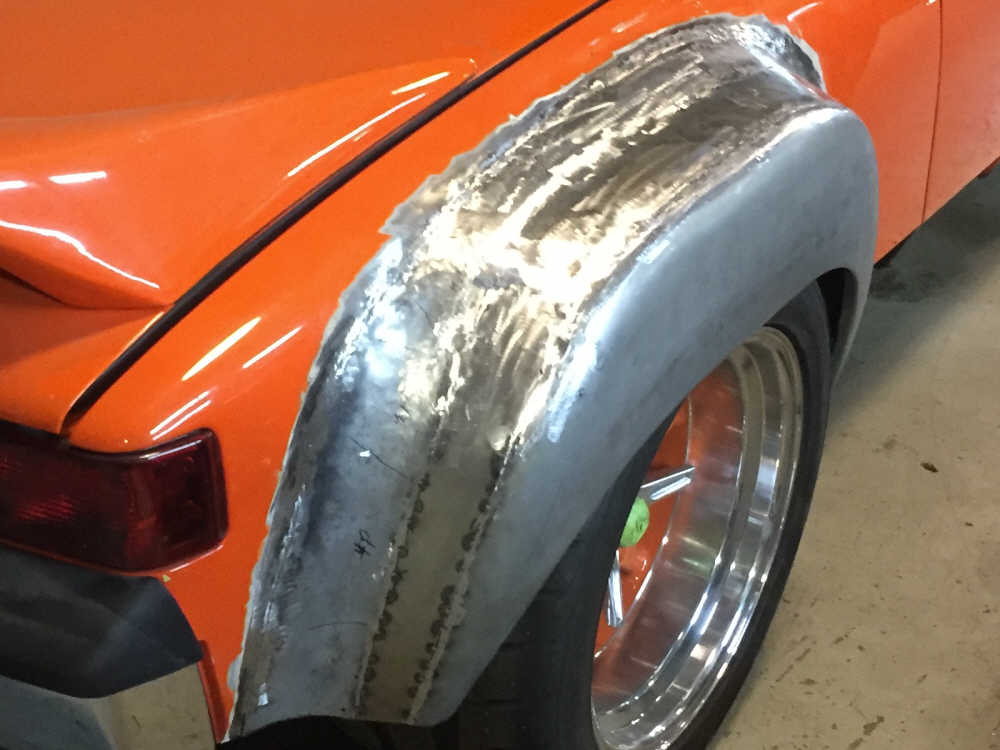 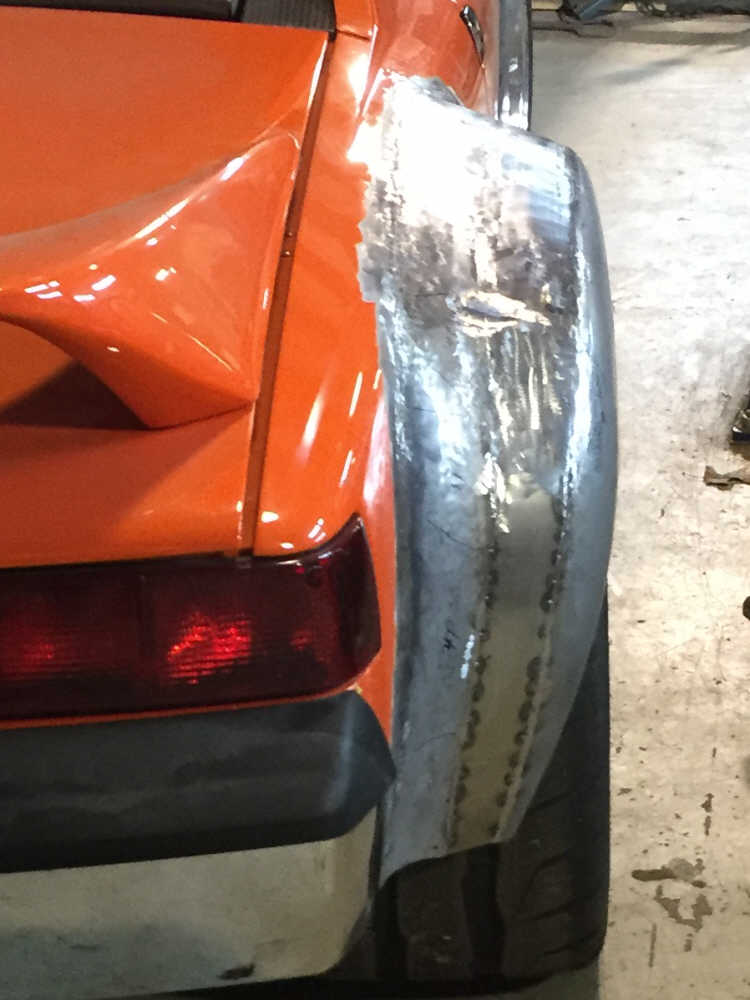 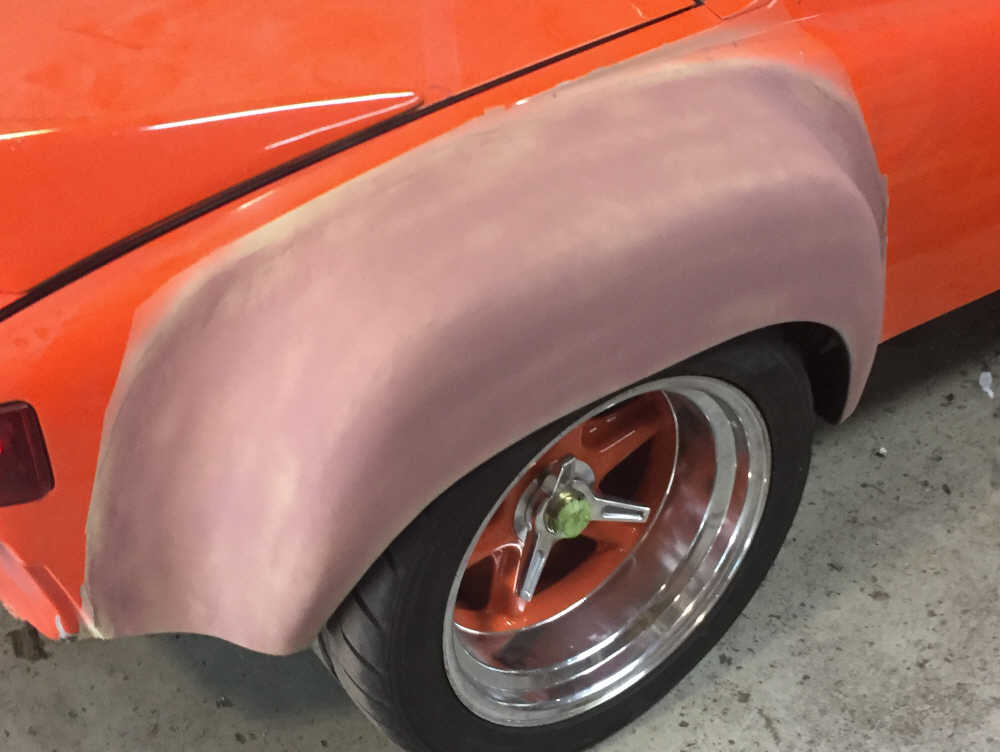 |
| Curbandgutter |
 Aug 25 2018, 05:31 PM Aug 25 2018, 05:31 PM
Post
#465
|
|
Senior Member    Group: Members Posts: 566 Joined: 8-March 13 From: Murrieta CA Member No.: 15,637 Region Association: Southern California 
|
Thank you @chrisfoley this is super helpful
|
| Curbandgutter |
 Aug 29 2018, 12:23 PM Aug 29 2018, 12:23 PM
Post
#466
|
|
Senior Member    Group: Members Posts: 566 Joined: 8-March 13 From: Murrieta CA Member No.: 15,637 Region Association: Southern California 
|
Well I started to install the flares. I started with it upside down cause it makes it so much easier. I painted both mating surfaces with weld-thru-primer before welding. Notice the rear fender how it encroaches onto the rear tail light. That is because I stretched the wheel base 3". I like the way it is fitting. I will need to add about 6" to the rear flare and 5" to the front flare. I'm waiting for the new rims to come it before I do that though.
Attached thumbnail(s) 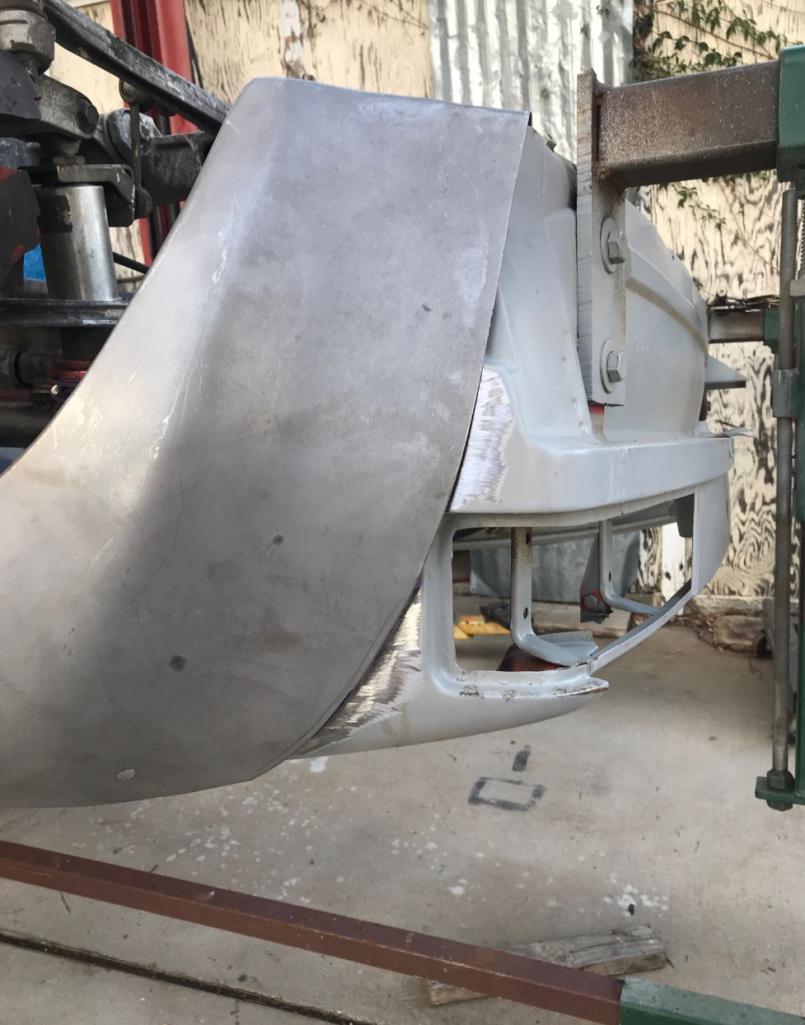 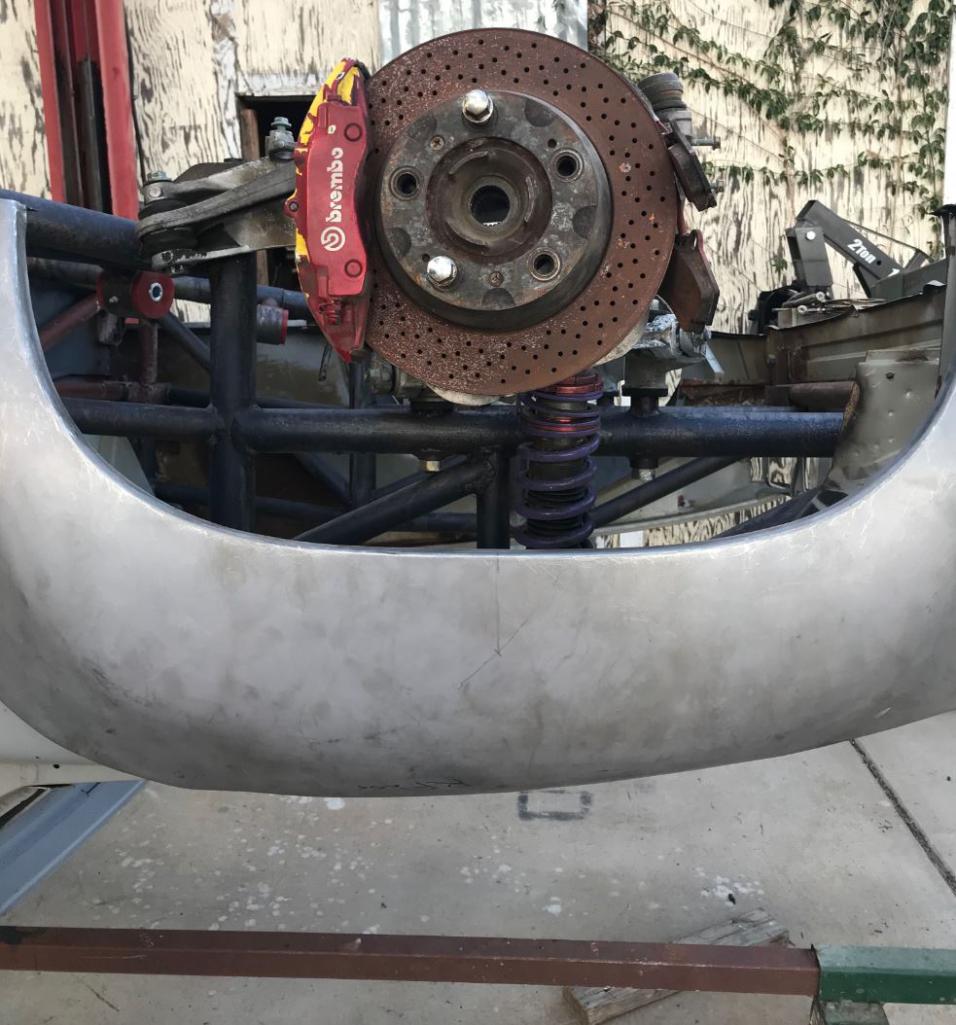 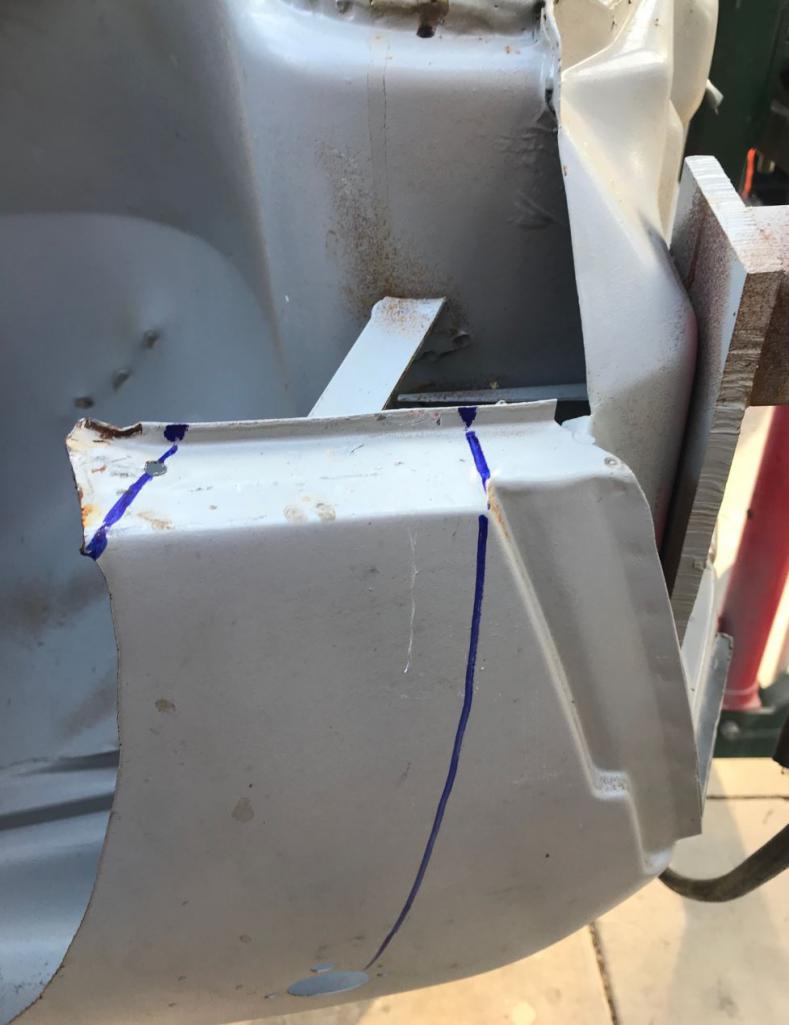 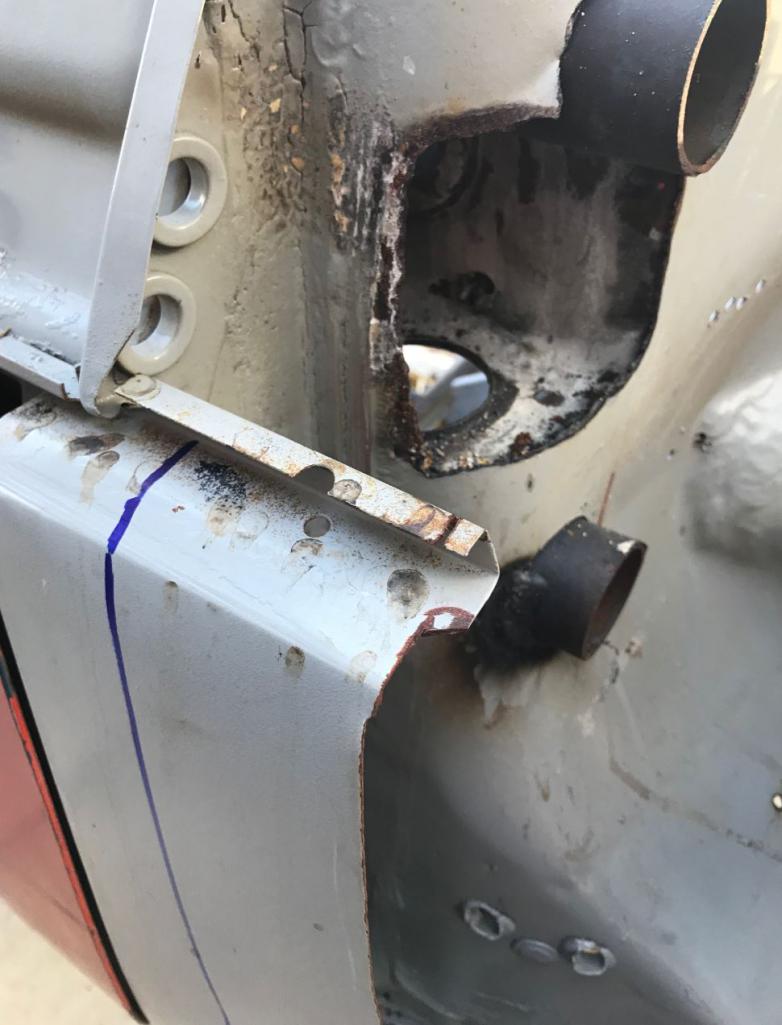 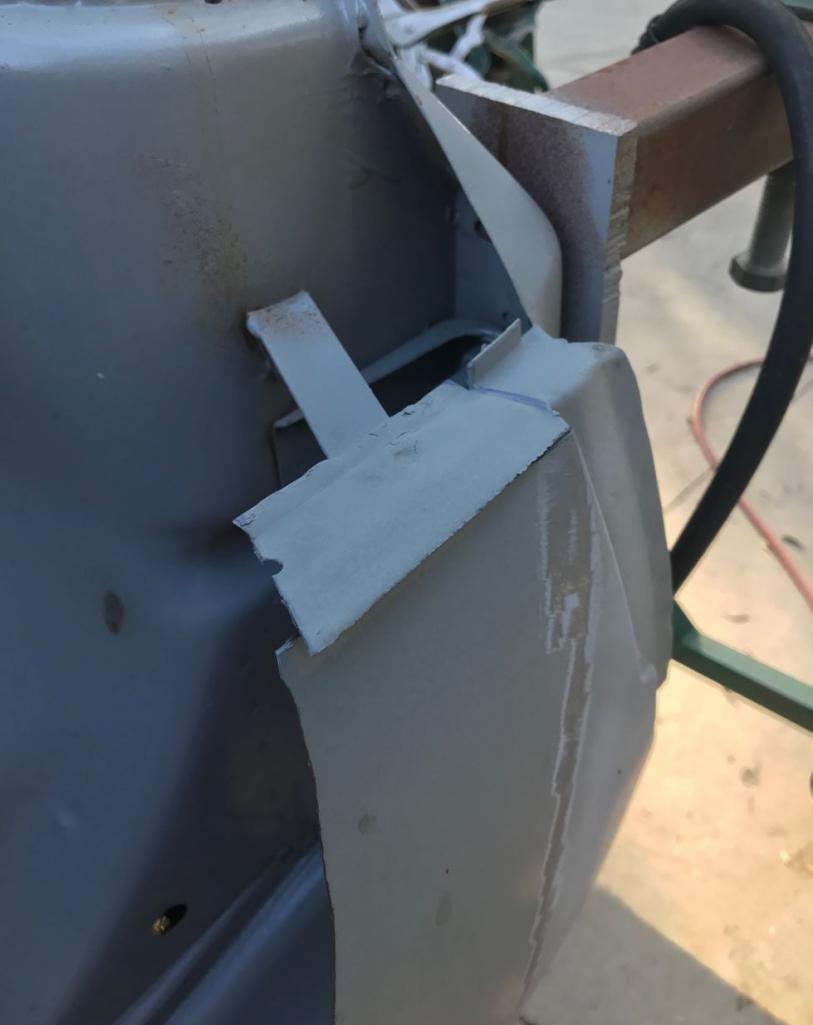 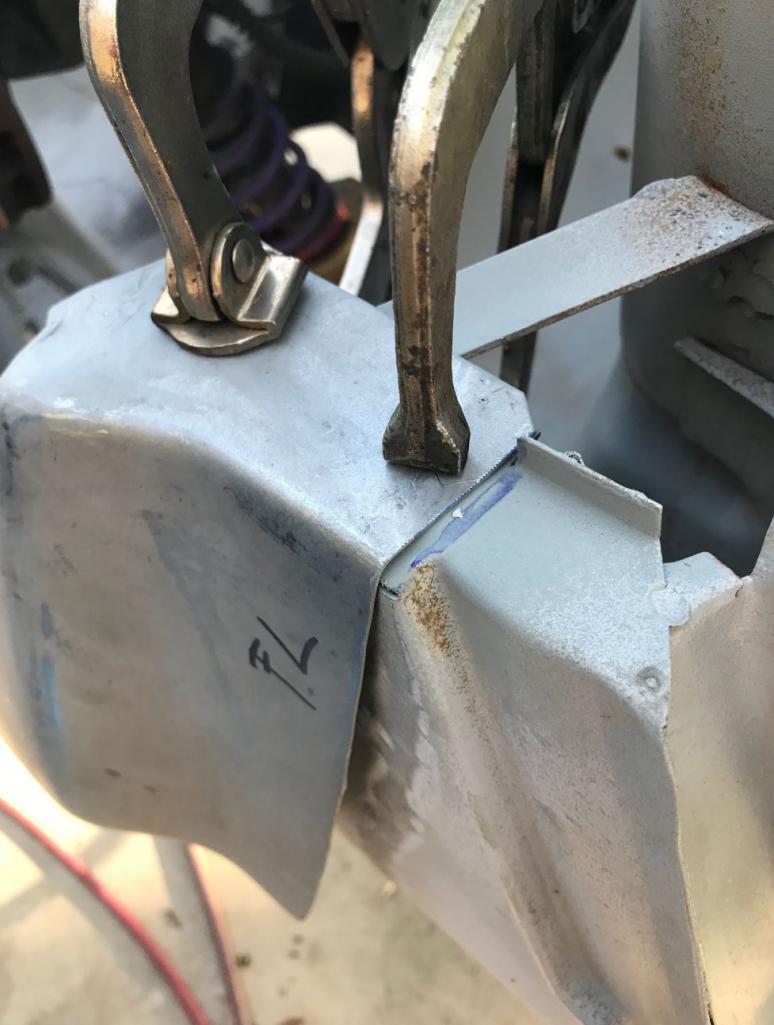 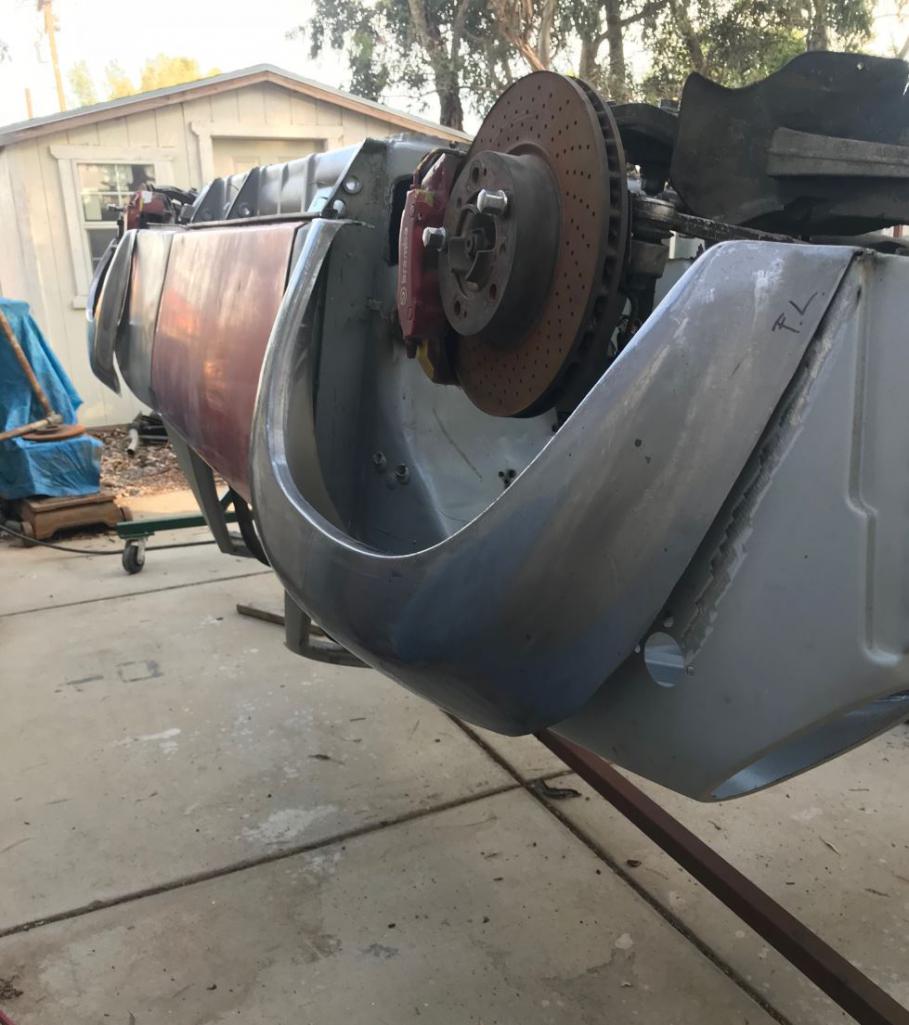
|
| ValcoOscar |
 Aug 29 2018, 12:51 PM Aug 29 2018, 12:51 PM
Post
#467
|
|
Garage Life     Group: Members Posts: 2,541 Joined: 19-November 13 From: SoCal Member No.: 16,669 Region Association: Southern California 

|
Wow Rudy...
That's Bad Ass. (IMG:style_emoticons/default/KMA.gif) For those who don't know the meaning. https://www.youtube.com/watch?v=RAGcDi0DRtU Enjoy !!! Oscar |
| Andyrew |
 Aug 29 2018, 01:08 PM Aug 29 2018, 01:08 PM
Post
#468
|
|
Spooling.... Please wait           Group: Members Posts: 13,380 Joined: 20-January 03 From: Riverbank, Ca Member No.: 172 Region Association: Northern California 
|
Im jealous of the fun metal fab work your going to do (IMG:style_emoticons/default/smile.gif)
However only 1 fender would be fun, 4 would be repetitious and boring (IMG:style_emoticons/default/tongue.gif) 6" extension of those flares is going to be substantial!!! |
| 914Toy |
 Aug 29 2018, 03:05 PM Aug 29 2018, 03:05 PM
Post
#469
|
|
Senior Member    Group: Members Posts: 746 Joined: 12-November 17 From: Laguna beach Member No.: 21,596 Region Association: Southern California 
|
Wow Rudy... That's Bad Ass. (IMG:style_emoticons/default/KMA.gif) For those who don't know the meaning. https://www.youtube.com/watch?v=RAGcDi0DRtU Enjoy !!! Oscar I did enjoy (IMG:style_emoticons/default/biggrin.gif) |
| Curbandgutter |
 Aug 29 2018, 03:20 PM Aug 29 2018, 03:20 PM
Post
#470
|
|
Senior Member    Group: Members Posts: 566 Joined: 8-March 13 From: Murrieta CA Member No.: 15,637 Region Association: Southern California 
|
Im jealous of the fun metal fab work your going to do (IMG:style_emoticons/default/smile.gif) However only 1 fender would be fun, 4 would be repetitious and boring (IMG:style_emoticons/default/tongue.gif) 6" extension of those flares is going to be substantial!!! Andy I hear you on that. The reason it's 6" is that the 996 hub to hub dimension is 5" wider than a 914. So, add to that the 335 tire on 12.5" rims and there are the ingredients for the wide rear. I think that it wont look too weird since I am adding an 18" wide radiator on each side within the quarter panel that will be taper to the interior about 12" from the face of the quarter panel. If I did not have that I would of put in some serious + offset on the 3-piece rim and tuck the meats inside. But I don't like the look of the meats tucked in. Yes there will be more aerodynamic drag on them....but I don't care, it will look downright mean. |
| Andyrew |
 Aug 29 2018, 04:07 PM Aug 29 2018, 04:07 PM
Post
#471
|
|
Spooling.... Please wait           Group: Members Posts: 13,380 Joined: 20-January 03 From: Riverbank, Ca Member No.: 172 Region Association: Northern California 
|
You might need a third cooler FYI. That 2.7 runs pretty hot. I would run an electric water pump so you can at least have as optimal cooling as possible (IMG:style_emoticons/default/smile.gif)
And your cars going to be awesome (IMG:style_emoticons/default/smile.gif) I just love everything about this build! |
| worn |
 Aug 29 2018, 05:29 PM Aug 29 2018, 05:29 PM
Post
#472
|
|
Winner of the Utah Twisted Joint Award     Group: Members Posts: 3,501 Joined: 3-June 11 From: Madison, WI Member No.: 13,152 Region Association: Upper MidWest 
|
Wow Rudy... That's Bad Ass. (IMG:style_emoticons/default/KMA.gif) For those who don't know the meaning. https://www.youtube.com/watch?v=RAGcDi0DRtU Enjoy !!! Oscar I am descended from Finns and now I am removed rom the thread pondering ass, or asses. Still, it looks like things are in good hands. |
| Curbandgutter |
 Aug 29 2018, 09:17 PM Aug 29 2018, 09:17 PM
Post
#473
|
|
Senior Member    Group: Members Posts: 566 Joined: 8-March 13 From: Murrieta CA Member No.: 15,637 Region Association: Southern California 
|
Wow Rudy... That's Bad Ass. (IMG:style_emoticons/default/KMA.gif) For those who don't know the meaning. https://www.youtube.com/watch?v=RAGcDi0DRtU Enjoy !!! Oscar Amazing how complex that word can be. |
| Curbandgutter |
 Sep 2 2018, 11:40 AM Sep 2 2018, 11:40 AM
Post
#474
|
|
Senior Member    Group: Members Posts: 566 Joined: 8-March 13 From: Murrieta CA Member No.: 15,637 Region Association: Southern California 
|
Hey guys I’m needing to borrow a sheet metal break for a couple of months. Does anyone have one that I can borrow or is someone willing to let theirs go on the cheap. Let me know.
|
| 76-914 |
 Sep 2 2018, 11:58 AM Sep 2 2018, 11:58 AM
Post
#475
|
|
Repeat Offender & Resident Subaru Antagonist           Group: Members Posts: 13,819 Joined: 23-January 09 From: Temecula, CA Member No.: 9,964 Region Association: Southern California 
|
Hey guys I’m needing to borrow a sheet metal break for a couple of months. Does anyone have one that I can borrow or is someone willing to let theirs go on the cheap. Let me know. I have a 24" or 30" brake. I forget which size it is. (IMG:style_emoticons/default/lol-2.gif) CPOS but it works. (IMG:style_emoticons/default/beerchug.gif) |
| Curbandgutter |
 Sep 2 2018, 03:20 PM Sep 2 2018, 03:20 PM
Post
#476
|
|
Senior Member    Group: Members Posts: 566 Joined: 8-March 13 From: Murrieta CA Member No.: 15,637 Region Association: Southern California 
|
Hey, guys, I’m needing to borrow a sheet metal break for a couple of months. Does anyone have one that I can borrow or is someone willing to let theirs go on the cheap? Let me know. I have a 24" or 30" brake. I forget which size it is. (IMG:style_emoticons/default/lol-2.gif) CPOS but it works. (IMG:style_emoticons/default/beerchug.gif) As long as the CPOS works....... (IMG:style_emoticons/default/smile.gif) I'll call you later this weekend. |
| Curbandgutter |
 Sep 4 2018, 09:32 AM Sep 4 2018, 09:32 AM
Post
#477
|
|
Senior Member    Group: Members Posts: 566 Joined: 8-March 13 From: Murrieta CA Member No.: 15,637 Region Association: Southern California 
|
Wow...love these panel clamps.
Attached thumbnail(s) 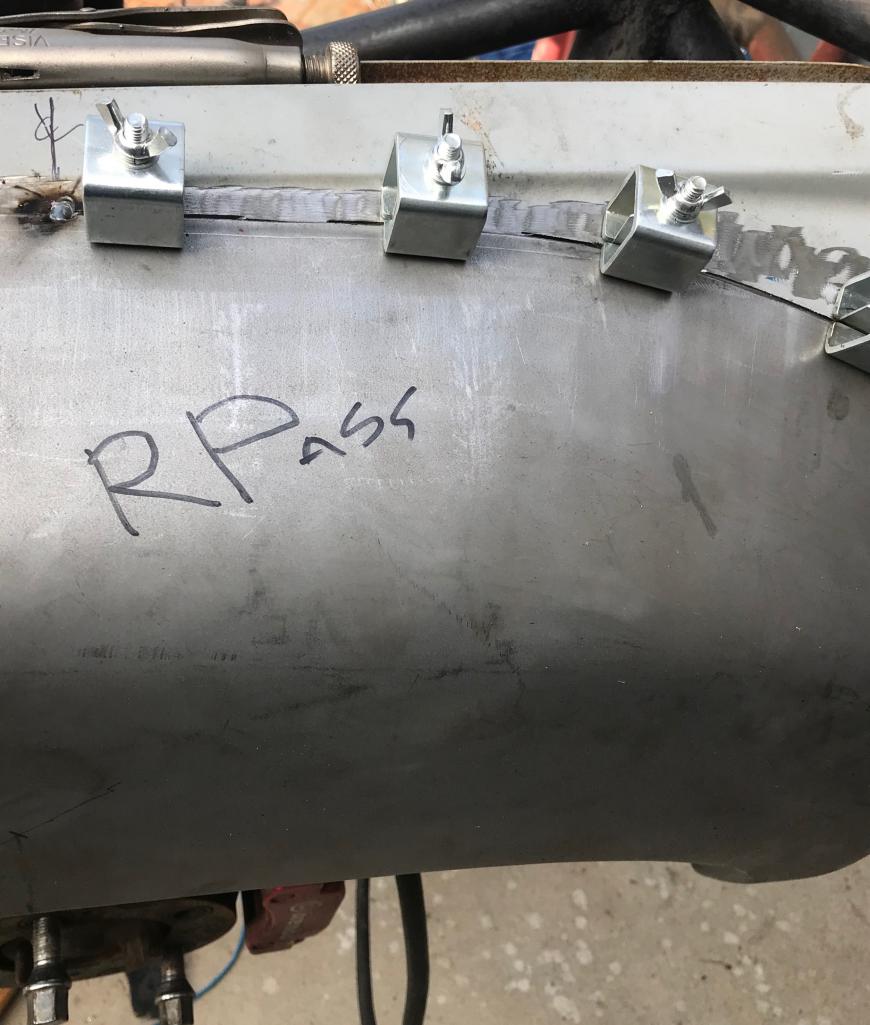
|
| Curbandgutter |
 Sep 7 2018, 11:09 AM Sep 7 2018, 11:09 AM
Post
#478
|
|
Senior Member    Group: Members Posts: 566 Joined: 8-March 13 From: Murrieta CA Member No.: 15,637 Region Association: Southern California 
|
Well I'm in the process of welding the fenders on. It takes me about 4 hours per fender. Here is how I did it.
First, flatten out the bottom lip of the existing fender. This is to give you a flat area with which to attach the new fender. At this time also cut the existing fender along the bottom edge. 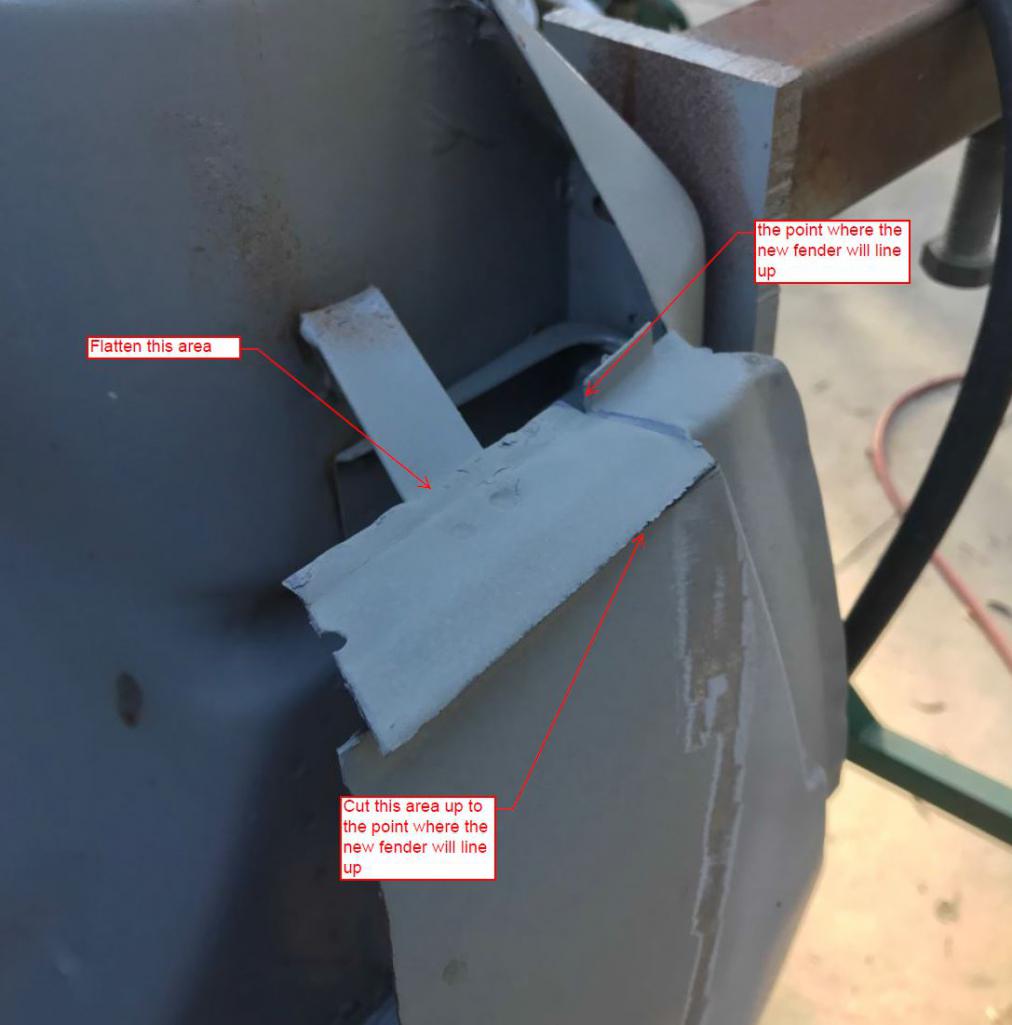 Then attach the fender to the two bottom lips and weld. Then tack weld along the top center of the fender. This will give you 3 points where it is attached to the car now. 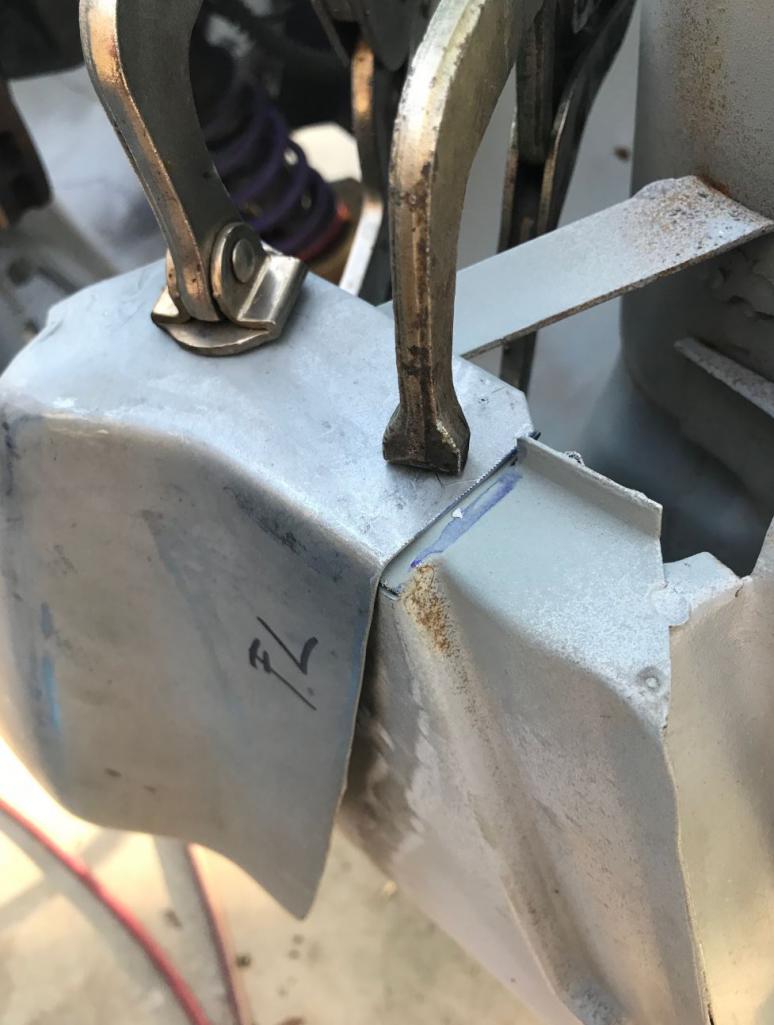 Then cut from the bottom to the top half of the fender an attach panel clamps. I found that using a thin cut off wheel worked the best. It gave a nice gap to weld and was not so tight that it would bind the panel clamps when trying to pull out. 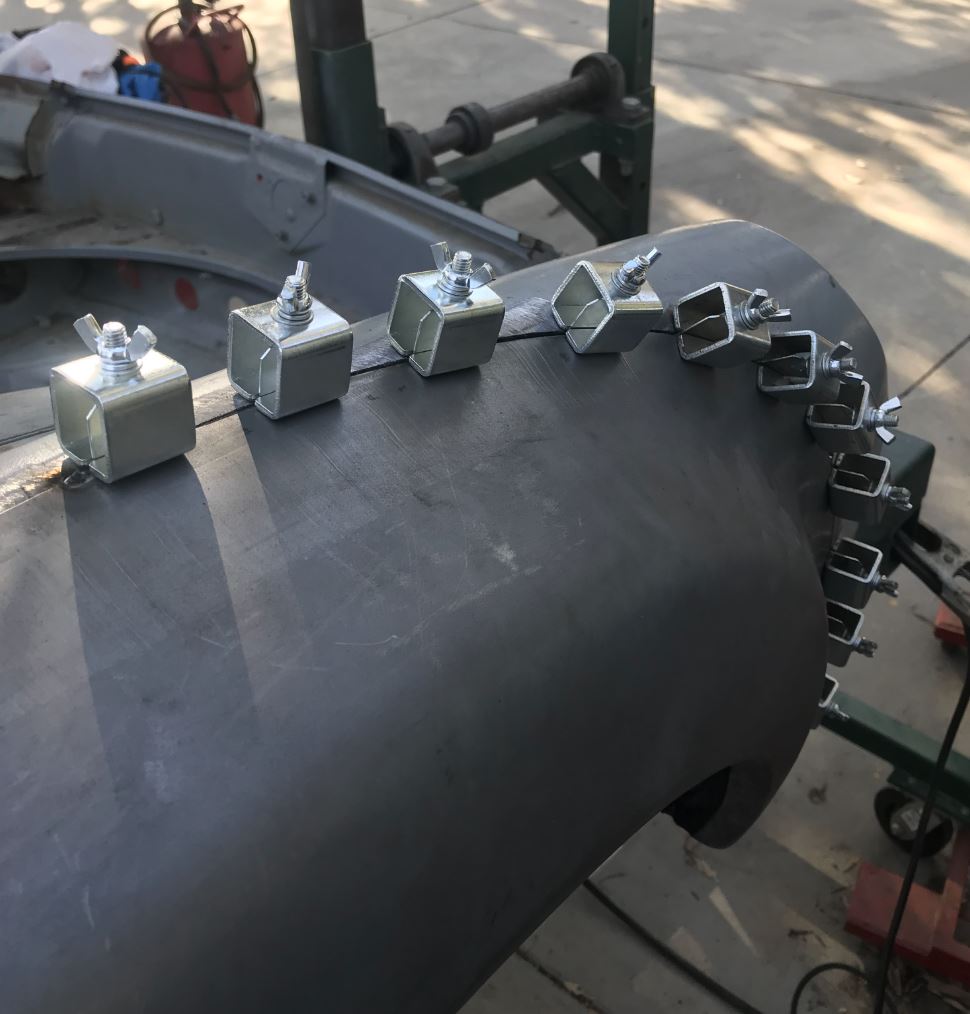 Spot weld in between the clamps 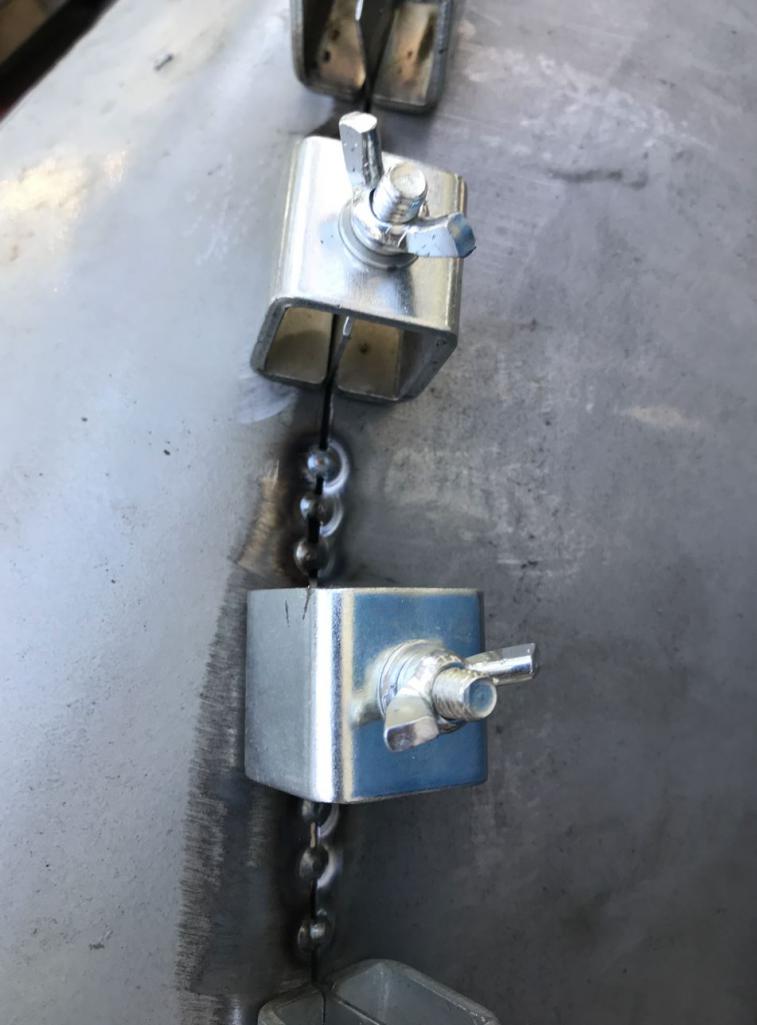 Then remove and spot weld remaining gaps that the clamps left behind. 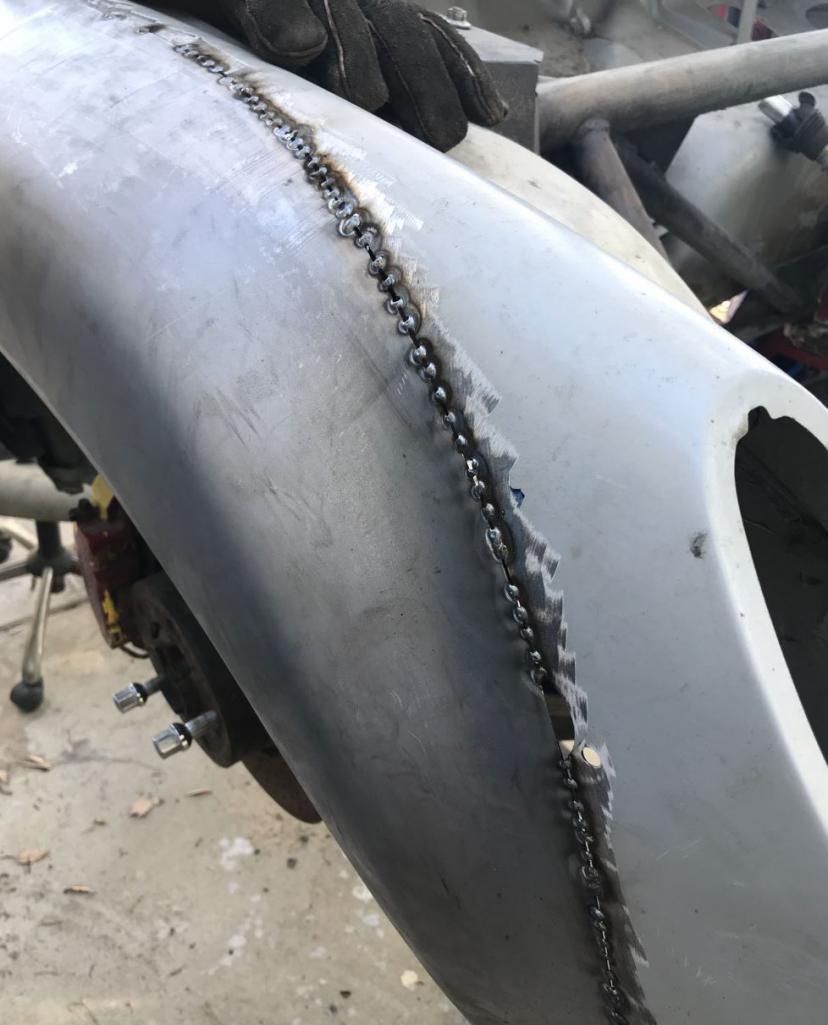 Cut and clamp the other half 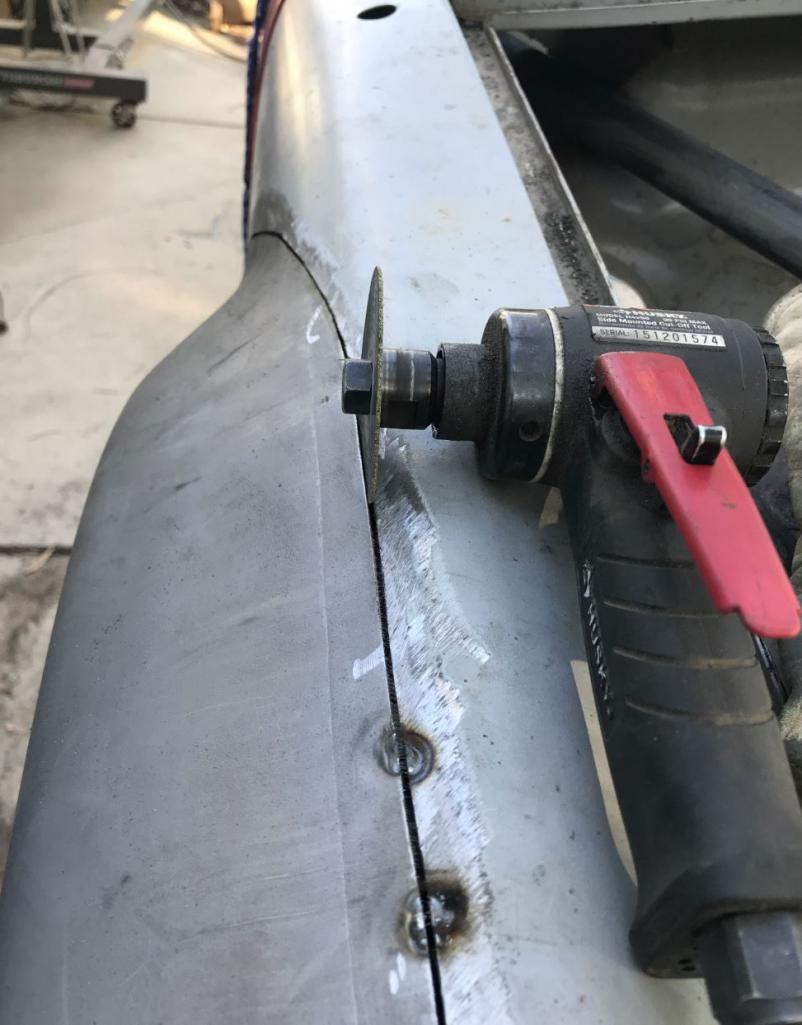 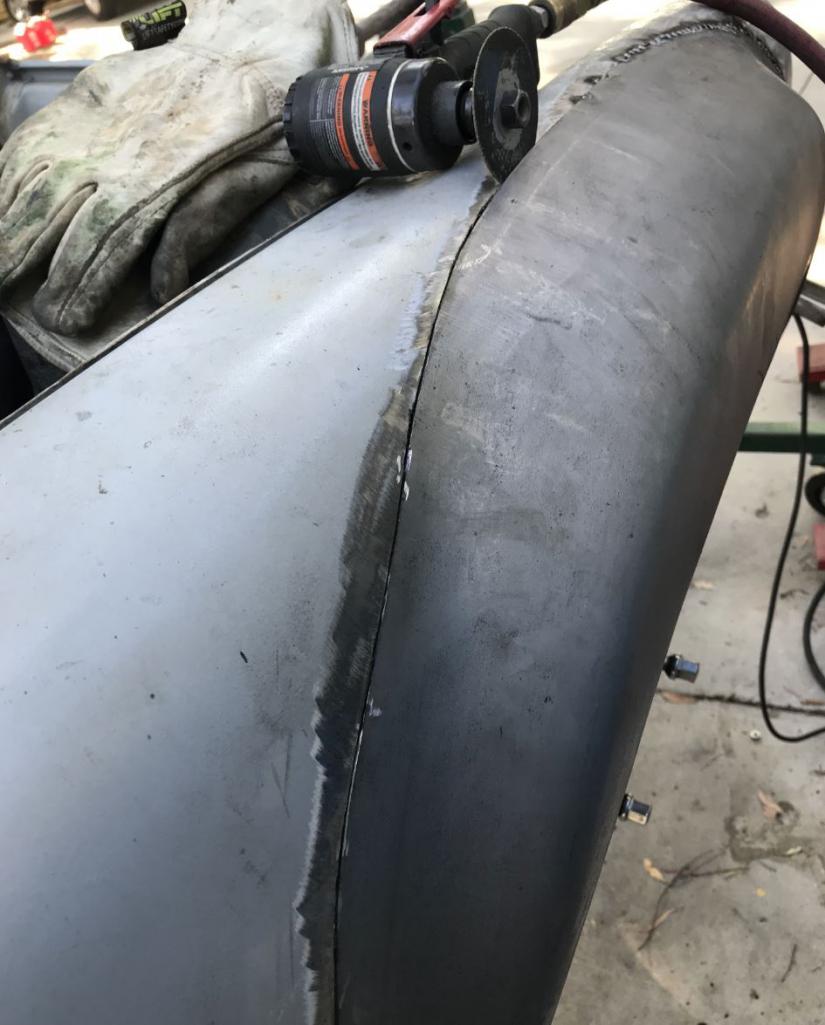 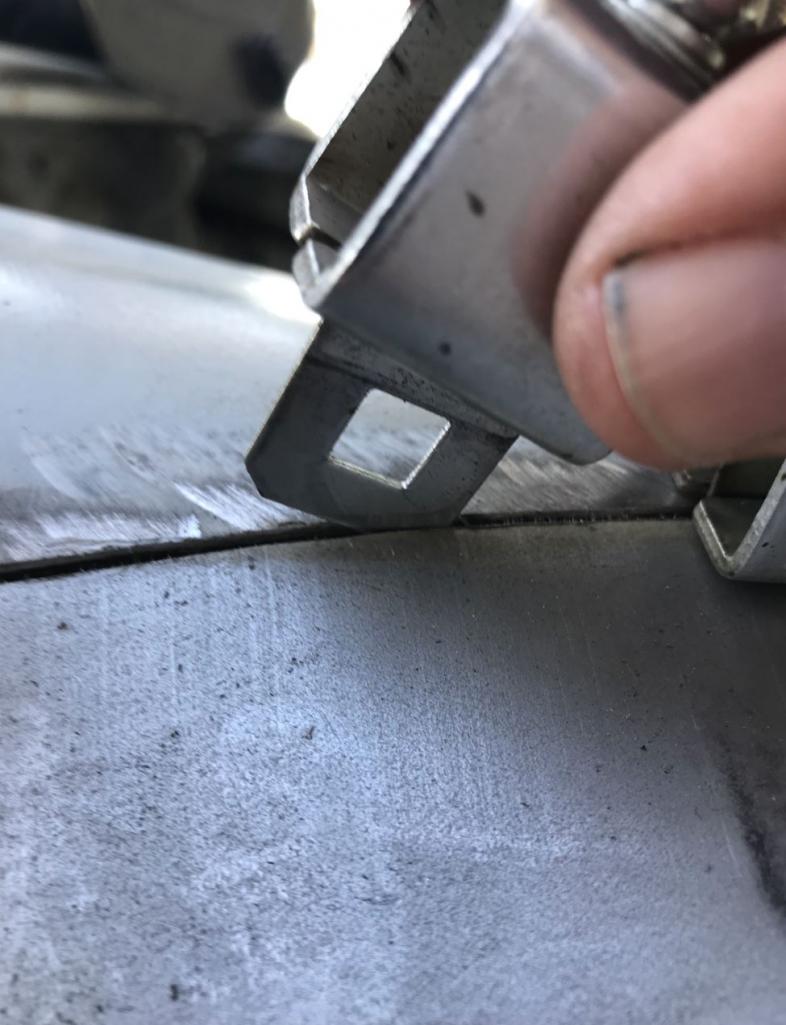 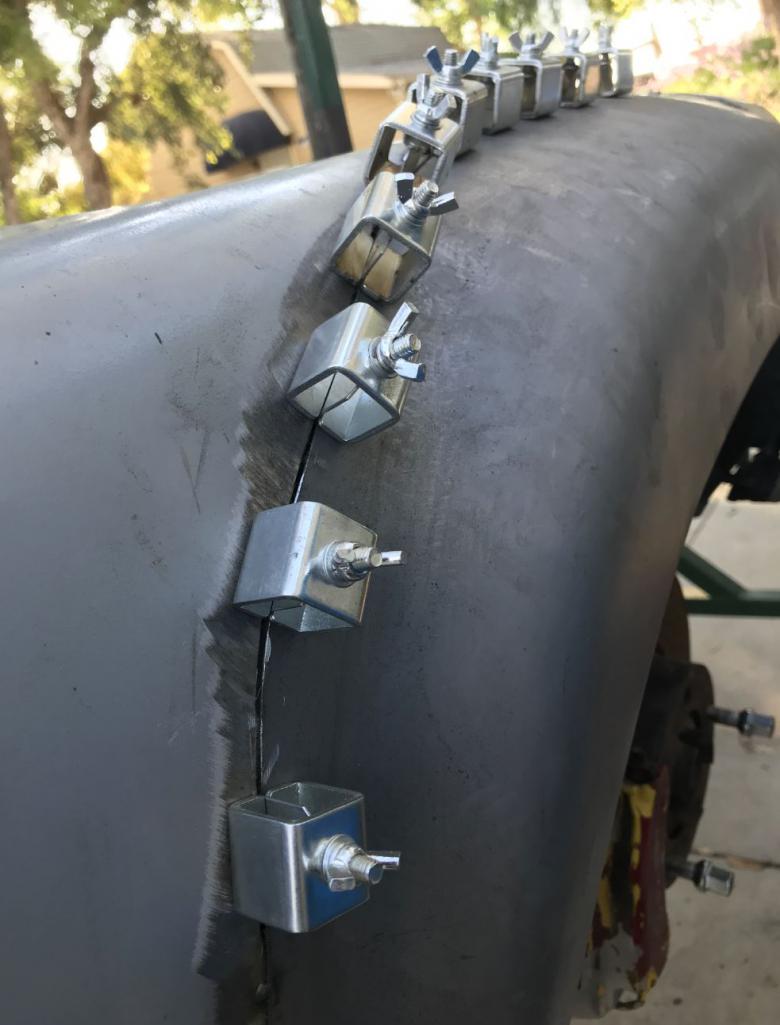 Weld, remove clamps, weld, and grind. I find that it was super easy to grind with the cut-off wheel and then to finish with an 80 grit disk sander. 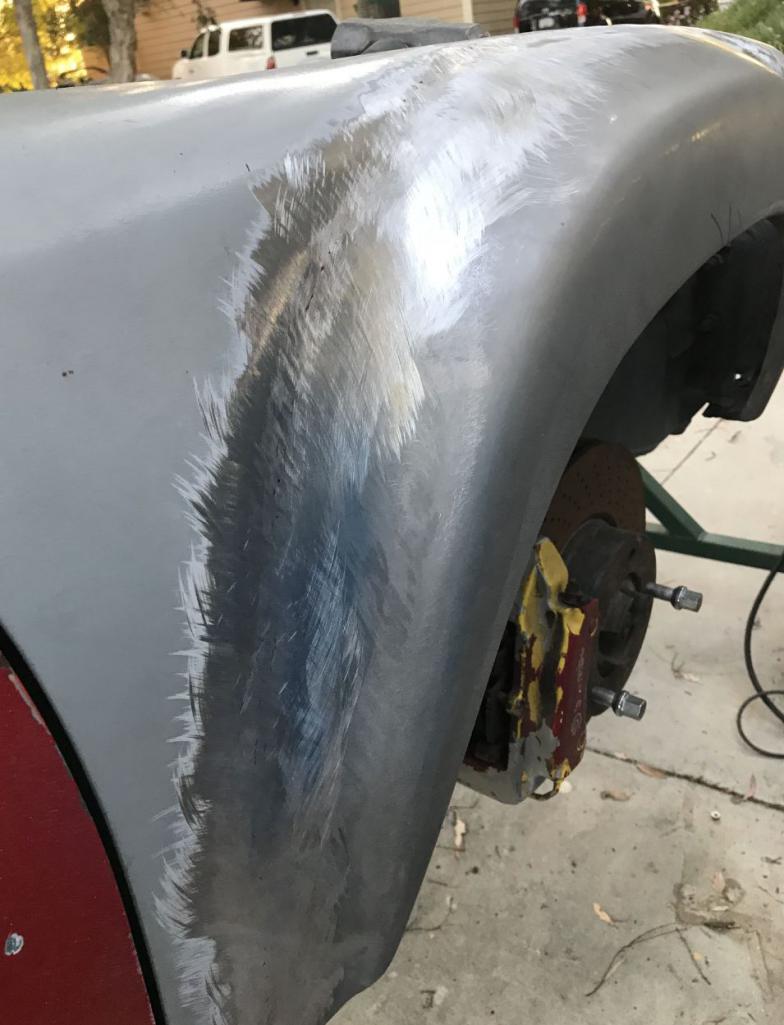 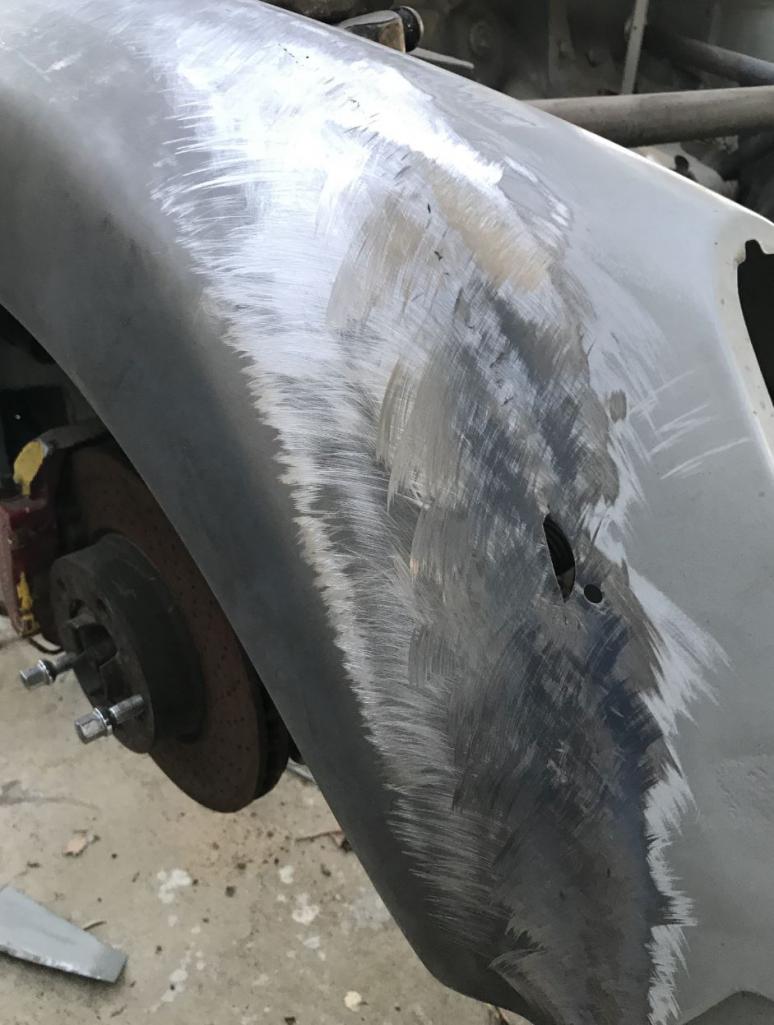 |
| ValcoOscar |
 Sep 7 2018, 11:59 AM Sep 7 2018, 11:59 AM
Post
#479
|
|
Garage Life     Group: Members Posts: 2,541 Joined: 19-November 13 From: SoCal Member No.: 16,669 Region Association: Southern California 

|
(IMG:style_emoticons/default/first.gif)
Amazing... Pictures speak volumes thanks Rudy Gee..I need more time off work (IMG:style_emoticons/default/piratenanner.gif) See you tomorrow for breakfast!!! Oscar |
| tygaboy |
 Sep 7 2018, 12:13 PM Sep 7 2018, 12:13 PM
Post
#480
|
|
914 Guru      Group: Members Posts: 5,701 Joined: 6-October 15 From: Petaluma, CA Member No.: 19,241 Region Association: Northern California 
|
Rudy - I know! You can come up to Petaluma and we can install my flares! (IMG:style_emoticons/default/laugh.gif)
Seriously, that looks GREAT! (IMG:style_emoticons/default/drooley.gif) Nice job! |
  |
1 User(s) are reading this topic (1 Guests and 0 Anonymous Users)
0 Members:

|
Lo-Fi Version | Time is now: 18th November 2025 - 10:50 AM |
Invision Power Board
v9.1.4 © 2025 IPS, Inc.


