|
|
|
Porsche, and the Porsche crest are registered trademarks of Dr. Ing. h.c. F. Porsche AG.
This site is not affiliated with Porsche in any way. Its only purpose is to provide an online forum for car enthusiasts. All other trademarks are property of their respective owners. |
|
|

  |

| ThePaintedMan |
 Mar 27 2013, 08:48 PM Mar 27 2013, 08:48 PM
Post
#1
|
|
Advanced Member  Group: Members Posts: 3,885 Joined: 6-September 11 From: St. Petersburg, FL Member No.: 13,527 Region Association: South East States |
Awhile back, Randy (RoadGlue) gave me the opportunity to rebuild his Weber 40 IDFs, and I thought I'd take the opportunity to document the process. I'm also going to try give a little insight on some of the tips and tricks I have learned along the way. Keep in mind, this thread is a work in progress, as Randy and I are still tracking down some of the parts these carbs were missing.
Now, I understand for most people, the process is fairly straightforward and many of you will think it unnecessary to give a step-by-step. After all, most rebuild kits only include a handful of parts and the location and function of most pieces are obvious. But there are some important additional steps that one can take to truly ensure the rebuild process goes smooth and that you won't have to do this over again immediately after reinstalling the carbs. Here it goes! First, I would like to outline the fact that not all Webers are the same. Not only are there different models of IDFs (the 36, the 40, the 44 and the much rarer 48), but there are "early" style carbs and "later" ones. I'll try to list some of the most obvious differences, which are to the best of my knowledge true in most cases, but may not hold true in all of them. Here are the tools you'll need for the job: -Carburetor rebuild kits (CB Performance or Redline are the most common) -8mm open/closed end wrench -10mm open/closed end wrench -11mm open/closed end wrench -19mm open/closed end wrench -Smaller flat tip screwdriver -Large flat tip screwdriver -Brass brush -Paint gun brush cleaning set -Small hammer -Brass punch set -Razor blade -Carb cleaner -B-12 Carb dip -Anti-seize -Shop towels -Compressed air source (preferably) -Clean workspace, preferably with white background Optional: - (4) 3/8 x 24 Brass Hex grub/set screws - Allen keys -SAE Tap and Die set Below is a picture of an early and late set of Weber 40 IDFs. 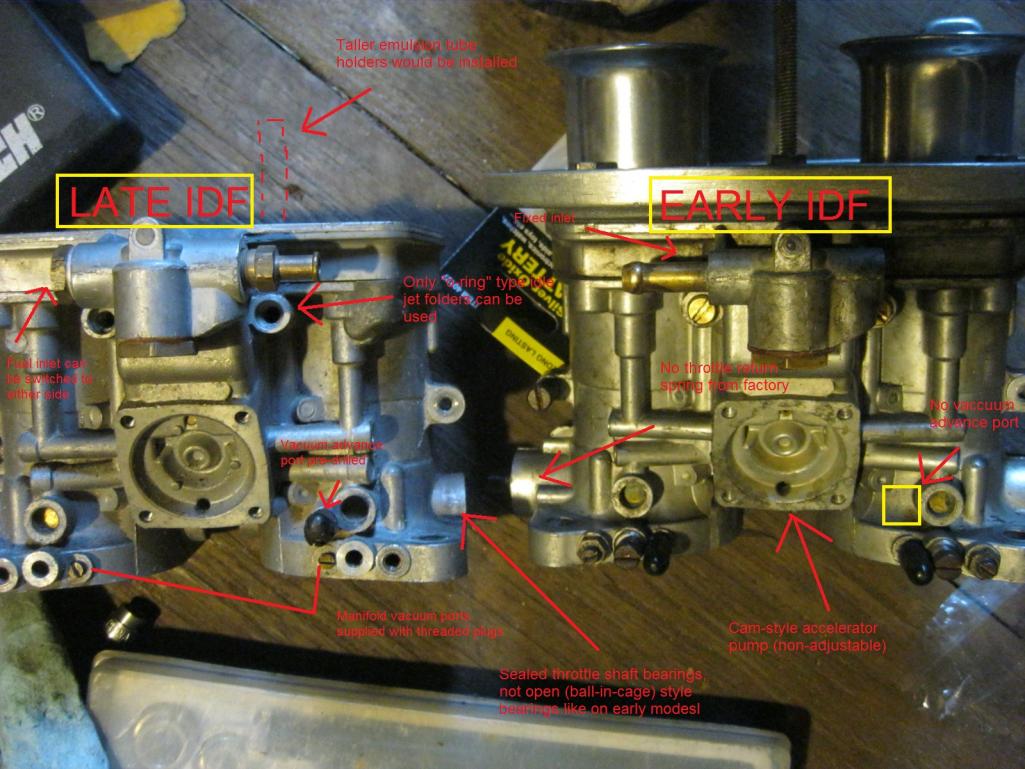 Some of the characteristics of EARLY versions are: -Short emulsion tube holders -Short throttle shafts with little overhang outside of the carb body -Non-sealed, ball-in-cage style throttle shaft bearings -Cam-actuated, non-adjustable accelerator pump assembly -No ports for "ported" vacuum (still has 2 "manifold" vacuum ports) -76 degree bevel throttle plates (this may or may not hold true for every set of early carbs) -No throttle return springs installed from factory (thanks Kevin for clarification) -Most (all?) were made in Italy and are stamped as such Later style Weber 40 IDFs (Weber 40 XEs) are usually characterized by: -Taller emulsion tube holders which extend above the carb top -Longer throttle shafts -Sealed black throttle shaft bearings -Adjustable, spring cushioned accelerator pump assembly -One pre-drilled ported vacuum port in addition to two threaded manifold vacuum ports -78 degree bevel throttle plates -Factory installed throttle return springs -Made in Spain, but potentially also Italy and Brazil Please note that most of these instructions to follow are also true for 44s and 48s as well. The main difference being the way that the secondary venturis are designed. |
   |

 
|
| ThePaintedMan |
Mar 27 2013, 08:57 PM
Post
#2
|
|
Advanced Member Group: Members Posts: 3,885 Joined: 6-September 11 From: St. Petersburg, FL Member No.: 13,527 Region Association: South East States |
This is Randy's set of later style, Spanish-made Webers as I received them.
Note the adjustable accelerator pump, tall emulsion tube holders, vacuum advance ports, etc. The rust in the accelerator pump housing as well as on the other areas is due to water which is absorbed by the fuel. Even carbs that are not left outside will exibit signs of rusting and oxidation as the fuel sits and picks up more and more water, unless they are drained first. No big deal though, Randy (IMG:style_emoticons/default/smile.gif) Attached image(s) 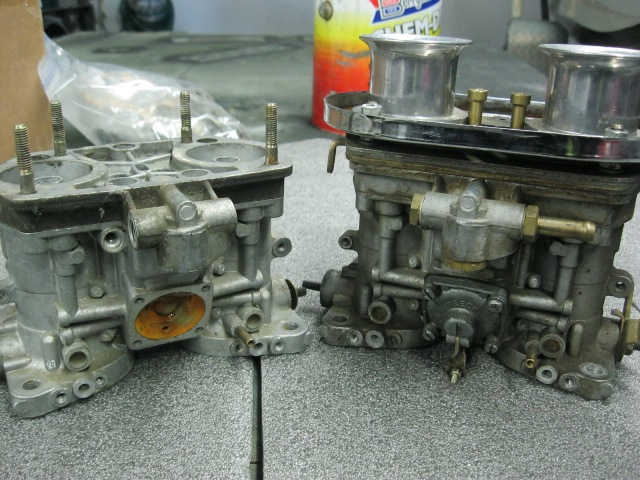
|
|
|
|
| ThePaintedMan |
Mar 27 2013, 08:59 PM
Post
#3
|
|
Advanced Member Group: Members Posts: 3,885 Joined: 6-September 11 From: St. Petersburg, FL Member No.: 13,527 Region Association: South East States |
Here are the throttle plates from underneath. Note the oxidation on the aluminum and the general crud on the carbs. There are several ways to clean up a set of Webers, and I'll show you how I did it without fancy equipment.
Attached image(s) 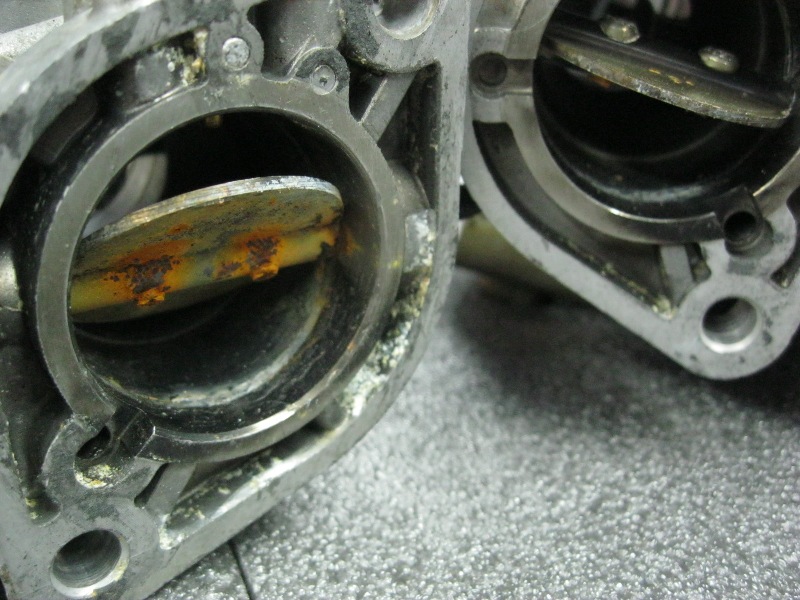
|
|
|
|
| ThePaintedMan |
Apr 8 2013, 09:14 PM
Post
#4
|
|
Advanced Member Group: Members Posts: 3,885 Joined: 6-September 11 From: St. Petersburg, FL Member No.: 13,527 Region Association: South East States |
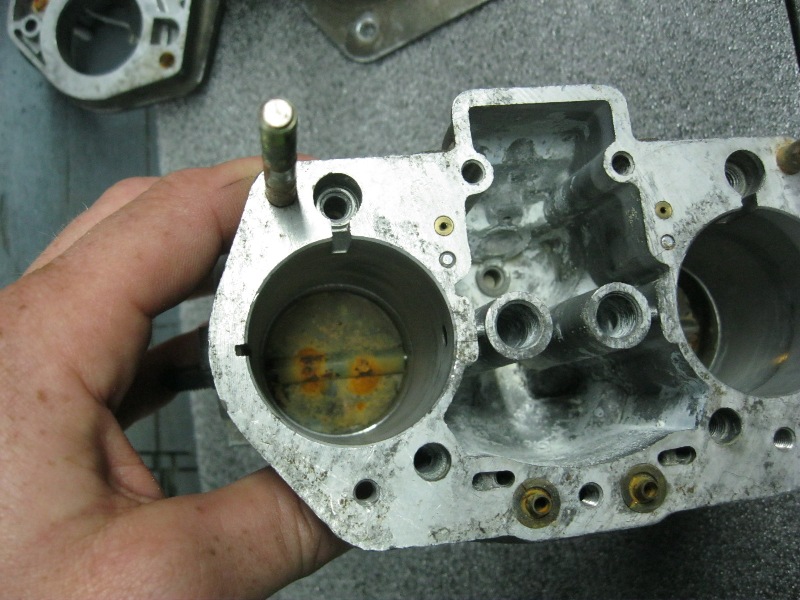
The best way is probably to use an ultrasonic cleaner, which will not only clean the corrosion on the outer portions of the carbs and throttle bodies, but will also remove scale and corrosion inside all of the small passageways. Unfortunately many of us don't have access to such a machine (although it's in my plans). Therefore, I decided to go a little different route with Randy's carbs. Below is another shot showing the deposits and oxidation in the fuel bowls.
 .... And all of the stuff that fell out when they were turned upside down. Now aren't you glad you're rebuilding your carbs? 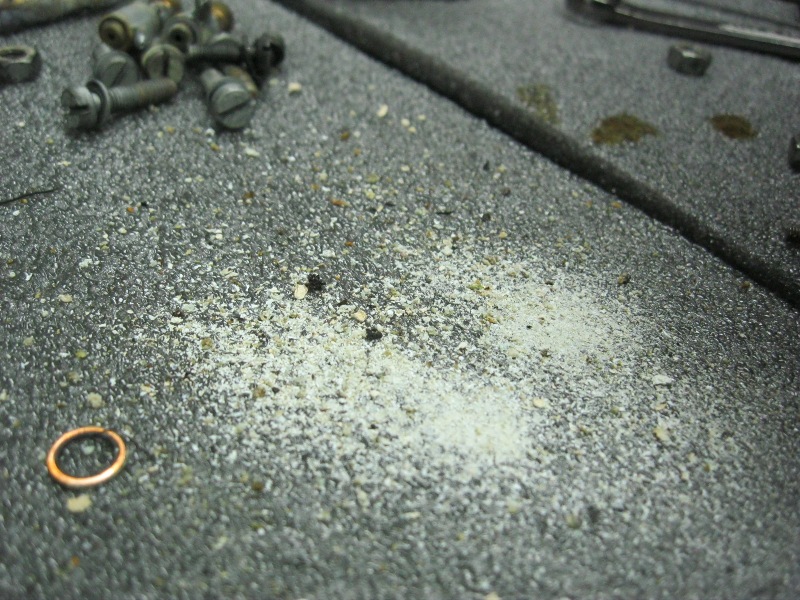 First, strip the carbs of all removable parts, keeping everything in baggies as you go. It's not if lose you lose a part, it's when. And tracking down individual replacement parts for Webers is not only a pain, but it will quickly drive up the cost of your rebuild and keep you off of the road longer. 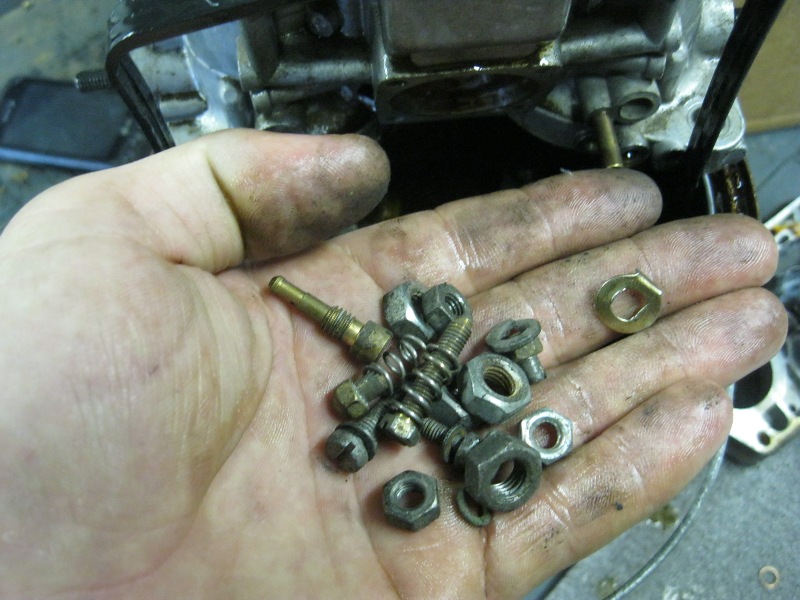 **However, DO NOT, unless you deem it absolutely necessary, remove the throttle plates or shafts. Bob Tomlinson, in his Weber Tech Manual, specifically recommends avoiding removing these parts from the carbs because realigning the plates and shafts exactly as they were pre-rebuild is nearly impossible. Not to mention the process of driving out the old shaft(s) will likely render them bent, giving you a whole other set of variables to deal with (ask me how I know). In some cases, where the throttle shafts and/or bearings are seized in the bores, you will have no recourse but to remove them. In this case, make every attempt to mark and maintain each butterfly with its parent throttle body as, like most parts that wear, each fits in it's position in a unique way over time. ** Ideally, the next step would be to dip the carbs in cleaner to begin braking up all of the gunk that has built up on them over time. However, there is a reason why that may not be the best idea. Remember those throttle shaft bearings I spoke about - the sealed ones? Well, they're not perfectly sealed. And if you submerge them in something like B-12 Chemtool, you're liable to dry out and destroy those bearings, meaning you'll end up having to pull those throttle shafts afterall. Instead, what I did was to clean the outside of the carb with a good dousing of carb and/or brake cleaner, being careful to avoid the shaft bushings. Baste or pipette B-12 or other good carb cleaner into the fuel bowls and let that soak for 2-4 hours. As you can see below, if you are careful and keep the throttle plates closed, you can even soak the top of the butterflies if they seal well enough. Soak all of the parts you removed in B-12 at this time too. I like B-12 because it seems to do a better job breaking down hard deposits than the stuff you get in the can. 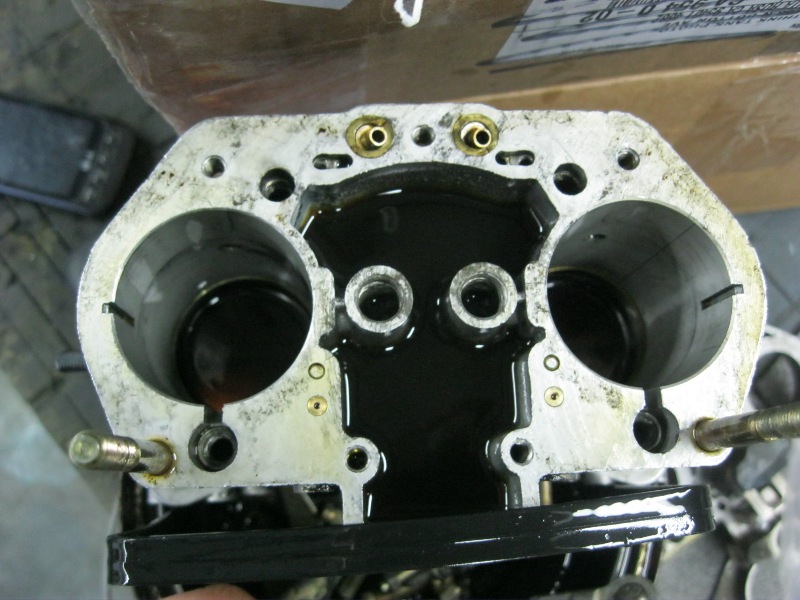 |
|
|
|
| ThePaintedMan |
Apr 8 2013, 09:21 PM
Post
#5
|
|
Advanced Member Group: Members Posts: 3,885 Joined: 6-September 11 From: St. Petersburg, FL Member No.: 13,527 Region Association: South East States |
Don't forget to remove these plates that cover the enrichment circuit. Might as well clean these out too, even though they *should* be inoperative. If you're careful you can probably reuse the gasket, if your carbs have them. The rebuild kits do not usually come with them.
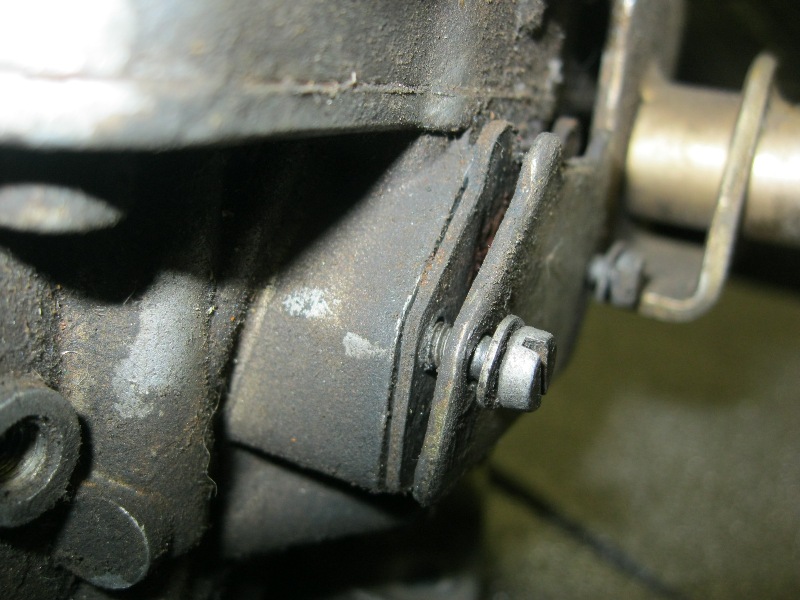 The enrichment circuits have a washer, plunger, spring and valve. You should clean out this area as well as added insurance. Plus this give you a chance to inspect the springs which push the enrichment valves down into their default position. If water has pooled in these areas, it is entirely possible the springs have rusted (like one of them on this carb) and collapsed. If they collapse, you need a replacement so that the valves stay down and don't leak fuel, causing an over-rich condition. While pushing a little downward tension on the little plunger to keep things from shooting across the room, simply pry up the little split washer. Then you'll be able to remove the spring and valve. 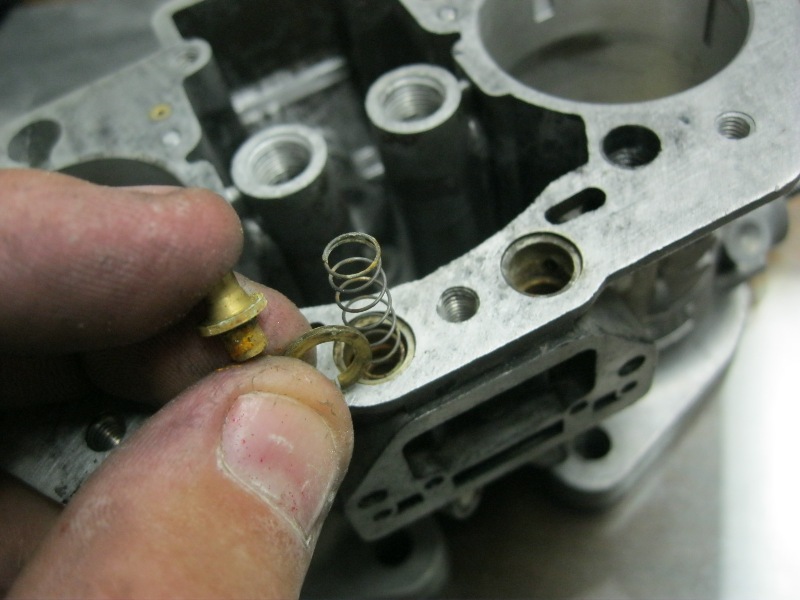 |
|
|
|
| Cairo94507 |
Apr 8 2013, 09:51 PM
Post
#6
|
|
Michael Group: Members Posts: 9,734 Joined: 1-November 08 From: Auburn, CA Member No.: 9,712 Region Association: Northern California |
I no longer have Webers on my car but I thoroughly enjoyed your work so far. Looking for more as you progress.
|
|
|
|
| rhodyguy |
Apr 9 2013, 07:44 AM
Post
#7
|
|
Chimp Sanctuary NW. Check it out. Group: Members Posts: 22,072 Joined: 2-March 03 From: Orion's Bell. The BELL! Member No.: 378 Region Association: Galt's Gulch |
good thread. well written and ++ for the pictures. nice job george. you may be able to source a sonic cleaner from a jewelry supply co.
k |
|
|
|
| euro911 |
Apr 10 2013, 02:56 AM
Post
#8
|
|
Retired & living the dream. God help me if I wake up! Group: Members Posts: 8,848 Joined: 2-December 06 From: So.Cal. & No.AZ (USA) Member No.: 7,300 Region Association: Southern California |
Nice work George ... now finish them (IMG:style_emoticons/default/laugh.gif)
I did a similar write up on rebuilding Zenith 40 TIN carbs back in 2000. If anyone's interested Click Here 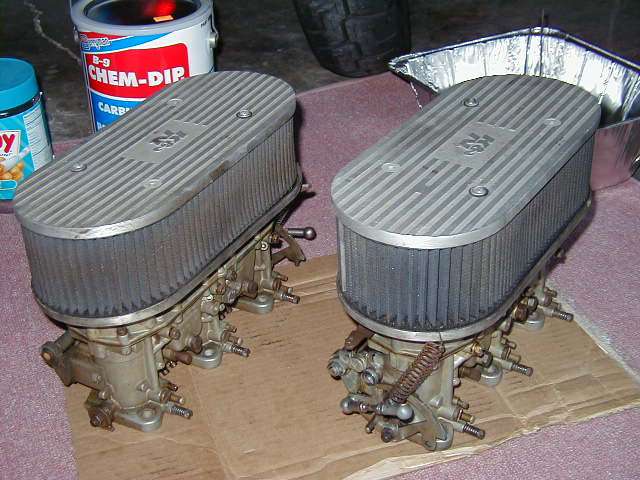 |
|
|
|
| FourBlades |
Apr 10 2013, 06:37 AM
Post
#9
|
|
From Wreck to Rockin Group: Members Posts: 2,054 Joined: 3-December 07 From: Brevard, FL Member No.: 8,414 Region Association: South East States |
|
|
|
|
| Mark Henry |
Apr 10 2013, 07:07 AM
Post
#10
|
|
that's what I do! Group: Members Posts: 20,065 Joined: 27-December 02 From: Port Hope, Ontario Member No.: 26 Region Association: Canada |
QUOTE(ThePaintedMan @ Apr 8 2013, 11:21 PM)  The enrichment circuits have a washer, plunger, spring and valve. You should clean out this area as well as added insurance. Plus this give you a chance to inspect the springs which push the enrichment valves down into their default position. If water has pooled in these areas, it is entirely possible the springs have rusted (like one of them on this carb) and collapsed. If they collapse, you need a replacement so that the valves stay down and don't leak fuel, causing an over-rich condition. While pushing a little downward tension on the little plunger to keep things from shooting across the room, simply pry up the little split washer. Then you'll be able to remove the spring and valve. In the past I've drilled and tapped these for a small brass hex head plug and a small rod and I permanently disabled this circuit. |
|
|
|
| ThePaintedMan |
Apr 10 2013, 07:13 AM
Post
#11
|
|
Advanced Member Group: Members Posts: 3,885 Joined: 6-September 11 From: St. Petersburg, FL Member No.: 13,527 Region Association: South East States |
Thanks guys,
The carbs are actually much further along, but I suck at uploading pictures. This thread will be a long work in progress, including jetting as I understand it. Mark, that Zenith looks killer! Other Mark (Henry), I've seen that trick as well, but since they aren't my carbs, and I don't know if Randy will ever want to resell them later, I'm hesitant to tap anything. But you're right, it's one way to make sure they never leak. It's a pretty ingenious little setup from the diagrams I've seen though - sort of like a choke, but just adds extra fuel instead of cutting air. |
|
|
|
| Mark Henry |
Apr 10 2013, 08:10 AM
Post
#12
|
|
that's what I do! Group: Members Posts: 20,065 Joined: 27-December 02 From: Port Hope, Ontario Member No.: 26 Region Association: Canada |
QUOTE(ThePaintedMan @ Apr 10 2013, 09:13 AM) Thanks guys, The carbs are actually much further along, but I suck at uploading pictures. This thread will be a long work in progress, including jetting as I understand it. Mark, that Zenith looks killer! Other Mark (Henry), I've seen that trick as well, but since they aren't my carbs, and I don't know if Randy will ever want to resell them later, I'm hesitant to tap anything. But you're right, it's one way to make sure they never leak. It's a pretty ingenious little setup from the diagrams I've seen though - sort of like a choke, but just adds extra fuel instead of cutting air. Personally the circuit sucks big time, if they ever get stuck open they will wash down the cylinders. All Gene Berg carbs sets were done this way. |
|
|
|
| ThePaintedMan |
Apr 10 2013, 08:12 AM
Post
#13
|
|
Advanced Member Group: Members Posts: 3,885 Joined: 6-September 11 From: St. Petersburg, FL Member No.: 13,527 Region Association: South East States |
QUOTE(Mark Henry @ Apr 10 2013, 10:10 AM) Personally the circuit sucks big time, if they ever get stuck open they will wash down the cylinders. All Gene Berg carbs sets were done this way. Good point. If Gene did it, then it's good enough for me. I'll ask Randy what he thinks. Thanks for your input! |
|
|
|
| RoadGlue |
Apr 10 2013, 08:29 AM
Post
#14
|
|
Sonoma County Gear Head Group: Admin Posts: 2,033 Joined: 8-January 03 From: Santa Rosa, CA Member No.: 108 Region Association: Northern California |
Okay! I'll stop lurking. George, I really appreciate your thoroughness with the rebuild. You are taking this much past my know-how, and it's exciting to imagine these whirling my next motor along.
I'm absolutely fine with the mod as discussed above. It wasn't with this set of Webers, but rather on my first set back in the late 90s that had this circuit jam up from time to time. I'm lucky I didn't bend a rod, as I'd come out to the car and twice had it where it would have a cylinder that was full of fuel. Funny how gasoline doesn't compress like air, huh? (IMG:style_emoticons/default/tongue.gif) Thanks again! |
|
|
|
| Mark Henry |
Apr 10 2013, 10:49 AM
Post
#15
|
|
that's what I do! Group: Members Posts: 20,065 Joined: 27-December 02 From: Port Hope, Ontario Member No.: 26 Region Association: Canada |
Just be careful tapping that you don't put too much pressure on the casting or it will break.
Drill to the correct size, use a sharp tap and clean it often. It should be cutting as smooth as butter. Use a brass hex grub screw, if you need a rod make sure it is also brass. I'd avoid a NPT tap and plug, if you do use one be damn careful not to put it in tight. Use a drop of locktite if you like, no teflon! |
|
|
|
| URY914 |
Apr 10 2013, 12:31 PM
Post
#16
|
|
I built the lightest 914 in the history of mankind. Group: Members Posts: 120,411 Joined: 3-February 03 From: Jacksonville, FL Member No.: 222 Region Association: None |
You can pick up a cheap sonic cleaners at Harbour Frieght or Northen Tool.
|
|
|
|
| ThePaintedMan |
Dec 17 2013, 11:49 AM
Post
#17
|
|
Advanced Member Group: Members Posts: 3,885 Joined: 6-September 11 From: St. Petersburg, FL Member No.: 13,527 Region Association: South East States |
Finishing up where I left off...
Once you have removed the lock washer clip at the top of the enrichment circuit, you can begin to pry up on the enrichment piston bodies. A small screwdriver will suffice, but be careful. Using the body of the carb as a lever is risky and it's easy to break the casting. If it's stuck in there (and it likely will be), you can try to soak the circuit in PB Blaster. If that does not work, a VERY small amount of localized heat may help free up the gummy gasoline that is gluing the piston in it's bore. Of course, be very careful to make sure that any remaining flammable liquids are gone first. Once removed, clean the pistons and their seats as best as possible. Attached thumbnail(s) 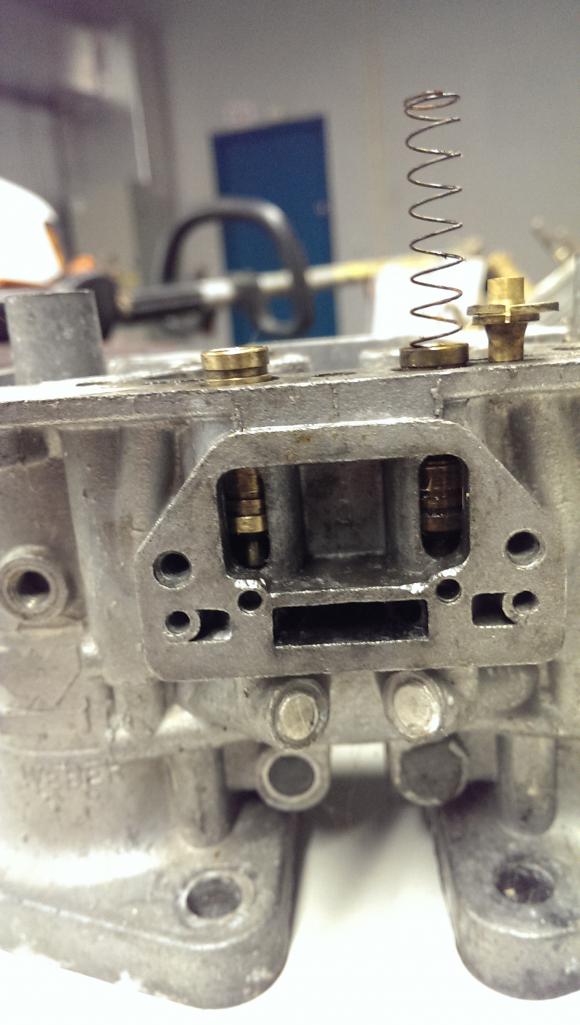
|
|
|
|
| ThePaintedMan |
Dec 17 2013, 11:59 AM
Post
#18
|
|
Advanced Member Group: Members Posts: 3,885 Joined: 6-September 11 From: St. Petersburg, FL Member No.: 13,527 Region Association: South East States |
Now you're ready to start tapping. First, plug the bottom of the enrichment orifice to prevent aluminum shavings from falling in. A small piece of paper towel soaked in gear oil works well. This was an old carb body that was cracked, so it is not pictured here.
If available, use a 21/64 drill bit to make it easier for the tap to do it's job. Drill down approximately 3/8 of an inch into the bore. Blow out the bore to remove shavings. Then, use a sharp 3/8 x 24 fine thread tap, threading approximately 3/8 inch into the bore. A metric tap might work as well, but since these will never need to be removed, I used what was readily available. Go slow and use plenty of cutting oil or gear oil as a substitute. You may wish to stop halfway through to blow out the tap and bore again. Attached thumbnail(s) 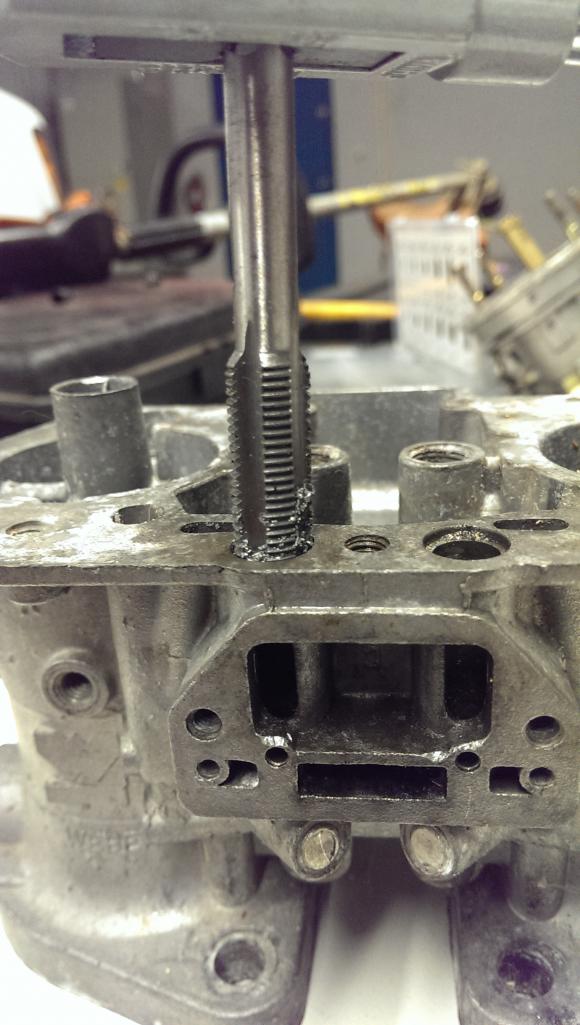
|
|
|
|
| ThePaintedMan |
Dec 17 2013, 12:03 PM
Post
#19
|
|
Advanced Member Group: Members Posts: 3,885 Joined: 6-September 11 From: St. Petersburg, FL Member No.: 13,527 Region Association: South East States |
Once both sides are done, remove your packing material from the bore and reinstall the piston. Give it a few light taps to ensure it's seating fully.
Then, install a 3/8 x 24 fine thread grub/set screw. Brass is preferred (thanks Mark Henry) but since these will likely never be removed, steel is also acceptable. Just don't put too much pressure on them. The set screws should sit below the top of the carb body when properly installed. Attached thumbnail(s) 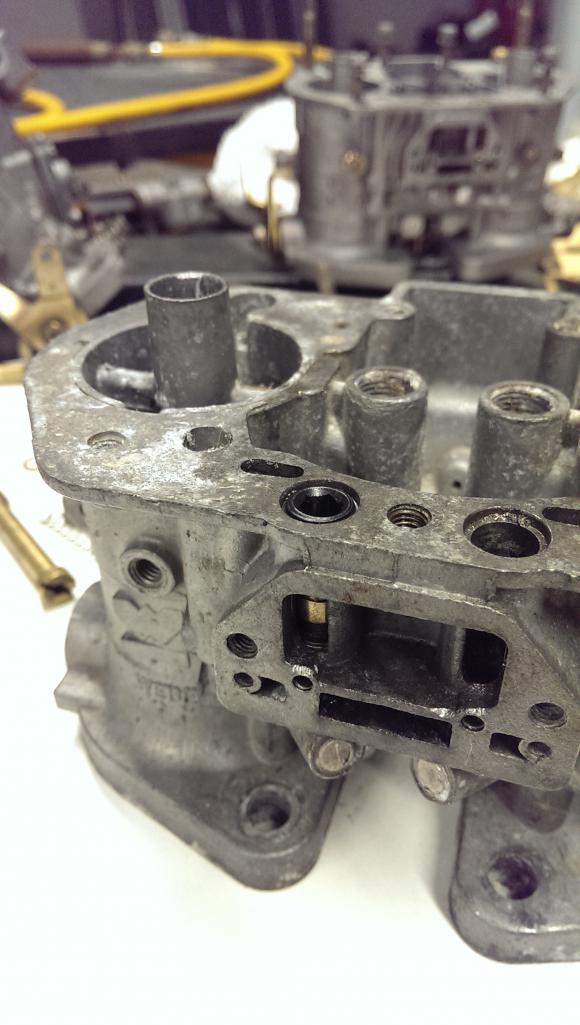
|
|
|
|
| ThePaintedMan |
Dec 17 2013, 12:12 PM
Post
#20
|
|
Advanced Member Group: Members Posts: 3,885 Joined: 6-September 11 From: St. Petersburg, FL Member No.: 13,527 Region Association: South East States |
Finally, you should be ready for reassembly. Blow out the carb bodies and bowls well before you start.
First, give the primary venturis/chokes a quick, light sanding on their outer face to remove any gum deposits. Clean them with solvent and install into their respective bores. The numbers should face up.  Install the choke hold down screws on the outside of the carb body with their associated nuts. The venturi will have a small dimple in it which should line up with the screw. 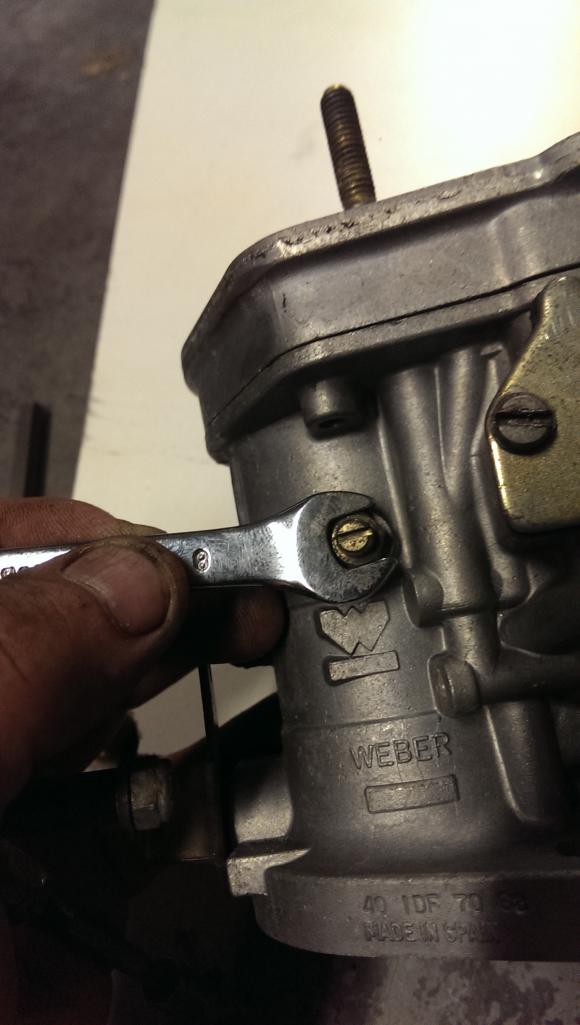 Then install the secondary venturies with the "fat" end of the aerofoil facing up. One side of the venturi will have a retaining spring which should line up with it's small slot in the carb body. 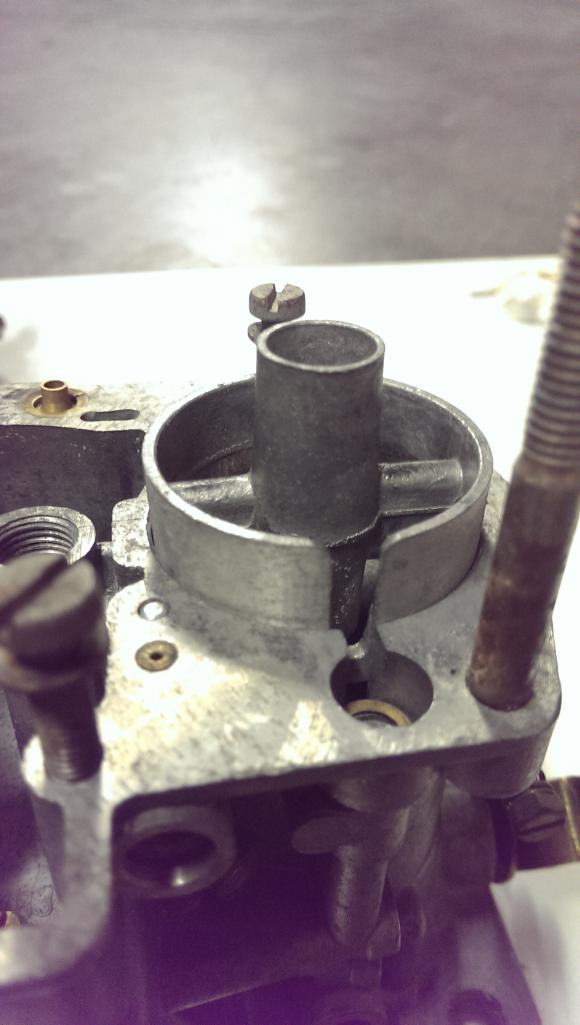 NOTE: If you have the time, you can use a jewelers file and some sandpaper to smooth out any casting imperfections on both the primary and secondary venturis. For most people's uses this will prove unnecessary, but for the racers, every little bit counts. You can see some of the casting remnants below. 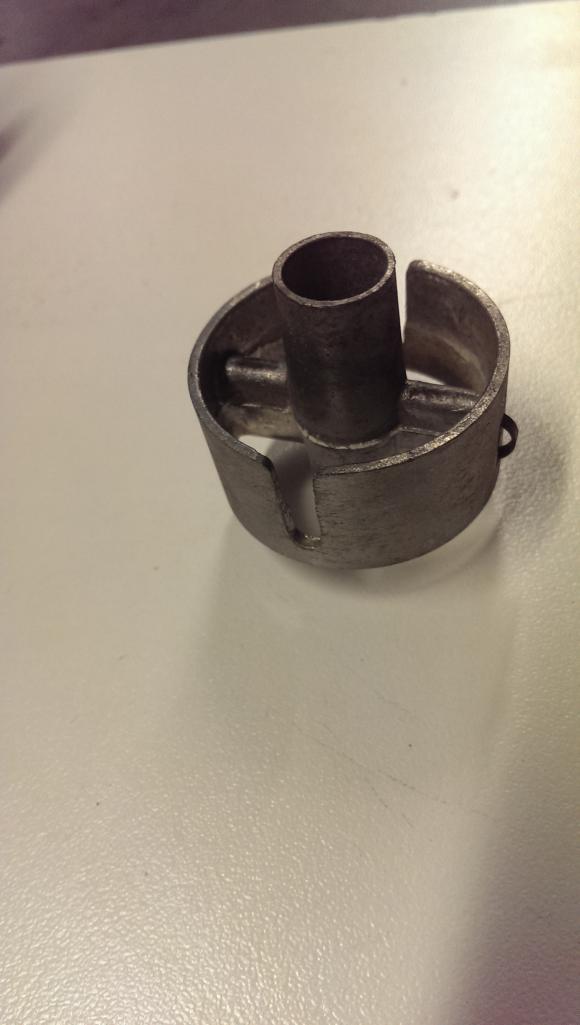 |
|
|
|
|
1 User(s) are reading this topic (1 Guests and 0 Anonymous Users)
0 Members:

|
Lo-Fi Version | Time is now: 5th May 2024 - 08:46 PM |
Invision Power Board
v9.1.4 © 2024 IPS, Inc.