|
|
|
Porsche, and the Porsche crest are registered trademarks of Dr. Ing. h.c. F. Porsche AG.
This site is not affiliated with Porsche in any way. Its only purpose is to provide an online forum for car enthusiasts. All other trademarks are property of their respective owners. |
|
|

  |

| Porschef |
 Apr 10 2013, 07:05 PM Apr 10 2013, 07:05 PM
Post
#1
|
|
How you doin'  Group: Members Posts: 2,165 Joined: 7-September 10 From: LawnGuyland Member No.: 12,152 Region Association: North East States |
Well, it seems that the constant reoccurrence of an exhaust leak stemmed from a pulling exhaust stud. I'd tighten it, the noise would go away, come back, rinse, repeat.
A couple of weeks ago I took her out for a spin, heard that sound, and got under after cooling to see what the deal was. A quarter turn later, the stud dropped right out. So I'm gonna do an EZLOK insert, and pray. Pics to follow, along with any tips, snags, or bonifide cuss sessions. The fun never ends Right Joe? (IMG:style_emoticons/default/hissyfit.gif) |
   |

 
|
| Rand |
Apr 10 2013, 07:14 PM
Post
#2
|
|
Cross Member Group: Members Posts: 7,409 Joined: 8-February 05 From: OR Member No.: 3,573 Region Association: None |
A step stud is a solid solution, no prayers needed. I'll take new real threads over an an insert any time I can. Exhaust stud is one of those times. They were cheap at my local VW shop. I think I even have extras.
|
|
|
|
| 76-914 |
Apr 10 2013, 07:17 PM
Post
#3
|
|
Repeat Offender & Resident Subaru Antagonist Group: Members Posts: 13,502 Joined: 23-January 09 From: Temecula, CA Member No.: 9,964 Region Association: Southern California |
drill it in 3 steps i.e. use 3 different sizes working up to the final required tap size. this acts almost like a guide and you can't miss. be ready for the drill bit to want to pull into the soft aluminum. mark your bit depth with some blue painters tape. you won't be able to see blk elec tape in that recess and duct tape is the shiots to get off. (IMG:style_emoticons/default/beerchug.gif)
|
|
|
|
| Rand |
Apr 10 2013, 07:28 PM
Post
#4
|
|
Cross Member Group: Members Posts: 7,409 Joined: 8-February 05 From: OR Member No.: 3,573 Region Association: None |
QUOTE(76-914 @ Apr 10 2013, 06:17 PM)  drill it in 3 steps i.e. use 3 different sizes working up to the final required tap size. this acts almost like a guide and you can't miss. be ready for the drill bit to want to pull into the soft aluminum. mark your bit depth with some blue painters tape. you won't be able to see blk elec tape in that recess and duct tape is the shiots to get off. (IMG:style_emoticons/default/beerchug.gif) Depends on the size of the step stud I guess. I just tapped mine once and done. I don't see a reason to redrill three times. If you have to drill at all, just drill the right size. Yes it needs to be straight, but you knew that. (IMG:style_emoticons/default/confused24.gif) |
|
|
|
| Porschef |
Apr 10 2013, 07:49 PM
Post
#5
|
|
How you doin' Group: Members Posts: 2,165 Joined: 7-September 10 From: LawnGuyland Member No.: 12,152 Region Association: North East States |
Rand,
Thanks for the offer. After getting twisted up about stepped stud availability, I realized that there was already a stepped unit in there. So I'm gonna go with an EZLOK to get me back to using an 8mm stud. I love a repair that could lead to a partial teardown if done improperly... (IMG:style_emoticons/default/icon8.gif) |
|
|
|
| Rand |
Apr 10 2013, 08:05 PM
Post
#6
|
|
Cross Member Group: Members Posts: 7,409 Joined: 8-February 05 From: OR Member No.: 3,573 Region Association: None |
QUOTE(Porschef @ Apr 10 2013, 06:49 PM) Rand, Thanks for the offer. After getting twisted up about stepped stud availability, I realized that there was already a stepped unit in there. So I'm gonna go with an EZLOK to get me back to using an 8mm stud. I love a repair that could lead to a partial teardown if done improperly... (IMG:style_emoticons/default/icon8.gif) Hope it goes well. (IMG:style_emoticons/default/beerchug.gif) |
|
|
|
| ThePaintedMan |
Apr 10 2013, 08:45 PM
Post
#7
|
|
Advanced Member Group: Members Posts: 3,886 Joined: 6-September 11 From: St. Petersburg, FL Member No.: 13,527 Region Association: South East States |
Don't let anyone fool you, it's not that hard. I did three at once. Mark the bit depth, and drill at the exact same angle the original stud was at. If you can, use some kind of drilling lubricant - Harbor Freight sells a good foaming kind that won't drip out.
I know that others here have far more experience than I do, but personally, I wouldn't worry about the step stud. If THAT one pulls out, you won't have enough aluminum left to tap the hole for a Time-Sert/EZ Lok. If you install a Time-Sert (which I would recommend) the first time correctly, with red Locktite, you won't have to do this job again later. Sounds intuitive, but some may not know this - you must remove the heat exchanger first so you can see what you're doing. |
|
|
|
| Rand |
Apr 10 2013, 10:13 PM
Post
#8
|
|
Cross Member Group: Members Posts: 7,409 Joined: 8-February 05 From: OR Member No.: 3,573 Region Association: None |
QUOTE(ThePaintedMan @ Apr 10 2013, 07:45 PM) Don't let anyone fool you, it's not that hard. I did three at once. Mark the bit depth, and drill at the exact same angle the original stud was at. If you can, use some kind of drilling lubricant - Harbor Freight sells a good foaming kind that won't drip out. I know that others here have far more experience than I do, but personally, I wouldn't worry about the step stud. If THAT one pulls out, you won't have enough aluminum left to tap the hole for a Time-Sert/EZ Lok. If you install a Time-Sert (which I would recommend) the first time correctly, with red Locktite, you won't have to do this job again later. Sounds intuitive, but some may not know this - you must remove the heat exchanger first so you can see what you're doing. Wait, what? About the step stud? You prefer an insert? With Loctite? Did I hear that right? Oof. Really? That's why I'm not painted. |
|
|
|
| Porschef |
Apr 11 2013, 04:35 AM
Post
#9
|
|
How you doin' Group: Members Posts: 2,165 Joined: 7-September 10 From: LawnGuyland Member No.: 12,152 Region Association: North East States |
Yes, heat exchanger is off.. (IMG:style_emoticons/default/blink.gif)
I don't want to use the stepped stud as the hole for an 8 mm stud insert Is obviously smaller. So I'll track one down, and go with the EZLOK as a hopeful solution. Looks like Saturdays project... |
|
|
|
| ThePaintedMan |
Apr 11 2013, 07:32 AM
Post
#10
|
|
Advanced Member Group: Members Posts: 3,886 Joined: 6-September 11 From: St. Petersburg, FL Member No.: 13,527 Region Association: South East States |
QUOTE(Rand @ Apr 11 2013, 12:13 AM) Wait, what? About the step stud? You prefer an insert? With Loctite? Did I hear that right? Oof. Really? That's why I'm not painted. Sarcasm aside (and I did say that you guys know more than I do (IMG:style_emoticons/default/pray.gif) ), a Time Insert is a stronger and more reliable option. If I remember correctly, several engine builders here have recommended that when heads are rebuilt that Time Serts be installed to avoid future headaches. They are along the same lines as "case savers" for Type 1s, which are installed to prevent case studs from pulling in high HP applications. Aluminum gets brittle as it is heat cycled over and over. If you drill out a stud, re-tap the aluminum and install a step stud, is it not just a matter of time before the step stud pulls out from the same forces that pulled out the initial stud? Finally, if a Time Sert pulls out (which I have not heard of), another can be reinstalled. If a step stud pulls out, the hole will then be large enough that it is doubtful you'll find another step stud large enough at the base, but still small enough at the stem to fit our heat exchangers. Anyway, the point of my original post was to reassure Porschef that if he goes slow and takes the right precautions, it's not as risky as one might think. Drill straight and do NOT drill too deep. You'll be fine. |
|
|
|
| worn |
Apr 11 2013, 09:56 AM
Post
#11
|
|
can't remember Group: Members Posts: 3,156 Joined: 3-June 11 From: Madison, WI Member No.: 13,152 Region Association: Upper MidWest |
QUOTE Finally, if a Time Sert pulls out (which I have not heard of), another can be reinstalled. If a step stud pulls out, the hole will then be large enough that it is doubtful you'll find another step stud large enough at the base, but still small enough at the stem to fit our heat exchangers. I am afraid that Time Certs aren't magic and can pull out. At least that is what I read in the 911 books. Also, if a time cert actually pulls out, that leaves a pretty big hole. I don't think you are going to get it back in. With that said, I like time certs. They move the stud interface from steel to aluminum to steel-steel. Then when the electrolysis corrosion fairy comes calling, it will lock the time cert in place, not the stud. And hopefully the loctite will even prevent that. |
|
|
|
| ThePaintedMan |
Apr 11 2013, 10:02 AM
Post
#12
|
|
Advanced Member Group: Members Posts: 3,886 Joined: 6-September 11 From: St. Petersburg, FL Member No.: 13,527 Region Association: South East States |
QUOTE(worn @ Apr 11 2013, 11:56 AM) I am afraid that Time Certs aren't magic and can pull out. At least that is what I read in the 911 books. Also, if a time cert actually pulls out, that leaves a pretty big hole. I don't think you are going to get it back in. With that said, I like time certs. They move the stud interface from steel to aluminum to steel-steel. Then when the electrolysis corrosion fairy comes calling, it will lock the time cert in place, not the stud. And hopefully the loctite will even prevent that. Sorry, I guess I meant loosen, as in the Time Sert unscrews with the stud. I imagine it is possible for the Sert to pull out of the aluminum, but I personally have not witnessed it. Your point about the steel-steel interface is a good one, and exactly what the designers had in mind, from what I understand. If I ever rebuild a set of heads, I am strongly considering installing Serts in each exhaust stud hole from the get-go; I trust them that much. |
|
|
|
| stugray |
Apr 11 2013, 03:57 PM
Post
#13
|
|
Advanced Member Group: Members Posts: 3,824 Joined: 17-September 09 From: Longmont, CO Member No.: 10,819 Region Association: None |
FWIW - in my business (aerospace) threads directly into Al, is absolutely Verboten!! Inserts ONLY (they can be replaced).
That said - when I got my first 914 (I was ~20yrs old), it was not assembled when I bought it, so I did not know what the exhaust SHOULD look like. I didnt know what the "funny shaped steel thingy" under the trunk carpet was for.... I drove the car for a year or two with no rear exhaust support for the exhaust and all the weight (and torque) was being applied directly to the exhaust studs. No wonder that I had to replace exhaust studs every few months. By the time I figured it out (and installed the exhaust support bracket) I had: Drilled stripped stud, tapped, insert new step-stud Drilled out stripped step stud and replaced with insert + stock stud Drilled out stripped insert and replaced with New Insert + Step stud Learned that exhaust is supposed to be supported from the back with bracket Lesson learned is: Make sure the rear is suported. The heads can be drilled & redrilled with the heads in the car and inserts installed more than once, but requires the skill of a Anal-retentive person that has drilled thousands of holes in Al. I do NOT condone such stupidity that requires you to do this repeatedly ;-) Stu |
|
|
|
| yeahmag |
Apr 11 2013, 04:15 PM
Post
#14
|
|
Advanced Member Group: Members Posts: 2,421 Joined: 18-April 05 From: Pasadena, CA Member No.: 3,946 Region Association: Southern California |
Time Sert is the way to go. I think Aircooled.net sells the inserts and rents the tools.
|
|
|
|
| yeahmag |
Apr 11 2013, 04:26 PM
Post
#15
|
|
Advanced Member Group: Members Posts: 2,421 Joined: 18-April 05 From: Pasadena, CA Member No.: 3,946 Region Association: Southern California |
|
|
|
|
| ThePaintedMan |
Apr 11 2013, 04:49 PM
Post
#16
|
|
Advanced Member Group: Members Posts: 3,886 Joined: 6-September 11 From: St. Petersburg, FL Member No.: 13,527 Region Association: South East States |
Hmm... see, I may be painted, but I'm not crazy. (IMG:style_emoticons/default/slap.gif)
|
|
|
|
| Porschef |
May 2 2013, 07:56 PM
Post
#17
|
|
How you doin' Group: Members Posts: 2,165 Joined: 7-September 10 From: LawnGuyland Member No.: 12,152 Region Association: North East States |
Lazy man finally posts pics...
Here's the hole from which the stud pulled out... 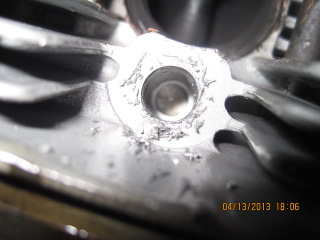 The tools required. Pretty basic- a drill index, a 27/64ths drill bit, ultimately, a 1/2"x13 tap, the same size sawn off to create a bottoming tap, and the EZ Loc. 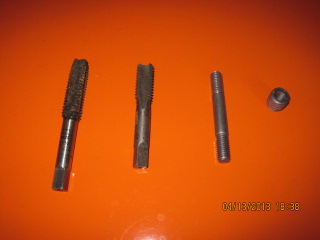 The EZ Loc. Cost about four bucks at Fastenal. 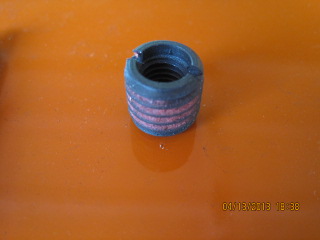 Drilled it out, and tapped it. Then I ran the flat bottomed tap in a bit to make sure there was enough thread to grab... 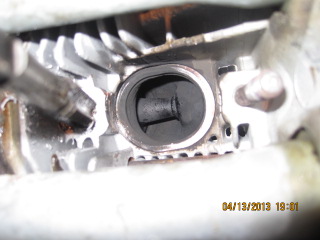 The EZ Loc screwed right in 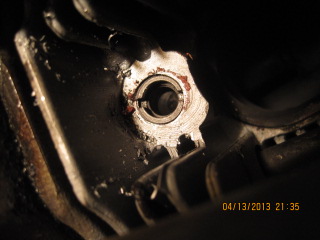 I forgot to take a pic of the stud in the insert. (IMG:style_emoticons/default/wacko.gif) I picked it up at the local Ace hardware. An 8mmx8mm exhaust stud. Cost just over 2 bucks. It had a flat, that would bottom out in the insert, without hitting the head. It was a little longer than the others, but the nut would tighten without any problem. After, reattaching the exchanger went fine. 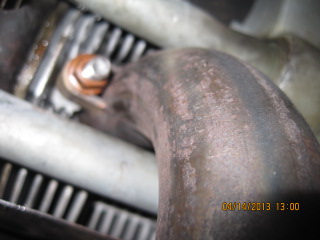 All went well, the leak is gone. |
|
|
|
| Chris H. |
May 3 2013, 07:52 AM
Post
#18
|
|
Senior Member Group: Members Posts: 4,030 Joined: 2-January 03 From: Chicago 'burbs Member No.: 73 Region Association: Upper MidWest |
You sir are a stud (repair guy). (IMG:style_emoticons/default/beerchug.gif)
|
 |
|
| r_towle |
May 3 2013, 08:06 AM
Post
#19
|
|
Custom Member Group: Members Posts: 24,574 Joined: 9-January 03 From: Taxachusetts Member No.: 124 Region Association: North East States |
Very nice.
Is there red locktight on that insert to keep it in place as you tighten or loosen the nut? Just curious how things stay put. rich |
|
|
|
| stugray |
May 3 2013, 10:24 AM
Post
#20
|
|
Advanced Member Group: Members Posts: 3,824 Joined: 17-September 09 From: Longmont, CO Member No.: 10,819 Region Association: None |
I replaced the three exhaust studs that came out during disassembly (two were 9/8mm step studs). Went to put the exhaust stubs on last night and the rest of the studs are all jacked up and need to be replaced as well. They all have rusted threads and sections of threads missing right where the stock nut took a bite and then rusted in place over 40 years.
So tonight will be fun removing 5 more studs from the assembled engine. At least it is still on the engine stand so I can turn it upside down to work (not quite so much fun with the engine in the car ;-) Can I get enough heat into the heads with a propane torch, or will I need Mapp gas like some of the other threads on exhaust stud removal? Stu |
|
|
|
|
1 User(s) are reading this topic (1 Guests and 0 Anonymous Users)
0 Members:

|
Lo-Fi Version | Time is now: 17th May 2024 - 12:16 PM |
Invision Power Board
v9.1.4 © 2024 IPS, Inc.