

 Rebel Bushing Install, also yet another reason I dont let "pro" shops touch my cars Rebel Bushing Install, also yet another reason I dont let "pro" shops touch my cars |
|
|

|
Porsche, and the Porsche crest are registered trademarks of Dr. Ing. h.c. F. Porsche AG.
This site is not affiliated with Porsche in any way. Its only purpose is to provide an online forum for car enthusiasts. All other trademarks are property of their respective owners. |
|
|
  |
| JamesM |
 May 29 2013, 12:48 AM May 29 2013, 12:48 AM
Post
#21
|
|
Caretaker of 914s - Master of Fuel Injection  Group: Members Posts: 2,304 Joined: 6-April 06 From: Kearns, UT Member No.: 5,834 Region Association: Intermountain Region  |
Anyone else notice the crack in this picture? I have known it was there for some time as you can see it in the front trunk but after examing it closer due to a bit of binding when installing the new bushings on that side it seems like it might be related to the poly bushing freezing up as well, I am guessing also related to the damage to the sway bar tab. I suspect that due to lack of front suspension movement the swaybar tab was at times acting as a fulcrum causing the suspension crossmember to be pulled away from the chasis. The tear goes right across the top of the mount for the crossmember. The binding when installing the new bushings was due to the control arm wanting to angle up towards the front of the car. As this can not be corrected with the adjusting washers I had to take a 2x4 and a sledge to see if I could straighten it out a bit. Its slightly better now but not great, nowhere near as free moving as the drivers side. Oh well, just have to live with it for the moment as I am pressed for time. I know of a shop in town with a celette bench, might have to make an appointment this winter to get it straightened and stiched up.
QUOTE(JamesM @ May 28 2013, 03:15 PM)  |
   |

 
|
| JamesM |
May 29 2013, 01:04 AM
Post
#22
|
|
Caretaker of 914s - Master of Fuel Injection Group: Members Posts: 2,304 Joined: 6-April 06 From: Kearns, UT Member No.: 5,834 Region Association: Intermountain Region |
As the crack has been there for quite a while I am not to concerned to autox with it a few more times, has not seemed to be getting any worse. Think i might have to sit it out next year though if i dont get this taken care of this winter.
Looks really nasty in close ups. Anyone else seen this sort of thing before? 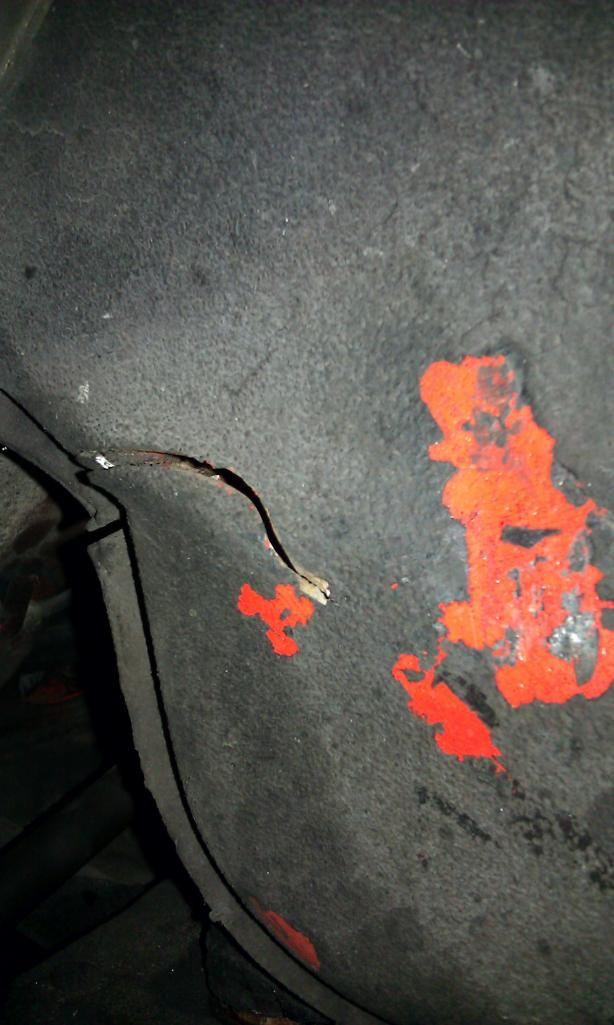 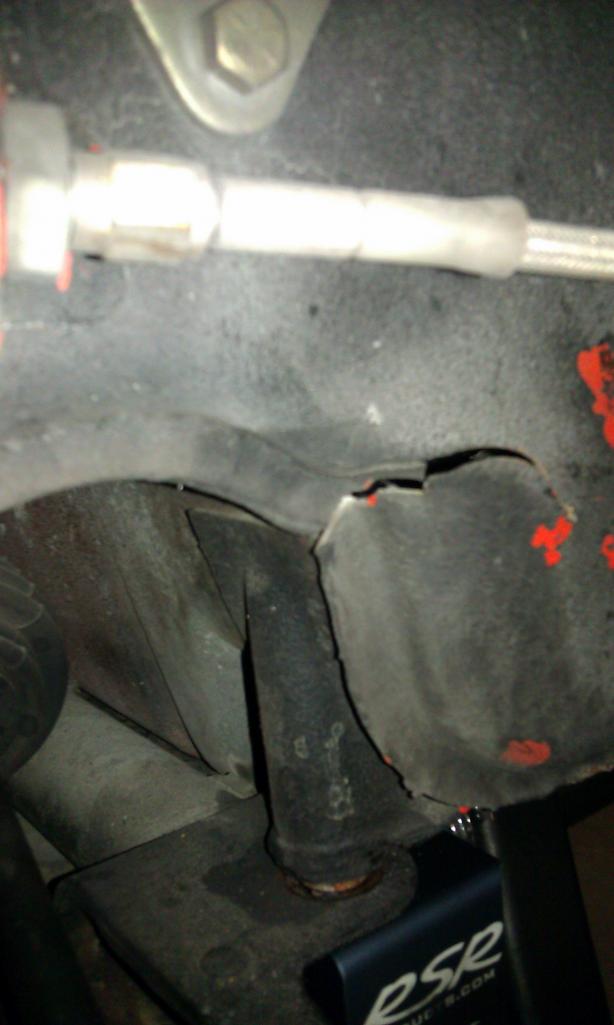 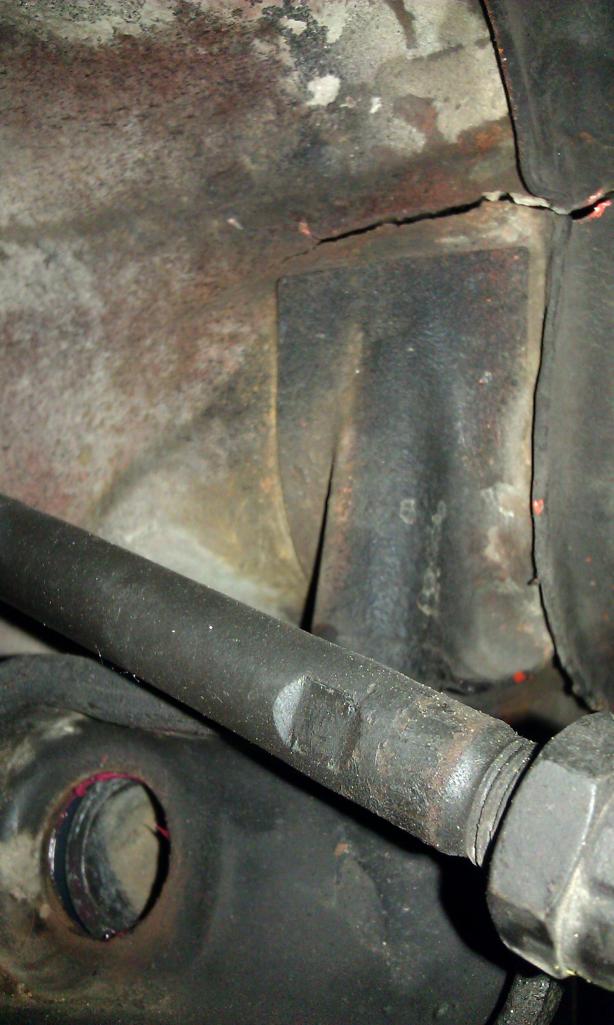 |
|
|
|
| Jeff Hail |
May 29 2013, 07:08 AM
Post
#23
|
|
Senior Member Group: Members Posts: 1,141 Joined: 3-May 07 From: LA/ CA Member No.: 7,712 |
QUOTE(JamesM @ May 29 2013, 12:04 AM) As the crack has been there for quite a while I am not to concerned to autox with it a few more times, has not seemed to be getting any worse. Think i might have to sit it out next year though if i dont get this taken care of this winter. Looks really nasty in close ups. Anyone else seen this sort of thing before? Pretty common. Ive seen cracks around the sheetmetal boss and along the arch of the pinchweld. Aside from the old bushings being stuck; how low is your car? Does the suspension bottom out a lot and has it ever been in a collision on that side of the car. Any more metal fatigue visible under the car at the footwell. I'd fix it now. Its only going to get worse by driving it. It's a safety issue. |
|
|
|
| 76-914 |
May 29 2013, 08:11 AM
Post
#24
|
|
Repeat Offender & Resident Subaru Antagonist Group: Members Posts: 13,964 Joined: 23-January 09 From: Temecula, CA Member No.: 9,964 Region Association: Southern California 
|
At least "stop drill" that crack.
|
|
|
|
| Eric_Shea |
May 29 2013, 09:20 AM
Post
#25
|
|
PMB Performance Group: Admin Posts: 19,304 Joined: 3-September 03 From: Salt Lake City, UT Member No.: 1,110 Region Association: Rocky Mountains  |
QUOTE Eric also recomends jb welding them into the contorl arm and installing zerks, I have not yet, again because I am not sure how long they will be in there. Maybe Eric can add some more tips here, all my info came from him. Pretty much spot on James. Jeff, these bushings don't compress. They're very hard at 70D. Here's some final updates to the 70D bushing thread: 1. Use the McMaster 1x3" sanding drum to hone the bore to match the shaft. As James mentioned, this is a trial fit method. I like to use the drum in a drill press and spin the bushing as I move it up and down. Also, as mentioned herein, the bushing can get warm and expand. What is a "snug fit" just after honing will become a tight to no fit when it cools slightly. Do one until it just fits, then move on to another. While you're honing that bushing the first one will cool enough to trial fit. THEY SHOULD BE VERY SNUG. The weight of the car and the grease will allow for precise movement without binding. Once you have the trial fit on each shaft, keep the units together. McMaster Parts #46715A84 2. Next, trial fit the bushings in the arm. The arms are not precise and (hopefully) your bushing hone job is. This means you may need to take a little bit more off the inside to get the shaft through bushing. Before honing again, try different combinations. Make a mental note and keep the bushings and rod ends in the same orientation throughout this process. 3. Once you get the arms to fit through the bushings you'll need to address the tops. I do this with a sanding disc, again, in the drill press. As mentioned above, keep the units together in the same orientation now that you have them all fitting in the arms. Take one bushing at a time and put it in the press vise if you have one and mill the top down using 80 grit and disc holder McMaster Part #4702A71. You'll probably end up taking almost 1/2 the beveled step down in this process. Again, trial fit until the knurled edges of the shaft are exposed on each end. Try to take equal amounts off the top of each bushing. 4. Once you have all of the shafts fitting in the bushings and the ends of the bushings are set to the proper depth behind the knurled ends, JB Weld the bushings in place and forget about them for 24 hours. 5. Install zerks 15/16" down from the lip. On the outside section of the tube (the long tube side) install the zerk in the center of the tube facing back toward the hub. On the inside section of the tube (the part closest to where it bolts to the body mount) install the zerk down and by the handbrake tab (early cars). To install zerks properly you'll want to follow a few simple steps. a ) mask off the location with 3M blue tape and make a x mark where you want the zerk to go. b ) use a punch and indent the arm where you are going to drill (on the x presumably). c ) get a good quality bit that won't dull the first time you use it and make sure it's the exact size you need to tap your zerk hole. d ) drill and tap. e ) remove the tape and install the zerk. DON'T GO CRAZY TRYING TO LINE UP THE ZERK WHERE YOU WANT IT! It will snap off in your newly tapped hole. These are not the standard plastic bushings. They are made by the same manufacturer but using the hardest compound they have. If installed properly and lubricated annually they should last a lifetime and never squeak. That said; James brings up a good point... he may not have them in there forever. I don't think JB Weld will be a problem as all you would need to do is heat them with a torch and the JB weld should come loose. I do suggest the 15/16" placement of the zerks because that is where the Elephant PolyBronze zerks go. If you do decide to install Elephants you'll be ready to go. In his case, he has the Rebel unit up front and may want to go with the Rebel 914 rears when they come available. Based upon the Rebel "teflon" type front technology you won't need zerks but those holes can easily be plugged if you go that route.. |
|
|
|
| Eric_Shea |
May 29 2013, 09:36 AM
Post
#26
|
|
PMB Performance Group: Admin Posts: 19,304 Joined: 3-September 03 From: Salt Lake City, UT Member No.: 1,110 Region Association: Rocky Mountains |
RE: Crack - Call Troy and get it in. I think he has a window right now between Mike's car and mine. 1/2 hour fix.
I think your bound up arm caused this. |
|
|
|
| JamesM |
May 29 2013, 10:06 AM
Post
#27
|
|
Caretaker of 914s - Master of Fuel Injection Group: Members Posts: 2,304 Joined: 6-April 06 From: Kearns, UT Member No.: 5,834 Region Association: Intermountain Region |
QUOTE(Eric_Shea @ May 29 2013, 07:36 AM) RE: Crack - Call Troy and get it in. I think he has a window right now between Mike's car and mine. 1/2 hour fix. I think your bound up arm caused this. yeah, can he get it in before like, friday though? still need to get it aligned before sunday |
|
|
|
| JamesM |
May 29 2013, 10:30 AM
Post
#28
|
|
Caretaker of 914s - Master of Fuel Injection Group: Members Posts: 2,304 Joined: 6-April 06 From: Kearns, UT Member No.: 5,834 Region Association: Intermountain Region |
Haven't hooked the sway bar back up yet or got an alignment yet, but took it out for the first test drive this morning and I am loving it! SO much quieter and smoother now, I was aiming for imperfections in the road just so I could enjoy the lack of a ruckus that used to be caused by even a tiny pebble.
Don't think I will need to go stiffer torsion bars in the front, everything still feels pretty tight, I think hooking the sway bar back up should be enough. Still a bit of a squeak from the right rear (the side I didn't go too far on) so I will need to go back and work the face of that one a tiny bit more, but overall, WOW, I would be happy using this car on the street again. |
|
|
|
| SirAndy |
May 29 2013, 11:31 AM
Post
#29
|
|
Resident German Group: Admin Posts: 42,517 Joined: 21-January 03 From: Oakland, Kalifornia Member No.: 179 Region Association: Northern California |
QUOTE(Jeff Hail @ May 28 2013, 09:43 PM) Funny.. I just noticed this under the banner. "This site is not affiliated with Porsche in any way". Hilarious! Did Shea come up up with that disclaimer? (IMG:style_emoticons/default/poke.gif) I did ... What's so "Hilarious" about it? (IMG:style_emoticons/default/confused24.gif) |
 |
|
| 914_teener |
May 29 2013, 01:32 PM
Post
#30
|
|
914 Guru Group: Members Posts: 5,270 Joined: 31-August 08 From: So. Cal Member No.: 9,489 Region Association: Southern California |
Thanks for the info James...and Eric. I didn't know there was a thread on these?
Will do on the rears as suggested. I am hoping for at least three years play with these hard durometer bushings at least. Just a question on the fronts that you used James....how does the road noise and vibration stack up on the street in your opinion?. I know this is subjective since you ax your car apparently. Thanks for the thread. |
|
|
|
| JamesM |
May 29 2013, 03:38 PM
Post
#31
|
|
Caretaker of 914s - Master of Fuel Injection Group: Members Posts: 2,304 Joined: 6-April 06 From: Kearns, UT Member No.: 5,834 Region Association: Intermountain Region |
QUOTE(914_teener @ May 29 2013, 11:32 AM) Thanks for the info James...and Eric. I didn't know there was a thread on these? Will do on the rears as suggested. I am hoping for at least three years play with these hard durometer bushings at least. Just a question on the fronts that you used James....how does the road noise and vibration stack up on the street in your opinion?. I know this is subjective since you ax your car apparently. Thanks for the thread. I would suspect you would get a lot longer then 3 years out of the rears if they are installed properly, and re-lubed on a semi regular basis. As for how they stack up on the street, keep in mind I have only driven of them for about 10 minutes at this point, but compared to the polys its a HUGE difference. I had for the most part stopped driving this car on the street when I moved to Utah due to it just being to rough and noisy (didnt bother me on califormia freeways as they were a lot smoother) With the new setup being so fluid its allowing the suspension to absorb the bumps rather then transmit them through the chasis (or just ripping the chasis apart) so despite being 100% solid bushings they give a suprising smooth ride. Ill give an update after i get the car alligned and get more time on them, but right now I am thinking I am going to start driving it on the street more. This is on a car running no carpet, no sound pads, and 215/45-16s with very stiff sidewalls at 37PSI cold. To add a little more perspective, I had had a rattle comming from behind my head for quite a while (either the window seal or possibly the engine lid) I didnt really pay to much attention to it before as the entire car was resonating sound. On my short test drive all i could think of was how I wanted to fix that rattle as it was the only thing I was picking up on other then the sound of the engine. I would guess that on a stock car the ride would be not at all unplesant. I still need to hook up the sway bar again, but with just bilstiens and turbo tie rods the front end feels razor sharp. |
|
|
|
| Jeff Hail |
May 30 2013, 07:33 AM
Post
#32
|
|
Senior Member Group: Members Posts: 1,141 Joined: 3-May 07 From: LA/ CA Member No.: 7,712 |
QUOTE(Eric_Shea @ May 29 2013, 08:20 AM) QUOTE Eric also recomends jb welding them into the contorl arm and installing zerks, I have not yet, again because I am not sure how long they will be in there. Maybe Eric can add some more tips here, all my info came from him. Pretty much spot on James. Jeff, these bushings don't compress. They're very hard at 70D. Here's some final updates to the 70D bushing thread: 1. Use the McMaster 1x3" sanding drum to hone the bore to match the shaft. As James mentioned, this is a trial fit method. I like to use the drum in a drill press and spin the bushing as I move it up and down. Also, as mentioned herein, the bushing can get warm and expand. What is a "snug fit" just after honing will become a tight to no fit when it cools slightly. Do one until it just fits, then move on to another. While you're honing that bushing the first one will cool enough to trial fit. THEY SHOULD BE VERY SNUG. The weight of the car and the grease will allow for precise movement without binding. Once you have the trial fit on each shaft, keep the units together. McMaster Parts #46715A84 2. Next, trial fit the bushings in the arm. The arms are not precise and (hopefully) your bushing hone job is. This means you may need to take a little bit more off the inside to get the shaft through bushing. Before honing again, try different combinations. Make a mental note and keep the bushings and rod ends in the same orientation throughout this process. 3. Once you get the arms to fit through the bushings you'll need to address the tops. I do this with a sanding disc, again, in the drill press. As mentioned above, keep the units together in the same orientation now that you have them all fitting in the arms. Take one bushing at a time and put it in the press vise if you have one and mill the top down using 80 grit and disc holder McMaster Part #4702A71. You'll probably end up taking almost 1/2 the beveled step down in this process. Again, trial fit until the knurled edges of the shaft are exposed on each end. Try to take equal amounts off the top of each bushing. 4. Once you have all of the shafts fitting in the bushings and the ends of the bushings are set to the proper depth behind the knurled ends, JB Weld the bushings in place and forget about them for 24 hours. 5. Install zerks 15/16" down from the lip. On the outside section of the tube (the long tube side) install the zerk in the center of the tube facing back toward the hub. On the inside section of the tube (the part closest to where it bolts to the body mount) install the zerk down and by the handbrake tab (early cars). To install zerks properly you'll want to follow a few simple steps. a ) mask off the location with 3M blue tape and make a x mark where you want the zerk to go. b ) use a punch and indent the arm where you are going to drill (on the x presumably). c ) get a good quality bit that won't dull the first time you use it and make sure it's the exact size you need to tap your zerk hole. d ) drill and tap. e ) remove the tape and install the zerk. DON'T GO CRAZY TRYING TO LINE UP THE ZERK WHERE YOU WANT IT! It will snap off in your newly tapped hole. These are not the standard plastic bushings. They are made by the same manufacturer but using the hardest compound they have. If installed properly and lubricated annually they should last a lifetime and never squeak. That said; James brings up a good point... he may not have them in there forever. I don't think JB Weld will be a problem as all you would need to do is heat them with a torch and the JB weld should come loose. I do suggest the 15/16" placement of the zerks because that is where the Elephant PolyBronze zerks go. If you do decide to install Elephants you'll be ready to go. In his case, he has the Rebel unit up front and may want to go with the Rebel 914 rears when they come available. Based upon the Rebel "teflon" type front technology you won't need zerks but those holes can easily be plugged if you go that route.. Capece Mr. Shea, 70 is a pretty firm durometer. You could drive on that or roller skate. |
|
|
|
|
1 User(s) are reading this topic (1 Guests and 0 Anonymous Users)
0 Members:

|
Lo-Fi Version | Time is now: 18th September 2026 - 09:28 AM |
Invision Power Board
v9.1.4 © 2026 IPS, Inc.