|
|
|
Porsche, and the Porsche crest are registered trademarks of Dr. Ing. h.c. F. Porsche AG.
This site is not affiliated with Porsche in any way. Its only purpose is to provide an online forum for car enthusiasts. All other trademarks are property of their respective owners. |
|
|

  |

| rick 918-S |
 Jun 14 2013, 09:01 PM Jun 14 2013, 09:01 PM
Post
#1
|
|
Hey nice rack! -Celette  Group: Members Posts: 20,460 Joined: 30-December 02 From: Now in Superior WI Member No.: 43 Region Association: Northstar Region |
This is the method I use to split spot welds. Some guys use the Blair spot weld drills. I have nothing against them but when I had my shop I found that my employees had no concern for the cost of the bits or the way they were using them. They would break the hardened cutters and toss them like a used rubber on prom night or they would over drill and end up weakening the attachment for the new panel.
If used correctly the Blair is a nice tool. The proper use is to use the cutter to score the sacrificial panel then use a air chisel or a hand chisel to split the panel. Nobody uses it that way. At least no one I've ever had the experience of seeing use the tool. So, I imposed this method in my shop and would spot check the results to be sure my guys were doing it correctly. This is my way not the only way. First I trim away as much of the panel as I can and usually try to leave only the spot weld strip. Run a grinder over the spot weld strip to show the spot welds. 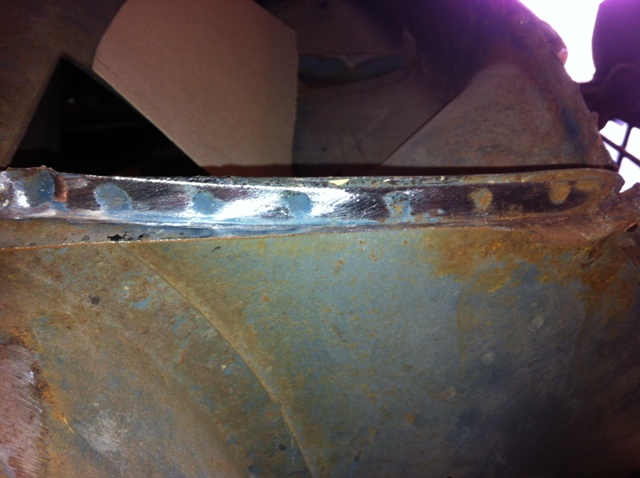 Then I use a 3" grinder and grind the spot welds. My goal is to thin the metal not grind through. 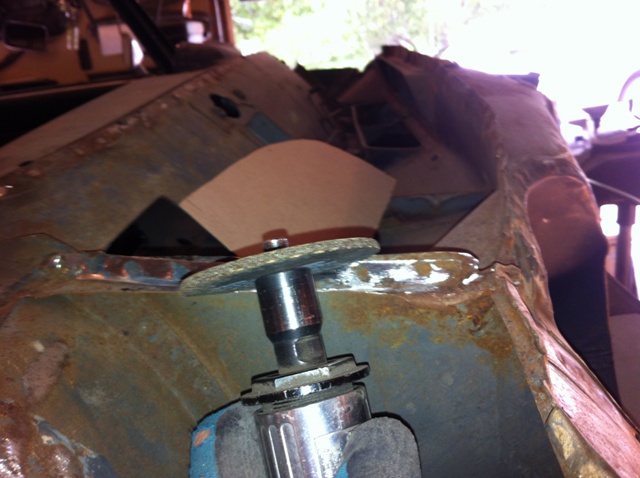 Here is what it looks like after I grind. 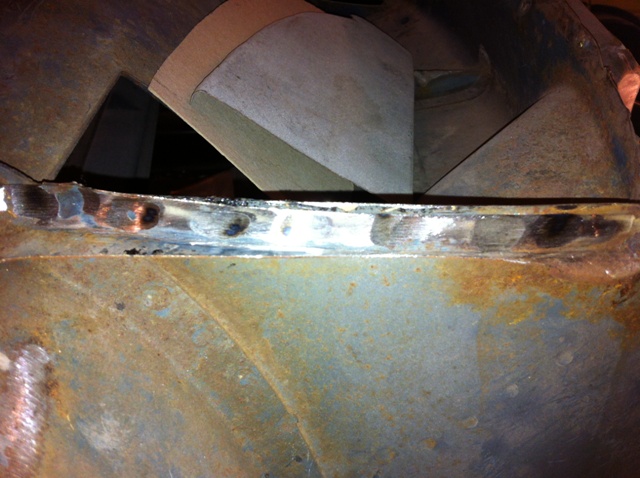 I like to use a screw driver that I have sharpened to a chisel end. I work it in and around the spot welds until I get it split. 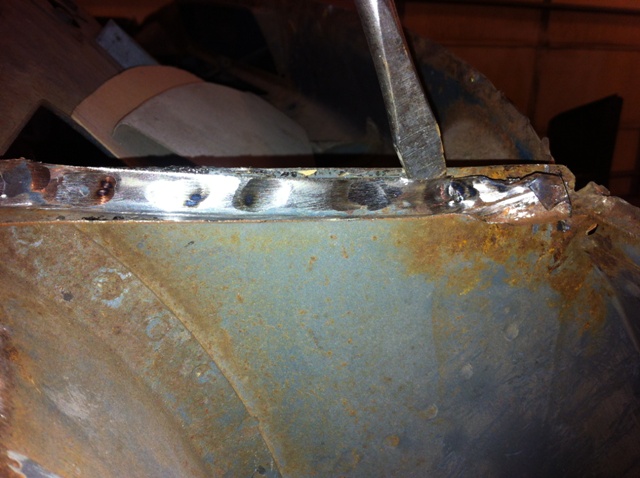 Here is what is left after I split the spots. Notice the actual spot welds are still showing on the body. 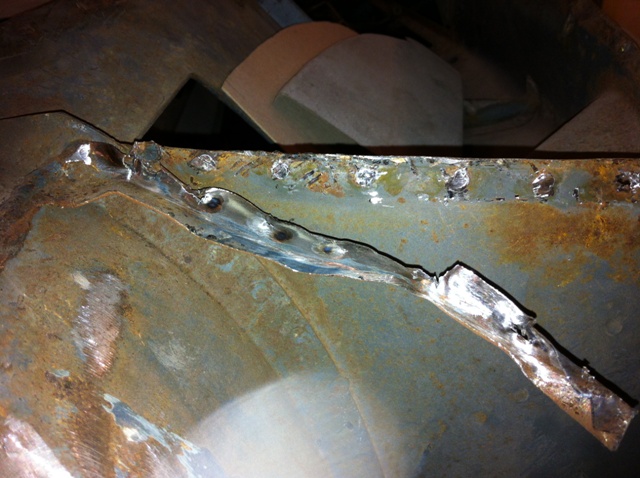 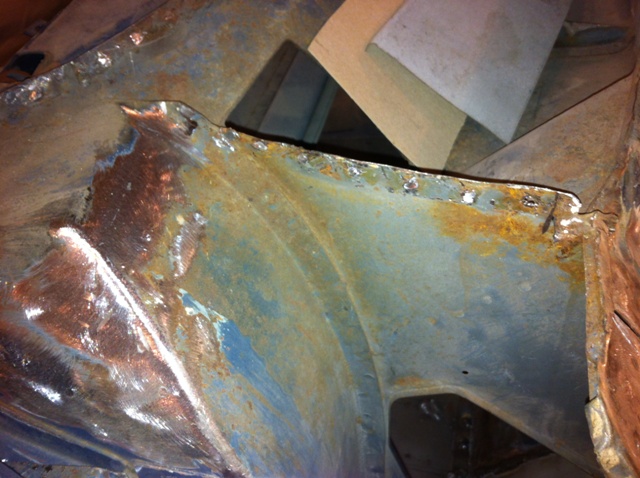 After grinding and prepping the body for the replacement panel. 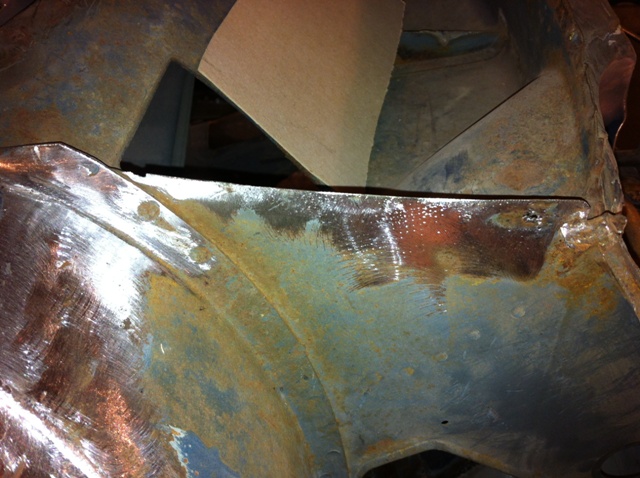 This is not the fastest way but this is how I prevent damaging the car and weakening the metal I want to re-use on the body. |
   |

 
|
| Cairo94507 |
Jun 15 2013, 06:22 AM
Post
#2
|
|
Michael Group: Members Posts: 9,759 Joined: 1-November 08 From: Auburn, CA Member No.: 9,712 Region Association: Northern California |
Wow that is a very nice work. Hard to find shops that will go the extra mile these days to preserve the original metal in the best possible condition.
|
|
|
|
| TargaToy |
Jun 15 2013, 06:54 AM
Post
#3
|
|
-NONSOLIS RADIOS SEDIOUIS FULMINA MITTO- Group: Members Posts: 692 Joined: 26-March 10 From: DelMarVa Peninsula Member No.: 11,509 Region Association: MidAtlantic Region |
|
|
|
|
| ChrisFoley |
Jun 15 2013, 07:02 AM
Post
#4
|
|
I am Tangerine Racing Group: Members Posts: 7,925 Joined: 29-January 03 From: Bolton, CT Member No.: 209 Region Association: None |
Very well demonstrated Rick!
|
|
|
|
| bulitt |
Jun 15 2013, 05:44 PM
Post
#5
|
|
Achtzylinder Group: Members Posts: 4,188 Joined: 2-October 11 Member No.: 13,632 Region Association: South East States |
"Hate" is an awful strong word. I hate spot welds!
So you must be using an actual spotwelder to reattach panels? I think If I was doing major panel work I would invest in one. |
|
|
|
| ConeDodger |
Jun 15 2013, 05:53 PM
Post
#6
|
|
Apex killer! Group: Members Posts: 23,588 Joined: 31-December 04 From: Tahoe Area Member No.: 3,380 Region Association: Northern California |
I actually use the spot weld drill bits. They are about $15-$18 each so Rick is right, abusing them is stupid. It takes a fine touch with the drill to use them properly. Go too deep and you have a hole where you will want metal for the new panel... (IMG:style_emoticons/default/dry.gif)
|
 |
|
| r_towle |
Jun 15 2013, 08:33 PM
Post
#7
|
|
Custom Member Group: Members Posts: 24,574 Joined: 9-January 03 From: Taxachusetts Member No.: 124 Region Association: North East States |
Blah blah blah
I would have learned more if the was not the Benz... |
|
|
|
| rick 918-S |
Jun 15 2013, 09:16 PM
Post
#8
|
|
Hey nice rack! -Celette Group: Members Posts: 20,460 Joined: 30-December 02 From: Now in Superior WI Member No.: 43 Region Association: Northstar Region |
QUOTE(bulitt @ Jun 15 2013, 06:44 PM)  "Hate" is an awful strong word. I hate spot welds! So you must be using an actual spotwelder to reattach panels? I think If I was doing major panel work I would invest in one. No you don't have to use a panel spotter to reinstall the panels. I have one but depending on what I'm working on I will either mig, tig, or spot weld. How this whole discussion got started is when tomeric914 posted this thread http://www.914world.com/bbs2/index.php?showtopic=211105 And was posting about using the Blair spot weld drill to remove panels. So this is the thread I stated I would post. Now welding is a whole nuther thread... (IMG:style_emoticons/default/welder.gif) |
|
|
|
| rick 918-S |
Jun 15 2013, 09:18 PM
Post
#9
|
|
Hey nice rack! -Celette Group: Members Posts: 20,460 Joined: 30-December 02 From: Now in Superior WI Member No.: 43 Region Association: Northstar Region |
QUOTE(r_towle @ Jun 15 2013, 09:33 PM) Blah blah blah I would have learned more if the was not the Benz... I gotsa finish this thing some day! (IMG:style_emoticons/default/sad2.gif) |
|
|
|
| stateofidleness |
Jun 16 2013, 11:45 AM
Post
#10
|
|
Senior Member Group: Members Posts: 810 Joined: 1-September 07 From: Canyon Lake, Texas! Member No.: 8,065 Region Association: None |
Rick,
Thanks for posting! I'm toying with the idea of replacing the rear pans on mine after removing the tar coating and finding more rust than I thought... When looking at the underside of the car, it appears the whole floor was one piece? I've seen the repro pans for sale and was wondering what is the best way to remove the exisiting pans cleanly in preparation for the new pans? How should it be cut properly to separate it from the "front" pans underneath the middle crossmember thing? |
|
|
|
| rick 918-S |
Jun 16 2013, 03:31 PM
Post
#11
|
|
Hey nice rack! -Celette Group: Members Posts: 20,460 Joined: 30-December 02 From: Now in Superior WI Member No.: 43 Region Association: Northstar Region |
I look at the pan in the car and try to leave what I can of the original one. However you usually end up using the whole repair panel because where the original pan is welded to the longs it's usually rusty enough to merit just changing it. Some day maybe I can do a pan replacement how-to. (IMG:style_emoticons/default/confused24.gif)
|
|
|
|
|
1 User(s) are reading this topic (1 Guests and 0 Anonymous Users)
0 Members:

|
Lo-Fi Version | Time is now: 17th May 2024 - 04:27 PM |
Invision Power Board
v9.1.4 © 2024 IPS, Inc.