|
|
|
Porsche, and the Porsche crest are registered trademarks of Dr. Ing. h.c. F. Porsche AG.
This site is not affiliated with Porsche in any way. Its only purpose is to provide an online forum for car enthusiasts. All other trademarks are property of their respective owners. |
|
|

  |

| jmargush |
 Jun 22 2013, 06:21 PM Jun 22 2013, 06:21 PM
Post
#1
|
|
Member  Group: Members Posts: 460 Joined: 8-June 04 From: Goshen, IN Member No.: 2,176 |
I ran the first try for my valve train geometry and I need some input or votes of confidence!
9590 Cam from Raby Waiting on my adjustable push rod tool and shim kit (in case I need it). So I just put in the stock push rod and cycled the intake valve. Spec lift is to be .426 and I got .4365 which is within the 5% rule. So I cycled it back to half way open and here is what the adjuster to valve looks like. is this good or do I need to play with push rod length? Any input is appreciated. Attached thumbnail(s) 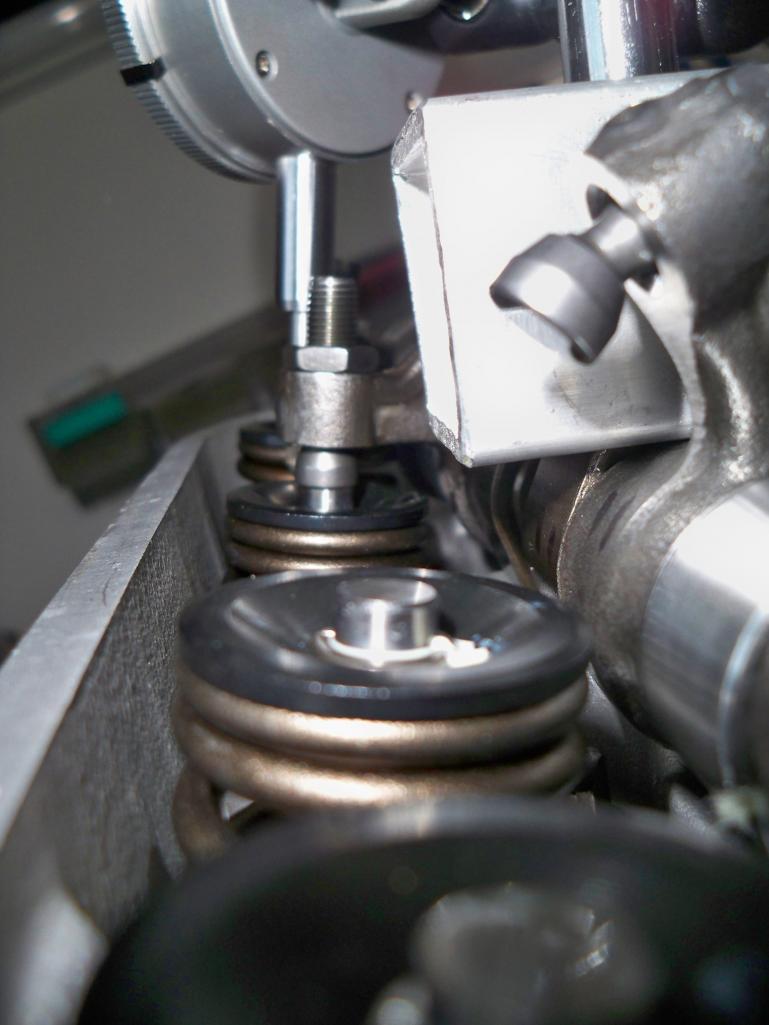 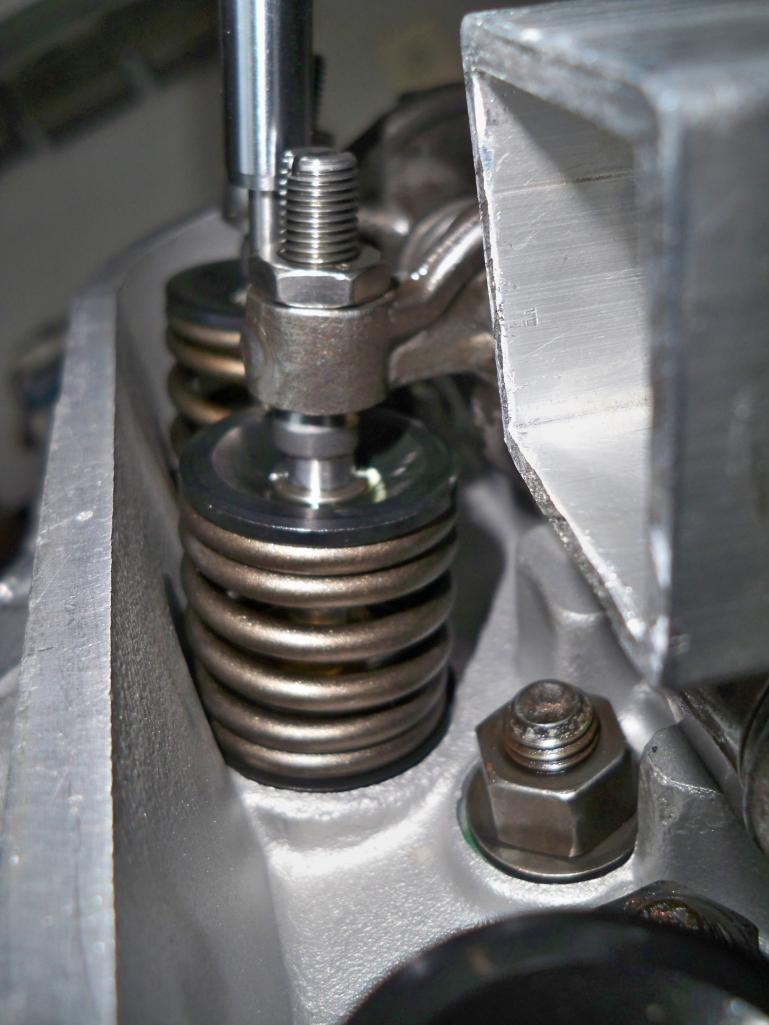
|
   |

 
|
| pilothyer |
Jun 23 2013, 12:54 PM
Post
#2
|
|
Member Group: Members Posts: 838 Joined: 21-May 08 From: N. Alabama Member No.: 9,080 Region Association: South East States |
As far as I can tell, by looking at the picture, the geometry looks to be correct and should keep your valves and guides happy.
Even if the original pushrods give you favorable results, you should consider using the steel pushrods anyway. You will have a quieter more efficient valve train. .............."It's all in the combination" . (IMG:style_emoticons/default/smile.gif) |
|
|
|
| malcolm2 |
Jun 23 2013, 01:10 PM
Post
#3
|
|
Advanced Member Group: Members Posts: 2,745 Joined: 31-May 11 From: Nashville Member No.: 13,139 Region Association: South East States |
Raby's directions worked for me. measure 2 or 3 times...cut once. Your pix look good.
|
|
|
|
| stugray |
Jun 23 2013, 02:05 PM
Post
#4
|
|
Advanced Member Group: Members Posts: 3,824 Joined: 17-September 09 From: Longmont, CO Member No.: 10,819 Region Association: None |
looks pretty good.
The hardest part in the instructions is determining what is "straight". Just out of curiosity.. what does your cam card card say for both "cam lobe lift" & "valve lift" - Intake & exhaust. My first cam card showed only lobe lift & I had to figure out what valve lift was supposed to be by myself. Stu |
|
|
|
| jmargush |
Jun 23 2013, 07:53 PM
Post
#5
|
|
Member Group: Members Posts: 460 Joined: 8-June 04 From: Goshen, IN Member No.: 2,176 |
I am definitely going to use the chrome molly pushrods I was just trying these while I was waiting for the adjustable one to show up.
Cam Card calls out Valve lift .426 both exhaust and intake. doesn't say anything about lobe lift |
|
|
|
| jmargush |
Jun 24 2013, 08:03 AM
Post
#6
|
|
Member Group: Members Posts: 460 Joined: 8-June 04 From: Goshen, IN Member No.: 2,176 |
How did you guys go about cutting your pushrods?
Cut a little long and grind to finished size? |
|
|
|
| malcolm2 |
Jun 26 2013, 09:36 AM
Post
#7
|
|
Advanced Member Group: Members Posts: 2,745 Joined: 31-May 11 From: Nashville Member No.: 13,139 Region Association: South East States |
QUOTE(jmargush @ Jun 24 2013, 09:03 AM)  How did you guys go about cutting your pushrods? Cut a little long and grind to finished size? Used a copper tube cutter. Very small increases in wheel depth and a couple extra wheels, then some filing, light sanding. Bought a 24" long mic from Harbor Freight too. |
|
|
|
| stugray |
Jun 26 2013, 10:05 AM
Post
#8
|
|
Advanced Member Group: Members Posts: 3,824 Joined: 17-September 09 From: Longmont, CO Member No.: 10,819 Region Association: None |
If I remember correctly, I clamped the pushrod in a vise and used a hacksaw.
The vise was used as a guide for the saw. I cut a little long and used my bench sander to fine adjust. I also bought the 24" HF calipers. Then I had a some teflon blocks I used to pound the ends in. Stu |
|
|
|
|
1 User(s) are reading this topic (1 Guests and 0 Anonymous Users)
0 Members:

|
Lo-Fi Version | Time is now: 17th May 2024 - 02:45 PM |
Invision Power Board
v9.1.4 © 2024 IPS, Inc.