|
|
|
Porsche, and the Porsche crest are registered trademarks of Dr. Ing. h.c. F. Porsche AG.
This site is not affiliated with Porsche in any way. Its only purpose is to provide an online forum for car enthusiasts. All other trademarks are property of their respective owners. |
|
|

  |

| r3dplanet |
 Jul 8 2018, 09:10 PM Jul 8 2018, 09:10 PM
Post
#201
|
|
Senior Member  Group: Members Posts: 679 Joined: 3-September 05 From: Portland, Oregon Member No.: 4,741 Region Association: None |
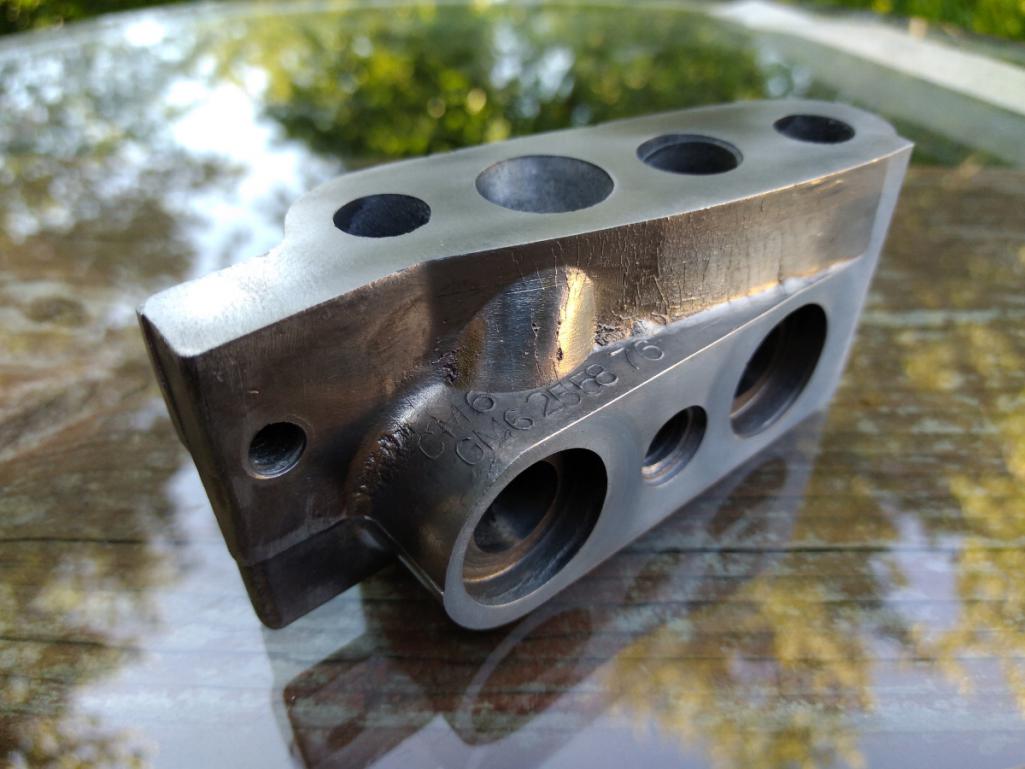
Moving along, I spent some time polishing the 90 degree oil cooler adapter that connects the engine case to the oil cooler. In the future I'm positive that it will get changed to a remote oil cooler, but this will certainly work well enough for now.
 Then I went to powder coat it and some other parts, but made the unpleasant discovery that the only colors I have left on my shelf are Ford Blue, Chrysler Orange, and chrome. So chrome it is! As you can see, the finished product is really trashy. I have no idea where the bubbles came from, especially after cleaning it so well. Now it looks awful, but I don't care enough to strip it and re-coat it. Ta da! Professional results every time when yours truly is involved! 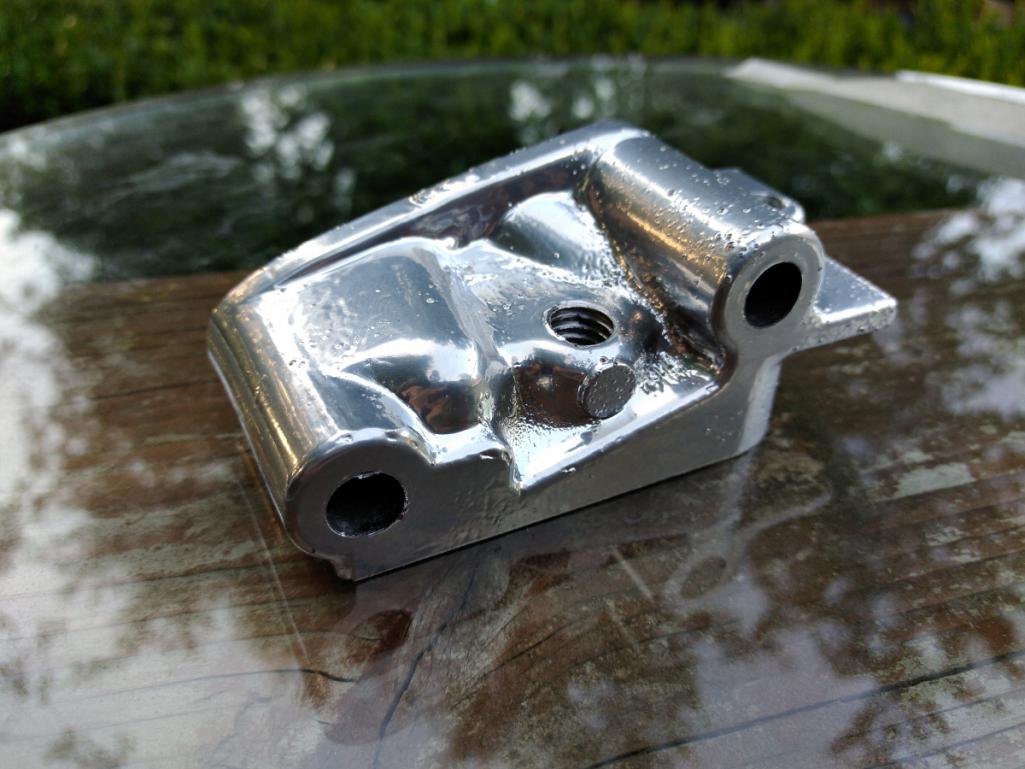 And then the PCV tube and clamp. Note that the tube installs with a little Viton o-ring. Then it's clamped into place. The top of the tube pokes through the engine shroud and then to ... I'm not sure. A PCV valve for sure, or maybe a filter-to-carb adapter. Something. I've heard it whispered that a Volvo PCV valve is exactly the right size. We'll see. 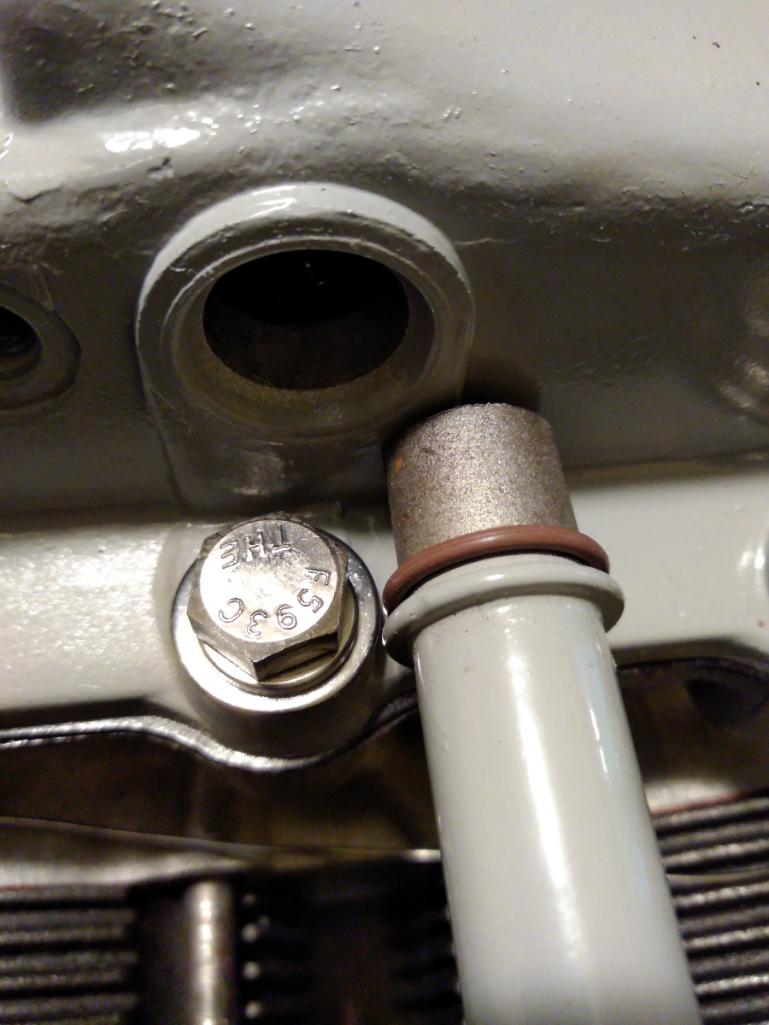 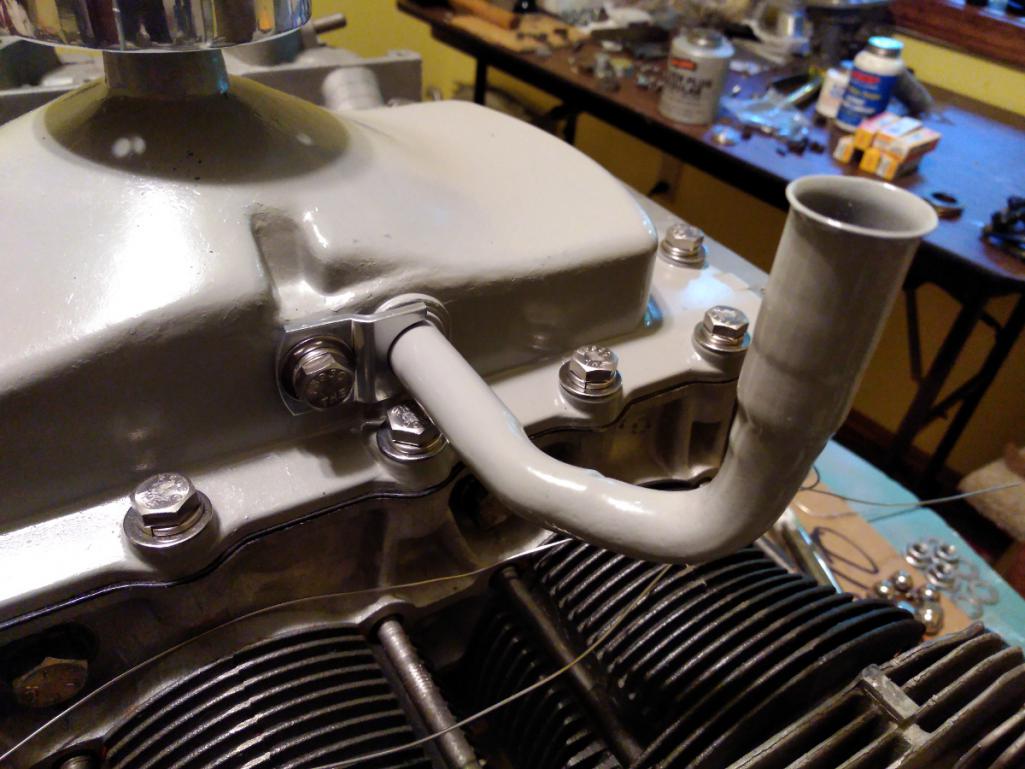 |
   |

 
|
| r3dplanet |
Jul 8 2018, 09:15 PM
Post
#202
|
|
Senior Member Group: Members Posts: 679 Joined: 3-September 05 From: Portland, Oregon Member No.: 4,741 Region Association: None |
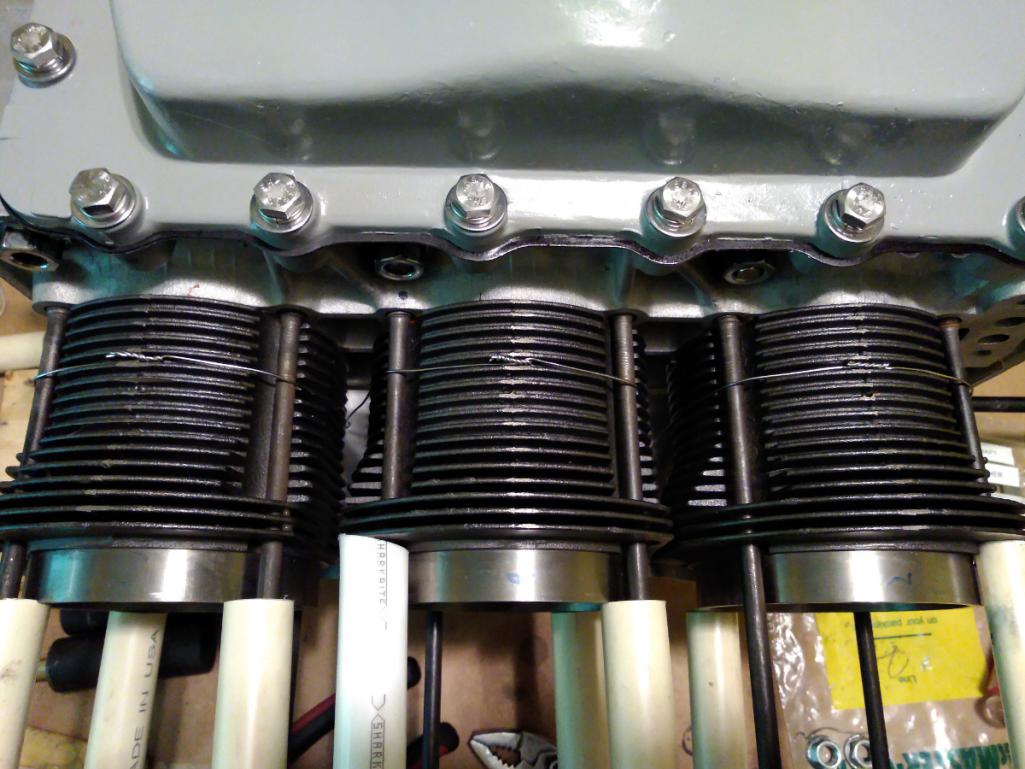
A quick note on the cylinder heat shields. They sit underneath and would normally clip into place if the stock cylinders are used. Since these are not stock cylinders, I'm using stainless wire. Not classy, but it works.
 |
|
|
|
| r3dplanet |
Jul 8 2018, 09:55 PM
Post
#203
|
|
Senior Member Group: Members Posts: 679 Joined: 3-September 05 From: Portland, Oregon Member No.: 4,741 Region Association: None |
In modern times, whenever the word "EMPI" gets involved I get a little nervous. So it was again when I went to install the other cylinder head. The thickness of the copper head gaskets are supposed to be .040, but .035-.040 is fine. As long as they all match, right? Here's the current collection of head gaskets:
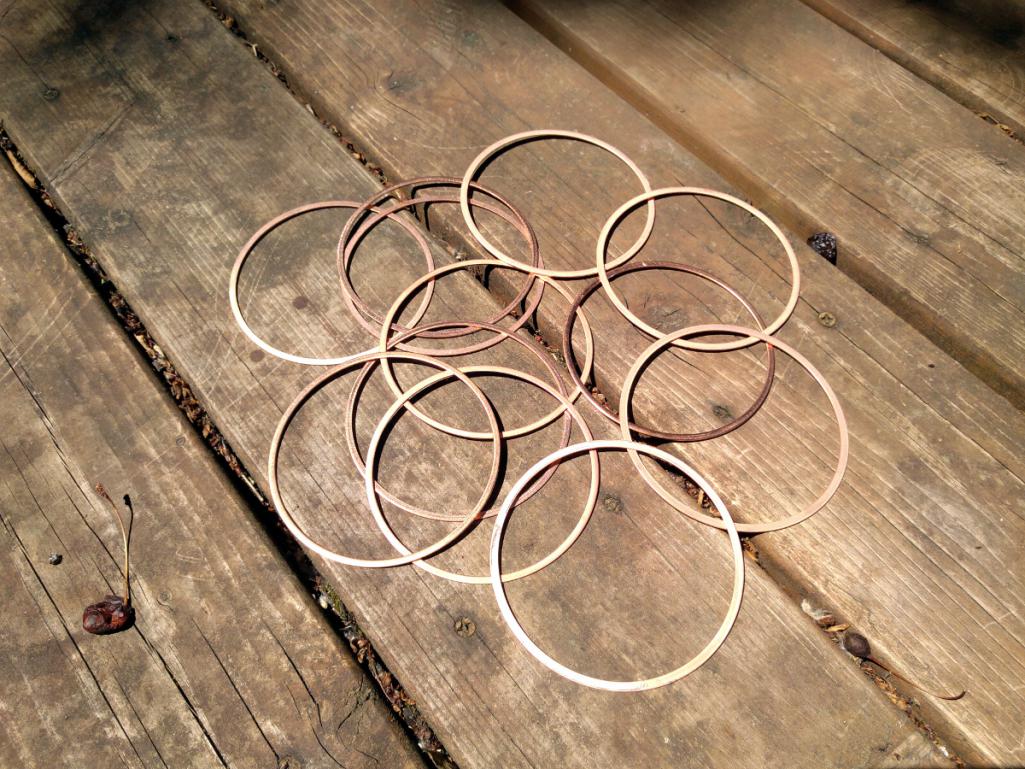 Because the step has been removed from the heads and opened to 94mm, we're using 94mm head gaskets. But I quickly found that these gaskets ranged in thickness from .034-.047. They don't compress so it's a big deal to have the right thickness. In one of the packs I bought it contained, weirdly, a 90.5mm gasket and three 92mm gaskets. Right. After visiting my local VW shop this morning I bought yet another package. And this time each gasket was perfect - 94mm, .039 thickness. So it's a little example of how EMPI can make great parts, but with quite a lot of variation. Then came a moment of panic when I went to trial fit the other cylinder head. It installed correctly but then the engine wouldn't turn over . W T F..>? After removing the head and doing what I should have done before in terms of quality control, the problem immediately became clear. I accidentally used one of the 92mm gaskets and it disallowed one of the pistons to fully rise. This was the point where I re-measured all of them. Once that was cleared up I moved to mocking up the second cylinder head. Observe that the heads are held onto the cylinders by way of six nuts on the top row, and six threaded studs on the bottom row. The top studs must be flange nuts. If just a standard washer is used instead the washer will bow out and become wiggly. To help prevent rust (remember the work where I had to use a nut cracker on each of these during disassembly?) I'm coating each stud with JetLube, torquing on the flange nut, and then installing an acorn nut to protect the threads. I splurged and bought 316 stainless fasteners from McMaster. The bottom row holds the head down with dual-purpose studs. That is, it holds down the head but it also provides a stud to which the rockers are mounted. I spent some time cleaning each of the internal and external threads on these. They are hardened steel. Here's one goobered in JetLube. 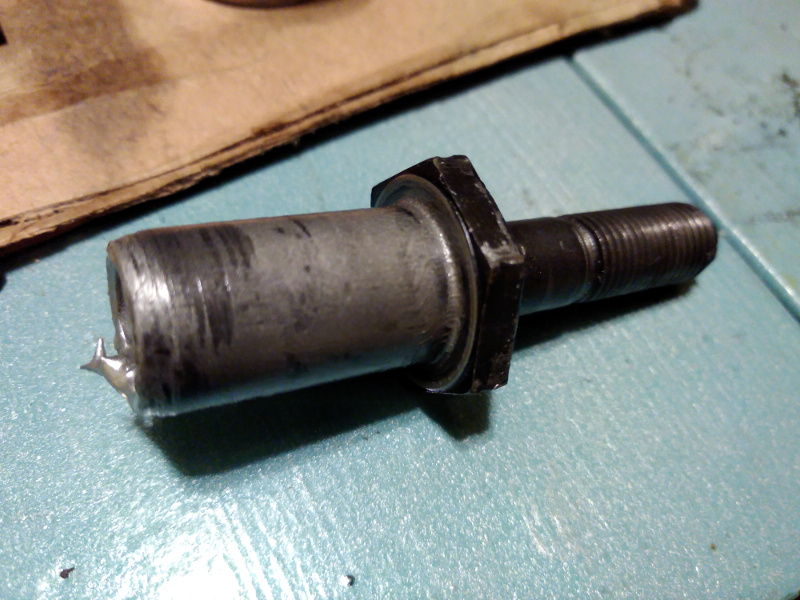 These require no special treatment for oxidization like the top row because they're always coated in oil instead of being exposed to the atmosphere. This is the time where I tighten up my girdle. The pushrods rest in holes positioned on the pushrod guides, one per valve pair. Note that the "U" is only on one side and faces "You." U for You. Like an '80s Danish band name. 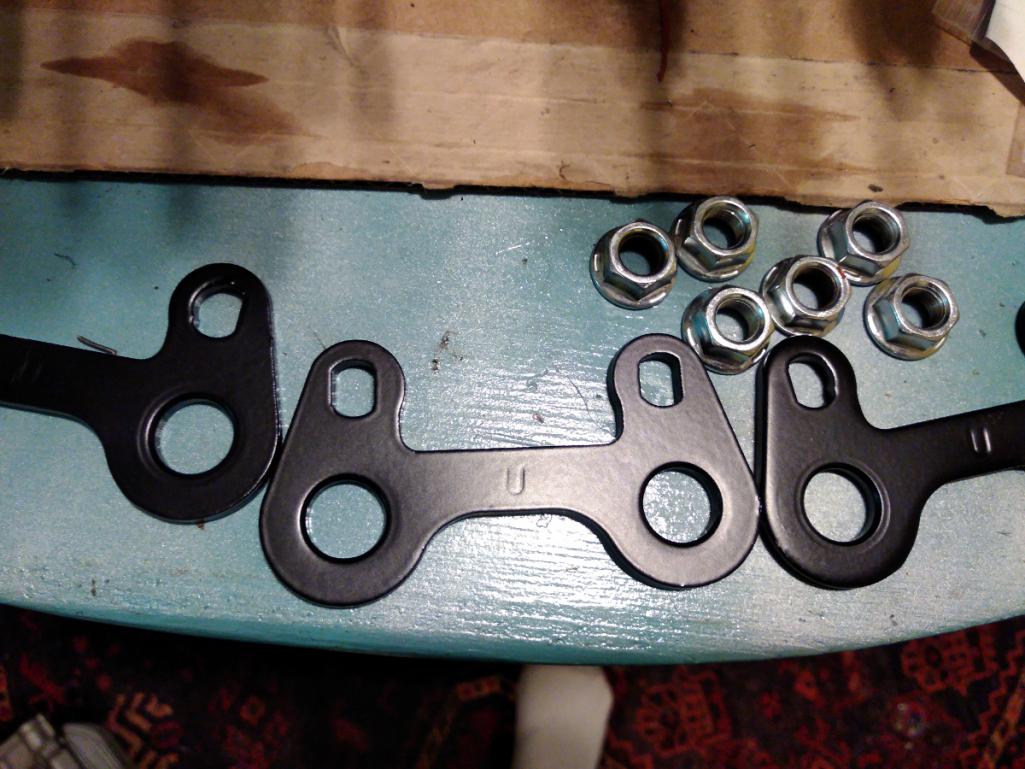 Very important note: The service manual says to torque the head nuts down to 38-40lbs, but that's way too high. That amount of force can pop out the case stud and then it's a Very Bad Day. Because the JetLube I use is messy and very slippery, I'm torquing the top nuts to 30 ft/lbs and the bottom row to 32 ft/lbs. I can always bump it a bit if necessary. I don't have the lifters or pushrod tubes installed yet because I'm waiting to do the rocker geometry. But here's what it looks like when mocked up. 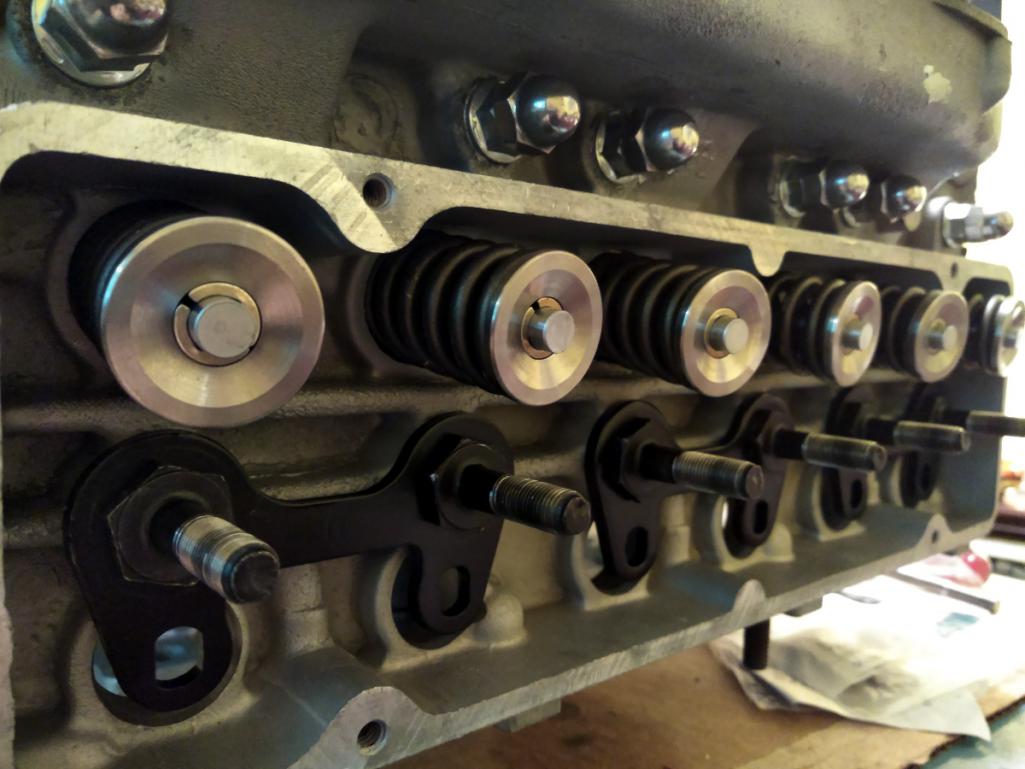 |
|
|
|
| r3dplanet |
Jul 8 2018, 10:06 PM
Post
#204
|
|
Senior Member Group: Members Posts: 679 Joined: 3-September 05 From: Portland, Oregon Member No.: 4,741 Region Association: None |
Just a few last notes for now.
I'm doing some passive work by soaking the lifters in some 30 weight dino oil. It isn't necessary but it makes me feel like things are still moving even when I'm down for a few days. This humble can normally contains the best coffee ever made. Admittedly I'm not a huge coffee drinker, but I'll lay this dead bird at your feet: if your opinion differs you should reflect on your coffee choices over long winter evenings. 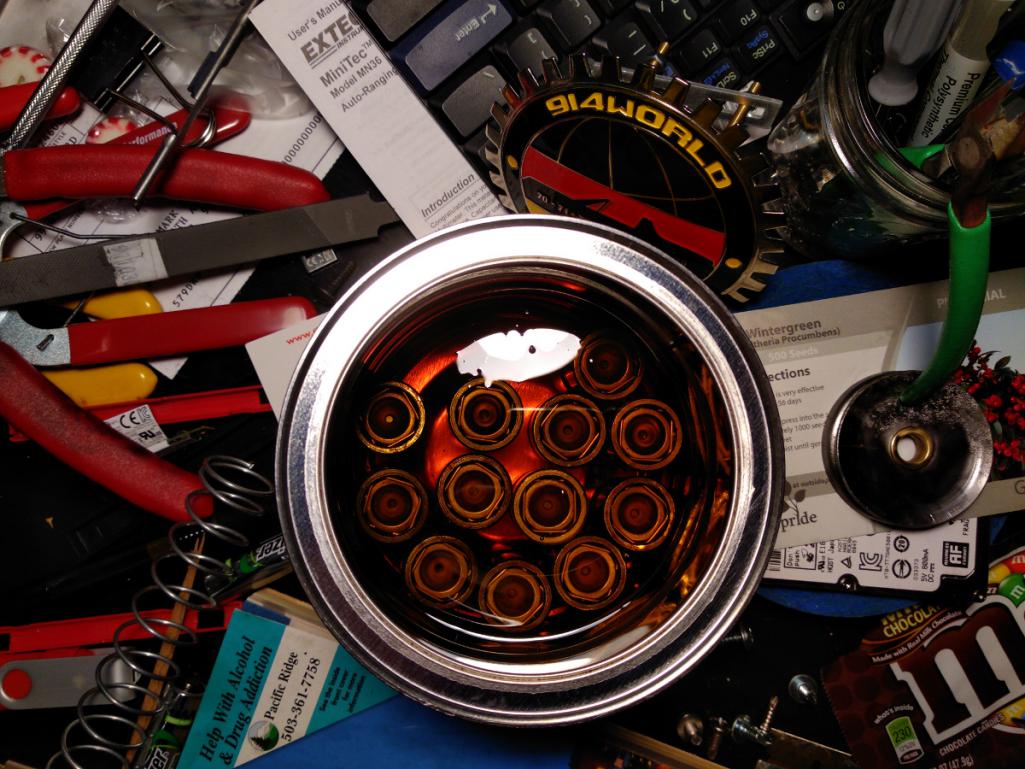 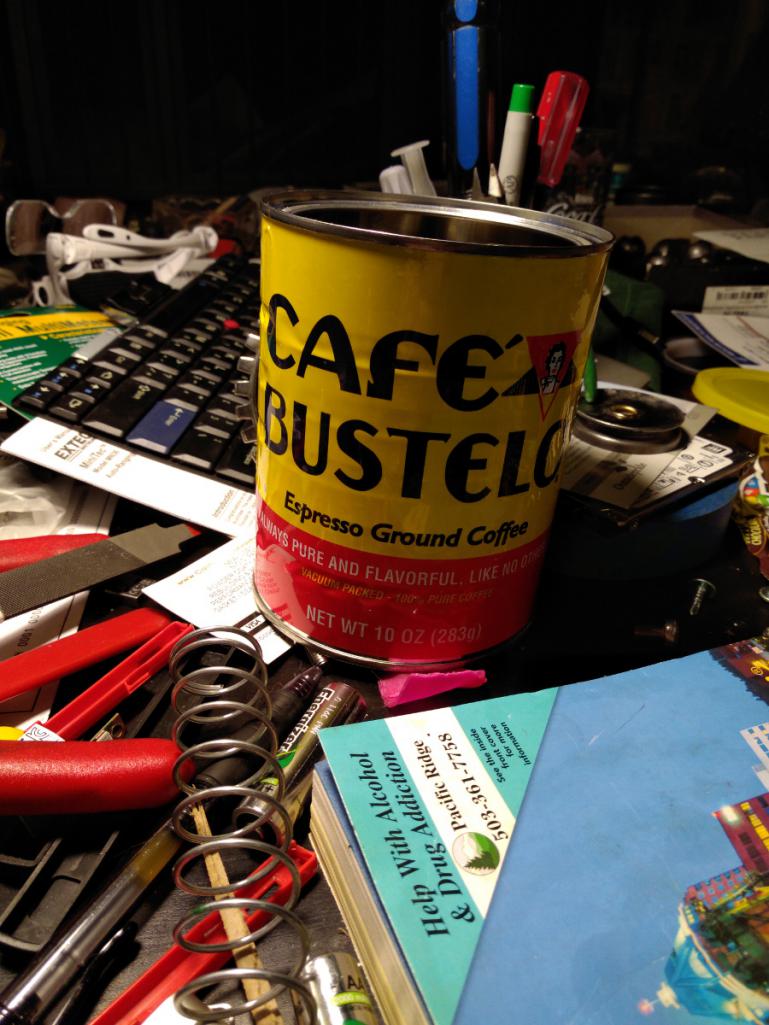 And here's the engine as of today. I'm running out of parts to assemble. Rad! 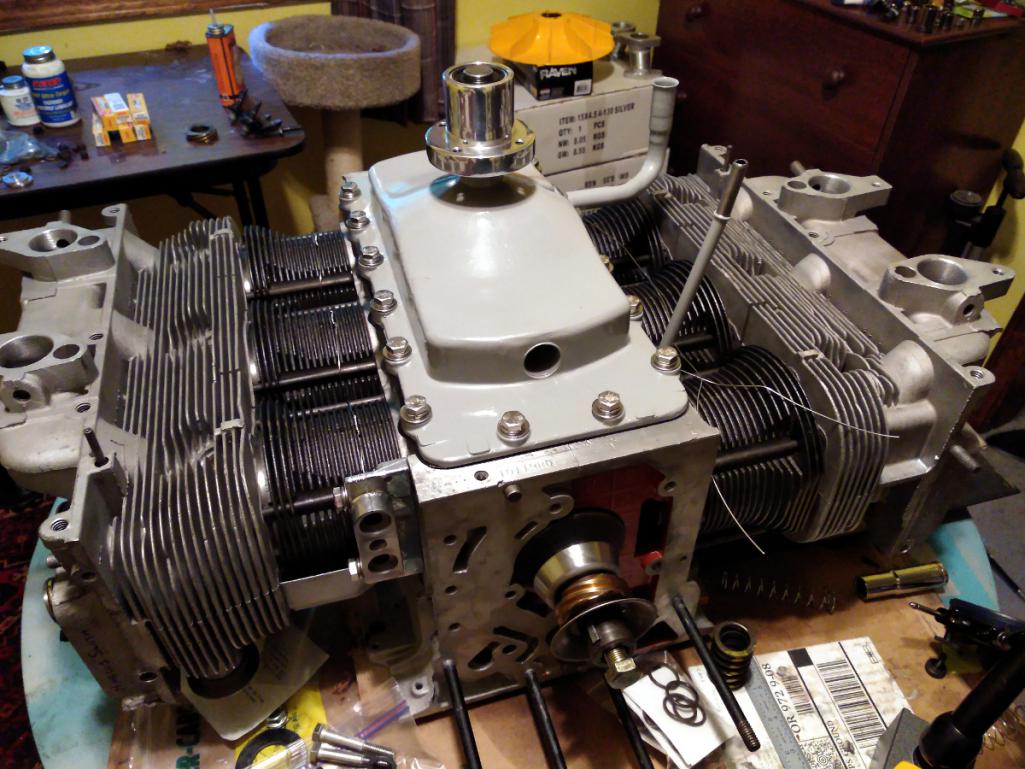 |
|
|
|
| Tbrown4x4 |
Jul 9 2018, 03:00 AM
Post
#205
|
|
Senior Member Group: Members Posts: 708 Joined: 13-May 14 From: Port Orchard, WA Member No.: 17,338 Region Association: None |
You did get the small o-rings under the rocker studs (nuts?). right?
The engine's looking great! I can't wait to see how it fits in the car. |
|
|
|
| VaccaRabite |
Jul 9 2018, 07:16 AM
Post
#206
|
|
En Garde! Group: Admin Posts: 13,807 Joined: 15-December 03 From: Dallastown, PA Member No.: 1,435 Region Association: MidAtlantic Region |
For the oil pump housing thats .002 too deep, here is what Jake told me to do a bunch of years ago. Took a little time but it worked.
Take a pane of glass and put some fine grade sandpaper on it (I used 800 grit). Using a good bit of oil, use that to slowly mill down the pump housing. Test periodically so that you don't accidentally take too much off. Doing this will get you exactly how much clearance you want at the oil pump. Zach |
|
|
|
| r3dplanet |
Jul 9 2018, 11:25 AM
Post
#207
|
|
Senior Member Group: Members Posts: 679 Joined: 3-September 05 From: Portland, Oregon Member No.: 4,741 Region Association: None |
Good point!
I didn't put them in now as it's just a mock up to make sure the crank can spin. I'll be sure to detail the proper install sequence when I have everything else ready. Thank you for pointing that out. QUOTE(Tbrown4x4 @ Jul 9 2018, 02:00 AM)  You did get the small o-rings under the rocker studs (nuts?). right? The engine's looking great! I can't wait to see how it fits in the car. |
|
|
|
| r3dplanet |
Jul 9 2018, 11:28 AM
Post
#208
|
|
Senior Member Group: Members Posts: 679 Joined: 3-September 05 From: Portland, Oregon Member No.: 4,741 Region Association: None |
Hey Zach,
Thanks for saying this. The new pump should arrive today, but if it's not the right size I'm going to have to get creative. This process sounds like a good way to get it dialed in. QUOTE(Vacca Rabite @ Jul 9 2018, 06:16 AM) For the oil pump housing thats .002 too deep, here is what Jake told me to do a bunch of years ago. Took a little time but it worked. Take a pane of glass and put some fine grade sandpaper on it (I used 800 grit). Using a good bit of oil, use that to slowly mill down the pump housing. Test periodically so that you don't accidentally take too much off. Doing this will get you exactly how much clearance you want at the oil pump. Zach |
|
|
|
| 914forme |
Jul 9 2018, 08:56 PM
Post
#209
|
|
Times a wastin', get wrenchin'! Group: Members Posts: 3,896 Joined: 24-July 04 From: Dayton, Ohio Member No.: 2,388 Region Association: None |
QUOTE(Vacca Rabite @ Jul 9 2018, 09:16 AM) For the oil pump housing thats .002 too deep, here is what Jake told me to do a bunch of years ago. Took a little time but it worked. Take a pane of glass and put some fine grade sandpaper on it (I used 800 grit). Using a good bit of oil, use that to slowly mill down the pump housing. Test periodically so that you don't accidentally take too much off. Doing this will get you exactly how much clearance you want at the oil pump. Zach And if you want to start making reeds for woodwind instruments you can use the same technique minus the oil. |
|
|
|
| Larry.Hubby |
Jul 9 2018, 09:27 PM
Post
#210
|
|
Member who doesn't post much, but has a long time in 914s Group: Members Posts: 189 Joined: 24-November 04 From: Palo Alto, CA Member No.: 3,172 Region Association: Northern California |
Hi Marcus,
Beautiful work on your build! A lot of what you're doing is very familiar to me because I was originally (back in ~1980) going to put a built Corvair in my 914 using much the same parts you seem to be using now. I had multiple cars, engines and parts, and my wife thought I was running a used car lot. I ultimately fell into the opportunity to buy a '78 911SC engine and trans, and went that direction instead, giving all my Corvair stuff away to a friend. I do remember some of the issues with a reverse rotation engine, however, one of which was that you have to reverse the louvers on the crankcase baffle, otherwise the spray from the crank will pump oil out the breather because the louvers face the wrong way and you can't simply reverse the baffle plate front for back to fix it because the cover bolt pattern isn't symmetrical. Perhaps you're well-aware of this and have done something about it, but I didn't see any reference to that in your thread, and I'd hate for all that beautiful work you've done to run afoul of something so simple. Regards, Larry Hubby |
|
|
|
| r3dplanet |
Jul 9 2018, 11:03 PM
Post
#211
|
|
Senior Member Group: Members Posts: 679 Joined: 3-September 05 From: Portland, Oregon Member No.: 4,741 Region Association: None |
Wait, WAIT...
First up, I'm super pleased to have you here on this thread. It would be great if you could tell us more about your project, even though it's gone. I'll bet that you're full of good information. Second, I'm 100% unaware about flipping the baffle plate. As far as I knew it only fit on one way, the stock way. I've read in the books that the main thing is to make sure that the PCV tube is mounted on the opposite side of the baffles. I haven't read anywhere about about this. Could I persuade you to maybe give a bit more detail and depth on this? I want to make sure that I understand. Also, what did you do on your car about the thermostats and cooling flaps? On the Corvair, they point directly aft of the car. I'm not super sure how to tackle this but figured I would spend some brain power when the time came. Welcome aboard! QUOTE(Larry Hubby @ Jul 9 2018, 08:27 PM) Hi Marcus, Beautiful work on your build! A lot of what you're doing is very familiar to me because I was originally (back in ~1980) going to put a built Corvair in my 914 using much the same parts you seem to be using now. I had multiple cars, engines and parts, and my wife thought I was running a used car lot. I ultimately fell into the opportunity to buy a '78 911SC engine and trans, and went that direction instead, giving all my Corvair stuff away to a friend. I do remember some of the issues with a reverse rotation engine, however, one of which was that you have to reverse the louvers on the crankcase baffle, otherwise the spray from the crank will pump oil out the breather because the louvers face the wrong way and you can't simply reverse the baffle plate front for back to fix it because the cover bolt pattern isn't symmetrical. Perhaps you're well-aware of this and have done something about it, but I didn't see any reference to that in your thread, and I'd hate for all that beautiful work you've done to run afoul of something so simple. Regards, Larry Hubby |
|
|
|
| r3dplanet |
Jul 9 2018, 11:26 PM
Post
#212
|
|
Senior Member Group: Members Posts: 679 Joined: 3-September 05 From: Portland, Oregon Member No.: 4,741 Region Association: None |
Ugh. More oil pump drama today. I spent a week waiting for a "new" Melling oil pump to arrive from California. I figured it would be NOS in any event since nobody makes them any longer, except for Clark's, and theirs is mostly worthless. On the subject of the Clark's oil pump, not only is it .0015-.002" too short, but I measured the backlash today and there isn't any. Zero. It would bind for sure if installed. I perused some of the Corvair forums and found that numerous other buyers had the same problem going back at least three years. Great.
I sat around all day waiting for the new pump because they send signature required only. So I lost half a day waiting around. And to my surprise in the box was a s#itty oil old pump. In was in the NOS Melling box, but very poorly packaged. The gaskets were bent up and the gears were obviously used and worn. The driveshaft shows scoring and the gaskets have grease on them. Have a look: 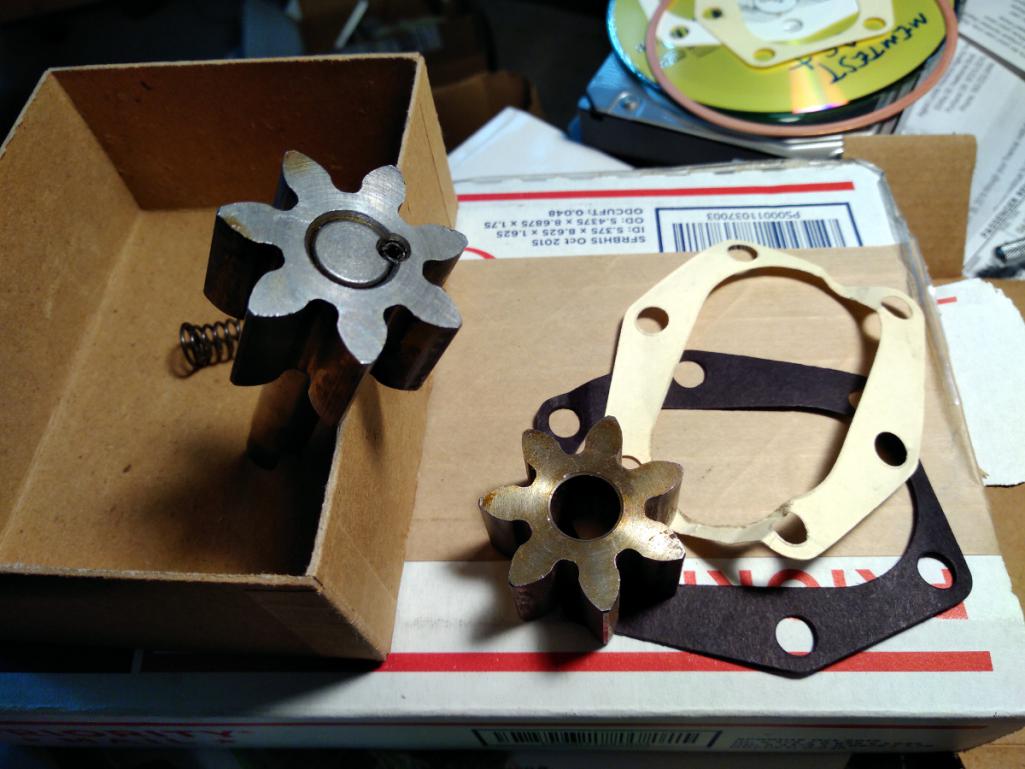 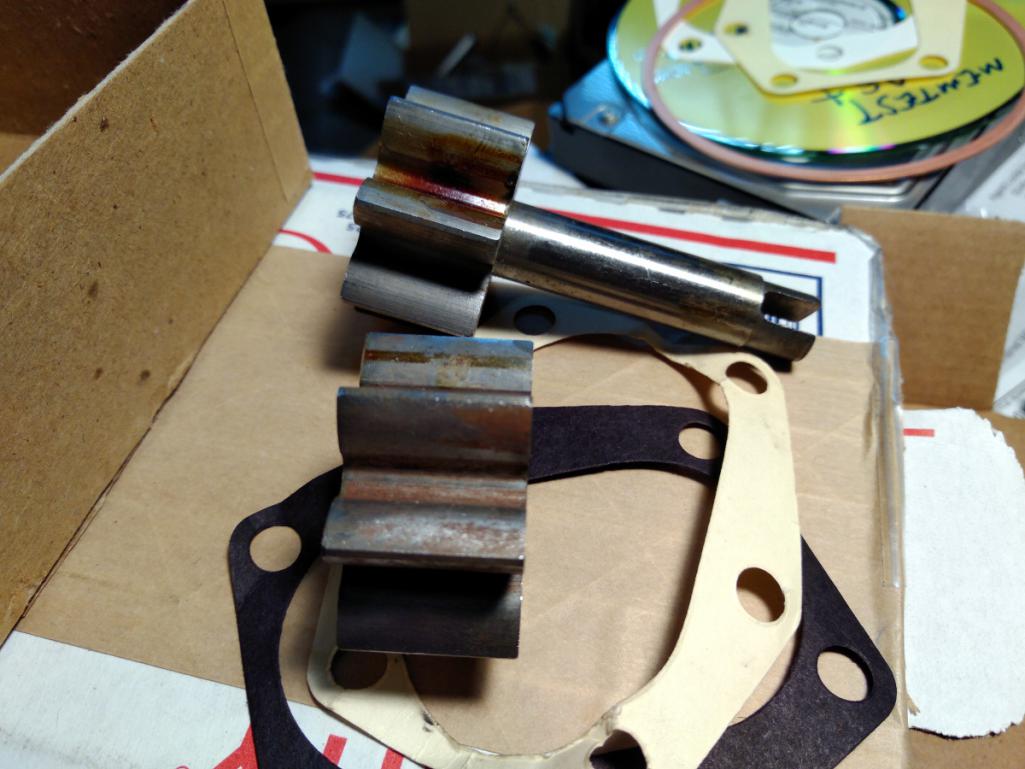 Also, it's worn down so far that the backlash is out of spec. So this too is worthless. I contacted the vendor and was told again that they've sold many of them and insist that it's new. They made no mention of it being used, worn, or trashed. And obviously didn't even open the box before they shipped it. <rant> I'm getting tired of this "that'll do" attitude on the part of some vendors. I do understand that much of these parts are long gone, but I hate having my time wasted by someone else's laziness. The customer is not in charge of quality control. </rant> But one silver lining came of it. Playing around with the Clark's oil pump and my original oil pump, I found that by using the out-of-spec Clark's drive gear and my original idler gear that I can get mostly decent measurements. It's not perfect splitting the differences like this, but I am getting .003" clearance to the cover and .004" backlash, which is supposed to be between .002-.008". Once mocked up it span very well and with proper gap. But then one last bit of bad news: having torqued on the cover so many times over the past week I managed to strip one of the threads even though I was only going to seven foot pounds. No biggie. I'll pop a big-sert into tomorrow. I'm relieved that all this ridiculous oil drama is over. What a pain. Time to move on. |
|
|
|
| Dr Evil |
Jul 10 2018, 01:35 PM
Post
#213
|
|
Send me your transmission! Group: Members Posts: 23,041 Joined: 21-November 03 From: Loveland, OH 45140 Member No.: 1,372 Region Association: MidAtlantic Region |
QUOTE(r3dplanet @ Jul 10 2018, 01:26 AM) Ugh. More oil pump drama today. I spent a week waiting for a "new" Melling oil pump to arrive from California. I figured it would be NOS in any event since nobody makes them any longer, except for Clark's, and theirs is mostly worthless. On the subject of the Clark's oil pump, not only is it .0015-.002" too short, but I measured the backlash today and there isn't any. Zero. It would bind for sure if installed. I perused some of the Corvair forums and found that numerous other buyers had the same problem going back at least three years. Great. I sat around all day waiting for the new pump because they send signature required only. So I lost half a day waiting around. And to my surprise in the box was a s#itty oil old pump. In was in the NOS Melling box, but very poorly packaged. The gaskets were bent up and the gears were obviously used and worn. The driveshaft shows scoring and the gaskets have grease on them. Have a look: Also, it's worn down so far that the backlash is out of spec. So this too is worthless. I contacted the vendor and was told again that they've sold many of them and insist that it's new. They made no mention of it being used, worn, or trashed. And obviously didn't even open the box before they shipped it. <rant> I'm getting tired of this "that'll do" attitude on the part of some vendors. I do understand that much of these parts are long gone, but I hate having my time wasted by someone else's laziness. The customer is not in charge of quality control. </rant> But one silver lining came of it. Playing around with the Clark's oil pump and my original oil pump, I found that by using the out-of-spec Clark's drive gear and my original idler gear that I can get mostly decent measurements. It's not perfect splitting the differences like this, but I am getting .003" clearance to the cover and .004" backlash, which is supposed to be between .002-.008". Once mocked up it span very well and with proper gap. But then one last bit of bad news: having torqued on the cover so many times over the past week I managed to strip one of the threads even though I was only going to seven foot pounds. No biggie. I'll pop a big-sert into tomorrow. I'm relieved that all this ridiculous oil drama is over. What a pain. Time to move on. I remember the oil pump being one of the biggest PITA of the whole build. IT still leaks, but at this point I don't care. I will remove the engine someday and go over it to address issues that are revealed. I think the Corvair vendor attitude, and the AC VW guys as well, of "Eh, its good enough" is due to the fact that most are not building to your level of build and just slap on the part and go and it usually provides enough service to not be an issue. A shame. |
|
|
|
| r3dplanet |
Jul 10 2018, 02:45 PM
Post
#214
|
|
Senior Member Group: Members Posts: 679 Joined: 3-September 05 From: Portland, Oregon Member No.: 4,741 Region Association: None |
I agree. I understand that I'm being a bit exacting about tolerances and quality. At some moments it's a big deal, others not so much. I hate complaining about this stuff. I need to understand that these engines went out of fashion long ago, but so did the Beetle or the 914. As I'm sure we can all attest some aftermarket vendors are great and others not so much. It's one of the things that really draws me to the 914 crowd, because so many people here are going out of their way to produce necessary parts at a high level of quality. That's such a huge benefit for us.
Little updates: I finally found a machinist who will flatten the oil pan and valve covers and that should be finished within days. After that I can install the lifters and then do the rocker geometry. Soon there will be a point where the rebuild will finish and fitting the engine will become the goal. But I'm also rapidly running out of time. I'm trying to get this all buttoned up and sold before the end of August. What do you guys think? Since my goal is to sell my precious 914 to some lucky and intrepid gentleman, should I proceed with fitting the Corvair engine and try to sell it? Or install the 1911cc Type-4 and appeal to a wider market? Time is running short and soon another pair of hands is going to have to pick up where I left off. Or at least that's my hope. More soon. [/quote] I remember the oil pump being one of the biggest PITA of the whole build. IT still leaks, but at this point I don't care. I will remove the engine someday and go over it to address issues that are revealed. I think the Corvair vendor attitude, and the AC VW guys as well, of "Eh, its good enough" is due to the fact that most are not building to your level of build and just slap on the part and go and it usually provides enough service to not be an issue. A shame. [/quote] |
|
|
|
| sixnotfour |
Jul 10 2018, 06:41 PM
Post
#215
|
|
914 Wizard Group: Members Posts: 11,017 Joined: 12-September 04 From: Life Elevated..planet UT. Member No.: 2,744 Region Association: Rocky Mountains |
follow your dream,,my dad built a 911 wheelbase corvair, then wanted to put it a 914, he then passed away,, I parted the corvair out...quick box ,saginaw gearbox, tele wheel column , 140 plus with tripple webers.. follow your dream ...the rest does not matter...God Bless
Attached image(s)  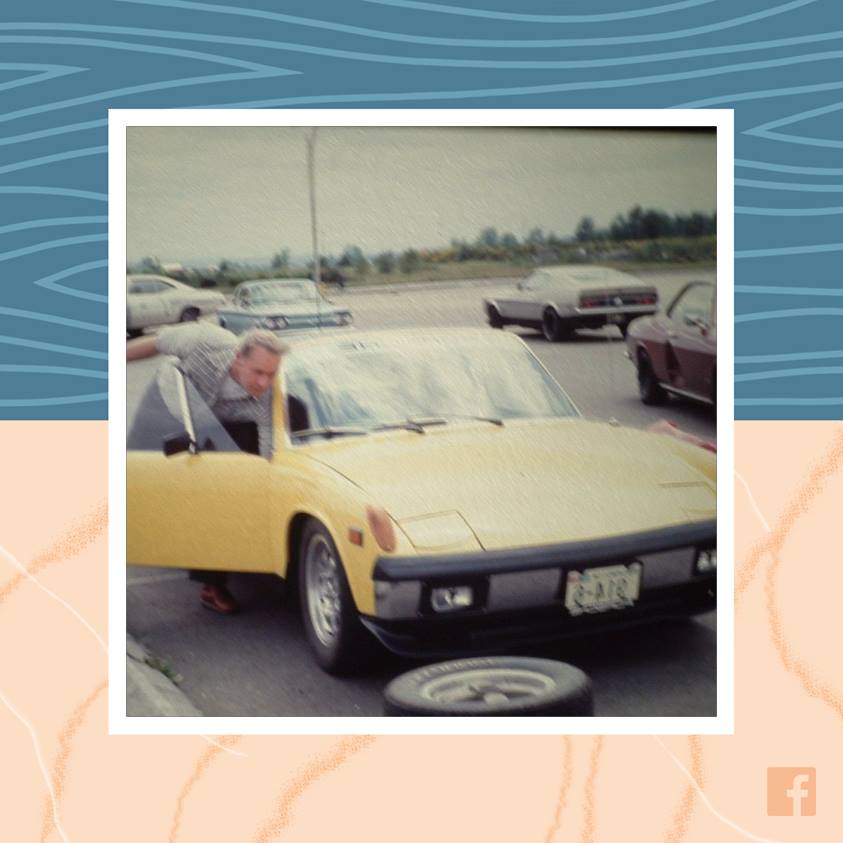
|
|
|
|
| worn |
Jul 10 2018, 08:39 PM
Post
#216
|
|
Winner of the Utah Twisted Joint Award Group: Members Posts: 3,501 Joined: 3-June 11 From: Madison, WI Member No.: 13,152 Region Association: Upper MidWest |
I have had your thread open in a tab for weeks. Such grace and finesse. We could all benefit from what you are doing. Thanks Marcus. Were it me, as surely it will be in some way, I would forget about end goals and do what makes you happy now. How wise that advice might be beats the heck outa me.
Warren |
|
|
|
| Larry.Hubby |
Jul 10 2018, 09:28 PM
Post
#217
|
|
Member who doesn't post much, but has a long time in 914s Group: Members Posts: 189 Joined: 24-November 04 From: Palo Alto, CA Member No.: 3,172 Region Association: Northern California |
Hi Marcus,
I believe the baffle plate does fit only one way. The bolt holes, although they look close to symmetric fore to aft, aren't quite, and you also need, as you said, to keep the sloped side of the top part of the baffle toward the breather pipe. What I remember was that you had to literally reverse the louvers by hammering them into the baffle plate. You use a punch and a hammer to hit the center of the louver and get it started, then you can bend down the remainder of it with the blade of a screwdriver. Not pretty, but it keeps the oil in the crankcase where it belongs. As far as my experience being very useful on your project, I never got my engine in the car, or even assembled, so it's highly questionable. I did build a front motor mount to fit it in the car, but never got to try it, so I'm not sure it worked. You certainly seem to be using good parts. The Otto Parts oil pan and cam gear retainer, the Crown transmission adapter, the nitrided crank, 140hp heads, etc. are all the good stuff. One thing I'm not sure about is using dual throat Weber carbs on 140hp heads. The second carb on each side of the stock 140hp setup was opened progressively and so was like the secondary barrels of a four-barrel single carb. My understanding was that this was done due to flow reversals in the intake runner that are quite pronounced under part throttle conditions. The center-mounted adapters for four barrel carbs that were popular for the Corvair had baffles that confined flow from the primary throats to the ports at the rear of the engine (in a Corviar), and the secondaries to the front ports. This was correct for one side of the engine, but not the other, and these things never worked very well if I recall correctly, and machining out the baffle made them work even worse. So, if the Webers open both barrels at the same rate, you might experience some rough running at low to medium throttle openings. If you have a copy of Bill Fischer's book, "How to Hotrod Corvair Engines", I beleive this effect is talked about in it. Crown Engineering had at one point some manifold adapters that fit the triple-throat Webers used on the 911 engines on the Corvair heads. You had to machine off the intake runners to mount them so that you had a true individual throat of carburetion per cylinder configuration, and of course the carbs are quite spendy, but it worked very well. No idea if such things are still available. Regards, Larry Hubby |
|
|
|
| r3dplanet |
Jul 10 2018, 10:15 PM
Post
#218
|
|
Senior Member Group: Members Posts: 679 Joined: 3-September 05 From: Portland, Oregon Member No.: 4,741 Region Association: None |
Cool photos! Thanks for sharing them here for us all to see.
In the past I've followed my dreams to mixed results, but that's the way it always works out. Before I got sick there was always plenty of time to plan adventures. There was always something to do next year, something of which to look forward. Way back when I worked for the government it was great because I was always jetting off somewhere, and when that wasn't in play I was eating up time at grad school. I loved all that. The sense that something is always coming down the pipe. But cancer changes that because it removes the possibility of planning anything. So really it's all about what's happening in the next few days, punctuated by a full medical calendar. Sometimes time passes so slow when relatively healthy, but now the months are ripping off the calendar. And so it is that the dream chasing period has ended and the quest for creature comforts and stability is the most important thing. On a long enough timeline that's how it works for most people. It's just that I'm hitting it sooner rather than later. So whether I like it or not, it's time to sell of my toys and let someone else play with them. Those photos of your dad? He looks like he's having a blast. QUOTE(sixnotfour @ Jul 10 2018, 05:41 PM) follow your dream,,my dad built a 911 wheelbase corvair, then wanted to put it a 914, he then passed away,, I parted the corvair out...quick box ,saginaw gearbox, tele wheel column , 140 plus with tripple webers.. follow your dream ...the rest does not matter...God Bless |
|
|
|
| r3dplanet |
Jul 10 2018, 10:22 PM
Post
#219
|
|
Senior Member Group: Members Posts: 679 Joined: 3-September 05 From: Portland, Oregon Member No.: 4,741 Region Association: None |
Warren, thank you for the kindness.
I feel like I'm already dumping out my purse for everyone to see. But yes, it's all about the now and soon rather than long term. I promise you I'm not graceful in any meaning of the word. Instead, I've just had way too much time to adjust. Long ago when I was living in Moscow as a student I overheard some babushkas at a magazine stand gossiping about Yeltsin, who was on his way out of both power and lifespan. The phrase always stuck with me, even though I can't now conjure the Russian translation. The woman said, "Yeltsin! Always dying but never dead!" The idea being that it's super bad manners to take more time than you really need. Now I really understand that. Gulp. When it was my turn at the stand, I bought an orange Fanta and a Playboy. The nipples on Russian Playboy pinups are airbrushed out, just FYI. How's that for graceful? QUOTE(worn @ Jul 10 2018, 07:39 PM) I have had your thread open in a tab for weeks. Such grace and finesse. We could all benefit from what you are doing. Thanks Marcus. Were it me, as surely it will be in some way, I would forget about end goals and do what makes you happy now. How wise that advice might be beats the heck outa me. Warren |
|
|
|
| r3dplanet |
Jul 14 2018, 08:30 PM
Post
#220
|
|
Senior Member Group: Members Posts: 679 Joined: 3-September 05 From: Portland, Oregon Member No.: 4,741 Region Association: None |
Alright. The oil pump is finally finished. It took way, way more work than I wanted but it's all assembled now. The solution ended up being a little Column A, a little Column B. Using my flat glass plate I ground down .001" off the original oil pump idler gear in order to make it the same depth as the new drive gear. Then I polished and polished and polished both mating surfaces and went through a dozen gaskets getting it all just right. Or at least I think it's right. Doubt is a devil.
I also fixed the both stripped threads on housing side using Time-Serts, which are my favorite insert - especially for jobs like these with tiny clearances. Anyway, the oil pump is finally finished. Hoo! You may have noticed that the oil pump cover has two holes in it. This is an aftermarket cover sold by Clark's, and if desired, can be purchased with much longer oil pump gears for high pressure applications. Those gears have a shaft that would fit into these bores. I left the doors open to the possibility for this later if the engine ends up with both a remote cooler and filter. But it might not be necessary. I understand that high pressure does not equal high volume, but I'm not a fluid dynamics expert. Crappy focus, good thread repair: 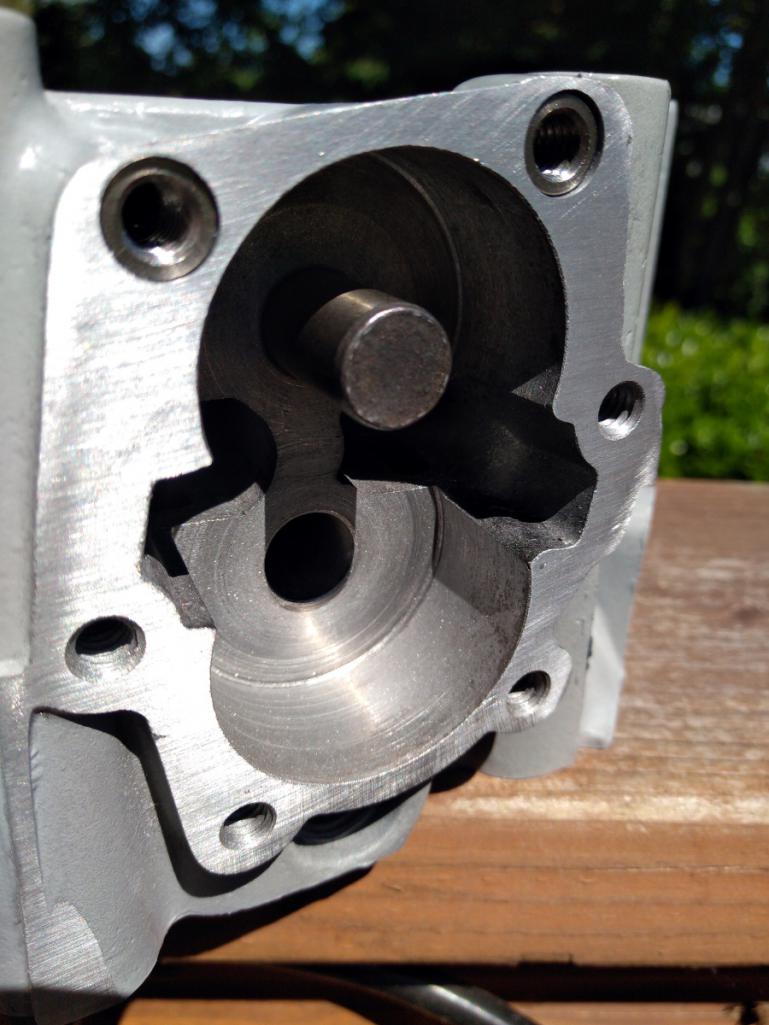 Somewhat polished: 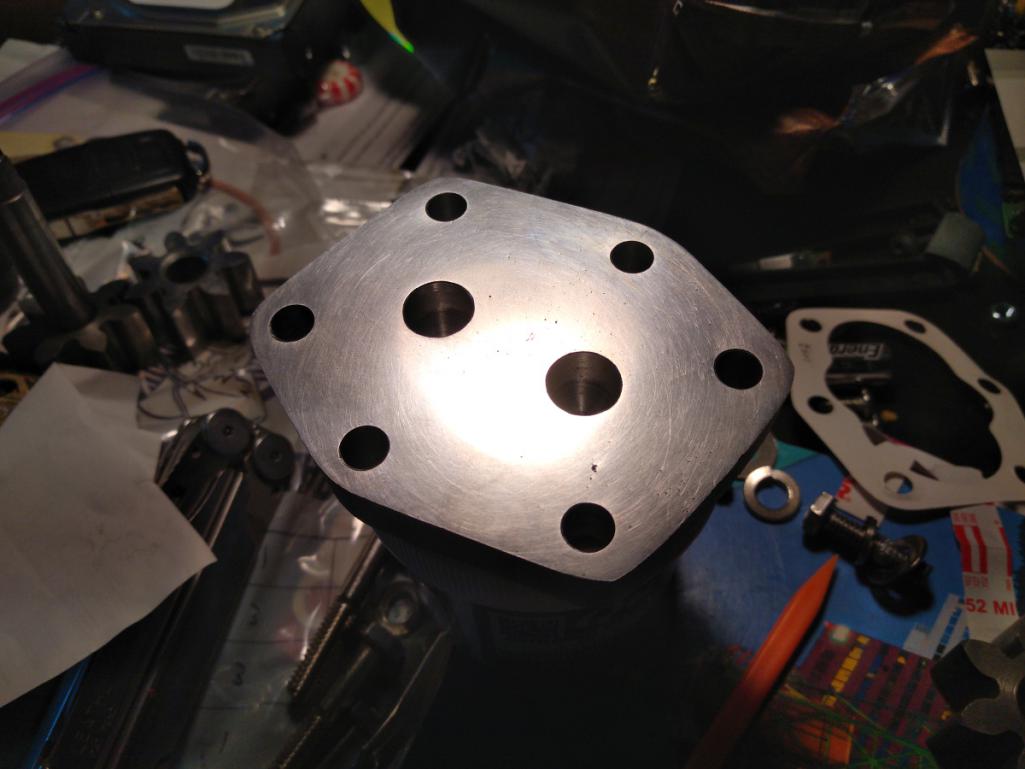 |
|
|
|
|
2 User(s) are reading this topic (2 Guests and 0 Anonymous Users)
0 Members:

|
Lo-Fi Version | Time is now: 5th November 2025 - 03:01 AM |
Invision Power Board
v9.1.4 © 2025 IPS, Inc.