|
|
|
Porsche, and the Porsche crest are registered trademarks of Dr. Ing. h.c. F. Porsche AG.
This site is not affiliated with Porsche in any way. Its only purpose is to provide an online forum for car enthusiasts. All other trademarks are property of their respective owners. |
|
|

  |

| veekry9 |
 Oct 13 2013, 05:43 PM Oct 13 2013, 05:43 PM
Post
#81
|
|
OldMember  Group: Retired Members Posts: 3,068 Joined: 17-June 13 From: TO Member No.: 16,025 Region Association: Canada |
QUOTE(r3dplanet @ Sep 28 2013, 06:17 PM)  Some more progress on this long term project. I'm still working on case prep. Since the last episode, my machinist tested my crank to make sure it was still good and then had him polish it and make sure it was balanced. I also bought a new crank gear, cam, and cam gear. The cam I'm using is a reverse rotation Otto-20. I've sent these, the newly cleaned up connecting rods, and a few other parts to be cryogenically treated. Gregg Hikimian is doing the work. He's a very interesting chap and has delighted me outstanding service. He also performs all kinds of space age coatings and other treatments. While I'm waiting for all of those parts to return I had my case halves cleaned, and cleaned again. I'm going to perform a head stud test (as seen below), clean off the casting flash from the engines halves with a Dremel, and then hike hike them up to American Metal Cleaners for a trip into a heat-process cleaning specifically for aluminum. Or Aluminium if you are British. So today I'm showing the head stud test. I found a great procedure here: http://flycorvair.net/2012/01/28/testing-head-studs/ I followed this for the most part with one small modification. But first up I had to clean up the threads on the head studs. I'm actually considering pulling all of them and replacing them with stronger studs, but the Corvair brains I've picked are very split in their opinions. The aircraft guys all seem to do it, but the automotive guys don't tend to unless there's serious problems. I have a call in to American-Pi to see what they recommend. In the meantime, I'm passing the time with important little tasks. [Hey Marty, please feel free to chime in on this issue!] You can see that the ends of the studs (3/8"-24 using the Roman Catholic measuring system) don't look very good. So I'm using both a die and a thread chaser to clean them up. The thing about a six cylinder engine is that there's more studs than usual. The top row is where the damage is. The bottom row is shorter by an inch or so. The bottom studs also hold the rockers in place, and because they're constantly coated in oil these threads are in super condition. Now it's time to see if the studs can hold 30 pounds of torque. The first idea I had was just to use one of the old cylinders and torque it down with some fasteners, but you can see that there's no way to do that since any little amount of torque would just break the fins. I thought about making a square jig to fit over all four studs and the cylinder to simulate the head, but then I remembered that I don't have any machining capability. So I went to Plan B and cut some 3/8" steel tubing and used some hardened fasteners instead. This failed because the tubing begins to collapse at less than 20 pounds. But finally the lights when on and I picked up some steel plumbing nipples of different lengths to match the stud length and still reveal the threads. I spun on a Tee so that I could view into the hole with a small light to see if the head stud would turn as I torqued it down. The tool completely obscures sight of the stud so this little idea worked really well. This is the final setup. Using hardened washers to protect the case surface, I torqued down the nut to 15 pounds making note of the position of the wrench handle. Then I torqued again to 20, 25, and then 30 pounds making sure that the handle didn't travel too far to meet each target. At the end of the exercise I had exactly one loose stud. I'll order a replacement from Clark's that measures .003" thicker on the base stud and Loctite it in unless American-Pi tells me to pull them. If that's the case, then I just wasted a Saturday. But hey, it's pouring down in rain Portland and this is what you do in this crappy weather. First(second) Post Hi Marcus-and all I have recently purchased a cherry tomatoe '72. I am Vic in the T.O. and have decided to follow your lead and install an American F6 in the tail(er mittle) of my 914. I have begun the restoration of the body/paint without the usual sheetmetal fabrication or replacement.The car is virtually rust-free and SoCal condition and therefore rare in the salty environs of Ontario. The VW repair shop proprietor had installed a later 2L and TX but could no longer devote the time or space to the project. As it was stored indoors 10+years after a 70's repaint it only requires some hand sanding. Having owned a '62 Beetle in the early 70's I cannot get past the sound of the VW-Porsche F4.There is available a '05 3.6 for 3.5K as a core locally but alternatively I purchased 2 110 Corvairs for 0.5K instead. The vendor decided a Lycoming O-320 was more suitable for his aircraft. I have been reading the progress reports and dialog of so many different sub-versions of the NARP 914's with great interest.As I now have taken the first steps to replace the 2L I trust you are trailblazing the way ahead of me. I have not yet put a wrench to the F6's. I'll post again soon with pix as this is the second time I am typing this. (typo delete) vic  I've made my P-car blue. |
   |

 
|
| Dr Evil |
Oct 18 2013, 02:32 PM
Post
#82
|
|
Send me your transmission! Group: Members Posts: 23,044 Joined: 21-November 03 From: Loveland, OH 45140 Member No.: 1,372 Region Association: MidAtlantic Region |
Here are the pics of my roller rocker failure. It appears the circlip may have failed---> then the needle bearing ----> then the stud. Not bad as it is easy to replace.
For my 3130 I bored the case and used T2 2.0 P/C. The studs were checked and the registers opened to fit the spigots. No issues as of yet, with this part (IMG:style_emoticons/default/rolleyes.gif) Marty, nice to see you here (IMG:style_emoticons/default/smile.gif) Check out my bus thread for an interesting vair build and CIS adaptation. Attached thumbnail(s) 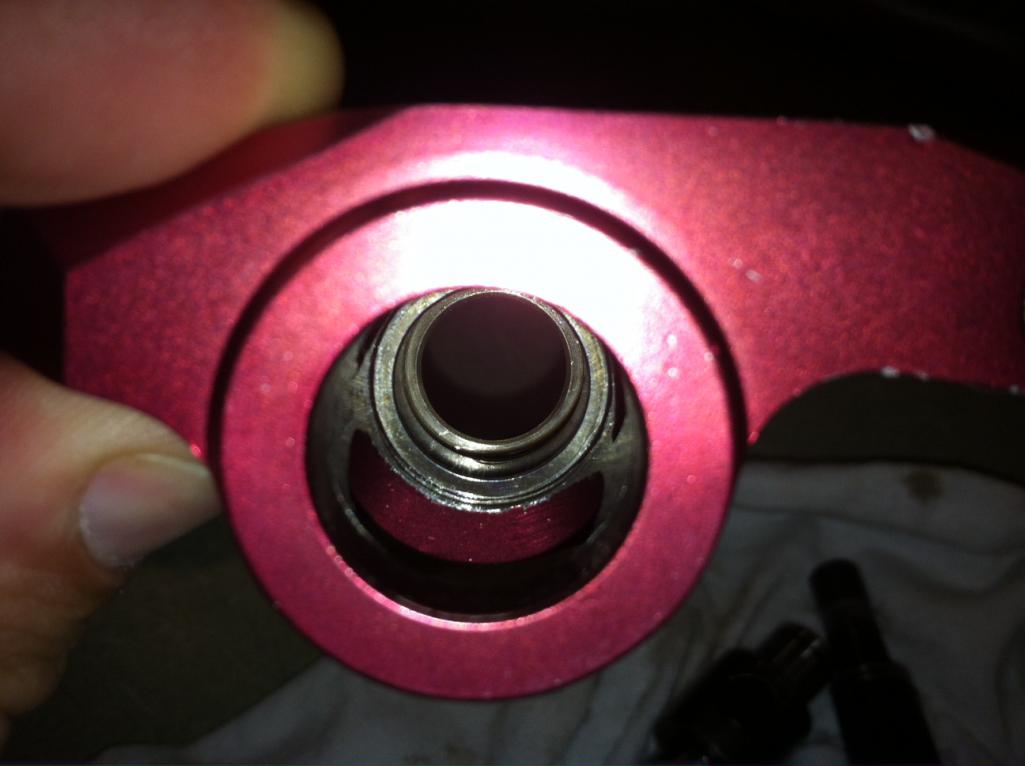 Attached image(s) 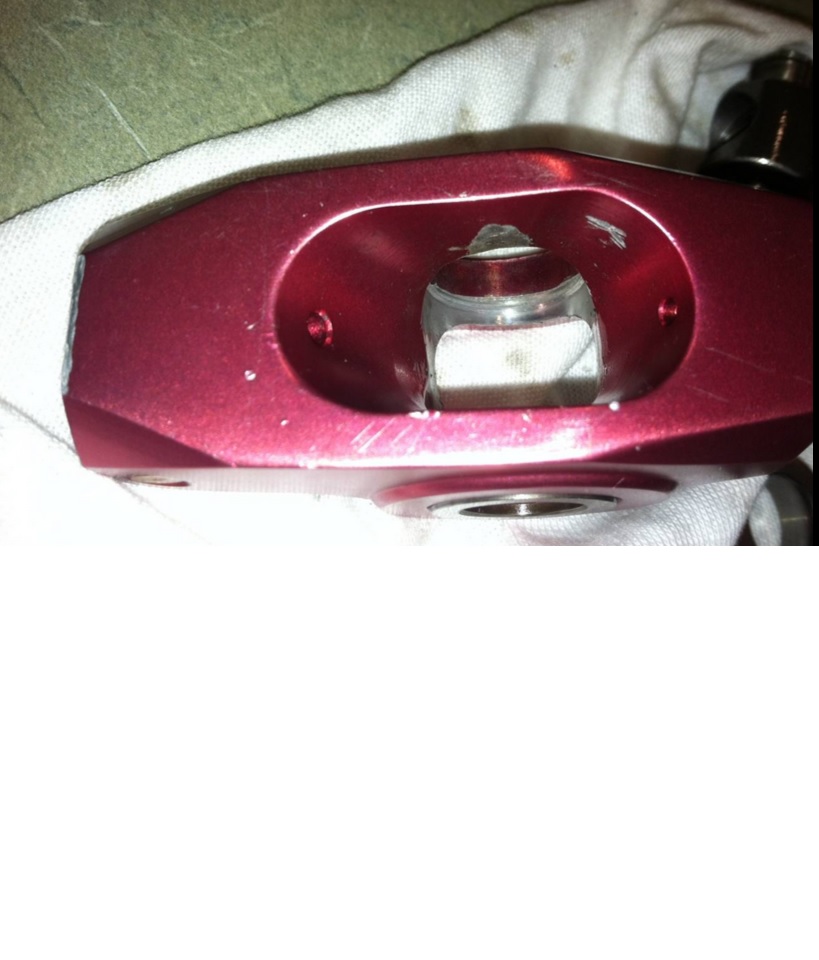 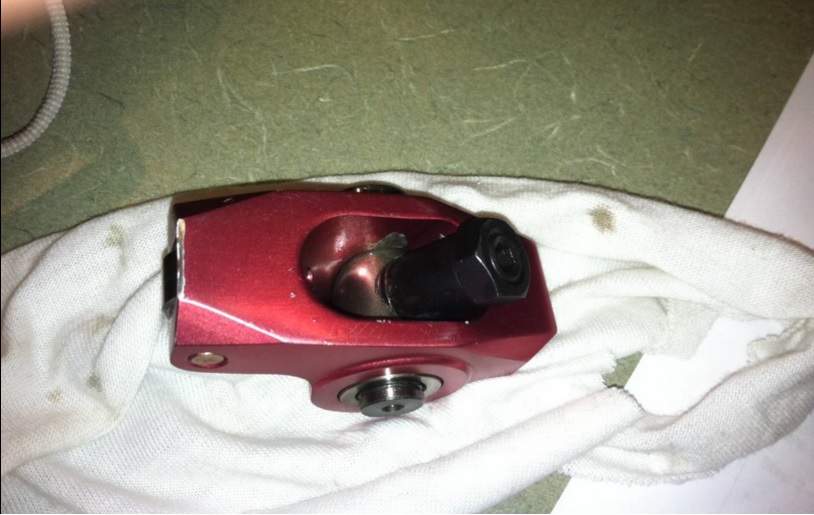 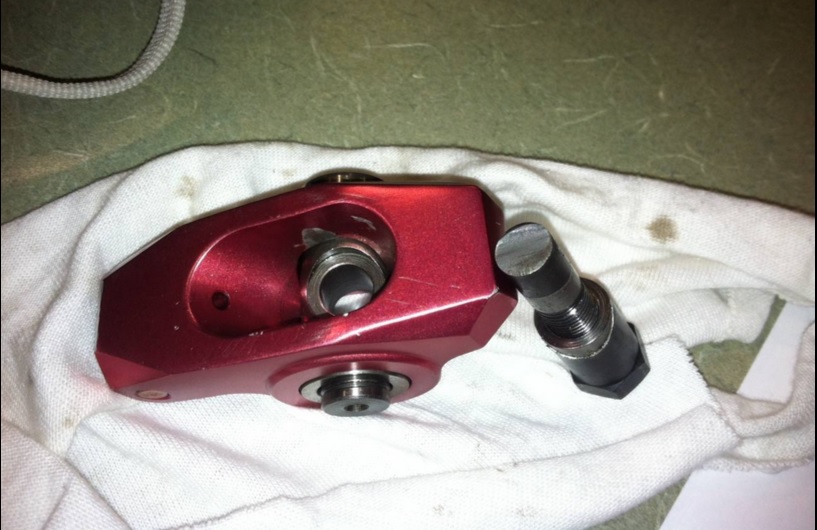 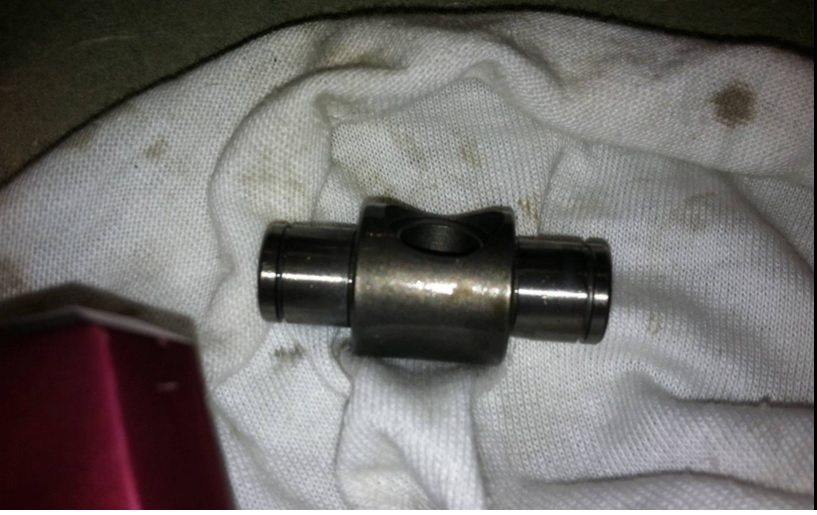
|
|
|
|
| veekry9 |
Oct 18 2013, 04:59 PM
Post
#83
|
|
OldMember Group: Retired Members Posts: 3,068 Joined: 17-June 13 From: TO Member No.: 16,025 Region Association: Canada |
Greetings Dr. Evil.I am Vic from across the lake in TO.
I am currently embarking on the path of a Corvair powered 914 and have read of your trials and tribulations. Your converted bus is neatO. I presume you brought it North for your clinic recently.I have been considering the products offered by CorvairSpecialties.A inquiry on the other site was immediately flamed.What you describe is a proper response from a vendor, much like Bruce Crower's response to a customer.I am therefore confident to make a purchase of some parts.The rocker covers appear to be the Clark,s product.I have heard only positive feedback re their service. A vehicle out of production since '69 yet the support is meeting the demand. It's wonderful,isn't it? You may be correct as to the failure mode. However,the pix of the rocker stud failure may be a sign of a stress crack in the weak point of the stud,at the root of the thread/shank interface. The photo clearly shows the edge of the thread runout.The proper heat-treat of the studs is what gives them their strength. I will test,like you,the parts durability and performance. |
|
|
|
| r3dplanet |
Jan 20 2014, 02:17 AM
Post
#84
|
|
Senior Member Group: Members Posts: 679 Joined: 3-September 05 From: Portland, Oregon Member No.: 4,741 Region Association: None |
I'm not dead yet.
However, I am totally bummed about my Mars-One application being denied with a stupid form letter. Seriously. I've written better notes on paper napkins at late night diners. I think those bastards would reconsider if only they had brains to realize that I was always the ideal candidate; it's obviously their selection criteria that's faulty. OBVIOUSLY. Two words for them: Apollo I. Now that my life has no meaning again, I'm back to working on my Corvair engine. There will be a bunch of updates soon. Over the past few months I've had a bunch of bottom-end parts (crank, cam, etc.) crogenically treated. After getting them back I sent the crankshaft off to be ground, polished, indexed, and balanced. It should be available any day now. In the meantime I've been slowly, slowly, slowly cleaning and polishing the secret innards of the case halves. The part I'm not going to reveal to anyone is the probable application of GE Glyptal paint to the interior. It's a hot button topic and I totally don't care about that controversy. We can argue, classic Greek-style, all day long on another thread about it's merit. While we're at it we can punt around PC vs Mac, Coke vs Pepsi, Girlfriend vs Your Mother. Frankly, I enjoy making arbitrary decisions and then following through with them. Like Glyptal paint. Makes for good mental exercise. I have also collected other parts including all of the remaining reverse rotation parts like cam gears, idlers, and alternator fans. The new Melling lifters are here. And I've contracted out to have a pair of custom-made intake manifolds produced to accomodate my Weber 44 IDF carbs that are currently powering my 1.7 liter engine with the magic of 28mm chokes. That gentleman is Tom Knoblauch of American Flat 6 fame. He normally produces intakes for the Weber 40s, but he agreed to make intakes for the 44s just because he's cool. The charge is $275 for the pair, which I feel is extremely reasonable. In clutch news, I found a specialty 215mm 130-tooth conversion flywheel that will allow me to use the standard size clutch and pressure plate for the 901 transmission. Previously I had a Bus conversion flywheel (180mm) and clutch pressure plate that I bought as a VW reverse rotation kit. To this day I don't know if it would have worked in the 901 or not. Maybe some long winter even as I loaf about with my cats grieving over my past mistakes I'll pull out my old tail-shifter and see how it would work. In other news, I have a VW bus clutch, pressure plate, and 180mm conversion flywheel for sale. I also ended up buying an Otto-20 reverse camshaft from Clark's to replace my previously purchased stock specification reverse cam. That cam is now also for sale. Somewhere along the way I found myself staring at upright 914-6/911-style cooling fan/shroud combos like this one: http://www.thesamba.com/vw/forum/viewtopic.php?p=3833213 .. But they require a load of bread to capitalize. Star Cooke sells the complete package of shroud, fan, and alternator for $1500. When poking around eBay I was unpleasantly surprised to find that the 911 fans alone cost $300-$600. Add in another $200 for the magnesium housing. And another $200 for the alternator. Earlier this week I looked at having a fabricator make just a fiberglass shroud from the original molds from back when they were more commonly sold. It looked to be doable right up until I realized that I don't want to spend that kind of money on a fancy fan. Anyway, as it turns out they don't cool effectively due to the lack of correct internally baffling to direct the airflow. My hopes for coolness have become dashed, and it feels exactly like having a crush on a Playboy bunny only to realize that she's half my age and I'm forty and all she wants to talk about in real life is scientology and Justin Bieber. So soon there will finally be some actual assembly for your viewing pleasure. All that's left now is raising capital for some 140 heads and the machine work for the VW piston & cylinder conversion machine work. If someone finds some money laying on the sidewalk please throw it into an envelope and send it to me so I can steam the stamp off of it. Forward, comrades. Thanks for being patient for the World's Slowest Engine Build. -marcus |
|
|
|
| r3dplanet |
Feb 22 2014, 05:04 PM
Post
#85
|
|
Senior Member Group: Members Posts: 679 Joined: 3-September 05 From: Portland, Oregon Member No.: 4,741 Region Association: None |
So let us sit upon the ground and tell sad stories of case preparation. While I really dig the design of this six cylinder engine, I dislike the "let's crank out fifty more of these before lunch" attitude GM seems to have had in terms of production. In my not-at-all humble opinion this always irked me about the American Big-3 - often some very cool engineering ideas but watered down to hit a price point.
Take this aluminum case for example. I like that the case is just big enough to provide for six cylinders. I love that the rotating assembly just fits inside to maximize a small space. The construction is strong and simple. But these were obviously not hand built by German union labor who cared about their craft. Observe the crazy volume of casting flash in the block hemispheres: 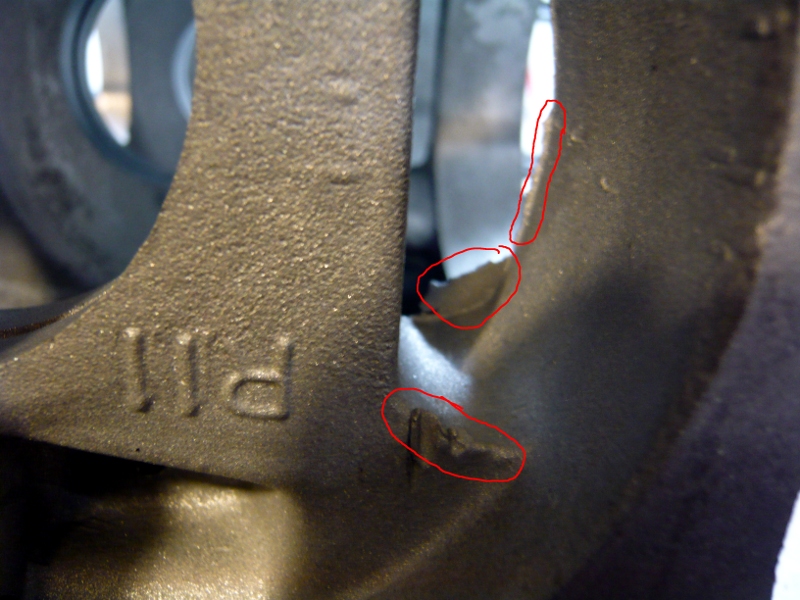 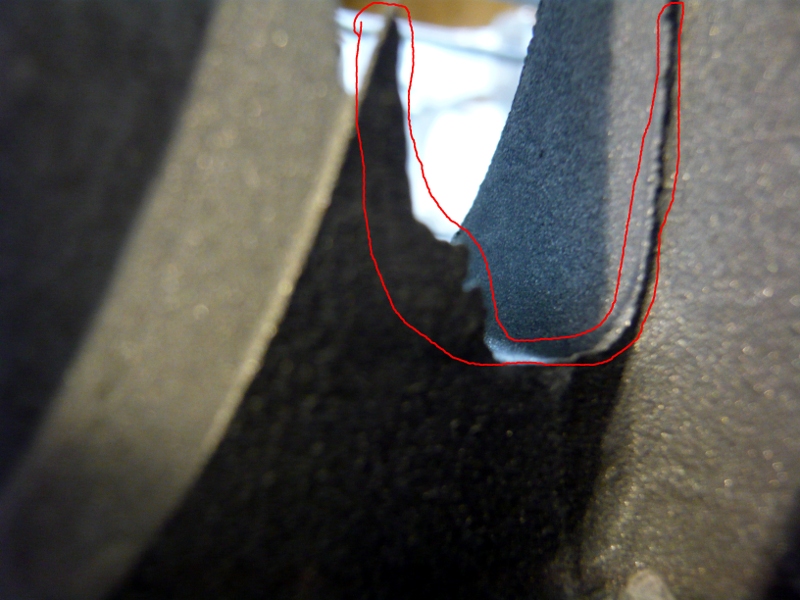 Also observe how the oil drain holes on the bottom of the case don't even match up. For that matter, neither do the tops of the walls for the journals. Luckily, I can easily clean all of this up. Specficially, I bolted the case together and used a 7/16" drill bit to clean up the drain holes. 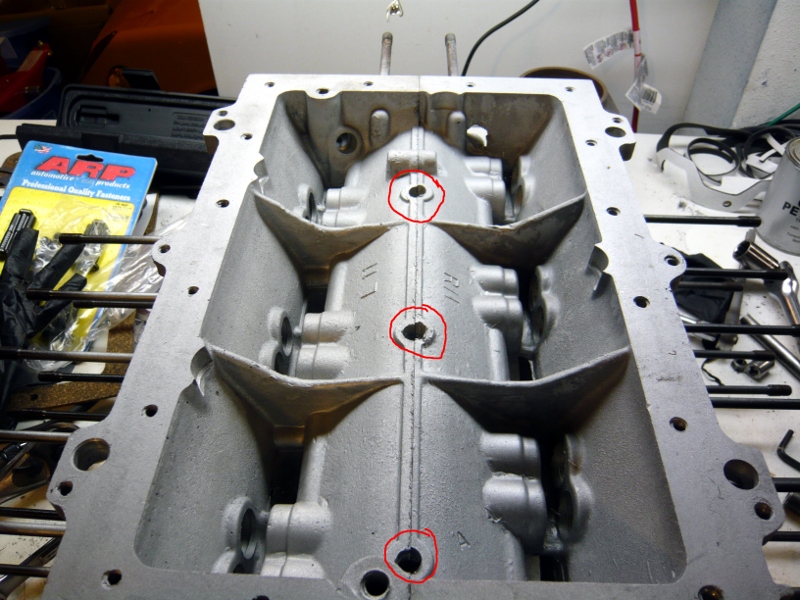 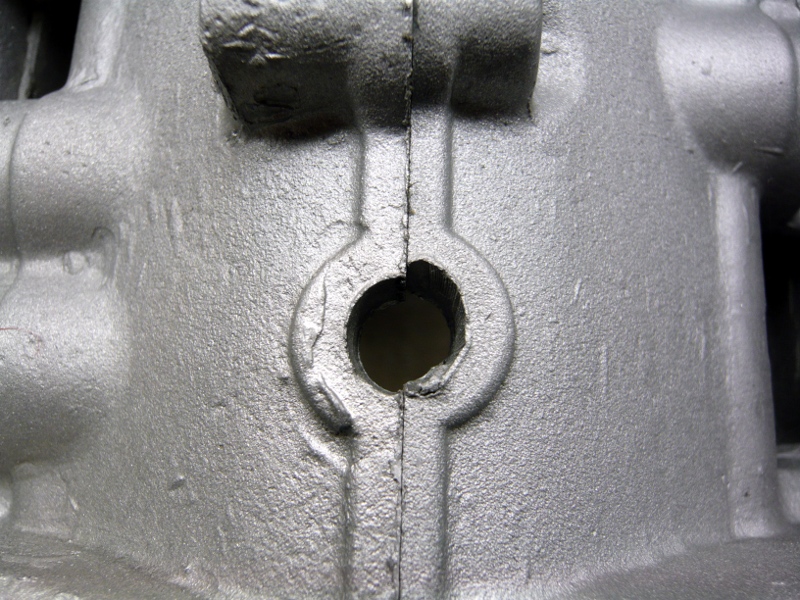 That's actually the good news about all of this. GM may not have cared about this, and clearly the engine ran for 40 years before failing. However, Marcus DOES care and was rewarded with a HALF CUP of casting flash at the end of the exercise. [shameless plug] It's also time for an unpaid commercial plug: Here I'm using the my fourth and LAST DREMEL EVER to remove case flash. Pro Tip: I finally got sick of replacing Dremels every few months so I replaced it with a Proxxon rotary tool (part #FBS 115/E) made by the nice people living in Luxembourg. Matched with a Flexishaft, this tool is superior in every way. It's quiet. It's comfortable. It has an adjustable chuck instead of a 1/8" collet so you can use a far wider array of bits. Another Pro Tip: McMaster-Carr has a ton of rotary bits that cost half of what Dremel bits cost and last longer. For example, I bought eleven brass cone brushes for $1.48 each. It's a money saver for sure. [/shameless plug] 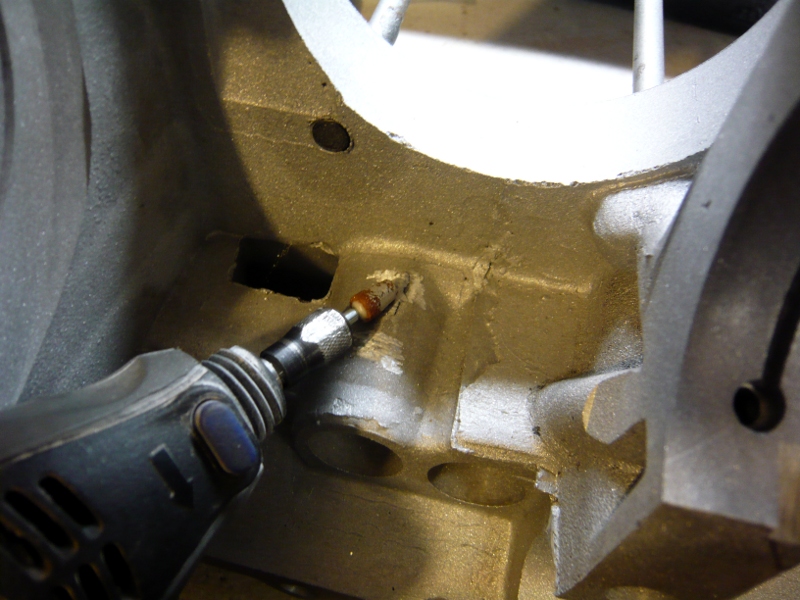 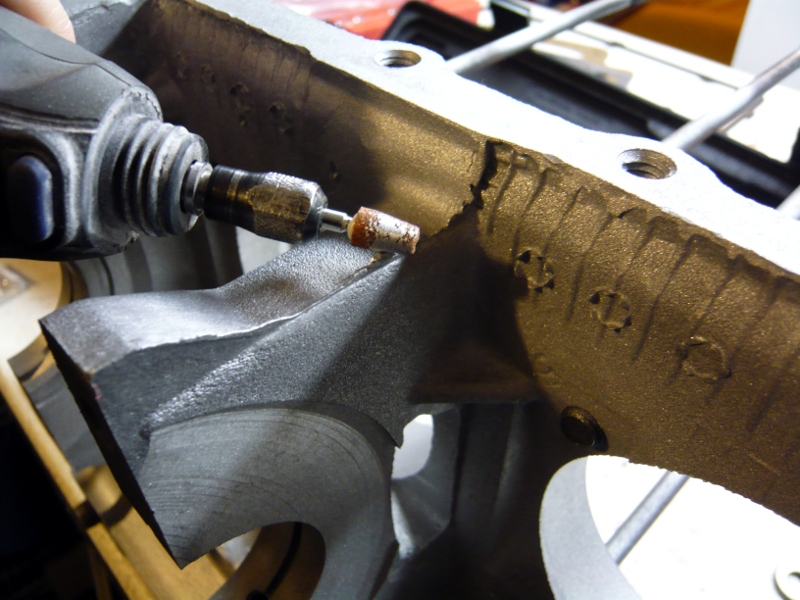 The part that took the most amount of time were the valleys above the center of the lifter bores. There were casting pockets full of little bits of crud; something like an undersea cave system. This took some serious time to grind down. It also reinforced my plan to proceed with an application of GE Glyptal paint. |
|
|
|
| r3dplanet |
Feb 22 2014, 05:26 PM
Post
#86
|
|
Senior Member Group: Members Posts: 679 Joined: 3-September 05 From: Portland, Oregon Member No.: 4,741 Region Association: None |
When the week of grinding had finally come to an end, it was time to make some decisions about the case. For example, in the very handy book Performance Corvairs: How to Hotrod the Corvair Engine and Chassis, it is recommended to widen each of the oil passages behind the main bearings to 3/16". Indeed, the passages are supposed to be 1/8" from the factory but they actually waver all over the place from .09-.14". I called up Corvair engine machinist Ray Sedman to ask about this, but he said it's better to try to even them out to just a hair over 1/8" and then cut them slightly deeper. This way you get more oil flow as well as the full surface support for the bearings. Grand idea. When the case goes to him for the VW cylinder modification he'll take care of that with a big expensive machine.
Also, some have repeatedly told me not to remove the oil gallery plugs when performing case prep for fear of something or rather. But for the sake of completeness I wanted to open them up anyway, especially since the case was glass bead blasted and knew the case would get cleaned about a dozen times before final assembly. Check it out: The two case plugs are 1/4" NPT plugs with 1/4" square drive sockets. They're made of steel and held in place with some sort of sealant. I used a 1/4" ratchet to remove them but would have preferred a perfectly square tool without the ball on the side. 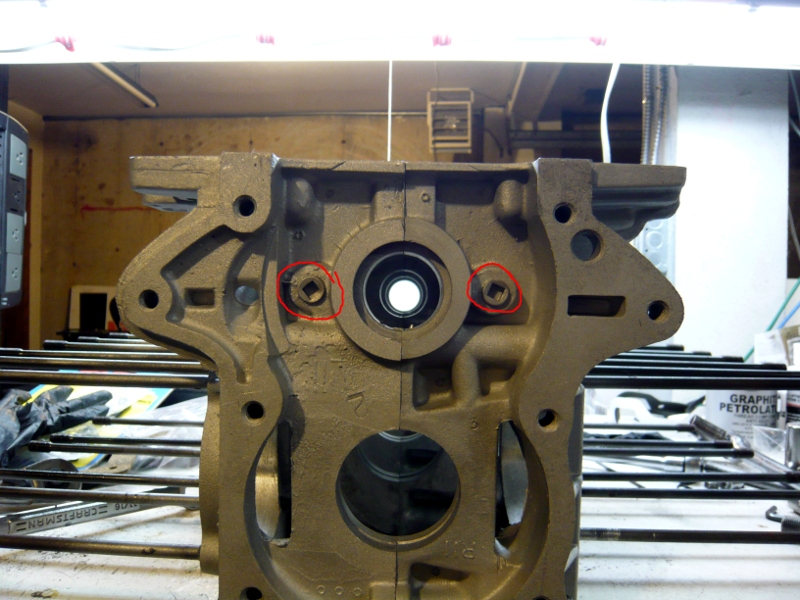 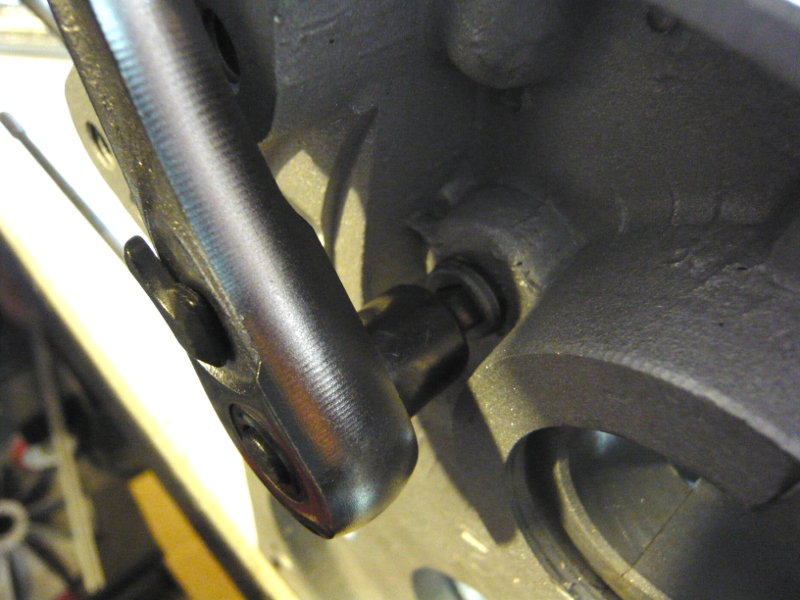 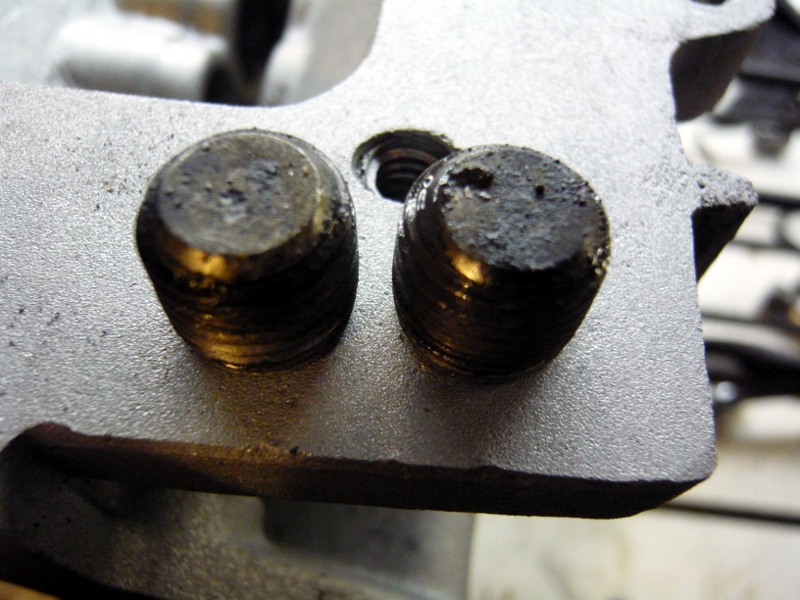 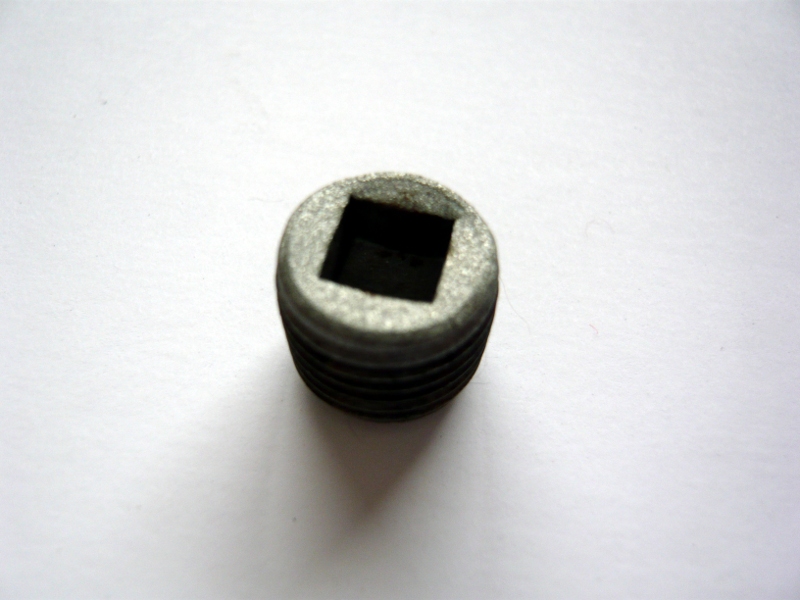 In later years, GM replaced these with aluminum hex-socket plugs and so will I. You can see the oil galleries are about as clean as a coal mine even after the case has been blasted and pressure washed a couple of times. 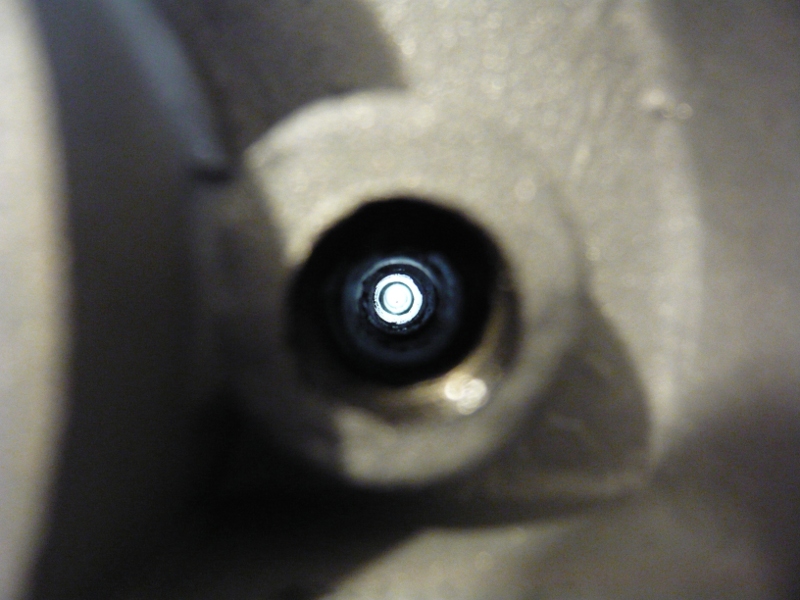 So it's a series of brass engine case brushes from FLAPS to suggestively clean the gallery, which with a little kerosene worked like magic. 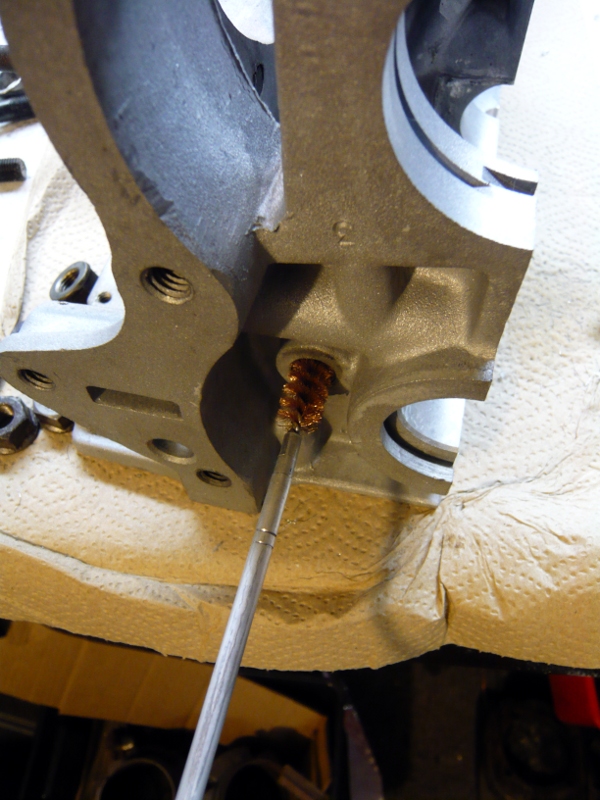 |
|
|
|
| r3dplanet |
Feb 22 2014, 05:53 PM
Post
#87
|
|
Senior Member Group: Members Posts: 679 Joined: 3-September 05 From: Portland, Oregon Member No.: 4,741 Region Association: None |
Now that the case is clean it's time to really clean the case. And I mean Mommy-Dearest-toothbush-and-bleach-on-the-tile-floor-clean. Why? Glad you asked. First, I'm polishing the innards of the case for the sake of removing unseen debris - like rounghess, impregnated glass, microscopic bits of this and that. I could have left it there but since I'm taking the extra step of painting with Glyptal paint, the surface needs to be operating room clean.
First: brass brushes and the last moments of my crappy old Dremel before switching to the Roxxon. 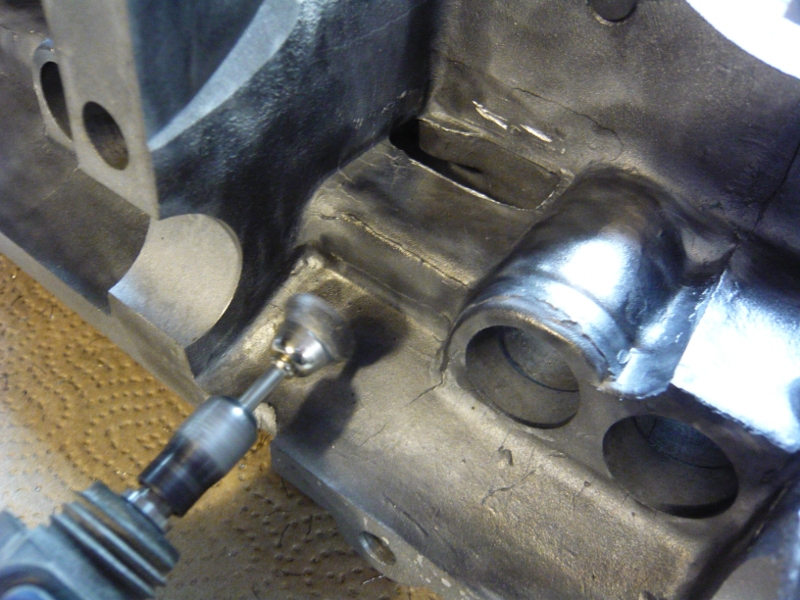 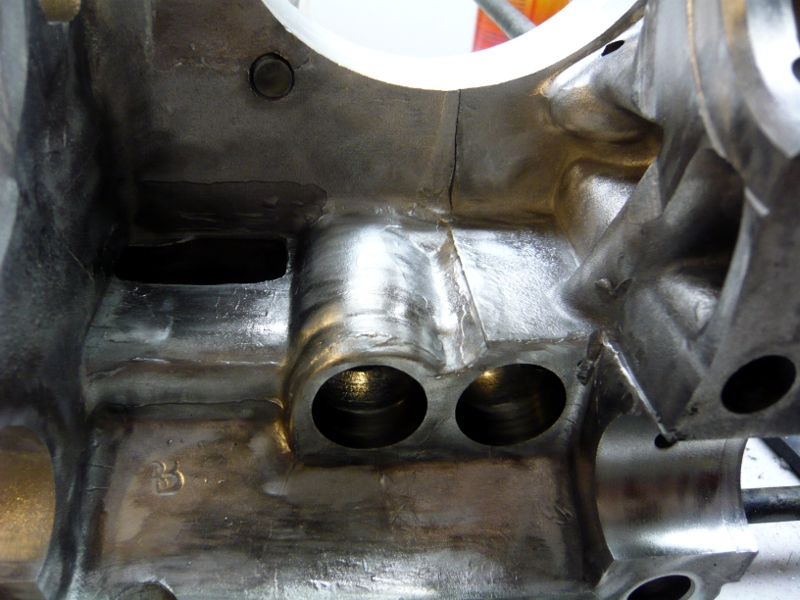 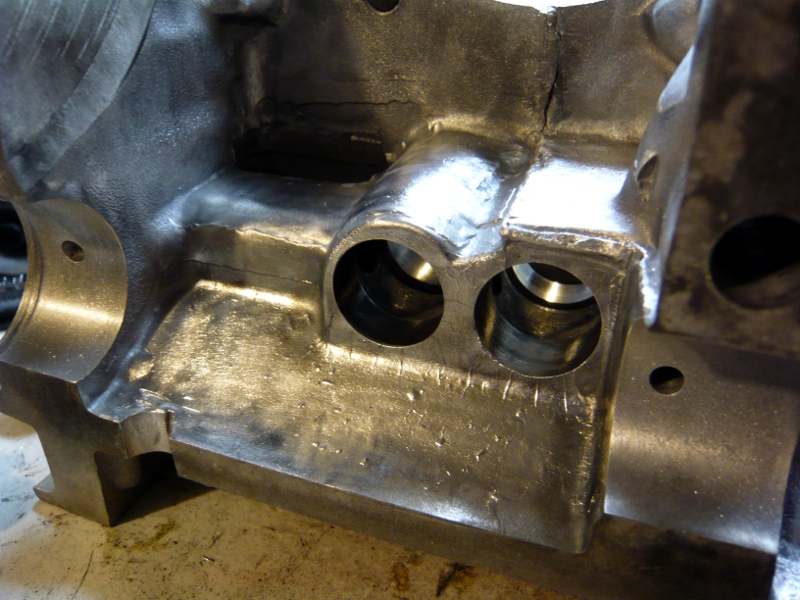 And then the whole of the engine gets cleaned with a thousand coffee filters and denatured alcohol until no discoloration can be seen on the white coffee filters. Coffee filter paper is cheap, strong, absorbent, and lint-free. They're the perfect tool for the job. After the coffee filters come the Q-tips, with which I used half a box, in order to really make sure that no dirt was left in any of the many many hiding places. 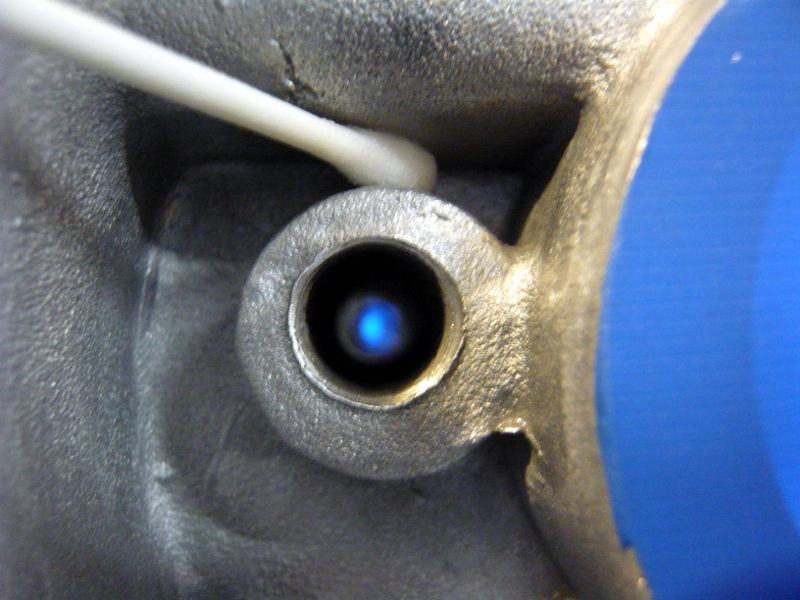 While I Was I There I took some more time to find more casting flash and more things to polish. My favorite gem by far is this oil return "hole." When I first found this my heart skipped a beat thinking that it absolutely must of have been a piece of crankshaft or bearing or something exploding right out of the case wall. Actually, this is GM's idea of a machined oil passage. Just like snow flakes, no two Corvair engine oil passages are the same thanks to what looks like a quite a blast. I polished this with great care. 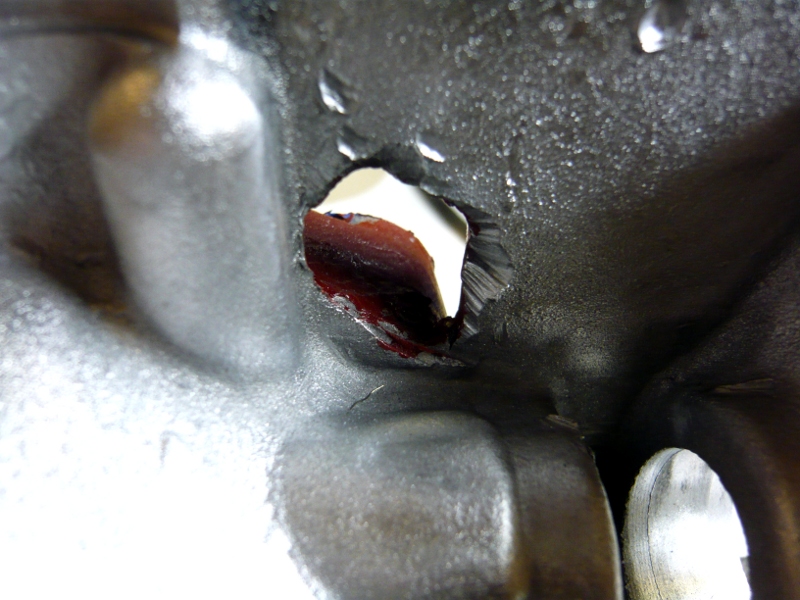 This also seemed like a great time to clean out the threads for the oil pan, top tan housing, front oil cover assembly, etc. After which I cleaned them out with Q-tips, Kroil, and alcohol. 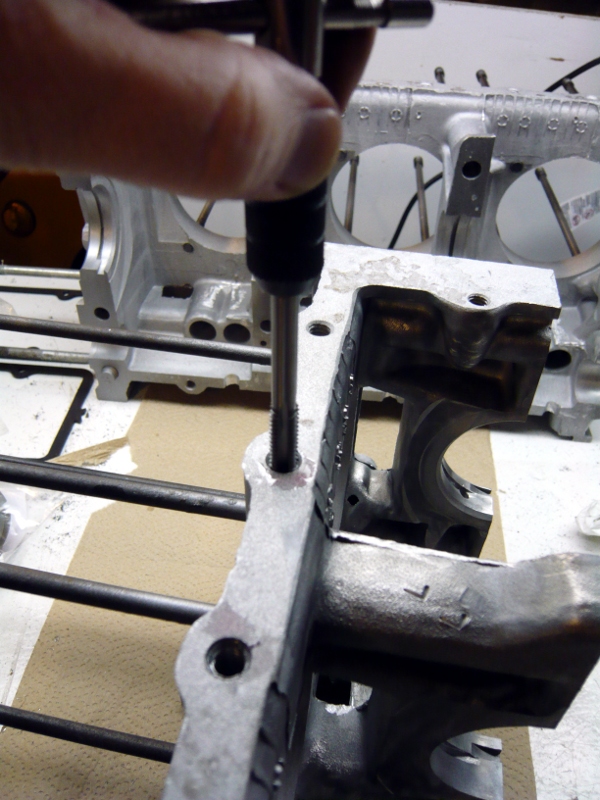 Finally, this case half is clean enough for Glyptal paint. In reading over the requisite number of Glyptal paint scare stories I found they were usually forwarded with statements like, "I don't know why this paint flaked off since I gave it a quicky clean with WD-40 and didn't bother to bake it properly afterward." Since profound cleanliness is required, profound cleanliness was executed. All told, the cleaning alone took about four days of part-time work, after a week of part-time case polishing, after another week of part-time flash grinding. 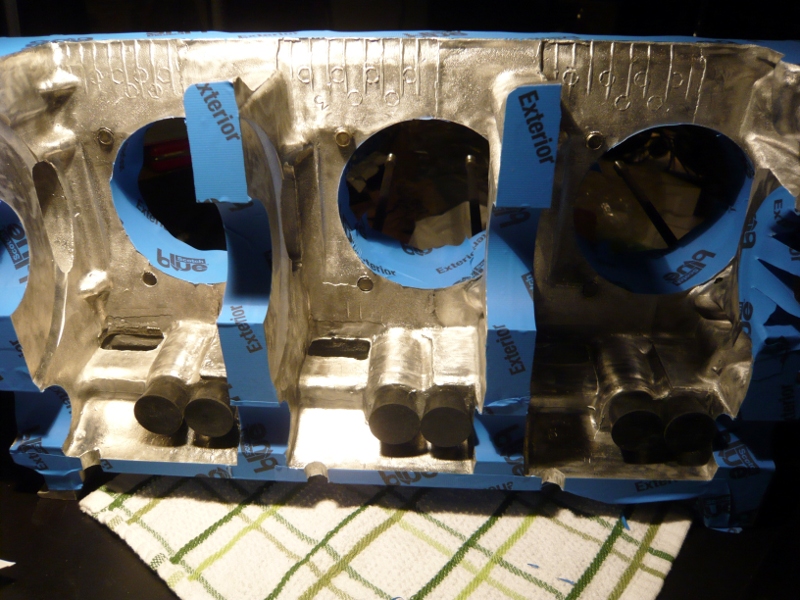 |
|
|
|
| r3dplanet |
Feb 22 2014, 06:23 PM
Post
#88
|
|
Senior Member Group: Members Posts: 679 Joined: 3-September 05 From: Portland, Oregon Member No.: 4,741 Region Association: None |
Okay. It's time for a little paint.
I gave the cases one more wipe down with denatured alcohol and compressed air. Since Glyptal is toxic, especially to people with delicate constitutions like myself, I worked one area at a time, separated by one day each, even though I was wearing a respirator and goggles. The directions on the can say to use an appropriate brush. So I used a series of 1/4" natural bristle, acid-proof model paint brushes from the hobby store. First the inside, and then after drying some more cleanup on the next side. 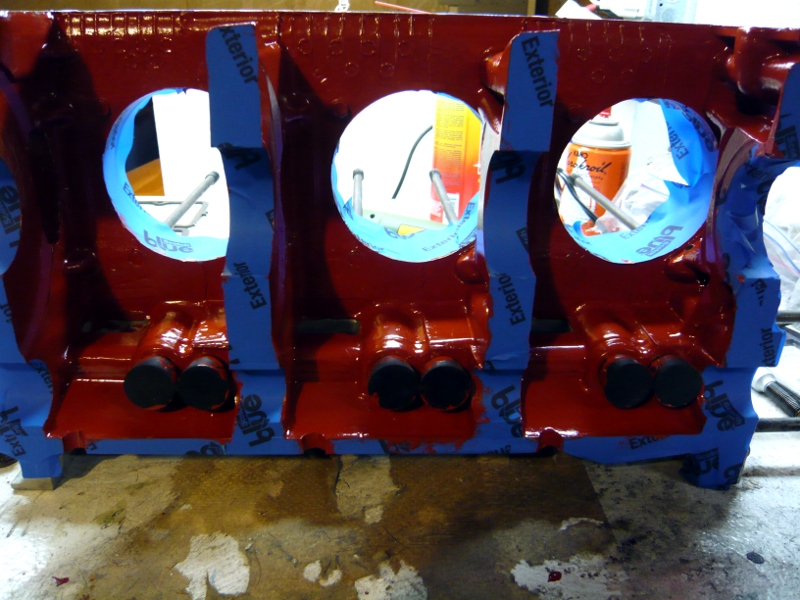 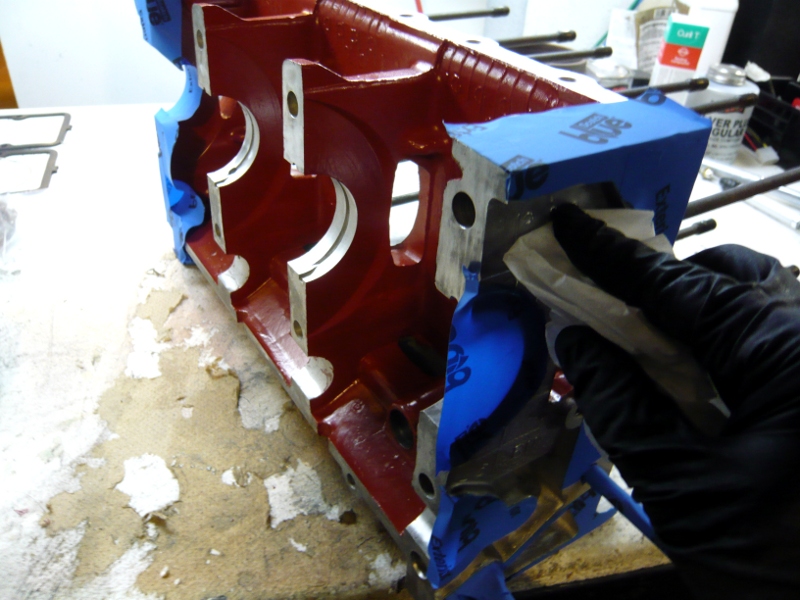 I was bummed to discover that the blue masking tape didn't mask very well, so I switched back to green which did a near-perfect job. Important tip: remove any slop like this with Xylene and a brass brush before it's baked on. After it's baked on there's little to be done about removing it except grinding or blasting it off. 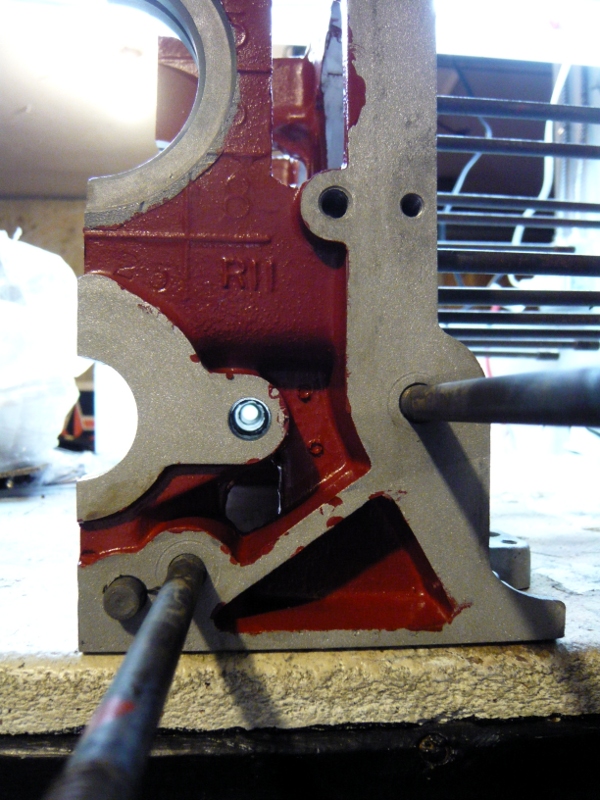 Then the bottom: 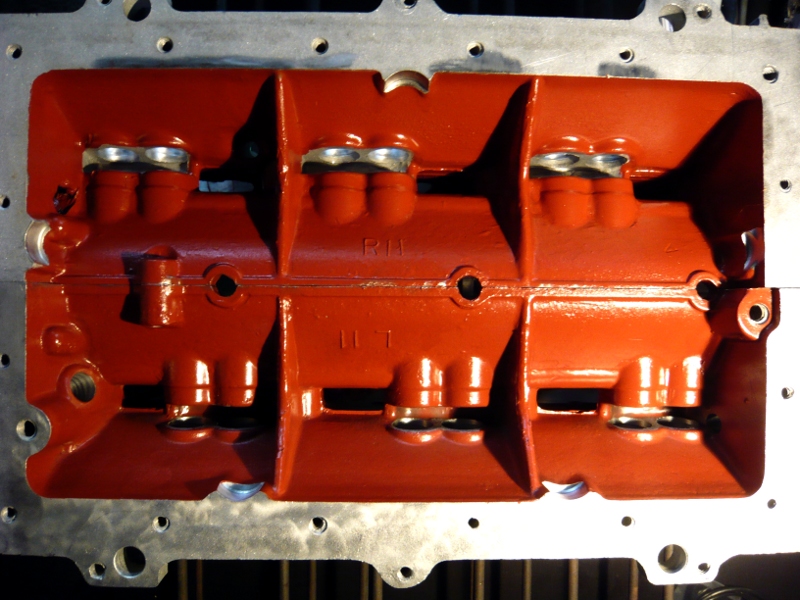 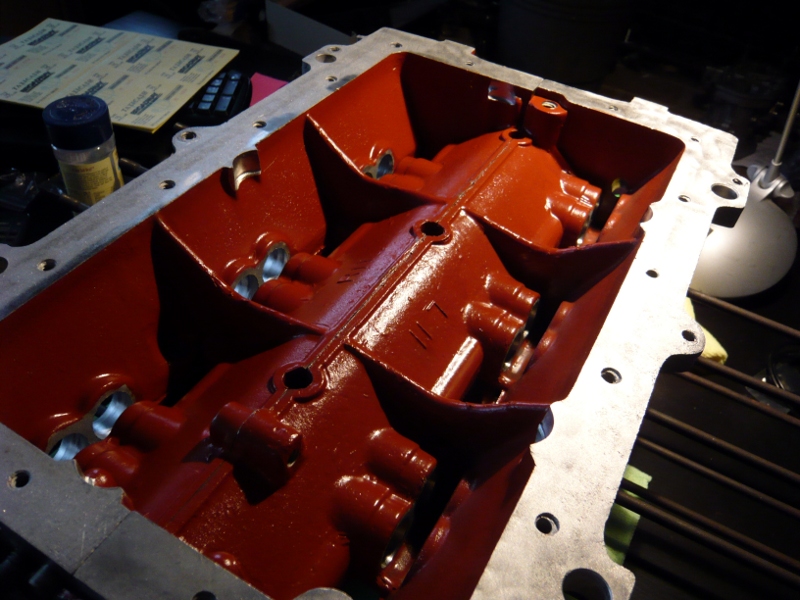 It was freezing in my garage at the time but I used my trusty Perfection Oil Heater to keep it warm for the duration. Glyptal takes a while to outgas, so it sat around for a week while I painted the other hemisphere before baking. Finally, here's a lovely smooth brick red glow after baking at 250F for two hours. And yes, this is my living room table. Since I'm a bachelor, I can get away with taking photos of the block on any surface I choose. Plus it's more fun to watch Starsky & Hutch re-runs this way. 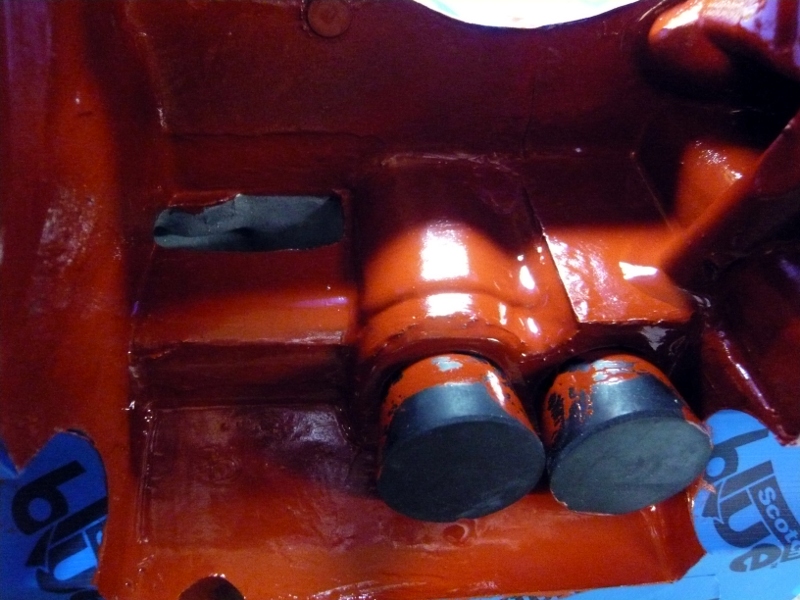 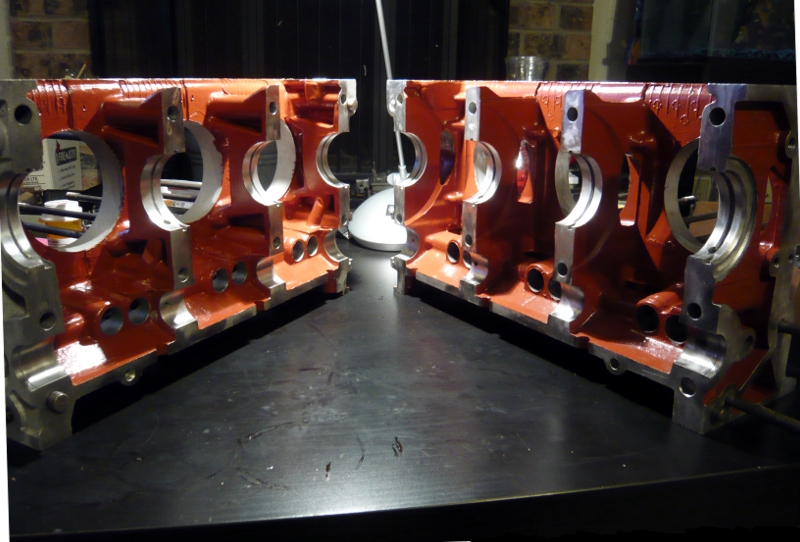 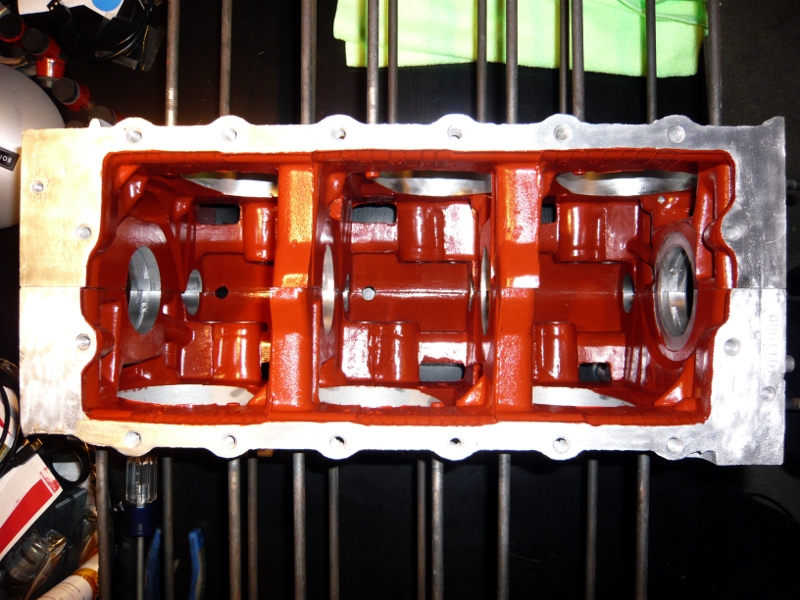 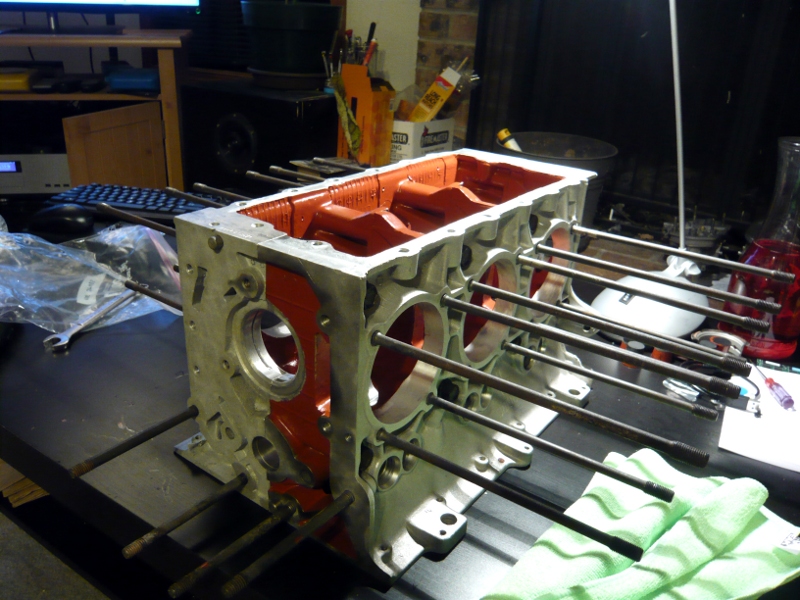 Some of the more observant viewers might see that the cylinder bores had a little paint bleed on them. Not to worry. What couldn't be removed easily will be machined off when it's time for the VW 94mm cylinder prep. |
|
|
|
| r3dplanet |
Feb 22 2014, 07:16 PM
Post
#89
|
|
Senior Member Group: Members Posts: 679 Joined: 3-September 05 From: Portland, Oregon Member No.: 4,741 Region Association: None |
The biggest score I've made thus far are the heads. After a series of false starts I bought a pair of heads that were, astonishingly, rebuilt by Ray Sedman of American-Pi, the very same machinist doing the big bore conversion work. These were rebuilt twelve years ago but never used. One or two of the fins look to need a gentle bend, and they've already been deflashed. Most photos of Corvair heads I've seen have more flash than the case, and all of the major Corvair books strongly suggest to spend a few hours with a file through the fins. These are super, but I'll probably spend some time with a small file picking and cleaning anyway.
These heads are TITS! Wider and deeper seats, stainless valves, titanium spring retainers, silicon/aluminum/bronze valve guides, heat treated valve locks, high squish chamber machining, chrome-moly retainers, new cylinder mating surface, etc. The friggin' WORKS... for $700 from a true gentleman who bought them and never used them after spending $1575 in Year 2002 dollars. For all the detail I'm putting into this thread I apologize that I have no photos of their rebuild process, but here are the pics that I took today.  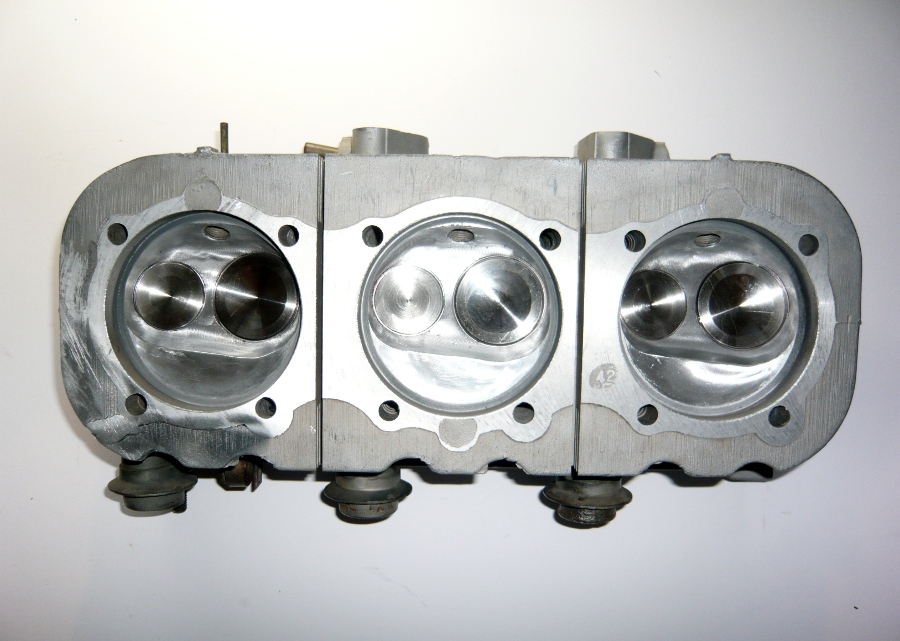 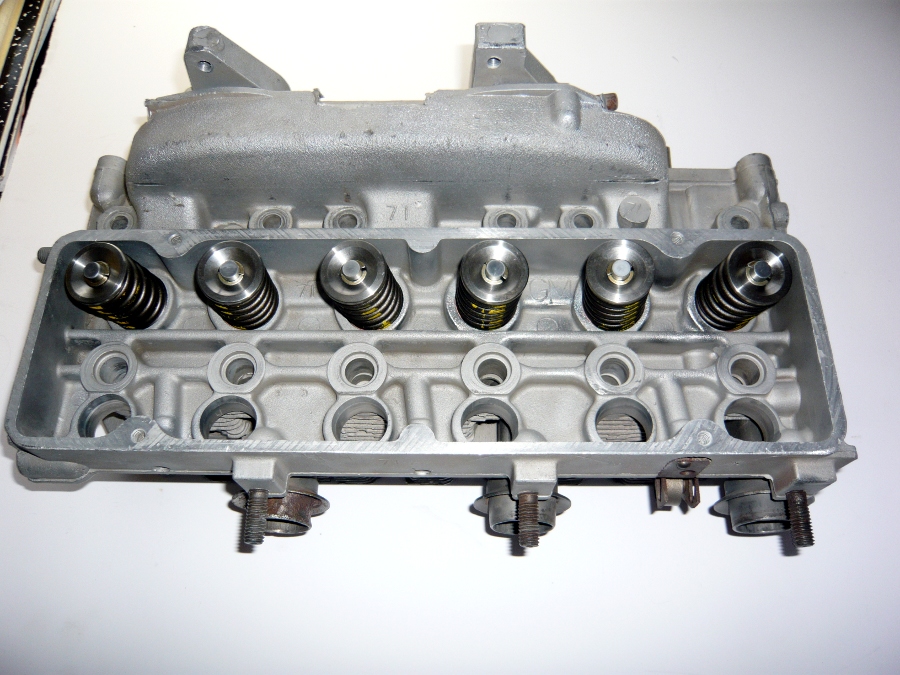 This means that as of now I have all I need to deliver the parts to American-Pi for the VW big bore conversion. My plan is to drive them to LA from Portland myself because there are friends I want to visit there anyway. This will take a few months easily. In the meantime, all of the crank/cam/rolling assembly is back from cryogenic treatment and off to Gary the IncrediMachinist to be balanced. More after a while. |
|
|
|
| Dr Evil |
Feb 22 2014, 09:17 PM
Post
#90
|
|
Send me your transmission! Group: Members Posts: 23,044 Joined: 21-November 03 From: Loveland, OH 45140 Member No.: 1,372 Region Association: MidAtlantic Region |
Wow, man. Thanks for the coverage. You are meticulous. Makes my build look like a monkey did it (low hanging fruit for the trolls, there). (IMG:style_emoticons/default/wink.gif)
|
|
|
|
| DBCooper |
Feb 22 2014, 09:48 PM
Post
#91
|
|
14's in the 13's with ATTITUDE Group: Members Posts: 3,079 Joined: 25-August 04 From: Dazed and Confused Member No.: 2,618 Region Association: Northern California |
Really enjoying your build, Mr. r3dplanet, and that's coming from someone who would rather flop his dick onto an anvil and hit it with a very large hammer than ever deal with a Corvair engine again. Go dude, GO!
|
|
|
|
| VaccaRabite |
Feb 22 2014, 10:53 PM
Post
#92
|
|
En Garde! Group: Admin Posts: 13,882 Joined: 15-December 03 From: Dallastown, PA Member No.: 1,435 Region Association: MidAtlantic Region |
QUOTE(r3dplanet @ Jan 20 2014, 03:17 AM) ...But they require a load of bread to capitalize... (IMG:style_emoticons/default/beerchug.gif) And that, my friends, is how you work Ghostbusters into a thread on 914World. Well done! I award you a slimer! (IMG:http://www.914world.com/bbs2/uploads_offsite/static3.wikia.nocookie.net-1435-1393131193.1.png) ScottyB, please take note. Zach |
|
|
|
| r3dplanet |
Feb 22 2014, 11:17 PM
Post
#93
|
|
Senior Member Group: Members Posts: 679 Joined: 3-September 05 From: Portland, Oregon Member No.: 4,741 Region Association: None |
I just want to do this job once. Certainly this is a build where I'm going bananas, but I enjoy going bananas with this sort of thing. Besides, I covet your CIS system. It makes my dual Weber 44 setup look like.. um .. 1960s technology.
QUOTE(Dr Evil @ Feb 22 2014, 07:17 PM) Wow, man. Thanks for the coverage. You are meticulous. Makes my build look like a monkey did it (low hanging fruit for the trolls, there). (IMG:style_emoticons/default/wink.gif) |
|
|
|
| r3dplanet |
Feb 22 2014, 11:18 PM
Post
#94
|
|
Senior Member Group: Members Posts: 679 Joined: 3-September 05 From: Portland, Oregon Member No.: 4,741 Region Association: None |
That, sir, paints quite a picture. Please do not do that. Unless you're a clown and use a balloon for a dick; in which case please upload a video.
QUOTE(DBCooper @ Feb 22 2014, 07:48 PM) Really enjoying your build, Mr. r3dplanet, and that's coming from someone who would rather flop his dick onto an anvil and hit it with a very large hammer than ever deal with a Corvair engine again. Go dude, GO! |
|
|
|
| r3dplanet |
Feb 22 2014, 11:20 PM
Post
#95
|
|
Senior Member Group: Members Posts: 679 Joined: 3-September 05 From: Portland, Oregon Member No.: 4,741 Region Association: None |
AH HA! I knew someone would chime in. I'm glad it was you, Zach! It's just that Dan Akroyd is do damn quotable. Especially for Gen X-ers like us. I may also work a few The A-Team references in here somewhere.
QUOTE(Vacca Rabite @ Feb 22 2014, 08:53 PM) QUOTE(r3dplanet @ Jan 20 2014, 03:17 AM) ...But they require a load of bread to capitalize... (IMG:style_emoticons/default/beerchug.gif) And that, my friends, is how you work Ghostbusters into a thread on 914World. Well done! I award you a slimer! (IMG:http://www.914world.com/bbs2/uploads_offsite/static3.wikia.nocookie.net-1435-1393131193.1.png) ScottyB, please take note. Zach |
|
|
|
| DBCooper |
Feb 23 2014, 08:52 AM
Post
#96
|
|
14's in the 13's with ATTITUDE Group: Members Posts: 3,079 Joined: 25-August 04 From: Dazed and Confused Member No.: 2,618 Region Association: Northern California |
Well, I'm probably exaggerating a little. My experiences were long, long ago, I was ignorant, and as everyone knows, ignorance can and should be painful. On the other hand it's a pleasure to see it done well so I'm enjoying watching you do that, and am curious to see how it turns out.
QUOTE(r3dplanet @ Feb 22 2014, 09:18 PM) That, sir, paints quite a picture. Please do not do that. Unless you're a clown and use a balloon for a dick; in which case please upload a video. QUOTE(DBCooper @ Feb 22 2014, 07:48 PM) Really enjoying your build, Mr. r3dplanet, and that's coming from someone who would rather flop his dick onto an anvil and hit it with a very large hammer than ever deal with a Corvair engine again. Go dude, GO! |
|
|
|
| sixnotfour |
Feb 23 2014, 08:04 PM
Post
#97
|
|
914 Wizard Group: Members Posts: 11,272 Joined: 12-September 04 Member No.: 2,744 Region Association: NineFourteenerVille |
I started with Corviars, air cooled, 6cylinders, turbos , oh ya.....then found an overhead cam aircooled six cylinder.....no push rods from that point on....its a quote in some engineers book BTW
Lots of fond memories, Have Fun and it was nice to never adjust the valves... |
|
|
|
| r3dplanet |
Mar 18 2014, 10:35 PM
Post
#98
|
|
Senior Member Group: Members Posts: 679 Joined: 3-September 05 From: Portland, Oregon Member No.: 4,741 Region Association: None |
So, I've been spending the past few weeks learning how to apply new and better coatings. I'll detail some of my experiments here, although Mark Henry is doing many of the same things right now on his thread and probably provides better explanations.
Specifically I'm experimenting with Techline dry film and ceramic coatings, KG Gun-Kote, and powder coating at home. I'll start with powder coating. I picked up Eastwood's powder coating kit for tinkerers and I must say that it's already saved me quite a bit of money. Every powder coat place in town charges a $125 minimum, and the Eastwood kit costs the about the same. Certainly shops need to charge minimums and I don't have a problem with that, but when I need just a few little parts or different colors this process totally saves the day and has paid for itself already with the half dozen parts I've coated so far. The process is easy, almost foolproof, and provides excellent results. In addition to the tried-and-true basic powders like satin black, gloss black, machine gray ("grey" for the British amongst us), Porsche silver, etc. I've also picked up some high temp silver ceramic/silicon powder for things like pushrod tubes. The one splash of color I'm indulging in is RAL color #1028 - the closest color I can find to Signal Orange. From England I ordered a RAL color fan (K5 Classic with high gloss) it's extremely handy since most powders I can find are sold by virtue of RAL colors. RAL #1028 isn't a dead ringer for Signal Orange but it is quite close. Certainly closer than Nepal Orange. Close enough for highlights. Today I'm coating my cooling fan. It's made of magnesium, extremely pitted, and very hard to clean. Any drop of water will instantly oxidize the magnesium, so I had to clean it mechanically and clean after that acetone. I walnut blasted the fan several months ago and you can see that the color is typical for oxidized magnesium. 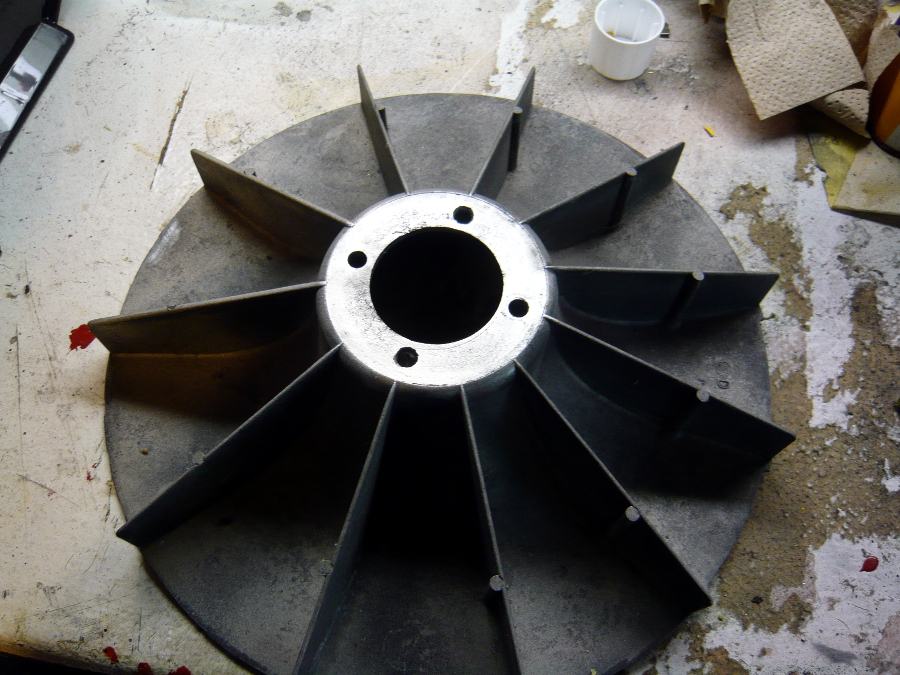 So I gave it quick blast with more walnut and then set to work with the Roxxon rotary tool. This took a couple of hours with various bits, but it eventually came clean, and was followed up with good scrubbing of acetone and denatured alcohol.  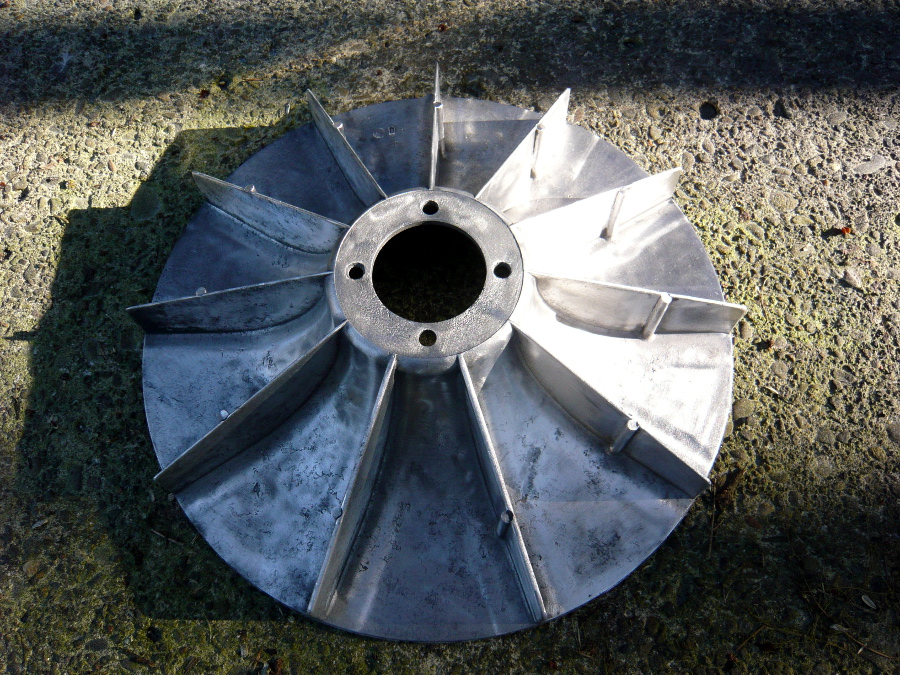 In addition to the $40 large size counter top oven I bought from a junk shop, I also picked up a large assortment of high-heat resistant silicone plugs and caps. Experimenting with powder coating has taught that one of the most important steps is to make sure one knows exactly how to mount the part into the oven without fiddling and mucking up the powder after it's been sprayed. In the this photo I have the fan sitting directly on the rack to preheat it to 150 degrees, but in the final curing I placed it silicone-plug-side down on a thin cookie sheet and practiced getting it into and out of the oven. 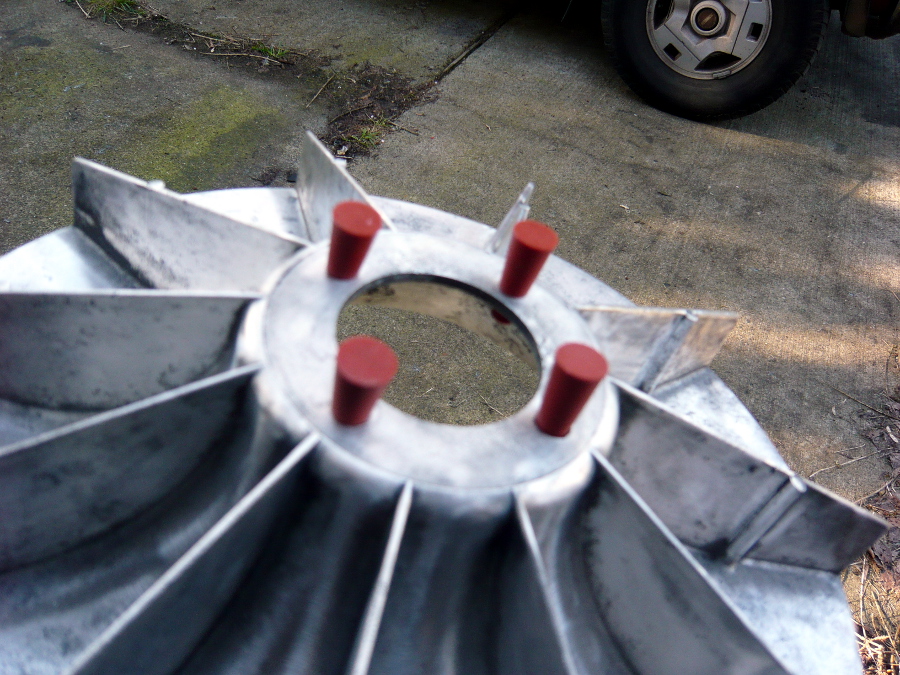 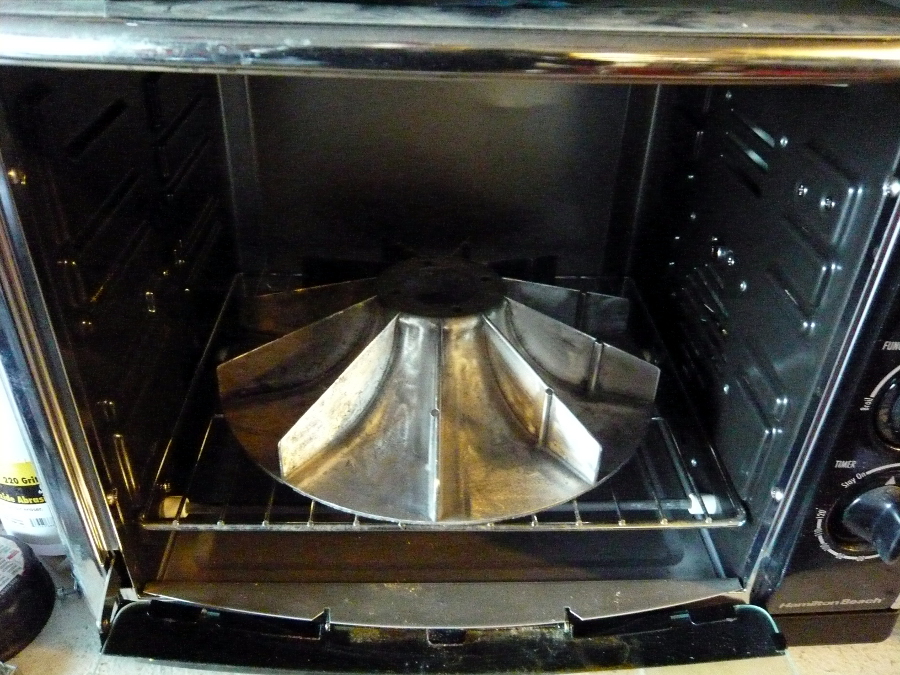 This is Eastman powder #10137, or "Orange Yellow." I was surprised to find this color which is exactly RAL #1028. Otherwise I would have to pay $75 for custom color mixing. Good deal. Signal orange 914 owners, please memorize that number. Here it is in a two pound can. In real life it looks exactly like the powdered cheese one might encounter in a box of industrial/prison/orphanage grade mac-and-cheese. Thankfully the color does tone down a bit on the finished product. 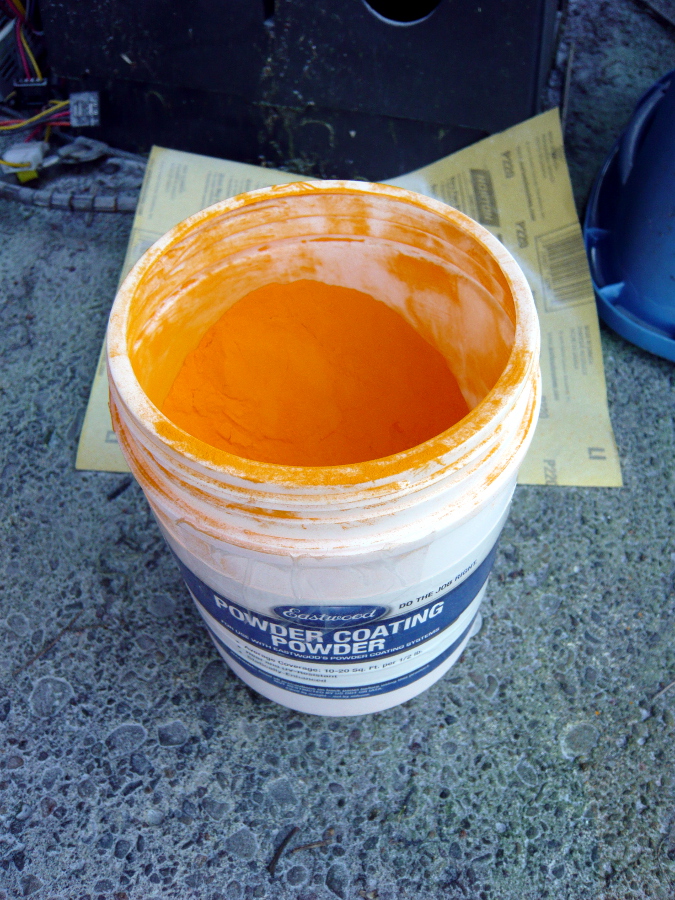 Here it is strung up and ready to go, and then with the powder applied. 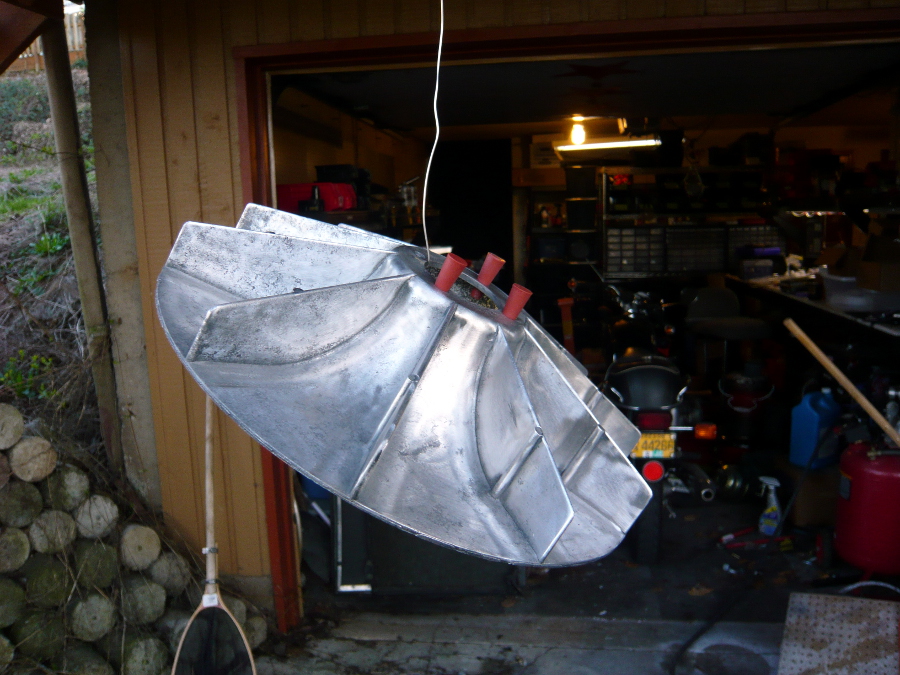 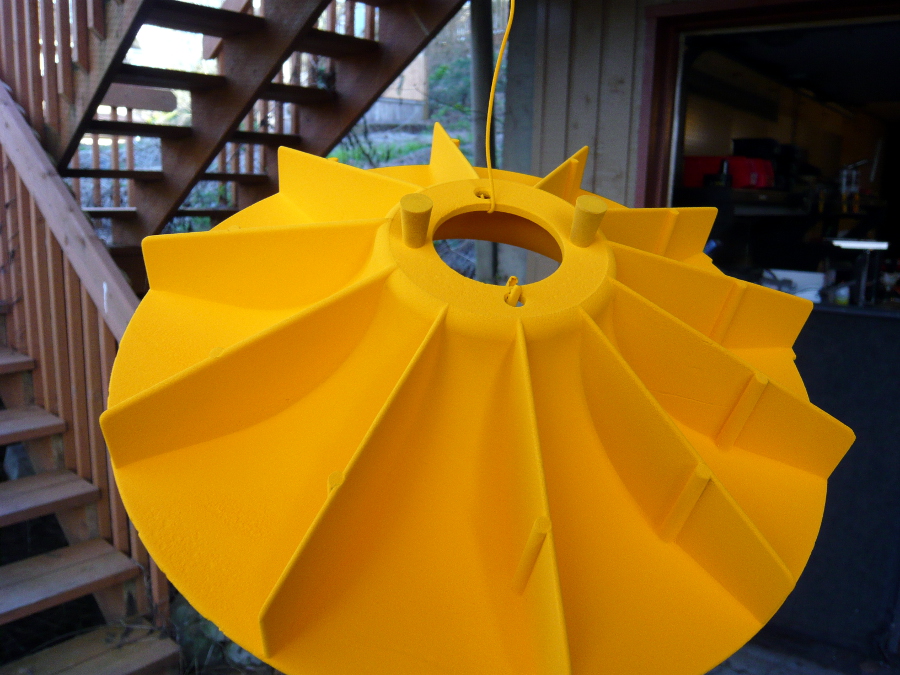 And finally into the oven. If you look closely you can see a goofy image of me taking the photo with my trusty Lumix camera. It has a certain "I take pictures of you when you're sleeping and I know when you're alone" vibe to it. 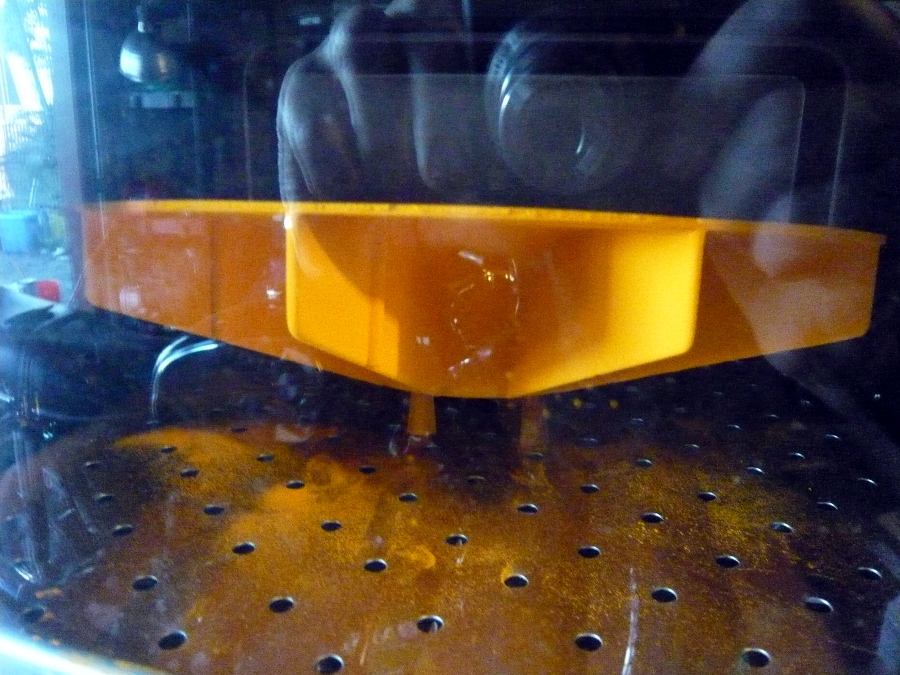 |
|
|
|
| r3dplanet |
Mar 18 2014, 10:46 PM
Post
#99
|
|
Senior Member Group: Members Posts: 679 Joined: 3-September 05 From: Portland, Oregon Member No.: 4,741 Region Association: None |
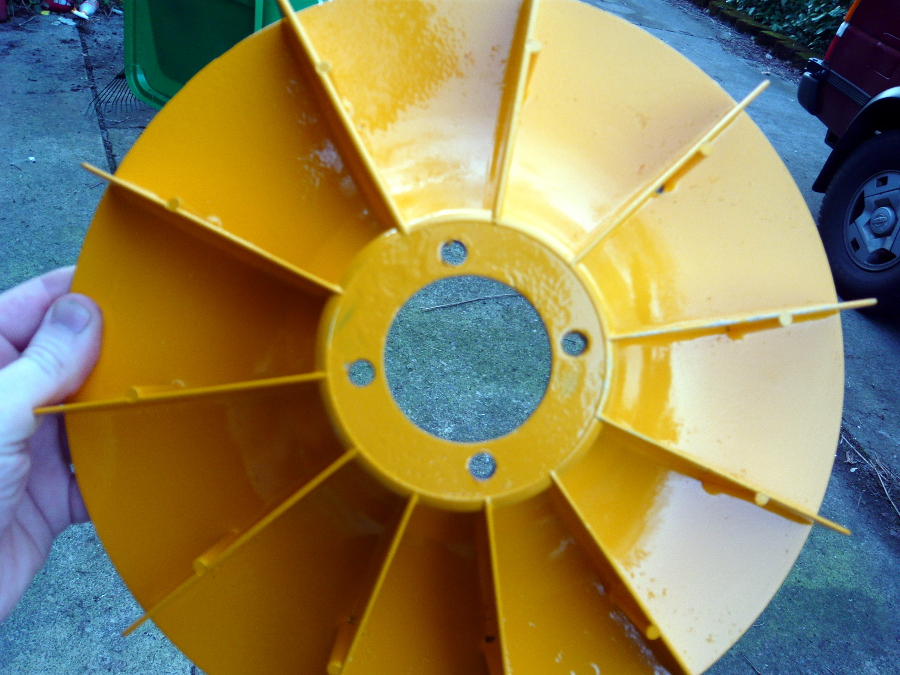
I stared at it for twenty minutes or so until it gelled over at 450 degrees Fahrenheit (*), then let it bake for 400 degrees for another 25 minutes. Here's the final product. You can see that it's still quite pitted but that just can't be avoided with a weathered, fifty year old part that's seen action and abuse. However, in real life in looks much better and smoother than the photo. I didn't want to add any filler to smooth it out because I didn't want to throw the fan off balance. There are also a tiny few spots where the powder didn't take to oxidized sections that I didn't grind down far enough; but it will never show and it will never rust so I'm not worried. Having said all that, I'm quite pleased with how it came it. It's a half-shade darker color than the car, but I can easily live with that. For the most part, it looks great.
 (*) Fun Fact: The Daniel Fahrenheit temperature scale is based on the lowest temperature he could make in the lab with alcohol and brine, or what he determined would be zero degrees. The high point was based on the human body which he scaled to 100 degrees. By repeatedly poking his extremely patient wife, Wilma, with thermometers he achieved his points and scale. But it turns out that she often had poor health with fevers so it's a bit high. Corrected for non-fever, it's 98.6 degrees. I wish so badly that we used the Metric / Centigrade system in the States, but frankly the goofy system we have is a LOT funnier. |
|
|
|
| rsrguy3 |
Mar 18 2014, 11:14 PM
Post
#100
|
|
Member Group: Members Posts: 136 Joined: 4-April 09 From: Utah Member No.: 10,234 Region Association: None |
I am watching with a keen eye as I'm seriously considdering the corvair as the power plant for my Q2 homebuilt.-G
|
|
|
|
|
2 User(s) are reading this topic (2 Guests and 0 Anonymous Users)
0 Members:

|
Lo-Fi Version | Time is now: 15th June 2026 - 01:25 PM |
Invision Power Board
v9.1.4 © 2026 IPS, Inc.