|
|
|
Porsche, and the Porsche crest are registered trademarks of Dr. Ing. h.c. F. Porsche AG.
This site is not affiliated with Porsche in any way. Its only purpose is to provide an online forum for car enthusiasts. All other trademarks are property of their respective owners. |
|
|

  |

| ThePaintedMan |
 Jul 11 2013, 10:14 PM Jul 11 2013, 10:14 PM
Post
#1
|
|
Advanced Member  Group: Members Posts: 3,886 Joined: 6-September 11 From: St. Petersburg, FL Member No.: 13,527 Region Association: South East States |
... of my own stupidity.
I had to weld in front nut plates for my bolt in cage, which are basically recessed into the top of the longs. Took my time and let everything cool, but it appears there was still enough heat to close up the top of my door gaps on both sides.. i.e. the front cowl moved in/down a little. I can still close my doors, but it's a little tighter than I like. The difference is, since I planned to put a cage in the car, I did not install an Engman kit, so there is no kit for me to cut before doing the whole Porta-power push. Is my only option here to cut the top of the long, push with a Porta-power, then seam weld them back? |
   |

 
|
| brant |
Jul 11 2013, 10:29 PM
Post
#2
|
|
914 Wizard Group: Members Posts: 11,623 Joined: 30-December 02 From: Colorado Member No.: 47 Region Association: Rocky Mountains |
Oops. You have to put a car on jack stands when welding a cage including the foot plates. Door bars are practically required. Was the car sitting on its wheels when you did this?
|
 |
|
| ThePaintedMan |
Jul 12 2013, 05:52 AM
Post
#3
|
|
Advanced Member Group: Members Posts: 3,886 Joined: 6-September 11 From: St. Petersburg, FL Member No.: 13,527 Region Association: South East States |
QUOTE(brant @ Jul 12 2013, 12:29 AM)  Oops. You have to put a car on jack stands when welding a cage including the foot plates. Door bars are practically required. Was the car sitting on its wheels when you did this? Yep, it sure was on it's wheels Brant. I thought that I had read through all the threads I needed to and I remembered hearing about putting it on jackstands, but never got it definitively. Dumb, dumb mistake. |
|
|
|
| bulitt |
Jul 12 2013, 05:53 AM
Post
#4
|
|
Achtzylinder Group: Members Posts: 4,188 Joined: 2-October 11 Member No.: 13,632 Region Association: South East States |
QUOTE(brant @ Jul 12 2013, 12:29 AM) Oops. You have to put a car on jack stands when welding a cage including the foot plates. Door bars are practically required. Was the car sitting on its wheels when you did this? I guess that would apply for welding on a long kit also? |
|
|
|
| 7275914911 |
Jul 12 2013, 06:09 AM
Post
#5
|
|
Hummmm!!! Group: Members Posts: 756 Joined: 7-May 08 From: Mid-South Member No.: 9,028 Region Association: South East States |
QUOTE(bulitt @ Jul 12 2013, 06:53 AM) QUOTE(brant @ Jul 12 2013, 12:29 AM) Oops. You have to put a car on jack stands when welding a cage including the foot plates. Door bars are practically required. Was the car sitting on its wheels when you did this? I guess that would apply for welding on a long kit also? That is correct, Bob... |
|
|
|
| rick 918-S |
Jul 12 2013, 07:55 AM
Post
#6
|
|
Hey nice rack! -Celette Group: Members Posts: 20,457 Joined: 30-December 02 From: Now in Superior WI Member No.: 43 Region Association: Northstar Region |
Remove the door latches, close the door and take photos and post them. I want to see the fender to door gap and the door to quarter gap. Also post "F" and "X" measurements from this diagram. Both sides. and both "X" directions.
http://www.914world.com/specs/bodydims.php |
|
|
|
| ThePaintedMan |
Jul 12 2013, 07:58 AM
Post
#7
|
|
Advanced Member Group: Members Posts: 3,886 Joined: 6-September 11 From: St. Petersburg, FL Member No.: 13,527 Region Association: South East States |
QUOTE(rick 918-S @ Jul 12 2013, 09:55 AM) Remove the door latches, close the door and take photos and post them. I want to see the fender to door gap and the door to quarter gap. Also post "F" and "X" measurements from this diagram. Both sides. and both "X" directions. Will do. I love being given clear instructions! Thank you for your help. Should be able to snap some when I get home from work. |
|
|
|
| rick 918-S |
Jul 12 2013, 08:02 AM
Post
#8
|
|
Hey nice rack! -Celette Group: Members Posts: 20,457 Joined: 30-December 02 From: Now in Superior WI Member No.: 43 Region Association: Northstar Region |
QUOTE(ThePaintedMan @ Jul 12 2013, 08:58 AM) QUOTE(rick 918-S @ Jul 12 2013, 09:55 AM) Remove the door latches, close the door and take photos and post them. I want to see the fender to door gap and the door to quarter gap. Also post "F" and "X" measurements from this diagram. Both sides. and both "X" directions. Will do. I love being given clear instructions! Thank you for your help. Should be able to snap some when I get home from work. I'll be out today but I'll check on this later. |
|
|
|
| scotty b |
Jul 12 2013, 05:18 PM
Post
#9
|
|
rust free you say ? Group: Members Posts: 16,375 Joined: 7-January 05 From: richmond, Va. Member No.: 3,419 Region Association: None |
QUOTE(bulitt @ Jul 12 2013, 03:53 AM) QUOTE(brant @ Jul 12 2013, 12:29 AM) Oops. You have to put a car on jack stands when welding a cage including the foot plates. Door bars are practically required. Was the car sitting on its wheels when you did this? I guess that would apply for welding on a long kit also? How was the car sitting ? On the wheels or on jackstands ? Post your welder setting s when you did this. I never brace anything when I do long kit its which require a LOT more welding and have yet to have a cars dimensions change from that. The only advantage I have is the scissor lift has flat plate on top that support the center of the car. |
|
|
|
| ThePaintedMan |
Jul 13 2013, 02:42 PM
Post
#10
|
|
Advanced Member Group: Members Posts: 3,886 Joined: 6-September 11 From: St. Petersburg, FL Member No.: 13,527 Region Association: South East States |
Okay, here are the dimensions, from the best of my measurements. It is entirely possible I have not measured correctly, especially dimension X but the pictures shouldn't lie.
Dimension F Passenger side - 24 7/8 inches (spec is 25 1/8) Dimension F Driver side - 24 7/8 inches (spec is 25 1/8) Dimension X Passenger front to drivers roll bar point - 54 inches (spec is 52 5/8) Dimension X Drivers front to passenger roll bar point - 53 1/2 inches (spec is 52 5/8) First three pics are passenger side 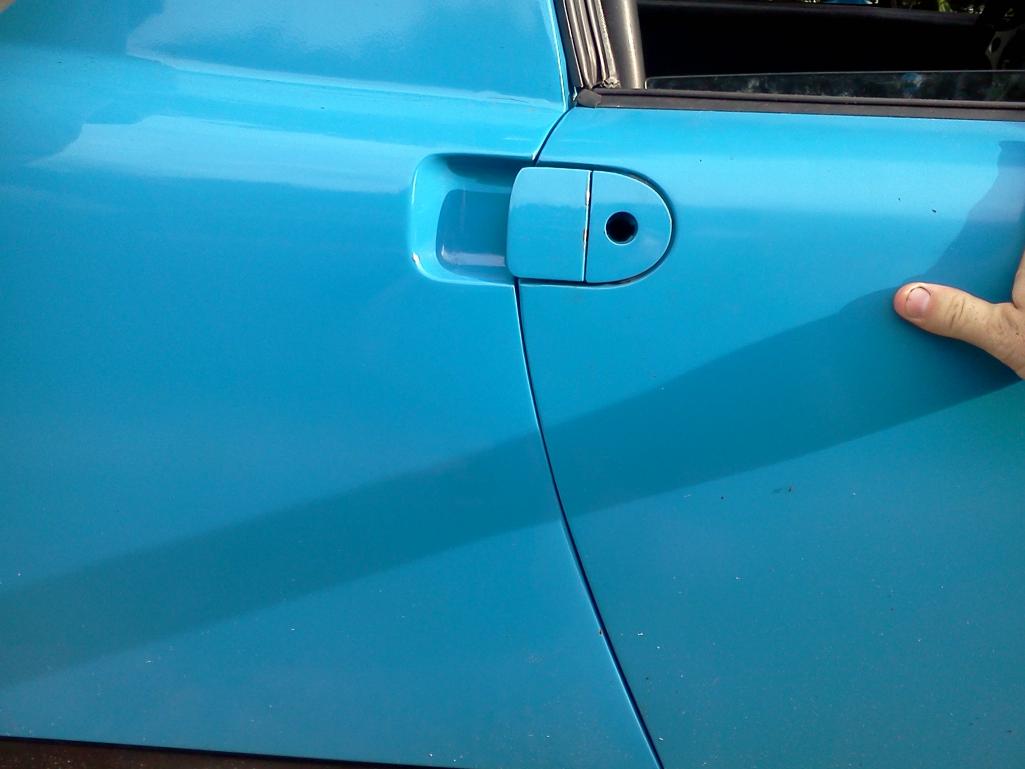 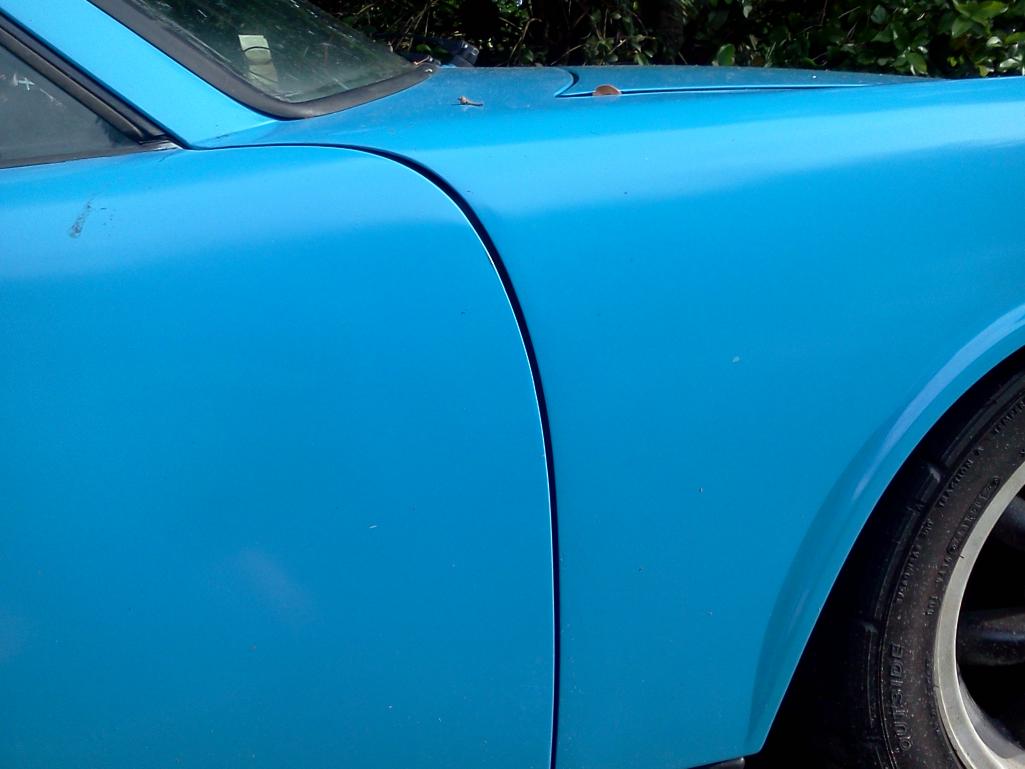 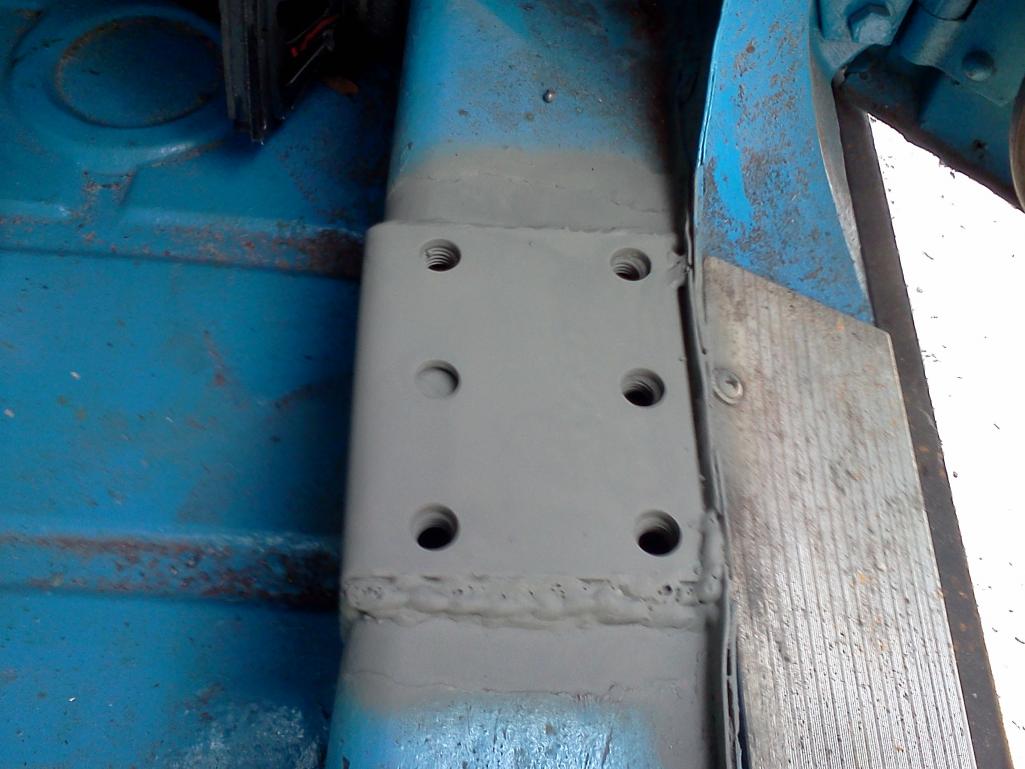 Second two are driver 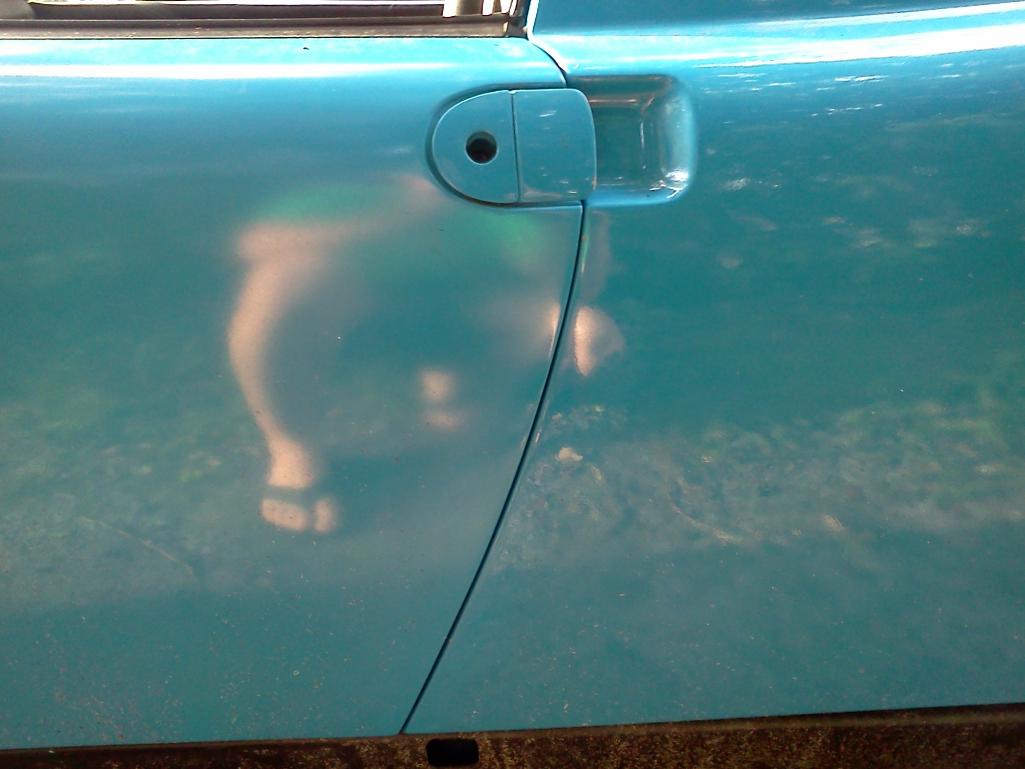 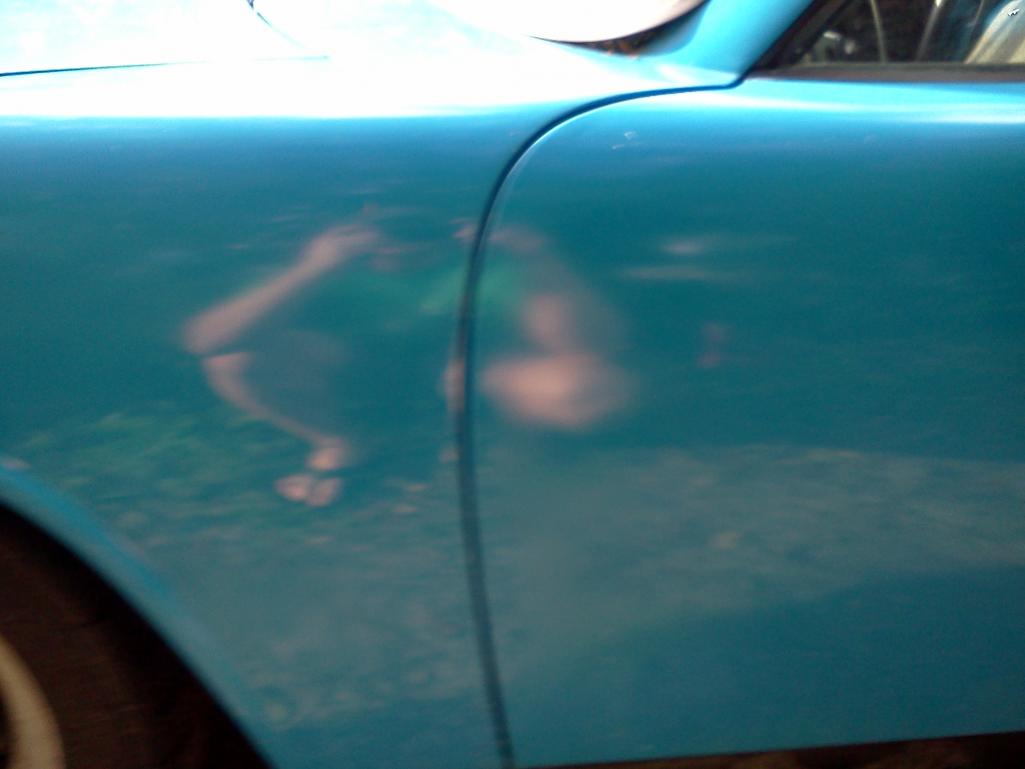 Scotty, this was done with a Hobart 110 welder on setting "3" so I could get enough penetration on the thick plates. As mentioned before, the car was on the wheels, because I'm stupid and didn't know it should have been on stands. I should also mention that I had some shrinkage after I did my hell hole/console replacement on the passenger side. The door was tight, but not as tight as it is now, after I did the nut plates. |
|
|
|
| 76-914 |
Jul 13 2013, 07:00 PM
Post
#11
|
|
Repeat Offender & Resident Subaru Antagonist Group: Members Posts: 13,501 Joined: 23-January 09 From: Temecula, CA Member No.: 9,964 Region Association: Southern California |
I know that sitting in the warm sun and drying off has always helped me with my shrinkage problems. Maybe you could roll the car outside and give it a try. (IMG:style_emoticons/default/biggrin.gif)
|
|
|
|
| jasons |
Jul 13 2013, 07:02 PM
Post
#12
|
|
Jackstand Extraordinaire Group: Members Posts: 2,002 Joined: 19-August 04 From: Scottsdale, AZ Member No.: 2,573 Region Association: None |
I'm not seeing how jackstands would help. It seems to me, the chassis on jackstands could twist without proper door braces. And if you weld on jackstands... I would think you would want to take reference measurements of the car before the door braces are mounted. Then tension the door braces once the car is on jackstands so the jackstand measurements match the car on the ground reference measurements. It feels dangerous to me, to assume that the car on jackstands is better than on the ground. And putting the car on jackstands incorrectly may be more likely to F your door gaps than leaving it on the ground
All I am saying is, when you weld with the car on the ground, at least it's in its normally loaded state. Once you put it in the air, it is reacting to different loads and tensions than when its on its wheels. But, I'm not a professional mechanic or welder I just play both in my garage. Can someone elaborate? |
|
|
|
| r_towle |
Jul 13 2013, 07:06 PM
Post
#13
|
|
Custom Member Group: Members Posts: 24,574 Joined: 9-January 03 From: Taxachusetts Member No.: 124 Region Association: North East States |
If that was my car, I would be thinking about removing the door, measure how far the hinge plate it from the rear door jam, then get a block of wood that fits the hinge plate perfectly, and hit it with a sledge hammer, then measure again.
They do move, but not much. But, I have been accused of being bush league. (IMG:style_emoticons/default/smile.gif) Mental bends, you just need to move it to the right place, with controlled hits from a very large hammer. Rich |
|
|
|
| rick 918-S |
Jul 13 2013, 07:40 PM
Post
#14
|
|
Hey nice rack! -Celette Group: Members Posts: 20,457 Joined: 30-December 02 From: Now in Superior WI Member No.: 43 Region Association: Northstar Region |
QUOTE(ThePaintedMan @ Jul 13 2013, 03:42 PM) Okay, here are the dimensions, from the best of my measurements. It is entirely possible I have not measured correctly, especially dimension X but the pictures shouldn't lie. Dimension F Passenger side - 24 7/8 inches (spec is 25 1/8) Dimension F Driver side - 24 7/8 inches (spec is 25 1/8) Dimension X Passenger front to drivers roll bar point - 54 inches (spec is 52 5/8) Dimension X Drivers front to passenger roll bar point - 53 1/2 inches (spec is 52 5/8) First three pics are passenger side Second two are driver Scotty, this was done with a Hobart 110 welder on setting "3" so I could get enough penetration on the thick plates. As mentioned before, the car was on the wheels, because I'm stupid and didn't know it should have been on stands. I should also mention that I had some shrinkage after I did my hell hole/console replacement on the passenger side. The door was tight, but not as tight as it is now, after I did the nut plates. Ya those "X" measurements a screwed up. They are showing the windshield to Targa bar is wiiiiiide but the door gaps don't support that. So the important thing is both numbers are the same and are showing the opening is square. In other words the cowl is square with the targa bar and that's ok. The gaps are hard to read. If you followed my instructions I'm assuming these were taken with the latch plate removed. This allows the doors to swing from the hinges with no interference and usually lends clues to the method of correction. I often see the door sitting low to the quarter panel at the belt line. (horizontal window seal height) This would indicate a sag at the cowl to rocker. Usually from a front end collision and usually on one side with a "X" measurement that differs from side to side. You often see the gap at the top of the door is tighter than the bottom but still on the same plane. This often indicates a sag at the rear of the rocker usually caused by weak or rusted longs at the jack point. Your passenger side looks like the belt line is even with the rear of the door to quarter panel gap being tight but even. The front side looks like the gap is wider at the top. This could have been the result of a prior adjustment. The driver side looks like the front gap is even but the door is sitting low and tight at the beltline. If you have done a bunch of welding on the car in the past correcting rust you likely had some issues from that before you started the roll bar plates. Because we have multiplying issues I'm not sure I can help long distance but I'll give it a shot. We'll have to go slow with this one. Start here: Passenger side. reset the passenger door to align with the front fender. Take a small piece of flat bar and grind it to 4 to 5 mm thickness. This is your door gauge. Start with 4mm. This may give you more room at the back of the door. It's a little tight for a 914 but you have issues. Start there. move the door up so the bottom corner of the door matches the front fender bottom. tighten the gap at the hinge side to 4 to 5 mm with your gauge. Be sure the fender and door are flush top and bottom with each other. Then swing the door shut and re-shoot a photo and post it. Then we'll have a better idea where to push, pull, etc. Drivers door: Same thing. Check the gap top to bottom on the hinge side with your gauge. Match it to the fender line. The shoot a photo and post it. Let's see where that brings us. Leave the latches out for now. |
|
|
|
| mmcgrego |
Aug 5 2013, 07:59 PM
Post
#15
|
|
Newbie Group: Members Posts: 5 Joined: 9-July 11 From: Guelph Ontario Member No.: 13,295 Region Association: Canada |
So what happened? I have a very similar problem over this way...
|
|
|
|
| ThePaintedMan |
Aug 5 2013, 08:16 PM
Post
#16
|
|
Advanced Member Group: Members Posts: 3,886 Joined: 6-September 11 From: St. Petersburg, FL Member No.: 13,527 Region Association: South East States |
I took Rick's suggestions to heart. Unfortunately haven't had time to address them correctly. Currently I'm running around like a chicken with my head cut off trying to get the car race-ready for September. Will let you know what I discover. (IMG:style_emoticons/default/beerchug.gif)
|
|
|
|
| rick 918-S |
Aug 5 2013, 09:01 PM
Post
#17
|
|
Hey nice rack! -Celette Group: Members Posts: 20,457 Joined: 30-December 02 From: Now in Superior WI Member No.: 43 Region Association: Northstar Region |
QUOTE(ThePaintedMan @ Aug 5 2013, 09:16 PM) I took Rick's suggestions to heart. Unfortunately haven't had time to address them correctly. Currently I'm running around like a chicken with my head cut off trying to get the car race-ready for September. Will let you know what I discover. (IMG:style_emoticons/default/beerchug.gif) Let me know if I can help. You may want to get a handle on the chassis as part of the prep. Tough to corner balance a twisted car. This winter I plan to do a video this very subject. I will do a simple instructional using the Raspberry car. It is as straight as any car I have ever seen. I will demo chassis repair and explain datum and reversing damage without causing more damage. |
|
|
|
| brant |
Aug 5 2013, 09:09 PM
Post
#18
|
|
914 Wizard Group: Members Posts: 11,623 Joined: 30-December 02 From: Colorado Member No.: 47 Region Association: Rocky Mountains |
You can still corner balance this car. It will sit crooked but will be balanced on scales. I ran a race car with the same issue for a dozen years until I built a new car and used jack stands on the 2nd car when installing the cage.
|
|
|
|
| Jeff Hail |
Aug 6 2013, 01:48 AM
Post
#19
|
|
Senior Member Group: Members Posts: 1,141 Joined: 3-May 07 From: LA/ CA Member No.: 7,712 |
When you welded the plates in you should have put the heat on the plates and flow the welds out into the long in short bursts. (apply heat from thick to thin) Next... Mig welders have a trigger so you can stop too. You had the heat setting correct for thin sheetmetal but not hot enough to get good penetration and heat transfer into the plates which is why the beads are narrow and tall. (proud). The multiple passes look pulled when you should have pushed the gun. Gun was moving to fast where the wire just piled up like traffic on the 405. Not sure what the purpose of the car is but those welds at the foot plates would not pass tech inspection and will raise some stink eye. Lot of porosity. Not trying to be critical just observant.
Take it as a learning experience. The good news the gap issue is not as bad as one might think. You put a lot of heat into a small area. You also put a lot of heat primarily on the top of the long not the sides or bottom. The top is short and now has a bow to it. What moved? The long did and the quarter panel came forward. Next lesson -door bars or some kind of bracing are not optional. Have to mechanically resist the the shrink and slow way down with the gun. Support the center section of the tub at minimum of 4 corners. How to correct it.. you could bang on the hinge pillar. The door will sag more if you bang on the lower hinge pocket. If you bang on the upper pocket the gap will actually get tighter at the door/ qtr bottom rear and sit high at the beltline. Beat on both and you might end up with a compromise that works for you. Push the door opening with a porto-power and the qtr panel/ lock pillar will move outward. I would try that first and see if he door opening can be squared while watching the lock pillar for deflection. More heat? oh no no no! Celette bench and pull? Not unless you want two 914s. My thoughts to get it right you will probably need to slice, sleeve and weld the long. Double the gap you are trying to achieve and it will shrink back about 4-5 mm. If its a race car and the gaps cause you not to lose sleep - grind the welds down at the plates and use larger diameter MIG wire. Do short bursts like plugs that overlap each other half way through the last one. Put the heat into the plates with a bit of overlap into the long. See if the car can be corner balanced without to much issue. If it can bolt in the cage and go. |
|
|
|
| worn |
Aug 6 2013, 05:27 AM
Post
#20
|
|
can't remember Group: Members Posts: 3,155 Joined: 3-June 11 From: Madison, WI Member No.: 13,152 Region Association: Upper MidWest |
QUOTE(ThePaintedMan @ Jul 13 2013, 12:42 PM) Scotty, this was done with a Hobart 110 welder on setting "3" so I could get enough penetration on the thick plates. As mentioned before, the car was on the wheels, because I'm stupid and didn't know it should have been on stands. With plates like that you need the highest setting. The trick is not to burn through the thinnner metal. Not too hard with the long, and this is not where MIG shines I am afraid, but it can be done by focusing your heat on the thick and let it flow into the thin. Good luck amigo. |
|
|
|
|
1 User(s) are reading this topic (1 Guests and 0 Anonymous Users)
0 Members:

|
Lo-Fi Version | Time is now: 15th May 2024 - 12:47 PM |
Invision Power Board
v9.1.4 © 2024 IPS, Inc.