|
|
|
Porsche, and the Porsche crest are registered trademarks of Dr. Ing. h.c. F. Porsche AG.
This site is not affiliated with Porsche in any way. Its only purpose is to provide an online forum for car enthusiasts. All other trademarks are property of their respective owners. |
|
|

  |

| OllieG |
 Aug 11 2013, 03:52 PM Aug 11 2013, 03:52 PM
Post
#1
|
|
OllieG  Group: Members Posts: 212 Joined: 6-July 11 From: UK Member No.: 13,282 Region Association: England |
I've just welded on some suspension ear re-inforcements from Tangerine Racing.. I'm looking to put in a Suby engine so figured it was wise..
(IMG:http://www.914world.com/bbs2/uploads_offsite/i1235.photobucket.com-13282-1376257919.1.jpg) Before I slapped on the primer, I thought I'd just go over the whole thing again with a cup brush on the grinder, and to my surprise, found this 'little' hole lurking on the underside.. (IMG:http://www.914world.com/bbs2/uploads_offsite/i1235.photobucket.com-13282-1376257920.2.jpg) OK, so my repair job looks a bit of a dog's dinner but it's solid to say the least. I would say the car I'm restoring generally has a 'normal' amount of rust, not excessive and certainly repairable for a novice like me. But before I removed the paint from the ear there were no signs of any holes... (IMG:http://www.914world.com/bbs2/uploads_offsite/i1235.photobucket.com-13282-1376257920.3.jpg) Now I don't like to stir, but the whole thing did get me wondering how many other 914s are out there being driven unwittingly with potential issues like this..I'm sure suspension mounts with holes like thiese can't be safe surely?! Next time you get a chance, you might want to have a quick check of your own. |
   |

 
|
| mepstein |
Aug 11 2013, 04:23 PM
Post
#2
|
|
914-6 GT in waiting Group: Members Posts: 19,279 Joined: 19-September 09 From: Landenberg, PA/Wilmington, DE Member No.: 10,825 Region Association: MidAtlantic Region |
"how many other 914s are out there being driven unwittingly with potential issues like this..I'm sure suspension mounts with holes like thiese can't be safe surely?!"
Many of them. Most thought to be "rust free" |
 |
|
| d914 |
Aug 11 2013, 06:13 PM
Post
#3
|
|
Advanced Member Group: Members Posts: 2,331 Joined: 12-July 03 From: Atlanta, ga Member No.: 904 Region Association: South East States |
I did the same thing and found a crack.. !! for the same reason.. Just thought I was getting ahead of the game!!
|
|
|
|
| 914werke |
Aug 11 2013, 08:09 PM
Post
#4
|
|
"I got blisters on me fingers" Group: Members Posts: 10,081 Joined: 22-March 03 From: USofA Member No.: 453 Region Association: Pacific Northwest |
Oh they CAN be driven....
|
|
|
|
| Socalandy |
Aug 11 2013, 08:20 PM
Post
#5
|
|
Its got to be Yellow!!! Group: Members Posts: 2,432 Joined: 29-August 09 From: Orange Member No.: 10,742 Region Association: Southern California |
I'm sure this is a regular thing with our cars. replaced the Passenger sided completely and used rust encapsulator inside the drivers side. Here's what the inside looked like, a lot of rust in the bottom for sure.
Attached image(s)  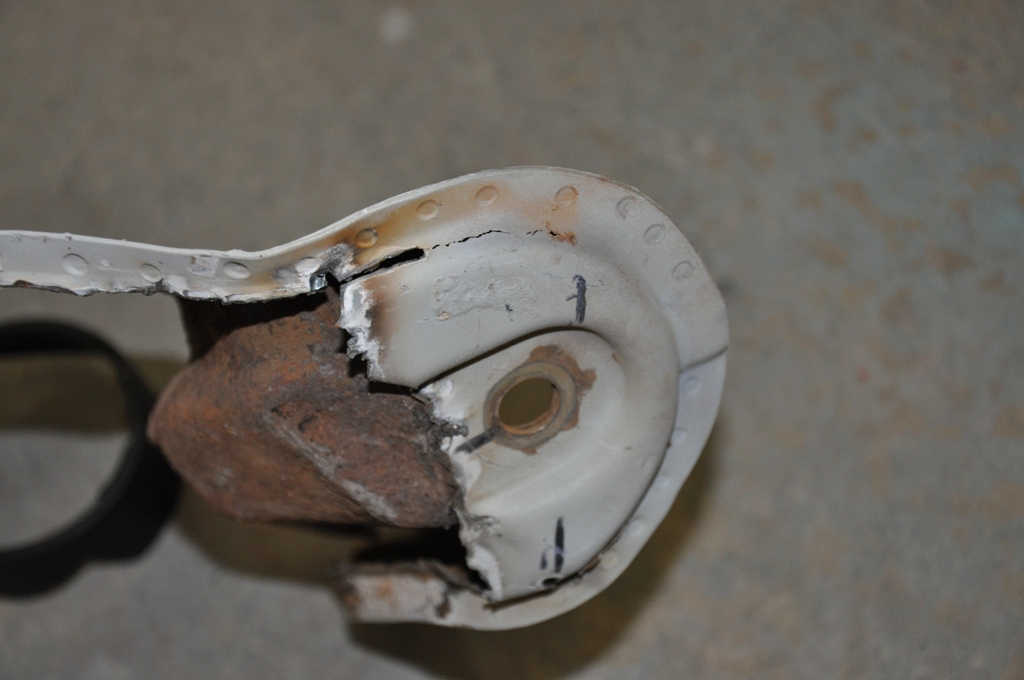 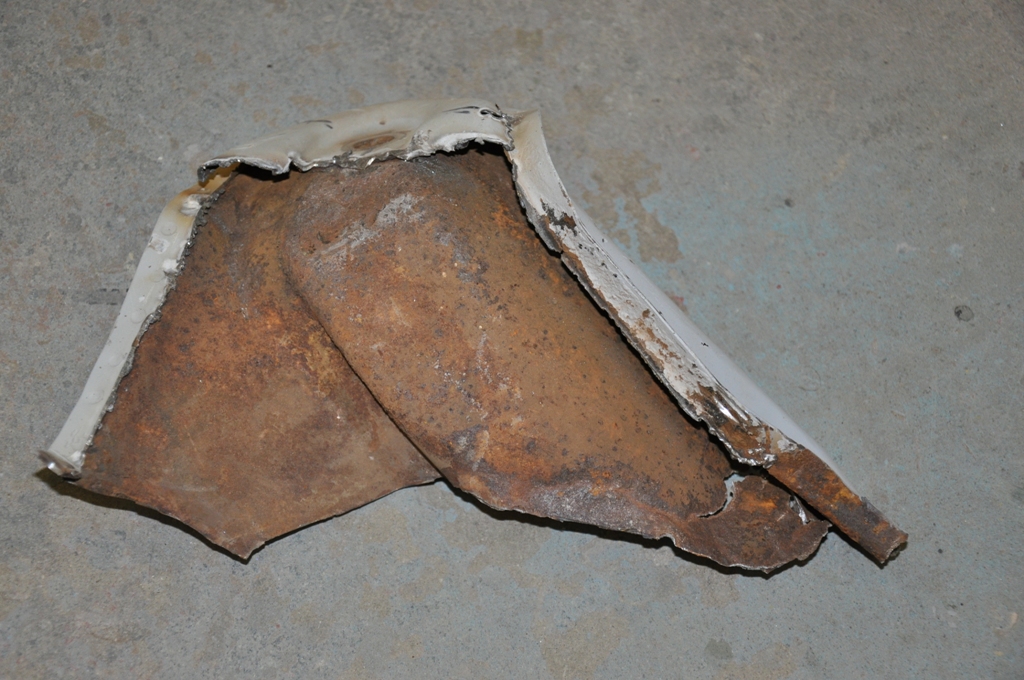 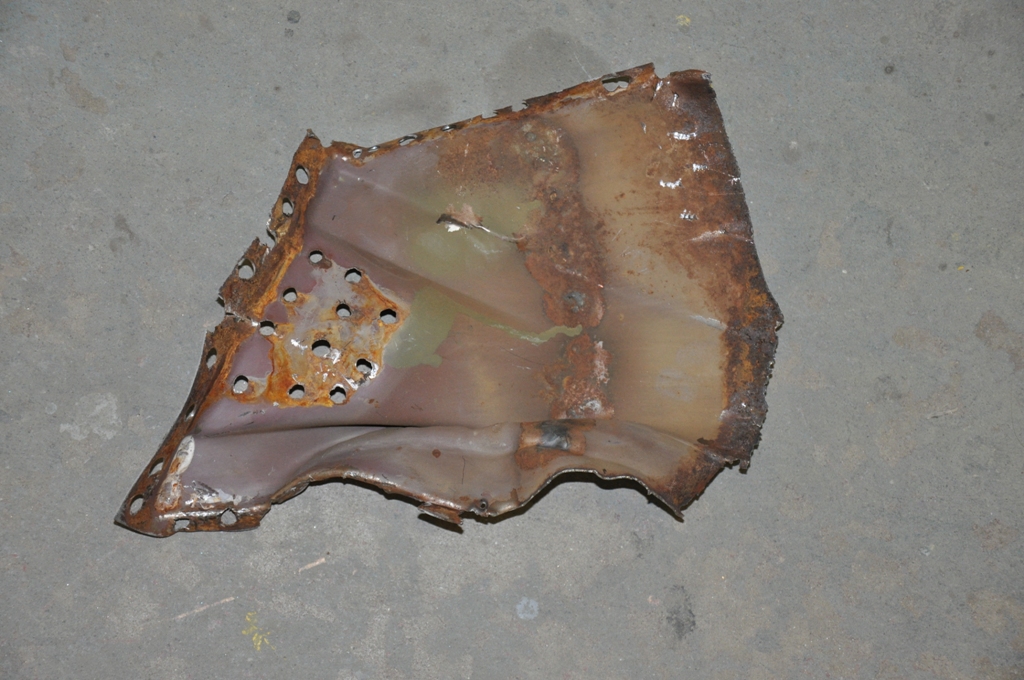
|
|
|
|
| OllieG |
Aug 12 2013, 03:43 AM
Post
#6
|
|
OllieG Group: Members Posts: 212 Joined: 6-July 11 From: UK Member No.: 13,282 Region Association: England |
Yeah, that looks bad...but it's only when you have a really good clean-up that you can see just how bad it is, and even then it's not always obvious.
Love your yellow six btw Andy. Cheers, Ollie. |
|
|
|
| saigon71 |
Aug 12 2013, 07:13 AM
Post
#7
|
|
Senior Member Group: Members Posts: 1,999 Joined: 1-June 09 From: Dillsburg, PA Member No.: 10,428 Region Association: MidAtlantic Region |
Nice repair work Ollie. (IMG:style_emoticons/default/beerchug.gif) I ran into the same thing after hitting it with a wire wheel. Make sure you keep that suspension drain clear going forward. It took me a few hours with a piece of safety wire, a set of picks and compressed air to unclog mine. I sprayed some extend in there with a red straw from a WD-40 can, then hit the inside with two coats of appliance epoxy. Good to find this now. (IMG:style_emoticons/default/sad.gif)
|
|
|
|
| sean_v8_914 |
Aug 12 2013, 08:22 AM
Post
#8
|
|
Chingon 601 Group: Members Posts: 4,011 Joined: 1-February 05 From: San Diego Member No.: 3,541 |
YOU NEED TO CONNECT THE LOWER RIBS!
you cant stop there or it will rip where teh reinforcement ends |
|
|
|
| sean_v8_914 |
Aug 12 2013, 08:29 AM
Post
#9
|
|
Chingon 601 Group: Members Posts: 4,011 Joined: 1-February 05 From: San Diego Member No.: 3,541 |
both lower ribs connect to back of ear
Attached thumbnail(s) 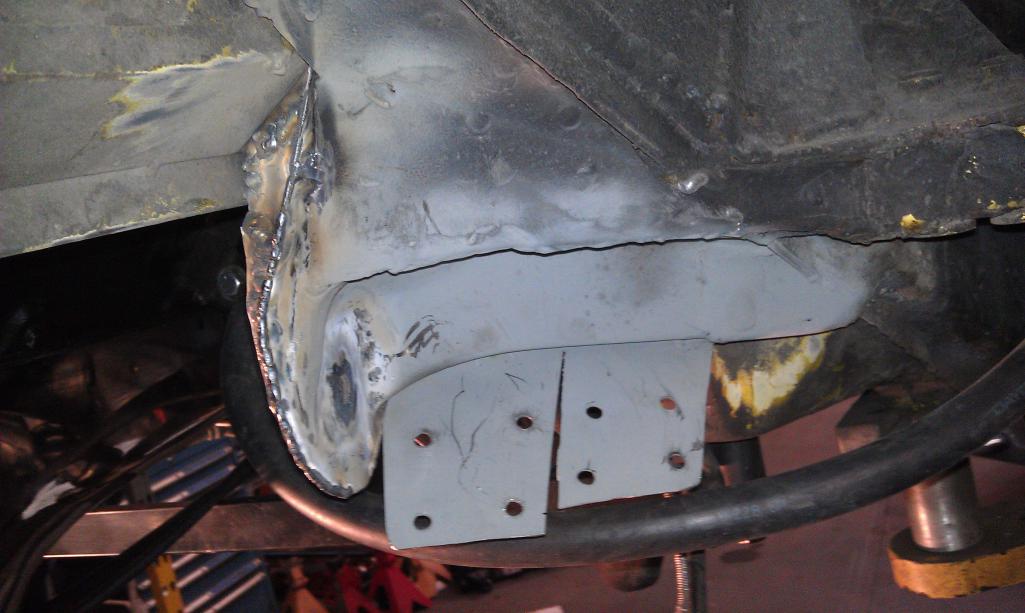 
|
|
|
|
| OllieG |
Aug 12 2013, 08:41 AM
Post
#10
|
|
OllieG Group: Members Posts: 212 Joined: 6-July 11 From: UK Member No.: 13,282 Region Association: England |
QUOTE(sean_v8_914 @ Aug 12 2013, 03:29 PM)  both lower ribs connect to back of ear Very good shout...I'll do that, thanks. |
|
|
|
| naro914 |
Aug 12 2013, 07:20 PM
Post
#11
|
|
Losing my mind... Group: Members Posts: 2,476 Joined: 26-May 06 From: Charlotte, NC Member No.: 6,073 Region Association: South East States |
Yes, get your cars on a lift and check it over.... A couple years ago, I was planning to scrape all the undercoating off Papa Smurf a couple weeks after I had just run my last PCA Club Race of the year...
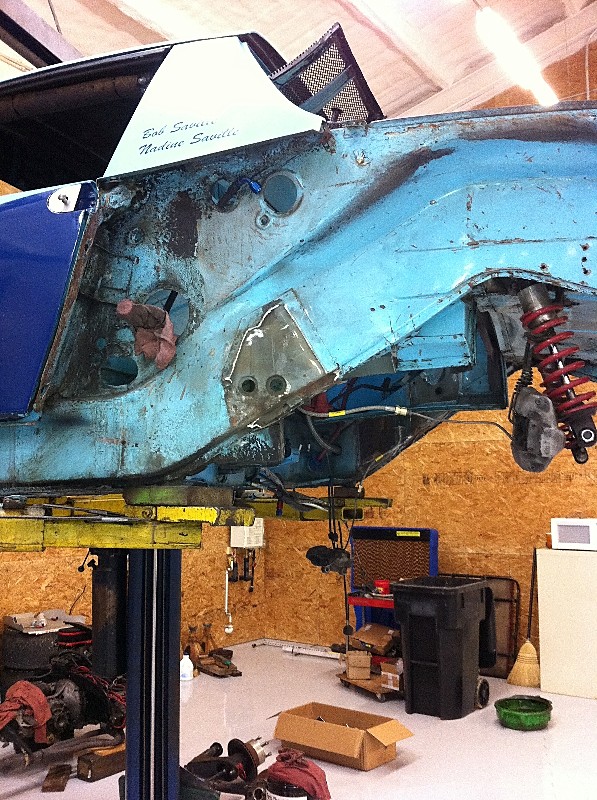
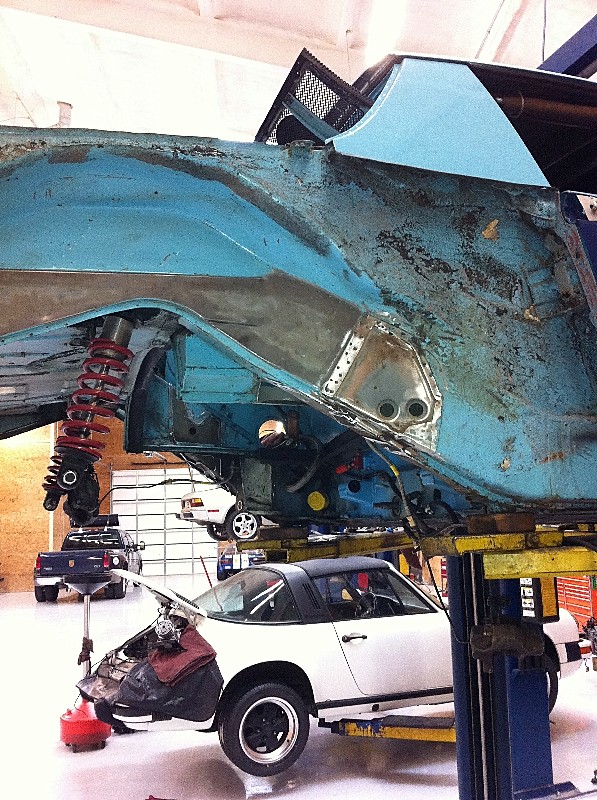
To my surprise I found this: 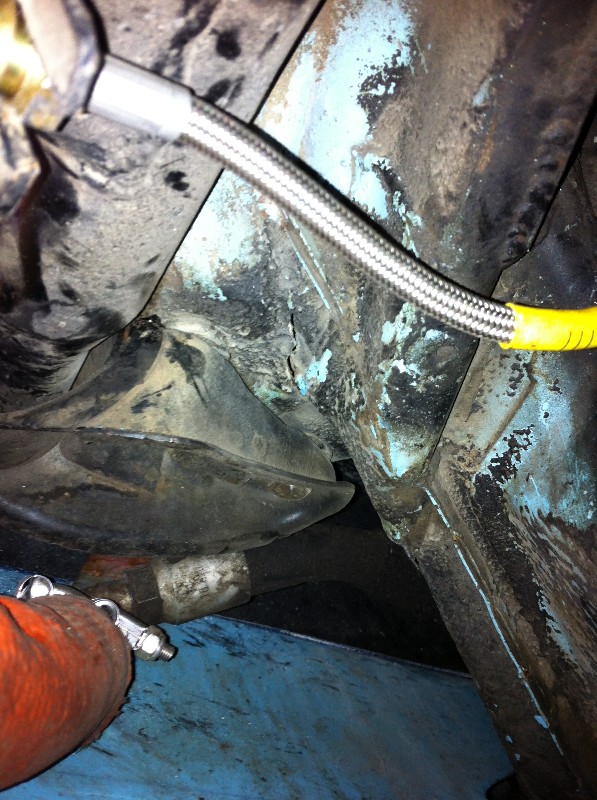 Which after further investigation, became this: 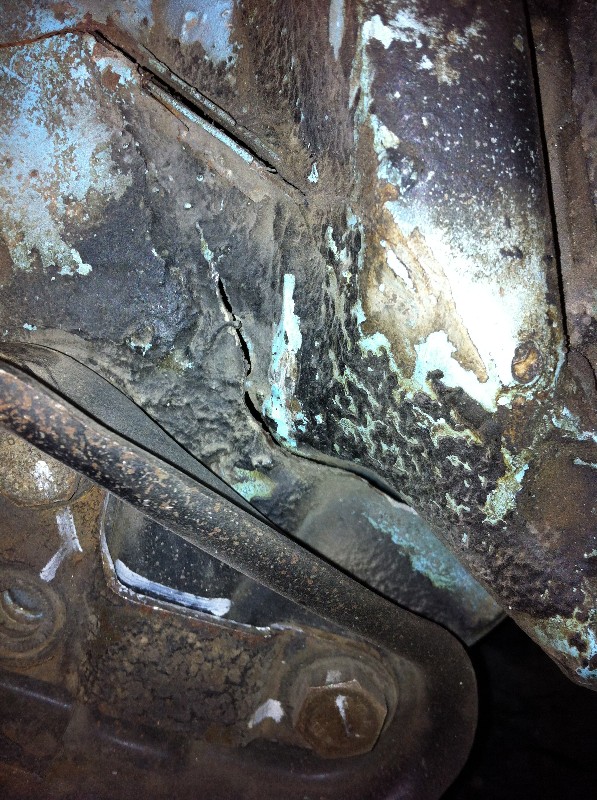 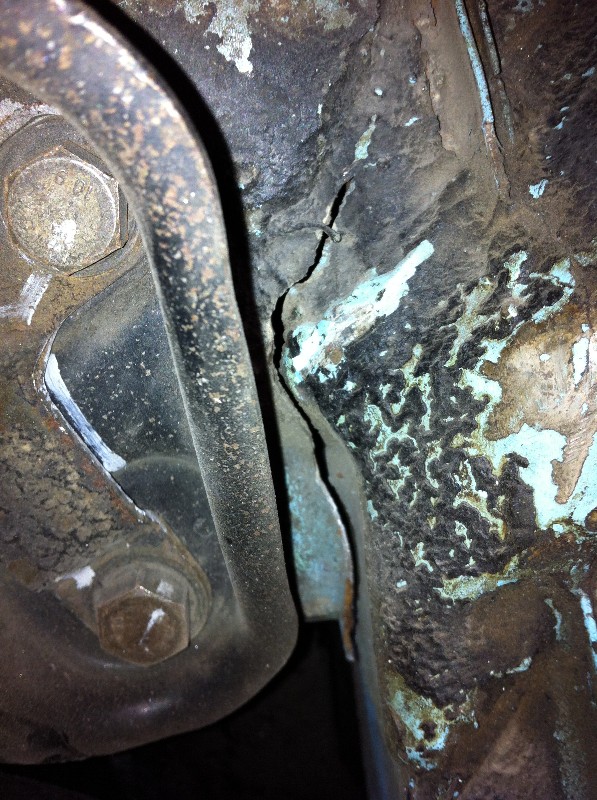 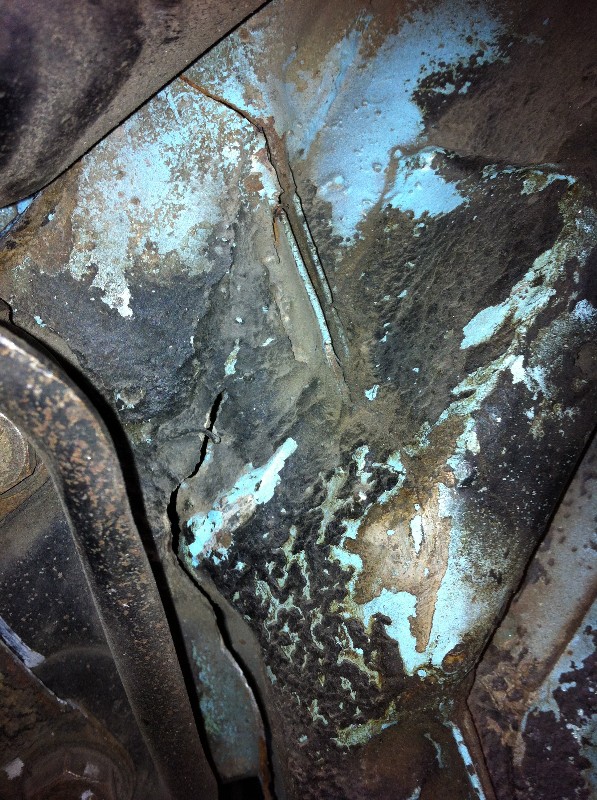 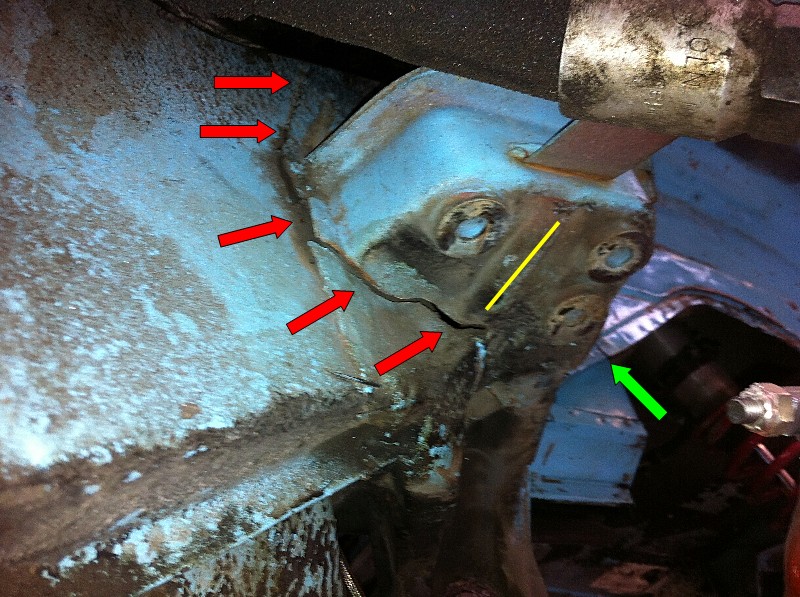 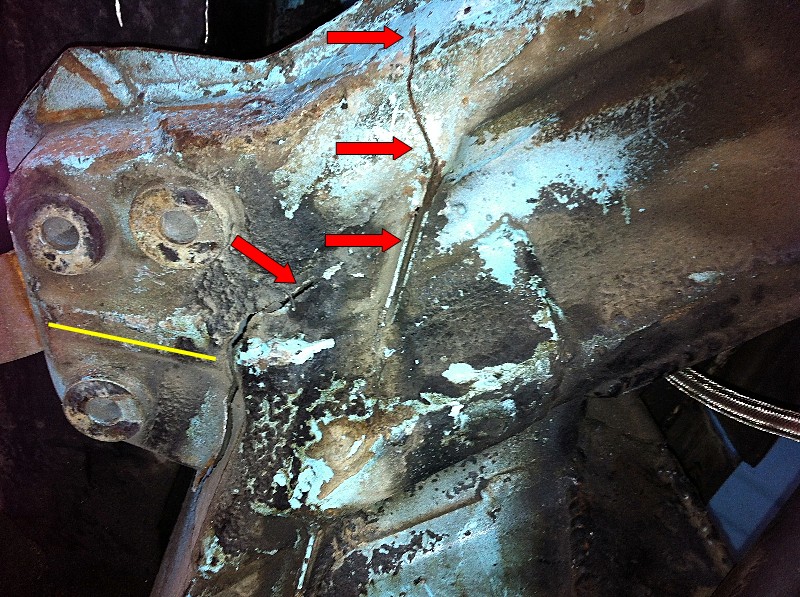  I've since replaced EVERYTHING with the Tangerine Racing raised rear pickup points kit. |
|
|
|
| bulitt |
Aug 12 2013, 07:34 PM
Post
#12
|
|
Achtzylinder Group: Members Posts: 4,188 Joined: 2-October 11 Member No.: 13,632 Region Association: South East States |
Just fricking great, more crap to check! (IMG:style_emoticons/default/lol-2.gif)
Think when I get my V8 in I will do a 6000rpm clutch dump. That should expose some weak parts! Several ways to solve this. JP solved this issue as he just welded what looks like a straight 1/4" plate in place of the ear. (IMG:style_emoticons/default/biggrin.gif) (IMG:http://www.914world.com/bbs2/uploads/post-45-1371386136.jpg) |
|
|
|
| 914_teener |
Aug 12 2013, 07:47 PM
Post
#13
|
|
914 Guru Group: Members Posts: 5,198 Joined: 31-August 08 From: So. Cal Member No.: 9,489 Region Association: Southern California |
QUOTE(sean_v8_914 @ Aug 12 2013, 07:22 AM) YOU NEED TO CONNECT THE LOWER RIBS! you cant stop there or it will rip where teh reinforcement ends Sean... Are you sayin to weld up the drain hole? |
|
|
|
| bulitt |
Aug 13 2013, 02:31 AM
Post
#14
|
|
Achtzylinder Group: Members Posts: 4,188 Joined: 2-October 11 Member No.: 13,632 Region Association: South East States |
QUOTE(914_teener @ Aug 12 2013, 09:47 PM) QUOTE(sean_v8_914 @ Aug 12 2013, 07:22 AM) YOU NEED TO CONNECT THE LOWER RIBS! you cant stop there or it will rip where teh reinforcement ends Sean... Are you sayin to weld up the drain hole? I believe he is saying when you reinforce the ear alone it just moves the potential failure point to the two ribs that extend to the outer suspension ear. Chris has said this also. So in this pic from Sean you will see the two flat pieces of metal hanging down. I believe he wraps them around the rib and welds them on as reinforcement. This ties the ear to the body. (IMG:http://www.914world.com/bbs2/uploads/post-3541-1376317568_thumb.jpg) |
|
|
|
| sean_v8_914 |
Aug 13 2013, 07:41 AM
Post
#15
|
|
Chingon 601 Group: Members Posts: 4,011 Joined: 1-February 05 From: San Diego Member No.: 3,541 |
yes, it wraps around to the inside. i do both ribs under there and of course new drain holes. there is also a fat pc of 14 ga on teh trailing edge welded to the rear most seam.
Bob, I bet you had lots of fun doing that, didn't ya? |
|
|
|
| sean_v8_914 |
Aug 13 2013, 07:50 AM
Post
#16
|
|
Chingon 601 Group: Members Posts: 4,011 Joined: 1-February 05 From: San Diego Member No.: 3,541 |
here is another example of what happens when we stop short of a complete reinforcement of this area
front rib, back rib, under long up to shock tower, seam welded, re do spot welds note that this ear is not rusty inside. fat sticky tires did this...and a guy that knows how to make them stick of course. Attached thumbnail(s) 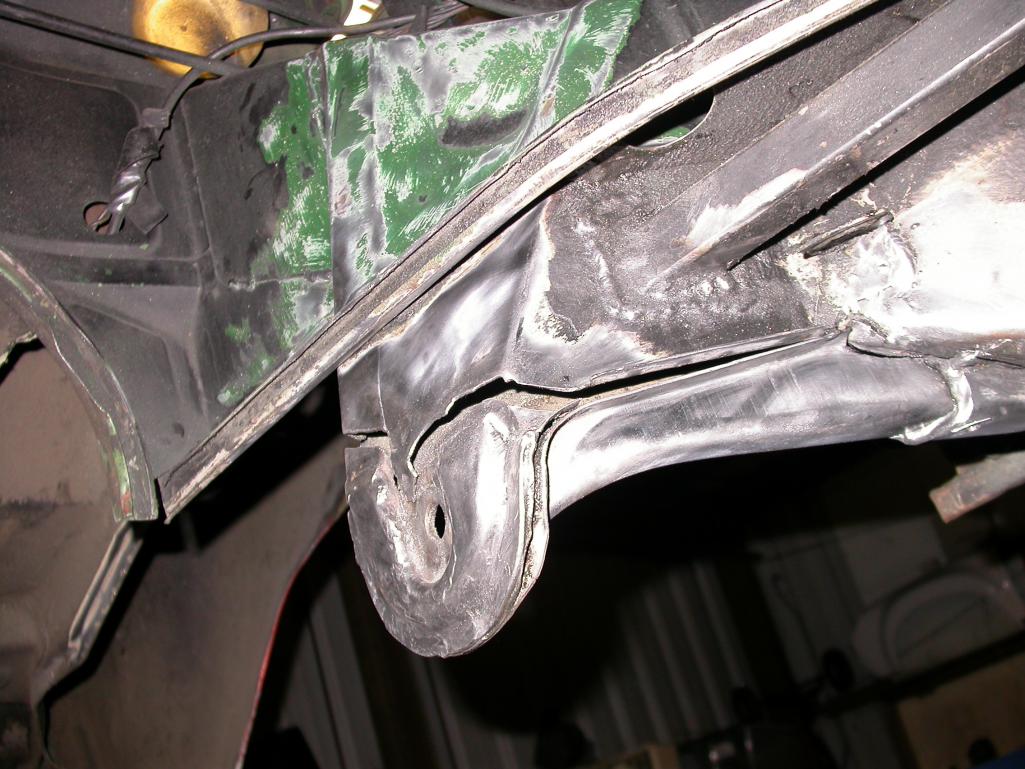 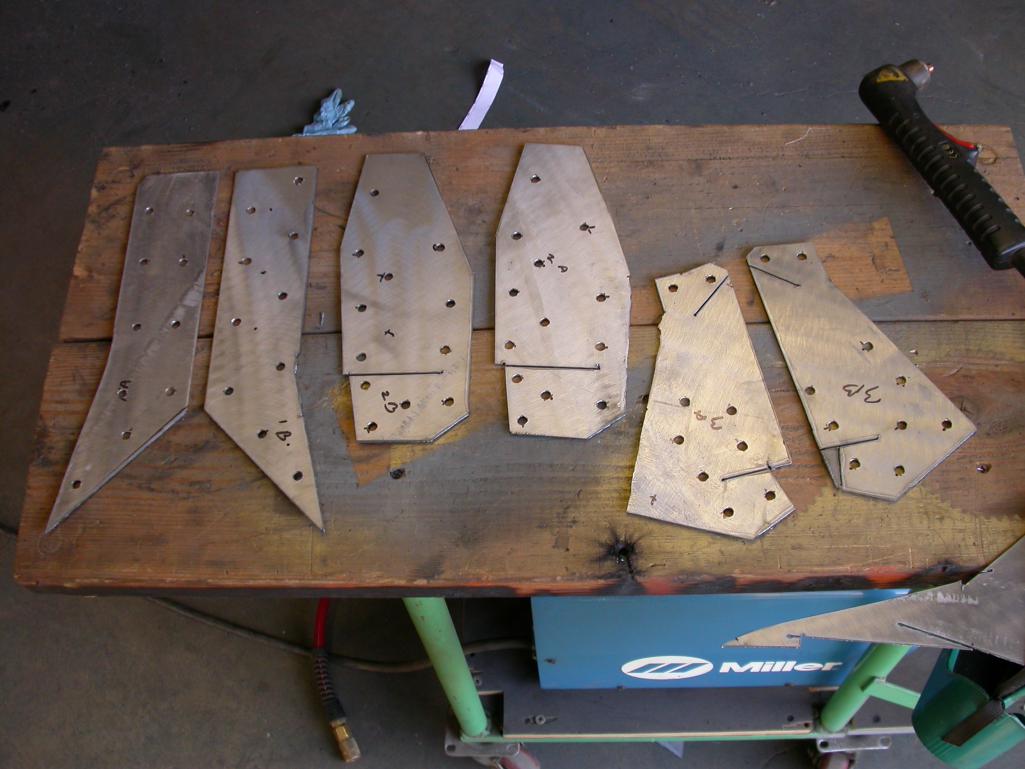
|
|
|
|
| sean_v8_914 |
Aug 13 2013, 07:52 AM
Post
#17
|
|
Chingon 601 Group: Members Posts: 4,011 Joined: 1-February 05 From: San Diego Member No.: 3,541 |
i really want to do some CFR raised mounts on the 10jreen sooooo bad it hurts
|
|
|
|
| naro914 |
Aug 13 2013, 08:00 AM
Post
#18
|
|
Losing my mind... Group: Members Posts: 2,476 Joined: 26-May 06 From: Charlotte, NC Member No.: 6,073 Region Association: South East States |
Everything...and I mean everything, got cut out and replaced with Chris' system:
  After everything is cut out, weld in the kit, plus the stiffening plates for the wheel well area. 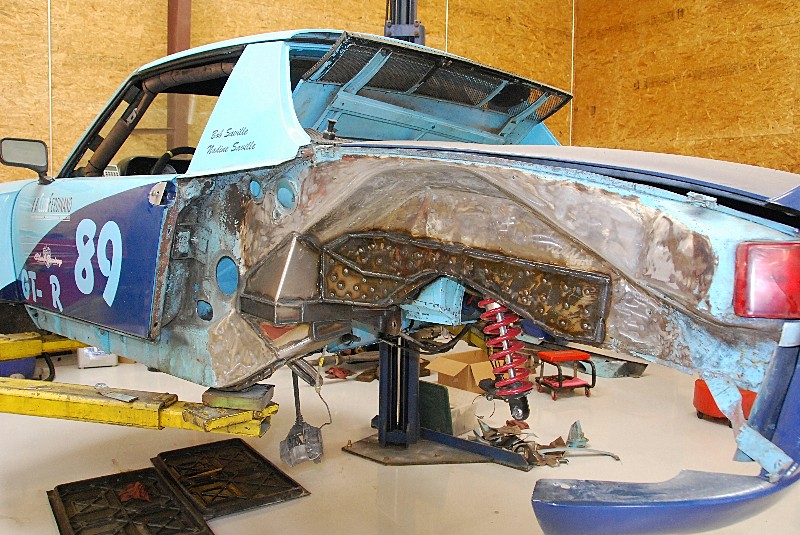 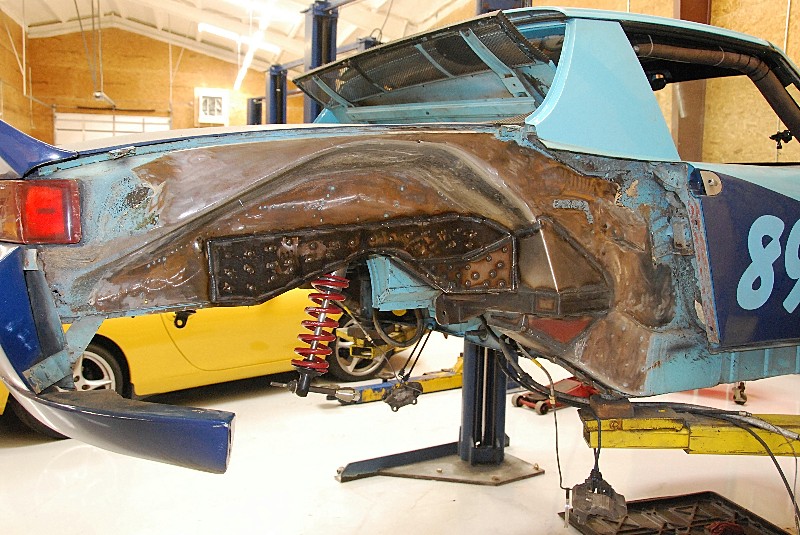 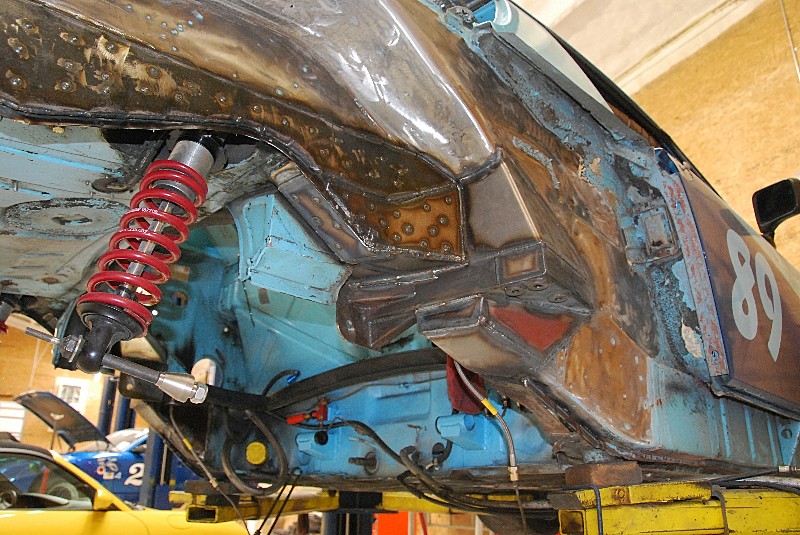 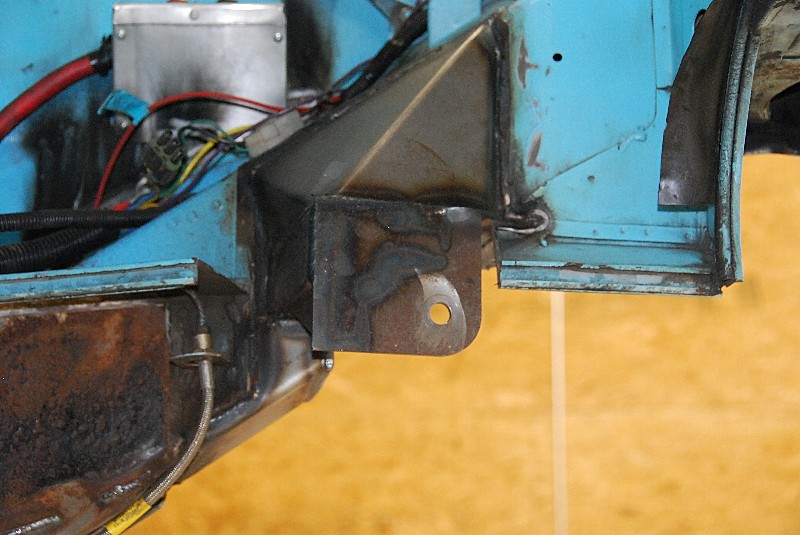  All painted and pretty! 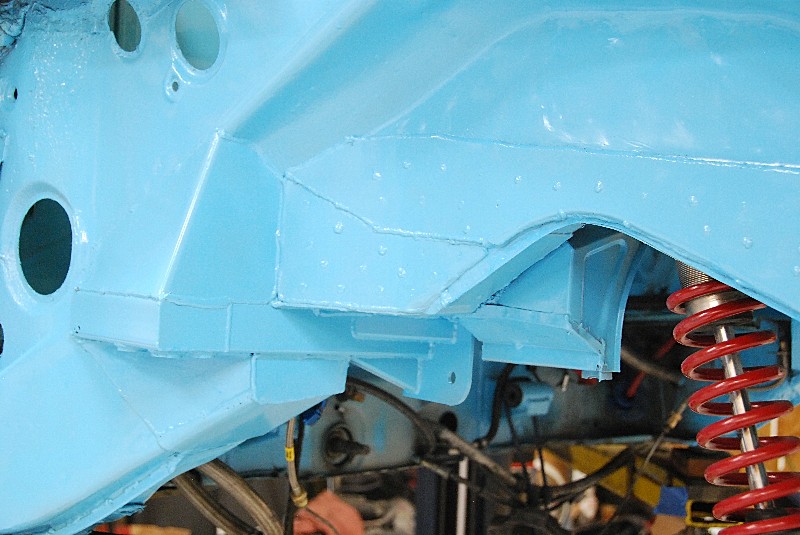   |
|
|
|
| naro914 |
Aug 13 2013, 08:04 AM
Post
#19
|
|
Losing my mind... Group: Members Posts: 2,476 Joined: 26-May 06 From: Charlotte, NC Member No.: 6,073 Region Association: South East States |
oh, and fyi, there was NO rust anywhere in there.
these cars were 1) built over 40 years ago and 2) were built to withstand the stress of around 100 hp and little tires. Papa's been running over 200 hp with 12" wide slicks for 15 years now, and now has around 350 hp...with that stress, something has to give. |
|
|
|
| OllieG |
Aug 13 2013, 09:29 AM
Post
#20
|
|
OllieG Group: Members Posts: 212 Joined: 6-July 11 From: UK Member No.: 13,282 Region Association: England |
QUOTE(sean_v8_914 @ Aug 13 2013, 02:41 PM) yes, it wraps around to the inside. i do both ribs under there and of course new drain holes. there is also a fat pc of 14 ga on teh trailing edge welded to the rear most seam. Bob, I bet you had lots of fun doing that, didn't ya? Sorry, what do you mean 'new drain holes'? Also, when you wrap the metal around to the inside how do you get around the curvature of the rib? Is it important that the re-inforcement metal sits right up against the rib or is it OK to have gaps in places?.. |
|
|
|
|
1 User(s) are reading this topic (1 Guests and 0 Anonymous Users)
0 Members:

|
Lo-Fi Version | Time is now: 20th May 2024 - 07:24 PM |
Invision Power Board
v9.1.4 © 2024 IPS, Inc.